Forte's

Visit our community sponsor

Thanks Thanks:  0
Likes Likes:  0
Results 1 to 38 of 38

Thread: Factory Five Customer Edward S. Finishes FFR Hot Rod #297

  1. #1
    Webmaster, FFR
    Join Date
    Feb 2011
    Location
    Middleboro, MA
    Posts
    1,834
    Post Thanks / Like

    Factory Five Customer Edward S. Finishes FFR Hot Rod #297

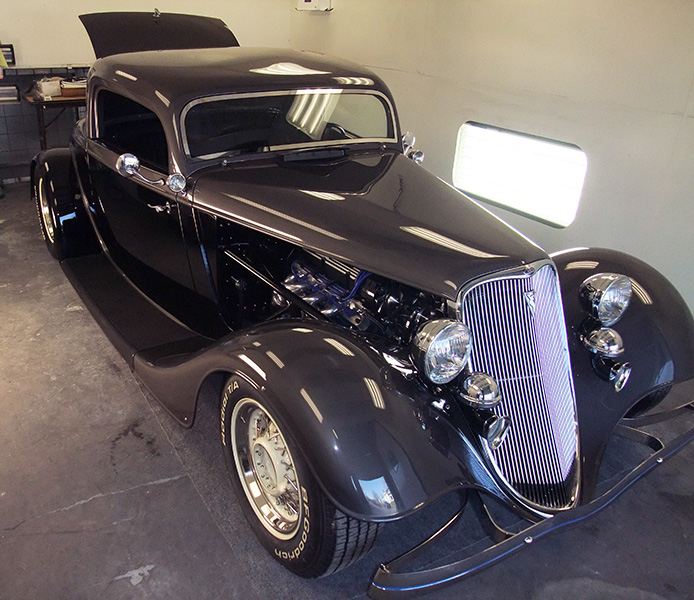
    Factory Five customer Edward S. sent us an e-mail with photos of his almost finished Factory Five Hot Rod. Edward started the build with five other Hot Rods in his garage, all of them ’34s. He built the Factory Five ’33 with some modifications to make it look more like a the ’34s in his collection.


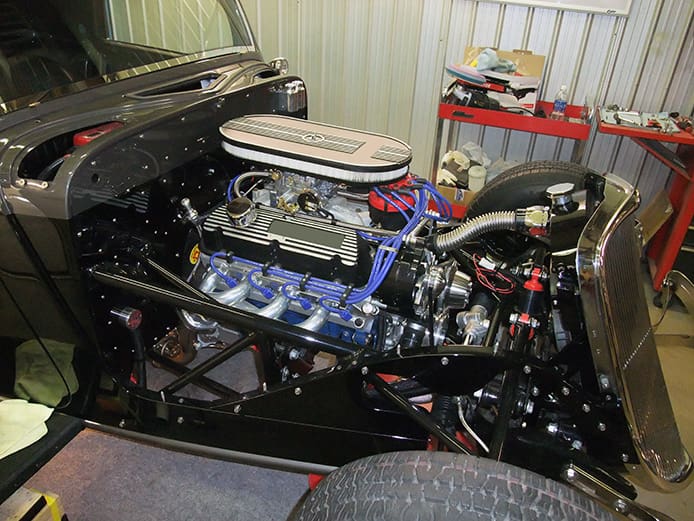
    Edward used a carbureted small block Ford mated to an AOD transmission from TCI, running through an 8.8″ Moser rear end with Factory Five’s 3-link rear-suspension.


    The wheels are 15″ x 8″ and 15″ x 10″ McLean Classic Hand Trued Wire wheels with 52-laced stainless steel spokes and powder coated rims and hubs. The tires are BF Goodrich T/A P225/60R15 in the front and BF Goodrich T/A P255/70R15 in the rear.


    Some of the mods Edward made to make the car look more like a ’34 included installing a custom 1934 cowl vent and louvered ’34 side panels, modifying the fenders and running boards to the ’34 style, and building custom frame extensions to support the front and rear Ford bumpers. He also installed the ’34 Ford chrome horns and custom glove box.


    Congratulations Edward on a fantastic build!
    Dave Lindsey
    FFR's Mad Dog

  2. #2
    Senior Member 68GT500MAN's Avatar
    Join Date
    Feb 2011
    Location
    Fresno, CA
    Posts
    1,808
    Post Thanks / Like
    Great job with your build. Now I have more ideas to work with.
    Doug

  3. #3
    Senior Member
    Join Date
    Mar 2011
    Location
    Orlando, FL
    Posts
    1,284
    Post Thanks / Like
    I love this car!!!! At first I thought it wasn't a FFR 33. Outstanding job Edward!

    I would like to see and know more about the custom cowl, engine panel louvers and the extensions he did for the bumpers. Is there a build thread anywhere we could check out?

    The bumper extensions could be a very good solution for those who have to have bumpers in their states.

    David

  4. #4
    Senior Member
    Join Date
    Feb 2011
    Posts
    334
    Post Thanks / Like
    Blog Entries
    1
    Very, very nice !!!! More pictures please !!!!!

  5. #5
    Senior Member Arm7419's Avatar
    Join Date
    Feb 2011
    Location
    Sedona Az
    Posts
    170
    Post Thanks / Like
    Beautiful car
    Chuck

    Mk1, MK3, Hotrod, Gen 3 Daytona Coupe, RF GT40
    Hang Up and Drive

  6. #6
    Senior Member
    Join Date
    Feb 2011
    Posts
    334
    Post Thanks / Like
    Blog Entries
    1
    Can you share where the cowl lights came from ? Thanks.

  7. #7
    Junior Member
    Join Date
    Jul 2011
    Posts
    4
    Post Thanks / Like
    Hi Tim,
    The cowl lights are actually 1934 Ford aftermarket lights. They are available from any number of
    aftermarket suppliers. I purchased these from Dick Spadaro's Early Fords in Altamont, NY.

    Dick Spadaro 518-861-5367

  8. #8
    Junior Member
    Join Date
    Jul 2011
    Posts
    4
    Post Thanks / Like
    Quote Originally Posted by Vman7 View Post
    I love this car!!!! At first I thought it wasn't a FFR 33. Outstanding job Edward!

    I would like to see and know more about the custom cowl, engine panel louvers and the extensions he did for the bumpers. Is there a build thread anywhere we could check out?

    The bumper extensions could be a very good solution for those who have to have bumpers in their states.

    David
    David I sent a rather lengthy response and lost it in the transmission someway.
    Last edited by 154079; 05-23-2013 at 03:27 PM.

  9. #9
    Senior Member
    Join Date
    Mar 2011
    Location
    Orlando, FL
    Posts
    1,284
    Post Thanks / Like
    Quote Originally Posted by 154079 View Post
    David I sent a rather lengthy response and lost it in the transmission someway.

    My e-mail address took out for safety if you would like questions
    answered about the 1934 Ford modifications.
    Ed I sent a PM and an email
    Last edited by Vman7; 05-23-2013 at 02:35 PM.

  10. #10
    EFI Rules and Carbs Drool Arrowhead's Avatar
    Join Date
    Feb 2011
    Location
    Stillwater, NY
    Posts
    599
    Post Thanks / Like
    Quote Originally Posted by Vman7 View Post
    Is there a build thread anywhere we could check out?

    I had posted some progress pictures for Ed a while back on the other forum:

    http://www.ffcars.com/forums/120-fac...upsate-ny.html

  11. #11
    Senior Member
    Join Date
    Mar 2011
    Location
    Orlando, FL
    Posts
    1,284
    Post Thanks / Like
    Quote Originally Posted by Arrowhead View Post
    I had posted some progress pictures for Ed a while back on the other forum:

    http://www.ffcars.com/forums/120-fac...upsate-ny.html
    Thanks Arrowhead , don't know how I missed that.

  12. #12
    Junior Member
    Join Date
    Jul 2011
    Posts
    4
    Post Thanks / Like

    1934 ford

    Good morning David,
    George Robitaille, “arrowhead” posted some photos early on when I started the car and they
    will give you a glance into some of the modifications.

    The Cowl openings are simply cut out, saving the cutouts and using them as replacement lids.
    A ledge was added below the opening so the lids could be set in place and fastened down with
    S.S. fasteners. The larger openings are nice when attaching the Roadster Windshield. The engine
    side panels and inner fenders are all steel and were formed from flat sheet metal. They each have
    formed mating frames around them, the Hood Sides Panels can be installed or removed by simply
    raising the hood and lifting them out. The inner fender panels stay in place and are attached to the
    frame as well as the fenders. The Fenders are original 1934 Ford parts that have been modified to
    wrap down under the grill and extended to meet the Running Boards. The Hood and Fenders on a
    Factory Five Car are about 8 inches longer than the original 1934 Ford. The Running Boards are 34
    Original Steel that are also modified to conform to the Factory Five chassis and to meet the original
    Ford front fender lines. The cowl Vent is all original 1934 parts and the opening was fabricated.

    The Front and rear Bumpers are Original 1934 parts. I purchased 34 Front Frame Horns from a
    1934 chassis, made brackets that allowed them to be bolted to the Factory Five chassis and simply
    made the attachment. The rear bumpers were another project!! The entire rear portion of the car
    has been modified. The trunk lower panel was all modified including the latching mechanism and
    anything around it. The portion of the body below the trunk was extended 5.5 inches and bumper
    bracket mounts were formed into the fiberglass. A frame was constructed, added to the Factory
    Five chassis and bolted in place before the body was placed onto the car. From that point it was a
    matter of attaching the Bumpers and modifying the rear fenders to replicate the look of a 1934
    Ford from the rear view.

    I actually have seven 34 Fords including this Replica, they all have the original vintage appearance
    including spoke wheels, full fenders, a hood and a stance that looks like Henry Ford built the cars. My
    goal was to have the Factory Five closely resemble the cars I have with the lower stance. I’ve had fun
    with the project and feel I accomplished what I set out to do. I would admit that I have more time and
    money in this car than expected, but it’s cute! I have all kinds of pictures of this project so if you have
    a particular area that you are interested let me know and I will send those pictures.

    Ed Seagroatt

  13. #13
    Senior Member
    Join Date
    Mar 2011
    Location
    Orlando, FL
    Posts
    1,284
    Post Thanks / Like
    Good timing Ed, I just logged on......

    Thanks for the great info on the mod.s!

    I figured you might have used 34 frame horns, was mostly wondering just how well they would work, and you pulled it off. The rear frame I gathered had to be some form of a subframe built, cool that you could just bolt it in.

    Pretty much everything you said, mostly about doing the bumpers/frame, and the side engine panels are pretty much the way I figured they would be done. Nice to know somebody actually did it.

    Thanks for all of the info on your vision on doing all that work.

    David
    Last edited by Vman7; 05-25-2013 at 11:38 AM.

  14. #14
    Senior Member
    Join Date
    Mar 2011
    Location
    Orlando, FL
    Posts
    1,284
    Post Thanks / Like
    Ed was kind enough to send me some photos on some details for posting. Not sure in which order they were actually done, but I have tried to keep them in groups.

    David
    Last edited by Vman7; 05-29-2013 at 11:45 PM.

  15. #15
    Senior Member
    Join Date
    Mar 2011
    Location
    Orlando, FL
    Posts
    1,284
    Post Thanks / Like
    Cowl Area

    Cowl Vent pattern to be cut out and re-formed


    Cowl Vent formed and placed in the car


    Cowl vent frame being bonded in place


    Cowl Vent and mechanism placement


    Cowl vent frame & mechanism brackets being bonded in place

    Last edited by Vman7; 05-29-2013 at 10:35 PM.

  16. #16
    Senior Member
    Join Date
    Mar 2011
    Location
    Orlando, FL
    Posts
    1,284
    Post Thanks / Like
    more of the Cowl Area

    Cowl Vent frame inside finished


    Cowl Vent frame outside finished


    Finished Cowl Vent


    Wiper system & Cowl Vent mechanism
    Last edited by Vman7; 05-29-2013 at 10:55 PM.

  17. #17
    Senior Member
    Join Date
    Mar 2011
    Location
    Orlando, FL
    Posts
    1,284
    Post Thanks / Like
    Dash Area

    Dash Gauge pattern


    Original 1934 Ford Glove Box


    Inside view of the Glove Box
    Last edited by Vman7; 05-29-2013 at 10:55 PM.

  18. #18
    Senior Member
    Join Date
    Mar 2011
    Location
    Orlando, FL
    Posts
    1,284
    Post Thanks / Like
    Fenders

    Front Fender Re-Construction


    Adding to the Front Fender to go around the grille


    Adding to the Fender Skirt to line with the Running Board


    Rear Fender Re-construction


    Rear Fender Tail construction
    Last edited by Vman7; 05-29-2013 at 10:58 PM.

  19. #19
    Senior Member
    Join Date
    Mar 2011
    Location
    Orlando, FL
    Posts
    1,284
    Post Thanks / Like
    Running Boards & Lower Rear Panel

    Rear Fender Running Board mating


    Front Fender Running Board mating


    Lower rear panel started to accommodate the Bumper installation
    Last edited by Vman7; 05-29-2013 at 11:03 PM.

  20. #20
    Senior Member
    Join Date
    Mar 2011
    Location
    Orlando, FL
    Posts
    1,284
    Post Thanks / Like
    Running Board Support Arms


    Last edited by Vman7; 05-29-2013 at 11:06 PM.

  21. #21
    Senior Member
    Join Date
    Mar 2011
    Location
    Orlando, FL
    Posts
    1,284
    Post Thanks / Like
    Engine Side Panels & Inner Fenders

    Engine Panel Pattern


    Louver stamped Engine panels


    Louvered Engine Side Panel cut to shape


    Mating Engine Side Panel and Inner Fender Panel Edges


    Inner Fender panel rear view
    Last edited by Vman7; 05-29-2013 at 11:12 PM.

  22. #22
    Senior Member
    Join Date
    Mar 2011
    Location
    Orlando, FL
    Posts
    1,284
    Post Thanks / Like
    more Engine Side Panels & Inner Fenders

    Engine Side Panel & Inner Fender installed


    Mating Engine Side Panel & Inner Fender


    Finished Cowl Vent & Engine Side Panel installed
    Last edited by Vman7; 05-29-2013 at 11:16 PM.

  23. #23
    Senior Member
    Join Date
    Mar 2011
    Location
    Orlando, FL
    Posts
    1,284
    Post Thanks / Like
    Front Frame Horns

    Front Frame Horn fabrication


    Last edited by Vman7; 05-29-2013 at 11:19 PM.

  24. #24
    Senior Member
    Join Date
    Mar 2011
    Location
    Orlando, FL
    Posts
    1,284
    Post Thanks / Like
    Front Frame Horns Installed

    Driver side Front Frame Horn & fender bracket


    Driver side Front Frame Horn & fender bracket


    Driver side Front Frame Horn installed


    Passenger side Front Frame Horn & fender Bracket installed
    Last edited by Vman7; 05-29-2013 at 11:23 PM.

  25. #25
    Senior Member
    Join Date
    Mar 2011
    Location
    Orlando, FL
    Posts
    1,284
    Post Thanks / Like
    Rear Bumper Frame

    Laying out Rear Bumper Frame


    Rear Bumper frame


    Rear Bumper Frame attachment points
    Last edited by Vman7; 05-29-2013 at 11:26 PM.

  26. #26
    Senior Member
    Join Date
    Mar 2011
    Location
    Orlando, FL
    Posts
    1,284
    Post Thanks / Like
    more Rear Bumper Frame

    Rear Bumper Frame temmporarily attached


    Rear Bumper Frame finished & installed


    Bumper temporarily attached
    Last edited by Vman7; 05-29-2013 at 11:29 PM.

  27. #27
    Senior Member
    Join Date
    Mar 2011
    Location
    Orlando, FL
    Posts
    1,284
    Post Thanks / Like
    Trunk Latch beginning modification
    Last edited by Vman7; 05-29-2013 at 11:32 PM.

  28. #28
    Senior Member
    Join Date
    Mar 2011
    Location
    Orlando, FL
    Posts
    1,284
    Post Thanks / Like
    E-Brake

    E-Brake Mounting Bracket


    E-Brake Brackets installed


    E-Brake and cable brackets
    Last edited by Vman7; 05-29-2013 at 11:35 PM.

  29. #29
    Senior Member
    Join Date
    Mar 2011
    Location
    Orlando, FL
    Posts
    1,284
    Post Thanks / Like
    Driveline Tunnel

    Driveline Tunnel being formed


    Driveline Tunnel finished
    Last edited by Vman7; 05-29-2013 at 11:37 PM.

  30. #30
    Senior Member
    Join Date
    Mar 2011
    Location
    Orlando, FL
    Posts
    1,284
    Post Thanks / Like
    Inside Door Details

    Door frame & hinge setup


    Modified Door Latch / Structure System


    Door Window Electric channel


    Electric Window Handle and Switch
    Last edited by Vman7; 05-29-2013 at 11:40 PM.

  31. #31
    Senior Member
    Join Date
    Mar 2011
    Location
    Orlando, FL
    Posts
    1,284
    Post Thanks / Like
    Enjoy all the pictures!

    Hopefully some of these pictures will help with those who need to have or just want bumpers or nerf bars. Some really good ideas here.

    Thanks Ed for sending the pictures

    David

  32. #32
    PLATNUM Supporting Member
    wallace18's Avatar
    Join Date
    Apr 2012
    Location
    Trenton, Florida
    Posts
    5,382
    Post Thanks / Like
    Wow! that was a lot of work. It sure came out nice.

  33. #33
    Senior Member
    Join Date
    Feb 2011
    Location
    Myrtle Beach, SC
    Posts
    2,108
    Post Thanks / Like
    Extraordinary work on this beauty!! Wow, what a vision to make this all come together.

    Thanks for sharing the pictures on how you made it come together. What attention to detail. Stunning work!

    Regards,

    Steve

  34. #34
    Senior Member 68GT500MAN's Avatar
    Join Date
    Feb 2011
    Location
    Fresno, CA
    Posts
    1,808
    Post Thanks / Like
    Thanks David for posting all of the detailed photos. Now back to the garage with many new ideas!
    Doug

  35. #35
    Senior Member ehansen007's Avatar
    Join Date
    Mar 2011
    Location
    Aliso Viejo, CA
    Posts
    1,625
    Post Thanks / Like
    Amazing work. Truly. Hopefully Dave will have Dino shoot this car at some point. Really incredible.

  36. #36
    Junior Member
    Join Date
    Feb 2011
    Location
    Calgary, Alberta
    Posts
    4
    Post Thanks / Like
    Wow - what a great build! Nice work.

  37. #37
    Junior Member
    Join Date
    Jul 2014
    Posts
    1
    Post Thanks / Like
    Fantastic build. Thank you Ed for sharing yours and your teams efforts.

  38. #38
    Senior Member Arm7419's Avatar
    Join Date
    Feb 2011
    Location
    Sedona Az
    Posts
    170
    Post Thanks / Like
    Amazing. Just beautiful

    Chuck
    Chuck

    Mk1, MK3, Hotrod, Gen 3 Daytona Coupe, RF GT40
    Hang Up and Drive

Posting Permissions

  • You may not post new threads
  • You may not post replies
  • You may not post attachments
  • You may not edit your posts
  •  

Martin's Dent and Collision Shop

Visit our community sponsor