Very Cool Parts

Visit our community sponsor

Thanks Thanks:  0
Likes Likes:  0
Results 1 to 5 of 5

Thread: MK3 Power Steering conversion done

  1. #1
    Senior Member
    Join Date
    Feb 2011
    Location
    Summerfield, NC
    Posts
    201
    Post Thanks / Like

    MK3 Power Steering conversion done

    Seems to be 'power steering upgrade' season. Mine is done and I'm very happy. Getting in & out of my garage involved a couple lock-to-lock turns of my steering wheel, so this upgrade made the first & last few minutes of each drive a lot easier.

    My car is an MK3 and has the round solid steering shaft. Finding the right u-joint was a PITA, so hopefully this thread will help someone down the road.

    Here's a summary of what I did.

    Installation Notes:

    I wound up moving the FFR lower control arm to the inner holes. My tires stuck out just a bit more than I liked and Mark at Breeze suggested this. Looks better now without the tire bulge out past the lip.

    Using the FFR upper arms (with their standard length sleeves), I was able to get this at the alignment shop:
    1/16 toe in
    -1deg camber
    4 deg caster - even tried to shim the front, but it didn't help. Would like to get more, but the current sleeves are both turned almost all the way in. I will have to see how I like it and may get shorter sleeves.

    The explorer pump I used has the spring in a different spot than the cII mustang pump (it's opposite of pressure hose). I cut it down to about 1 5/16". I could probably go shorter, but I'll probably keep it as is for now. I tried it at 1 7/16 and it felt too loose...no road feel. The little snip helped quite a bit.

    The car is nice & easy to drive, but the steering isn't so loose that you lose all feel. No wandering or floating feel as I'm driving along. The wheel return could be better ( need more caster to fix that), but I don't notice it being much different than what I had with the manual rack.
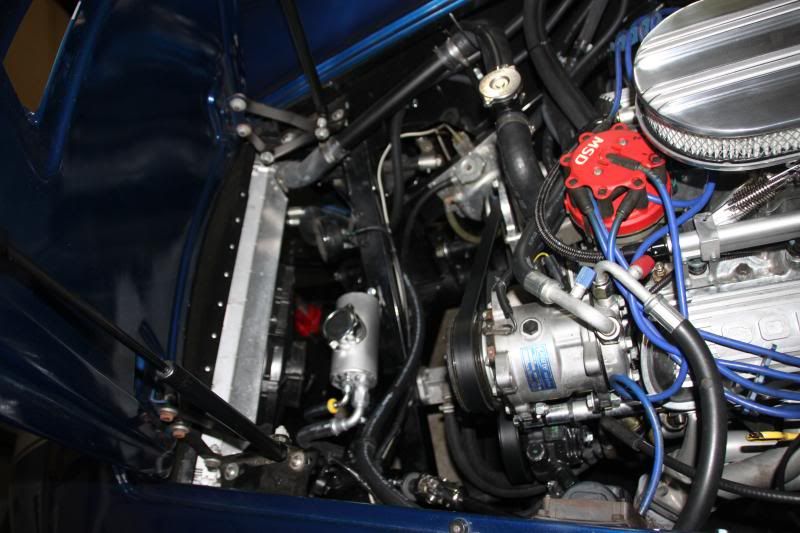
    Some pictures.

    Wish I could get a better shot of the Whitby bracket...Jeff was a lifesaver (didn't have to buy an expensive pump and modify the breeze bracket to work with my original A/C Compressor brackets.


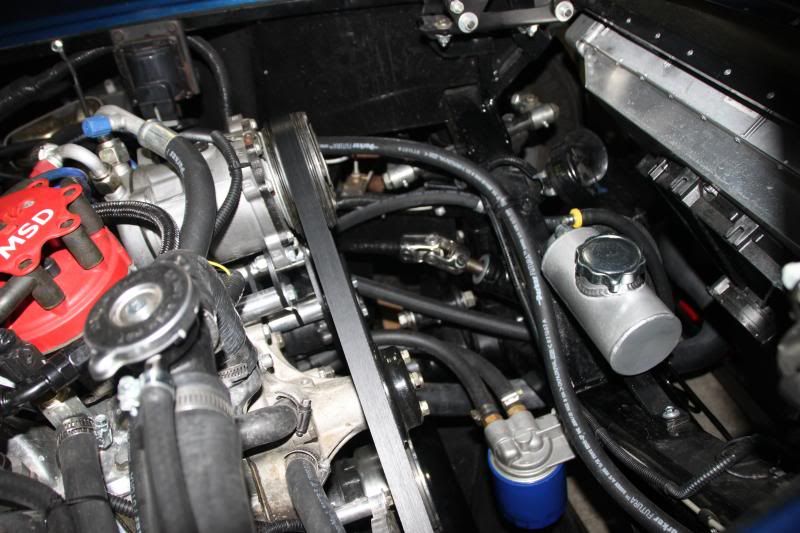
    I didn't want a large PS reservoir and this speedway piece reminded me of a smaller version of the 289 Cobra overflow tanks that I've seen in one of 2Fast's posts.


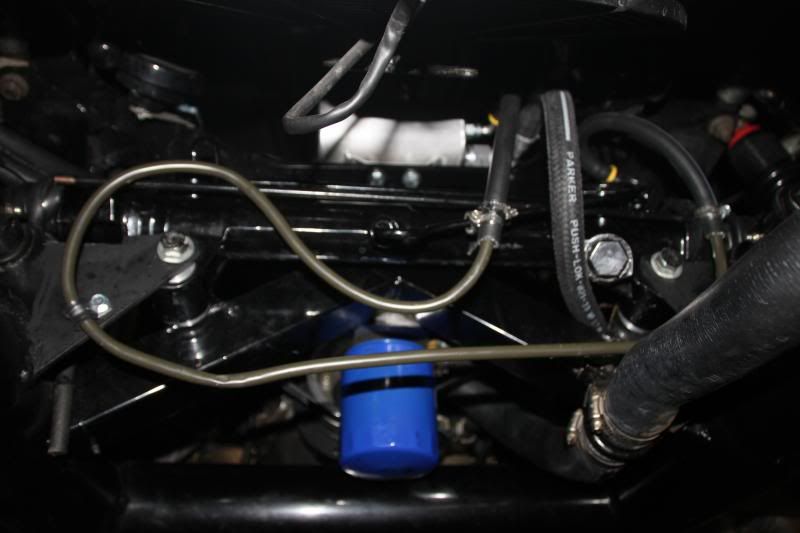
    Here's where I installed the short cooling line. For a street car, I probably didn't need this, but figured it couldn't hurt either.


    Parts used:

    Breeze - Steering Rack
    Breeze - Steering Rack Limiters
    Breeze - fittings for rack
    Breeze - solid offset bushing

    Unisteer - U-Joint 3/4"-36 (Ford) x 9/16"-30 part number: 8050500
    U-Joint 3/4"-36 (Ford) x 9/16"-30 | U-Joints | Search By Product | Unisteer Performance

    Speedway - power steering reservoir
    Speedway Steering-Mounted Reservoir Tank - Speedway Motors, America's Oldest Speed Shop

    NAPA - 99 Explorer (Ford CIII) pump and pulley
    NAPA - 3/8th fuel line (to use for a short cooling line)

    Whitby - A/C & PS pump bracket (worked great with my North Racecar A/C setup). Perfect fit for the compressor and it lowered the compressor just a bit. The power steering pump sits nicely underneath and with black hoses, everything seems pretty well hidden.

    High pressure hose - had it made up (twice...measured wrong the first time) I didn't want the look of braided lines, so I went with black hose. WARNING>>>>Don't get your hose made at NAPA. My original hose (the one that was too short) cost me just under $20 at a local hydraulic shop. Went to NAPA on a Sunday to get the longer one made (about 6" longer) and when they rang me up..it was almost $70. Talk about feeling like an *** for not getting the measurement right on a weekday.

    Socketless hose and 90degree fittings for the return lines.

  2. #2
    cobra Handler skullandbones's Avatar
    Join Date
    Jul 2011
    Location
    Superstition Mtn foothills 5 miles west of Gold Canyon AZ
    Posts
    2,686
    Post Thanks / Like
    Blog Entries
    19
    Hi Dan,

    Do you plan on installing the longer adjustable control arm peice? I ordered mine and should be here this week. I can only get about 3.5 degrees of castor in my front end without extending the threads of the heim joints too much. I got this from one of J Kleiner's posts.

    Pt #: 91034158-5 It's also at Speedway for $8.99 ea.

    I like the power rack but don't know if the tires I plan 255/40 - 17 will feel different, yet (don't have them). Just have some skinny ones on there now. It sure steers easy and negotiates the turns like it's on rails! I haven't done the spring mod either. I'll have to put some more miles on it to tell for sure. The other thing is deciding on how much castor. I think I will start out at 6 and try it again.

    Also, did you move the lower control arms in before your initial alignment and how did it affect things?

    Thanks, WEK.
    Last edited by skullandbones; 06-05-2013 at 09:51 PM.
    FFR MkIII 302 (ATK), EFI 75mm TB with custom box plenum chamber, 24# injectors, 4 tube BBK ceramic, cold air sys, alum flywheel, crane roller rockers, T5, Wilwood pedals, custom five link with Watt's link, 4 rotors, coil overs, power steering with Heidt valve, alum FFR rad, driver's crash bar mod, mini dead pedal mod, quick release steering wheel hub #6046

  3. #3
    Senior Member
    Join Date
    Feb 2011
    Location
    Summerfield, NC
    Posts
    201
    Post Thanks / Like
    When they put the car on the alignment rack, the biggest difference as a result of me moving the lower arms was the camber. The wheels were at about 2deg pos (the wheels were visibly tilted out at the top). The caster wasn't really all that much difference.

    I think to get more caster, I need shorter sleeves. Both sleeves are as short as they can get (no threads showing). If I extended the length of the front arm, wouldn't that impact the camber setting too just a bit?

    I think with thicker tires, you'd get a bit more road feedback. Maybe wait, then start cutting the spring if you feel that it's still too light.

  4. #4
    Not a waxer Jeff Kleiner's Avatar
    Join Date
    Feb 2011
    Location
    Bloomington, Indiana
    Posts
    8,069
    Post Thanks / Like
    Quote Originally Posted by Dan Babb View Post
    I think to get more caster, I need shorter sleeves. Both sleeves are as short as they can get (no threads showing). If I extended the length of the front arm, wouldn't that impact the camber setting too just a bit?
    Dan,
    Yes you are correct that lengthening the front link will add positive caster as well as moving camber in a more positive direction. I always advise that longer sleeves will likely be necessary for the front link when going beyond 4ish degrees of caster BUT in your case moving the LCA pivot inward has the same effect as making the uppers longer. I think you'll like the PS even better with some more caster, say around 8 degrees positive. There is a lot of thread in the sleeves you currently have so an option would be to cut the rear ones down a little, maybe 1/8" on both ends (assure that you aren't bottoming out internally; if so you may need to trim the male "stubs" also). This will let you shorten the rear links and lengthen the fronts which will provide more positive caster while allowing the camber to remain the same.

    I know what you mean about the steering shaft; they're like the proverbial hen's teeth! FFR only had a short run of that style shaft between the Mk2 and Mk3.1 I'm building a Mk3 for someone right now and was about to convert it to a Mk4 shaft before finally stumbling across one that a builder had leftover.

    For WEK,
    More tire and more positive caster will both increase feedback at the steering wheel.

    Cheers,
    Jeff

  5. #5
    Senior Member CraigS's Avatar
    Join Date
    Feb 2011
    Location
    Blacksburg, Va
    Posts
    4,728
    Post Thanks / Like
    Dan here is another possible option for getting more caster. I think I can see in one of your pics that the UCA is mounted on the horizontal surface of the frame. (no SAI mod right?) If so, drill another hole for the rear bolt of the cross shaft. You would need to test for clearance of the coil over spring to the front leg of the UCA which is probably tight w/ your super short arms. Remove the rear bolt, and loosen the front one slightly so you can tap on the rear of the cross shaft to move it toward the center of the car. You want to move it enough so there is about 1/8 inch of metal between the old and new hole. I have been running mine like this for 6 years of autocross on R-compound tires so it is plenty strong. If an entire new hole is too much, you could make it into a slot for less movement but I would probably want to weld it back to just a hole for the long term. If you run out of clearance for the coil over spring, adjust shims at the top mount to move it toward the rear of the car. You can run as little as 3/16 inch spacer at the rear of the bolt.
    FFR MkII, 408W, Tremec TKO 500, 2015 IRS, DA QA1s, Forte front bar, APE hardtop.

Tags for this Thread

Posting Permissions

  • You may not post new threads
  • You may not post replies
  • You may not post attachments
  • You may not edit your posts
  •  

FFMetal

Visit our community sponsor