Forte's

Visit our community sponsor

Thanks Thanks:  0
Likes Likes:  0
Page 5 of 8 FirstFirst ... 34567 ... LastLast
Results 161 to 200 of 307

Thread: Boz's 33

  1. #161
    Senior Member narkosys's Avatar
    Join Date
    May 2012
    Posts
    243
    Post Thanks / Like
    the neck scarf is found on Mercedes convertibles. It is basicly a vent installed in the seats which blows hot air onto the back of your neck keeping it warm and in turn more comfortable when driving on colder days.

    edit: my mistake. they call it the Air Scarf.

    P

  2. #162
    Senior Member Boz1911's Avatar
    Join Date
    May 2013
    Location
    Peachtree City
    Posts
    344
    Post Thanks / Like
    Evan the studs just screw out then the upholstered surround will cover the holes.

    How did I know Tim would have a great idea. Thanks

  3. #163
    Senior Member
    Join Date
    Feb 2011
    Posts
    334
    Post Thanks / Like
    Blog Entries
    1
    Sachse Hot Rod parts. Pg. # 129 on their online catalog.

    narkosys ...... got me thinking now ........

  4. #164
    Senior Member esff32's Avatar
    Join Date
    Oct 2012
    Location
    La Verne, Ca
    Posts
    560
    Post Thanks / Like
    Thanks Tim!

  5. #165
    Senior Member Boz1911's Avatar
    Join Date
    May 2013
    Location
    Peachtree City
    Posts
    344
    Post Thanks / Like
    Well decided to purchase some aluminum and a brake to make some needed components for the rod. I spent over an hour looking for aluminum yesterday. You would think as big as Atlanta is everyone would have some. Not! Then a flashbulb went off and I remembered we had an aircraft supply place here in town, Aircraft spruce and specialty. Alas they had everything I needed plus a host of other goodies that will be useful. To top it off they're not five minutes from my house. Made a couple of heat shields for the mufflers to get my feet wet. I polished the muffler side as Eric suggested to reflect some of the heat. For anyone building a 33 and using the supplied exhaust be aware the floorboards get super hot, I hope these help some.
    P1080004.JPG

  6. #166
    Senior Member esff32's Avatar
    Join Date
    Oct 2012
    Location
    La Verne, Ca
    Posts
    560
    Post Thanks / Like
    I made the same thing for mine too Boz. In the short time I have had it running, it has made a huge difference. I was able to put my bare hand on the sheet metal above the muffler after it had been running for about 40 minutes. I took mine and had them ceramic coated. Looks great.


  7. #167
    Senior Member maczter's Avatar
    Join Date
    Feb 2013
    Location
    Xenia, OH
    Posts
    277
    Post Thanks / Like
    Blog Entries
    1
    Would you mind sharing the size specs on these? I am not buying a brake but I think I can do it on bench with clamps and a 2x4.
    FFR HR #530
    Race car theme, Tim Whitaker roll bar, Autometer Autolite Gauges, Satin Black, SBC 383/700R4, 8.8 rear with Cobra Brakes, 3.29 gear, Boyd Tank, QA1 springs and shocks,

    My build blog: http://jacks33hotrod.blogspot.com/

  8. #168
    Senior Member
    Join Date
    Feb 2011
    Posts
    334
    Post Thanks / Like
    Blog Entries
    1
    Bummer Boz ..... You're going to need another $10K to finish the car now. I get all my materials from Aircraft Spruce and I see stuff on almost every page of their 1"+ thick catalog that I really need .....
    Great source for Clekos, aluminum, glass cloth, resin and everything in between. I could probably have afforded to buy another 300 Hp for my 33 if I lived as close to them as you do and didn't have to pay all the shipping I do for parts and materials.

  9. #169
    Senior Member Boz1911's Avatar
    Join Date
    May 2013
    Location
    Peachtree City
    Posts
    344
    Post Thanks / Like
    Quote Originally Posted by maczter View Post
    Would you mind sharing the size specs on these? I am not buying a brake but I think I can do it on bench with clamps and a 2x4.
    I used the muffler dimensions plus 1 1/2 inches on each side. No room on mine to add any extra to the length. My muffler is 8 x 13.5 so the panels are 11 x 13.75 with the angles being 1.5 inches each side. Material is .063 6061.

    Sorry Evan, should have credited you for the idea. I thought I would get by without but there is no way, those floorboards were getting damn hot after running for a while.

    Yes, Tim I brought the catalogue home with me. I also picked up some fiberglass and heat shrink tubing while I was there. They are going to be a handy source and the prices are reasonable.
    Last edited by Boz1911; 01-09-2014 at 05:42 AM.

  10. #170
    Senior Member esff32's Avatar
    Join Date
    Oct 2012
    Location
    La Verne, Ca
    Posts
    560
    Post Thanks / Like
    No problem, I got the idea from Erik, thats the best part about this forum.

  11. #171
    Senior Member rcotner's Avatar
    Join Date
    Aug 2013
    Location
    Wilsonville, OR
    Posts
    200
    Post Thanks / Like
    Blog Entries
    1
    Evan, Boz, do you guys plan to use spacers to create a gap between the heat shields and car frame below the floor panels? Seems that shield to frame contact might conduct heat to the floor. Are you planning the same type of shields over the cats?

    Thanks for the info, Ray

  12. #172
    Senior Member Boz1911's Avatar
    Join Date
    May 2013
    Location
    Peachtree City
    Posts
    344
    Post Thanks / Like
    Quote Originally Posted by rcotner View Post
    Evan, Boz, do you guys plan to use spacers to create a gap between the heat shields and car frame below the floor panels? Seems that shield to frame contact might conduct heat to the floor. Are you planning the same type of shields over the cats?

    Thanks for the info, Ray
    Mine are bolted directly to the floor boards for now. I thought about using a washer or two to create an air gap but then I thought about the crap that could get in that gap. So for now I'm gonna try them as is. I can always add the gap if needed later on. My car has no cat's but if it did I sure as heck would make some shields.

  13. #173
    Senior Member esff32's Avatar
    Join Date
    Oct 2012
    Location
    La Verne, Ca
    Posts
    560
    Post Thanks / Like
    PM sent Ray, with new pics

  14. #174
    Senior Member Boz1911's Avatar
    Join Date
    May 2013
    Location
    Peachtree City
    Posts
    344
    Post Thanks / Like
    Evan did you space the shield away from the floorboard? Ran the car yesterday, the floorboards are definately cooler but still get pretty warm. This 408 is making some good ponies.

  15. #175
    Senior Member esff32's Avatar
    Join Date
    Oct 2012
    Location
    La Verne, Ca
    Posts
    560
    Post Thanks / Like
    Nice, I love driving my car and it isn't even done. Wheres the video...I've been waiting. 
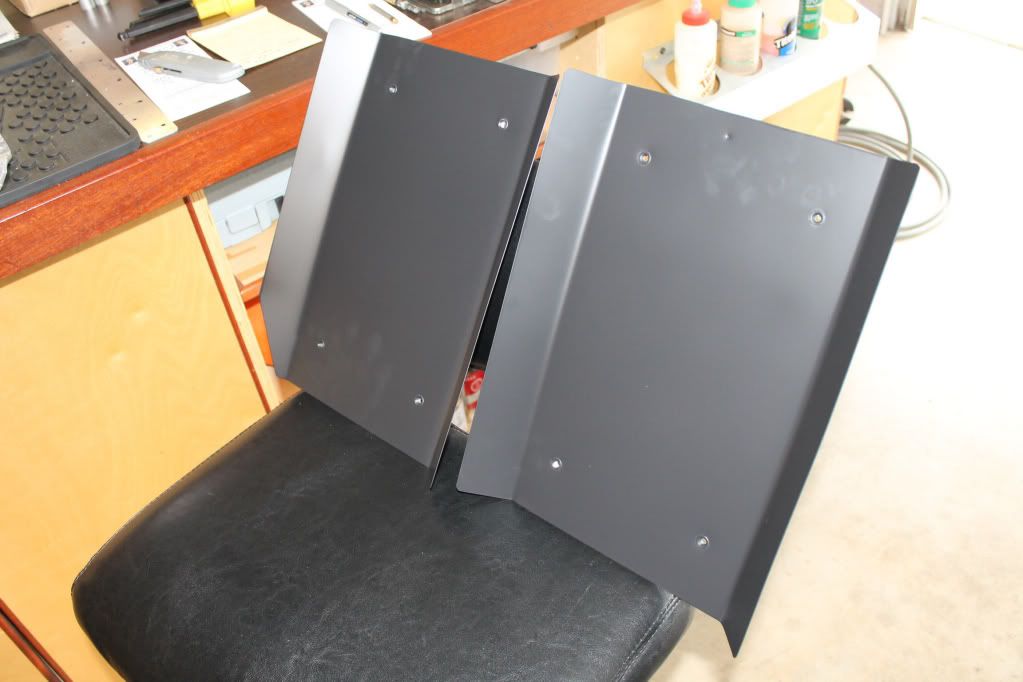
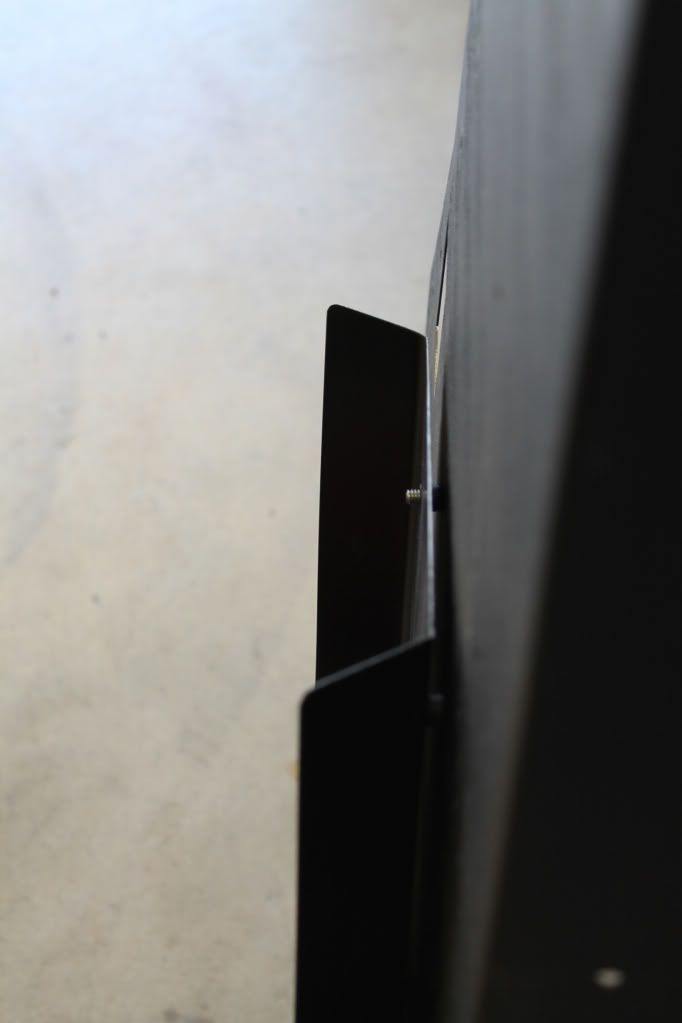
I used riv nuts but flipped them over and used the squashed backside as the spacer. I want to say it gives about a 1/4" gap between the two. It should be enough airflow to make a difference. I ran the car for about 30 minutes without driving and I could put my hand on the bare sheet metal without a problem. I used SS button heads to anchor them from the inside.
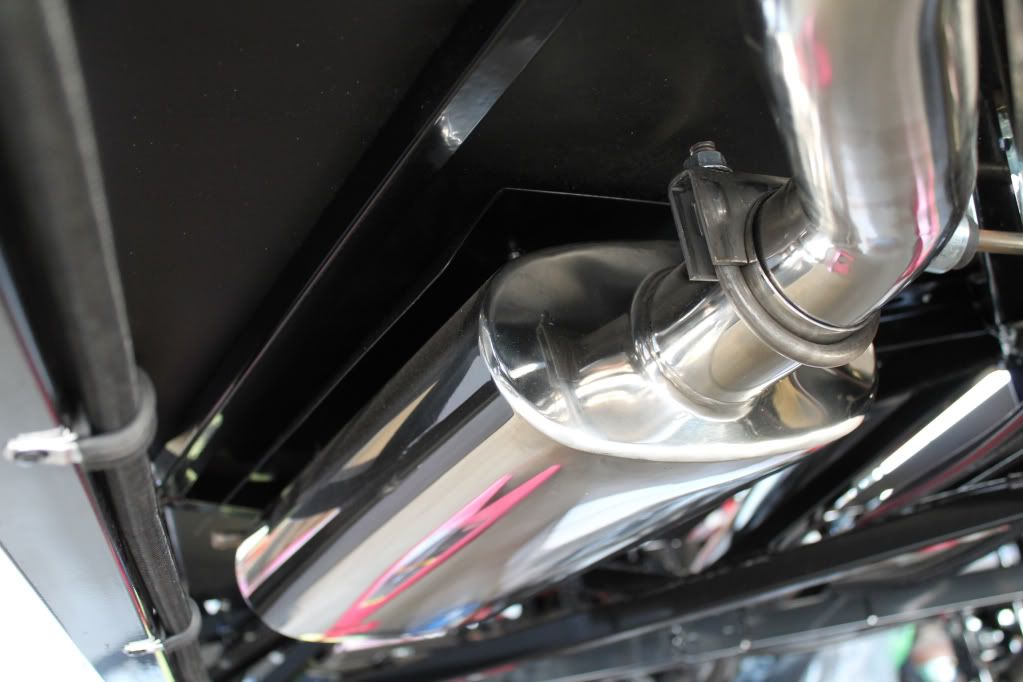


  16. #176
    Senior Member Boz1911's Avatar
    Join Date
    May 2013
    Location
    Peachtree City
    Posts
    344
    Post Thanks / Like
    Little thing but now with the aircraft supply so close, I picked up some aluminum tubing and made a polished PCV tube.

    P1150007.JPG

    Oh, on another note, I always wanted to learn how to weld. I know an older gentleman that owns a steel building company and he graciously offered to teach me. Wednesday morning he gave me a lesson and I practiced with a stick welder for a couple of hours. I really enjoy learning a new skill and he has plenty of scrap to practice on, not to mention the Mig and Tig welders he has. Tomorrow going back for another lesson.
    Last edited by Boz1911; 01-16-2014 at 08:18 PM.

  17. #177
    Member TigerBill's Avatar
    Join Date
    Jan 2013
    Location
    Kingsport, TN
    Posts
    93
    Post Thanks / Like
    My tunnel (kit no. 522) is like Boz's. I just cut the connector piece at the top next to the fire wall. Then you can squeeze the tunnel in and take out several inches of width. Mine is just about as narrow as the cutout in the firewall now. So I couldn't go anymore if I wanted to. However I have a fairly comfortable amount of room for my pedal (it came with my LS3 package and us hung from the pedal box above).
    Bill
    '33HR #522, LS3, TKO 500, Boyd's Tank, QA1 Shocks, Double Roll Bars

  18. #178
    Senior Member esff32's Avatar
    Join Date
    Oct 2012
    Location
    La Verne, Ca
    Posts
    560
    Post Thanks / Like
    Quote Originally Posted by Boz1911 View Post
    Little thing but now with the aircraft supply so close, I picked up some aluminum tubing and made a polished PCV tube.

    P1150007.JPG

    Oh, on another note, I always wanted to learn how to weld. I know an older gentleman that owns a steel building company and he graciously offered to teach me. Wednesday morning he gave me a lesson and I practiced with a stick welder for a couple of hours. I really enjoy learning a new skill and he has plenty of scrap to practice on, not to mention the Mig and Tig welders he has. Tomorrow going back for another lesson.
    Looks good Boz. Welding is one of those skills that is invaluable. I used to work for a mechanical effects company that did work for movies, commercials, and theme parks before I got hired with the fire dept. I learned how to mig and tig weld as well as a host of other fabrication skills. I currently own a Miller mig welder with a spool gun to weld aluminum. You are only limited by your imagination.

  19. #179
    Senior Member Boz1911's Avatar
    Join Date
    May 2013
    Location
    Peachtree City
    Posts
    344
    Post Thanks / Like
    Spent the last few days remaking my battery cables. I have three hot cables, one from battery to master switch, one from switch to solenoid, one from solenoid to starter. I used welding cable and solid copper lugs. Got some nice heat shrink from aircraft supply that dressed them all up pretty. With our cold azz weather lately looks there has been no hope of shooting any primer so I started on my console and working on ideas for the console. Got the storage area under the armrest laid out and in place, waiting to see if some more ideas pop up in Evan's thread, so far I like 33 machines layout, just got to have a cup holder or two.
    P1260010.JPGP1260014.JPG

  20. #180
    Senior Member esff32's Avatar
    Join Date
    Oct 2012
    Location
    La Verne, Ca
    Posts
    560
    Post Thanks / Like
    Hey Boz, can you take a few more detailed pics of the console inside and out and post them. I'm curious as to how you went about making it. One of the photos came out a bit fuzzy. Thanks for the help bro.

  21. #181
    Senior Member
    Join Date
    Feb 2011
    Posts
    211
    Post Thanks / Like
    How do you like the spool gun? I want to start welding and trying to figure out if I should get a mig with a spool gun or get a tig and plasma cutter as well.

  22. #182
    Senior Member Boz1911's Avatar
    Join Date
    May 2013
    Location
    Peachtree City
    Posts
    344
    Post Thanks / Like
    Quote Originally Posted by bbksv View Post
    How do you like the spool gun? I want to start welding and trying to figure out if I should get a mig with a spool gun or get a tig and plasma cutter as well.
    Haven't used a spool gun yet but from what I've seen and watched for aluminum Tig is the way to go for appearance. I'm going to buy a Miller Mig first then later a Tig machine.

    Evan the console is just two 18+inch x 3.5 inch pans (3/4 inch brakes all around) joined with a flat piece of stock at each end. After I hinge it I'll rivet it to the trans tunnel and to the rear. I made the console slightly narrower (1/4 inch)than the tunnel and will probably narrow the pad also because of seat interference. Thanks for the links by the way, some cool items there............you seem to always be forcing me to spend more money.
    Last edited by Boz1911; 01-27-2014 at 07:59 PM.

  23. #183
    Senior Member esff32's Avatar
    Join Date
    Oct 2012
    Location
    La Verne, Ca
    Posts
    560
    Post Thanks / Like
    Thanks Boz, I'm happy anytime I can spend someone else's money. The Miller spoolgun I have works very well. Aluminum can be a bit tedious only because the material must be extremely clean. The weld locations have to be brushed with a stainless steel brush and thoroughly cleaned with acetone. But it does weld very well and the results look awesome.

  24. #184
    Senior Member Boz1911's Avatar
    Join Date
    May 2013
    Location
    Peachtree City
    Posts
    344
    Post Thanks / Like
    Since I'm more or less waiting on the weather to get started priming and painting I went ahead and made the drivetrain purchase for the 64 Fairlane. 460 big block motor to be stroked to 521CI and C-6 auto, that way my wife can drive it.

  25. #185
    Senior Member esff32's Avatar
    Join Date
    Oct 2012
    Location
    La Verne, Ca
    Posts
    560
    Post Thanks / Like
    That will haul some groceries in a hurry!

  26. #186
    Senior Member Boz1911's Avatar
    Join Date
    May 2013
    Location
    Peachtree City
    Posts
    344
    Post Thanks / Like
    Still finishing some little items like final mounting the hood release cable, but there's not much to do until I get some painting weather. I was going to drive the car around the neighborhood yesterday but limited the driving to up and down the driveway for a couple of reasons. One, the manual brakes require a lot of force or they need some break in, either way I need to get used to them. Second, the go pedal needs to be moved further away from the stop pedal. If I just stop by instinct I hit both pedals. Also I need to raise the car a bit, my oil pan is the lowest part and my driveway is fairly steep. Also I need to make a decision on rear view mirrors, the car is not easy to see out of.

  27. #187
    PLATNUM Supporting Member
    wallace18's Avatar
    Join Date
    Apr 2012
    Location
    Trenton, Florida
    Posts
    5,383
    Post Thanks / Like
    Quote Originally Posted by Boz1911 View Post
    Still finishing some little items like final mounting the hood release cable, but there's not much to do until I get some painting weather. I was going to drive the car around the neighborhood yesterday but limited the driving to up and down the driveway for a couple of reasons. One, the manual brakes require a lot of force or they need some break in, either way I need to get used to them. Second, the go pedal needs to be moved further away from the stop pedal. If I just stop by instinct I hit both pedals. Also I need to raise the car a bit, my oil pan is the lowest part and my driveway is fairly steep. Also I need to make a decision on rear view mirrors, the car is not easy to see out of.
    Get the convex mirrors from Napa for the side ones in the kit. They really help with seeing behind you. Check the thread on this subject .

  28. #188
    Senior Member Boz1911's Avatar
    Join Date
    May 2013
    Location
    Peachtree City
    Posts
    344
    Post Thanks / Like
    Thanks, Tom, probably going with a different mirror that the ones supplied.
    A few pics of my baby in the sun for the first time.

    P2090001.JPGP2090002.JPGP2090003_01.JPGP2090005.JPGP2090004.JPG

  29. #189
    Senior Member EBarnes's Avatar
    Join Date
    Feb 2011
    Location
    Peachtree City, GA
    Posts
    117
    Post Thanks / Like
    Hey Brian... getting back to working on my coupe and caught up with your progress. NICE! Looks like the weather is going to improve over the next week or so. I'd love to come see your project.
    Eric

  30. #190
    Junior Member
    Join Date
    Feb 2014
    Posts
    7
    Post Thanks / Like
    your pictures have got me pumped up to get my car, I just ordered it two weeks ago, you have answered some questions I have had,good luck

  31. #191
    Senior Member Boz1911's Avatar
    Join Date
    May 2013
    Location
    Peachtree City
    Posts
    344
    Post Thanks / Like
    Quote Originally Posted by EBarnes View Post
    Hey Brian... getting back to working on my coupe and caught up with your progress. NICE! Looks like the weather is going to improve over the next week or so. I'd love to come see your project.
    Eric
    Just give me a call, I can't wait for some decent weather !!

  32. #192
    Senior Member Boz1911's Avatar
    Join Date
    May 2013
    Location
    Peachtree City
    Posts
    344
    Post Thanks / Like
    Quote Originally Posted by Rod Shop View Post
    your pictures have got me pumped up to get my car, I just ordered it two weeks ago, you have answered some questions I have had,good luck
    Congrats!! It's a good idea to page through the build threads, they are extremely helpful. Everyone solves problems in their own way but that is part of the fun. I feel like I'm pretty good mechanically but I'm not trying to go overboard on the custom stuff, just want a good, solid driving car that I can modify any way I want to later. Planning ahead can really save you some money if you shop wisely. For example, I'm building 557CI engine for my 64 Fairlane and by using CL and E-bay, etc I should have it built for about half of what I put in the 33's 408. Which by the way is too much power for this car. If I had it to do over probably would have gone with a 302 based engine. Good luck, I know the anticipation is awesome!!

  33. #193
    Junior Member
    Join Date
    Feb 2014
    Posts
    7
    Post Thanks / Like
    stainless fasteners are good, I used them almost everywhere i could in my 34 ford sedan when I built it back in '78, & '79 it was finished in '80 for the street nationals, the car now has 114,069 miles on it, still have my T-bucket that was at the first street rod nats in Peoria' Il in 1970. Your car and garage looks good!!my wife noticed your garage when i showed her some pictures of your car!!

  34. #194
    Senior Member Boz1911's Avatar
    Join Date
    May 2013
    Location
    Peachtree City
    Posts
    344
    Post Thanks / Like
    A week or so ago I was planning on some neighborhood driving to do some shakedown but before I got out of the driveway I realized several issues that have now been addressed.
    First: The car seemed to low and my driveway is pretty steep so I adjusted the ride height 1.25 inches above what the manual shows. My biggest concern is my oil pan hangs an inch or so below the frame.
    Second: The go and whoa pedals were too close, when I went to apply the brakes my fat foot was hitting the go pedal. A new lower and further right bracket for the go pedal solved that problem.
    Third: The car is hard to see out of and I had no outside mirrors so I added these for now.P2260012.JPGP2260016.JPG. I may change the brackets but for now they'll suffice.
    Fourth: The drivers door was very difficult to open from the inside. After securing everything and readjusting for the 500th time the door fits and opens with just a finger.

    Perhaps if this weekend is nice I'll move the Fairlane and do a little neighborhood terrorizing.

  35. #195
    Senior Member rcotner's Avatar
    Join Date
    Aug 2013
    Location
    Wilsonville, OR
    Posts
    200
    Post Thanks / Like
    Blog Entries
    1
    Boz, if only I were as far along. I dream of the day I can pull out of the garage shake out stuff! Great job!

  36. #196
    Senior Member Boz1911's Avatar
    Join Date
    May 2013
    Location
    Peachtree City
    Posts
    344
    Post Thanks / Like
    Quote Originally Posted by rcotner View Post
    Boz, if only I were as far along. I dream of the day I can pull out of the garage shake out stuff! Great job!
    Thanks.
    Seems like things are just creeping along at the moment waiting on some paint weather. Oh also put down the sound/heat barrier on the floorboards and lower firewall. Made a huge difference in the cockpit heat.


    I have found the doors to be by far the biggest PITA by far on this entire car so here's a tip that helped me finally get the doors perfect. Make sure the bolts that hold the latch bracket can move freely horizontally. Mine would lock down and wouldn't budge in the slots. Once I could move the door freely I was able to center it up nicely.

  37. #197
    Senior Member
    Join Date
    Feb 2011
    Posts
    334
    Post Thanks / Like
    Blog Entries
    1
    Boz,

    If you find any slop in the hinges, I get good reports on the delrin bushings.

  38. #198
    Senior Member Boz1911's Avatar
    Join Date
    May 2013
    Location
    Peachtree City
    Posts
    344
    Post Thanks / Like
    Didn't know everyone one be driving around my neighborhood this afternoon and my wife is no photographer.

    http://www.youtube.com/watch?v=GB6mR...re=c4-overview

    http://www.youtube.com/watch?v=L6ORj...BZvKPw&index=3

    http://www.youtube.com/watch?v=En5Av...BZvKPw&index=2

  39. #199
    Senior Member esff32's Avatar
    Join Date
    Oct 2012
    Location
    La Verne, Ca
    Posts
    560
    Post Thanks / Like
    Sounds great Boz, I can't believe you had the patience to wait so long to drive it. Very nice.

  40. #200
    Senior Member
    Join Date
    Jan 2014
    Posts
    117
    Post Thanks / Like
    Loooooooove that idle! Sounds nasty exactly like it should do

Page 5 of 8 FirstFirst ... 34567 ... LastLast

Posting Permissions

  • You may not post new threads
  • You may not post replies
  • You may not post attachments
  • You may not edit your posts
  •  

Replica Parts

Visit our community sponsor