Very Cool Parts

Visit our community sponsor

Thanks Thanks:  0
Likes Likes:  0
Page 1 of 2 12 LastLast
Results 1 to 40 of 75

Thread: Stickshift84's Build Thread

  1. #1
    Senior Member Stickshift84's Avatar
    Join Date
    Jun 2011
    Location
    Rhode Island
    Posts
    127
    Post Thanks / Like

    Stickshift84's Build Thread

    I have remained almost silent on the forum so far but I figured now would be a good time to start sharing.

    I started my donor tear-down on 6/29/13 with an 06 WRX donor with 18K miles and a salvage title.

    5Ka5F25H33L73J93o9c42a7d4d62c6a7e1955.jpg

    All I can say is wow do these cars come apart fairly quickly and easily.

    old chassis.jpg

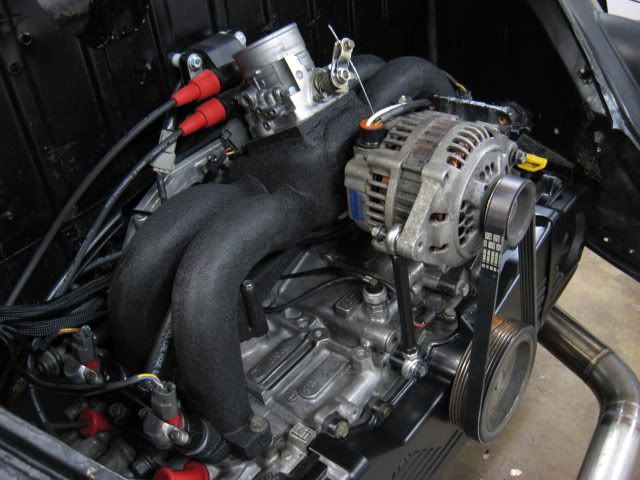
    After breaking down the car I spent most of my time detailing and adding parts to the engine.

    engine.jpg

    I picked up my kit on 7/27/13 using an open trailer. If anyone has questions on that let me know.

    trailer.jpg

    Inside on the trailer.

    inside.jpg

    In its place and time to start working...

    home.jpg

  2. #2
    Senior Member Stickshift84's Avatar
    Join Date
    Jun 2011
    Location
    Rhode Island
    Posts
    127
    Post Thanks / Like
    I have a long list of items that I am adding to my build and for those interested some of it is as follows:

    Interior:
    OMP TRS seats
    NRG 300mm steering wheel with Splash hub

    Engine:
    Grimmspeed TMIC, EBCS, X-pipe, Up-pipe, phenolic spacers, pulley
    Moroso aos
    Fidanza flywheel
    GFB BOV
    smog and TGV delete
    AEM CAI

    Misc:
    Carbonetic LSD
    Mishimoto radiator
    ARP lugs

    There is more and there will be a lot more to follow. This is addicting, be warned.

  3. #3
    Senior Member Stickshift84's Avatar
    Join Date
    Jun 2011
    Location
    Rhode Island
    Posts
    127
    Post Thanks / Like
    Tomorrow I will be starting on the aluminum. I have completed inventory and I have built the new axle assemblies so far. Also all of mine and metalmakers raw steel parts have been blasted and are at the powdercoaters. I will try to update when I have time.

  4. #4
    818 builder metalmaker12's Avatar
    Join Date
    Mar 2012
    Location
    Exeter R.I
    Posts
    2,834
    Post Thanks / Like
    Blog Entries
    1
    I like what you did to your engine, it's hard for me to break away from tradition, but I think it looks like the nicest engine on here. Can't wait to get our parts back so I can build the suspension.

  5. #5
    Junior Member Scott J's Avatar
    Join Date
    Feb 2011
    Location
    Plymouth, MA
    Posts
    17
    Post Thanks / Like
    You're engine is absolutely stunning!

  6. #6
    PLATNUM Supporting Member
    wallace18's Avatar
    Join Date
    Apr 2012
    Location
    Trenton, Florida
    Posts
    5,382
    Post Thanks / Like
    WoW! what a cool engine. Looking great so far. Keep up the pictures.

  7. #7
    fasterer and furiouser longislandwrx's Avatar
    Join Date
    Aug 2012
    Location
    Long Island
    Posts
    2,540
    Post Thanks / Like
    Blog Entries
    6
    very nice, looks sharp. I guess the Ford Mustang sign is coming down?

    I am super excited about my Grimmspeed TMIC. Did you get in on the GB?
    A well stocked beverage fridge is the key to any successful project.

  8. #8
    Senior Member Stickshift84's Avatar
    Join Date
    Jun 2011
    Location
    Rhode Island
    Posts
    127
    Post Thanks / Like
    Not sure if the Mustang sign is coming down but it will most likely be moving....

    I got the TMIC on the GB and I got the thermal dispersant coating. It is a thing of beauty and I just hope it functions as well as it looks.

    Forgot to mention that I also added a Killer B oil pickup and baffle when I did the engine. However when I removed my original pickup it looked perfectly fine.

  9. #9
    Mechie3's Avatar
    Join Date
    May 2012
    Location
    Indianapolis
    Posts
    5,174
    Post Thanks / Like
    The pickups often failed with little notice.

    The motor does indeed look nice. Here's two suggestions if you want them: The tangle of hoses/valve that bolts to the manifold near the silicone inlet can be removed. It's used for purging the charcoal canister which we most likely won't have. Cap those lines and delete the CEL codes in the ECU. It's quite an ugly birdsnest that hides that nice manifold.

    Also, if you want to ditch the bracket for the power steering line you can make a simple bar like the picture below (not my pic). It's similar to the bracket I made for my car, except I moved my alternator over to the right. Buy rod ends from mcmaster (or other place), one is right hand threaded, one is left. Tap a piece of aluminum rod with one left hand one right hand thread. It's easy enough to make with hand tools if you don't have access to a lathe.


    Zero Decibel Motorsports
    Check out my new website!
    www.zerodecibelmotorsports.com
    www.facebook.com/zero.decibel.motorsports

  10. #10
    Senior Member rjh2pd's Avatar
    Join Date
    Jul 2012
    Location
    Detroit MI
    Posts
    159
    Post Thanks / Like
    Very nice detail, even gold bolts on the timing belt cover. If you guys are using old blocks how are you getting them so clean?

  11. #11
    Senior Member Stickshift84's Avatar
    Join Date
    Jun 2011
    Location
    Rhode Island
    Posts
    127
    Post Thanks / Like
    I have no idea why I have waited so long to post any updates... But tonight after my first start I figured I would post some pictures. And sorry guys the video did not work out so well so I will work on that again tomorrow.

    Pic 1.jpg

  12. #12
    Senior Member Stickshift84's Avatar
    Join Date
    Jun 2011
    Location
    Rhode Island
    Posts
    127
    Post Thanks / Like

  13. #13
    Senior Member Stickshift84's Avatar
    Join Date
    Jun 2011
    Location
    Rhode Island
    Posts
    127
    Post Thanks / Like
    PS the grimmspeed intercooler will fit.

    pic 6.jpg

  14. #14
    Senior Member Stickshift84's Avatar
    Join Date
    Jun 2011
    Location
    Rhode Island
    Posts
    127
    Post Thanks / Like
    oil temp and pressure gauge senders under the alternator.

    pic 7.jpg

  15. #15
    Senior Member Stickshift84's Avatar
    Join Date
    Jun 2011
    Location
    Rhode Island
    Posts
    127
    Post Thanks / Like
    Even if I did an almost full wire diet there are still tons of wires to try to neatly hide.

    pic 8.jpg

  16. #16
    Senior Member Stickshift84's Avatar
    Join Date
    Jun 2011
    Location
    Rhode Island
    Posts
    127
    Post Thanks / Like
    air oil separator set-up.

    pic 9.jpg

  17. #17
    Senior Member Stickshift84's Avatar
    Join Date
    Jun 2011
    Location
    Rhode Island
    Posts
    127
    Post Thanks / Like
    Well that is all for now. If anybody wants to see something particular let me know. Or feel free to ask me any questions.

  18. #18
    Senior Member Stickshift84's Avatar
    Join Date
    Jun 2011
    Location
    Rhode Island
    Posts
    127
    Post Thanks / Like

  19. #19
    Senior Member wleehendrick's Avatar
    Join Date
    Jul 2012
    Location
    Encinitas, CA
    Posts
    1,653
    Post Thanks / Like
    Blog Entries
    2
    NICE color! Is that a satin finish?

  20. #20
    Mechie3's Avatar
    Join Date
    May 2012
    Location
    Indianapolis
    Posts
    5,174
    Post Thanks / Like
    What catch cans are you using?
    Zero Decibel Motorsports
    Check out my new website!
    www.zerodecibelmotorsports.com
    www.facebook.com/zero.decibel.motorsports

  21. #21
    PLATNUM Supporting Member
    wallace18's Avatar
    Join Date
    Apr 2012
    Location
    Trenton, Florida
    Posts
    5,382
    Post Thanks / Like
    Very nice work. I am glad to see I am not the only one with a bunch of wires to hide even after a diet. LOL.

  22. #22
    818 builder metalmaker12's Avatar
    Join Date
    Mar 2012
    Location
    Exeter R.I
    Posts
    2,834
    Post Thanks / Like
    Blog Entries
    1
    That junk is coming together, finally!!!

    Honestly I am not a fan of plastic dip, but nick did a really good job applying the product and I like the satinish metalic peralish blue he mixed. Hopefully he can get plates soon and we can go for a drive
    Last edited by metalmaker12; 08-23-2014 at 12:09 PM.
    818S frame #13 Jdm version 8 ej207

  23. #23
    Senior Member Frank818's Avatar
    Join Date
    Jun 2013
    Location
    QC, Canada
    Posts
    5,732
    Post Thanks / Like
    Spray can or gun?
    Frank
    818 chassis #181 powered by a '93 VW VR6 Turbo GT3582R
    Go-karted Aug 5, 2016 - Then May 19+21, 2017
    Tracked May 27/July 26, 2017
    Build time before being driveable on Sep 27, 2019: over 6000h
    Build Completed Winter 2021

  24. #24
    Senior Member Stickshift84's Avatar
    Join Date
    Jun 2011
    Location
    Rhode Island
    Posts
    127
    Post Thanks / Like
    The paint is plastidip using the dipyourcar spray gun. It sprays nice and smooth. If I were to do it again I could do even a better job. Put down a matte black base first. Then mixed 50:50 gloss and matte plastidip clear with a blend of sapphire blue and sage green pearl. It took a lot of thin coats for good coverage. We shall see how it holds up. Never did a whole car before.

  25. #25
    Senior Member Stickshift84's Avatar
    Join Date
    Jun 2011
    Location
    Rhode Island
    Posts
    127
    Post Thanks / Like
    Catch cans are from moroso and I ordered the wrx kit and adapted it to the 818.

    No kidding on wiring... Completely sick of it. Just had to wire in some led load resistors so my turn signals would not blink so fast. Of course I melted some of my trunk carpet while soldering... At least that was the last of the wiring... I hope.

  26. #26
    Senior Member Stickshift84's Avatar
    Join Date
    Jun 2011
    Location
    Rhode Island
    Posts
    127
    Post Thanks / Like
    Door panels are finished with satin black plastidip, silver vinyl inserts, and powder coated handles.

    IMG_20140822_183314.jpg

  27. #27
    Senior Member Stickshift84's Avatar
    Join Date
    Jun 2011
    Location
    Rhode Island
    Posts
    127
    Post Thanks / Like
    Spoiler is a attached. Very thin fiberglass so be careful not to crack it. Painted it gloss black to match my front splitter and side skirts. Attached with 10-24 screws which seem to hold it in place well enough.

    IMG_20140824_094423.jpg

  28. #28
    Senior Member
    Join Date
    Mar 2014
    Location
    Vacaville, CA
    Posts
    157
    Post Thanks / Like
    If you find the time, please post a couple more shots of the spoiler. I can't seem to find any profile/side shots with the street spoiler.

  29. #29
    Senior Member Stickshift84's Avatar
    Join Date
    Jun 2011
    Location
    Rhode Island
    Posts
    127
    Post Thanks / Like
    Here are some more pictures of the spoiler. Finished the trunk and engine cover last night and will try to get the doors done tonight.

    IMG_20140824_234648.jpg
    IMG_20140824_234623.jpg

  30. #30
    Senior Member Stickshift84's Avatar
    Join Date
    Jun 2011
    Location
    Rhode Island
    Posts
    127
    Post Thanks / Like

  31. #31

    Join Date
    Oct 2013
    Location
    Puyallup, WA
    Posts
    576
    Post Thanks / Like
    Looks awesome. Great work!

  32. #32
    Senior Member Stickshift84's Avatar
    Join Date
    Jun 2011
    Location
    Rhode Island
    Posts
    127
    Post Thanks / Like
    I made my own front splitter and splitter frame to support it from the chassis. It is now complete and installed. What do you think?

    IMG_20140704_115617.jpg
    IMG_20140824_105448.jpg

  33. #33
    Senior Member Stickshift84's Avatar
    Join Date
    Jun 2011
    Location
    Rhode Island
    Posts
    127
    Post Thanks / Like
    I made my own front splitter and splitter frame to support it from the chassis. It is now complete and installed. What do you think?

    IMG_20140704_115617.jpg
    IMG_20140824_105448.jpg

  34. #34
    Member tango68ss's Avatar
    Join Date
    Mar 2014
    Posts
    40
    Post Thanks / Like
    Oh my GOD this ride looks fantastic!! PlastiDip seems to be the way to go! If you don't like it, just peel and redo! I love your color choice! get her out in to the light and post up! Great job!

  35. #35
    Senior Member
    Join Date
    Mar 2014
    Location
    Vacaville, CA
    Posts
    157
    Post Thanks / Like
    Quote Originally Posted by Stickshift84 View Post
    Here are some more pictures of the spoiler. Finished the trunk and engine cover last night and will try to get the doors done tonight.

    IMG_20140824_234648.jpg
    IMG_20140824_234623.jpg
    Cool, thanks.

  36. #36
    Senior Member
    Join Date
    Mar 2014
    Location
    Vacaville, CA
    Posts
    157
    Post Thanks / Like
    How well do you feel the plasti-dip covered the imperfections of the body? I love the whole concept and the colors available. Less body work would also be a huge bonus.

  37. #37
    Mechie3's Avatar
    Join Date
    May 2012
    Location
    Indianapolis
    Posts
    5,174
    Post Thanks / Like
    I'm interested in that as well. May be a lower cost lower time investment way to go vs vinyl wrapping or painting.
    Zero Decibel Motorsports
    Check out my new website!
    www.zerodecibelmotorsports.com
    www.facebook.com/zero.decibel.motorsports

  38. #38
    Senior Member Stickshift84's Avatar
    Join Date
    Jun 2011
    Location
    Rhode Island
    Posts
    127
    Post Thanks / Like
    First I have chassis 16 so an early body. I had a ton of void spaces so had a lot of body work to do. I went through the entire body, sanded everything, primed, and then sanded more. It took forever. In that time I experimented with paint vinyl and plastidip. I hate vinyl and cannot get good results except for on a flat surface. I also did not want to spray automotive paint in the garage attached to my house. So plastidip it was.

    Plastidip will not really cover imperfections. When properly thinned before spraying you can see everything. For example sprayed over a surface roughed up with 80 grit you can see all the lines through it. On a newer body with hopefully less void spaces I would just clean the gelcoat and spray. It would work perfect that way.

  39. #39
    Mechie3's Avatar
    Join Date
    May 2012
    Location
    Indianapolis
    Posts
    5,174
    Post Thanks / Like
    So no benefit over paint except maybe cost?
    Zero Decibel Motorsports
    Check out my new website!
    www.zerodecibelmotorsports.com
    www.facebook.com/zero.decibel.motorsports

  40. #40
    fasterer and furiouser longislandwrx's Avatar
    Join Date
    Aug 2012
    Location
    Long Island
    Posts
    2,540
    Post Thanks / Like
    Blog Entries
    6
    Quote Originally Posted by Stickshift84 View Post
    PS the grimmspeed intercooler will fit.

    pic 6.jpg
    A well stocked beverage fridge is the key to any successful project.

Page 1 of 2 12 LastLast

Posting Permissions

  • You may not post new threads
  • You may not post replies
  • You may not post attachments
  • You may not edit your posts
  •  

Stewart Transport

Visit our community sponsor