Forte's

Visit our community sponsor

Thanks Thanks:  0
Likes Likes:  0
Page 1 of 6 123 ... LastLast
Results 1 to 40 of 227

Thread: Replicaparts.com 818 build thread

  1. #1

    Join Date
    Feb 2011
    Location
    Norton, MA USA earth
    Posts
    3,345
    Post Thanks / Like

    Replicaparts.com 818 build thread

    I know its a little early to start my build thread since I don't have a kit yet. Have no fear, I have pictures to show. My kit will be picked up by me on Friday. My Boss and I are going down in the morning to bring it home.
    My build will not progress as fast as some on here. I still have 4 cars in my shop to finish first. I plan to pick away at this 1 hour a night.
    Here are some pictures of my donor, some parts that I picked up second hand and some stuff from other sources.

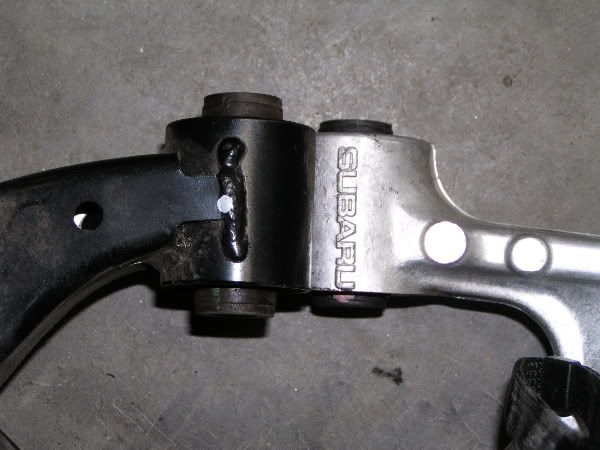
    Donor lower controls arms from Ebay. These will look nice all cleaned up and polished. No one will ever see them again. What a shame.


    Donor pedal box. This will be disassembled and powdercoated black.


    STI brakes from the Sube forum. These things are huge. 12 inch in the back and 13 in the front. The rotors will get cleaned up and powdercoated black. Just the center of course.


    Front and rear calipers.


    Rear rotors all cleaned up.


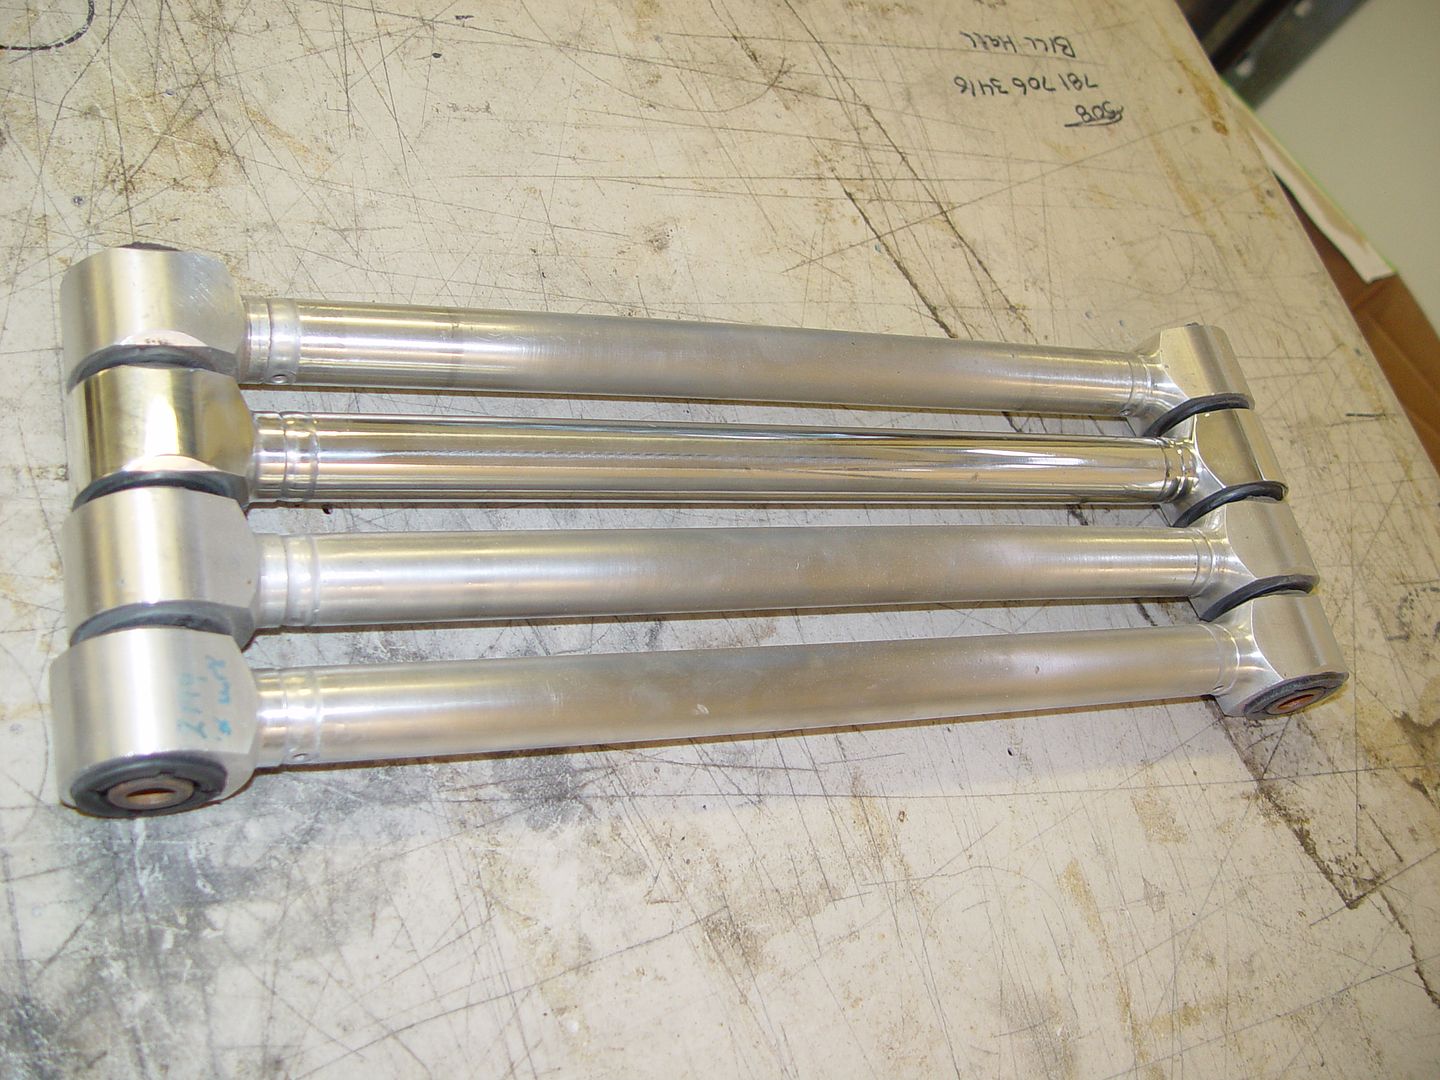
    I bought these 4 links on Ebay. I cleaned and polished one of them. It looks real nice. I plan to do the others soon.


  2. #2

    Join Date
    Feb 2011
    Location
    Norton, MA USA earth
    Posts
    3,345
    Post Thanks / Like
    I bought these rear lower control arms on Ebay. They seem to be decent quality. I don't think they are powder coated though. If they are not, I will strip them and powdercoat them black.


    here is my donor. I forget how many miles are on it. Somewhere around 130,000. I will be using the engine, transmission, some suspension hardware and maybe some of the wiring. Lots of other little stuff as well.


    I am planning on aftermarket seats, FFR steering wheel and I already bought the new Boyd fuel tank for it. Also I have spindles from a 2004 WRX. My plan is to buy a wiring harness from Wayne Presley once I get the harness out and look it over. Not really wanting to tackle the donor harness at this time.

  3. #3
    Senior Member ehansen007's Avatar
    Join Date
    Mar 2011
    Location
    Aliso Viejo, CA
    Posts
    1,625
    Post Thanks / Like
    Nice Mike! Can't wait to see the build!

  4. #4
    Senior Member Frank818's Avatar
    Join Date
    Jun 2013
    Location
    QC, Canada
    Posts
    5,732
    Post Thanks / Like
    What year those STI brakes? 5x114?
    Frank
    818 chassis #181 powered by a '93 VW VR6 Turbo GT3582R
    Go-karted Aug 5, 2016 - Then May 19+21, 2017
    Tracked May 27/July 26, 2017
    Build time before being driveable on Sep 27, 2019: over 6000h
    Build Completed Winter 2021

  5. #5

    Join Date
    Feb 2011
    Location
    Norton, MA USA earth
    Posts
    3,345
    Post Thanks / Like
    Frank. I was told they are from a 2004, but not sure. They bolt right up to my 2004 STI spindles which are 5x100
    Mike

  6. #6
    Senior Member Frank818's Avatar
    Join Date
    Jun 2013
    Location
    QC, Canada
    Posts
    5,732
    Post Thanks / Like
    Ha that's the trick. Not sure how much they are sold for, but maybe it's a very good bargain over say the FFR Willwood upgrade. Of course it depends what one wants.
    Frank
    818 chassis #181 powered by a '93 VW VR6 Turbo GT3582R
    Go-karted Aug 5, 2016 - Then May 19+21, 2017
    Tracked May 27/July 26, 2017
    Build time before being driveable on Sep 27, 2019: over 6000h
    Build Completed Winter 2021

  7. #7
    Senior Member fateo66's Avatar
    Join Date
    Oct 2011
    Location
    Golden, Co
    Posts
    229
    Post Thanks / Like
    Fyi the brembos are from an 08+ sti. The fronts have obviously been redrilled though. Do you uave the rear aeapters? I think the 08+ rears have a different bolt pattern then the 04-07 so you might have a hard time finding the adapter.

    Also those control arms are from a late 90's jdm car. So they are the narrower gc/ wagon width and you will also have to run spacers in the front to bolt them in.

  8. #8
    Senior Member fateo66's Avatar
    Join Date
    Oct 2011
    Location
    Golden, Co
    Posts
    229
    Post Thanks / Like
    Also if you see my kit down the ( Zach F) take a pic for me.

  9. #9

    Join Date
    Feb 2011
    Location
    Norton, MA USA earth
    Posts
    3,345
    Post Thanks / Like
    Zach. The brakes bolted right up to the spindles that I have. Not sure why, but it all worked. I did have to redrill the rotors for the smaller 5x100 pattern. I was told the spindles are from an 04 STI which is the only STI to have that bolt pattern. How can you tell that the arms are not WRX? Where would I need spacers? To move the wheels out?
    Thanks Mike

  10. #10
    818 builder metalmaker12's Avatar
    Join Date
    Mar 2012
    Location
    Exeter R.I
    Posts
    2,834
    Post Thanks / Like
    Blog Entries
    1
    Looks great, if you have any subaru related questions etc let me know

  11. #11
    Senior Member fateo66's Avatar
    Join Date
    Oct 2011
    Location
    Golden, Co
    Posts
    229
    Post Thanks / Like
    So do you have the rears bolted up too if so which hubs are you running? 06-07? or the 04's from your donor? I know the 08+ rear brembos have a different bolt spacing but I don't know how it changed

    FYI STI front calipers will fully bolt up to any 91+ legacy or impreza hub.

    There are several ways to tell if the arms are from a late 90's JDM STI. First off, the shape of the arm at the rear where the transverse link bolts on has a slightly different shape then the GD aluminum arms. I have two sets of GD arms for sale in the for sale section, you can go look at the pictures and see what I'm talking about. next up is the thickness of the aluminum next to the transverse link. On yours you can see that the aluminum is slightly wider than the black steel base. On a GD arm it is thinner than that bar. lastly and most obviously is the subaru cast into the front section of the arm. GD arms do not have this.

    As for the width you'll just have to bolt the arms in the wagon bolt holes on your chassis. And here is a picture to show what I was talking about with the spacers that will be needed for the front bushing.


    Lastly, is one of the steel bars on your arms black and the other silver? All JDM GC arms that I have seen are silver and all GD ones are black. I only ask because I was curious if they have the same geometry
    Last edited by fateo66; 08-29-2013 at 10:57 PM.

  12. #12

    Join Date
    Feb 2011
    Location
    Norton, MA USA earth
    Posts
    3,345
    Post Thanks / Like
    Youre right about the rear brakes. They do not bolt up. It appears I have enough room to drill another set of holes though. I will try drilling and mounting them this morning. Thanks for the heads up on the arms. I am all new to this Subaru stuff. Just glad they will still work for me.
    Mike

  13. #13
    Senior Member fateo66's Avatar
    Join Date
    Oct 2011
    Location
    Golden, Co
    Posts
    229
    Post Thanks / Like
    If you want you can measure the distance from hole to hole and I can look threw my vast archive of info to see if I can figure anything out about an adapter.

  14. #14
    Senior Member Frank818's Avatar
    Join Date
    Jun 2013
    Location
    QC, Canada
    Posts
    5,732
    Post Thanks / Like
    Just so I understand, the front 2004 STI 13" do bolt up fine but the rear 2004 STI 12" don't?
    Frank
    818 chassis #181 powered by a '93 VW VR6 Turbo GT3582R
    Go-karted Aug 5, 2016 - Then May 19+21, 2017
    Tracked May 27/July 26, 2017
    Build time before being driveable on Sep 27, 2019: over 6000h
    Build Completed Winter 2021

  15. #15

    Join Date
    Feb 2011
    Location
    Norton, MA USA earth
    Posts
    3,345
    Post Thanks / Like
    yes

  16. #16
    818 builder metalmaker12's Avatar
    Join Date
    Mar 2012
    Location
    Exeter R.I
    Posts
    2,834
    Post Thanks / Like
    Blog Entries
    1
    Quote Originally Posted by michael everson View Post
    Youre right about the rear brakes. They do not bolt up. It appears I have enough room to drill another set of holes though. I will try drilling and mounting them this morning. Thanks for the heads up on the arms. I am all new to this Subaru stuff. Just glad they will still work for me.
    Mike
    Mike there may be mounts you can get for that configuration, but you can drill them to. I had to get mounts for my 02 spindles-2pot rears, and I think there may be a conversion for your setup. I have to look around

  17. #17

    Join Date
    Feb 2011
    Location
    Norton, MA USA earth
    Posts
    3,345
    Post Thanks / Like
    Picked up my kit Friday morning. There were about 3 others ready to go. All went well. There is a short list of backordered items, but nothing that will hold me up. I wont have much time to work on it anyway. Here are some pictures of the pick up.


    Here is the kit finally in my garage


    Chassis stripped of its body. The body requires a lot of room to store all the panels safely. They too up most of my attic. I suppose they could just be left outside with the white surface up.


    My first load of powder coated parts. I went through all of the boxes to find anything that was uncoated steel. This is most of it. I will have another load going in tomorrow.


    Anyone know what these 3 dog tags are? I am mildly concerned that there is 3 and not 4. I haven't looked them up to see what they do yet.


  18. #18
    Mechie3's Avatar
    Join Date
    May 2012
    Location
    Indianapolis
    Posts
    5,174
    Post Thanks / Like
    Look like the new offset washers to mount the shifter. I think there should be four. I went to mount my shifter and found the spacing was off so ffr made those washers to replace the stock rubber bushings.
    Zero Decibel Motorsports
    Check out my new website!
    www.zerodecibelmotorsports.com
    www.facebook.com/zero.decibel.motorsports

  19. #19
    818 builder metalmaker12's Avatar
    Join Date
    Mar 2012
    Location
    Exeter R.I
    Posts
    2,834
    Post Thanks / Like
    Blog Entries
    1
    Shifter washers, you need 4, I have a couple sets

  20. #20
    Senior Member Bob_n_Cincy's Avatar
    Join Date
    Sep 2012
    Location
    Cincinnati OH
    Posts
    3,903
    Post Thanks / Like
    Hi Michael,
    congrats on your delivery.
    My kit did not have the dog tags.
    I heard something about a change to adjust toe angle of rear wheels. I wonder if it's not part of that change.

    edit : see shifter washers above
    Bob

  21. #21

    Join Date
    Feb 2011
    Location
    Norton, MA USA earth
    Posts
    3,345
    Post Thanks / Like
    I will be doing a lot of jumping around on this build as time permits. One big set back is that the entire hardware package is on back order. So I really cannot bolt anything to the chassis.
    I have all of the aluminum in the front drilled and clecoed. I have not riveted it yet because I may powder coat it black.


    Here are my shocks all assembled.


    I took apart the donor pedal box and sand blasted the whole thing. I then powder coated it all black. Looks a lot better than the slightly rusted unit.


  22. #22
    Senior Member Bob_n_Cincy's Avatar
    Join Date
    Sep 2012
    Location
    Cincinnati OH
    Posts
    3,903
    Post Thanks / Like
    Michael
    Test fit your lower control arms before you final install the front firewall.
    If there is an issue. It will be in the way of grinding the bracket.
    Bob

  23. #23
    Senior Member RM1SepEx's Avatar
    Join Date
    Jul 2011
    Location
    Freeport, ME
    Posts
    3,801
    Post Thanks / Like
    Grind the left LCA rear bushing's shaft flush with the nut to clear the aluminum of the firewall. The right one has no problems, that sheet of the firewall is on the other side of the 1 inch tube.
    Dan

    818S #17 Picked up 8/1/13 First start 11/1/13 Go Kart 3/28/14

  24. #24
    fasterer and furiouser longislandwrx's Avatar
    Join Date
    Aug 2012
    Location
    Long Island
    Posts
    2,540
    Post Thanks / Like
    Blog Entries
    6
    Quote Originally Posted by michael everson View Post
    One big set back is that the entire hardware package is on back order.

    Ouch. Hope they have them before I pick my kit up.

    Pedal box looks great.
    A well stocked beverage fridge is the key to any successful project.

  25. #25

    Join Date
    Feb 2011
    Location
    Norton, MA USA earth
    Posts
    3,345
    Post Thanks / Like
    Well I spent a whole day taking most of my donor apart. This car was so rusty that most of the suspension couldn't even come off. The carcass is gone. I spent some time cleaning and depowering the stock rack. I wish I had taken before photos. This thing was so covered in rust and grime that I wasn't sure I could use it. I took it completely apart and sand blasted all the rusty and dirty parts. I then powdercoated everything. You can see through the powder coating how rough the surface is from the rust. I also removed the seal on the piston. There really is no reason to remove the piston itself. It does nothing once the seal is gone. I couldn't figure out what people were talking about with steering slop once the power assist is removed. Maybe I did something wrong, but mine has no slop. At least not that I can feel with it off the car.
    I filled all the open ports with silicone.


    Last edited by michael everson; 09-08-2013 at 06:30 PM.

  26. #26
    Mechie3's Avatar
    Join Date
    May 2012
    Location
    Indianapolis
    Posts
    5,174
    Post Thanks / Like
    You won't feel the slop by hand unless you put a pair of vice grips on it.
    Zero Decibel Motorsports
    Check out my new website!
    www.zerodecibelmotorsports.com
    www.facebook.com/zero.decibel.motorsports

  27. #27
    Senior Member RM1SepEx's Avatar
    Join Date
    Jul 2011
    Location
    Freeport, ME
    Posts
    3,801
    Post Thanks / Like
    there has to be movement/slop in a PS rack, the relative motion allows fluid ports to open, the pressurized fluid "assists" the rack movement. The WRX rack uses a torsion bar to make it feel less obvious than say a Miata rack that just "flops" 3-4 degrees to open the ports
    Dan

    818S #17 Picked up 8/1/13 First start 11/1/13 Go Kart 3/28/14

  28. #28
    818 builder metalmaker12's Avatar
    Join Date
    Mar 2012
    Location
    Exeter R.I
    Posts
    2,834
    Post Thanks / Like
    Blog Entries
    1
    Looking good mike, I am going up yo FFR Thursday of your around.

  29. #29

    Join Date
    Feb 2011
    Location
    Norton, MA USA earth
    Posts
    3,345
    Post Thanks / Like
    Sorry. at work all day. What time were you planning on going up?
    Mike

  30. #30
    fasterer and furiouser longislandwrx's Avatar
    Join Date
    Aug 2012
    Location
    Long Island
    Posts
    2,540
    Post Thanks / Like
    Blog Entries
    6
    maybe the splines on your rack rusted together. BONUS.
    A well stocked beverage fridge is the key to any successful project.

  31. #31
    Member 508wrx's Avatar
    Join Date
    Nov 2012
    Location
    Taunton, Ma
    Posts
    78
    Post Thanks / Like
    Mike, I might have to bring a bunch of stuff by to sand blast & powder coat. I'm kinda jealous how good some of your stuff looks compared to mine. I would be happy to compensate you for allowing me to use it.

  32. #32
    East Coast Speed Machines Erik W. Treves's Avatar
    Join Date
    Feb 2011
    Location
    Huntsville, Al
    Posts
    2,109
    Post Thanks / Like
    Mike, I drove mine up and down the street a couple weeks ago, and did not notice any slop at all..or nothing stuck out at me, like, "wow that steering stinks", felt much like my cobra....
    FFR 1879, Blown DSS 306,REDLINE management, VeryCoolParts Tuned 460RWHP

    FFR 818S, The Flash, Chassis #5, 2.0L, LSD, Electromotive TEC-S, VCP Tuned, 278RWHP 265 RWTQ

    FFR 6651, Green Lantern, 408W Crate, Hellion 66mm Turbo, JGS Waste gate / Blowoff valve, Tec-GT management, VCP Tuned, 575 RWHP, 690 RWTQ

    FFR 8335, Black Mamba, 289 FIA CSX 2001 tribute car, 347, 48 IDA webers, VCP Tuned, 311 RWHP 386 RWTQ, 3-link, Trigo's

    FFR 0004, Gen 3 , Hawk Coupe, Coyote twin turbo, 683 RWHP 559 RWTQ, IRS, VCP Tuned. "not too shabby"

    US ARMY Maintenance Test Pilot (CW4 Retired)

  33. #33

    Join Date
    Feb 2011
    Location
    Norton, MA USA earth
    Posts
    3,345
    Post Thanks / Like
    Erik. Are you wishing for Power steering?
    Mike

  34. #34
    East Coast Speed Machines Erik W. Treves's Avatar
    Join Date
    Feb 2011
    Location
    Huntsville, Al
    Posts
    2,109
    Post Thanks / Like
    not at all! there isn't any weight on the front of this thing and I even have really wide front tires.... my biggest issue..and people are starting to see this... the tires are contacting the frame or aluminum prior to full lock...so turning radius is not fantastic...I am going to clearance the aluminum at some point.
    FFR 1879, Blown DSS 306,REDLINE management, VeryCoolParts Tuned 460RWHP

    FFR 818S, The Flash, Chassis #5, 2.0L, LSD, Electromotive TEC-S, VCP Tuned, 278RWHP 265 RWTQ

    FFR 6651, Green Lantern, 408W Crate, Hellion 66mm Turbo, JGS Waste gate / Blowoff valve, Tec-GT management, VCP Tuned, 575 RWHP, 690 RWTQ

    FFR 8335, Black Mamba, 289 FIA CSX 2001 tribute car, 347, 48 IDA webers, VCP Tuned, 311 RWHP 386 RWTQ, 3-link, Trigo's

    FFR 0004, Gen 3 , Hawk Coupe, Coyote twin turbo, 683 RWHP 559 RWTQ, IRS, VCP Tuned. "not too shabby"

    US ARMY Maintenance Test Pilot (CW4 Retired)

  35. #35
    PLATNUM Supporting Member
    wallace18's Avatar
    Join Date
    Apr 2012
    Location
    Trenton, Florida
    Posts
    5,382
    Post Thanks / Like
    Quote Originally Posted by Erik W. Treves View Post
    not at all! there isn't any weight on the front of this thing and I even have really wide front tires.... my biggest issue..and people are starting to see this... the tires are contacting the frame or aluminum prior to full lock...so turning radius is not fantastic...I am going to clearance the aluminum at some point.
    It is good to know I am not the only one having this issue. I would like a fix though.

  36. #36
    Senior Member wleehendrick's Avatar
    Join Date
    Jul 2012
    Location
    Encinitas, CA
    Posts
    1,653
    Post Thanks / Like
    Blog Entries
    2
    Quote Originally Posted by Erik W. Treves View Post
    ...so turning radius is not fantastic...
    Quote Originally Posted by wallace18 View Post
    It is good to know I am not the only one having this issue. I would like a fix though.
    There's always another way to tighten the turning radius:


  37. #37
    Senior Member ehansen007's Avatar
    Join Date
    Mar 2011
    Location
    Aliso Viejo, CA
    Posts
    1,625
    Post Thanks / Like
    I like that way better!

  38. #38
    East Coast Speed Machines Erik W. Treves's Avatar
    Join Date
    Feb 2011
    Location
    Huntsville, Al
    Posts
    2,109
    Post Thanks / Like
    Quote Originally Posted by wallace18 View Post
    It is good to know I am not the only one having this issue. I would like a fix though.
    Let me first apologize to Mike, not trying to hijack your thread.....one and done here....

    you forget...I have the same problem but I was quite clear...I did not follow the recommended FFR tire size selection...I will clearance the aluminum and make it work...I am not lacking much....again...keep the alarms off...follow Jim's recommendations and you will be fine...I have said up front I am not stock so to group me with the norm or a guy that "follows directions" is an incorrect assumption..I like exploring the edge..sorry for being so blunt...
    FFR 1879, Blown DSS 306,REDLINE management, VeryCoolParts Tuned 460RWHP

    FFR 818S, The Flash, Chassis #5, 2.0L, LSD, Electromotive TEC-S, VCP Tuned, 278RWHP 265 RWTQ

    FFR 6651, Green Lantern, 408W Crate, Hellion 66mm Turbo, JGS Waste gate / Blowoff valve, Tec-GT management, VCP Tuned, 575 RWHP, 690 RWTQ

    FFR 8335, Black Mamba, 289 FIA CSX 2001 tribute car, 347, 48 IDA webers, VCP Tuned, 311 RWHP 386 RWTQ, 3-link, Trigo's

    FFR 0004, Gen 3 , Hawk Coupe, Coyote twin turbo, 683 RWHP 559 RWTQ, IRS, VCP Tuned. "not too shabby"

    US ARMY Maintenance Test Pilot (CW4 Retired)

  39. #39

    Join Date
    Feb 2011
    Location
    Norton, MA USA earth
    Posts
    3,345
    Post Thanks / Like
    Found a little time tonight to do some more work. I decided to powder coat all the aluminum that is visible up front. I also powder coated all the rivets so that they blend right in. What do you think?


    I temporarily mounted the pedal box and master cylinder. I noticed that once you drill the holes through the pedal box for the master cylinder, there is no room for the nuts. I decided instead to just tap the holes 3/8-16 and bolt it to the front of the frame. Not sure if this is an issue on all of these or just mine. Here is a close-up of the offending area.


  40. #40
    818 builder metalmaker12's Avatar
    Join Date
    Mar 2012
    Location
    Exeter R.I
    Posts
    2,834
    Post Thanks / Like
    Blog Entries
    1
    Yea I had to use 1/4 inch nuts that just fit, I was thinking of taping it also, everyone has had the same issue, I am going to try to shoot up your way if I can after FFR

    I also have a tire fitment issue, bit I am going with different rims and tires altogether soon, also getting some other goodies

Page 1 of 6 123 ... LastLast

Posting Permissions

  • You may not post new threads
  • You may not post replies
  • You may not post attachments
  • You may not edit your posts
  •  

Brown County Customs

Visit our community sponsor