BluePrint Engines

Visit our community sponsor

Thanks Thanks:  5
Likes Likes:  4
Page 4 of 6 FirstFirst ... 23456 LastLast
Results 121 to 160 of 209

Thread: Wiring Guide: 06 WRX Sedan with Auto AC/HVAC

  1. #121
    Senior Member RM1SepEx's Avatar
    Join Date
    Jul 2011
    Location
    Freeport, ME
    Posts
    3,801
    Post Thanks / Like
    grab a manual ecu harness? many have went the Route of Wayne and Erik.... plenty available, pretty much any year
    Dan

    818S #17 Picked up 8/1/13 First start 11/1/13 Go Kart 3/28/14

  2. #122
    Senior Member Bob_n_Cincy's Avatar
    Join Date
    Sep 2012
    Location
    Cincinnati OH
    Posts
    3,903
    Post Thanks / Like
    Quote Originally Posted by RM1SepEx View Post
    grab a manual ecu harness? many have went the Route of Wayne and Erik.... plenty available, pretty much any year
    It would have to be an 04 FXT or 04 STI manual harness w/avcs & DBW to match every thing I have. I have to much effort into the harness I have to go that route. Thanks, Bob

  3. #123
    nkw8181's Avatar
    Join Date
    Sep 2013
    Location
    Dallas, TX
    Posts
    762
    Post Thanks / Like
    hey I got some connectors from Radio Shack and the pins may slide in depending on which you are looking at. trying to be helpful.
    Nolan
    65 coupe Gen 3 "Phoenix" build
    http://thefactoryfiveforum.com/showt...032#post297032

    818 s (with r windscreen ) 350 rwhp. Registered and street legal (SOLD)

  4. #124
    Senior Member Bob_n_Cincy's Avatar
    Join Date
    Sep 2012
    Location
    Cincinnati OH
    Posts
    3,903
    Post Thanks / Like
    Quote Originally Posted by nkw8181 View Post
    hey I got some connectors from Radio Shack and the pins may slide in depending on which you are looking at. trying to be helpful.
    Hi Nolan,
    I'm looking for a pin remover the connector back on post 115.
    I suspect the pins you got a radio shack are for Molex or Amp connectors.
    I have no clue of the manufacture of the ECU connector is, but I'm pretty sure it is not on of those.
    Thanks for your help.
    Bob

  5. #125
    Senior Member Xusia's Avatar
    Join Date
    Oct 2011
    Location
    Eugene, OR, USA
    Posts
    2,343
    Post Thanks / Like
    Quote Originally Posted by Bob_n_Cincy View Post
    Hi Brian, There are open holes that need wires, I can't get any of the unneeded pins out.
    The problem hole is the one that tells the ECU that the transmission is a manual. That wire is missing in my automatic harness.
    Bob
    Is it also missing on the ECU side, or is the connector soldered onto the ECU board?

  6. #126
    Senior Member Bob_n_Cincy's Avatar
    Join Date
    Sep 2012
    Location
    Cincinnati OH
    Posts
    3,903
    Post Thanks / Like
    Quote Originally Posted by Xusia View Post
    Is it also missing on the ECU side, or is the connector soldered onto the ECU board?
    All the pins are there on the ECU side.
    I could bring a wire out of the side of the ecu box.
    Bob

  7. #127
    Senior Member Xusia's Avatar
    Join Date
    Oct 2011
    Location
    Eugene, OR, USA
    Posts
    2,343
    Post Thanks / Like
    Given the situation, that's what I would do.

  8. #128
    iWire's Avatar
    Join Date
    Jan 2014
    Location
    Lake Forest, CA
    Posts
    287
    Post Thanks / Like
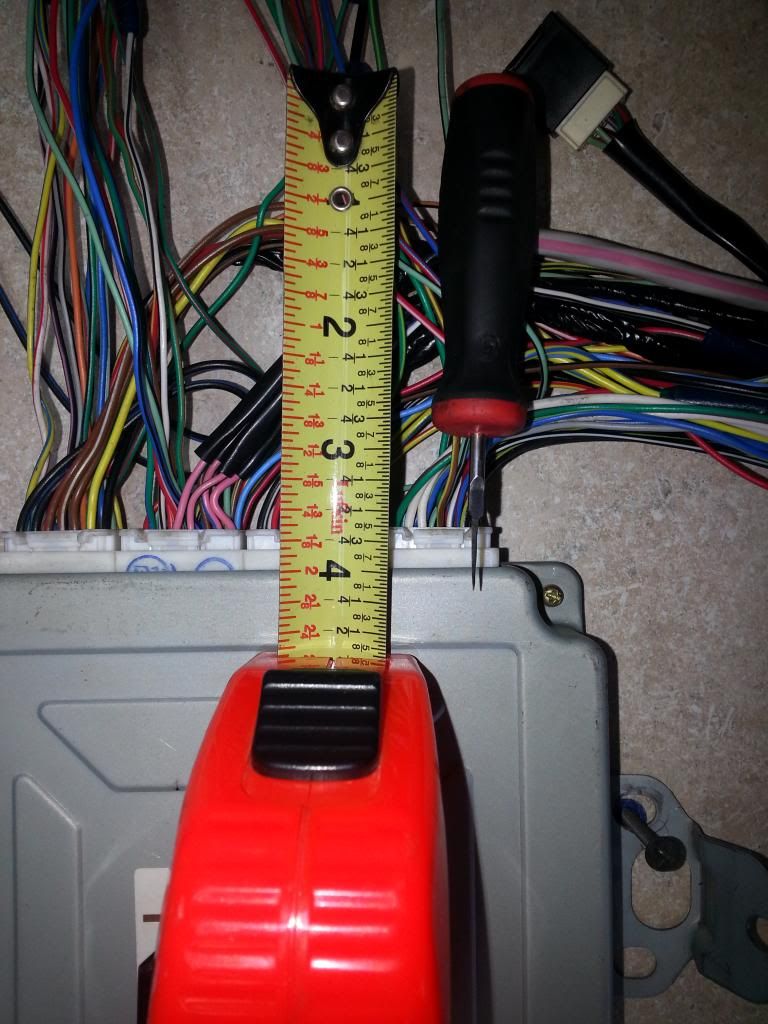
    Pulling the pins out of these is pretty much impossible without the correct tool. You need to find a basic pin removal tool that is flat. Then take a bench grinder/dremel etc to it until you get the width/thickness small enough to fit in the lower slot of the plug(about an inch of depth should be enough). If you get it right, you just push it all the way in and it'll unlock and the pin should slide out. I had the actual Subaru tool, it worked, but was flimsy and broke pretty quickly. The hand made one has served me better.
    Last edited by iWire; 03-30-2014 at 08:07 PM.

  9. #129
    Senior Member Bob_n_Cincy's Avatar
    Join Date
    Sep 2012
    Location
    Cincinnati OH
    Posts
    3,903
    Post Thanks / Like
    Quote Originally Posted by iWire View Post
    Pulling the pins out of these is pretty much impossible without the correct tool. You need to find a basic pin removal tool that is flat. Then take a bench grinder/dremel etc to it until you get the width/thickness small enough to fit in the lower slot of the plug(about an inch of depth should be enough). If you get it right, you just push it all the way in and it'll unlock and the pin should slide out. I had the actual Subaru tool, it worked, but was flimsy and broke pretty quickly. The hand made one has served me better.
    Thanks IWire
    I had almost gave up on finding a solution to this.

    I'm looking at Mcmaster part
    http://www.mcmaster.com/#4253k14/=rbqw0j

    it is 20 x 40 mils
    It might be to soft but it worth a try.
    Can you measure your tool to see if this is the right size.
    Bob
    Last edited by Bob_n_Cincy; 03-31-2014 at 03:43 PM.

  10. #130
    iWire's Avatar
    Join Date
    Jan 2014
    Location
    Lake Forest, CA
    Posts
    287
    Post Thanks / Like
    Here is a picture, I don't have calipers to get a real measurement. I think that would be too soft. You just need a tool that is a decent metal you can modify it without it breaking.


  11. #131
    Senior Member Goldwing's Avatar
    Join Date
    Nov 2012
    Location
    Medina, OH
    Posts
    744
    Post Thanks / Like
    I think this is R26 (RH taillight):
    image.jpg

    I noticed it was eerily similar to R24. See PM.

    Great write up.
    Last edited by Goldwing; 04-13-2014 at 01:46 PM.
    Rich

    818S in progress. 2007 WRX sedan donor.
    Powered up: 7-8-14, First Start: 7-20-14, Go kart: 8-19-14

  12. #132
    Senior Member Goldwing's Avatar
    Join Date
    Nov 2012
    Location
    Medina, OH
    Posts
    744
    Post Thanks / Like
    I have an '07 donor (sedan, man A/C, wrx, 5spd, no sunroof or heated seats) and can say that your thread was entirely usable with very few differences. So similar it doesn't warrant a separate thread. I guess that's kind of predictable with the 06-07 similarities. Here are a few differences or additions to Mechie3's stellar write up.

    B8 (wiper motor) is gray in 07, otherwise the same with the same color wires.

    I didn't find the black multi pin connector between the front and bulkhead harnesses in '07 which could be an option difference with more of a base model car in my case.

    One of the engine harness connectors is larger in '07, but self-evident.

    Additions I may have missed above:
    B18 upstream O2
    image.jpg

    B127 Wastegate Control Solenoid
    image.jpg

    B3 Mass Airflow Sensor
    image.jpg

    F127 Air Pump (emissions)
    image.jpg

    I couldn't figure out what this was on the branch with the engine harnesses and most of the above.
    image.jpg
    image.jpg
    Still working on it.

    Thank you again Mechie3 for the huge service to us in taking the time to put this all in the forum. It is a tremendous service to other builders. In short, you rock!

    EDIT: 7-15-14 That last connector is B5 for the daytime running light resistor.
    Last edited by Goldwing; 07-15-2014 at 03:10 PM.
    Rich

    818S in progress. 2007 WRX sedan donor.
    Powered up: 7-8-14, First Start: 7-20-14, Go kart: 8-19-14

  13. #133
    Mechie3's Avatar
    Join Date
    May 2012
    Location
    Indianapolis
    Posts
    5,174
    Post Thanks / Like
    Thanks for the additions. I didn't have some of those (deleted a long time ago) so it's helpful to have those.

    The 07 harness is a bit different in the engine bay. Where the 06 had two connectors the 07 had 1 massive connector.
    Zero Decibel Motorsports
    Check out my new website!
    www.zerodecibelmotorsports.com
    www.facebook.com/zero.decibel.motorsports

  14. #134
    Senior Member AZPete's Avatar
    Join Date
    Feb 2011
    Location
    Scottsdale, AZ
    Posts
    2,374
    Post Thanks / Like
    Rich, I believe the terminal you asked about connects to a front ABS sensor. The left front ABS sensor has black & white wires; the right sensor has blue & green wires.

    Thanks to Mechie3 I have identified all terminals except this white one.
    white 8 pole.jpg

    And, my donor is 2006 WRX Sedan with MANUAL A/C so I found three terminals that are not in Mechie3's photos of the auto A/C:

    B86 blower.jpg
    B88 to AC.jpg
    B168 Mode Control Panel.jpg

    Again, thank you Mechie3. Thank you for all your work posting photos of the terminals !!
    818S/C : Chassis #25 with 06 WRX 2.5 turbo, ABS, cruise, PS, A/C, Apple CarPlay, rear camera, power windows & locks, leather & other complexities. Sold 10/19 with 5,800 miles.
    Mk3 Roadster #6228 4.6L, T45, IRS, PS, PB, ABS, Cruise, Koni's, 17" Halibrands, red w/ silver - 9K miles then sold @ Barrett-Jackson Jan 2011 (got back cash spent).

  15. #135
    Senior Member Goldwing's Avatar
    Join Date
    Nov 2012
    Location
    Medina, OH
    Posts
    744
    Post Thanks / Like
    Pete , that little guy doesn't even look familiar. I'll watch out for it. My mystery connector is larger than the ABS connectors. It's more the size if the alternator plug. I gave the wires a break to get my firewall sorted. Back at the wires soon.
    Rich

    818S in progress. 2007 WRX sedan donor.
    Powered up: 7-8-14, First Start: 7-20-14, Go kart: 8-19-14

  16. #136
    Senior Member
    Join Date
    Mar 2011
    Location
    Houston
    Posts
    477
    Post Thanks / Like
    Impact Sensor B423 I believe.


    Thanks to Mechie3 I have identified all terminals except this white one.
    Click image for larger version.

    Name: white 8 pole.jpg

    ID: 27992

  17. #137
    Mechie3's Avatar
    Join Date
    May 2012
    Location
    Indianapolis
    Posts
    5,174
    Post Thanks / Like
    I have the impact sensor so I could verify that tonight.
    Zero Decibel Motorsports
    Check out my new website!
    www.zerodecibelmotorsports.com
    www.facebook.com/zero.decibel.motorsports

  18. #138
    Senior Member AZPete's Avatar
    Join Date
    Feb 2011
    Location
    Scottsdale, AZ
    Posts
    2,374
    Post Thanks / Like
    Detective Freds solved the mystery! The white plug with 8 poles & 6 wires I asked about in Post #134 above is B423. On page 185 of the wiring diagram B423 is listed as 5 pole, which is an error, so I didn't identify it. Now I see that B423 is shown on page 170 as 8 pole with 6 wires, which is correct. I even confirmed the colors of the wires to confirm. It connects to the security system impact sensor so I don't need it but at least the mystery is solved!
    818S/C : Chassis #25 with 06 WRX 2.5 turbo, ABS, cruise, PS, A/C, Apple CarPlay, rear camera, power windows & locks, leather & other complexities. Sold 10/19 with 5,800 miles.
    Mk3 Roadster #6228 4.6L, T45, IRS, PS, PB, ABS, Cruise, Koni's, 17" Halibrands, red w/ silver - 9K miles then sold @ Barrett-Jackson Jan 2011 (got back cash spent).

  19. #139
    Senior Member Goldwing's Avatar
    Join Date
    Nov 2012
    Location
    Medina, OH
    Posts
    744
    Post Thanks / Like
    Looking over the fuel tank harness, I never labeled them after going through the guide, so there's opportunity to identify a few here we have to work with while identifying wires. Many aren't used directly, but can help in identifying wires to wire the fuel level sender (need to grab a wire from the fuel pump plug and the sub level sender since the 818 uses one sender and the wrx uses two added resistance sensors). Anyway, a few that I thought could be helpful:

    R58 - Fuel pump Assembly (Black Redwhite Blueblack Blackyellow Blackwhite Blue)
    image.jpg

    R59 - Sub fuel level sender (Brownwhite Blue)
    image.jpg

    R47 - Fuel tank pressure sensor (Red Redyellow Greenorange)
    image.jpg

    R68 - Pressure control solenoid valve (YG)
    image.jpg
    Rich

    818S in progress. 2007 WRX sedan donor.
    Powered up: 7-8-14, First Start: 7-20-14, Go kart: 8-19-14

  20. #140
    Senior Member C.Plavan's Avatar
    Join Date
    Mar 2011
    Location
    Clovis, Ca
    Posts
    2,225
    Post Thanks / Like
    Anyone know what there two connectors are for near the ALT?


    And this one near the turbo (I think its just a ground, but to what?)
    Thanks- Chad
    818R-SOLD!!!- Go Karted 7/20/14/ Officially raced NASA ST2- 2/28/15
    2016 Elan NP01 Prototype Racecar Chassis #20
    1969 Porsche 911ST Vintage Race Car
    1972 Porsche 911T (#'s matching undergoing nut & bolt resto in my garage)

  21. #141
    Senior Member Bob_n_Cincy's Avatar
    Join Date
    Sep 2012
    Location
    Cincinnati OH
    Posts
    3,903
    Post Thanks / Like
    Quote Originally Posted by C.Plavan View Post
    Anyone know what there two connectors are for near the ALT?

    Chad
    Not sure, but based on the location,
    The single looks like power steering pressure switch. Check to see if Red/Yellow wire.
    The 2 pin looks like purge control solenoid valve, Check for Red wire and green/yellow wire.
    Bob

  22. #142
    Mechie3's Avatar
    Join Date
    May 2012
    Location
    Indianapolis
    Posts
    5,174
    Post Thanks / Like
    The one in the first picture is indeed the powersteering. I don't quite recognize the other one.
    Zero Decibel Motorsports
    Check out my new website!
    www.zerodecibelmotorsports.com
    www.facebook.com/zero.decibel.motorsports

  23. #143
    Senior Member
    Join Date
    Jan 2012
    Posts
    1,112
    Post Thanks / Like
    It's for the purge solenoid. The 2 wire one by proximity and I was just working on that system today.

  24. #144
    Senior Member C.Plavan's Avatar
    Join Date
    Mar 2011
    Location
    Clovis, Ca
    Posts
    2,225
    Post Thanks / Like
    Exactly what they are. I should of remembered the purge valve connector.....I uninstalled all that stuff 3 weeks ago- haha.
    Thanks guys.
    Thanks- Chad
    818R-SOLD!!!- Go Karted 7/20/14/ Officially raced NASA ST2- 2/28/15
    2016 Elan NP01 Prototype Racecar Chassis #20
    1969 Porsche 911ST Vintage Race Car
    1972 Porsche 911T (#'s matching undergoing nut & bolt resto in my garage)

  25. #145
    Mechie3's Avatar
    Join Date
    May 2012
    Location
    Indianapolis
    Posts
    5,174
    Post Thanks / Like
    I thought the purge solenoid had a different connector. I do remember the boost solenoid having a ground lug bolted to the top of it. I can't find any pictures though and mine isn't stock.
    Zero Decibel Motorsports
    Check out my new website!
    www.zerodecibelmotorsports.com
    www.facebook.com/zero.decibel.motorsports

  26. #146
    Mechie3's Avatar
    Join Date
    May 2012
    Location
    Indianapolis
    Posts
    5,174
    Post Thanks / Like
    I found my spare stock boost solenoid. It has a simlar black wire and single connector on it. Not quite the same.

    Zero Decibel Motorsports
    Check out my new website!
    www.zerodecibelmotorsports.com
    www.facebook.com/zero.decibel.motorsports

  27. #147
    Senior Member Triathletedave's Avatar
    Join Date
    Sep 2012
    Location
    Calgary
    Posts
    232
    Post Thanks / Like

    Fuel sub level plug

    Quote Originally Posted by Goldwing View Post
    Looking over the fuel tank harness, I never labeled them after going through the guide, so there's opportunity to identify a few here we have to work with while identifying wires. Many aren't used directly, but can help in identifying wires to wire the fuel level sender (need to grab a wire from the fuel pump plug and the sub level sender since the 818 uses one sender and the wrx uses two added resistance sensors). Anyway, a few that I thought could be helpful:

    R58 - Fuel pump Assembly (Black Redwhite Blueblack Blackyellow Blackwhite Blue)
    image.jpg

    R59 - Sub fuel level sender (Brownwhite Blue)
    image.jpg

    R47 - Fuel tank pressure sensor (Red Redyellow Greenorange)
    image.jpg

    R68 - Pressure control solenoid valve (YG)
    image.jpg

    Can anyone tell me what to do with R59? I don't need two fuel level sensors, but if I delete this then the main fuel level circuit is also broken. Do I simply short these 2 wires together and use the main wires on R58 for the FFR fuel level sensor unit?

    Edit: read the previous post again. To clarify, I use 1 wire from R58, and 1 wire from R59, and delete the wire that connects R58 to R59?
    Last edited by Triathletedave; 08-25-2014 at 09:00 AM.
    TriguyDave
    818 noobie builder
    First start: Sept 28, 2014
    Go-carted: Oct 4, 2014
    Registered and Street legal Sept 30, 2015
    Calgary, Alberta

  28. #148
    Member
    Join Date
    Nov 2013
    Location
    Groton MA
    Posts
    38
    Post Thanks / Like
    I am doing the harness now.
    What can't I deleted from the 4 doors?
    I know I will have to short the door sensors but what else do I need to keep?
    I need to get rid of a lot of wires so I can make sense of this nightmare.

  29. #149
    Mechie3's Avatar
    Join Date
    May 2012
    Location
    Indianapolis
    Posts
    5,174
    Post Thanks / Like
    I don't remember if you short the doors or just delete the door chimes. I the no they might be normally open. Otherwise delete whatever you want if you don't want power mirrors or power locks.
    Zero Decibel Motorsports
    Check out my new website!
    www.zerodecibelmotorsports.com
    www.facebook.com/zero.decibel.motorsports

  30. #150
    Senior Member
    Join Date
    Aug 2014
    Posts
    165
    Post Thanks / Like
    Hey Mechie, Did you ever confirm whether you could delete the DRL (magic black box)? And the various light relays? (I am thinking that anything light related should be kept?) I am assuming that you can delete the blower motor relay?

    Thanks for the help!

  31. #151
    Senior Member Frank818's Avatar
    Join Date
    Jun 2013
    Location
    QC, Canada
    Posts
    5,732
    Post Thanks / Like
    Quote Originally Posted by Mechie3 View Post
    Frank 818 would be proud of me though.
    Ha!! Just saw this!
    Of course I am!! Keep up the great work! I know you are far from home right now, but you'll be back to continue that work.


    What were we discussing back then?
    Frank
    818 chassis #181 powered by a '93 VW VR6 Turbo GT3582R
    Go-karted Aug 5, 2016 - Then May 19+21, 2017
    Tracked May 27/July 26, 2017
    Build time before being driveable on Sep 27, 2019: over 6000h
    Build Completed Winter 2021

  32. #152
    Mechie3's Avatar
    Join Date
    May 2012
    Location
    Indianapolis
    Posts
    5,174
    Post Thanks / Like
    Hello iblackwe,
    I haven't touched the wiring since I started the car way back when. I had enough of it so moved onto the body. Once that is complete I'll finish up the wiring.

    Frank...I have no idea. HAHAHA!
    Zero Decibel Motorsports
    Check out my new website!
    www.zerodecibelmotorsports.com
    www.facebook.com/zero.decibel.motorsports

  33. #153
    Senior Member
    Join Date
    Jan 2012
    Posts
    1,112
    Post Thanks / Like
    You can delete the blower motor relay for sure, if you have any questions you should call Brian at iWire, he can answer all of your questions.

  34. #154
    Senior Member TrickyPete's Avatar
    Join Date
    Feb 2015
    Location
    Lewiston ME
    Posts
    117
    Post Thanks / Like
    I'm starting on the wire harness and just had a question. I'm almost certain but I would feel a lot better with another opinion. The wires wrapped in mustard yellow tape are all part of the airbag system correct? These all have bright yellow connectors.

  35. #155
    Mechie3's Avatar
    Join Date
    May 2012
    Location
    Indianapolis
    Posts
    5,174
    Post Thanks / Like
    Correct. The yellow is all airbags though be careful. I thought I remember a shared ground or two so just trace it to look for them.
    Zero Decibel Motorsports
    Check out my new website!
    www.zerodecibelmotorsports.com
    www.facebook.com/zero.decibel.motorsports

  36. #156
    Senior Member TrickyPete's Avatar
    Join Date
    Feb 2015
    Location
    Lewiston ME
    Posts
    117
    Post Thanks / Like
    Quote Originally Posted by Mechie3 View Post
    Correct. The yellow is all airbags though be careful. I thought I remember a shared ground or two so just trace it to look for them.
    Thanks. I am not confident in my wiring abilities at all. But.... I'm going to give it a shot. I pulled all the tape off everything and used zipties loosely to hold it together in its original shape to make it easier to cut stuff out.

  37. #157
    Senior Member TouchStone's Avatar
    Join Date
    Sep 2014
    Location
    Dallas, TX
    Posts
    512
    Post Thanks / Like
    Blog Entries
    1
    Quote Originally Posted by Mechie3 View Post
    Wiring Delete Guide:

    https://drive.google.com/file/d/0B3e...it?usp=sharing
    Last updated 12-31-2013


    If you find errors, fixes, or info to add please let me know
    Can you send me the google spread sheet or excel file of this document. I want to integrate pictures directly into this document, and make notes for a 2003 WRX Wagon.
    818S Chassis #288 2.5L 323hp
    Ordered: 9/19/14 Received Kit: 11/2/14 First Start: 5/31/15 First Drive: 6/7/15 Registered: 3/10/2016 Completed: 2/10/2017
    Status: Complete Build Thread Sold 9/22/2017
    joshuajach.com

  38. #158
    Senior Member suttonb3's Avatar
    Join Date
    Jan 2014
    Location
    Tampa, Florida
    Posts
    106
    Post Thanks / Like
    IMG_20150508_143232.jpg
    Anybody know what this is and what to do with it?
    Kit #295 Picked up 11/26/2014!

  39. #159
    Senior Member matteo92065's Avatar
    Join Date
    Feb 2014
    Location
    Ramona, CA
    Posts
    417
    Post Thanks / Like
    Quote Originally Posted by suttonb3 View Post
    IMG_20150508_143232.jpg
    Anybody know what this is and what to do with it?
    Its the daytime headlight dimmer. You can look it up in the FSM as connector "B5", "Daytime Running Light Resistor".
    Funny thing is you can find them on Ebay listed as Fuel injection components.

    Edit: What to do with it? I kept it, and installed it. Or you can jumper the wires and your DRLs will not be dimmer during the day.
    It will not work unless you keep the "Daytime Running Light Control Module" (B96) that controls the "Daytime Running Light Relay" (B102).
    Last edited by matteo92065; 05-08-2015 at 01:48 PM.

  40. #160
    Senior Member TouchStone's Avatar
    Join Date
    Sep 2014
    Location
    Dallas, TX
    Posts
    512
    Post Thanks / Like
    Blog Entries
    1
    That is the DRL (Daytime Running Lights) resistor. It is used to run your lights at low power at all times. If you want it keep it, if not then you can also delete the DRL module.
    818S Chassis #288 2.5L 323hp
    Ordered: 9/19/14 Received Kit: 11/2/14 First Start: 5/31/15 First Drive: 6/7/15 Registered: 3/10/2016 Completed: 2/10/2017
    Status: Complete Build Thread Sold 9/22/2017
    joshuajach.com

Page 4 of 6 FirstFirst ... 23456 LastLast

Posting Permissions

  • You may not post new threads
  • You may not post replies
  • You may not post attachments
  • You may not edit your posts
  •  

Breeze

Visit our community sponsor