FormaCars

Visit our community sponsor

Thanks Thanks:  4
Likes Likes:  8
Page 4 of 8 FirstFirst ... 23456 ... LastLast
Results 121 to 160 of 297

Thread: The 'Savage' build thread

  1. #121
    Senior Member Tamra's Avatar
    Join Date
    Apr 2014
    Location
    Shelton, CT
    Posts
    1,011
    Post Thanks / Like
    I love the ipad. Are you going to have it set up with any data logging apps? Or what is your plan for it?

  2. #122
    K3LAG's Avatar
    Join Date
    May 2013
    Location
    Greensburg, PA
    Posts
    552
    Post Thanks / Like
    It will be used for Audio, Navigation (Navigon), and OBD II monitoring/logging/etc (Dash Command) plus anything else I might want to use it for. It will connect to an iStreamer D/A which will in turn be connected to an amp. I will probably put a AudioControl Overdrive + between the iStreamer and Amp. I am using a PLXDevices Kiwi for the OBD II connection.

    The iPad mount is from Fifield Fabrications.

    I did the final sanding last night. It just needs a final coat of primer then it will sit until we are ready for paint. The dash will be painted orange to match the other trim on the car. Unfortunately I dropped my orbital sander on my right middle toe and broke the toe. Will be off my feet for a couple of days.

    Power tools and bare feet not smart.

    Larry
    Last edited by K3LAG; 07-22-2014 at 10:14 AM.

  3. #123
    Senior Member wleehendrick's Avatar
    Join Date
    Jul 2012
    Location
    Encinitas, CA
    Posts
    1,653
    Post Thanks / Like
    Blog Entries
    2
    Quote Originally Posted by K3LAG View Post
    Unfortunately I dropped my orbital sander on my right middle toe and broke the toe. Will be off my feet for a couple of days.

    Power tools and bare feet not smart.
    Bummer, Larry! Hope you heal quick.

    When not at work, I pretty much live in shorts and OluKai sandals. I try to change to jeans and closed toed shoes when doing auto work, but not always. This will be a reminder to me.

  4. #124
    Member Westview's Avatar
    Join Date
    Jan 2013
    Location
    Columbia, Maryland
    Posts
    78
    Post Thanks / Like
    Quote Originally Posted by K3LAG View Post
    Unfortunately I dropped my orbital sander on my right middle toe and broke the toe. Will be off my feet for a couple of days.

    Power tools and bare feet not smart.

    Larry
    Och!! Hope if heals quick! The dash looks awesome, can't wait to see it person.

  5. #125
    Mechie3's Avatar
    Join Date
    May 2012
    Location
    Indianapolis
    Posts
    5,174
    Post Thanks / Like
    I've done metal working at home in sandals. Usually end up with hot chips on my toes and then I say to myself "well, that was dumb" and I go inside and put on shoes. (sometimes...).
    Zero Decibel Motorsports
    Check out my new website!
    www.zerodecibelmotorsports.com
    www.facebook.com/zero.decibel.motorsports

  6. #126
    K3LAG's Avatar
    Join Date
    May 2013
    Location
    Greensburg, PA
    Posts
    552
    Post Thanks / Like
    Here it is, ready for paint. Also a couple of pictures showing the Dash Command and Navigon screens.

    IMG_0579.jpg IMG_0585.jpg IMG_0583.jpg

    Will see the podiatrist about the toe on Monday. It's feeling better already, but being careful not to do anything to make it worse.

    Larry

  7. #127
    K3LAG's Avatar
    Join Date
    May 2013
    Location
    Greensburg, PA
    Posts
    552
    Post Thanks / Like

    Major milestone reached!

    This evening we reached a major milestone. I buttoned up the final grounds and plugged in all the connectors on the harness and methodically started applying power and testing. It's alive and everything seems to work as expected. I was able to communicate with the ECU and married my AccessPort.

    I'll still have to complete the light wiring once the body is on, but I have connectors installed for both front and rear light harnesses so that will be easy.

    IMG_0597.jpg

    Here is the final pile of discarded wire and connectors:

    IMG_0599.jpg

    All we need to do to start the engine at this point is finish the cooling system and add all the fluids. Should be running soon.

    We still have to complete e-brake, shifter, seats, install rori's column mount to shorten the column, torque suspension bolts and do rough alignment before we can go-kart. Maybe we'll go-kart Labor Day weekend but probably a little later than that.

    Now that I've finished the harness, I'll complete part 4 of my diet process, which is earlier in this thread, in the next few days.

    Larry

  8. #128
    Senior Member
    Join Date
    Jul 2013
    Location
    Richmond, VA
    Posts
    127
    Post Thanks / Like
    Nicely done. I like where you're going with this. I am going down a similar road, but looking at an ipad mini in the center console. I'm looking at Out of Sight Audios Mark 3 bluetooth receiver

    http://www.outofsightaudio.com/mark-3.html

    It's only 14 oz. I'm not much past that, but starting to think about the small self powered bazooka tubes, and running 2 speakers off that internal amp. If I can get it up under the dash and do a quick disconnect, then I'm only left with 14oz and 2 speakers on track days. I can live with that.

    I am also looking at dash command and using it to monitor air intake temps after the AWIC with the addition of an additional sensor. You definitely have a better setup as far as being able too see the interface. Again, I like the direction you are going, can't wait to see the finished product.

    Travis

  9. #129
    Senior Member wleehendrick's Avatar
    Join Date
    Jul 2012
    Location
    Encinitas, CA
    Posts
    1,653
    Post Thanks / Like
    Blog Entries
    2
    Good job, Larry! I haven't decided if/what I'll do for a sub; I'm also thinking a small, removable bazooka tube like Travis. However, for main speaker power, I already bought an Alpine KTP-445U Class D amp. In bridged mode, it's a solid 90W to 2 channels at 4 Ohms from a 1.5 x 2.5 x 8" package! Thought I'd throw it out here for anyone that wants a decent amp is a very small/light package. Being a digital switching amp, it doesn't throw off a lot of heat, so you can tuck it away without worry. Perfect for a weight conscious 818 audio system. I'll be running a single DIN headunit and have a smartphone cradle.

  10. #130
    K3LAG's Avatar
    Join Date
    May 2013
    Location
    Greensburg, PA
    Posts
    552
    Post Thanks / Like

    8/30 Update

    Nothing particularly exciting or technical this week, just an update.

    We have 8 things on our list to get accomplished this long weekend:

    Install Group N motor mounts
    Install Group N transmission mount
    Install upper radiator mounts from Mechie3
    Install steering column spacer from Rori
    Complete cooling lines
    Modify rear firewall and install
    Install Lokar E-Brake Handle
    and install anti-corrosion felt things on the battery posts (gotta include the easy stuff, makes it easy to cross things off)

    As of quitting time last night we have 5.5 of them done.

    Motor and Trans mounts installed:

    IMG_0612.jpg IMG_0611.jpg

    I'm very glad I decided to put these on. They are substantially stiffer than the original old mounts from the donor. It would have been a lot easier to put them on before installing the engine, but I just decided recently to do it. Even at that, it only took a bit over an hour to do all three. Things are much more solid now.

    Upper Radiator Mounts installed:

    IMG_0614.jpg

    Steering column spacer installed and column shortened:

    IMG_0613.jpg

    This is a big improvement for us comfort wise. With the hub and quick release installed the steering wheel was really too close. It should also look a lot better. Here is a picture before Rori's spacer as a comparison.

    IMG_0453.jpg

    The firewall is only half done. It is cut and riveted back together, but not yet installed. That will get finished on Monday

    IMG_0615.jpg

    The picture of the firewall looks pretty bad with all the hand/finger prints on it. I'll clean it up for the installed picture.

    No picture of the felt things on the battery terminals, nothing too exciting there. I do find they work well on every car I've used them on.

    We should have no problem finishing our remaining 2.5 items on Monday. Fingers crossed .

    We are really close to firing this thing up for the first time.

    Larry

  11. #131
    K3LAG's Avatar
    Join Date
    May 2013
    Location
    Greensburg, PA
    Posts
    552
    Post Thanks / Like
    For anyone wondering, we didn't finish the planned list this weekend. All got done except the cooling lines. Had a couple things pop up that took time away from garage. I'll post some pics of the finished firewall and e-brake sometime soon.

    Larry

  12. #132
    K3LAG's Avatar
    Join Date
    May 2013
    Location
    Greensburg, PA
    Posts
    552
    Post Thanks / Like

    First Start

    A few minor issues to resolve, but it's alive!

    https://www.icloud.com/photostream/#...B-163EA633FDB6

    Larry

  13. #133
    Senior Member Tamra's Avatar
    Join Date
    Apr 2014
    Location
    Shelton, CT
    Posts
    1,011
    Post Thanks / Like
    Congrats on the 1st start!

  14. #134
    Administrator
    Wayne Presley's Avatar
    Join Date
    Feb 2011
    Location
    Enterprise Alabama
    Posts
    2,804
    Post Thanks / Like
    Blog Entries
    3
    Love all of the orange, congrats on first start
    Wayne Presley www.verycoolparts.com
    Xterminator 705 RWHP supercharged 4.6 DOHC with twin turbos

  15. #135
    Senior Member Bob_n_Cincy's Avatar
    Join Date
    Sep 2012
    Location
    Cincinnati OH
    Posts
    3,904
    Post Thanks / Like
    Way to go Larry, I hope to be doing the same in a few day. I started wiring today.
    Bob

  16. #136
    K3LAG's Avatar
    Join Date
    May 2013
    Location
    Greensburg, PA
    Posts
    552
    Post Thanks / Like
    Last night was a productive night. The goal was to get the leaks fixed and tidy up a bunch of things. My Dad, step mom, and mother in law are all coming to visit next week so we wanted it to start, not leak and look decent for them.

    First the leaks. We had 3, one of each fluid. The transmission was leaking from the passenger side axle seal. Got the seal for $8 from the dealer, dropped the passenger side suspension, popped the old seal out and new in, then put it all back together. Took about an hour. The oil leak we first though was drivers side valve cover, once we eliminated that we thought it was coming from the front seal on one of the cams. Turned out to be much simpler than that, the bolt/plug next to the drivers side upper cam was very loose. Cleaned it up, put a dab of sealant on it and reinstalled, problem solved. The final leak was from some of the joints in the cooling system. We got all of those stopped but one which is still dripping a tiny bit.

    Once all those mechanical things were done, we moved to cleaning up the center tunnel. Attached all the cables and tires and cut a slot in it for the handbrake. Once that was done, we put the tunnel aluminum in and reattached the rear firewall and cleaned things up. I think it's ready for people to see it now.

    IMG_0632.jpg IMG_0631.jpg

    Maybe we'll bolt the wheels on for good measure.

    Larry

  17. #137
    K3LAG's Avatar
    Join Date
    May 2013
    Location
    Greensburg, PA
    Posts
    552
    Post Thanks / Like
    One of the minor issues I had once we started the car was a very high idle and trouble code from the IACV. Each time we started the car the idle actually got higher. I found directions on NASIOC for cleaning the IACV and followed them. My IACV was so crudded up the valve wouldn't move at all. After a thorough cleaning I reinstalled it and all works as expected now.

    If you have any problems with the car idling properly, check your IACV. Be sure to get a new gasket, because apparently used ones don't fit or seal correctly.

    Here is the NASIOC thread with the cleaning info: http://forums.nasioc.com/forums/show....php?t=1704762

    We also worked on the throttle mounting a bit. Like some others I didn't quite have full throw of the throttle. We modified the FFR provided bracket to move the top of the pedal mount closer to the firewall to give us a bit more throw. We also took some of the flex out of it while we were at it.

    We continue to work on minor stuff to prepare for go-karting while I finish my welding class. In a couple of weeks I'll make seat brackets and we will get the seats and seat belts in. I hope to go-kart before Halloween.

    Larry

  18. #138
    Senior Member Rasmus's Avatar
    Join Date
    Mar 2012
    Location
    Las Vegas, USA
    Posts
    983
    Post Thanks / Like
    Nice diagnosis and fix on the IACV.

  19. #139
    K3LAG's Avatar
    Join Date
    May 2013
    Location
    Greensburg, PA
    Posts
    552
    Post Thanks / Like
    It's been a few weeks, so here's the latest...

    We had been feeling like we hadn't gotten a lot done in the last few weeks, but last night we finally feel like we are making real progress again.

    Seat belt mounting is pretty much done and floor is temporarily installed. Seat brackets should get finished up in the next week. After that I think we will be ready to get it down off the dolly to prep it for go-karting!

    IMG_0633.jpg IMG_0634.jpg

    We also temporarily installed the dash so we could get the wire routing finalized.

    Larry

  20. #140
    Senior Member metros's Avatar
    Join Date
    Jun 2013
    Location
    NoVA
    Posts
    1,064
    Post Thanks / Like
    I can relate to the ups and downs of feeling like you're progressing toward a final product. Looks like it's really coming along though. Keep plugging away and you'll be fitting the body in no time.

  21. #141
    K3LAG's Avatar
    Join Date
    May 2013
    Location
    Greensburg, PA
    Posts
    552
    Post Thanks / Like

    Floor, Seats and Seat Belts installed

    Last night was very productive. The floor, seats and seat belts are all installed now. Oh, and a nice orange shift knob.

    I'll post a more detailed post on the seat install next, but here's some pictures of everything in place and a few grins to boot.

    IMG_0641.jpg IMG_0643.jpg IMG_0109 (1).jpg

    Should only be one or two building sessions away from go-karting now.

    Larry

  22. #142
    K3LAG's Avatar
    Join Date
    May 2013
    Location
    Greensburg, PA
    Posts
    552
    Post Thanks / Like

    Seat Install

    Here are the details of my seat install.

    Sparco Chrono Road Medium size with Sparco sliders
    Boyd Tank and firewall moved back accordingly

    Goal: Mount the seats as low as possible in the back and a few inches higher in the front for a comfortable slightly bent leg position. Since Dave and I are several inches different in inseam we need the seats to slide a couple of inches.

    The rear of the fixed rail of the slider are bolted directly to the side-to-side bar of the frame. Since the front of the seats are elevated, I made shims to go between the frame and sliders and between the slider and nut so the nut and slider would be fully supported even thought the slider is mounted at an angle.

    With our planned rise of about 2 inches, the front the shims needed to be made at an 8 degree angle. Here are the shims:

    IMG_1098.jpg

    The wider ones go between the slider and frame and the narrower ones go between slider and nut.

    I made brackets to support the front of the sliders about 2 inches above the frame. The brackets are made from 1" thick walled tubing. The thicker wall probably isn't really needed, but since the ends are unsupported I opted for the extra strength. The top plates that the slider bolts to are 3/16" thick x 1" bar. The top plates are also angled at 8 degrees. Here are the brackets that support the front of the seats:

    IMG_0635.jpg

    Here is two views of the brackets and sliders installed:

    IMG_0640.jpg IMG_0638.jpg

    In the top view you can see how the back of the sliders is attached to the frame with the shims and how the front is bolted to the frame. The view from the foot well shows you how they are inclined in the front and how it fits with respect to the frame.

    After these were taken I shortened the slider handles to provide a bit more clearance with the diagonal bar.

    I hope this helps someone else trying to figure out how to mount their seats if they are in a similar situation.

    Larry

  23. #143
    Senior Member Frank818's Avatar
    Join Date
    Jun 2013
    Location
    QC, Canada
    Posts
    5,732
    Post Thanks / Like
    Better welds than my mech, hey? lolll

    Nice seat belt color! Did you ever mention where you got them?
    Frank
    818 chassis #181 powered by a '93 VW VR6 Turbo GT3582R
    Go-karted Aug 5, 2016 - Then May 19+21, 2017
    Tracked May 27/July 26, 2017
    Build time before being driveable on Sep 27, 2019: over 6000h
    Build Completed Winter 2021

  24. #144
    K3LAG's Avatar
    Join Date
    May 2013
    Location
    Greensburg, PA
    Posts
    552
    Post Thanks / Like
    Quote Originally Posted by Frank818 View Post
    Better welds than my mech, hey? lolll

    Nice seat belt color! Did you ever mention where you got them?
    I've always wanted to learn how to weld so I used this as an excuse to take a welding class from the local community college. It was a bit expensive but well worth it. About 36 hours of training over 6 weeks. Those are my first welds other than the practice plates we used in class and some practice I did with some of the scraps from the bracket parts.

    If you have the option of taking a class like that, I recommend it. It's certain possibly to learn on your own and practice, but the engineer in me like to know the right way to do it. The hour long lecture on welding symbols probably won't be all that useful for me, but it's interesting nonetheless.

    The seat belts are from seatbeltsplus.com, the same place aloha818 got his.

    Larry

  25. #145
    Senior Member Frank818's Avatar
    Join Date
    Jun 2013
    Location
    QC, Canada
    Posts
    5,732
    Post Thanks / Like
    Larry, which model you got? 3-point non-retracable with 6in buckle?
    Thing is I can't find one that has a black latch like your. They are chrome.
    Frank
    818 chassis #181 powered by a '93 VW VR6 Turbo GT3582R
    Go-karted Aug 5, 2016 - Then May 19+21, 2017
    Tracked May 27/July 26, 2017
    Build time before being driveable on Sep 27, 2019: over 6000h
    Build Completed Winter 2021

  26. #146
    K3LAG's Avatar
    Join Date
    May 2013
    Location
    Greensburg, PA
    Posts
    552
    Post Thanks / Like
    Quote Originally Posted by Frank818 View Post
    Larry, which model you got? 3-point non-retracable with 6in buckle?
    Thing is I can't find one that has a black latch like your. They are chrome.
    I got the 3-point retractable with contoured sleeve. However, the sleeves kind of got in the way so I pulled the short section of belt and buckle out of the sleeves. If I were to order them again I would probably get the ones with the 12" cable on the buckle side.

    Larry

  27. #147
    Senior Member Frank818's Avatar
    Join Date
    Jun 2013
    Location
    QC, Canada
    Posts
    5,732
    Post Thanks / Like
    Ok I see. Surprisingly, they don't seem to retract on your picture, they are loose on the seats and firewall.

    I'll check how long I need for a cable buckle and I'll order a set, I like the fact I can get them in electric blue to match my car, just what you did.

    Did you have to order the 5 bucks installation hardware?
    Frank
    818 chassis #181 powered by a '93 VW VR6 Turbo GT3582R
    Go-karted Aug 5, 2016 - Then May 19+21, 2017
    Tracked May 27/July 26, 2017
    Build time before being driveable on Sep 27, 2019: over 6000h
    Build Completed Winter 2021

  28. #148
    K3LAG's Avatar
    Join Date
    May 2013
    Location
    Greensburg, PA
    Posts
    552
    Post Thanks / Like
    Quote Originally Posted by Frank818 View Post
    Ok I see. Surprisingly, they don't seem to retract on your picture, they are loose on the seats and firewall.

    I'll check how long I need for a cable buckle and I'll order a set, I like the fact I can get them in electric blue to match my car, just what you did.

    Did you have to order the 5 bucks installation hardware?
    The retractor springs aren't real strong so the friction of them draping around the seat and the fact that they are buckled makes them look that way. When they have a body in them, the belts are pulled out further and the retractor pulls a little harder.

    I ordered the hardware and used much of it. I used the L brackets to mount them to the frame and all the nuts and washers. I wanted some of the bolts to be different lengths so I bought a few. I think I had to buy a couple extra washers and nuts too. 7/16 bolts aren't cheap so $5/set isn't bad.

    Larry

  29. #149
    Senior Member Frank818's Avatar
    Join Date
    Jun 2013
    Location
    QC, Canada
    Posts
    5,732
    Post Thanks / Like
    Good to know. So with a body under, their retractable feature felt pretty much the same as OEM belts? I guess yes as they are certified for road use, according to them.
    Frank
    818 chassis #181 powered by a '93 VW VR6 Turbo GT3582R
    Go-karted Aug 5, 2016 - Then May 19+21, 2017
    Tracked May 27/July 26, 2017
    Build time before being driveable on Sep 27, 2019: over 6000h
    Build Completed Winter 2021

  30. #150
    K3LAG's Avatar
    Join Date
    May 2013
    Location
    Greensburg, PA
    Posts
    552
    Post Thanks / Like

    Go Karted today!

    Well, technically it was yesterday. What great fun. I haven't driven a stick shift in about 22 years, so my shifts were a little sloppy. The sound in the video revealed a rattle that neither Dave or I heard while driving. I had temporarily wire tied some things to the frame in a few spots to keep things from floppy around and I think something was hitting the frame. Probably a connector.

    Here's the video: https://www.icloud.com/photostream/#...7-39C90877C230

    Larry

  31. #151
    Senior Member Bob_n_Cincy's Avatar
    Join Date
    Sep 2012
    Location
    Cincinnati OH
    Posts
    3,904
    Post Thanks / Like
    Great Job Larry,
    What's your plan for the tablet screen?
    Bob
    818S #22 Candy Blue Frame, Front Gas Tank, 2.5L Turbo, Rear radiator, Shortened Transmission, Wookiee Compatible, Console mounted MR2 Shifter, Custom ECU panel, AWIC soon
    My Son Michael's Turbo ICE Build X22 http://thefactoryfiveforum.com/showt...rts-818S-Build
    My Electric Supercar Build X21 (on hold until winter) http://thefactoryfiveforum.com/showt...e-Build-Thread

  32. #152
    K3LAG's Avatar
    Join Date
    May 2013
    Location
    Greensburg, PA
    Posts
    552
    Post Thanks / Like
    Quote Originally Posted by Bob_n_Cincy View Post
    What's your plan for the tablet screen?
    Stereo, Navigation and in theory Obd2 based display using dash command. Dash Command is causing me some trouble though. About half the time it gets OBD2 protocol errors. I have heard both that it's a Subaru issue or that it's an issue with Cobb tuned Subarus. Still looking into it.

    Larry

  33. #153
    Senior Member AZPete's Avatar
    Join Date
    Feb 2011
    Location
    Scottsdale, AZ
    Posts
    2,374
    Post Thanks / Like
    Congrats, Larry, on the smooth go-kart trip . . . no smoke, flames, dropped parts nor tow strap! I'm planning on a tablet also so I'll be watching your OBD2 solution.
    818S/C : Chassis #25 with 06 WRX 2.5 turbo, ABS, cruise, PS, A/C, Apple CarPlay, rear camera, power windows & locks, leather & other complexities. Sold 10/19 with 5,800 miles.
    Mk3 Roadster #6228 4.6L, T45, IRS, PS, PB, ABS, Cruise, Koni's, 17" Halibrands, red w/ silver - 9K miles then sold @ Barrett-Jackson Jan 2011 (got back cash spent).

  34. #154
    Senior Member wleehendrick's Avatar
    Join Date
    Jul 2012
    Location
    Encinitas, CA
    Posts
    1,653
    Post Thanks / Like
    Blog Entries
    2
    Hi Larry,

    I just starting to tackle my wiring harness, and have found your tutorial invaluable. Do you plan to finish Part 4? I think the 4 part series would be useful enough that you should copy it over to a new thread in the Electrical section and have a moderator sticky it up top, so everyone will benefit from the effort you went to to document it.

    Thanks,

    Lee

  35. #155
    K3LAG's Avatar
    Join Date
    May 2013
    Location
    Greensburg, PA
    Posts
    552
    Post Thanks / Like
    Quote Originally Posted by wleehendrick View Post
    Hi Larry,

    I just starting to tackle my wiring harness, and have found your tutorial invaluable. Do you plan to finish Part 4? I think the 4 part series would be useful enough that you should copy it over to a new thread in the Electrical section and have a moderator sticky it up top, so everyone will benefit from the effort you went to to document it.

    Thanks,

    Lee
    I should do that one day. I've just been busy with other things. Maybe I'll try to do it over the long Thanksgiving weekend.

    Larry

  36. #156
    K3LAG's Avatar
    Join Date
    May 2013
    Location
    Greensburg, PA
    Posts
    552
    Post Thanks / Like
    Nothing major to report.

    AWIC installed and system filled an bled.
    New wheel studs and spacers installed.
    And we have started to install the body.

    Here are a couple of progress pics:

    IMG_0663.jpg IMG_0662.jpg IMG_0658.jpg

    Larry
    Last edited by K3LAG; 12-14-2014 at 12:12 AM.

  37. #157
    Senior Member AZPete's Avatar
    Join Date
    Feb 2011
    Location
    Scottsdale, AZ
    Posts
    2,374
    Post Thanks / Like
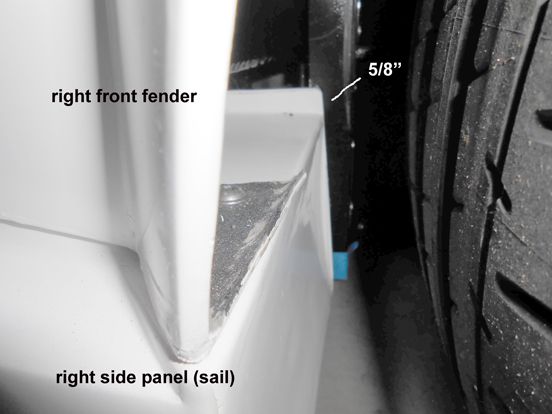
    You'll want to cut the flat excess off the front of the side body panel (sail). When the manual say to place it 5/8" back from the front of the frame tube, they mean after trimming it so the front is perpendicular to the frame - see the manual photo. I'll try to postbag photo later if I have one.

    edit: here's photo. I guess leaving some of the flange on would be good, just measure from the right place.


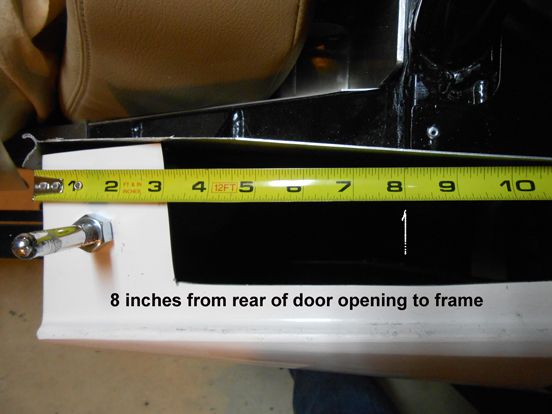
    Dan (RM1Sepex) found that when properly positioned the side panels are 8 inches from the rear door opening to the frame, as pictured:
    Last edited by AZPete; 12-14-2014 at 02:08 PM. Reason: added photo
    818S/C : Chassis #25 with 06 WRX 2.5 turbo, ABS, cruise, PS, A/C, Apple CarPlay, rear camera, power windows & locks, leather & other complexities. Sold 10/19 with 5,800 miles.
    Mk3 Roadster #6228 4.6L, T45, IRS, PS, PB, ABS, Cruise, Koni's, 17" Halibrands, red w/ silver - 9K miles then sold @ Barrett-Jackson Jan 2011 (got back cash spent).

  38. #158
    Senior Member Bob_n_Cincy's Avatar
    Join Date
    Sep 2012
    Location
    Cincinnati OH
    Posts
    3,904
    Post Thanks / Like
    Quote Originally Posted by AZPete View Post
    You'll want to cut the flat excess off the front of the side body panel (sail). When the manual say to place it 5/8" back from the front of the frame tube, they mean after trimming it so the front is perpendicular to the frame - see the manual photo. I'll try to postbag photo later if I have one.
    Pete'
    would it hurt to leave 5/8" of that flange?
    Bob

    flange.jpg
    818S #22 Candy Blue Frame, Front Gas Tank, 2.5L Turbo, Rear radiator, Shortened Transmission, Wookiee Compatible, Console mounted MR2 Shifter, Custom ECU panel, AWIC soon
    My Son Michael's Turbo ICE Build X22 http://thefactoryfiveforum.com/showt...rts-818S-Build
    My Electric Supercar Build X21 (on hold until winter) http://thefactoryfiveforum.com/showt...e-Build-Thread

  39. #159
    K3LAG's Avatar
    Join Date
    May 2013
    Location
    Greensburg, PA
    Posts
    552
    Post Thanks / Like
    We took the flange into account when we measured and positioned it. We will trim it off after we determine it's final location. We need to trim the door opening too. Once it is all in place we will mark all the areas where it needs trimmed with a sharpie then take it off and trim everything. I don't think we are going to cut it all the way back as is shown in the manual. I think we may leave a bit of that front edge, but it won't overhang the firewall and probably will be just a little short of it. It looks like Wayne left a bit of that flange on his. I haven't dug through the threads to look at others to see how much, if any, they have left.

    Larry

  40. #160
    Senior Member AZPete's Avatar
    Join Date
    Feb 2011
    Location
    Scottsdale, AZ
    Posts
    2,374
    Post Thanks / Like
    I should have thought about leaving some of the flange.
    Larry, can you see the Ipad in bright sunlight? I'd like to put an Ipad into my console but I'm worried it might be hard to read the screen.
    818S/C : Chassis #25 with 06 WRX 2.5 turbo, ABS, cruise, PS, A/C, Apple CarPlay, rear camera, power windows & locks, leather & other complexities. Sold 10/19 with 5,800 miles.
    Mk3 Roadster #6228 4.6L, T45, IRS, PS, PB, ABS, Cruise, Koni's, 17" Halibrands, red w/ silver - 9K miles then sold @ Barrett-Jackson Jan 2011 (got back cash spent).

Page 4 of 8 FirstFirst ... 23456 ... LastLast

Posting Permissions

  • You may not post new threads
  • You may not post replies
  • You may not post attachments
  • You may not edit your posts
  •  

Martin's Dent and Collision Shop

Visit our community sponsor