Boig Motorsports

Visit our community sponsor

Thanks Thanks:  64
Likes Likes:  146

View Poll Results: Startup with new ID1050x or previous EV14s?

Voters
0. You may not vote on this poll
  • Engine startup with new 1050cc injectors

    0 0%
  • Engine startup with previous known 550cc EV14s

    0 0%
Page 19 of 56 FirstFirst ... 9171819202129 ... LastLast
Results 721 to 760 of 2231

Thread: Frank818 -1993 VW VR6 Turbo donor- Build Thread

  1. #721
    Senior Member Frank818's Avatar
    Join Date
    Jun 2013
    Location
    QC, Canada
    Posts
    5,732
    Post Thanks / Like
    Quote Originally Posted by Bob_n_Cincy View Post
    Frank,
    How much axial movement does your inner CV joint Have?
    I'm not familiar with that type.
    Bob
    Well, so far after fitting 1 axle in a yet-not-ready-spindle-but-enough-to-get-the-hang-of-it, it seems I have enough play on all 3 axial dimensions, up-down, front-back and side-side (inner CV extension). Which axial movement exactly were you referring to?

    Quote Originally Posted by Hindsight View Post
    Be really careful with the rear backing plates. As I'm sure you know, they locate the rear brake calipers and when pressing old bearings out and new bearings into the spindles, it's real tricky to do it without bending that backing plate. The plate has to be on before you press the hubs in. I bent my backing plates a bit doing it; not enough to be a major problem but until I replace those plates (which requires replacing the bearings as well), I'll never get full use out of a set of rear brake pads because the inside will wear out before the outside one. The spindle is just an awkward shape and there isn't a good way to make it sit flat in a press.
    Good point. The plates look ok and as straight as they were before, I'll mention that to my mech when he's change again the bearings, especially the new set will go on the other set of spindles which required removing and reinstalling the plates.

    Quote Originally Posted by svanlare View Post
    Nice to get it figured out, even if it means a new trip to the BOD. Mine is still on the side of the house, in case I'm not done with part cleaning.
    Yeah you never know when this might come handy again!

    But plz, I highly suggest anyone not to make a mistake about spindles, it's a pain to play with those all the time and a full set of bearings/seals costs USD$100 with shipping to CAD.
    Frank
    818 chassis #181 powered by a '93 VW VR6 Turbo GT3582R
    Go-karted Aug 5, 2016 - Then May 19+21, 2017
    Tracked May 27/July 26, 2017
    Build time before being driveable on Sep 27, 2019: over 6000h
    Build Completed Winter 2021

  2. #722
    Senior Member Frank818's Avatar
    Join Date
    Jun 2013
    Location
    QC, Canada
    Posts
    5,732
    Post Thanks / Like
    Made some progress this w-e, after removing all the stress about the spindles.

    Custom throttle cable bracket to reinstate the cable's tension (not pictured yet), custom overflow reservoir bracket (tnx to my new bench grinder), oil cooler and exhaust. I just need to secure the muffler in place and finish the exit and it's done. Oh crap, the dump tube as well, it will merge just before the muffler, that is a very nice but complicated challenge. Not a problem, just a challenge. I got my parts from Verocious, I'll see next w-e what I can do about that. It'll be a very compact exhaust, all made by myself which I never did before! So far the SS welding is going on really good! I can't say how important that welder is for the build.

    2015-11-22 09.24.43_1.jpg2015-11-22 09.30.30_1.jpg2015-11-22 15.00.50_1.jpg2015-11-22 16.00.54_1.jpg2015-11-22 16.01.08_1.jpg


    It's impressive how I (and we) can reuse old parts and brackets, modify them and make them look like new parts. There are some 25yo parts I was reusing, some others I had severely modified and yet here's a second life for them! Who would knew...
    Frank
    818 chassis #181 powered by a '93 VW VR6 Turbo GT3582R
    Go-karted Aug 5, 2016 - Then May 19+21, 2017
    Tracked May 27/July 26, 2017
    Build time before being driveable on Sep 27, 2019: over 6000h
    Build Completed Winter 2021

  3. #723
    Member
    Join Date
    Aug 2015
    Posts
    40
    Post Thanks / Like
    Always good to see progress Frank, that angle on the axle shafts looks a little dicey!

    Sidebar: I may be picking up a 92 Corrado SLC at the end of the week. If I do, it may also become a 3.6VR host before moving one to an 818 :P

  4. #724
    Senior Member Frank818's Avatar
    Join Date
    Jun 2013
    Location
    QC, Canada
    Posts
    5,732
    Post Thanks / Like
    Yes it's dicey to me, but according to DSS and my friend's racing experience it should be ok. I haven't found anyone yet on google running such an axle angle setup, so it's hard to see real world experiences. The good news is the axles on the inner CVs always tend to push forward on acceleration, so the stress is on the right direction.

    Instead of swapping the 3.6 in the C and then in the 818, you might want to skip the intermediate step.

    Send me pix of the car if you get it!
    Frank
    818 chassis #181 powered by a '93 VW VR6 Turbo GT3582R
    Go-karted Aug 5, 2016 - Then May 19+21, 2017
    Tracked May 27/July 26, 2017
    Build time before being driveable on Sep 27, 2019: over 6000h
    Build Completed Winter 2021

  5. #725
    Senior Member Frank818's Avatar
    Join Date
    Jun 2013
    Location
    QC, Canada
    Posts
    5,732
    Post Thanks / Like
    I've got a lot of pix coming around the corner, but I want to wait a little more until I complete a few other things.

    In the meantime, I blew off an edge of the dump tube bellow when welding to the flange, it's inside the pipe, do you think I should weld the hole (fill it) and grind the bead to make it flush or leave it that way?

    2015-12-05 07.09.07_1.jpg
    Frank
    818 chassis #181 powered by a '93 VW VR6 Turbo GT3582R
    Go-karted Aug 5, 2016 - Then May 19+21, 2017
    Tracked May 27/July 26, 2017
    Build time before being driveable on Sep 27, 2019: over 6000h
    Build Completed Winter 2021

  6. #726
    Moonlight Performance
    Hindsight's Avatar
    Join Date
    May 2014
    Location
    Atlanta
    Posts
    3,402
    Post Thanks / Like
    As long as it's sealed on the outside, it's so small that it just comes down to your knowing it's there and being able to live with it.

  7. #727
    Tazio Nuvolari wannabe Scargo's Avatar
    Join Date
    Nov 2013
    Location
    south-central CT
    Posts
    1,611
    Post Thanks / Like
    Agreed. It's so inconsequential, unless you're really anal, just let it be. The exhaust: why not straight out the top rear?

  8. #728
    Senior Member Frank818's Avatar
    Join Date
    Jun 2013
    Location
    QC, Canada
    Posts
    5,732
    Post Thanks / Like
    Ok I thought having such a small hole the high heat would light up orange the edges of the hole and could cause... whatever, something, backfires or other things. Good to know it's bull**** and I can leave it be.

    Can't do straight, the turbo's outlet is too big and needs to deviate immediately otherwise it would hit right on the manifold's integrated WG-ready exit. It needs to deviate back of the engine or down, there are no other ways out (well, up, but through the deck lid? lolll). Manifold 100% made for the engine in a VW engine bay (totally illogic to go anywhere but downwards in a VW).


    Welding Q again. What about this situation? Never thought it would be possible, but after welding the $USD42.00 2.5" long bellow to my thick flange (WG), this one bent! Like, you put your indexes on both bolt holes and your thumbs in the middle close to the 1.5" hole and you press. It will V/U bend the flange (if you are very very strong lolll), well that's what happened to my flange, it's not flush anymore, even a gasket is not enough to fill the distance on the edges.

    What should I do? I don't want to torque the bolts hard as I could strip the threads.
    I could heat up the flange with a torch and torque it at the same time?
    Or spend another $42.00 with a new bellow and pay someone to TIG weld it on my backup flange...


    I could get half that distance cuz on the pic the left bolt is flush to the manifold's flange, so I could have a small distance on the left side and reduce by half the distance on the right side, but even though I have 1400C copper caulking, I don't know if the temp in that area can be higher or if the caulking would sustain the pressure.

    2015-12-06 12.18.40_1.jpg
    Last edited by Frank818; 12-07-2015 at 07:44 PM.
    Frank
    818 chassis #181 powered by a '93 VW VR6 Turbo GT3582R
    Go-karted Aug 5, 2016 - Then May 19+21, 2017
    Tracked May 27/July 26, 2017
    Build time before being driveable on Sep 27, 2019: over 6000h
    Build Completed Winter 2021

  9. #729

    Join Date
    Oct 2013
    Location
    Puyallup, WA
    Posts
    576
    Post Thanks / Like
    Perhaps glue a sheet of sandpaper to a flat surface (glass, mdf, etc) and sand it flat.

  10. #730
    Senior Member Canadian818's Avatar
    Join Date
    Nov 2011
    Location
    Edmonton, Alberta
    Posts
    1,378
    Post Thanks / Like
    Get a flat file and put some elbow grease to it. My 1/2" turbo flange warped a ton and I had a thick blank bolted to it.
    Adam _____ Instagram @PopesProjects____ YouTube Channel
    818 SRX - #91
    Arrived 01/02/2014
    First Start 10/31/2016
    First Drive 05/22/2017
    Registered 10/25/2019 BRAP818

  11. #731
    Senior Member STiPWRD's Avatar
    Join Date
    Jan 2014
    Location
    Leesburg, VA
    Posts
    1,624
    Post Thanks / Like
    Put it on a belt sander or better yet find a shop that can fly cut the top surface. You've got enough thickness there in the metal to remove some. An engine shop or a place that resurfaces flywheels could turn this around in short order.

  12. #732
    Senior Member Frank818's Avatar
    Join Date
    Jun 2013
    Location
    QC, Canada
    Posts
    5,732
    Post Thanks / Like
    Good ideas.
    I was so damn surprised it warped like this. Man look at how thick this crap is and the damn bellow is so much thinner but had nothing!

    I could try with my bench grinder and finish it off on a flat file or sand paper glued to flat surface, but I think I'll ask my mech to bring it to his guy for a quick flat precise cut, shouldn't be too expensive and would save me a lot of time. On this build, time is more important than money, at some point, unfortunately.
    Frank
    818 chassis #181 powered by a '93 VW VR6 Turbo GT3582R
    Go-karted Aug 5, 2016 - Then May 19+21, 2017
    Tracked May 27/July 26, 2017
    Build time before being driveable on Sep 27, 2019: over 6000h
    Build Completed Winter 2021

  13. #733
    Member
    Join Date
    Aug 2015
    Posts
    40
    Post Thanks / Like
    Quote Originally Posted by Canadian818 View Post
    Get a flat file and put some elbow grease to it. My 1/2" turbo flange warped a ton and I had a thick blank bolted to it.
    Flanges like these heat up very very quickly. You almost have to weld an inch, let the assembly cool, weld an inch, etc etc etc. It really cuts down on the need to flat file afterwards. That said, I have flat filed my share of flanges too and it can be time consuming...but it gets the job done

  14. #734
    Senior Member Canadian818's Avatar
    Join Date
    Nov 2011
    Location
    Edmonton, Alberta
    Posts
    1,378
    Post Thanks / Like
    Quote Originally Posted by choobs View Post
    Flanges like these heat up very very quickly. You almost have to weld an inch, let the assembly cool, weld an inch, etc etc etc. It really cuts down on the need to flat file afterwards. That said, I have flat filed my share of flanges too and it can be time consuming...but it gets the job done
    I agree completely agree, but do you know how long it takes for a 1/2" flange to cool? I don't have the patience for that.
    Adam _____ Instagram @PopesProjects____ YouTube Channel
    818 SRX - #91
    Arrived 01/02/2014
    First Start 10/31/2016
    First Drive 05/22/2017
    Registered 10/25/2019 BRAP818

  15. #735
    Senior Member RM1SepEx's Avatar
    Join Date
    Jul 2011
    Location
    Freeport, ME
    Posts
    3,801
    Post Thanks / Like
    You have to stitch weld it to distribute the heat, just like welding up a fender patch. It's still quicker than repair after the fact

    I'd add heat to the assembly and then tighten it up. Basically warp it straight
    Dan

    818S #17 Picked up 8/1/13 First start 11/1/13 Go Kart 3/28/14

  16. #736
    Senior Member Frank818's Avatar
    Join Date
    Jun 2013
    Location
    QC, Canada
    Posts
    5,732
    Post Thanks / Like
    Whoa, I've worked a lot lately! Basically I work at work, work on the car, eat, sleep. That's all.

    Flange, yeah I tried heating it with a torch it worked a little, but came back to warped form afterwards. I might need to heat it more.

    Anyway, here's what I've been moving on lately :

    http://www.topgear.com/car-news/supe...ne-go-mad-dyno

    Yeah I want that in my 818. More on youtube, it's worth looking at a couple of vids!!

    Seriously, I've been doing this!

    2015-12-06 12.18.22_1.jpg2015-12-13 08.40.18_1.jpg2015-12-13 11.46.22_1.jpg2015-12-13 15.44.21_1.jpg2015-12-13 15.44.48_1.jpg2015-12-13 15.45.03_1.jpg2015-12-17 03.45.08_1.jpg2015-12-17 03.52.56_1.jpg2015-12-17 03.53.07_1.jpg
    Last edited by Frank818; 12-19-2015 at 06:50 PM.
    Frank
    818 chassis #181 powered by a '93 VW VR6 Turbo GT3582R
    Go-karted Aug 5, 2016 - Then May 19+21, 2017
    Tracked May 27/July 26, 2017
    Build time before being driveable on Sep 27, 2019: over 6000h
    Build Completed Winter 2021

  17. #737
    Senior Member Frank818's Avatar
    Join Date
    Jun 2013
    Location
    QC, Canada
    Posts
    5,732
    Post Thanks / Like
    2015-12-17 03.53.21_1.jpg2015-12-17 03.53.38_1.jpg2015-12-17 03.53.53_1.jpg2015-12-13 08.40.37_1.jpg


    My downpipe certainly will be a lot more efficient than my original one on the Corrado. It wasn't easy to weld the dump tube at 45-deg, I poked 2 holes but thank god I was able to fill them in. This will flow so much better, I'm sure I'll have more power. I am quite proud of the DP I made with my bare freakin hands and welded it myfreakinself.

    Then on the muffler supports, I bent SS bars, cut them, welded them, aligned them totally perfect in a way that the muffler, at normal position, will NOT put any stress on the flex bellows. It worked!! And the rubbers are quite firm, the muffler moves maybe 1/16 no more. That too I am very proud.

    Now I have moved to wiring, I am completing what's left of it apart from lighting (no body yet), plugging all the devices, attaching the wires on the frame, etc. It's very crowded on the driver's side where my wires are in the engine bay, I have a couple of sensors, ISV, etc., it's very hard to bolt my stuff, sometimes I have to remove 4-5 things in order to bolt one. But it works.

    Steps before 1st start:
    1- Getting my rear spindles ready
    2- Completing wiring
    3- Plugging wiring
    4- Finishing coolant lines
    5- Stiffening throttle cable
    6- Upgrading my InfinitBox with new rules
    7- Installing shift cables
    8- Fixing shifter brackets
    9- Installing tunnel cover and rear ebrake cover
    10- Completing AWIC tank support bracket
    11- Bleeding brakes
    12- Fixing and bBleeding clutch
    13- Filling engine with oil
    14- Filling trans with oil
    15- Filling engine with coolant
    16- Filling AWIC with coolant
    17- Upgrading ECU to latest software
    18- Tuning a few ECU parms
    19- Testing wiring
    21- Fixing DSS CV issue
    22- Replacing front spindles
    23- First start!

    Ok, that's more steps than I thought. lolll

    I have 14 days off in a row during X-Mas and plan on burning 100-110h. I should almost complete the above list.
    I'll update the list (striking out steps) once steps are done.
    Last edited by Frank818; 01-11-2016 at 12:36 PM.
    Frank
    818 chassis #181 powered by a '93 VW VR6 Turbo GT3582R
    Go-karted Aug 5, 2016 - Then May 19+21, 2017
    Tracked May 27/July 26, 2017
    Build time before being driveable on Sep 27, 2019: over 6000h
    Build Completed Winter 2021

  18. #738
    Senior Member AZPete's Avatar
    Join Date
    Feb 2011
    Location
    Scottsdale, AZ
    Posts
    2,374
    Post Thanks / Like
    Very nice work on your exhaust, Frank. You have come a long ways and learned some good skills! Considering the Devel video, I think you can get your creation to 4,000 HP, or maybe just a lowly 3,000, eh? With 2 weeks off I look forward to seeing your progress.
    818S/C : Chassis #25 with 06 WRX 2.5 turbo, ABS, cruise, PS, A/C, Apple CarPlay, rear camera, power windows & locks, leather & other complexities. Sold 10/19 with 5,800 miles.
    Mk3 Roadster #6228 4.6L, T45, IRS, PS, PB, ABS, Cruise, Koni's, 17" Halibrands, red w/ silver - 9K miles then sold @ Barrett-Jackson Jan 2011 (got back cash spent).

  19. #739
    Member
    Join Date
    Aug 2015
    Posts
    40
    Post Thanks / Like
    Can't wait to hear it fire up in 2 weeks if everything goes according to schedule! That exhaust routing was no easy task for sure, lots of tight bends...glad to see you got it done how you wanted!

  20. #740
    Senior Member Frank818's Avatar
    Join Date
    Jun 2013
    Location
    QC, Canada
    Posts
    5,732
    Post Thanks / Like
    Wow, what a time. I did work over 100h on the car in the past 2 weeks (60h in the 1st week). However, I am still waiting for 3 parts and with those in, all my 20 tasks list in post 737 would be completed.

    I had to move on other things, like redesigning the rear shock tower brace! Which I did, I am very proud of the result. Took about 20h!
    I also took time to fix little issues, some mistakes I made or stuff not designed and fabed in a way I was happy (or in a way it would hold on while driving).

    I won't upload pix today, I have too many, need to sort them out and need time to upload. Will update at some point in time.

    Damn I used that welder so much! My clothes smell welding, still.
    Frank
    818 chassis #181 powered by a '93 VW VR6 Turbo GT3582R
    Go-karted Aug 5, 2016 - Then May 19+21, 2017
    Tracked May 27/July 26, 2017
    Build time before being driveable on Sep 27, 2019: over 6000h
    Build Completed Winter 2021

  21. #741
    Senior Member Canadian818's Avatar
    Join Date
    Nov 2011
    Location
    Edmonton, Alberta
    Posts
    1,378
    Post Thanks / Like
    Good to hear frank, sounds like your so close!
    Adam _____ Instagram @PopesProjects____ YouTube Channel
    818 SRX - #91
    Arrived 01/02/2014
    First Start 10/31/2016
    First Drive 05/22/2017
    Registered 10/25/2019 BRAP818

  22. #742
    Moonlight Performance
    Hindsight's Avatar
    Join Date
    May 2014
    Location
    Atlanta
    Posts
    3,402
    Post Thanks / Like
    Congrats Frank! I can't imagine having 60+ hours to work on the car. I'm lucky to get a 3 hour chunk once a week.

    Looking forward to seeing that custom cross bar.

  23. #743
    Senior Member svanlare's Avatar
    Join Date
    Feb 2012
    Location
    San Jose, CA
    Posts
    545
    Post Thanks / Like
    Very much looking forward to the photos and the video of the first start! I ended up snowboarding (we finally have snow in CA) instead of checking off my list-to-first-start. Not sure I can put in a 100 hours in the next couple weeks, but hope to be not too far behind the rest of you.
    -Steve

  24. #744
    Senior Member Frank818's Avatar
    Join Date
    Jun 2013
    Location
    QC, Canada
    Posts
    5,732
    Post Thanks / Like
    I actually burned 105h in 13 days to be exact. Curiously "only" 45 in the 2nd week, I don't know where I lost those 15 but hey it's awesome anyway. It's really awesome to work on a day and tell yourself "ok, that thing I'll do it tomorrow, I need to finish this one first today and in 2 days I'll fix my mistake about this part". Different feeling than saying "ok I can't work on this part until next week, I'll fix my mistake next month once I really need to fix it, hoping I won't forget". The progress is so much quicker and you can keep a nice pace at it with fresh memory of what you just did and where you are going to.

    On the crossbar I realized I welded it a little too high and I need to curve half an inch the sides of the hump deck lid to sit on the top side crossbar flat brackets. Compromises again, on one side it's perfect for the engine clearance and breathing, on the other it might cause body fitting issues. I have 3 ways to fix this, a small quick fix with little results, a medium one and long drastic one. It's just a matter of time. I'll wait and see once I fit the body.

    I learned 2 things while doing that crossbar: First, how to cut proper angles (I didn't fix the improper ones, don't think it's required) and second, that even if you tack weld parts and it fits well bolted in place, once you do the full welds it may compress the lenght. I had to cut the bar in half and add a 0.5-1in portion to make it the correct lenght again so that the bolts would fit in. Learning, learning.

    I have to sort out the pix and upload them soon, I can have something almost go-kart completed.
    Last edited by Frank818; 01-06-2016 at 09:07 AM.
    Frank
    818 chassis #181 powered by a '93 VW VR6 Turbo GT3582R
    Go-karted Aug 5, 2016 - Then May 19+21, 2017
    Tracked May 27/July 26, 2017
    Build time before being driveable on Sep 27, 2019: over 6000h
    Build Completed Winter 2021

  25. #745
    PLATNUM Supporting Member
    wallace18's Avatar
    Join Date
    Apr 2012
    Location
    Trenton, Florida
    Posts
    5,382
    Post Thanks / Like
    Glad to hear about your progress. Sure have put a ton of work into your kit. The end result should be something to be proud of, IMO.

  26. #746
    Senior Member Frank818's Avatar
    Join Date
    Jun 2013
    Location
    QC, Canada
    Posts
    5,732
    Post Thanks / Like
    Tnx!

    Yeah I busted 1200h since May 2014 already. I think I have another 500-750h to invest.
    Those of you who played with bodies already might know how many hours in average it requires. Then I have the interior finish and all the details/added stuff everywhere else on the car. But it's moving!
    Frank
    818 chassis #181 powered by a '93 VW VR6 Turbo GT3582R
    Go-karted Aug 5, 2016 - Then May 19+21, 2017
    Tracked May 27/July 26, 2017
    Build time before being driveable on Sep 27, 2019: over 6000h
    Build Completed Winter 2021

  27. #747
    Senior Member Frank818's Avatar
    Join Date
    Jun 2013
    Location
    QC, Canada
    Posts
    5,732
    Post Thanks / Like
    This is how I fixed the stupid throttle cable in order to keep it under tension. Crappy way but after all that it works pretty well without moving. I think it will last.

    2015-12-26 07.02.51_1.jpg


    This is the ATE DOT4 TYP200 brake fluid after using non-EPDM rubber lines on the remote reservoir. Liquid should be yellow, not brown. I ditched the reservoir and I am now 100% stock.

    2015-12-28 11.24.11_1.jpg2015-12-28 11.24.23_1.jpg


    This is my hot side coolant lines and cold side lines solution. On the cold side I reused a hose piece of the Corrado to make the bend in S shape. It worked like a charm. Also that piece does the reducing from 1.25in to 1in (Corrado inlet size). I had to cut the FFR hard line and aim it upwards in order to keep the hoses from touching the control arm brackets or the transverse link. That route was the best I could get and it fits superb.

    2015-12-28 11.24.57_1.jpg2015-12-28 11.25.18_1.jpg


    This is what I had to do on the shifter cables for the one at the top. It was slightly rubbing on the brake metal piece the one where you attach the brake cables too. I had to make the space between that piece and the shifter cable larger. It is very tight in there.

    2015-12-28 11.26.59_1.jpg


    This is my VW OEM aux coolant pump (works while car running AND after-run, to keep coolant flowing and preventing heat soaking (also great to circulate through turbo after-run)). That pump has a complete control, I will have 3 devices controlling the pump, the ECU, a manual push button and a temp sensor; those last 2 can work even if IGN or ACC are not on (meaning when you are away from the car).
    You can also see the hot side coolant lines bending 90-deg and going down, just besides the exhaust on the right that you don't see.

    2015-12-28 11.27.23_1.jpg


    My spindles!! I will install them tomorrow Sunday. It looks like it's all going to fit, although the axle nut threads only into half of the threads, not tightened. Of course, I will put a cotter pin on the axles.

    2015-12-31 15.53.26_1.jpg2015-12-31 15.53.49_1.jpg2015-12-31 15.54.14_1.jpg
    Last edited by Frank818; 01-09-2016 at 02:04 PM.
    Frank
    818 chassis #181 powered by a '93 VW VR6 Turbo GT3582R
    Go-karted Aug 5, 2016 - Then May 19+21, 2017
    Tracked May 27/July 26, 2017
    Build time before being driveable on Sep 27, 2019: over 6000h
    Build Completed Winter 2021

  28. #748
    Senior Member Frank818's Avatar
    Join Date
    Jun 2013
    Location
    QC, Canada
    Posts
    5,732
    Post Thanks / Like
    Not proud much of that one, it was very hard to get the distance right, but I made it and I used scrap metal (free).
    What is it?? Oh, a throttle pedal stop.

    2016-01-03 06.26.56_1.jpg


    That is the most beautiful bead I have (and ever will!!) done!!!

    2016-01-03 13.43.42_1.jpg


    The rear shock tower brace. You can see the deck lid sits too high but I have a few ideas to fix it IF I ever need to.

    2016-01-06 05.26.17_1.jpg2016-01-06 05.26.33_1.jpg2016-01-06 05.27.16_1.jpg


    Better view of the brace and its clearance. I had to raise it enough so that it would clear the coil pack plug and cam sensor plug. The brace was RIGHT ON the damn plugs! What are the odds hey... well with such a project the odds are always against you, so.... loll With such odds I could win the US 900 million Power Ball! I'd give money to all of you guys!!!

    2016-01-06 05.45.35_1.jpg2016-01-06 05.45.54_1.jpg


    No pic yet of the entire engine bay far away for a nice big picture of the result, cuz I am waiting for 3 coolant parts in order to finish the coolant lines around the turbo. Once that's done, I'll take pix of the go-kart!

    Still waiting for my InfinityBox parts to arrive, once I get them I can test the wiring (it's ready aside from those parts). I know I'll have a lot to test, especially the cluster, it's all wired differently than OEM and uses commands from the Subaru column too, to activate some OEM VW stuff. Plus, once it rolls, I have to see how I can recalibrate the speedo, cuz my wheels at 10% higher which means about 10% showing faster on the speedo than real speed. The easy way to fix this is to move the needle, physically. I go at 100 on the GPS and then I push the needle with my finger either way it needs to move to show 100 (kmh). The downside is that the % difference is not constant, so at speeds other then 100 I will still have a difference, but still less. I did that already with my older tires on the Corrado. Good old mechanical ways of doing things. lolll
    Last edited by Frank818; 01-09-2016 at 02:18 PM.
    Frank
    818 chassis #181 powered by a '93 VW VR6 Turbo GT3582R
    Go-karted Aug 5, 2016 - Then May 19+21, 2017
    Tracked May 27/July 26, 2017
    Build time before being driveable on Sep 27, 2019: over 6000h
    Build Completed Winter 2021

  29. #749
    Senior Member svanlare's Avatar
    Join Date
    Feb 2012
    Location
    San Jose, CA
    Posts
    545
    Post Thanks / Like
    Frank, I have infinity box parts I didn't use if your's haven't shipped yet.
    -Steve

  30. #750
    Senior Member Frank818's Avatar
    Join Date
    Jun 2013
    Location
    QC, Canada
    Posts
    5,732
    Post Thanks / Like

    Major steps back!!!

    Right, again. This w-e was a w-e where I was dismantling the car and going back to Neanderthal. I have hit 4 issues and some are not pretty.

    1st issue
    The axles still don't fit!!!! God damn ****ing **** of my damn ****ing ***!!!!!!!! **** that **** ****!!!!!!!!
    Although the real 2003 spindles make the wheels turn freely (the others were tight and I never thought it was normal), the CVs still don't fit in!! Looks like the 2nd inner seal, the larger one with a dome, is preventing the CV from sliding in. I have sent pix to DSS. I am really, really, really totally speechless on the issue here. Is DSS using only 2 seals?? I have asked.

    2nd issue
    My disks wouldn't fit on the hubs!! For some reason, the new longer studs I installed weren't aligned straight so I couldn't slide the disks on. I had to hammer gently on the tip of 1-2 studs of each side in order to straighten then. They fit in now, but not as easy as it should. I believe it's ok as the studs will be bolted with the rim and lug nuts, but it freaked me out.

    3rd issue
    I can't bleed the mother ****ing clutch. My friend gave me a kit that I use with my 100psi compressor and it sucks air and liquid from the lines, but it sucks nothing! So it sucks!! loll I can't bleed that clutch.

    4th issue
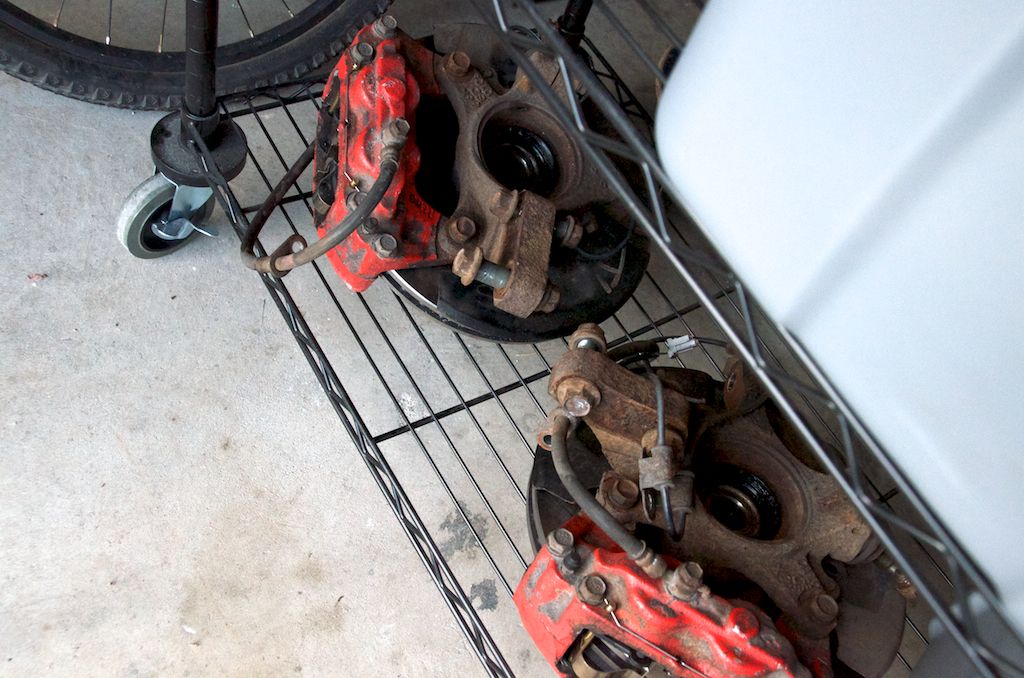
    My front spindles are NOT the right ones!! They are incompatible, like the older rear ones I had. Not surprising as they come from a non-compatible donor. Stupid me!! I am the stupidest ******* on Earth. Remember 1.5years ago I mentioned my front wheels (along with rears, but those are fixed) where so tight to spin they could barely do a 1/4 turn by themselves and that they were making a rubber rubbing noise? I never thought that was normal. My mech told me "Nah, it's nothing it'll wear out when you drive". Well no the spindles are not the right ones, so things don't fit properly. Check out the pix, the rusty ones are the 2003 spindles and the others are 2000. The 2000s have the ABS sensor at the bottom and the 2003s at the top.

    Plz tell me your front spindles have ABS sensors at the top and look like the rusty ones? They have a different center hole too.

    I thought my major issues were fixed, but no, the axles are the worst as I have no solution and no root cause either!
    For the other 3, time and money will fix them, which means, after these 4 issues, I am postponing my completion date to Spring 2017. I don't think the axles will get fix until many months.

    All this is very discouraging, although I admit the front spindles are my mistake. The axles are by far the most discouraging issue I have encountered so far. I just don't want to work on the car, now.


    2016-01-09 18.03.11_1.jpg2016-01-09 18.03.43_1.jpg2016-01-09 18.04.31_1.jpg2016-01-09 18.09.28_1.jpg2016-01-09 18.13.12_1.jpg2016-01-09 18.14.32_1.jpg2016-01-09 18.17.44_1.jpg2016-01-10 15.54.05_1.jpg2016-01-10 15.54.15_1.jpg2016-01-10 15.54.24_1.jpg
    Last edited by Frank818; 01-10-2016 at 08:20 PM.
    Frank
    818 chassis #181 powered by a '93 VW VR6 Turbo GT3582R
    Go-karted Aug 5, 2016 - Then May 19+21, 2017
    Tracked May 27/July 26, 2017
    Build time before being driveable on Sep 27, 2019: over 6000h
    Build Completed Winter 2021

  31. #751
    Senior Member Frank818's Avatar
    Join Date
    Jun 2013
    Location
    QC, Canada
    Posts
    5,732
    Post Thanks / Like
    Oh, I also installed the LCA spacers. Pretty easy on one side, the other got me perspiring a lot but I made it. I think 10mm is the max you can try, it pushes the LCA close to the transverse bushing's limit. Hopefully it won't push fwd the front wheel too much in the wheel well, I'd like to keep it centered.

    2016-01-10 15.55.21_1.jpg


    Have you ever seen bent bolts? These 2 are from the LCA ball joint at the bottom of the front spindle. WTF happened here? 10.9 bolts and they bend like this, at 70F?
    The left bolt is not OEM, I had lost the OEM bolt so I used that 10.9 bolt, but the result is the same.

    2016-01-10 15.54.44_1.jpg
    Last edited by Frank818; 01-10-2016 at 08:21 PM.
    Frank
    818 chassis #181 powered by a '93 VW VR6 Turbo GT3582R
    Go-karted Aug 5, 2016 - Then May 19+21, 2017
    Tracked May 27/July 26, 2017
    Build time before being driveable on Sep 27, 2019: over 6000h
    Build Completed Winter 2021

  32. #752
    Senior Member Frank818's Avatar
    Join Date
    Jun 2013
    Location
    QC, Canada
    Posts
    5,732
    Post Thanks / Like
    Quote Originally Posted by svanlare View Post
    Frank, I have infinity box parts I didn't use if your's haven't shipped yet.
    What parts you got?
    I'm waiting for inVERTs, inCODE and a black 8-ga wire for the PowerCell (gives constant 12v fused).
    Frank
    818 chassis #181 powered by a '93 VW VR6 Turbo GT3582R
    Go-karted Aug 5, 2016 - Then May 19+21, 2017
    Tracked May 27/July 26, 2017
    Build time before being driveable on Sep 27, 2019: over 6000h
    Build Completed Winter 2021

  33. #753
    Senior Member svanlare's Avatar
    Join Date
    Feb 2012
    Location
    San Jose, CA
    Posts
    545
    Post Thanks / Like
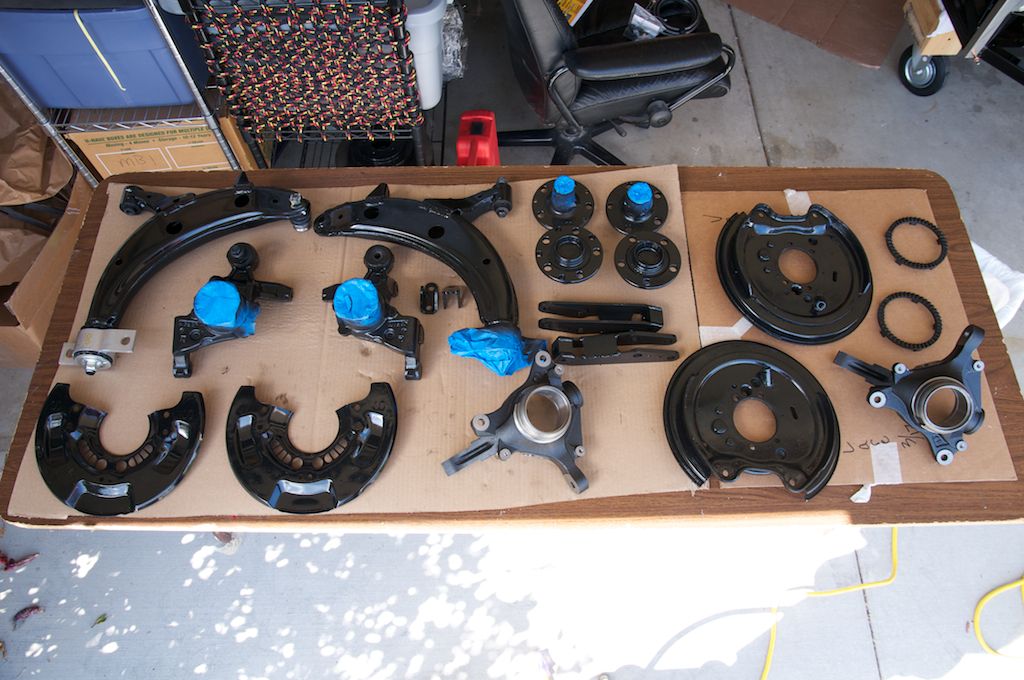
    Here are the front hubs I started with.


    and I ended up buying new ones - see this photo

    Right side is PN: 28313AE020
    Left side is PN: 28313AE030


    I can snap pics of the ones in the garage but they look like the pre-BOD ones in your photo.

    As for the infinityBox, I didn't order any inVERT's as I thought I was going to be able to only positive logic, and I never got to the point where I needed to reprogram with the inCode. They did tell me that all of the in's and out's are programmed, so if you just need a follow signal, you shouldn't have to reprogram any.

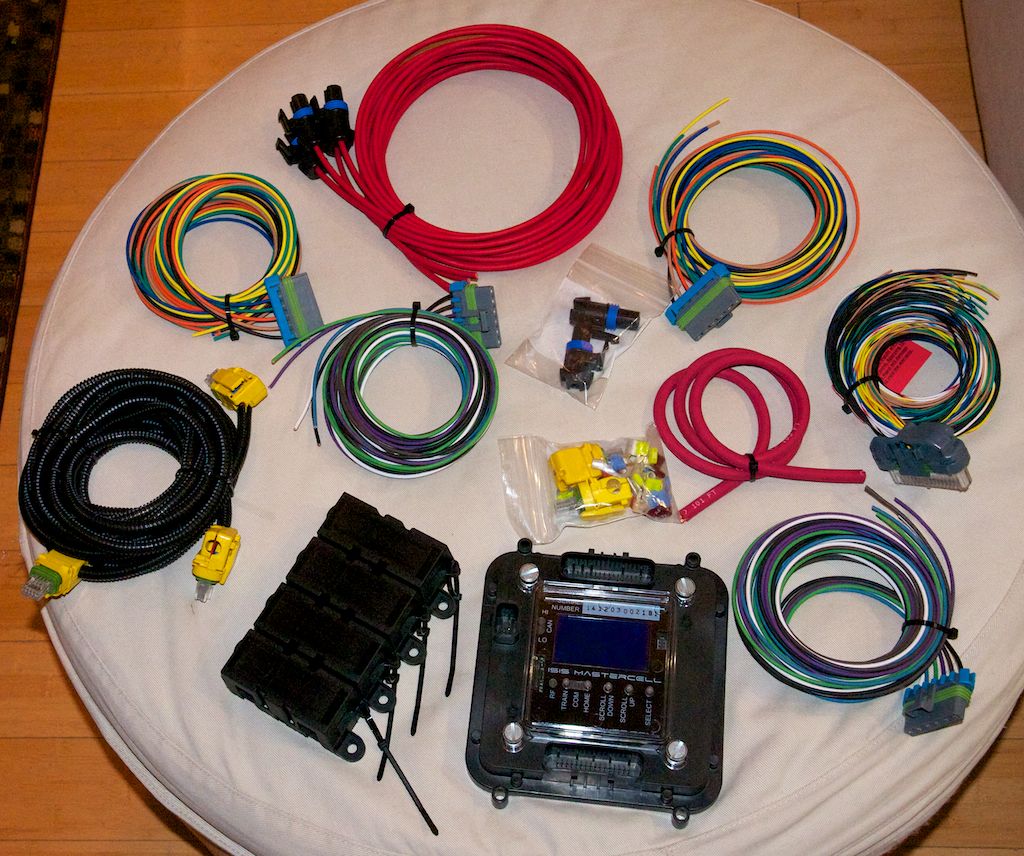
    For the fused 12v, I was going to use the red wires that came with the kit (seen at the top of this picture). I can send them your way if you need. All the black wires in the multi-wire bundles handled the grounds.

    -Steve

  34. #754
    Moonlight Performance
    Hindsight's Avatar
    Join Date
    May 2014
    Location
    Atlanta
    Posts
    3,402
    Post Thanks / Like
    Steve, any trick getting the rear hubs out of the spindle without bending the backing plates? I bent mine a small amount pressing the hubs out. There was just not good place on the spindle to act as a support on the press.

    Frank - I had the same issue bleeding my clutch. Turns out it was a bad clutch master cylinder. It was fine in the donor car but went bad after sitting for a year and a half. Got a new Centric brand master from Amazon. Bled just great immediately after replacing. Prior to that I was pulling a vacuum at the slave cylinder end of the line and using a power bleeder to pressurize the reservoir. Even with that setup, it still wouldn't bleed.

  35. #755
    Senior Member svanlare's Avatar
    Join Date
    Feb 2012
    Location
    San Jose, CA
    Posts
    545
    Post Thanks / Like
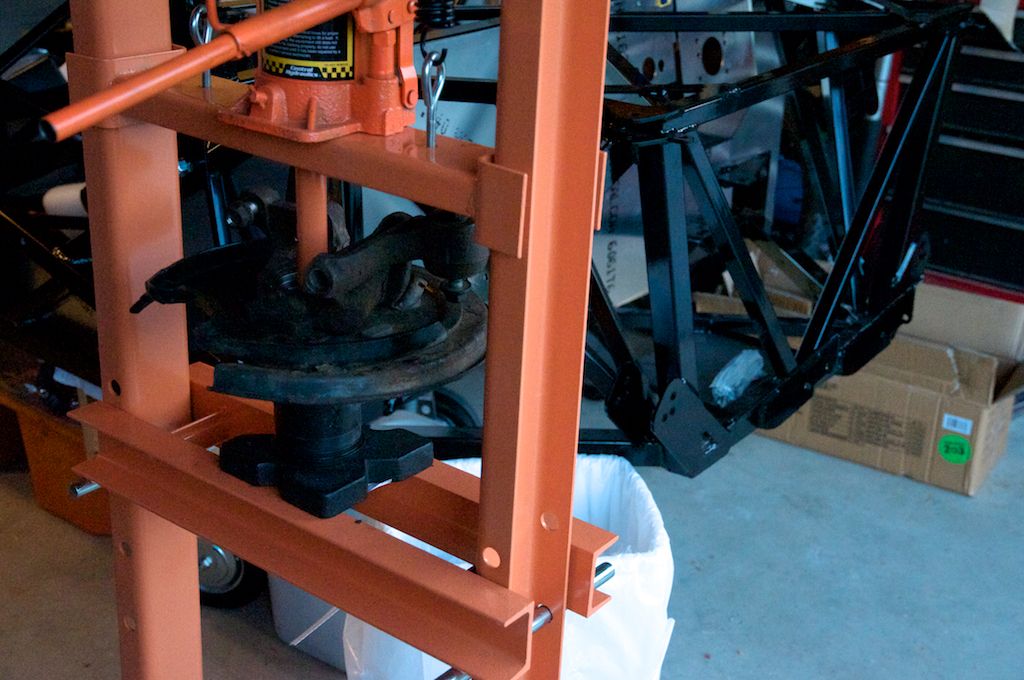
    Hindsight - I remember it being a pain to figure out. Screwed up the front's until I figured out what I was doing. Here is the only photo I have while the backing plate was still attached. I used a combination of supports from a Harbor Freight kits, stacked everything up and pressed away. Putting it together was much easier.

    -Steve

  36. #756
    Moonlight Performance
    Hindsight's Avatar
    Join Date
    May 2014
    Location
    Atlanta
    Posts
    3,402
    Post Thanks / Like
    Thanks Steve.... mine are bent enough that I won't get even wear on my rear pads but I don't think they are bent enough to cause any other issues. At some point I'm going to have to buy new backing plates and figure out how to R&R them in such a way that they don't bend. As I recall, I could press in new bearings and hubs without using the backing plate for support, but removing was much more of a challenge.

  37. #757
    Senior Member Frank818's Avatar
    Join Date
    Jun 2013
    Location
    QC, Canada
    Posts
    5,732
    Post Thanks / Like
    Quote Originally Posted by svanlare View Post
    EDITED: [Front hubs]
    Right side is PN: 28313AE020
    Left side is PN: 28313AE030

    I can snap pics of the ones in the garage but they look like the pre-BOD ones in your photo.

    As for the infinityBox, I didn't order any inVERT's as I thought I was going to be able to only positive logic, and I never got to the point where I needed to reprogram with the inCode. They did tell me that all of the in's and out's are programmed, so if you just need a follow signal, you shouldn't have to reprogram any.

    For the fused 12v, I was going to use the red wires that came with the kit (seen at the top of this picture). I can send them your way if you need. All the black wires in the multi-wire bundles handled the grounds.
    Tnx man. Those are the same as my rusted ones. I have no idea if the non-compatible ones mess up with camber/caster, but they do mess up with oil seal to CV, too tight. I will change them as well. Changed all 4 corners now. What a stupid step back.

    I need inCODE as my parts where bought just before Jay programmed the 818 kit, so I have a standard rear-engine configuration. Besides I have added required functions which require reprogramming too.

    I did use an existing left over cable from them for my front constant 12v but for the back I don't want to run a cable all the way or splice my alternator 4-gauge wire.

    Quote Originally Posted by Hindsight View Post
    Frank - I had the same issue bleeding my clutch. Turns out it was a bad clutch master cylinder. It was fine in the donor car but went bad after sitting for a year and a half. Got a new Centric brand master from Amazon. Bled just great immediately after replacing. Prior to that I was pulling a vacuum at the slave cylinder end of the line and using a power bleeder to pressurize the reservoir. Even with that setup, it still wouldn't bleed.
    Well that is possible, although I have tried the master using a clear line (about 12" long) and it pushes out and sucks back in the fluid. I have no reason to think it's a bad master unless the liquid should be pushed further but I have no reference to base myself onto. Therefore I cannot know if it's a bad master until I buy another one and try it out for fun.

    I have tried gravity, it works with a clear line but not with my hard line, cuz I believe the hard line's upwards direction at the outlet of the master prevents gravity from doing it's job. Unfortunately, the distance before the line goes down is too far for the master to push the fluid into.
    I have tried using a compressor and sucking the air/fluid with at the slave bleeder valve but it didn't work.
    Not sure how that can relate to a bad master?
    But I admit, ANYTHING is possible.

    I will lower the front of the car (off my candles) and leave the back up in order to let the fluid go further in the line using gravity. Then I'll raise the front again, add fluid and try it out. If that doesn't work, then WTF I'll buy a new master yeah, I have paid so much for multiple mistakes so far, one more isn't the end of the world, isn't it?

    Quote Originally Posted by Hindsight View Post
    At some point I'm going to have to buy new backing plates
    Backing plates are not too expensive. Maybe the rears are more, though.
    Last edited by Frank818; 01-11-2016 at 08:11 AM.
    Frank
    818 chassis #181 powered by a '93 VW VR6 Turbo GT3582R
    Go-karted Aug 5, 2016 - Then May 19+21, 2017
    Tracked May 27/July 26, 2017
    Build time before being driveable on Sep 27, 2019: over 6000h
    Build Completed Winter 2021

  38. #758
    Moonlight Performance
    Hindsight's Avatar
    Join Date
    May 2014
    Location
    Atlanta
    Posts
    3,402
    Post Thanks / Like
    Frank, I had the same thing happen with my master. I removed the hard line from the SLAVE, put a clear line on it using an adapter, then pumped the clutch pedal. Each time I would pump the clutch pedal, it would push out the same amount of fluid it will pull back in. The issue is that it isn't drawing fluid in from the reservoir.... at least, not fast enough to equal a normal rate of a good master. I know a lot of master cylinders have a check-valve in them that allows a certain amount of fluid to pass through in one direction. I think maybe these valves go bad (maybe from sitting dry-ish for some period of time).

    I did another test: I put my hand over the end of the output line from the master. I pushed the clutch pedal down, then lifted my finger. I could feel the pressure in the line escape, which is good that it was building pressure. But then I put my finger on the end of the line again and lifted the pedal up. I felt a vacuum on my finger. But then I left my finger in place for a full 30 seconds. I then removed my finger and there was still the same amount of vacuum on it. So in 30 seconds, despite the clutch pedal being all the way up, and despite there being a vacuum in the system, the master would not re-fill from the reservoir enough to equalize the vacuum. So it had to be something inside the master causing it. I replaced the master and bled the system easily. Only took like 5-10 pumps before the whole system was fully bled using the new master.

  39. #759
    Senior Member STiPWRD's Avatar
    Join Date
    Jan 2014
    Location
    Leesburg, VA
    Posts
    1,624
    Post Thanks / Like
    Frank, sorry to hear about the bad luck.

    Rear axles: I recall you had started another thread about rear axles not fitting and me and Bob sent you pictures of our axles, which did not match up with the ones DSS had. Did you ever get to the bottom of why DSS was using different looking rear outer CV joints? This could be the root cause of why your axles don't fit, perhaps DSS based their design off of improper OEM axles. The best way is to just send them your OEM axles and have them replicate the outer CVs.

    Bleeding the clutch: I also found this to be very difficult. The best advice I can give is to troubleshoot the system one step at a time. Start with the master cylinder, remove the output fitting and pump it with your hand to see if it squirts out fluid. This will tell you if the master is good or not. Then reinstall the line to the slave cylinder and see if you can pump fluid through the line. Try disconnecting the master from the pedal linkage and pumping it with your hand as the pedal can limit the travel of the piston. Elevating the slave above the master is a good idea. Also, I used a vacuum bleeder at the slave end, it probably helped a little bit. They are cheap at HF. Finally, try clamping the slave cylinder to prevent the slave piston from moving, this can help remove air from the system as it will not fill the slave cylinder and be forced out.

  40. #760
    Senior Member Bob_n_Cincy's Avatar
    Join Date
    Sep 2012
    Location
    Cincinnati OH
    Posts
    3,904
    Post Thanks / Like
    Frank,
    shorten your clutch rod about 1/8" and try again.
    Bob
    818S #22 Candy Blue Frame, Front Gas Tank, 2.5L Turbo, Rear radiator, Shortened Transmission, Wookiee Compatible, Console mounted MR2 Shifter, Custom ECU panel, AWIC soon
    My Son Michael's Turbo ICE Build X22 http://thefactoryfiveforum.com/showt...rts-818S-Build
    My Electric Supercar Build X21 (on hold until winter) http://thefactoryfiveforum.com/showt...e-Build-Thread

Page 19 of 56 FirstFirst ... 9171819202129 ... LastLast

Posting Permissions

  • You may not post new threads
  • You may not post replies
  • You may not post attachments
  • You may not edit your posts
  •  

FFMetal

Visit our community sponsor