BluePrint Engines

Visit our community sponsor

Thanks Thanks:  0
Likes Likes:  0
Page 7 of 25 FirstFirst ... 5678917 ... LastLast
Results 241 to 280 of 996

Thread: FFRSpec72 818R Build Seattle WA

  1. #241
    Senior Member FFRSpec72's Avatar
    Join Date
    Feb 2011
    Location
    Kirkland, WA
    Posts
    2,255
    Post Thanks / Like
    Spent the weekend working on the wing mount and anti-intrusion for transmission, ran into some issues with exhaust, shifting linkage, tail light housings and rear deck humps being in the way but I think with some mods this will be good to go this weekend, the frame will provide anti-intrusion for transaxle, and mount supports for the rear deck pins/latches along with rear deck support if needed.
    Tony Nadalin
    2018 SOVREN Big Bore Champion
    2015 SCCA Oregon Region VP3 Champion
    2012 ICSCC ITE Class Champion
    FFR MkII Challenge Car, Spec Racer, Street Legal, SCCA, ICSCC and NASA Racing
    818R Build in progress

  2. #242
    Sgt.Gator's Avatar
    Join Date
    Apr 2013
    Location
    Bend, Oregon
    Posts
    1,652
    Post Thanks / Like
    Are you going to be at ORP this Sunday with the 818?
    "Good Judgement comes from Experience. Experience comes from Bad Judgement"
    Owner: Colonel Red Racing
    eBAy Store: http://stores.ebay.com/colonelredracing
    818R ICSCC SPM
    2005 Subaru STI Race Car ICSCC ST and SPM
    Palatov DP4 - ICSCC Sports Racer

  3. #243
    Senior Member FFRSpec72's Avatar
    Join Date
    Feb 2011
    Location
    Kirkland, WA
    Posts
    2,255
    Post Thanks / Like
    Quote Originally Posted by Sgt.Gator View Post
    Are you going to be at ORP this Sunday with the 818?
    Nope the earliest it will be done is at the start of regular season (end April/start of May)
    Tony Nadalin
    2018 SOVREN Big Bore Champion
    2015 SCCA Oregon Region VP3 Champion
    2012 ICSCC ITE Class Champion
    FFR MkII Challenge Car, Spec Racer, Street Legal, SCCA, ICSCC and NASA Racing
    818R Build in progress

  4. #244
    Senior Member FFRSpec72's Avatar
    Join Date
    Feb 2011
    Location
    Kirkland, WA
    Posts
    2,255
    Post Thanks / Like
    I finished up the seat back brace

    WP_20150309_20_49_06_Pro.jpg WP_20150309_20_48_59_Pro.jpgWP_20150309_20_47_58_Pro.jpg

    I also added a mirror mount (and other dash junk that need to be mounted)

    WP_20150309_20_47_47_Pro.jpg

    I also finished the wing mount. The mount will serve as transaxle anti-intrusion and mounts for the rear deck lid. You can see the thread "New APR Wing Mount" for pictures. I think I will be notching the rear deck lid and having a quick release wing as I don't want the wing to get damaged by taking it on an off, the wing can be unbolted if I need to do so
    Last edited by FFRSpec72; 03-10-2015 at 12:05 PM.
    Tony Nadalin
    2018 SOVREN Big Bore Champion
    2015 SCCA Oregon Region VP3 Champion
    2012 ICSCC ITE Class Champion
    FFR MkII Challenge Car, Spec Racer, Street Legal, SCCA, ICSCC and NASA Racing
    818R Build in progress

  5. #245

    Join Date
    Oct 2013
    Location
    Puyallup, WA
    Posts
    576
    Post Thanks / Like
    Would being rear ended and engine shifting forward potentially launch the brace into your back?

  6. #246
    Senior Member FFRSpec72's Avatar
    Join Date
    Feb 2011
    Location
    Kirkland, WA
    Posts
    2,255
    Post Thanks / Like
    Quote Originally Posted by Kurk818 View Post
    Would being rear ended and engine shifting forward potentially launch the brace into your back?
    No, as I looked at that when figuring out where to put the brace, so you can't tell from the picture but the tube has a non-obstructed path backwards, so if the engine gets shoved forward the tube/brace will not be in the way. The tube also will be shortened.
    Tony Nadalin
    2018 SOVREN Big Bore Champion
    2015 SCCA Oregon Region VP3 Champion
    2012 ICSCC ITE Class Champion
    FFR MkII Challenge Car, Spec Racer, Street Legal, SCCA, ICSCC and NASA Racing
    818R Build in progress

  7. #247
    Senior Member C.Plavan's Avatar
    Join Date
    Mar 2011
    Location
    Clovis, Ca
    Posts
    2,225
    Post Thanks / Like
    I just want to put it out there for others looking at this- My 818R passed without the seat back brace. I pushed the firewall back and my seat is against the firewall. The Tech's said that is as good as a brace (I smashed SFI flat padding between the seat and firewall as cushion). It just depends on the Techs as Tony's said he needed it. I personally have never come across a tech that said a mid engine car needs one if seat is against firewall (914's ect) but your YMMV. It's not a bad thing to have (I have one on my 911) but a firewall is plenty strong also.
    Thanks- Chad
    818R-SOLD!!!- Go Karted 7/20/14/ Officially raced NASA ST2- 2/28/15
    2016 Elan NP01 Prototype Racecar Chassis #20
    1969 Porsche 911ST Vintage Race Car
    1972 Porsche 911T (#'s matching undergoing nut & bolt resto in my garage)

  8. #248
    Senior Member FFRSpec72's Avatar
    Join Date
    Feb 2011
    Location
    Kirkland, WA
    Posts
    2,255
    Post Thanks / Like
    Quote Originally Posted by C.Plavan View Post
    I just want to put it out there for others looking at this- My 818R passed without the seat back brace. I pushed the firewall back and my seat is against the firewall. The Tech's said that is as good as a brace (I smashed SFI flat padding between the seat and firewall as cushion). It just depends on the Techs as Tony's said he needed it. I personally have never come across a tech that said a mid engine car needs one if seat is against firewall (914's ect) but your YMMV. It's not a bad thing to have (I have one on my 911) but a firewall is plenty strong also.
    Completely agree if you can use the firewall use it as this was a pain to do and costs more money !
    Tony Nadalin
    2018 SOVREN Big Bore Champion
    2015 SCCA Oregon Region VP3 Champion
    2012 ICSCC ITE Class Champion
    FFR MkII Challenge Car, Spec Racer, Street Legal, SCCA, ICSCC and NASA Racing
    818R Build in progress

  9. #249
    Senior Member D Clary's Avatar
    Join Date
    Aug 2013
    Location
    Santa Rosa CA
    Posts
    407
    Post Thanks / Like
    I don't see how you got so far from the firewall. I am short and my seatback is touching.

  10. #250
    Senior Member FFRSpec72's Avatar
    Join Date
    Feb 2011
    Location
    Kirkland, WA
    Posts
    2,255
    Post Thanks / Like
    Quote Originally Posted by D Clary View Post
    I don't see how you got so far from the firewall. I am short and my seatback is touching.
    I have a thin fuel cell, so I pushed the firewall back 5" from the FFR position and changing the firewall angle and how it fits
    Tony Nadalin
    2018 SOVREN Big Bore Champion
    2015 SCCA Oregon Region VP3 Champion
    2012 ICSCC ITE Class Champion
    FFR MkII Challenge Car, Spec Racer, Street Legal, SCCA, ICSCC and NASA Racing
    818R Build in progress

  11. #251
    Member
    Join Date
    Apr 2012
    Location
    Bothell, WA
    Posts
    48
    Post Thanks / Like
    Quote Originally Posted by FFRSpec72 View Post
    I have a thin fuel cell, so I pushed the firewall back 5" from the FFR position and changing the firewall angle and how it fits
    How did you bend the firewall the additional angle? That's a pretty thick piece of aluminum and don't want to crack it.

  12. #252
    Senior Member FFRSpec72's Avatar
    Join Date
    Feb 2011
    Location
    Kirkland, WA
    Posts
    2,255
    Post Thanks / Like
    Quote Originally Posted by fryguy View Post
    How did you bend the firewall the additional angle? That's a pretty thick piece of aluminum and don't want to crack it.
    So I modified the bottom piece (made it shorter, also wanted to get rid of that very odd shaped opening that FFR has in the rear firewall) and having a new top piece built.
    Tony Nadalin
    2018 SOVREN Big Bore Champion
    2015 SCCA Oregon Region VP3 Champion
    2012 ICSCC ITE Class Champion
    FFR MkII Challenge Car, Spec Racer, Street Legal, SCCA, ICSCC and NASA Racing
    818R Build in progress

  13. #253
    Senior Member AZPete's Avatar
    Join Date
    Feb 2011
    Location
    Scottsdale, AZ
    Posts
    2,374
    Post Thanks / Like
    Fryguy, I took my firewall piece to a metal shop that has a big bending brake and they bent it 20 degrees. In other words, they bent an additional 20 degrees into the bend that is at the front of the narrow shelf, the second bend from the top. I think I paid $40 and waited a week for them to get to it so call around to see who can do it for you.
    That was for the Boyd fuel tank.
    818S/C : Chassis #25 with 06 WRX 2.5 turbo, ABS, cruise, PS, A/C, Apple CarPlay, rear camera, power windows & locks, leather & other complexities. Sold 10/19 with 5,800 miles.
    Mk3 Roadster #6228 4.6L, T45, IRS, PS, PB, ABS, Cruise, Koni's, 17" Halibrands, red w/ silver - 9K miles then sold @ Barrett-Jackson Jan 2011 (got back cash spent).

  14. #254
    Senior Member FFRSpec72's Avatar
    Join Date
    Feb 2011
    Location
    Kirkland, WA
    Posts
    2,255
    Post Thanks / Like
    Not much time in the past several weeks as I have been working on my Challenge car as that has to be on track at end of this month. With Shane (of VRaptor) have completed the transaxle protection, so this works in conjunction with the wing mount from Shane.

    WP_20150329_11_25_26_Pro.jpg WP_20150329_11_28_12_Pro.jpg

    Working on rear deck supports and fasteners next.
    Tony Nadalin
    2018 SOVREN Big Bore Champion
    2015 SCCA Oregon Region VP3 Champion
    2012 ICSCC ITE Class Champion
    FFR MkII Challenge Car, Spec Racer, Street Legal, SCCA, ICSCC and NASA Racing
    818R Build in progress

  15. #255
    Member
    Join Date
    Apr 2012
    Location
    Bothell, WA
    Posts
    48
    Post Thanks / Like
    Quote Originally Posted by FFRSpec72 View Post
    Right now I have it bolted on, the rules state that you can bolt it on 1/4" bolts as the largest size bolts, I have about 8 bolts per panel now, will increase that once I'm sure I have everything right (I'm only bolting to the 2x2 cross members at this time). On my challenge car I have my panels welded, I want to go with bolts this time as there have been occasions where I needed to get to things and if it was bolted it would have been easier.
    I couldn't find any requirements in the NASA ST rules for anti-intrusion panels. I was trying to figure out why you went with 1/8" for the panels and realized (I think) you are using the Challenge Series rules? Then I noticed it says weld or u-bolt in the rules. Am I looking in the wrong place or are we in a gray area on mounting these panels?

    I like the idea of welding the panels. Do you still think you might need to remove the side panels occasionally?

  16. #256
    Senior Member FFRSpec72's Avatar
    Join Date
    Feb 2011
    Location
    Kirkland, WA
    Posts
    2,255
    Post Thanks / Like
    Quote Originally Posted by fryguy View Post
    I couldn't find any requirements in the NASA ST rules for anti-intrusion panels. I was trying to figure out why you went with 1/8" for the panels and realized (I think) you are using the Challenge Series rules? Then I noticed it says weld or u-bolt in the rules. Am I looking in the wrong place or are we in a gray area on mounting these panels?

    I like the idea of welding the panels. Do you still think you might need to remove the side panels occasionally?
    So anti-instruction panels are optional, and not required for any class that I run currently. I use them for my own and daughter's safety and they also help distribute the impact force if T-Boned. The mounting is in the gray area, the FIA rules say that these can be bolted to cage but using bolts no larger than 1/4". My challenge car I welded these on and never had an issue. I have chosen to bolt these on just because I have no idea is I will need to take these off or if these will get in the way of anything and so far I can't think of any time I needed to remove these.
    Tony Nadalin
    2018 SOVREN Big Bore Champion
    2015 SCCA Oregon Region VP3 Champion
    2012 ICSCC ITE Class Champion
    FFR MkII Challenge Car, Spec Racer, Street Legal, SCCA, ICSCC and NASA Racing
    818R Build in progress

  17. #257
    fasterer and furiouser longislandwrx's Avatar
    Join Date
    Aug 2012
    Location
    Long Island
    Posts
    2,540
    Post Thanks / Like
    Blog Entries
    6
    did you use rivnuts or just drill and tap the frame?
    A well stocked beverage fridge is the key to any successful project.

  18. #258
    Senior Member FFRSpec72's Avatar
    Join Date
    Feb 2011
    Location
    Kirkland, WA
    Posts
    2,255
    Post Thanks / Like
    Quote Originally Posted by longislandwrx View Post
    did you use rivnuts or just drill and tap the frame?
    I went through the square tubing only and used 1/4-20 screws and nuts
    Tony Nadalin
    2018 SOVREN Big Bore Champion
    2015 SCCA Oregon Region VP3 Champion
    2012 ICSCC ITE Class Champion
    FFR MkII Challenge Car, Spec Racer, Street Legal, SCCA, ICSCC and NASA Racing
    818R Build in progress

  19. #259
    Senior Member FFRSpec72's Avatar
    Join Date
    Feb 2011
    Location
    Kirkland, WA
    Posts
    2,255
    Post Thanks / Like
    I have been on extended travel so have not had much time to spend but this weekend I got most of the body fit (roughly) and will fine tune it this week. As most have indicated previously the headlights were the biggest issue and they still need to be fixed a little more and I need to build a support bracket.I built a support bracket for the doors and attached it to door hinge bracket on the frame and then tapped the holes in the frame since it was 1/8 thick.I have made brackets for the front bumper I just need to weld these to the frame this week once I get everything lined up.

    WP_20150518_07_22_50_Pro.jpg WP_20150518_07_22_43_Pro.jpg WP_20150518_07_22_31_Pro.jpg WP_20150518_07_22_13_Pro.jpgWP_20150517_18_50_36_Pro.jpgWP_20150517_09_57_37_Pro.jpgWP_20150517_09_57_32_Pro.jpg WP_20150517_09_57_27_Pro.jpg
    Tony Nadalin
    2018 SOVREN Big Bore Champion
    2015 SCCA Oregon Region VP3 Champion
    2012 ICSCC ITE Class Champion
    FFR MkII Challenge Car, Spec Racer, Street Legal, SCCA, ICSCC and NASA Racing
    818R Build in progress

  20. #260

    Join Date
    Oct 2013
    Location
    Puyallup, WA
    Posts
    576
    Post Thanks / Like
    Looking good Tony. I was beginning to wonder where you went. Glad to see you back at it. Ill have mine in Bellevue on the 26th for WSP inspection. Maybe you can stop by.

  21. #261
    Senior Member FFRSpec72's Avatar
    Join Date
    Feb 2011
    Location
    Kirkland, WA
    Posts
    2,255
    Post Thanks / Like
    Quote Originally Posted by Kurk818 View Post
    Looking good Tony. I was beginning to wonder where you went. Glad to see you back at it. Ill have mine in Bellevue on the 26th for WSP inspection. Maybe you can stop by.
    Would love to stop by on the 26th, let me know the details please. you were right the on the headlights, I could not just "slap those puppies in" took a while and they are still not perfect.
    Tony Nadalin
    2018 SOVREN Big Bore Champion
    2015 SCCA Oregon Region VP3 Champion
    2012 ICSCC ITE Class Champion
    FFR MkII Challenge Car, Spec Racer, Street Legal, SCCA, ICSCC and NASA Racing
    818R Build in progress

  22. #262

    Join Date
    Oct 2013
    Location
    Puyallup, WA
    Posts
    576
    Post Thanks / Like
    Quote Originally Posted by FFRSpec72 View Post
    Would love to stop by on the 26th, let me know the details please. you were right the on the headlights, I could not just "slap those puppies in" took a while and they are still not perfect.
    Ill show you what i did on mine. White door edging similar to the black that is seen everywhere seals the final irregularities. I ended up with some air voids under the gelcoat that was unsightly and the trim was the perfect finish. Unfortunately, the lengths it comes in is approx 3" too short to go the length of the headlight.

    http://i.imgur.com/vqGR0FTl.jpg

  23. #263
    Senior Member FFRSpec72's Avatar
    Join Date
    Feb 2011
    Location
    Kirkland, WA
    Posts
    2,255
    Post Thanks / Like
    Quote Originally Posted by Kurk818 View Post
    Ill show you what i did on mine. White door edging similar to the black that is seen everywhere seals the final irregularities. I ended up with some air voids under the gelcoat that was unsightly and the trim was the perfect finish. Unfortunately, the lengths it comes in is approx 3" too short to go the length of the headlight.

    http://i.imgur.com/vqGR0FTl.jpg
    Looks like you made you own bracket that goes from the back of the headlight assemble to the frame support and did not use the bracket on the headlight ?
    Tony Nadalin
    2018 SOVREN Big Bore Champion
    2015 SCCA Oregon Region VP3 Champion
    2012 ICSCC ITE Class Champion
    FFR MkII Challenge Car, Spec Racer, Street Legal, SCCA, ICSCC and NASA Racing
    818R Build in progress

  24. #264

    Join Date
    Oct 2013
    Location
    Puyallup, WA
    Posts
    576
    Post Thanks / Like
    Quote Originally Posted by FFRSpec72 View Post
    Looks like you made you own bracket that goes from the back of the headlight assemble to the frame support and did not use the bracket on the headlight ?
    Yes, i did. The bracket was way too high and was forcing my headlights down. The angle on the bracket was also too far back for my fitment. It was the simple solution for proper alignment and fitment within the bucket

  25. #265
    Harley818's Avatar
    Join Date
    Jan 2014
    Location
    Vancouver BC
    Posts
    788
    Post Thanks / Like
    Hi Tony,

    Following up on a couple items we discussed when I stopped by on the weekend:

    Tapping into coolant line - see my thread post #76 for some good pictures

    Coolant temp sensor - see pic in post #42 - its connected into the coolant tube right next to the oil pressure sensor near the alternator.

    Turbo coolant line connection to the upper coolant tank - see my threat post # 85, picture 5. The top connection we were talking to goes directly to the turbo, the one underneath that I was showing you connects to a coolant line that comes from under the intake manifold. I'll see if I can get better pictures for you now that I'm home. I'll be taking my intercooler off when I get the new Air-water IC set up.

    Thanks for taking the time on the weekend, its was great to compare notes.
    Harley
    Bought 2002 Donor Jan 2014
    First Start Jan 18, 2015
    First Drive Feb 14, 2015

  26. #266
    Senior Member FFRSpec72's Avatar
    Join Date
    Feb 2011
    Location
    Kirkland, WA
    Posts
    2,255
    Post Thanks / Like
    Quote Originally Posted by Harley818 View Post
    Hi Tony,

    Following up on a couple items we discussed when I stopped by on the weekend:
    Thanks Harley for the follow up, was great to meet you and discuss the various aspects of the build. Did you say that someone had the Cobb AccessPort on sale ?
    Tony Nadalin
    2018 SOVREN Big Bore Champion
    2015 SCCA Oregon Region VP3 Champion
    2012 ICSCC ITE Class Champion
    FFR MkII Challenge Car, Spec Racer, Street Legal, SCCA, ICSCC and NASA Racing
    818R Build in progress

  27. #267
    Senior Member FFRSpec72's Avatar
    Join Date
    Feb 2011
    Location
    Kirkland, WA
    Posts
    2,255
    Post Thanks / Like
    I started to take a different approach on the body, we found the center of the frame, and then centered the front bumper, then the fenders and then the rear bumper so that the entire body was centered, no I can start to fit the lights, hood and rear decks. Also i'm going for a wider gap at the doors to keep the surface air moving down the side of the car.

    WP_20150524_11_44_53_Pro.jpg WP_20150524_11_45_06_Pro.jpg WP_20150524_11_45_15_Pro.jpg
    Tony Nadalin
    2018 SOVREN Big Bore Champion
    2015 SCCA Oregon Region VP3 Champion
    2012 ICSCC ITE Class Champion
    FFR MkII Challenge Car, Spec Racer, Street Legal, SCCA, ICSCC and NASA Racing
    818R Build in progress

  28. #268
    Senior Member FFRSpec72's Avatar
    Join Date
    Feb 2011
    Location
    Kirkland, WA
    Posts
    2,255
    Post Thanks / Like
    I also switched over to the group N motor and transmission mounts (I guess I should have done this before as it was just a little awkward doing this after engine and transmission were in car)
    Tony Nadalin
    2018 SOVREN Big Bore Champion
    2015 SCCA Oregon Region VP3 Champion
    2012 ICSCC ITE Class Champion
    FFR MkII Challenge Car, Spec Racer, Street Legal, SCCA, ICSCC and NASA Racing
    818R Build in progress

  29. #269
    Harley818's Avatar
    Join Date
    Jan 2014
    Location
    Vancouver BC
    Posts
    788
    Post Thanks / Like
    Tony here is a picture of the bracket to mount the front of the fender to the headlight bucket area and the front bumper. The hood pins mount in the hole on the right. The higher point is to secure the front of your fender above the light.

    DSCF4912.jpg

    Also I took a couple pictures of my Cobb intake location.
    The Cobb intake itself is straight, but it has a small hose section you can add (extra $$65) that allows you to angle the Cobb back a bit. You can see my two catch cans right there as well as all the related hoses.
    DSCF4919.jpgDSCF4920.jpgDSCF4923.jpg

    I don't recall who had them on sale, but it was on the forum here somewhere. I'll see if I can find it. AJW?
    Last edited by Harley818; 05-27-2015 at 01:05 AM.
    Harley
    Bought 2002 Donor Jan 2014
    First Start Jan 18, 2015
    First Drive Feb 14, 2015

  30. #270
    Senior Member FFRSpec72's Avatar
    Join Date
    Feb 2011
    Location
    Kirkland, WA
    Posts
    2,255
    Post Thanks / Like
    Harley, thanks for the pics, do you have a pic of your throttle body warm up bypass ?


    Also looks like I will need to mod the shock tower brace as my waste gate will hit

    WP_20150526_18_24_08_Pro.jpg
    Tony Nadalin
    2018 SOVREN Big Bore Champion
    2015 SCCA Oregon Region VP3 Champion
    2012 ICSCC ITE Class Champion
    FFR MkII Challenge Car, Spec Racer, Street Legal, SCCA, ICSCC and NASA Racing
    818R Build in progress

  31. #271
    Harley818's Avatar
    Join Date
    Jan 2014
    Location
    Vancouver BC
    Posts
    788
    Post Thanks / Like
    Now that I took off the air-air IC, I should be able to get a pic for you.
    Where did you get the adapter for the oil port to oil pressure gauge that you showed me? Do you have part no & source?

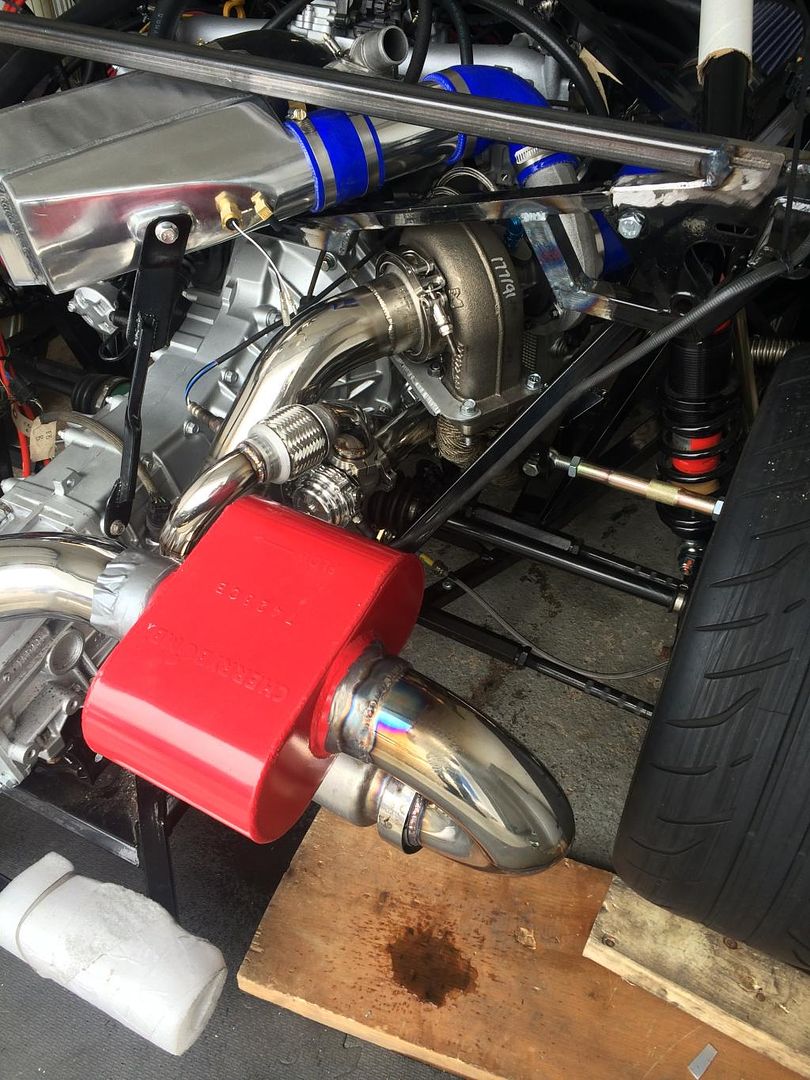
    Check post #451 on Andrew & Tamras build thread to see the brace mod that they did. You don't need to cut that much, and if I were you I would just double up the bottom tube and cut out what you need to clear the turbo wastegate. I think Sponagule also did a similar mod.
    Last edited by Harley818; 05-28-2015 at 07:08 PM.
    Harley
    Bought 2002 Donor Jan 2014
    First Start Jan 18, 2015
    First Drive Feb 14, 2015

  32. #272
    Senior Member
    Join Date
    Jun 2013
    Location
    Bowling Green, KY
    Posts
    1,382
    Post Thanks / Like
    I bought the oil port adaptor from Prosport Gauges www.prosportgauges.com Part Number PSNUT it is $13.00 and shipping was free.

    Thanks goes to another builder for posting the Prosport contact a while back.

  33. #273
    Senior Member Tamra's Avatar
    Join Date
    Apr 2014
    Location
    Shelton, CT
    Posts
    1,011
    Post Thanks / Like
    Here's the pic in case you don't want to search We painted after this photo, but it shows the areas we cut/reinforced pretty clearly.
    Tamra
    Building 818SR #297 picked up 10/25/14 with Andrew (xxguitarist)
    First start 12/21/14, First "drive" 1/17/15
    First Dyno at EFI Logics 3/7/15- 310whp at 15psi for break in, full spool by ~3500rpm!
    First autocross 3/29/15
    1st Registered 818 in Connecticut 7/24/2015. 9 months - 1 day from kit pickup!

  34. #274
    Senior Member FFRSpec72's Avatar
    Join Date
    Feb 2011
    Location
    Kirkland, WA
    Posts
    2,255
    Post Thanks / Like
    Quote Originally Posted by Tamra View Post
    Here's the pic in case you don't want to search We painted after this photo, but it shows the areas we cut/reinforced pretty clearly.
    Did you use a larger top bar on the shock tower brace (as it looks like it was replaced) ?
    Tony Nadalin
    2018 SOVREN Big Bore Champion
    2015 SCCA Oregon Region VP3 Champion
    2012 ICSCC ITE Class Champion
    FFR MkII Challenge Car, Spec Racer, Street Legal, SCCA, ICSCC and NASA Racing
    818R Build in progress

  35. #275
    Senior Member FFRSpec72's Avatar
    Join Date
    Feb 2011
    Location
    Kirkland, WA
    Posts
    2,255
    Post Thanks / Like
    Quote Originally Posted by Mitch Wright View Post
    I bought the oil port adaptor from Prosport Gauges www.prosportgauges.com Part Number PSNUT it is $13.00 and shipping was free.

    Thanks goes to another builder for posting the Prosport contact a while back.
    Harley see this thread as I list the part numbers there http://thefactoryfiveforum.com/showt...-are-you-doing
    Tony Nadalin
    2018 SOVREN Big Bore Champion
    2015 SCCA Oregon Region VP3 Champion
    2012 ICSCC ITE Class Champion
    FFR MkII Challenge Car, Spec Racer, Street Legal, SCCA, ICSCC and NASA Racing
    818R Build in progress

  36. #276
    Harley818's Avatar
    Join Date
    Jan 2014
    Location
    Vancouver BC
    Posts
    788
    Post Thanks / Like
    Quote Originally Posted by Mitch Wright View Post
    I bought the oil port adaptor from Prosport Gauges www.prosportgauges.com Part Number PSNUT it is $13.00 and shipping was free.

    Thanks goes to another builder for posting the Prosport contact a while back.
    I notice on Prosport website that they have a "oil filter adapter plate" that mounts between the oil filter and the oil pre-heat/cooler. This would give the best location for pressure and temp of flowing oil. Anyone use this? Any reason why this isn't a good idea......looks like a good solution to me and I don't have to fight to get two sensors into difficult postions on the block and can retain my stock oil sensors.

    Just followed up on your link Tony. Looks like this was discussed but there was no negative comments on the sandwich plate. I like that solution for $35.
    Last edited by Harley818; 05-29-2015 at 11:54 PM.
    Harley
    Bought 2002 Donor Jan 2014
    First Start Jan 18, 2015
    First Drive Feb 14, 2015

  37. #277
    Tazio Nuvolari wannabe Scargo's Avatar
    Join Date
    Nov 2013
    Location
    south-central CT
    Posts
    1,611
    Post Thanks / Like
    I will continue to beat the drum for a solution like mine. Not that it is the only solution or the only parts available. It's been a solution for me on my track car.


    This Canton adapter is a beefy part and could easily be tapped for sensors or fittings. Then you have a remote filter of your choice and the ability to add an oil cooler. However, I would prefer to not see wires and sensors down in the super hot hell-hole of the exhaust system where the stock filter is located. Wrapping the exhaust is an absolute necessity, too. I think this approach is very important for anyone who is going to do any extended performance driving.

  38. #278
    Senior Member C.Plavan's Avatar
    Join Date
    Mar 2011
    Location
    Clovis, Ca
    Posts
    2,225
    Post Thanks / Like
    Quote Originally Posted by FFRSpec72 View Post
    Harley, thanks for the pics, do you have a pic of your throttle body warm up bypass ?


    Also looks like I will need to mod the shock tower brace as my waste gate will hit

    WP_20150526_18_24_08_Pro.jpg
    I would try and loosen the motor and trans mounts and nudge the motor/trans forward. There is some wiggle room there. Its easier to do when putting the motor in. No need to cut/weld. Both my TD04 and Blouch have plenty of room with the Group N mounts.
    Thanks- Chad
    818R-SOLD!!!- Go Karted 7/20/14/ Officially raced NASA ST2- 2/28/15
    2016 Elan NP01 Prototype Racecar Chassis #20
    1969 Porsche 911ST Vintage Race Car
    1972 Porsche 911T (#'s matching undergoing nut & bolt resto in my garage)

  39. #279
    Senior Member FFRSpec72's Avatar
    Join Date
    Feb 2011
    Location
    Kirkland, WA
    Posts
    2,255
    Post Thanks / Like
    Quote Originally Posted by C.Plavan View Post
    I would try and loosen the motor and trans mounts and nudge the motor/trans forward. There is some wiggle room there. Its easier to do when putting the motor in. No need to cut/weld. Both my TD04 and Blouch have plenty of room with the Group N mounts.
    Thanks for the suggestion, I hooked up the hoist and tried to nudge the engine/transmission forward but I'm also up against the transmission mount not having any more movement backwards for the passenger side, it bought me a little more room but the waste gate still hits and will not fully operate.
    Tony Nadalin
    2018 SOVREN Big Bore Champion
    2015 SCCA Oregon Region VP3 Champion
    2012 ICSCC ITE Class Champion
    FFR MkII Challenge Car, Spec Racer, Street Legal, SCCA, ICSCC and NASA Racing
    818R Build in progress

  40. #280
    Senior Member FFRSpec72's Avatar
    Join Date
    Feb 2011
    Location
    Kirkland, WA
    Posts
    2,255
    Post Thanks / Like
    I had a few hours in between trying to fix and prep the challenge car for this coming weekend. So I tapped the water outlet for burping the cooling system and hooked up the IC and other solenoids.


    WP_20150531_10_28_36_Pro.jpg WP_20150531_10_28_17_Pro.jpg
    Tony Nadalin
    2018 SOVREN Big Bore Champion
    2015 SCCA Oregon Region VP3 Champion
    2012 ICSCC ITE Class Champion
    FFR MkII Challenge Car, Spec Racer, Street Legal, SCCA, ICSCC and NASA Racing
    818R Build in progress

Page 7 of 25 FirstFirst ... 5678917 ... LastLast

Posting Permissions

  • You may not post new threads
  • You may not post replies
  • You may not post attachments
  • You may not edit your posts
  •  

FFMetal

Visit our community sponsor