BluePrint Engines

Visit our community sponsor

Thanks Thanks:  0
Likes Likes:  0
Page 3 of 3 FirstFirst 123
Results 81 to 95 of 95

Thread: Zero Decibel Motorsports, Coolant Bracket Relocation Kit

  1. #81
    Senior Member billjr212's Avatar
    Join Date
    Feb 2011
    Location
    Frankfort, IL
    Posts
    734
    Post Thanks / Like
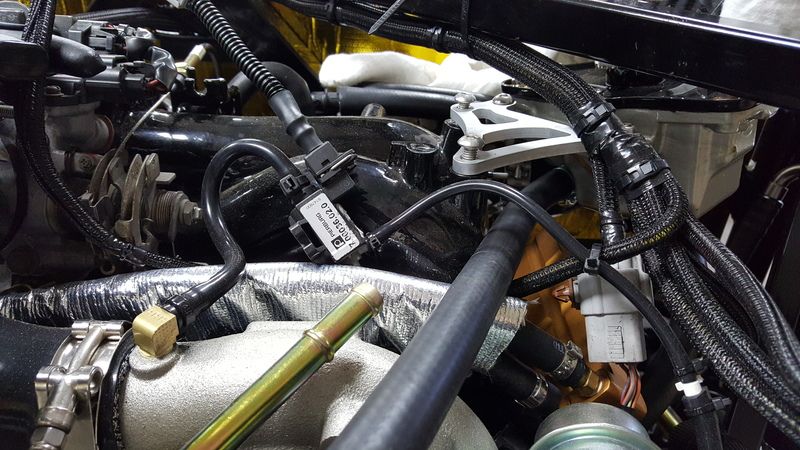
    Received my bracket this weekend and installed it yesterday. Looks great. I did end up having to cut off that support as you mentioned and still needed to add some spacers to move the coolant tank up to clear the intake tube. I probably could have cut off some more of the support leg and maybe cleared the intake that way instead, but was plenty happy with my alternative method. Thanks again! Great looking product and got it to me quickly.

  2. #82
    Senior Member Frank818's Avatar
    Join Date
    Jun 2013
    Location
    QC, Canada
    Posts
    5,732
    Post Thanks / Like
    Craig, your inbox is full.
    Frank
    818 chassis #181 powered by a '93 VW VR6 Turbo GT3582R
    Go-karted Aug 5, 2016 - Then May 19+21, 2017
    Tracked May 27/July 26, 2017
    Build time before being driveable on Sep 27, 2019: over 6000h
    Build Completed Winter 2021

  3. #83
    Mechie3's Avatar
    Join Date
    May 2012
    Location
    Indianapolis
    Posts
    5,174
    Post Thanks / Like
    Another round of parts showed up from the shop today.
    Zero Decibel Motorsports
    Check out my new website!
    www.zerodecibelmotorsports.com
    www.facebook.com/zero.decibel.motorsports

  4. #84
    Senior Member matteo92065's Avatar
    Join Date
    Feb 2014
    Location
    Ramona, CA
    Posts
    417
    Post Thanks / Like
    I did not read through this thread thoroughly, I might be making a suggestion that's been made already.

    After installing the bracket a couple of times to get things just right on my motor, I eventually filled the two tank holes, on the bracket, by welding. Then I taped them M8. It is so much easier to install and work with when you don't have to deal with the nuts on the underside. Less tools, less parts, easier.

    Onto my suggestion; make the two holes for the tank, the tap drill size for M8. Then the buyer can either drill it out for what ever screw clearance they want, or tap it.

    Maybe its not worth mentioning, maybe its the morning coffee talking, if nothing else this great little product gets a forum bump.

  5. #85
    Mechie3's Avatar
    Join Date
    May 2012
    Location
    Indianapolis
    Posts
    5,174
    Post Thanks / Like
    Not a bad idea. I might do that when I order the next batch of parts.
    Zero Decibel Motorsports
    Check out my new website!
    www.zerodecibelmotorsports.com
    www.facebook.com/zero.decibel.motorsports

  6. #86
    Senior Member metros's Avatar
    Join Date
    Jun 2013
    Location
    NoVA
    Posts
    1,064
    Post Thanks / Like
    Question - I'm using a blouch 18g-xt turbo. Is the coolant line on this turbo different than stock? It seems like the coolant tank will be down hill from the current turbo coolant line. Recommendations?


  7. #87
    Mechie3's Avatar
    Join Date
    May 2012
    Location
    Indianapolis
    Posts
    5,174
    Post Thanks / Like
    I think you're routing it wrong. The bottom tank fitting goes under the intake manifold. The top large fitting goes to the turbo.
    Zero Decibel Motorsports
    Check out my new website!
    www.zerodecibelmotorsports.com
    www.facebook.com/zero.decibel.motorsports

  8. #88
    Senior Member metros's Avatar
    Join Date
    Jun 2013
    Location
    NoVA
    Posts
    1,064
    Post Thanks / Like
    That would explain it. Thanks!

  9. #89
    Moonlight Performance
    Hindsight's Avatar
    Join Date
    May 2014
    Location
    Atlanta
    Posts
    3,402
    Post Thanks / Like
    If anyone is uncomfortable with bending a straight piece of 1/2" heater hose to go from Mechie's tank to the barb on the pipe under the manifold (which may kink the hose), I found the perfect and cheap bent hose.

    Buy this and cut one of the ends off at the correct length: http://www.amazon.com/gp/product/B000CHGIE8

    $12

    Here it is installed:

  10. #90
    Senior Member TouchStone's Avatar
    Join Date
    Sep 2014
    Location
    Dallas, TX
    Posts
    512
    Post Thanks / Like
    Blog Entries
    1
    818S Chassis #288 2.5L 323hp
    Ordered: 9/19/14 Received Kit: 11/2/14 First Start: 5/31/15 First Drive: 6/7/15 Registered: 3/10/2016 Completed: 2/10/2017
    Status: Complete Build Thread Sold 9/22/2017
    joshuajach.com

  11. #91
    Mechie3's Avatar
    Join Date
    May 2012
    Location
    Indianapolis
    Posts
    5,174
    Post Thanks / Like
    Going to place another order for these and gauging interest to see how many I should order.
    Zero Decibel Motorsports
    Check out my new website!
    www.zerodecibelmotorsports.com
    www.facebook.com/zero.decibel.motorsports

  12. #92
    Junior Member
    Join Date
    Jun 2013
    Posts
    14
    Post Thanks / Like
    I'm in for one

  13. #93
    Senior Member mistasherm's Avatar
    Join Date
    Mar 2016
    Location
    East Central PA
    Posts
    132
    Post Thanks / Like
    I would be in for one....

  14. #94
    Senior Member
    Join Date
    Mar 2015
    Location
    Houston, Tx
    Posts
    134
    Post Thanks / Like
    Yep. In.

  15. #95
    Mechie3's Avatar
    Join Date
    May 2012
    Location
    Indianapolis
    Posts
    5,174
    Post Thanks / Like
    Picked up an order this am. Need to deburr them but otherwise ready. Message or email to order.
    Zero Decibel Motorsports
    Check out my new website!
    www.zerodecibelmotorsports.com
    www.facebook.com/zero.decibel.motorsports

Page 3 of 3 FirstFirst 123

Posting Permissions

  • You may not post new threads
  • You may not post replies
  • You may not post attachments
  • You may not edit your posts
  •  

Replica Parts

Visit our community sponsor