Boig Motorsports

Visit our community sponsor

Thanks Thanks:  0
Likes Likes:  1
Page 4 of 8 FirstFirst ... 23456 ... LastLast
Results 121 to 160 of 317

Thread: 818R "Glynman Style"

  1. #121
    Tazio Nuvolari wannabe Scargo's Avatar
    Join Date
    Nov 2013
    Location
    south-central CT
    Posts
    1,611
    Post Thanks / Like
    You can juggle those Heim joint spacers, cut them down, use washers to compensate, etc. to get more clearance. I bought some thin, precision washers from McMaster-Carr and I now have a lathe.
    Note post #88. I have moved my trailing arm inside by making aluminum bushings and at the front I will move it fully inboard or I will cut the mounts out and by re-positioning, gain more room. One of the reasons I bought a bare frame.
    I'm almost that close with my (equivalent) 10.5 inch 18" rims with 28 ET. I still have to move out my uprights, or get shorter axles, as the axles are in too tight in the CV joint. If I move everything out I will need three longer arms per side and rims with more inward offset to allow fender to wheel clearance. A barrel o' snakes! I suspect I will get shorter axles or look on Ebay for front STi axles.

  2. #122
    Tazio Nuvolari wannabe Scargo's Avatar
    Join Date
    Nov 2013
    Location
    south-central CT
    Posts
    1,611
    Post Thanks / Like
    Took time out to reinstall my air scrubber in the garage and almost finished my sandblast cabinet today. I am making this out of an AC heat exchanger box.


    I have cut off all the suspension mounts on the front end except for the front LCA ones. Frame is getting lighter.

    Have just about settled on these for brakes:
    832.jpg
    Total brake package per wheel=25 pounds. That's brackets, pads and all.
    Stoptech says the weight distribution under braking is very close to 50/50
    , so I can use the same caliper sizing front and rear.
    Front: STR40/28-32 (28 &32 are the piston sizes), 328x28mm rotor
    Rear: same as front

    Master Cylinder Size: Front: ¾”, Rear: ¾”, Pedal Ratio: 5.61

  3. #123
    Senior Member Tamra's Avatar
    Join Date
    Apr 2014
    Location
    Shelton, CT
    Posts
    1,011
    Post Thanks / Like
    That's awesome that you have a sand blasting cabinet! That will come in handy for sure. We've been driving to Andrew's work when we need to sand blast something.

    The brakes look nice!
    Tamra
    Building 818SR #297 picked up 10/25/14 with Andrew (xxguitarist)
    First start 12/21/14, First "drive" 1/17/15
    First Dyno at EFI Logics 3/7/15- 310whp at 15psi for break in, full spool by ~3500rpm!
    First autocross 3/29/15
    1st Registered 818 in Connecticut 7/24/2015. 9 months - 1 day from kit pickup!

  4. #124
    Senior Member
    Join Date
    Feb 2011
    Location
    Orange, CA, USA
    Posts
    739
    Post Thanks / Like
    Quote Originally Posted by Scargo View Post
    Have just about settled on these for brakes:
    832.jpg
    Total brake package per wheel=25 pounds. That's brackets, pads and all.
    Stoptech says the weight distribution under braking is very close to 50/50
    , so I can use the same caliper sizing front and rear.
    Front: STR40/28-32 (28 &32 are the piston sizes), 328x28mm rotor
    Rear: same as front

    Master Cylinder Size: Front: ¾”, Rear: ¾”, Pedal Ratio: 5.61
    Great! That's what I'm using on the front. I had them lying around from a previous WRX I owned. I'm glad you are ahead of me and will figure out the balance before I have to sort out my rear brakes.

  5. #125
    Tazio Nuvolari wannabe Scargo's Avatar
    Join Date
    Nov 2013
    Location
    south-central CT
    Posts
    1,611
    Post Thanks / Like
    I don't know how ahead of you I will be. I am progressing slowly. I will have my brake stuff in a week or two but testing it may be a ways off.

    I did get the same answer from two brake experts. First, an engineer that used to work for AP and then Stoptech. I also was told that a proportioning valve will slow braking response and that a balanced system and adjustable bias on the master cylinders, using a racing pedal box, like the Tilton 600 and 900, is the best way to address braking pressure bias.

    As to my rear end design, it seems to have been ignored in the thread Rear End Redesign
    so I am reposting my favorite look here.

  6. #126
    Senior Member flynntuna's Avatar
    Join Date
    Apr 2011
    Location
    San Diego Ca 92106
    Posts
    1,972
    Post Thanks / Like
    All business!

  7. #127
    Tazio Nuvolari wannabe Scargo's Avatar
    Join Date
    Nov 2013
    Location
    south-central CT
    Posts
    1,611
    Post Thanks / Like
    Today I ordered Howe Racing, heavy duty, rebuildable, racing ball joints for the front UCAs. They are a ******* combination that allows me to use the FFR UCA with my Honda S2000 upright. The upright uses a common 7° stud but it is smaller than the Chrysler K772. A stud for early GM cars works so I ordered the parts independently. Howe was a big help!
    Howe Racing, heavy duty, rebuildable ball joints:
    Under "Howe 22306 Hybrid K5208/K772-22329" - Howe 22306 "Less Stud" = SKU: 22329 This fits the UCA.


    "Howe 22303 Fits K5108-22382" - Stud for 22303: +.200 stud = SKU: 22382 This fits the Honda S2000 upright (or spindle).

    Tomorrow I paint and build up the uprights.
    This evening I received the Tilton pedals, master cylinders and reservoir from Summit. I am about to order the -4 AN fittings and SS lines to feed the master cylinders.

    I have Anze Suspension working on Penske two-way shocks and an inboard shock design. Jim Schenck was so kind as to give me some data like roll centers and wheel rates.
    While I am at it I want to mention a guy who has selflessly assisted me for a month now. Primarily in suspension design but much more. He has been an all-round touchstone and mentor, providing many a litmus test for my crazy schemes. He is pretty savvy for being half my age! His name is Peter Agapoglou. His business is AutoSport, LLC and he's in Avon, CT. [email protected] 860 508 9670.
    He has worked for Bimmerworld in the pits on their stable of race cars and gets flown around the country to do so. He builds race cars, which includes all aspects of getting a car ready for the track and providing trackside support. His roll-cage work looks quite nice. He could certainly be helpful if you want help with your 818. He also has a working relationship with Anze, on Long Island.

  8. #128
    Tazio Nuvolari wannabe Scargo's Avatar
    Join Date
    Nov 2013
    Location
    south-central CT
    Posts
    1,611
    Post Thanks / Like
    WTF? Won't let me say bastar*, which is a common term for something non-standard or customized? Moderators should adjust their filters for something less rigid.
    We use wtf, nfw, etc. all the time and I can't say a form of bastar*ized? This is prehistoric censorship.

  9. #129
    Tazio Nuvolari wannabe Scargo's Avatar
    Join Date
    Nov 2013
    Location
    south-central CT
    Posts
    1,611
    Post Thanks / Like
    Progress. Blasting cabinet is working well. Honda S2000 front hubs. Nice and light and a beefy bearing. Sort of a teaser. I should have it all finished tomorrow.
    10931056_1042277419122703_8060277740513052481_o.jpg

    More excitement. Looks like I'll see my Stoptech brakes in three weeks. Now if i can just get the front suspension figured and all coming together!
    Last edited by Scargo; 01-18-2015 at 10:31 AM. Reason: additional comment

  10. #130
    Senior Member Tamra's Avatar
    Join Date
    Apr 2014
    Location
    Shelton, CT
    Posts
    1,011
    Post Thanks / Like
    Looking great, Glyn!
    Tamra
    Building 818SR #297 picked up 10/25/14 with Andrew (xxguitarist)
    First start 12/21/14, First "drive" 1/17/15
    First Dyno at EFI Logics 3/7/15- 310whp at 15psi for break in, full spool by ~3500rpm!
    First autocross 3/29/15
    1st Registered 818 in Connecticut 7/24/2015. 9 months - 1 day from kit pickup!

  11. #131
    Tazio Nuvolari wannabe Scargo's Avatar
    Join Date
    Nov 2013
    Location
    south-central CT
    Posts
    1,611
    Post Thanks / Like
    Honda S2000 uprights finished. Besides smoothing, lightening, baked-on paint and new ARP studs and bearing, I cut off the tone ring. Don't want no stinkin' ABS. Howe race ball joint is laying next to it. Fits in FFR provided UCA and ball stud fits the S2000 without modification.
    S2K upright finished.jpgS2K upright finished 2.jpgFullSizeRender (1).jpgBasic assembly (but UCA is backwards) and without LCA. Will probably be fabbing that.

    Wedssport TC105N with Titan Finish on order.
    Front: 17 x 9 +49 Rear: 17 x 9.5 +32
    15.8 pounds and 16.3 pounds
    wedssport.jpg
    As designed, I will have a 60 inch track in the front and start with 225 Conti slicks. These 225's and 245's are take-offs from a Porsche cup car.
    Last edited by Scargo; 01-23-2015 at 07:31 AM. Reason: Added pictures and comments

  12. #132
    Senior Member Bob_n_Cincy's Avatar
    Join Date
    Sep 2012
    Location
    Cincinnati OH
    Posts
    3,904
    Post Thanks / Like
    Quote Originally Posted by Scargo View Post
    Honda S2000 uprights finished. Besides smoothing, lightening, baked-on paint and new ARP studs and bearing, I cut off the tone ring. Don't want no stinkin' ABS. Howe race ball joint is laying next to it. Fits in FFR provided UCA and ball stud fits the S2000 without modification.
    S2K upright finished.jpgS2K upright finished 2.jpg
    Wedssport TC105N with Titan Finish on order.
    Front: 17 x 9 +49 Rear: 17 x 9.5 +32
    15.8 pounds and 16.3 pounds
    wedssport.jpg
    Wow Scargo,
    98% of the time I look at something, I understand. Not this time. Isn't the upper ball joint mount going to be about 6" short?

    I like the way the lower ball joint is a load bearing type. I may want this in my front heavy 818EV.
    Bob
    818S #22 Candy Blue Frame, Front Gas Tank, 2.5L Turbo, Rear radiator, Shortened Transmission, Wookiee Compatible, Console mounted MR2 Shifter, Custom ECU panel, AWIC soon
    My Son Michael's Turbo ICE Build X22 http://thefactoryfiveforum.com/showt...rts-818S-Build
    My Electric Supercar Build X21 (on hold until winter) http://thefactoryfiveforum.com/showt...e-Build-Thread

  13. #133
    Tazio Nuvolari wannabe Scargo's Avatar
    Join Date
    Nov 2013
    Location
    south-central CT
    Posts
    1,611
    Post Thanks / Like
    Look at my post again and perhaps it will be clearer. I added another picture and more info. I don't even have upper mounting points now. They are gone. Upper control arm and ball joint will be inside the wheel. The lower ball joint assembly is stock, though it has been ground on quite a bit. Those two mounting bolts for the LBJ provide an opportunity for adding spacers or a custom steering arm.
    I'm also working with Anze on inboard shocks/springs.
    Last edited by Scargo; 01-23-2015 at 08:00 AM. Reason: clarifications

  14. #134
    Member
    Join Date
    Oct 2014
    Posts
    33
    Post Thanks / Like
    You are doing some awesome front suspension development work. Please add any pictures/drawings/data of the inboard shock/spring setup when it comes together.

    By the way, I vote for your rear end design. "Form follows function" is the way to go.

  15. #135
    Tazio Nuvolari wannabe Scargo's Avatar
    Join Date
    Nov 2013
    Location
    south-central CT
    Posts
    1,611
    Post Thanks / Like
    Took time out to rework the air supply in my three-bay garage. Condensation columns with drain, filter, dryer and regulator combo. Six quick-disconnects and multiple regulators and dryers. Overhead hose reel. One outlet outside with regulator. Air into the basement. All heavy copper. A good start.
    air line cooling.jpgair lines reg.jpg
    Last edited by Scargo; 01-24-2015 at 08:43 AM.

  16. #136
    Senior Member
    Join Date
    Feb 2011
    Location
    Orange, CA, USA
    Posts
    739
    Post Thanks / Like
    I don't know anything about compressors, so can you tell me what's up with the zig-zag portion.

  17. #137
    Tazio Nuvolari wannabe Scargo's Avatar
    Join Date
    Nov 2013
    Location
    south-central CT
    Posts
    1,611
    Post Thanks / Like
    Sure. Before I explain, I have a mia culpa: In the photo, the filter/regulator block is backwards from how it should be. I have the air flowing from right to left and I had to reverse them to get everything to work.
    I have air from the compressor going into one inch copper first then the drain valve at the bottom and then the zig-zag is 3/4 copper. Stuff I had leftover from a big water heat/boiler project. Some people use flexible copper tubing and have it going back and forth on a wall, but the idea is to take the hot, moisture-laden air and cool it to condense out the moisture before it gets into the air supply system. The air travels slowly in the big tube, so it gets a chance to cool. Then it cools more as it heads up the zig-zag into the filter and dryer and then through the regulator. The design is a bit of a conceit. I am an artist/engineering type and just thought doing it this was would be cool looking as well as be functional.

  18. #138
    Tazio Nuvolari wannabe Scargo's Avatar
    Join Date
    Nov 2013
    Location
    south-central CT
    Posts
    1,611
    Post Thanks / Like
    Have mocked-up my seat location, steering wheel and pedals. I am 165 and 5-11. I felt cramped. My racing seat (temporarily a Sparco Pro 2000) was hard against the right seat-belt mount and I felt like I was going to be banging my left elbow against the cage. If I'm 5-11 and feeling like I'm running out of legroom I wonder how others are managing? Does anyone else have their knees at the steering wheel?

  19. #139
    Senior Member FFRSpec72's Avatar
    Join Date
    Feb 2011
    Location
    Kirkland, WA
    Posts
    2,255
    Post Thanks / Like
    I'm 170lbs, 6' tall and have extra room, seat is on slider and I don't have to go all the way back to my firewall. Several folks have tried it and no issues. The main issue is the broom stick test, as I pass but others are on the edge. So how did you fair on the broom stick test ?
    Tony Nadalin
    2018 SOVREN Big Bore Champion
    2015 SCCA Oregon Region VP3 Champion
    2012 ICSCC ITE Class Champion
    FFR MkII Challenge Car, Spec Racer, Street Legal, SCCA, ICSCC and NASA Racing
    818R Build in progress

  20. #140
    Senior Member C.Plavan's Avatar
    Join Date
    Mar 2011
    Location
    Clovis, Ca
    Posts
    2,225
    Post Thanks / Like
    Move the firewall back and seat needs to be mounted as low, and raked back as far as it can go. I just bent the upper firewall lower bend an additional ~10 degrees. I also bought a thinner seat cushion after my shakedown. That lowered me another 40mm. I'm 5'11, 180.
    Thanks- Chad
    818R-SOLD!!!- Go Karted 7/20/14/ Officially raced NASA ST2- 2/28/15
    2016 Elan NP01 Prototype Racecar Chassis #20
    1969 Porsche 911ST Vintage Race Car
    1972 Porsche 911T (#'s matching undergoing nut & bolt resto in my garage)

  21. #141
    Tazio Nuvolari wannabe Scargo's Avatar
    Join Date
    Nov 2013
    Location
    south-central CT
    Posts
    1,611
    Post Thanks / Like
    Perhaps it's partly the Tilton floor-mounted pedals. To have them where I want them they may not be as far forward as the Subaru hung pedals. I am grinding on them to have them completely straddle the square tube that is in my way. I don't have the seat all the way back. I have at least another inch.
    I tried it with just an adjuster which brings it up about an inch. Then I added 1-1/2" under that with a little tilt back. I'll get there but I didn't like having my knees so close to my already small, 12-1/2" diameter steering wheel.
    Nobody has commented about their left elbow bumping the cage... And that is without the SFI padding!
    Last edited by Scargo; 01-31-2015 at 07:16 AM.

  22. #142
    Senior Member Bob_n_Cincy's Avatar
    Join Date
    Sep 2012
    Location
    Cincinnati OH
    Posts
    3,904
    Post Thanks / Like
    Quote Originally Posted by Scargo View Post
    Perhaps it's partly the Tilton floor-mounted pedals. To have them where I want them they may not be as far forward as the Subaru hung pedals. I am grinding on them to have them completely straddle the square tube that is in my way. I don't have the seat all the way back. I have at least another inch.
    I tried it with just an adjuster which brings it up about an inch. Then I added 1-1/2" under that with a little tilt back. I'll get there but I didn't like having my knees so close to my already small, 12-1/2" diameter steering wheel.
    Nobody has commented about their left elbow bumping the cage...
    Scargo,
    My son driving in the video below is 6'3" and 285#
    We have fuel tank up front and a custom seat.
    As you see in this video he would be bumping his elbow if it was an R.
    We might pass a broomstick test with a R roll bar.
    broom.jpg
    818S #22 Candy Blue Frame, Front Gas Tank, 2.5L Turbo, Rear radiator, Shortened Transmission, Wookiee Compatible, Console mounted MR2 Shifter, Custom ECU panel, AWIC soon
    My Son Michael's Turbo ICE Build X22 http://thefactoryfiveforum.com/showt...rts-818S-Build
    My Electric Supercar Build X21 (on hold until winter) http://thefactoryfiveforum.com/showt...e-Build-Thread

  23. #143
    Senior Member
    Join Date
    Sep 2013
    Location
    Chicago, IL
    Posts
    571
    Post Thanks / Like
    Quote Originally Posted by Scargo View Post
    Perhaps it's partly the Tilton floor-mounted pedals. To have them where I want them they may not be as far forward as the Subaru hung pedals. I am grinding on them to have them completely straddle the square tube that is in my way.
    That was why I decided against a floor mount set up. You lose a couple of inches of leg room and it was apparent that we need all we can get here. I had also thought that you could "work around" the square tube in the forward bulkhead, but that doesn't seem feasible if you're using the Subaru LCA mount as FFR intended. You're in a more favorable position in this regard using a custom suspension set up.

    Good luck with the fitment! Sounds like you've got a few ways to make it work.

    Best,
    -j
    "Weight transfer is the enemy."

    Executive Director
    The Community Garage

  24. #144
    Senior Member C.Plavan's Avatar
    Join Date
    Mar 2011
    Location
    Clovis, Ca
    Posts
    2,225
    Post Thanks / Like
    I didn't notice my left arm hitting the roll bar at all. No different than other cars I race. Keep in mind, you "forget" about any distractions that might bug you once you are racing.

    If you are hitting the side harness mounts with your seat, that seat must be really wide. I have ~2" clearance on both sides between the side harness mounts.
    Thanks- Chad
    818R-SOLD!!!- Go Karted 7/20/14/ Officially raced NASA ST2- 2/28/15
    2016 Elan NP01 Prototype Racecar Chassis #20
    1969 Porsche 911ST Vintage Race Car
    1972 Porsche 911T (#'s matching undergoing nut & bolt resto in my garage)

  25. #145
    Tazio Nuvolari wannabe Scargo's Avatar
    Join Date
    Nov 2013
    Location
    south-central CT
    Posts
    1,611
    Post Thanks / Like
    Not a big seat. With the right mount bent over to the angle of the side of the seat base I have 4-1/2 inches of slop without bolts in the brackets. I don't and wont have a center console, per se, so having it to the far right feels pretty good. I don't know about forgetting about distractions. In my STi I have to contort my right leg a little and I was starting to get a cramp towards the end of a session. It was distracting and I was considering pulling in when the session ended. I will have padding on that area but I could see it interfering if I had a tank-slapper.
    I may end up moving the vertical. one inch square tube, but for the moment I have my master cylinders straddling it and I appear to have enough legroom.
    FullSizeRender (7).jpgFullSizeRender (6).jpgFullSizeRender (5).jpg

  26. #146
    Senior Member
    Join Date
    Sep 2013
    Location
    Chicago, IL
    Posts
    571
    Post Thanks / Like
    Quote Originally Posted by Scargo View Post
    I see you've got an SFI certified quick-disconnect hub there...instead of that street-tuner crap! =)

    Looking good Glyn. I'd be surprised if you needed more leg room with the masters ahead of the fire wall. Personally, I'd be reluctant to remove that tube, since it seems to play a structural role (total suspicion, in no way informed or analyzed thoroughly). Then again, I'm skittish that way - heck I'm even reluctant to remove that diagonal leg-bar that plagues folks.

    Best,
    -j
    "Weight transfer is the enemy."

    Executive Director
    The Community Garage

  27. #147
    Tazio Nuvolari wannabe Scargo's Avatar
    Join Date
    Nov 2013
    Location
    south-central CT
    Posts
    1,611
    Post Thanks / Like
    Yes, wise-A; and it's over-sized, heavy-duty Luan, too. Do you think the 1/2" pipe will pass muster?
    I have adjusted the seat and I'll have and inch forward and backwards on the slides. Everything is where I want it and I am one to two inches farther to the right with the pedals than "normal" and the seat is 1-5/8" off to the right of center. The steering shaft is only about an inch to the right.
    Will need a small riser to rest my heels on. I now have good knee clearance at the steering wheel.

    Wheels should be here Friday. Pagid Yellows just arrived. Next to them are my pads from my STi's 13" BBK. Not a big difference. Stoptechs should not be far behind.

    FullSizeRender (8).jpg
    Speaking of quick-disconnects: What would people recommend for the car? Hub, shaft, and quick-disconnect brand/style?
    I have a NRG Gen 2.0 on the STi and I'm not crazy about it. It's finicky and not fast to disengage.
    Last edited by Scargo; 02-04-2015 at 11:23 AM. Reason: Added question

  28. #148
    Senior Member C.Plavan's Avatar
    Join Date
    Mar 2011
    Location
    Clovis, Ca
    Posts
    2,225
    Post Thanks / Like
    I have two of these. Been using one for 10 years with no issues or slop. Get the Race version.

    http://www.tekniqauto.com/US/snapoff/snapoff.htm
    Thanks- Chad
    818R-SOLD!!!- Go Karted 7/20/14/ Officially raced NASA ST2- 2/28/15
    2016 Elan NP01 Prototype Racecar Chassis #20
    1969 Porsche 911ST Vintage Race Car
    1972 Porsche 911T (#'s matching undergoing nut & bolt resto in my garage)

  29. #149
    Administrator
    Wayne Presley's Avatar
    Join Date
    Feb 2011
    Location
    Enterprise Alabama
    Posts
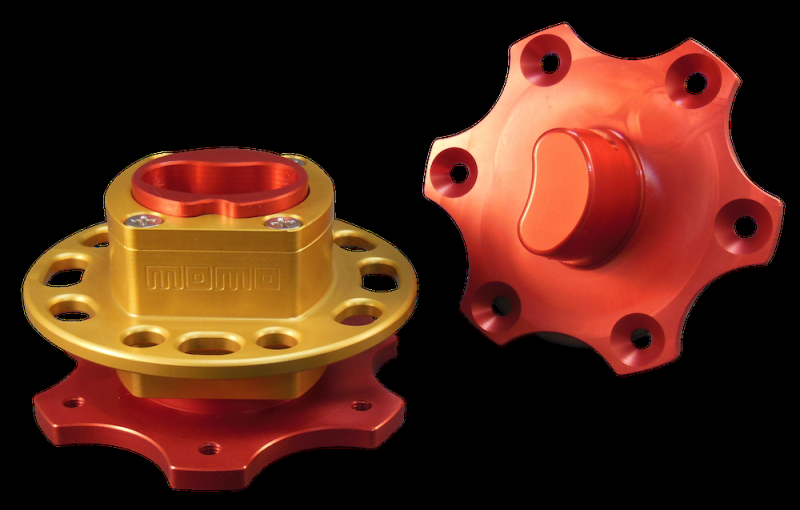
    2,804
    Post Thanks / Like
    Blog Entries
    3
    The MOMO hub is the best I've seen lately. Absolutely zero radial or axial play.
    Wayne Presley www.verycoolparts.com
    Xterminator 705 RWHP supercharged 4.6 DOHC with twin turbos

  30. #150
    Senior Member C.Plavan's Avatar
    Join Date
    Mar 2011
    Location
    Clovis, Ca
    Posts
    2,225
    Post Thanks / Like
    Quote Originally Posted by Wayne Presley View Post
    The MOMO hub is the best I've seen lately. Absolutely zero radial or axial play.
    Yep- agree. The Momo attaches to the above quick disconnect perfectly.
    Thanks- Chad
    818R-SOLD!!!- Go Karted 7/20/14/ Officially raced NASA ST2- 2/28/15
    2016 Elan NP01 Prototype Racecar Chassis #20
    1969 Porsche 911ST Vintage Race Car
    1972 Porsche 911T (#'s matching undergoing nut & bolt resto in my garage)

  31. #151
    Member Ellimist's Avatar
    Join Date
    Sep 2013
    Location
    Salt Lake City, UT
    Posts
    90
    Post Thanks / Like
    Quote Originally Posted by C.Plavan View Post
    I have two of these. Been using one for 10 years with no issues or slop. Get the Race version.

    http://www.tekniqauto.com/US/snapoff/snapoff.htm
    So it says the race version isn't street legal.... Darn.

  32. #152
    Senior Member
    Join Date
    Sep 2013
    Location
    Chicago, IL
    Posts
    571
    Post Thanks / Like
    I've been looking at the Woodward line of quick releases (all SFI 42.1 certified). Something like the QRA-1 with the QR697 hub adapter for the steering wheel I'd like to run. These are weld-on spline type adapters, so there's more fab work involved than some would prefer. You can go with their full steering column as well with splines pre-welded, but that's adding to the expenses. For a street driven car, this probably wouldn't be a viable option.

    That Tekniq looks nice too. So I'll look into it more.

    Best,
    -j
    "Weight transfer is the enemy."

    Executive Director
    The Community Garage

  33. #153
    Tazio Nuvolari wannabe Scargo's Avatar
    Join Date
    Nov 2013
    Location
    south-central CT
    Posts
    1,611
    Post Thanks / Like
    I like that Woodward one and have been looking at the Sweet (SWT801-70055 Sweet Momo/Sparco QR Hub).
    swt-801-70055_2.jpg
    I am trying to keep this simple and just get a 3/4 rod and weld one on. Then use...
    brg-650000_w_ml.jpgAluminum with two 5/16-18 threaded holes.
    AAF-ALL52148_ml.jpgand/or
    BRG-700010_ml.jpgSS mount on bulkhead. It has two set-screws (then I wouldn't need the collar clamp).

    What do you think?
    I'm not trying to cheap-out. Some are really slick but require more pieces. How important is it that I have something collapsible in the path?

  34. #154
    Administrator
    Wayne Presley's Avatar
    Join Date
    Feb 2011
    Location
    Enterprise Alabama
    Posts
    2,804
    Post Thanks / Like
    Blog Entries
    3
    Quote Originally Posted by C.Plavan View Post
    Yep- agree. The Momo attaches to the above quick disconnect perfectly.

    I was talking about the MOMO quick disconnect hub

    momo-qr6-quick-release-2.gif

    Wayne Presley www.verycoolparts.com
    Xterminator 705 RWHP supercharged 4.6 DOHC with twin turbos

  35. #155
    Senior Member C.Plavan's Avatar
    Join Date
    Mar 2011
    Location
    Clovis, Ca
    Posts
    2,225
    Post Thanks / Like
    Quote Originally Posted by Wayne Presley View Post
    I was talking about the MOMO quick disconnect hub

    momo-qr6-quick-release-2.gif

    Gotcha- I though you were just talking hubs. Those are pricey.

    I have used one similar in a buddy's car. I did like the one hand operation over the two hand of mine. http://www.rennline.com/Steering-Whe...tinfo/I18/RED/
    Thanks- Chad
    818R-SOLD!!!- Go Karted 7/20/14/ Officially raced NASA ST2- 2/28/15
    2016 Elan NP01 Prototype Racecar Chassis #20
    1969 Porsche 911ST Vintage Race Car
    1972 Porsche 911T (#'s matching undergoing nut & bolt resto in my garage)

  36. #156
    Tazio Nuvolari wannabe Scargo's Avatar
    Join Date
    Nov 2013
    Location
    south-central CT
    Posts
    1,611
    Post Thanks / Like
    Wayne, I would jump on that MOMO but then I wouldn't have any money left for the steering shaft adapter...

  37. #157
    Administrator
    Wayne Presley's Avatar
    Join Date
    Feb 2011
    Location
    Enterprise Alabama
    Posts
    2,804
    Post Thanks / Like
    Blog Entries
    3
    The kidney bean shaped part will only go on one way and is tapered for an exact fit. It's only $400
    Wayne Presley www.verycoolparts.com
    Xterminator 705 RWHP supercharged 4.6 DOHC with twin turbos

  38. #158
    Senior Member Frank818's Avatar
    Join Date
    Jun 2013
    Location
    QC, Canada
    Posts
    5,732
    Post Thanks / Like
    Quote Originally Posted by Wayne Presley View Post
    It's only $400
    Lolll
    Frank
    818 chassis #181 powered by a '93 VW VR6 Turbo GT3582R
    Go-karted Aug 5, 2016 - Then May 19+21, 2017
    Tracked May 27/July 26, 2017
    Build time before being driveable on Sep 27, 2019: over 6000h
    Build Completed Winter 2021

  39. #159
    Senior Member FFRSpec72's Avatar
    Join Date
    Feb 2011
    Location
    Kirkland, WA
    Posts
    2,255
    Post Thanks / Like
    Your build is looking great !
    Tony Nadalin
    2018 SOVREN Big Bore Champion
    2015 SCCA Oregon Region VP3 Champion
    2012 ICSCC ITE Class Champion
    FFR MkII Challenge Car, Spec Racer, Street Legal, SCCA, ICSCC and NASA Racing
    818R Build in progress

  40. #160
    Tazio Nuvolari wannabe Scargo's Avatar
    Join Date
    Nov 2013
    Location
    south-central CT
    Posts
    1,611
    Post Thanks / Like
    I just had the Wedssports delivered! SOoo stoked! Why is it wheels do that to you? It's not like a motor or anything. Tomorrow I will have the front suspension partially mocked up.
    Pete Agapoglou, of Autosport Fabrication, will be here in the morning and hopefully we will nail down the suspension points and then I can turn Anze loose on a front inboard shocks design. When finished I will share.
    Short wheelbase version!
    FullSizeRender (9).jpg
    And, yes, they are the same color. I just did some fill lighting on the right (rear) that caused the left one to look warmer than it really is.
    Last edited by Scargo; 02-05-2015 at 02:37 PM. Reason: added pic and notes

Page 4 of 8 FirstFirst ... 23456 ... LastLast

Tags for this Thread

Posting Permissions

  • You may not post new threads
  • You may not post replies
  • You may not post attachments
  • You may not edit your posts
  •  

Stewart Transport

Visit our community sponsor