Very Cool Parts

Visit our community sponsor

Thanks Thanks:  0
Likes Likes:  1
Page 2 of 8 FirstFirst 1234 ... LastLast
Results 41 to 80 of 317

Thread: 818R "Glynman Style"

  1. #41
    Senior Member metros's Avatar
    Join Date
    Jun 2013
    Location
    NoVA
    Posts
    1,064
    Post Thanks / Like
    Congrats on getting your R into the garage.

    Still looking for wheel suggestions?


    17x9 +42 front - 17.8 lbs
    18x9.5 +42 Rear - 19.0 lbs

    These are the wheels that I'm going to be using. Reasonably priced too.

  2. #42
    Tazio Nuvolari wannabe Scargo's Avatar
    Join Date
    Nov 2013
    Location
    south-central CT
    Posts
    1,611
    Post Thanks / Like
    I like the looks of wheels with more spokes. The Enkei PF01 are my style though I'm still open for something with evenly spaced spokes.
    In a couple of days I will receive most of my backordered parts. Still outstanding are the headlights (July 4 estimate) and the windscreen (no est.). That's a 42+ day wait for some parts and like many, when you call, they amazingly are just about to ship your parts out!

  3. #43
    Senior Member
    Join Date
    Jan 2012
    Posts
    1,112
    Post Thanks / Like
    42+ days for backordered parts I would kill for that. I'm at 4+ months on the headlights and just got my BO gas tank 2 weeks ago. Still waiting on fuel tank connectors.

  4. #44
    Mechie3's Avatar
    Join Date
    May 2012
    Location
    Indianapolis
    Posts
    5,174
    Post Thanks / Like
    I have stock headlights I'm not using if you can get FFR to credit you for the ones they owe you.
    Zero Decibel Motorsports
    Check out my new website!
    www.zerodecibelmotorsports.com
    www.facebook.com/zero.decibel.motorsports

  5. #45
    Tazio Nuvolari wannabe Scargo's Avatar
    Join Date
    Nov 2013
    Location
    south-central CT
    Posts
    1,611
    Post Thanks / Like
    Quote Originally Posted by Mechie3 View Post
    I have stock headlights I'm not using
    You have Spyder Auto headlights, correct? Did you do the mods you spoke of? Why the Spyders? Please share a link to the ones you are using. Perhaps I want to see if I can get a credit on the ones owed me.

    I received my tank yesterday and am supposed to get all fittings in a day or two. Anyone need/want mine? I will be using a racing cell.

  6. #46
    818 builder metalmaker12's Avatar
    Join Date
    Mar 2012
    Location
    Exeter R.I
    Posts
    2,834
    Post Thanks / Like
    Blog Entries
    1
    17x9 up front might be to wide, or damn close to rubbing rim, cause you need to run 215's max , I think 17x8 with a 30-35 offset will work well. The rear is a bit different and I think an 18x9, 9.5 or even 10.0 could fit with a 40-30 offset and maybe 255-275 tire width max.

  7. #47
    Tazio Nuvolari wannabe Scargo's Avatar
    Join Date
    Nov 2013
    Location
    south-central CT
    Posts
    1,611
    Post Thanks / Like
    My front suspension design is still inchoate. I want to do something other than the usual, which will make it uncharted territory. Probably moving things out, where flaring will be required.
    Would be sweet if I could run my STi's 18x10.5" Enkei RPF-01's (38ET) and 285X30 Hoosiers on the rear. Still think flares are in my future.

  8. #48
    Senior Member
    Join Date
    Feb 2011
    Location
    Orange, CA, USA
    Posts
    739
    Post Thanks / Like
    Quote Originally Posted by metros View Post
    Congrats on getting your R into the garage.

    Still looking for wheel suggestions?

    17x9 +42 front - 17.8 lbs
    18x9.5 +42 Rear - 19.0 lbs

    These are the wheels that I'm going to be using. Reasonably priced too.
    Unless there's an update somewhere else or I've got the wrong car, those wheel sizes appear to be incorrect. This page on GRM's website says

    Front:
    215/40R17 tires on 17x7.0-inch wheels, +35mm offset

    Rear:
    255/35R18 tires on 18x8.75-inch wheels, +35mm offset

    XXR 535 wheels
    Advan Neova AD08R tires
    Edit: Oops, sorry. I had the right car but the wrong wheels. It looks like they used Mach V wheels first as shown in your photo and specs before switching to wheels and tires I mentioned. They don't explain the reason for the switch, but they do say "The only problem is this: we have no idea if these wheels and tires will fit on the 818. Hopefully we won’t have too much trouble with fitment, as fiberglass fenders are awfully hard to roll."

    Tires in that photo are Yokohama Advan Neova AD08 R tires in 255/35R18 and 235/40R17.
    Last edited by Evan78; 06-19-2014 at 03:11 PM.

  9. #49
    Senior Member C.Plavan's Avatar
    Join Date
    Mar 2011
    Location
    Clovis, Ca
    Posts
    2,225
    Post Thanks / Like
    They really need to cut out the side vents.... and the front vents on the GRM car. Looks like crap IMHO
    Thanks- Chad
    818R-SOLD!!!- Go Karted 7/20/14/ Officially raced NASA ST2- 2/28/15
    2016 Elan NP01 Prototype Racecar Chassis #20
    1969 Porsche 911ST Vintage Race Car
    1972 Porsche 911T (#'s matching undergoing nut & bolt resto in my garage)

  10. #50
    Mechie3's Avatar
    Join Date
    May 2012
    Location
    Indianapolis
    Posts
    5,174
    Post Thanks / Like
    Forget where I bought them. LM performance maybe? Got them on sale for....$200 isn? Have to consult my spreadsheet. Didn't mod them yet. Maybe a winter project. I liked that they were projectors with led DRL instead of halos.

    Grm front vents are cutout. They just used a white mesh and no trim. Looks a bit odd. No side vents makes those humps look like an unfinished body kit.
    Zero Decibel Motorsports
    Check out my new website!
    www.zerodecibelmotorsports.com
    www.facebook.com/zero.decibel.motorsports

  11. #51
    Senior Member Rasmus's Avatar
    Join Date
    Mar 2012
    Location
    Las Vegas, USA
    Posts
    983
    Post Thanks / Like
    Glyn. Gimme your Motor, Location, and Turbo Stats and I'll run it though BorgWarner's Matchbot for you.

    I need.
    Displacement
    RPM Limit (High)
    Boost Target
    Turbo
    Your Altitude
    Average Air Temp the car is expected to run in.
    Fuel Type
    Intercooler Type, A2A, A2W?

    I'll post the link and give you one of my little interpretations.
    Fast Cars, Fast Women, Fast Haircuts!

  12. #52
    Tazio Nuvolari wannabe Scargo's Avatar
    Join Date
    Nov 2013
    Location
    south-central CT
    Posts
    1,611
    Post Thanks / Like
    Quote Originally Posted by Rasmus View Post
    Glyn. Gimme your Motor, Location, and Turbo Stats and I'll run it though BorgWarner's Matchbot for you.
    I'll post the link and give you one of my little interpretations.
    Would love to see what you get.
    Displacement: 2.34L
    RPM Limit (High):9000 perhaps 8500
    Boost Target: Unknown... would like to stay under 21-22 and just use 93 octane premium gas
    Turbo: Garrett GTX 2867 (unknown which A/R I will use)
    Your Altitude: 300
    Average Air Temp the car is expected to run in: 80F
    Fuel Type: 93 octane premium gas
    Intercooler Type: ATA

    Here's the kicker. I want to not exceed 270 RWH (for ST2), so that's about 305 at the crank? I want to make max torque. I plan on running DVACS engine with stock cams and perhaps punch up the compression a tad.
    Not sure on the intake. May run a LGT/WRX plastic manifold to reduce lag. Twin scroll v-band housing on exhaust.

    The 8374 I have has a .82 A/R housing and is for my BIG HP motor for the STi. Big valves and 270 cams. I will limit it to 430-450 AWHP. I calculate it can make 400 FPT at 3600 RPM, but it's a 3100 pound car and I'm 165.

  13. #53
    Senior Member Rasmus's Avatar
    Join Date
    Mar 2012
    Location
    Las Vegas, USA
    Posts
    983
    Post Thanks / Like
    Quote Originally Posted by Scargo View Post
    Turbo: Garrett GTX 2867 (unknown which A/R I will use)
    Oh man. I can't run a Garret/Honeywell turbo though the BorgWarner app. Coke don't mix with Pepsi!
    Fast Cars, Fast Women, Fast Haircuts!

  14. #54
    Senior Member Rasmus's Avatar
    Join Date
    Mar 2012
    Location
    Las Vegas, USA
    Posts
    983
    Post Thanks / Like
    Okay here's an old anaysis I did with that turbo. It's not as good as the BW MatchBot but that app uses many more variables...


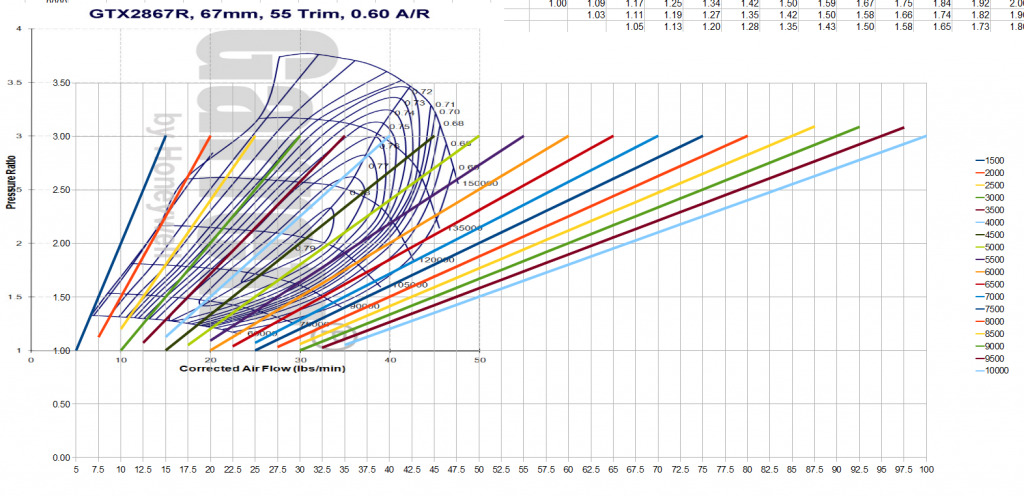
    Here's the GTX2867R compressor map under a 2.334L motor at various RPM's and Pressure Ratio's. At 2000 RPM the turbo's starting to get past the surge line (beginning to spool up). Turbo's full spooled at 3000RPM for Pressure Ratios 2.0 - 3.0. Peak HP should hit about 5000 - 5500 RPM, pushing 46 lb/min (460 hp +/- 5%) at PR 2.7. The GTX2867R will exceed it's choke line (a.k.a. gas out) at 7250 RPM pushing 36 lb/min at a PR of 1.5.
    I'll limit it to 2.5 Pressure Ratio at Sea Level (1.5 bar/~22 psi). GTX2867R turbo feed air by a 2.334L motor
    First off it looks the compressor map looks to based off a turbo running an Anti-Surge compressor housing. Just basing that on the characteristic 'S bend" in the Surge Line.
    1500 RPM - 0.0 bar 5 lb/min of air pumped , 48 hp;
    1600 RPM - 0.3 bar 6 lb/min, 57 hp, boost just starting. Next we walk up the surge line to...
    2000 RPM - 1.2 bar 14 lb/min, 133 hp;
    2250 RPM - 1.5 bar 18 lb/min 171 hp, target boost reached;
    3000 RPM - 1.5 bar 25 lb/min 238 hp;
    4000 RPM - 1.5 bar 33 lb/min, 314 hp;
    5000 RPM - 1.5 bar 41 lb/min, 390 hp;
    5500 RPM - 1.5 bar 45.5 lb/min, 433 hp, choke line reached, now we have to taper off the boost to stay below the choke line;
    6000 RPM - 1.2 bar 45 lb/min, 428 hp;
    6500 RPM - 1.0 bar 43 lb/min, 409 hp;
    7000 RPM - 0.6 bar 38 lb/min, 361 hp;
    7200 RPM - 0.4 bar 36 lb/min, 342 hp, "gassed out", RPM's higher than this push this turbo past it's choke line even if you run the boost at 0.0 bar (no boost at all). You're done.

    The above is just the mathematical ideal and does not take in to account things like pressure loss in the intercooler. Horsepower estimates are based on 9.5 hp for every 1 lb/min of air pumped. This is the low end of the that estimate (9.5-10.5). I did that on purpose to be a little more realistic. HP is estimated at the crank.
    Last edited by Rasmus; 10-11-2014 at 11:02 AM.
    Fast Cars, Fast Women, Fast Haircuts!

  15. #55
    Tazio Nuvolari wannabe Scargo's Avatar
    Join Date
    Nov 2013
    Location
    south-central CT
    Posts
    1,611
    Post Thanks / Like
    Attachment 34579
    "7200 RPM - 0.4 bar 36 lb/min, 342 hp, "gassed out", RPM's higher than this push this turbo past it's choke line even if you run the boost at 0.0 bar (no boost at all). You're done."
    I am not interested in exceeding 305 HP, so does it matter if the Garrett GTX 2867 runs out of gas?
    The GTX2867 and has slightly better efficiencies than the BW EFR 7163.
    The Garrett GTX3071R is the only one I find that works on the low and top end and its efficiencies are not better. I don't mind that it is externally wastegated.

    I'd like to see how the various turbine's area ratio (A/R) options affect the performance results.
    Last edited by Scargo; 10-30-2014 at 06:57 AM.

  16. #56
    Tazio Nuvolari wannabe Scargo's Avatar
    Join Date
    Nov 2013
    Location
    south-central CT
    Posts
    1,611
    Post Thanks / Like
    It has come into the warm garage. There's a bit of rust on the snout but it will all be acid dipped and powder-coated before assembly starts. I will be cutting metal away, radiusing sharp corners and deburring everything first.
    My mock-up motor in the background is now in. Now I will come up with a basic layout for the oil cooler, intercooler and turbo. I'm hoping to make significant use of the side inlets.
    Attached Images Attached Images

  17. #57
    Tazio Nuvolari wannabe Scargo's Avatar
    Join Date
    Nov 2013
    Location
    south-central CT
    Posts
    1,611
    Post Thanks / Like
    Thinking oil cooler will go here. Side inlet will feed air to it. I believe I will be enlarging the side inlets.
    10557649_988988577784921_2148034452603503350_o.jpg
    Under mount turbo location. Exhaust will probably exit just in front of rear wheel.
    1522700_988989191118193_6198347809445721454_o.jpg
    Took out cross-bracing so six-speed would fit. Took out center tubes in cockpit that form a tunnel front-to-back. Will do a separate mount for the shifter. Wiring and cables may be in a tube or half-tube. Full Race headers that I am modifying for the STi hang an inch too low for the 818.

  18. #58
    Senior Member
    Join Date
    Jan 2014
    Location
    USA
    Posts
    587
    Post Thanks / Like
    A low mount turbo is appealing considering the flexibility allowed in certain areas with this chassis compared to a WRX/STI engine bay. Good luck with your endeavor.

  19. #59
    818 builder metalmaker12's Avatar
    Join Date
    Mar 2012
    Location
    Exeter R.I
    Posts
    2,834
    Post Thanks / Like
    Blog Entries
    1
    Like the way your building it, like turbo location!!!
    818S frame #13 Jdm version 8 ej207

  20. #60
    Senior Member
    Join Date
    Sep 2013
    Location
    Chicago, IL
    Posts
    571
    Post Thanks / Like
    Looking forward to seeing the custom header work. I'm considering this as well, but in my case I just want to see if I have room to drop the engine an inch or two (I'll be going with a dry sump). Seems all the aftermarket headers hang damn near as low as the stock oil pan. So maybe a guy sends you a set of headers...and maybe you sends a guy back a modified set...=)

    That's a big oil cooler you got there. About time we see someone try to fit one in that location. Carbon scoops in your future?

    Best,
    -j
    "Weight transfer is the enemy."

    Executive Director
    The Community Garage

  21. #61
    Tazio Nuvolari wannabe Scargo's Avatar
    Join Date
    Nov 2013
    Location
    south-central CT
    Posts
    1,611
    Post Thanks / Like
    I spent most of yesterday deburring sharp edges, rounding corners and cleaning up welds. Today I fitted the sti hub and started looking for lateral links and trailing arms.
    Lateral Links:
    I am shocked that Cusco wants $1,400 for adjustable links.
    I am inclined to buy Lego-like parts and build them myself.
    I found at Allstar Performance everything I need (I think). I'd like some input from the track people out there.
    I can buy Aluminum rods or I can fab from .058" wall 4130.
    These Howe hex rods have 15/16" flats and 5/8 threads. They cost $11 each. Equals total of $44.
    These scalloped ones are $19 each and claim to be stronger than a plain tube. $76 total
    One inch OD 4130 with .058" wall can be had on Ebay for about $30 and ends are $80 for a total of $83 and some welding.
    Is aluminum strong enough?
    Rod ends/Heim Joints can run from $80 for a set to ridiculous. Around $200 seems normal/average. Should I go cheap and replace them as they get loose? I am not considering ones you can lube (hole in threaded end).
    What I see on my R is that the upper inboard mounting holes are larger than the lower ones. Like, 5/8" vs 12mm and the other slotted.
    Going with 5/8" ends seems obvious. On the other end the STi upright has about a .55" holes for a 14mm bolt. It would be easy to enlarge it to 5/8" if the trough between the ends will clear the bolt. I guess I could use a ball-end mill on it. Then I just have to find a couple of long bolts or threaded studs! Has anyone done this mod?
    On the trailing arm:
    I am considering something along the lines of a "J bar". Just to show ludicrous $$, Vivid Racing: $1,032.69
    If I were to turn aluminum bushings to replace the rubber one I think I could add a Heim joint/rod end to the inside and use a simpler/straighter link to the front. Perhaps an adaptation of an OTS item, like a J-bar.
    Last edited by Scargo; 11-08-2014 at 06:18 AM.

  22. #62
    Tazio Nuvolari wannabe Scargo's Avatar
    Join Date
    Nov 2013
    Location
    south-central CT
    Posts
    1,611
    Post Thanks / Like
    Today got to meet Tamra and Andrew. They are very close to me. What a neat couple. I interrupted their working on the 818 for about an hour. That's two hours of progress they lost. They're doing a great job.

  23. #63
    Senior Member Tamra's Avatar
    Join Date
    Apr 2014
    Location
    Shelton, CT
    Posts
    1,011
    Post Thanks / Like
    Quote Originally Posted by Scargo View Post
    Today got to meet Tamra and Andrew. They are very close to me. What a neat couple. I interrupted their working on the 818 for about an hour. That's two hours of progress they lost. They're doing a great job.

    It was great meeting you too, Glynn! Don't worry, we got the mains measured today despite you ;p Also, I would only count it as 1.5 hours. I'm not that good yet! We can't wait to see your 818R at some point.

  24. #64
    Tazio Nuvolari wannabe Scargo's Avatar
    Join Date
    Nov 2013
    Location
    south-central CT
    Posts
    1,611
    Post Thanks / Like
    For my lateral links I just purchased QuickCar 3/4" X 13" long Aluminum Scalloped Suspension Tube (QRP75-130) and QA1 XM Series Chrome Moly Steel Rod End - Male - 5/8" bore x 3/4"-16 thread from PitStopUSA. Getting 5/8" X bolts from McMaster Carr.
    Pictures in a couple of days...

  25. #65
    818r center seat biknman's Avatar
    Join Date
    Mar 2011
    Location
    Charm City
    Posts
    138
    Post Thanks / Like
    Blog Entries
    4
    Quote Originally Posted by Scargo View Post
    For my lateral links I just purchased QuickCar 3/4" X 13" long Aluminum Scalloped Suspension Tube (QRP75-130) and QA1 XM Series Chrome Moly Steel Rod End - Male - 5/8" bore x 3/4"-16 thread from PitStopUSA. Getting 5/8" X bolts from McMaster Carr.
    Pictures in a couple of days...

    FYI I've done this a several cars fine for racing IE occasionally use. But Daily Driving year round in the NE kills them overtime. Every time I do an oil change I service all the himes joints (usually just soak the bearing down with WD40 or PB blast and then rotate them thru their full range of motion) even if I run the seals on them. Unlike ploy or derlin bushes where you have to lube them once a year to avoid the squeaks. And eventually they break right at the eye of the hime ball joint to threaded joint. Unless it's some crazy big like 1"+ joint. http://www.ballisticfabrication.com/...ngs_c_143.html Oh and always us anti-seize on the threads into the tie rod and on the lock nut.

  26. #66
    Tazio Nuvolari wannabe Scargo's Avatar
    Join Date
    Nov 2013
    Location
    south-central CT
    Posts
    1,611
    Post Thanks / Like
    Making some progress. Got these parts in and assymbled.
    1507241_993750073975438_3171458502664797527_o.jpg
    Disassembled the rear uprights. Bearings are fun... Am about to drill the uprights out for this 5/8" cap screw:
    1529771_993125294037916_8261783870737784431_o.jpg
    I was wondering what the best lube for Heim joints is. I do have seals for them. Have to get on the lathe. The two seals occupy .094". I have 1/4" and 1/2" tapered spacers. I also bought some .030" shim washers.

  27. #67
    Senior Member D Clary's Avatar
    Join Date
    Aug 2013
    Location
    Santa Rosa CA
    Posts
    407
    Post Thanks / Like
    818 rear 001.JPG818 rear 002.JPGI bought all my links from speedway motors. Laterals are aluminum with aluminum hiems and the lower are aluminum with aircraft quality steel hiems. I made rear lower bushings to accommodate the rod end links

  28. #68
    Senior Member Frank818's Avatar
    Join Date
    Jun 2013
    Location
    QC, Canada
    Posts
    5,732
    Post Thanks / Like
    Quote Originally Posted by D Clary View Post
    818 rear 001.JPG818 rear 002.JPGI bought all my links from speedway motors. Laterals are aluminum with aluminum hiems and the lower are aluminum with aircraft quality steel hiems. I made rear lower bushings to accommodate the rod end links
    My favorite so far on this forum, sad for me I didn't see this before I installed my links last summer.
    Frank
    818 chassis #181 powered by a '93 VW VR6 Turbo GT3582R
    Go-karted Aug 5, 2016 - Then May 19+21, 2017
    Tracked May 27/July 26, 2017
    Build time before being driveable on Sep 27, 2019: over 6000h
    Build Completed Winter 2021

  29. #69
    Senior Member wleehendrick's Avatar
    Join Date
    Jul 2012
    Location
    Encinitas, CA
    Posts
    1,653
    Post Thanks / Like
    Blog Entries
    2
    Quote Originally Posted by D Clary View Post
    I bought all my links from speedway motors. Laterals are aluminum with aluminum hiems and the lower are aluminum with aircraft quality steel hiems. I made rear lower bushings to accommodate the rod end links
    Looks gorgeous, but have you verified wheel fitment? Your trailing arm looks straight, while the factory piece is concave (bent inboard) for rim clearance.

  30. #70
    Senior Member D Clary's Avatar
    Join Date
    Aug 2013
    Location
    Santa Rosa CA
    Posts
    407
    Post Thanks / Like
    They are straight but they are inset to the inside and are 1/2 the diameter of the VCP arms and have the same clearance

  31. #71
    Senior Member wleehendrick's Avatar
    Join Date
    Jul 2012
    Location
    Encinitas, CA
    Posts
    1,653
    Post Thanks / Like
    Blog Entries
    2
    Quote Originally Posted by D Clary View Post
    They are straight but they are inset to the inside and are 1/2 the diameter of the VCP arms and have the same clearance
    Glad you considered that in the design. I've seen a lot mounted swapped, so thought I'd mention it. Nice job!

  32. #72
    Tazio Nuvolari wannabe Scargo's Avatar
    Join Date
    Nov 2013
    Location
    south-central CT
    Posts
    1,611
    Post Thanks / Like
    D Clary, I bought from Pitstop. We great minds think alike. I am trying to schedule a time to use a lathe, to machine aluminum inserts so I can attach a Heim joint to the inside and keep the rod straight!
    I have not found bushings (on the internet) that are 40mm in diameter, that I feel will do the job. How did you accomplish it? Machined from two pieces of aluminum?
    9/16" or 5/8" Heims on the trailing arm?
    I assume you do not see that this will have any significant impact on the geometry of the rear suspension, as I do.
    Last edited by Scargo; 11-15-2014 at 09:38 AM. Reason: adding comment

  33. #73
    Senior Member Turboguy's Avatar
    Join Date
    Feb 2011
    Location
    Canada
    Posts
    416
    Post Thanks / Like
    Quote Originally Posted by FFRSpec72 View Post
    I would ask for a different car
    Buwaha ha ha ha ha!!!!

  34. #74
    Senior Member D Clary's Avatar
    Join Date
    Aug 2013
    Location
    Santa Rosa CA
    Posts
    407
    Post Thanks / Like
    Sorry been away from the computer, I made the bushings in two pieces that push in from either side. The spindles are not very uniform so you may have to make each bushing the correct od. I made them a tight slip fit, we'll see how that goes. I used 3/4 hiems in the rear and 3/4-5/8 in front, mainly because the rear is on single shear. I bought good aircraft hiem w/ 60,00 lbs radial load rating. I used aluminum rods as they are light and strong. The lateral links use aluminum hiems and rods. I have used this stuff on a lot of dirt race cars without a failure and that is much more violent usage than these will ever see. The rear geometry is unchanged as the attaching point are the same, the bar is just straight.

  35. #75
    Tazio Nuvolari wannabe Scargo's Avatar
    Join Date
    Nov 2013
    Location
    south-central CT
    Posts
    1,611
    Post Thanks / Like
    D Clary: I have been having a hard time duplicating what I think you have. One inch diameter Afco tubes? 16 inches long?
    I think you meant to say 60,000 lbs radial load rated Heim joints, but I have found nothing close.
    I plan on using a grade 8 cap screw at the upright. Might use 3/4-3/4 for the front since weight is irrelevant.

  36. #76
    Senior Member D Clary's Avatar
    Join Date
    Aug 2013
    Location
    Santa Rosa CA
    Posts
    407
    Post Thanks / Like
    I will measure the tubes tomorrow, I may have had to shorten them slightly. I used 3/4 5/8 in front because it required no modification to the mount and it is in double shear. I can look up the # for the joints, I am sure I got them from speedway. The rear bolt is a 3/4 grade 8 front is 5/8

  37. #77
    Senior Member D Clary's Avatar
    Join Date
    Aug 2013
    Location
    Santa Rosa CA
    Posts
    407
    Post Thanks / Like
    The lower links are 17 inches, I couldn't find the hiems either I would have to look harder I thing they are QA1 chrome molly

  38. #78
    Tazio Nuvolari wannabe Scargo's Avatar
    Join Date
    Nov 2013
    Location
    south-central CT
    Posts
    1,611
    Post Thanks / Like
    An update. I was on the phone with a brake expert two days ago. What he said shocked me. He said Alcons are very good. A smallish engineering-based brake company. Perhaps a little more expensive than others.
    AP is also very good. Perhaps Brembo and Stoptech next. Some biggies in the biz (as in lots of volume) will wait till they are virtually out of stock before they do a big manufacturing run and can cause supply issues.
    As an aside, I have 14" (355mm) Trophy Stoptechs on my STi. Stock Brembos and seven pounds lighter (each) 316mm (12.45") Gyrodisc floating rotors on the back. Stops well.
    The expert said "go big". He said testing showed that bigger is better. Better feel before lockup/less lockup. Weight is not that big a factor (except perhaps for autocrossers) and you can sometimes order thicker rotors, with a bigger airspace (and thus lighter) to compensate for the larger diameter. Thicker pads require bigger calipers. Seldom do pads need to be more than 20mm thick.
    Many brake companies use 180mm, center to center, mounting hole spacing for calipers, thus making many mounts standardized to this dimension. One brake companies adapter may work with other company's brake calipers. He wants to see caliper mounts shim-able in both axes for perfecting the alignment to the rotor.

    Perhaps the most shocking comment: Use 13 inch on front and back. SAME brakes, front and rear! Less spares.
    Use a proportioning valve. With a very low CG car there is not that much weight shift during braking. Braking force can be relatively equal-front to back.

    No need to do more than four piston calipers. He worked for Alcon and likes the "B" type for our car.
    He suggested I look at "NASCAR brakes". Good prices on Brembo and other "NASCAR" setups. A number of brake companies make a "NASCAR" brake setup. NASCAR cars are only 200-300 pounds more than our car @ 2000 pounds.
    I may go with a Tilton floor-mount pedal box based on what he had to say about pedal boxes. They are high-tech, with advanced features for the hydraulic cylinders with the 900 series. Good bang for the buck? They are pricey but gorgeous and full-featured.

  39. #79
    Senior Member Bob_n_Cincy's Avatar
    Join Date
    Sep 2012
    Location
    Cincinnati OH
    Posts
    3,903
    Post Thanks / Like
    Quote Originally Posted by Scargo View Post
    An update. I was on the phone with a brake expert two days ago. What he said shocked me. He said Alcons are very good. A smallish engineering-based brake company. Perhaps a little more expensive than others.
    AP is also very good. Perhaps Brembo and Stoptech next. Some biggies in the biz (as in lots of volume) will wait till they are virtually out of stock before they do a big manufacturing run and can cause supply issues.
    As an aside, I have 14" (355mm) Trophy Stoptechs on my STi. Stock Brembos and seven pounds lighter (each) 316mm (12.45") Gyrodisc floating rotors on the back. Stops well.
    The expert said "go big". He said testing showed that bigger is better. Better feel before lockup/less lockup. Weight is not that big a factor (except perhaps for autocrossers) and you can sometimes order thicker rotors, with a bigger airspace (and thus lighter) to compensate for the larger diameter. Thicker pads require bigger calipers. Seldom do pads need to be more than 20mm thick.
    Many brake companies use 180mm, center to center, mounting hole spacing for calipers, thus making many mounts standardized to this dimension. One brake companies adapter may work with other company's brake calipers. He wants to see caliper mounts shim-able in both axes for perfecting the alignment to the rotor.

    Perhaps the most shocking comment: Use 13 inch on front and back. SAME brakes, front and rear! Less spares.
    Use a proportioning valve. With a very low CG car there is not that much weight shift during braking. Braking force can be relatively equal-front to back.

    No need to do more than four piston calipers. He worked for Alcon and likes the "B" type for our car.
    He suggested I look at "NASCAR brakes". Good prices on Brembo and other "NASCAR" setups. A number of brake companies make a "NASCAR" brake setup. NASCAR cars are only 200-300 pounds more than our car @ 2000 pounds.
    I may go with a Tilton floor-mount pedal box based on what he had to say about pedal boxes. They are high-tech, with advanced features for the hydraulic cylinders with the 900 series. Good bang for the buck? They are pricey but gorgeous and full-featured.
    Scargo,
    A big thank you for getting this information on brakes.
    It confirms the theory I posted http://thefactoryfiveforum.com/showt...l=1#post178015
    I don't have a proportional valve yet. When I get big rear tires, I will have to determine where to install it(front or rear).
    You shouldn't need a proportional valve if you have a balance bar in you pedal assembly.
    Bob

    PS: you may need 18" wheels in front to run 13" brakes
    Last edited by Bob_n_Cincy; 11-20-2014 at 02:10 AM.
    818S #22 Candy Blue Frame, Front Gas Tank, 2.5L Turbo, Rear radiator, Shortened Transmission, Wookiee Compatible, Console mounted MR2 Shifter, Custom ECU panel, AWIC soon
    My Son Michael's Turbo ICE Build X22 http://thefactoryfiveforum.com/showt...rts-818S-Build
    My Electric Supercar Build X21 (on hold until winter) http://thefactoryfiveforum.com/showt...e-Build-Thread

  40. #80
    Senior Member
    Join Date
    Sep 2013
    Location
    Chicago, IL
    Posts
    571
    Post Thanks / Like
    I think it would be hard to call a pedal set $2,450 a good bang for the buck. I'm sure they're nice, but "bang for the buck" requires a hard evaluation of how much nicer they are in terms of real world function compared to something else that does the same job in a similar manner (like Wilwood's floor mount pedal set, $300).

    Also, I was considering a floor-mount 3-pedal set up and started to get worried that I was eating up longitudinal real estate on the floor, which meant limiting an already tight space for larger drivers (I anticipate others will drive the car, some of whom need a little Wookie love). Check the dimensions of whatever floor-mount pedal set up you're considering - check them carefully. I had hoped I could stick the masters out the back of the front firewall and just have the pedals in the cockpit, but on the backside is the rear mount for the lower control arm. That's a busy space to negotiate.

    I ditched the floor-mount idea in favor of the top-mount Wilwood set up (along with a throttle pedal from Joe's - which does mount to the floor but doesn't have master cylinders to complicate things). The Wilwood pedals are very nice, and I'm hard-pressed to imagine that almost 10x the cost is going to be justified for the 900-Series Tilton set up, much less considered a good bang-for-the-buck. Of course, these aren't the only pedals from Tilton, and all of their stuff looks top notch (incl. the sets that are 1/4 the cost of these). So again, I'm wondering just how practically valuable all the bells and whistles are in the other pedal set up.

    Best,
    -j
    "Weight transfer is the enemy."

    Executive Director
    The Community Garage

Page 2 of 8 FirstFirst 1234 ... LastLast

Tags for this Thread

Posting Permissions

  • You may not post new threads
  • You may not post replies
  • You may not post attachments
  • You may not edit your posts
  •  

Brown County Customs

Visit our community sponsor