Forte's

Visit our community sponsor

Thanks Thanks:  0
Likes Likes:  0
Page 6 of 20 FirstFirst ... 4567816 ... LastLast
Results 201 to 240 of 779

Thread: 818Rasmus E Modified

  1. #201
    Senior Member wleehendrick's Avatar
    Join Date
    Jul 2012
    Location
    Encinitas, CA
    Posts
    1,653
    Post Thanks / Like
    Blog Entries
    2
    Quote Originally Posted by Rasmus View Post
    My medical staples are starting to itch. Typing one handed sucks. Wah!
    I can relate... after my motorcylce get-off, I had four pins in my right hand for six weeks (and a torso brace for the fractured vertebrae for 12 weeks). As soon as you can, get it moving and start PT.

  2. #202
    Senior Member Doowop's Avatar
    Join Date
    Jan 2014
    Location
    Denver, CO
    Posts
    208
    Post Thanks / Like
    great Thread Rasmus.
    What amperage are you using for the bucket? 2 Amp? have you try different ones? Awesome way to do it, by the way. Thanks

  3. #203
    Senior Member Rasmus's Avatar
    Join Date
    Mar 2012
    Location
    Las Vegas, USA
    Posts
    983
    Post Thanks / Like
    Quote Originally Posted by Doowop View Post
    great Thread Rasmus.
    What amperage are you using for the bucket? 2 Amp?
    Thanks for the compliment. I use 12v@2 amp setting usually. My charger also has 6v@2 amp and 12v@6 amp. I've found that running the charger 12v@6amps for extended periods (more than 90 minutes) tends to trip the overheat-safety on my charger. Then I have to manually reset it. That varies widely depending on the size of my anode and the temperature of the air. I had it set up once with 16 rebars for the anode set in a circle during a Las Vegas Summer. It wouldn't stay on for 20 minutes even on the 12v@2amp setting. YMMV.

  4. #204
    Senior Member Rasmus's Avatar
    Join Date
    Mar 2012
    Location
    Las Vegas, USA
    Posts
    983
    Post Thanks / Like
    Shoulder's feeling about 20%. No pain any more, which is nice. Doc had me on a double set of Oxycontin slow release pills and 2 Oxycodone 10mg pills every four hours. Let me tell you, I know why people get addicted. You just feel nice. No problems. And staring at blank walls for three hours is entertainment. Tapered down and now I'm not taking any pain meds.


    Two used lateral link bolts and nuts arrived along with a used '97 Legacy knuckle. Bolts look in good shape. The knuckle, not so much. This has got to be the second greasiest, rustiest part I've ever worked on. Came from the Salt Lake area. Looks it too.


    The older Legacy knuckle has less webbing above the long lateral link bolt pocket, just below the bearing. See red arrows.


    But the dimensions are all the same. Bolt holes the same. Hole spacing the same. I can save it. Knuckle's in the anti-rust bucket as I type.
    Last edited by Rasmus; 03-14-2014 at 11:27 PM.

  5. #205
    Senior Member Goldwing's Avatar
    Join Date
    Nov 2012
    Location
    Medina, OH
    Posts
    744
    Post Thanks / Like
    Glad you're feeling better! Sadly, I took a spill today spraining my ankle. My turn to miss some valuable build time. Hopefully I'll be moving, albeit slowly in a few days. This winter has overstayed its welcome. (Slipped on ice while heading over to a hill with my little girl on what would have been her first sled riding adventure). She got to tour the urgent care instead, lol.
    Rich

    818S in progress. 2007 WRX sedan donor.
    Powered up: 7-8-14, First Start: 7-20-14, Go kart: 8-19-14

  6. #206
    Senior Member Frank818's Avatar
    Join Date
    Jun 2013
    Location
    QC, Canada
    Posts
    5,732
    Post Thanks / Like
    Great for the shoulder! Bot a new ball joint in there! Keep it on!

    About the rusted knuckles, you think that's rust? You haven't seen my 8 knuckles! Of course you haven't, I didn't post the pix yet on my thread. On 4 of them the rust is so thick it has formed a yellow and white thick crust. On the other 4, they are completely red with eaten back plates. I'll show that once I post the pix, for the fun of it. My anti-rust bucket is working very very hard to remove that rust, even on the bolts. I am actually testing 10amps as 2amps barely creates bubbles. The part in the bucket is placed 1in from the cathode to maximize current. I plan on zinc plating them in another bucket after that, using zinc sulfate and a zinc plate.
    Frank
    818 chassis #181 powered by a '93 VW VR6 Turbo GT3582R
    Go-karted Aug 5, 2016 - Then May 19+21, 2017
    Tracked May 27/July 26, 2017
    Build time before being driveable on Sep 27, 2019: over 6000h
    Build Completed Winter 2021

  7. #207
    Tazio Nuvolari wannabe Scargo's Avatar
    Join Date
    Nov 2013
    Location
    south-central CT
    Posts
    1,611
    Post Thanks / Like
    subarupartsforyou.com lists the part as $127. You can pick it up at your local dealership. Too much? Housing-rear axle, right, 28419FE001 / Housing-rear axle, left, 28419FE011

  8. #208
    Senior Member Rasmus's Avatar
    Join Date
    Mar 2012
    Location
    Las Vegas, USA
    Posts
    983
    Post Thanks / Like
    Quote Originally Posted by Frank818 View Post
    About the rusted knuckles, you think that's rust? You haven't seen my 8 knuckles! Of course you haven't, I didn't post the pix yet on my thread. On 4 of them the rust is so thick it has formed a yellow and white thick crust. On the other 4, they are completely red with eaten back plates. I'll show that once I post the pix, for the fun of it. My anti-rust bucket is working very very hard to remove that rust, even on the bolts. I am actually testing 10amps as 2amps barely creates bubbles.
    I don't think the boy from Vegas has a chance in the who's-rusty-is-thicker contest against the boy from Montreal.

    I run my bucket at 2 amps. It makes hydrogen bubbles, but it's not like it's a rolling boil that'd fill the Hindenburg. I'm truly interested in how the 10 amps works out. I'll follow along in your thread.

    Quote Originally Posted by Scargo View Post
    subarupartsforyou.com lists the part as $127. You can pick it up at your local dealership. Too much?
    For me it was. It's not just the cost of the knuckles, its the lateral link bolts too. Your website list those for $16 per. So for me it was a choice between $55+elbow grease for used or $159 for new. Even the new knuckle would need some work. I'd have to paint it to match the right side so at least a degreasing. Can't have knuckles that don't match.

  9. #209
    Senior Member
    Join Date
    Mar 2011
    Location
    Carrollton, Ga.
    Posts
    297
    Post Thanks / Like
    Hi, Rasmus; glad you are improving.

    I infer from the sequence of photos earlier in your build thread that there is a specific process for seating the wheel bearings/races in the carriers/uprights. (I have only a CD with a fairly basic "factory manual" on it. Very disappointing.) Left to my own devices, I would just press the unit bearing in (pressure applied on the races), respecting the limits set by the machined lip inside the carrier on one end and the snap-ring on the other. Then would gently press the hubs in.

    Because the carriers/hubs from my donor are fairly corroded, I opted for new OEM ones and will put new bearings, hubs and seals in them.

    If there is a procedure I should know about, is it too voluminous for you to outline it?

    Thanks for any help.

    Bill

  10. #210
    Senior Member Rasmus's Avatar
    Join Date
    Mar 2012
    Location
    Las Vegas, USA
    Posts
    983
    Post Thanks / Like
    Thanks Bill.

    Pressing a new bearing in to a 2006 WRX (or equivalent) front knuckle

    Note: Bearing goes in from the back side.
    Note: I believe new bearings come with a cool little plastic ring on the inside to keep every thing together. Don't remove it until it's time to press the hub in.
    1. Lightly grease, with the exact same grease in the bearing, the outside of the outer race and the machined surface the race will be pressed into. By light, I mean get your finger a little dab of grease on it and use only that dab to cover each part. Most of this will get scraped out in the next few steps. But it makes it so much easier than pressing it in dry.
    2. Lightly set the bearing assembly race into the knuckle and check with a ruler that it's sitting square in the machined bore.
    3. Lightly Load the press on the outer race by use an appropriately wide bearing driver disc (72mm) up a bit and recheck for square. This step is do-you-want-to-buy-another-bearing important.
    4. Press the bearing in to the knuckle by pressing on the outer race. I used a 72mm bearing press disc that came in my bearing press kit. Be sure you do this square. The first two pumps on the press are where you'll know if the bearings going in square or if your buying another new bearing set.
    5. With my bearing driver set I had to stop short of bottoming out the bearing because the 72mm bearing press disc is just about the right size to get stuck in the bore if you pressed it in there. So for the last little bit where the outer race has been driven past the bore lip but is still not bottomed out I switched to a smaller bearing driver and pressed on the bearings inner race to fully seat.
    6. No need to go 20-tons on seating the race fully down. Just one pump past when you feel it hit bottom and you're good.
    7. Install snap ring. I like to make sure the tongs of the snap ring are up. Just because I'd like to think there's less chance for the snap ring groove to collect debris or water when the lower portion of it is filled by snap ring. Probably just being overly cautious.
    8. Install outer shaft seal into the knuckle. It's the one without the extra lip. Install it correctly orientated. Think, "The cup catches the grease, keeping it inside".
    9. Lightly grease the hub's machined surface just like the above step 1.
    10. Remove the cool little plastic ring that held the bearing together up to this point. Be mindful the inner races, roller bearing, and cages are just sitting in there with only the surface tension of the grease holding them in. They can fall out. And the first thing they find when they fall is that pile of metal shavings you missed sweeping up.
    11. Press bearing (with knuckle surrounding it) onto the hub. Now to press this on, you're going to press on the inner race of the bearing set from back side with probably the same smaller bearing driver disc you used in steps 5 and 6. Do not set the hub on the wheel studs to press the knuckle on. The wheel studs can easily dislodge and get you pressing crooked. Hub needs to be supported by it's flange. If you can't get this. You could try locking all five studs to the hub with junky open ended lug nuts. I, personally, don't have those but hey you might. Though pressing square is important here it's harder to mess up compared to step 4.
    12. Stop pressing when the hub has no more play in the bearing. You'll have to keep unloading the press to check. We're not looking to fully seat the hub into the bearing on this step just get it close enough.
    13. Install inner shaft seal into the knuckle. It'll seem like there's a gap between the inner portion of the inner shaft seal and the face of the inner bearing race. That's normal.
    14. Install axle into hub. Tighten down to 162 ft-lb. Yes, one hundred sixty two. This fully seats the bearing.
    15. Post cool pictures of what you did on the internet.
    16. Have Bills Waters ask you how you did it.
    17. Type a step-by-step list up for Bill Waters.
    Last edited by Rasmus; 03-16-2014 at 09:58 AM.

  11. #211
    Senior Member
    Join Date
    Mar 2011
    Location
    Carrollton, Ga.
    Posts
    297
    Post Thanks / Like
    Many, many thanks, Rasmus. for steps 1 - 15 and especially for willingness to post when pestered by the guy in steps 16 & 17.

    I have used rear knuckles/carriers from a 2006 WRX which I won't be needing. Do you prefer them to the ones you sourced? If so, I'll be happy for you to have mine. Let me know.

    Thanks again,

    Bill

  12. #212
    Senior Member Rasmus's Avatar
    Join Date
    Mar 2012
    Location
    Las Vegas, USA
    Posts
    983
    Post Thanks / Like
    Knuckles vs. Carriers vs. Uprights. Must be a regional thing. Like soda/pop/coke.

    Right now I'm gonna stick with what I got, but thanks for the thought. If I break another one you'll get a PM from me.

  13. #213
    Senior Member Frank818's Avatar
    Join Date
    Jun 2013
    Location
    QC, Canada
    Posts
    5,732
    Post Thanks / Like
    Yeah I wish I'd be in Vegas, Rasmus... I'd spend less time cleaning my parts. lolll

    Actually so far I found out 10amps really does a great job and the bolts (no knuckles tried out yet) don't make big bubbles. Very small ones on the surface. And I have to place them about 2in from the metal plate. It seems it needs some very good current to work well and probably 3 to 6h for the rear long lateral bolts. But it's easy to manually remove the excess if any left, the rust may still show a little, but not stuck hard. Now that I start to get the hang of it, next parts I will post a video to show the difference.

    I will also zinc electroplate the bolts and nuts. Like you know, it's the same process as anti-rust, but you have to switch the anode-cathode and use a different mixture with a zinc plate. I am doing all this after I have seen your post when you started cleaning. See how you influence others. lolll
    Frank
    818 chassis #181 powered by a '93 VW VR6 Turbo GT3582R
    Go-karted Aug 5, 2016 - Then May 19+21, 2017
    Tracked May 27/July 26, 2017
    Build time before being driveable on Sep 27, 2019: over 6000h
    Build Completed Winter 2021

  14. #214
    Senior Member Rasmus's Avatar
    Join Date
    Mar 2012
    Location
    Las Vegas, USA
    Posts
    983
    Post Thanks / Like
    Quote Originally Posted by Frank818 View Post
    And I have to place them about 2in from the metal plate. It seems it needs some very good current to work well and probably 3 to 6h for the rear long lateral bolts.
    Did you add 'Washing Soda' to the water? Sodium Carbonate? It helps the water conduct electricity. Only 1 tablespoon per gallon needed. Adding more does nothing but waste the washing soda.

  15. #215
    Senior Member Frank818's Avatar
    Join Date
    Jun 2013
    Location
    QC, Canada
    Posts
    5,732
    Post Thanks / Like
    Yup I added that amount for 4-5gals, so 4-5 tablespoon.
    But I fab my own washing soda, I had baking soda and to make it washing soda you have to... bake it! lolll 30mins at 400F. It dries out the water in the formula and makes it baking soda. The problem is I don't know if it really worked...

    Sodium Carbonate (washing soda) is Na2CO3.
    Sodium Bicarbonate (baking soda) is NaHCO3.

    The way it supposed to work is that at 50C+ sodium bicarbonate gradually decomposes into sodium carbonate, water and carbon dioxide. The conversion is faster at 200C.

    Therefore,
    2 NaHCO3 → Na2CO3 + H2O + CO2

    H2O and CO2 evaporate in the air, leaving you with Na2CO3.
    Frank
    818 chassis #181 powered by a '93 VW VR6 Turbo GT3582R
    Go-karted Aug 5, 2016 - Then May 19+21, 2017
    Tracked May 27/July 26, 2017
    Build time before being driveable on Sep 27, 2019: over 6000h
    Build Completed Winter 2021

  16. #216
    Senior Member Rasmus's Avatar
    Join Date
    Mar 2012
    Location
    Las Vegas, USA
    Posts
    983
    Post Thanks / Like
    Go Science!

    I've read, but don't know, that Sodium Bicarbonate is half as effective for this as compared to Sodium Carbonate. It'll still work. Just slower. (I really don't know if this it true or not)

    Tell you what. I'll just pop some in the mail for ya. How much of this white powdery substance to you want? I'll package it up nice in an unlabeled zip-loc baggie inside a manila envelope and mail it across our shared international border.

  17. #217
    fasterer and furiouser longislandwrx's Avatar
    Join Date
    Aug 2012
    Location
    Long Island
    Posts
    2,540
    Post Thanks / Like
    Blog Entries
    6
    Quote Originally Posted by Rasmus View Post
    It makes hydrogen bubbles, but it's not like it's a rolling boil that'd fill the Hindenburg.
    http://www.amazon.com/dia-Profession.../dp/B0081UGJ9W

    to the stars!

    Quote Originally Posted by Rasmus View Post
    Tell you what. I'll just pop some in the mail for ya. How much of this white powdery substance to you want? I'll package it up nice in an unlabeled zip-loc baggie inside a manila envelope and mail it across our shared international border.
    sounds legit.
    A well stocked beverage fridge is the key to any successful project.

  18. #218
    Senior Member Frank818's Avatar
    Join Date
    Jun 2013
    Location
    QC, Canada
    Posts
    5,732
    Post Thanks / Like
    lolll one must not simply read your last paragraph, Rasmus, without reading the other one first. lolll
    I didn't search around yet, but I'm sure there is some washing soda somewhere, I'll take a look. I'd be interested to compare with my baked baking soda. If I don't find any I'll let Vegas know. Cuz you know, what happens in Vegas stays in Vegas.
    Frank
    818 chassis #181 powered by a '93 VW VR6 Turbo GT3582R
    Go-karted Aug 5, 2016 - Then May 19+21, 2017
    Tracked May 27/July 26, 2017
    Build time before being driveable on Sep 27, 2019: over 6000h
    Build Completed Winter 2021

  19. #219
    Senior Member
    Join Date
    Jan 2014
    Posts
    617
    Post Thanks / Like
    Quote Originally Posted by Rasmus View Post
    Lightly Load the press on the outer race by use an appropriately wide bearing driver disc (72mm) up a bit and recheck for square. This step is do-you-want-to-buy-another-bearing important.
    This is what mine looks like:
    knuckle.jpg

    The rotor also has about 0.080 runout at the edge. I have a hard time wrapping my head around how the bearing could possibly sit in the housing that crooked. If I rotate the axle, the wide spot moves with the CV. I removed and rotated the CV and the wide spot didn't move, so it's not the CV.

    I also don't like that the front hub doesn't catch the inside inner race as well as the rear hub does. Without a CV, the hub will just fall out if you're not careful.

  20. #220
    Senior Member Rasmus's Avatar
    Join Date
    Mar 2012
    Location
    Las Vegas, USA
    Posts
    983
    Post Thanks / Like
    Quote Originally Posted by Frank818 View Post
    lolll one must not simply read your last paragraph
    I'll send you a kilo then. Should last a while.

  21. #221
    Senior Member Rasmus's Avatar
    Join Date
    Mar 2012
    Location
    Las Vegas, USA
    Posts
    983
    Post Thanks / Like
    Well this is thrilling. Stewart Transport just called me 20 minutes ago. Scott, the driver, said:

    I'm in Kingman, AZ. I'll will be passing though Vegas in about 90 minutes. Want your car? It's in the back on the top.
    Yes, please.

  22. #222
    Senior Member
    Join Date
    Mar 2011
    Location
    Carrollton, Ga.
    Posts
    297
    Post Thanks / Like
    I know just how that feels. Congrats, Rasmus.

    Like you, I have 2006 aluminum LCAs, and, like you, I completely disassembled them when I was cleaning everything up. I can't find the torque value for the two bolts which hold the steel fitting which articulates with the rear bushing. The closest reference in the build manual gives values that seem way too high - like 140 ft-lbs or so. What values did you use when you reassembled yours?
    Thanks,

    Bill

  23. #223
    Senior Member Bob_n_Cincy's Avatar
    Join Date
    Sep 2012
    Location
    Cincinnati OH
    Posts
    3,904
    Post Thanks / Like
    bill
    here are the diagrams out of the 06 manual
    I think the bolts you are talking about at T11 on the diagram, so 114 ft-lbs

    Rasmus, I guess trucking is open all night in Vegas
    have fun tonight
    Bob

    06 tq spec.jpg06 tq spec2.jpg
    Attached Images Attached Images
    Last edited by Bob_n_Cincy; 03-23-2014 at 09:43 PM.

  24. #224
    Senior Member Rasmus's Avatar
    Join Date
    Mar 2012
    Location
    Las Vegas, USA
    Posts
    983
    Post Thanks / Like
    It arrived.


    Stewart Transport's Scott backed into my tiny four house cul-de-sac.


    Even seeing my name on it, it didn't feel real.


    Tucked it in.


    All the neighbors came over, even. Must have had 20 humans running around at one point.


    Full up. Just wish my shoulder was ready for this. I can only sit in the garage and look at it for the next several weeks. But it's here. It's really here.

  25. #225
    Senior Member Bob_n_Cincy's Avatar
    Join Date
    Sep 2012
    Location
    Cincinnati OH
    Posts
    3,904
    Post Thanks / Like
    Congratulations Rasmus,
    I know it will be hard, Please let your shoulder get better before you do any wrenching.
    Get your kid(s) to help.
    Bob

  26. #226
    Senior Member Pearldrummer7's Avatar
    Join Date
    Feb 2014
    Location
    Asheville, NC
    Posts
    1,230
    Post Thanks / Like
    Woohoo! And it begins! Congrats buddy; excited to see how it goes for you.

  27. #227
    Senior Member Rasmus's Avatar
    Join Date
    Mar 2012
    Location
    Las Vegas, USA
    Posts
    983
    Post Thanks / Like


    Looks like it's chassis #144.

  28. #228
    Senior Member Frank818's Avatar
    Join Date
    Jun 2013
    Location
    QC, Canada
    Posts
    5,732
    Post Thanks / Like
    Congrats on the delivery!

    20 people around? Well that should help build the kit in 3 days!
    Frank
    818 chassis #181 powered by a '93 VW VR6 Turbo GT3582R
    Go-karted Aug 5, 2016 - Then May 19+21, 2017
    Tracked May 27/July 26, 2017
    Build time before being driveable on Sep 27, 2019: over 6000h
    Build Completed Winter 2021

  29. #229
    Senior Member Goldwing's Avatar
    Join Date
    Nov 2012
    Location
    Medina, OH
    Posts
    744
    Post Thanks / Like
    Congrats Rasmus! Staring at mine with a sprained ankle sucks too, lol. I hobbled out and installed my shift bracket a couple days ago. My garage is so cluttered right now, crutches just aren't safe out there. Gave up and hobbled back in. Sigh.
    Rich

    818S in progress. 2007 WRX sedan donor.
    Powered up: 7-8-14, First Start: 7-20-14, Go kart: 8-19-14

  30. #230
    Senior Member Canadian818's Avatar
    Join Date
    Nov 2011
    Location
    Edmonton, Alberta
    Posts
    1,378
    Post Thanks / Like
    Congrats buddy! My shoulder is fine and more often then I'd like to admit, all I can do is stare at it. get well soon, the hard part will be taking it easy once you can work on it.
    Adam _____ Instagram @PopesProjects____ YouTube Channel
    818 SRX - #91
    Arrived 01/02/2014
    First Start 10/31/2016
    First Drive 05/22/2017
    Registered 10/25/2019 BRAP818

  31. #231
    fasterer and furiouser longislandwrx's Avatar
    Join Date
    Aug 2012
    Location
    Long Island
    Posts
    2,540
    Post Thanks / Like
    Blog Entries
    6
    Just wait until they start coming over and asking if it's done yet.

    20 people is 40 hands to sand high build primer!

    Congrats!

    My knuckles come Thursday so my build is back in 5th gear.
    A well stocked beverage fridge is the key to any successful project.

  32. #232
    Senior Member
    Join Date
    Mar 2011
    Location
    Carrollton, Ga.
    Posts
    297
    Post Thanks / Like
    Congratulations, Rasmus; I can empathize - the day my Roadster arrived a few years ago, I was fresh from an ankle fracture requiring a titanium plate and 6 weeks off of it. You will prevail.

    Bob - thanks very much for forwarding the info.

    Bill

  33. #233
    Senior Member Rasmus's Avatar
    Join Date
    Mar 2012
    Location
    Las Vegas, USA
    Posts
    983
    Post Thanks / Like
    Quote Originally Posted by longislandwrx View Post
    my build is back in 5th gear.
    Get out of overdrive you slacker. Pop that thing in 3rd and rev to 8000.

    Quote Originally Posted by Bill Waters View Post
    requiring a titanium plate and 6 weeks off of it.
    I'm on the 6 week thing. Saw the surgeon last week and asked him how much I could load it up.
    You can lift up to 1 coffee cup... empty. See you in three weeks and hopefully we'll start you on Physical Therapy after that.
    I was bummed. I didn't even get a cool titanium plate. Just two titanium screws.
    Last edited by Rasmus; 03-24-2014 at 11:26 AM.

  34. #234
    Senior Member
    Join Date
    Sep 2013
    Location
    Chicago, IL
    Posts
    571
    Post Thanks / Like
    Very exciting indeed! Thanks for sharing the pics - I kind of get a sense of the surreal experience for you. Wow...it's happening, it's not just an idea...

    I've already been following your thread, so I'm looking forward to tagging along till she's complete.

    Best,
    -j
    "Weight transfer is the enemy."

    Executive Director
    The Community Garage

  35. #235
    Senior Member Frank818's Avatar
    Join Date
    Jun 2013
    Location
    QC, Canada
    Posts
    5,732
    Post Thanks / Like
    Quote Originally Posted by Rasmus View Post
    I didn't even get a cool titanium plate. Just two titanium screws.
    Well at least your screws will never rust so you won't need to service them in your anti-rust bucket.

    Oh sorry, we're talking about your shoulder, here! lolll
    Frank
    818 chassis #181 powered by a '93 VW VR6 Turbo GT3582R
    Go-karted Aug 5, 2016 - Then May 19+21, 2017
    Tracked May 27/July 26, 2017
    Build time before being driveable on Sep 27, 2019: over 6000h
    Build Completed Winter 2021

  36. #236
    Senior Member VD2021's Avatar
    Join Date
    Feb 2011
    Location
    Central, FL
    Posts
    958
    Post Thanks / Like
    Blog Entries
    2
    Congrats!

    I'm eager to see this one......
    R/s
    Vidal
    CURRENT STATUS: Interior Rework and Bodywork.
    GenII GTM #331. Delivered (23/9/10)
    BUILD LOG AND WEBSITE:
    http://gtmbuild.weebly.com/ .

  37. #237
    Senior Member wleehendrick's Avatar
    Join Date
    Jul 2012
    Location
    Encinitas, CA
    Posts
    1,653
    Post Thanks / Like
    Blog Entries
    2
    Quote Originally Posted by Rasmus View Post
    It arrived.
    Congrats!

    Quote Originally Posted by Rasmus View Post
    Even seeing my name on it, it didn't feel real.
    I know the feeling. After seeing so many deliveries online... wow, this one's mine!

    Quote Originally Posted by Rasmus View Post
    I didn't even get a cool titanium plate. Just two titanium screws.
    At least you have some cool hardware in you. After my accident, I was disappointed that the four pins in my hand would come out and I wouldn't be left with any metal in me. Removing them was fun... it was out-patient, no anesthetic; just me, the surgeon, and a pair of pliers.

  38. #238
    fasterer and furiouser longislandwrx's Avatar
    Join Date
    Aug 2012
    Location
    Long Island
    Posts
    2,540
    Post Thanks / Like
    Blog Entries
    6
    Quote Originally Posted by Rasmus View Post
    Get out of overdrive you slacker. Pop that thing in 3rd and rev to 8000.
    HAHA I chose to wait to get some clean west coast knuckles... the long bolts have already been removed No snap crackle pop here.
    A well stocked beverage fridge is the key to any successful project.

  39. #239
    Senior Member
    Join Date
    Mar 2011
    Location
    Carrollton, Ga.
    Posts
    297
    Post Thanks / Like
    Quote Originally Posted by Rasmus View Post
    I was bummed. I didn't even get a cool titanium plate. Just two titanium screws.

    Don't worry! You're young and have a number of dangerous acitivities planned....there will be many opportunities for Titanium plates in the future!

  40. #240
    Senior Member Rasmus's Avatar
    Join Date
    Mar 2012
    Location
    Las Vegas, USA
    Posts
    983
    Post Thanks / Like
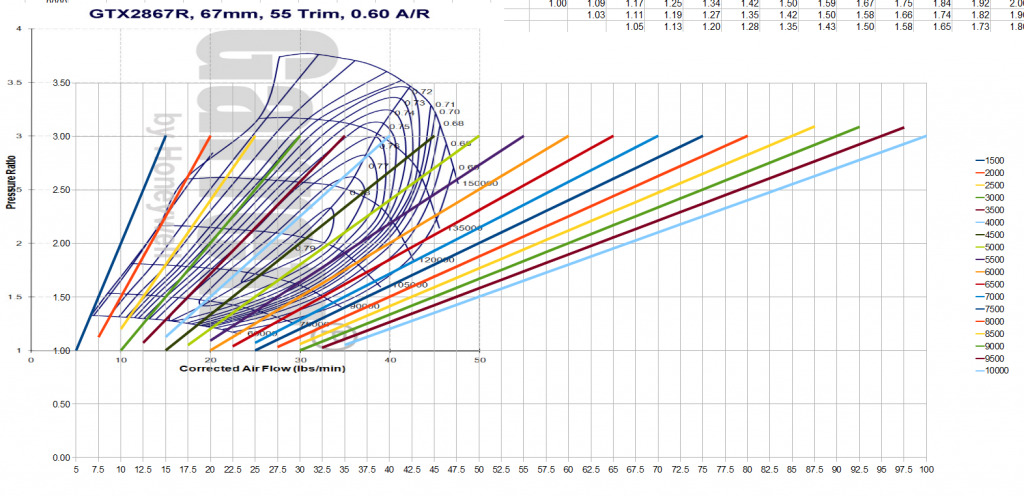
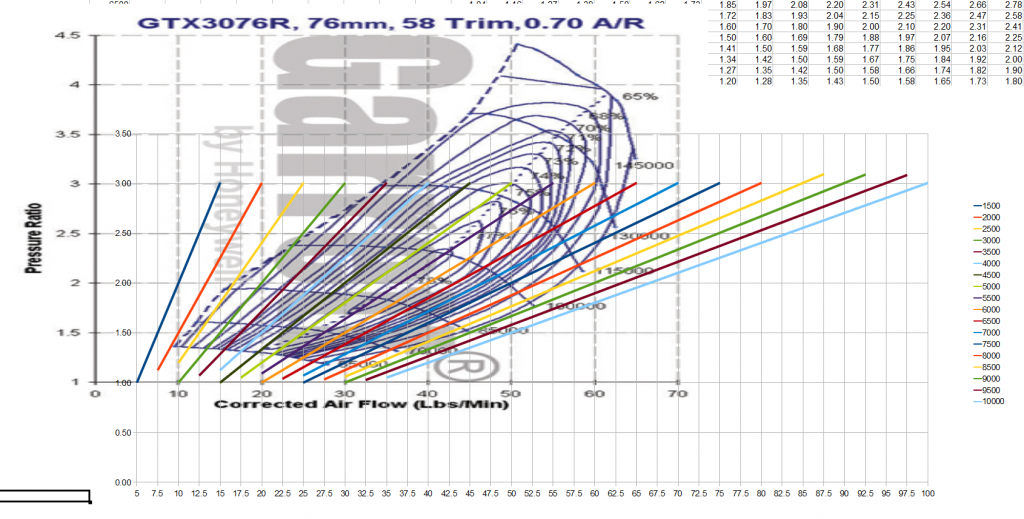
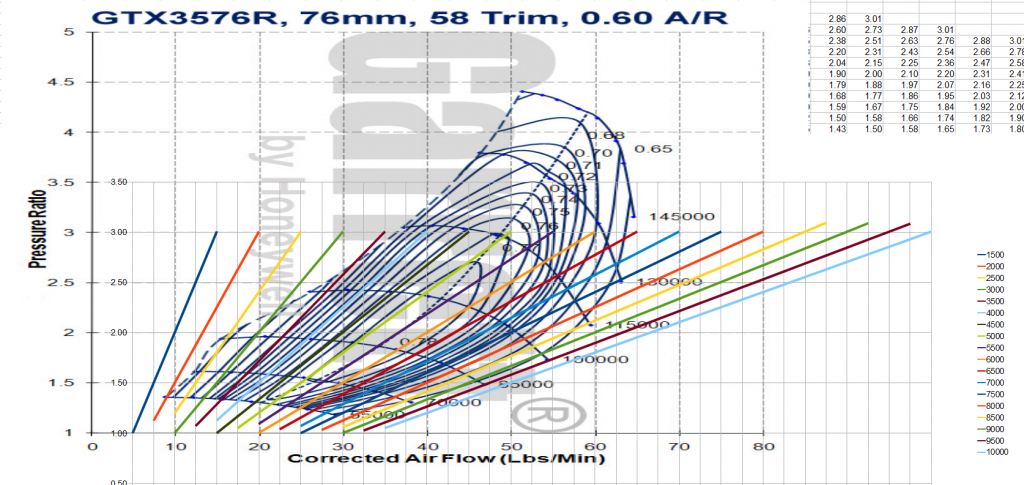
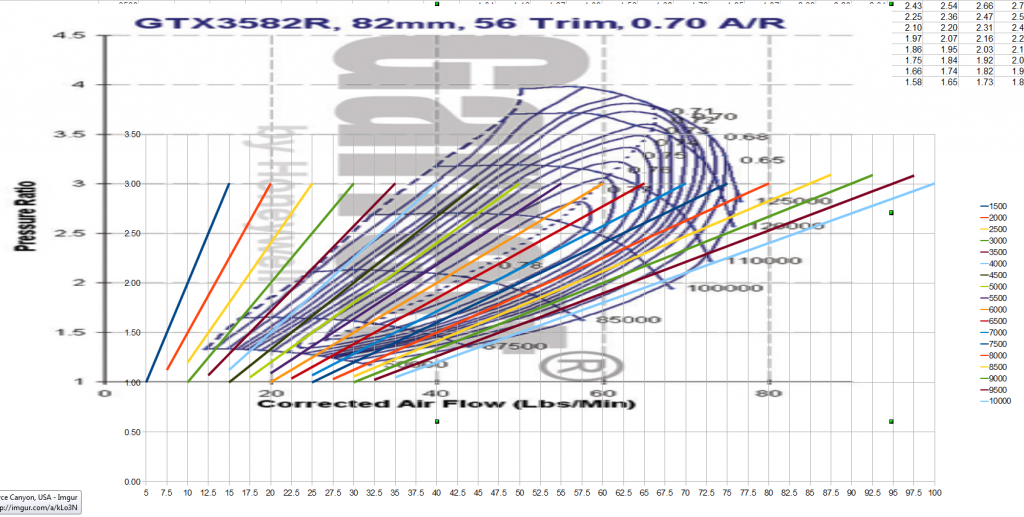
    Based on some formulas from this thread on Nabisco I overlaid how much air my planned 2.334 liter motor can pump at various RPM's and Pressure Ratio's (PR). I'm trying to choose the correct size turbo for SCCA's X Prepared class. X Axis is Lb of Air/Min Pumped (Lb/Min). Y Axis is Pressure Ratio (a.k.a. Boost). The colored lines represent how much air can be pumped through the 2.334 liter motor at a given RPM as the PR changes. This is a purely mathematical exercise assuming 100% efficiency at Sea Level Air pressure.

    PR of 0.0 = Perfect Vacuum
    PR of 1.0 = Zero Boost, Wide Open Throttle
    PR of 1.5 = 7.4 psi of boost
    PR of 2.0 = 14.7 psi of boost
    PR of 2.5 = 22.1 psi of boost
    PR of 3.0 = 29.4 psi of boost
    PR of 4.0 = 44.1 psi of boost


    Here's the GTX2867R compressor map under a 2.334L motor at various RPM's and Pressure Ratio's. At 2000 RPM the turbo's starting to get past the surge line (beginning to spool up). Turbo's full spooled at 3000RPM for Pressure Ratios 2.0 - 3.0. Peak HP should hit about 5000 - 5500 RPM, pushing 46 lb/min (460 hp +/- 5%) at PR 2.7. The GTX2867R will exceed it's choke line (a.k.a. gas out) at 7250 RPM pushing 36 lb/min at a PR of 1.5.


    Here's the GTX3076R compressor map under a 2.334L motor at various RPM's and Pressure Ratio's. At 3000 RPM the turbo's starting to get past the surge line (beginning to spool up). Turbo's full spooled at 3750RPM for Pressure Ratios 2.0 - 3.0. Limiting ourselves to PR's under 3.0 peak HP should hit about 6250 - 7000 RPM at PR from 3.0 to 2.7, pushing ~62 lb/min (625 hp +/- 5%). If limited to a PR's of 2.5 peak HP should hit about 7400 RPM, pushing ~61 lb/min (615 hp +/- 5%). If limited to a PR's of 2.0 peak HP should hit about 8400 RPM, pushing ~56 lb/min (565 hp +/- 5%)The GTX3076R will exceed it's choke line (a.k.a. gas out) at 8800 RPM pushing 46 lb/min (460 hp +/- 5%) at a PR of 1.6.


    Here's the GTX3576R compressor map under a 2.334L motor at various RPM's and Pressure Ratio's. I'm not doing a written analysis for this one.


    Here's the GTX3582R compressor map under a 2.334L motor at various RPM's and Pressure Ratio's. At 3800 RPM the turbo's starting to get past the surge line (beginning to spool up). Turbo's full spooled at 4250 RPM for Pressure Ratios 2.0 - 3.0. Limiting ourselves to PR's under 3.0 Peak HP should hit about 7600 - 8300 RPM at PR from 3.0 to 2.7, pushing ~76 lb/min (765 hp +/- 5%). The GTX3582R will exceed it's choke line (a.k.a. gas out) at 10,500 RPM pushing ~62 lb/min (625 hp +/- 5%) at a PR of 1.75.

    Overall:
    The GTX2867R would seem to be an excellent 'street' turbo. Powerband running from 3000 to 7250 rpm. Boost would almost always be available for the duck and dart of street driving. You won't have to spin a 2.334 liter up to crazyville to use the whole thing.
    The GTX3076R is more of the 'track day' turbo. Powerband running from 3750 to 8800 RPM. If caught out cruising in low RPM's you'll experience turbo lag. But if geared correctly, with head work to prevent the valves from floating, you'd have a track-day hero. But you've got to get those RPM's up to use it properly.
    The GTX3582R is the 'drag' turbo. Powerband starting at 4250 and continuing up as high as you can spin it. I'm not even sure you could build a Subaru EJ 2.334 to take 10,500 RPM. But you can brag on the internet about how many hp's you' got on the dyno.

    Keep in mind you could also adjust these by running larger or smaller A/R turbine housing, to shift the maps a bit.
    Last edited by Rasmus; 03-25-2014 at 12:11 AM.

Page 6 of 20 FirstFirst ... 4567816 ... LastLast

Posting Permissions

  • You may not post new threads
  • You may not post replies
  • You may not post attachments
  • You may not edit your posts
  •  

Martin's Dent and Collision Shop

Visit our community sponsor