Boig Motorsports

Visit our community sponsor

Thanks Thanks:  0
Likes Likes:  1
Page 5 of 11 FirstFirst ... 34567 ... LastLast
Results 161 to 200 of 438

Thread: 15th Anniversary MKIV build thread - TROJAN

  1. #161
    Administrator David Hodgkins's Avatar
    Join Date
    Feb 2011
    Location
    Corona del Mar, CA
    Posts
    6,065
    Post Thanks / Like
    Blog Entries
    7
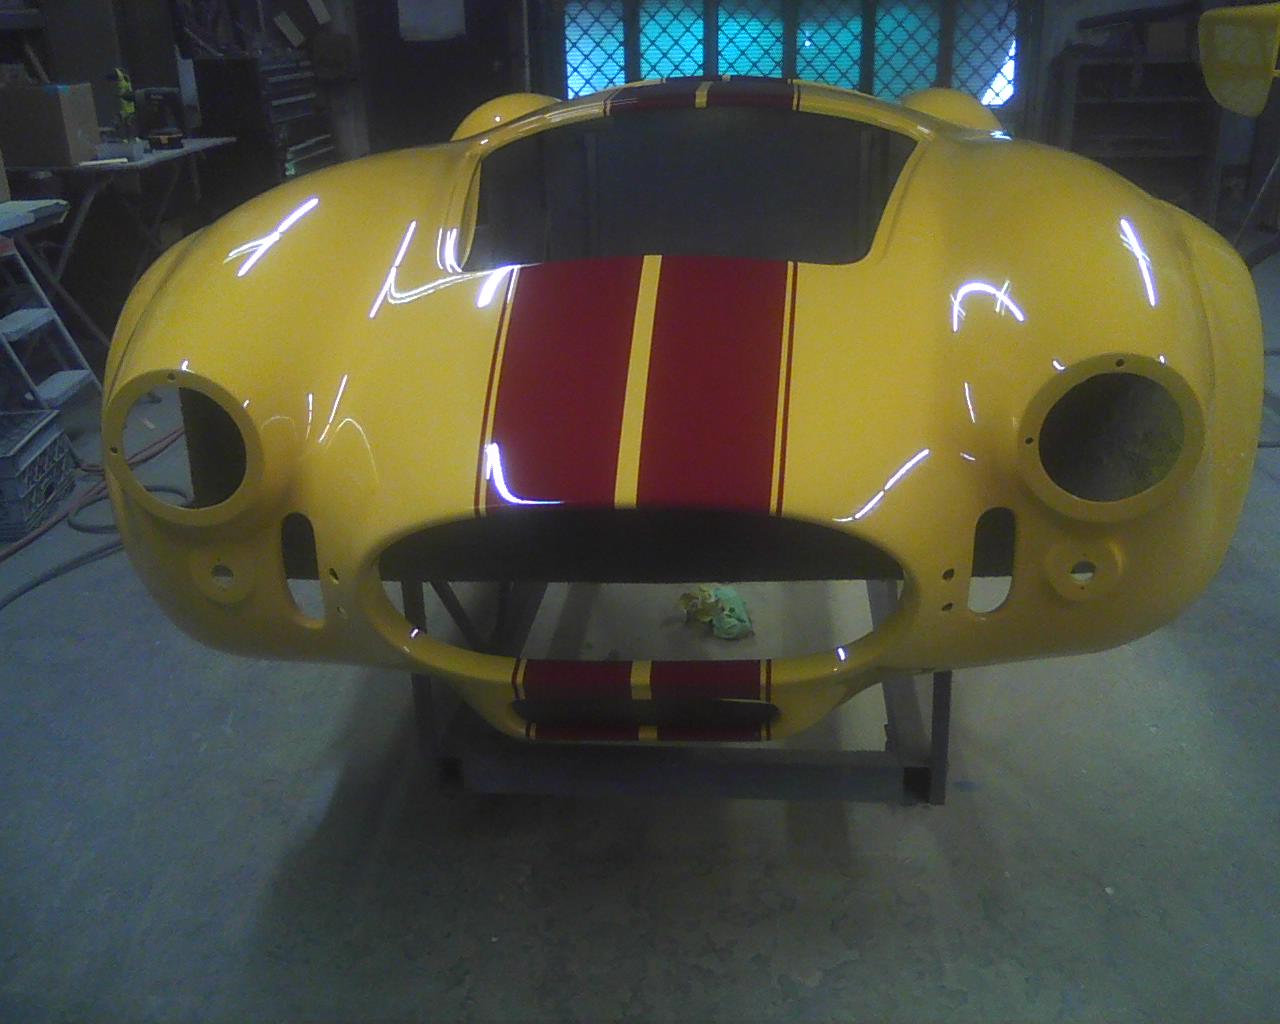
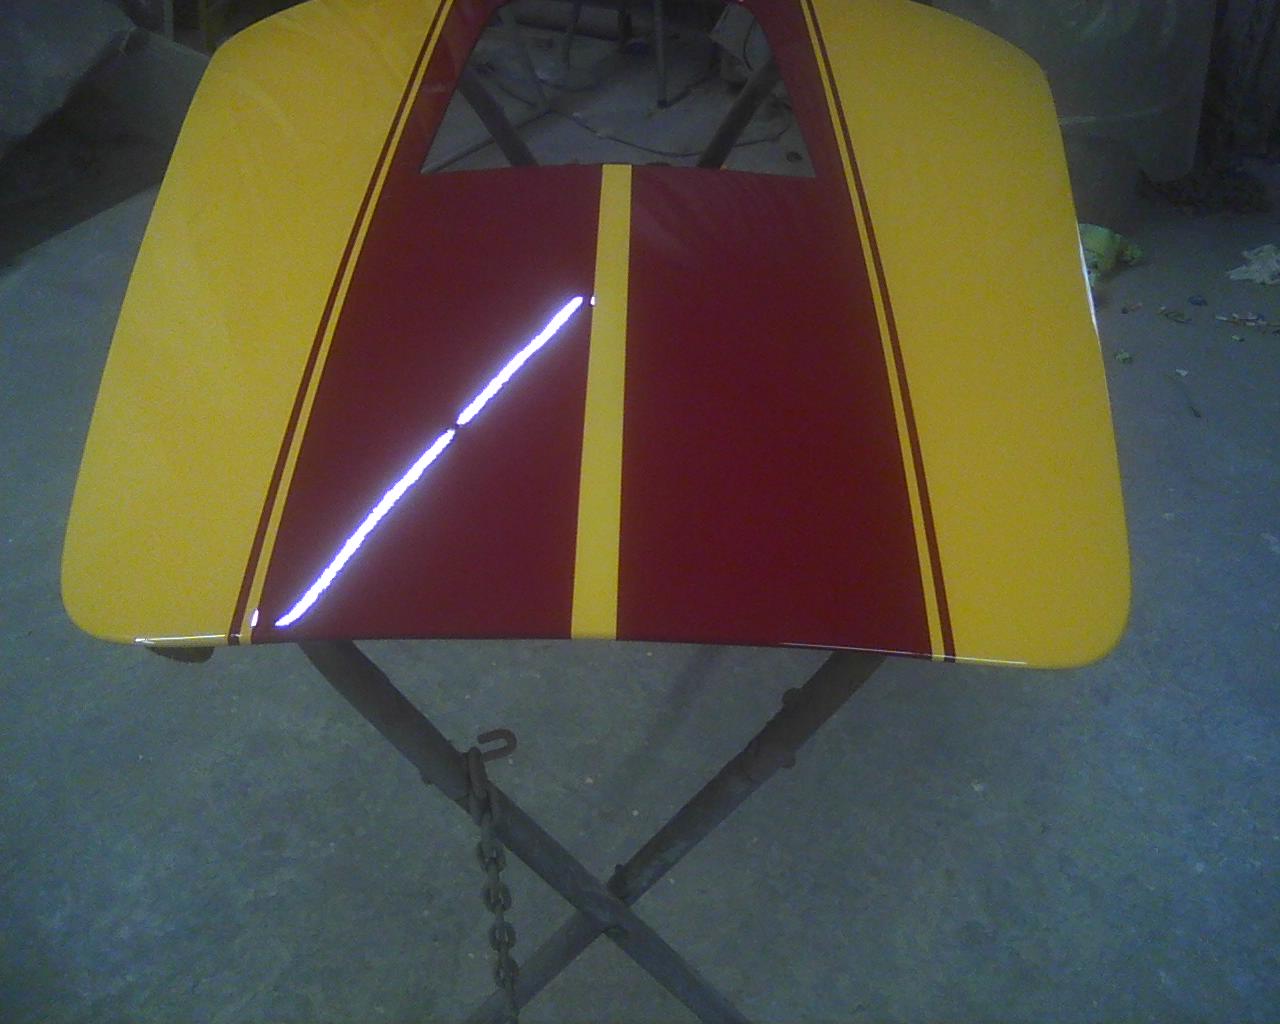
    Wow, can't believe it's been a whole month since my last update. Last time I posted, we were dropping off the body at Jeff Miller's. The body is now ready for paint, but I'm not ready to put the body on! I have several projects that are done and many more to do before the body can go on the car. Among the projects that needed to be done between dropping off the body and picking it up are:

    • Make Seat Brackets and mount the seats
    • Design and make the cockpit cubby wall
    • Buy and install stereo
    • Make a separate hinged cubby wall to hide the stereo components
    • Rivet cockpit
    • Engine turn dash and cubby walls
    • Apply cockpit soundproofing
    • Carpet cockpit
    • Wire Horn
    • wire high beams and test all exterior lighting
    • Install seat heaters
    • Create glovebox


    YIKES!

    I've made a good amount of progress, but still have a LONG way to go. I'm off to the shop again today and will try to update the build thread tonight with my activity in the past month...


    FFR 5369 Pin Drive, IRS, Trigos, Torsen, Wilwoods, FMS BOSS 302 "B" cam , Mass-flo. CA SB100 (SPCN) Registered
    Delivered 4/23/06. "Finished" 4/2012 (still not done!)


  2. #162
    Administrator David Hodgkins's Avatar
    Join Date
    Feb 2011
    Location
    Corona del Mar, CA
    Posts
    6,065
    Post Thanks / Like
    Blog Entries
    7

    Back to building...

    You know how long it's been since my last update? I have pics starting on June 12 (Pre FFR Open House) and proceeding all the way to July 22. Wow. There's so much to get catch you all up on! Without further adieu let's get into this. But first I give FFR some constructive criticism. I HATE to do it, but this is a problem that needs addressing

    I have a problem with my Cats. One is definitely too short. Here's the driver's side:


    Looks good, nice spacing away from the frame, nice and square through the hole in the body.

    Now look at this:


    Look at how close that pipe is to the chassis. It will not mount once the body is on unless severely turned out to get it through the body. After contacting FFR and sending pics measuring the length of the Cats, I was told they were in spec. I have a Crate 302, FFR-supplied motor mounts and BBK Shorty Headers. The FMS shorties I had do not work due to the #4 Cylinder hitting the motor mount. This is a very basic spec. Seems to me that the passenger side Cat length spec needs to change.

    The solution to this problem for this build is to either lengthen the Cat or make a spacer to go between the Cat and the side pipe. Since I've already paid to Ceramic-coat the Cats I will create a spacer for the pipe.

    Reluctantly.

    OK so now that I have that on record I can move on to all the really cool stuff I've done in the past month +!

    Well, I made some errors too. I took measurements from my roadster seat brackets in order to make some for this build. In my first build, I had Kirkey Intermediates (47 series) that I cut down to look like Kirkey Vintage 41V's. The 47 series Intermediates actually have a seam that I used as a cutting point to knock off the upper portion of the seats. I (mistakenly) assumed they used the same bottoms for both seats. As it turns out, they are substantially different. But I didn't know that so I had the bases made substantially shorter this time around. That would be fine with the 47 series base, but the 41V has a "kicked-up" front portion of the seat that requires a higher mount on the seat bracket. It's so much higher that I am going to have to re-do the brackets. So I'll just skip that little fiasco for now and we'll pick it back up after I get the basic shape re-manufactured. I'll then show how I set the seat height and layback, and how I mount the seat brackets. In other words the seat bracket you see in the following photos are going to be replaced. Moving on...

    I decided it was time to finally finish riveting the cockpit aluminum. The floors and back wall were done, and then I did the trans tunnel. I originally drilled the trans cover to be inside the side walls to I held the trans sidewalls in with clecos while riveting the back wall:


    I then carefully measured and cut out the shifter hole. I didn't have a hole saw so I had to do this with a dremel. I drilled and cleco'd the rear shift hole cover in and notched it where needed to match the new shifter hole:


    I riveted the trans cover in place but left the shifter cover cleco'd for the time being. Here's the finished result:

    FFR 5369 Pin Drive, IRS, Trigos, Torsen, Wilwoods, FMS BOSS 302 "B" cam , Mass-flo. CA SB100 (SPCN) Registered
    Delivered 4/23/06. "Finished" 4/2012 (still not done!)


  3. #163
    Senior Member KDubU's Avatar
    Join Date
    May 2015
    Location
    Kennebunkport, ME
    Posts
    1,192
    Post Thanks / Like
    Nice build David! Perhaps someone has already asked but how did you get the aluminum panels so shiny in the engine bay?

  4. #164
    Administrator David Hodgkins's Avatar
    Join Date
    Feb 2011
    Location
    Corona del Mar, CA
    Posts
    6,065
    Post Thanks / Like
    Blog Entries
    7
    Next project was the stereo. My brother wants tunes so there you go. He wanted it as hidden as possible, so no head unit. We decided to have just an amplifier and speakers. 6" speakers inside the cockpit cubby behind the occupants and 4" rounds in the side intrusion wall in front of the seats. A phone (or other device with headphone output) would drive the system. I picked out a decent Alpine system from a local dealer. The amp has separate gains for front and rear speakers as well as the ability to frequency cut so the 4" wouldn't sound muddy. After mocking it up and balancing the sound in the cockpit I can tell you it certainly sounds great while parked or at idle. We'll see about freeway speeds later.

    In keeping with the desire to hide the system as much as possible I decided to create a second wall in the trunk just behind the speakers and amp to hide them when the trunk is opened. The front wall would be structural and the rear wall hinged so I can get to the amp and speakers when needed.

    I bought some remnant wainscoting wood (hard pressboard) from a lumberyard and made wooden templates of the front and rear walls. I do this to get the right size and shape of the wall before making it out of metal. As I made the templates I also mocked up the amp and speakers. I did not take the speaker wires into account when I laid out the chassis harness so I had to feed it into the looms already existing and rub=n the wires from the trunk area, up the trans tunnel and then into the area behind the dash before exiting the sides and dropping down to the front of the door opening where the speakers are. Power and ground wires also needed to be fed to 12V and chassis ground, and a wire for switching the system on and off had to be run to the accessory poll on the ignition switch. The lift came in real handy to allow me under-car access to the wire looms and now you can't even tell they were added after the fact.

    Here are pictures of the stereo mockup:


    I got the radius by tracing the back of the cockpit wall onto some scrap wood and then cutting out the shape. I then traced the shape onto the wall templates and cut them out:


    continued...

    FFR 5369 Pin Drive, IRS, Trigos, Torsen, Wilwoods, FMS BOSS 302 "B" cam , Mass-flo. CA SB100 (SPCN) Registered
    Delivered 4/23/06. "Finished" 4/2012 (still not done!)


  5. #165
    Administrator David Hodgkins's Avatar
    Join Date
    Feb 2011
    Location
    Corona del Mar, CA
    Posts
    6,065
    Post Thanks / Like
    Blog Entries
    7


    Then I did the component install:


    I used the hole on the trunk floor for the battery mount on the driver's side to feed all the wires through. This doesn't show it but this hole now has a proper grommet in it to shield the cables:


    Wires integrated into loom:


    Here's the system wired up. I'll be adding an inline fuse to the positive, just to be safe...


    continued...

    FFR 5369 Pin Drive, IRS, Trigos, Torsen, Wilwoods, FMS BOSS 302 "B" cam , Mass-flo. CA SB100 (SPCN) Registered
    Delivered 4/23/06. "Finished" 4/2012 (still not done!)


  6. #166
    Administrator David Hodgkins's Avatar
    Join Date
    Feb 2011
    Location
    Corona del Mar, CA
    Posts
    6,065
    Post Thanks / Like
    Blog Entries
    7
    Quote Originally Posted by KDubU View Post
    Nice build David! Perhaps someone has already asked but how did you get the aluminum panels so shiny in the engine bay?
    Good question! I'll show you in a couple of posts coming up...


    FFR 5369 Pin Drive, IRS, Trigos, Torsen, Wilwoods, FMS BOSS 302 "B" cam , Mass-flo. CA SB100 (SPCN) Registered
    Delivered 4/23/06. "Finished" 4/2012 (still not done!)


  7. #167
    Administrator David Hodgkins's Avatar
    Join Date
    Feb 2011
    Location
    Corona del Mar, CA
    Posts
    6,065
    Post Thanks / Like
    Blog Entries
    7
    ...continued

    Front speaker install:


    Next up: creating the metal walls from wood templates

    FFR 5369 Pin Drive, IRS, Trigos, Torsen, Wilwoods, FMS BOSS 302 "B" cam , Mass-flo. CA SB100 (SPCN) Registered
    Delivered 4/23/06. "Finished" 4/2012 (still not done!)


  8. #168
    Senior Member ehansen007's Avatar
    Join Date
    Mar 2011
    Location
    Aliso Viejo, CA
    Posts
    1,625
    Post Thanks / Like
    Wow! 4 speakers and two amps in the rear! Impressive. Looking good buddy. I hope I don't have the same issue with my Cats but I'm pretty sure I will.

  9. #169
    Not a waxer Jeff Kleiner's Avatar
    Join Date
    Feb 2011
    Location
    Bloomington, Indiana
    Posts
    8,075
    Post Thanks / Like
    Great work David

    Hey, check your PM box---been trying to get in touch RE: some business we need to complete.

    Cheers,
    Jeff

  10. #170
    Member
    Join Date
    Dec 2011
    Location
    Saratoga Springs, Utah
    Posts
    68
    Post Thanks / Like
    I've wondered about placing speakers below the door in the side panels but didn't think anything would fit. The are Alpines but could you give me the model number? That would save me a lot of searching.

  11. #171
    Administrator David Hodgkins's Avatar
    Join Date
    Feb 2011
    Location
    Corona del Mar, CA
    Posts
    6,065
    Post Thanks / Like
    Blog Entries
    7
    lastdime, I'll get that for you today and let you know. EDIT: They are model SPS-410. The 6x9's are model SPS-619.

    BTW, anyone can take a look at my Build Pic album for pics of the build. I'm still behind on getting this thread up to speed but all the latest pics are in the album.
    http://thefactoryfiveforum.com/album.php?albumid=825


    FFR 5369 Pin Drive, IRS, Trigos, Torsen, Wilwoods, FMS BOSS 302 "B" cam , Mass-flo. CA SB100 (SPCN) Registered
    Delivered 4/23/06. "Finished" 4/2012 (still not done!)


  12. #172
    Member
    Join Date
    Dec 2011
    Location
    Saratoga Springs, Utah
    Posts
    68
    Post Thanks / Like
    Thanks for the speaker info and all the pics. You are really doing a spectacular job on your build. Your photos and illustrations are extremely helpful and have given me many really helpful ideas. Thanks!

  13. #173
    Administrator David Hodgkins's Avatar
    Join Date
    Feb 2011
    Location
    Corona del Mar, CA
    Posts
    6,065
    Post Thanks / Like
    Blog Entries
    7
    Quote Originally Posted by lastdime View Post
    Thanks for the speaker info and all the pics. You are really doing a spectacular job on your build. Your photos and illustrations are extremely helpful and have given me many really helpful ideas. Thanks!
    You are most welcome! I'm glad you are finding this thread helpful!

    So after I mocked up the cubby and trunk walls in wood and wired the amp and speakers, it was time to build the real walls in aluminum. I bought some 4'X1' .063 6061 sheets from a local supply house and got to work. I chose 6061 because it's stiffer than the 5052 that comes with the kit. For the front wall I marked out tabs that I would use to "lock" the panel in place. I came up with a slightly different method of mounting due to the un-evenness of the walls and floor in the trunk. Since the metal is going to be exposed I wanted the wall to fit really tight and not show any gaps so what I did was cut slits in the floor and the side walls that the tabs can slide into. After the wall is in place I'll go under the car and bend the tabs over and rivet them in place. It's a little unconventional but the wall doesn't rattle and it is definitely locked in place.

    I traced the wall pattern on to the metal from the wooden wall templates and cut out the shape on my bandsaw. then I filed down the edges to get to the final shape, repeatedly mounting the wall to check for size. When you look at the shape, the floor and passenger wall are very wavey, but once the filing is done the result is a very nice and tight fit. Here are some pics of the process...

    There is a lot of curve in the passenger side trunk wall. You can see it in this pic. This is because I was impatient and didn't fully adjust the floor and side walls befor I started drilling rivet holes. No biggie, but it's not as perfect as it could have been:


    The bottom was cut over-size and then filed to match the floor as it was fitted:


    Filing down the sides. As you can tell, not a perfect fit yet:


    Lining up and cutting the floor slots. The sides and bottom were fitted before cutting the top arch:


    Getting a little ahead of myself here to show how the tabs on the side walls are slotted to allow the wall to slide vertically into position. You can also see in this shot how much the floor rises toward the sides of the trunk:


    continued...

    FFR 5369 Pin Drive, IRS, Trigos, Torsen, Wilwoods, FMS BOSS 302 "B" cam , Mass-flo. CA SB100 (SPCN) Registered
    Delivered 4/23/06. "Finished" 4/2012 (still not done!)


  14. #174
    Administrator David Hodgkins's Avatar
    Join Date
    Feb 2011
    Location
    Corona del Mar, CA
    Posts
    6,065
    Post Thanks / Like
    Blog Entries
    7
    continued...

    Once I fit both walls it was time to polish and engine turn the panels. I like them to be as bright as possible, plus, the trunk wall was getting polished racing stripes so I set up and area to do the polishing. Polishing is DIRTY work so I cut up a large piece of cardboard to protect the work area. There were a couple of brackets I made to hold the remote reservoirs and fuel pressure regulator so I took those off the car to polish as well:


    I used some Nuvite metal polishing compound to polish these out. I can be a 3-stage process to get to full mirror. Here's the first panel after the first stage:


    As you can tell, it's a vast improvement but still had a ways to go:


    ...and this is after the fine polish was used:


    Here's a shot after all the panels were polished:


    After the panels were polished it was time to move over to the engine - turning jig. This next shot is pretty cool, in that it shows you everything you need to engine turn:


    continued...

    FFR 5369 Pin Drive, IRS, Trigos, Torsen, Wilwoods, FMS BOSS 302 "B" cam , Mass-flo. CA SB100 (SPCN) Registered
    Delivered 4/23/06. "Finished" 4/2012 (still not done!)


  15. #175
    Senior Member KDubU's Avatar
    Join Date
    May 2015
    Location
    Kennebunkport, ME
    Posts
    1,192
    Post Thanks / Like
    Very cool how you got theses panels to be mirror-like!

  16. #176
    Administrator David Hodgkins's Avatar
    Join Date
    Feb 2011
    Location
    Corona del Mar, CA
    Posts
    6,065
    Post Thanks / Like
    Blog Entries
    7
    Quote Originally Posted by KDubU View Post
    Very cool how you got theses panels to be mirror-like!
    They aren't full mirror, but pretty close. Good enough for rock and roll. I posted a pic above that shows Nuvite, which comes in several different abrasion levels. I just dab some thumbprint-sized bits on the metal and go to town with a wool pad and a polisher.

    There is a different technique I'm going to try this week, which is to use a soft pad on a grinder with a stick-abrasive. I'll let you know how that goes.

    Polished panels are a pain to maintain, frankly. My MKIII panels were left raw after polishing and they look BAD right now. I protected the new build panels with sharkhide, and although I lost some reflect-ability, they haven't oxidized at all since they were coated. So there's a trade-off. When I go back and hand-polish the panels on my first build they will look better than the panels on this build but will start to fade quickly...

    --------------

    When I engine turned the front wall, shown in the jig above, it gave me all sorts of trouble. It actually took 3 multi-hour sessions to do the panel but the wand broke in the middle of it and I lost a day while I ran around town getting the cable fixed.
    Everything started out ok...


    When I reached this far, the wand broke and I had to tear it apart...


    To get this little doohickie out. It was stripped:


    I did learn a lesson though. First is, it was fixable. Secondly, I was using too much pressure and holding the wand on the metal for too long. Overall the finished panel was not my best effort. I contemplated tossing and starting over but decided to press on and cut the speaker holes out and do a test fitting before deciding it's fate. Here it is after the second engine-turning session. As you can see, it's not perfect:


    continued...

    FFR 5369 Pin Drive, IRS, Trigos, Torsen, Wilwoods, FMS BOSS 302 "B" cam , Mass-flo. CA SB100 (SPCN) Registered
    Delivered 4/23/06. "Finished" 4/2012 (still not done!)


  17. #177
    Administrator David Hodgkins's Avatar
    Join Date
    Feb 2011
    Location
    Corona del Mar, CA
    Posts
    6,065
    Post Thanks / Like
    Blog Entries
    7
    ...and here is the panel after engine-turning:


    I pressed on and cut out the speaker holes VERY CAREFULLY with a dremel. Luckily, it came out clean, with no accidental "run-outs":


    After a bit of filing to clean up the dremel work I test-mounted the panel again. As you'll see in these next shots, it doesn't look too bad. I did burn a bit of the sharkhide on the floor panel while cutting out the slots. I'll carefully repair that before the final mounting:


    I decided to keep the panel. The next step was to do the rear wall. This will be visible when you open the trunk and will hide the speakers and the amp. This wall got polished racing stripes. First I glued the panel to the work surface and laid out the stripe edges:


    continued...

    FFR 5369 Pin Drive, IRS, Trigos, Torsen, Wilwoods, FMS BOSS 302 "B" cam , Mass-flo. CA SB100 (SPCN) Registered
    Delivered 4/23/06. "Finished" 4/2012 (still not done!)


  18. #178
    Administrator David Hodgkins's Avatar
    Join Date
    Feb 2011
    Location
    Corona del Mar, CA
    Posts
    6,065
    Post Thanks / Like
    Blog Entries
    7
    ...then I got to work:


    After the left hand side was done I pulled the tape and reset it for the pin stripe:


    I made short work of it and in no time at all I was ready to see how the pinstripe came out. This short video shows the unveiling...:


    Then I moved on to the center stripe and the right side. This panel went very smooth and came out very nice:


    FFR 5369 Pin Drive, IRS, Trigos, Torsen, Wilwoods, FMS BOSS 302 "B" cam , Mass-flo. CA SB100 (SPCN) Registered
    Delivered 4/23/06. "Finished" 4/2012 (still not done!)


  19. #179
    Administrator David Hodgkins's Avatar
    Join Date
    Feb 2011
    Location
    Corona del Mar, CA
    Posts
    6,065
    Post Thanks / Like
    Blog Entries
    7
    I've been on vacation but Da Bat has been busy!

    Sneak Peek:


    FFR 5369 Pin Drive, IRS, Trigos, Torsen, Wilwoods, FMS BOSS 302 "B" cam , Mass-flo. CA SB100 (SPCN) Registered
    Delivered 4/23/06. "Finished" 4/2012 (still not done!)


  20. #180
    Senior Member QSL's Avatar
    Join Date
    Nov 2011
    Location
    CORONA, CA
    Posts
    700
    Post Thanks / Like
    Did you order fries with that?
    MK4 delivery 12/17/11
    Build thread: HERE
    Epic First start video HERE

    Type 65 Coupe Ordered 01/17/13
    Build thread: HERE

  21. #181
    PLATNUM Supporting Member
    wallace18's Avatar
    Join Date
    Apr 2012
    Location
    Trenton, Florida
    Posts
    5,382
    Post Thanks / Like
    WoW! that looks great. You are truly doing a fantastic job on this build. Way to go!

  22. #182
    Administrator David Hodgkins's Avatar
    Join Date
    Feb 2011
    Location
    Corona del Mar, CA
    Posts
    6,065
    Post Thanks / Like
    Blog Entries
    7
    Quote Originally Posted by QSL View Post
    Did you order fries with that?
    I like onion rings dude...

    Quote Originally Posted by wallace18 View Post
    WoW! that looks great. You are truly doing a fantastic job on this build. Way to go!
    Thanks! Back at ya. You've got some cool cars in your avatar.

    FFR 5369 Pin Drive, IRS, Trigos, Torsen, Wilwoods, FMS BOSS 302 "B" cam , Mass-flo. CA SB100 (SPCN) Registered
    Delivered 4/23/06. "Finished" 4/2012 (still not done!)


  23. #183
    Senior Member QSL's Avatar
    Join Date
    Nov 2011
    Location
    CORONA, CA
    Posts
    700
    Post Thanks / Like
    Just busting you dave. Frank and Julie made me do it. Looks awesome!
    MK4 delivery 12/17/11
    Build thread: HERE
    Epic First start video HERE

    Type 65 Coupe Ordered 01/17/13
    Build thread: HERE

  24. #184
    Administrator David Hodgkins's Avatar
    Join Date
    Feb 2011
    Location
    Corona del Mar, CA
    Posts
    6,065
    Post Thanks / Like
    Blog Entries
    7
    I went on vacation last week - Did ya miss me? - and just got back to the build. Under Pressure!! I coated the cubby walls with sharkhide and began final assembly. I'm going to add some fiberboard to the inside walls of the stereo box to warm up the acoustics and that's why the panels below aren't powdercoated...

    The speaker panel hasn't been riveted in yet and it was floating a little in this shot, but you can see the panel is basically done. I'm going to glue was acoustic board to the back of this panel before mounting the stereo:


    Here's how the hinged rear wall works. I got some 90 degree angled stock and filed the floor-side to match the contours of the trunk floor. This is so that the upper edge that has the piano hinge mounted to it remains flat. You can see in the shot below that in the last inch or so I filed so much off that the metal against the floor is gone due to the raise in the trunk floor on the sides. I polished the trunk side then engine turned it to match the stripe pattern on the wall. I drilled offset hole patterns between the trunk floor and hinge so they wouldn't interfere, coated with sharkhide and mounted the angle to the floor with rivets and a light layer of silicone:


    I had to notch the upper corners of the rear wall to clear the bulb seal and I had to file a single rivet on each wall so that they wouldn't interfere with the wall when it is opened and closed. Here's what the wall will look like in the down position. BTW It will get a thin layer of sound board and bulb seal on the top too:


    And here is the rear wall (basically) mocked up. It will be held to the hinge with button screws and I still need to align it and mount guides on the sidewalls that will use magnets to hold the panel in place in the vertical position but you can get an idea of what it will look like:


    EDIT: Just about to hit 20,500 views. Thanks guys!

    FFR 5369 Pin Drive, IRS, Trigos, Torsen, Wilwoods, FMS BOSS 302 "B" cam , Mass-flo. CA SB100 (SPCN) Registered
    Delivered 4/23/06. "Finished" 4/2012 (still not done!)


  25. #185
    Administrator David Hodgkins's Avatar
    Join Date
    Feb 2011
    Location
    Corona del Mar, CA
    Posts
    6,065
    Post Thanks / Like
    Blog Entries
    7
    The "Music Box" continues...

    I used to be an audio engineer in a past life. So I decided that the box housing the stereo needed to be solid and have good sound reflection and enclosure properties. If I left the box all metal the resulting sound would be "tinny". I don't have a bass speaker so I want to warm the tone as best I can with the speakers I have. So I decided I can use the 6X9 speaker enclosure as a bass cabinet (couldn't hurt). I'm adding sound board to the inner surfaces. If nothing else the board, when bonded to the panel, increases it's stiffness and eliminates any chance of oil canning.

    Here are some pics of tonights progress:


    The trunk wall board is cut short on the sides and top to account for the bulb seal and where the wall will seat on the sides with the help of some angle aluminum, jbweld and magnets.


    FFR 5369 Pin Drive, IRS, Trigos, Torsen, Wilwoods, FMS BOSS 302 "B" cam , Mass-flo. CA SB100 (SPCN) Registered
    Delivered 4/23/06. "Finished" 4/2012 (still not done!)


  26. #186
    Administrator David Hodgkins's Avatar
    Join Date
    Feb 2011
    Location
    Corona del Mar, CA
    Posts
    6,065
    Post Thanks / Like
    Blog Entries
    7
    ...And continues...

    Installed the amp and rear speakers, and finished bonding soundboard. I installed and tightened the bazillion little buttonhead bolts on the rear wall piano hinge (the things we do for aesthetics) so all I have to do to finish it is bond some magnets to it that will match a set of magnets on some angle stock riveted to the side wall. That's part of tonight's' plan. The wall swings open and shut very cleanly and the wall to side wall gap is extremely small so it is turning out to be a very nice piece.

    As always, tons of pics:


    The wall in the down position. Servicing the amp if needed will be a snap:


    The clearance is tight! No buzzing or other weirdness when I tested the speakers at full volume...


    Rear wall:


    CLOSE up of the piano hinge and the matching engine-turned stripes on the base angle stock:


    Overall the trunk is starting to get there. I still have to trim and fit the battery cover; that's always an adventure! I'd like to find a thin piece of plastic to act as a gasket between the battery poles and the lid. The clearance is a little tight for my liking. The trunk is really dusty but I cleaned up the cubby aluminum to the right in this next pic a bit so you can tell how dusty the trunk is. You'll get the idea. (These are build pics after all. Glamour shots come later.)

    A warning: All those with and aversion to shiny bits may want to avert your eyes:


    I also spoke with an upholstery shop right around the corner from me and they should be able to knock out the cockpit next week before I go get the body next weekend at Da Bat!

    FFR 5369 Pin Drive, IRS, Trigos, Torsen, Wilwoods, FMS BOSS 302 "B" cam , Mass-flo. CA SB100 (SPCN) Registered
    Delivered 4/23/06. "Finished" 4/2012 (still not done!)


  27. #187
    Administrator David Hodgkins's Avatar
    Join Date
    Feb 2011
    Location
    Corona del Mar, CA
    Posts
    6,065
    Post Thanks / Like
    Blog Entries
    7
    I've been trying to get the upholstery done at a shop and they are - delaying - so I'm giving up putting in the carpet before the body.

    Bat cave this Sunday!


    FFR 5369 Pin Drive, IRS, Trigos, Torsen, Wilwoods, FMS BOSS 302 "B" cam , Mass-flo. CA SB100 (SPCN) Registered
    Delivered 4/23/06. "Finished" 4/2012 (still not done!)


  28. #188
    Senior Member KDubU's Avatar
    Join Date
    May 2015
    Location
    Kennebunkport, ME
    Posts
    1,192
    Post Thanks / Like
    Very cool! Can't wait to see it put together.

  29. #189
    Administrator David Hodgkins's Avatar
    Join Date
    Feb 2011
    Location
    Corona del Mar, CA
    Posts
    6,065
    Post Thanks / Like
    Blog Entries
    7
    Well, the best laid plans...

    I messed up. I forgot I had parts at the powder coater and therefore no way to mount the trunk or hood, even for test fitting. So I discussed it with Jeff and scrubbed the appointment. I feel really bad for Jeff, as he has had to store my body for a while now and deserves to get it out of there.

    And I feel REALLY bad for frankeeski, who came out to help after I announced I was going to be there and didn't know I cancelled.


    Yeah. Ouch. Frank: IOU breakfast - on top of everything else - at the next Maniac Mike's get together.

    Word on the street is it might happen this weekend. But I wouldn't count on it, that Hodgkins guy is kind of a flake these days.


    FFR 5369 Pin Drive, IRS, Trigos, Torsen, Wilwoods, FMS BOSS 302 "B" cam , Mass-flo. CA SB100 (SPCN) Registered
    Delivered 4/23/06. "Finished" 4/2012 (still not done!)


  30. #190
    Senior Member ehansen007's Avatar
    Join Date
    Mar 2011
    Location
    Aliso Viejo, CA
    Posts
    1,625
    Post Thanks / Like
    you dumbass. LOL

  31. #191
    Administrator David Hodgkins's Avatar
    Join Date
    Feb 2011
    Location
    Corona del Mar, CA
    Posts
    6,065
    Post Thanks / Like
    Blog Entries
    7
    Quote Originally Posted by ehansen007 View Post
    you dumbass. LOL
    I'm very tempted to add that to my sig...

    The powdercoating has been an adventure, which hopefully ends today. I gathered the parts from the new powdercoater (PC) and took them to the one I've used for the rest of this build. The guys that did the panels for this build are competent - if expensive - and I know the color will match. The new local guys earned some kudos by NOT shooting the panels because they couldn't match the color. I had told them to match the color or don't shoot it, and they didn't. Good move. They've earned a shot as a vendor for my next build.

    There's a little progress to report, but the pics came out blurry so no visuals at this time. I created a fuel pressure regulator bracket before the HB show from dumpster scrap I found. It had a 90 degree bend in it that a took out with a vice and flat body hammer. But it is good mild steel. I polished up one side and it was the piece I gave to the new PC as a test. When I got it back it had turned a medium-dark yellow on the polished side from the heat of the powder-coating oven. This hadn't happened to any of the panels that the original PC used but I came to learn later that the yellowing should have been expected from steel.

    The PC said the parts I dropped off will be ready today. I'm calling a bit later this AM to confirm. He has the trunk and hood pieces that I need before picking up the body. They put a rush on it, which they've never done for me before. But the price reflects it. $230 for 23 SMALL pieces (parking brake, trunk and hood hinges). OUCH.


    FFR 5369 Pin Drive, IRS, Trigos, Torsen, Wilwoods, FMS BOSS 302 "B" cam , Mass-flo. CA SB100 (SPCN) Registered
    Delivered 4/23/06. "Finished" 4/2012 (still not done!)


  32. #192
    Administrator David Hodgkins's Avatar
    Join Date
    Feb 2011
    Location
    Corona del Mar, CA
    Posts
    6,065
    Post Thanks / Like
    Blog Entries
    7
    Well the PC came through. I got all the parts so I can hang the hood and trunk. Gonna assemble them tonight.

    I'm also going to go ahead and close up the footboxes. I was going to keep them open to facilitate carpeting but...

    Lastly (for today's reporting), I should be getting some spacers and gaskets for the exhaust tomorrow from Mark at Breeze Automotive. Now I can properly set up the side pipes once the body is on. Thanks Mark!


    FFR 5369 Pin Drive, IRS, Trigos, Torsen, Wilwoods, FMS BOSS 302 "B" cam , Mass-flo. CA SB100 (SPCN) Registered
    Delivered 4/23/06. "Finished" 4/2012 (still not done!)


  33. #193
    Tool Baron frankeeski's Avatar
    Join Date
    Feb 2011
    Location
    "The I.E." SoCal
    Posts
    1,356
    Post Thanks / Like
    Well , redemption came yesterday and Hodgkins actually showed up at Miller's. Here are a few pictures with a bit of commentary.

    First a picture of Miller wearing this seasons latest fashion in head wear.

    Here Miller is installing the weather seal around the hood opening with Phil (David's brother and the car's owner) in the background with his head down asking WHEN IS LUNCH???!!!

    A beautiful picture of the painted and striped underside of the hood.

    And here is the last picture before it rolled back on to the trailer for it's journey home.
    Last edited by frankeeski; 09-07-2015 at 02:12 PM.
    Frank
    __________________________
    Factory Five Racing MKIII Super Snake Replica. Cannonball Cobra Drop Trunk Box, Horn Button and other machined Do Dads.
    i.e.427 Chromed Full Width Roll Bar with integrated LED Third Brake Light.
    I will never forget My Buddy Paul.

  34. #194
    Tool Baron frankeeski's Avatar
    Join Date
    Feb 2011
    Location
    "The I.E." SoCal
    Posts
    1,356
    Post Thanks / Like
    Quote Originally Posted by QSL View Post
    Did you order fries with that?
    Something like this?
    Frank
    __________________________
    Factory Five Racing MKIII Super Snake Replica. Cannonball Cobra Drop Trunk Box, Horn Button and other machined Do Dads.
    i.e.427 Chromed Full Width Roll Bar with integrated LED Third Brake Light.
    I will never forget My Buddy Paul.

  35. #195
    Senior Member KDubU's Avatar
    Join Date
    May 2015
    Location
    Kennebunkport, ME
    Posts
    1,192
    Post Thanks / Like
    Looks awesome! That colour combo really pops.
    Kyle

    Complete Kit pickup 09/05/2015, 351w, QF680, 3.55, 3-Link, 15" Halibrands with MT's, Painted Viking blue with Wimbledon white stripes on 03/15/2017. Sold in 08/2018 and totally regret it.

  36. #196
    Administrator David Hodgkins's Avatar
    Join Date
    Feb 2011
    Location
    Corona del Mar, CA
    Posts
    6,065
    Post Thanks / Like
    Blog Entries
    7
    Quote Originally Posted by QSL View Post
    Did you order fries with that?
    Quote Originally Posted by frankeeski View Post
    Something like this?
    More like this:


    PS Thanks for coming down Frank. U da man.

    Full report coming soon.

    FFR 5369 Pin Drive, IRS, Trigos, Torsen, Wilwoods, FMS BOSS 302 "B" cam , Mass-flo. CA SB100 (SPCN) Registered
    Delivered 4/23/06. "Finished" 4/2012 (still not done!)


  37. #197
    Senior Member 68GT500MAN's Avatar
    Join Date
    Feb 2011
    Location
    Fresno, CA
    Posts
    1,808
    Post Thanks / Like
    Looking great David. Can't wait to see it on the road with color and bling.
    Doug
    Built FFR5196 MKII in 2003, 427w
    Building FFR0058HR, Edlebrock 347-AOD

  38. #198
    Administrator David Hodgkins's Avatar
    Join Date
    Feb 2011
    Location
    Corona del Mar, CA
    Posts
    6,065
    Post Thanks / Like
    Blog Entries
    7

    The Birth of TROJAN

    Here's a recap of last Sunday's trip to the Bat Cave.

    First off a small note. I had to make some last minute decisions about how much of the chassis foot box and dash area I wanted to mount permanently. In my mind the body was going to have to come off so I had a lot of clecos holding the dash on, as well as the top and sides of the driver's foot box as well as the outer wall of the passenger foot box. The closer I got to the actual day of the pickup, the more clecos I replaced. It wasn't until an hour after we arrived at Jeff's and he was standing around waiting for me that I finally replaced all the clecos and riveted all the panels in place permanently, including silicone. I guess I was in denial. Now that the body is mounted, all I want to do is get it ready for the Snakes in the grass show coming up at the LA Arboretum October 3rd.

    Here's the go-cart on the trailer. One last shot pre-bodied:


    THE BIRTH OF TROJAN

    We arrived at Jeff's about 8:45 in the AM and the body was sitting out front. The color is a deep Yellow with Crimson stripes in the colors of USC, my brother's alma mater. My brother owns the TROJAN license plate. He originally wanted to do a yellow with silver stripes and that would have worked nicely with the silver frame but since we are using that plate I thought why not go all in with the college theme? I hope fans of 'SC get a kick out of it and I pray it doesn't get abused by a Bruin fan!

    BTW the phone camera is not able to pick up the actual color. Every pic I take shows the body brighter than real life. The shot of the nose below comes pretty close, if you look and the right-hand side of the pic:


    The color really pops in pictures taken in the sunlight:


    Heck, it pops in any light:


    A MAJOR concern was whether I had guessed correctly when deciding where the polished stripes would be on the firewall and trunk wall. When I called Jeff to discuss engine turning the dash He told me to hold off because there was no way to know where the stripes will be! He goes by the body openings, not chassis center like I did. So I was anxious to find out what the final result was.

    I lucked out. The stripes are perfectly centered. Check it out:


    continued...


    FFR 5369 Pin Drive, IRS, Trigos, Torsen, Wilwoods, FMS BOSS 302 "B" cam , Mass-flo. CA SB100 (SPCN) Registered
    Delivered 4/23/06. "Finished" 4/2012 (still not done!)


  39. #199
    Administrator David Hodgkins's Avatar
    Join Date
    Feb 2011
    Location
    Corona del Mar, CA
    Posts
    6,065
    Post Thanks / Like
    Blog Entries
    7
    Here are a few more pics of the hood and trunk mounting. These shots give you an idea of how much color shift the camera had. It has a real problem processing yellow!


    The weirdest thing happened while the body was being mounted. Some guy showed up, acted like he knew everybody, and then just stood around with his arms folded like he was wondering when his number was going to be called and mumbling to himself. It was kinda sad, really. Like he was wondering when his body would be painted. A guy like that probably has nightmares about grinding fiberglass and backing up into poles with your door open. Poor guy. He looked homeless...


    Anyway, back at the shop...


    continued...

    FFR 5369 Pin Drive, IRS, Trigos, Torsen, Wilwoods, FMS BOSS 302 "B" cam , Mass-flo. CA SB100 (SPCN) Registered
    Delivered 4/23/06. "Finished" 4/2012 (still not done!)


  40. #200
    Tool Baron frankeeski's Avatar
    Join Date
    Feb 2011
    Location
    "The I.E." SoCal
    Posts
    1,356
    Post Thanks / Like
    Quote Originally Posted by David Hodgkins View Post
    The weirdest thing happened while the body was being mounted. Some guy showed up, acted like he knew everybody, and then just stood around with his arms folded like he was wondering when his number was going to be called and mumbling to himself. It was kinda sad, really. Like he was wondering when his body would be painted. A guy like that probably has nightmares about grinding fiberglass and backing up into poles with your door open. Poor guy. He looked homeless...
    The way I hear it, that handsome dude was the only one that lifted a finger the entire day to help Miller. The rest of the those there just kept asking when lunch was? I here he was given some award or something for being so helpful.
    Last edited by frankeeski; 09-10-2015 at 02:21 PM.
    Frank
    __________________________
    Factory Five Racing MKIII Super Snake Replica. Cannonball Cobra Drop Trunk Box, Horn Button and other machined Do Dads.
    i.e.427 Chromed Full Width Roll Bar with integrated LED Third Brake Light.
    I will never forget My Buddy Paul.

Page 5 of 11 FirstFirst ... 34567 ... LastLast

Posting Permissions

  • You may not post new threads
  • You may not post replies
  • You may not post attachments
  • You may not edit your posts
  •  

Brown County Customs

Visit our community sponsor