FormaCars

Visit our community sponsor

Thanks Thanks:  8
Likes Likes:  31
Page 16 of 26 FirstFirst ... 61415161718 ... LastLast
Results 601 to 640 of 1012

Thread: Frank's 818R build

  1. #601
    Senior Member Pearldrummer7's Avatar
    Join Date
    Feb 2014
    Location
    Asheville, NC
    Posts
    1,230
    Post Thanks / Like
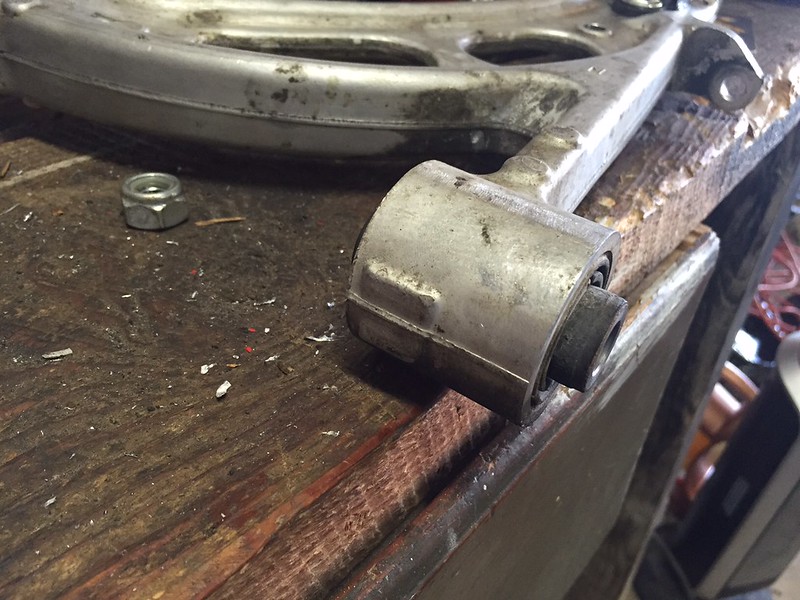
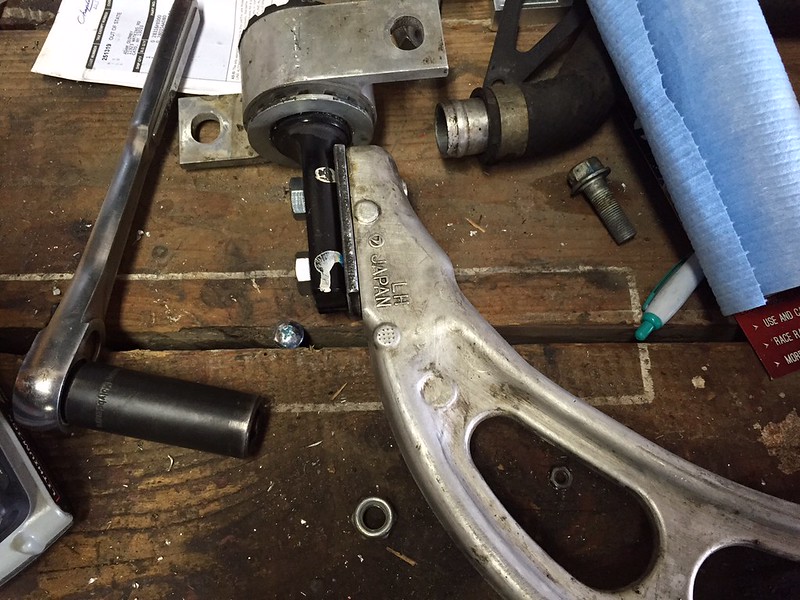
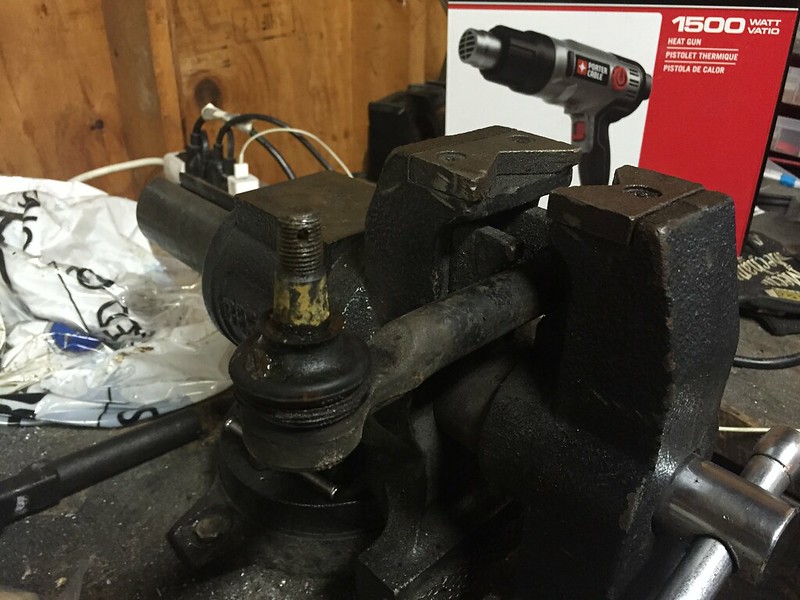
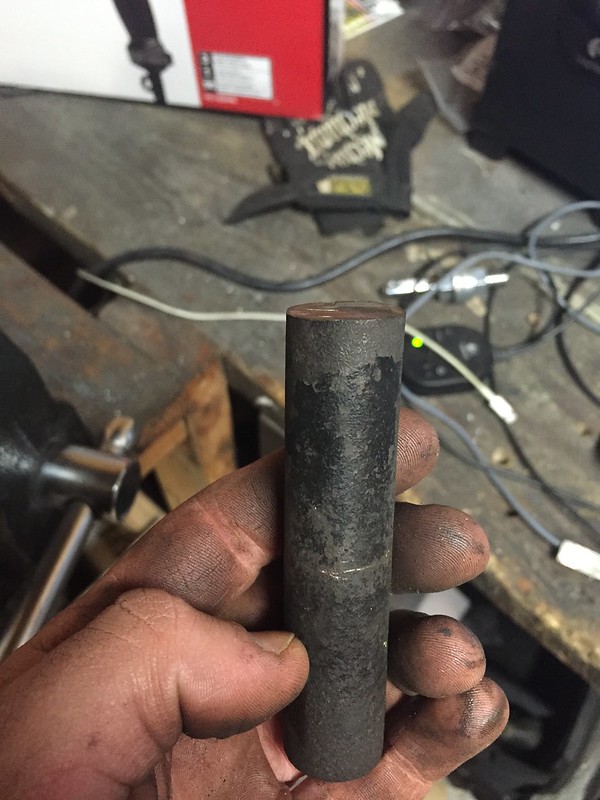
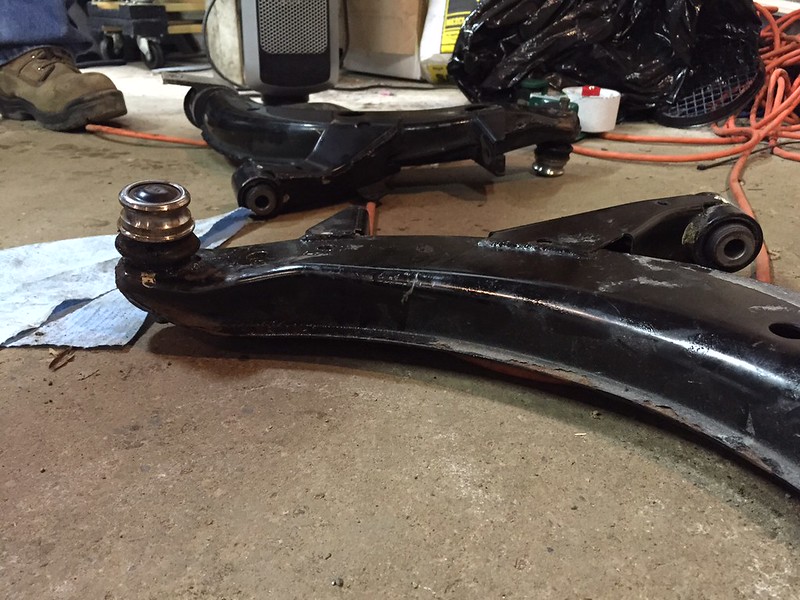
    I guess I'm buying new ball joints for my aluminum arms... These were STUCK.


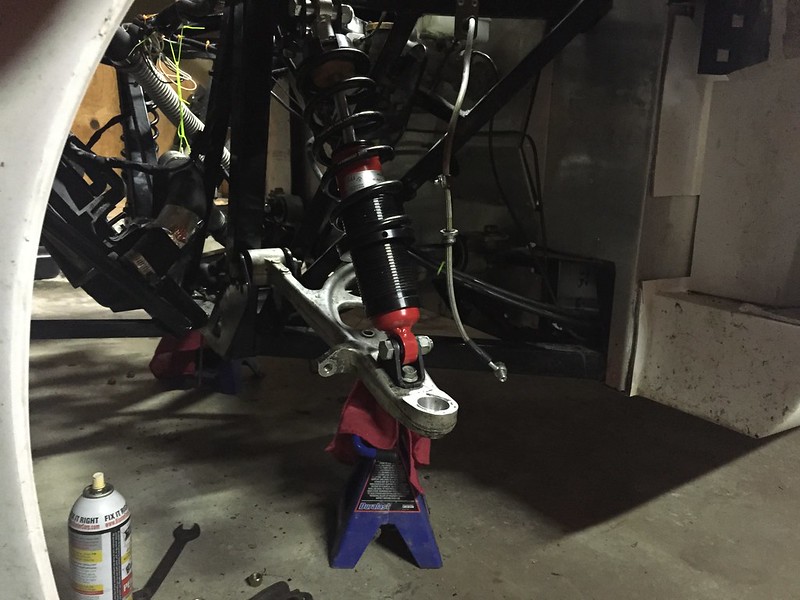
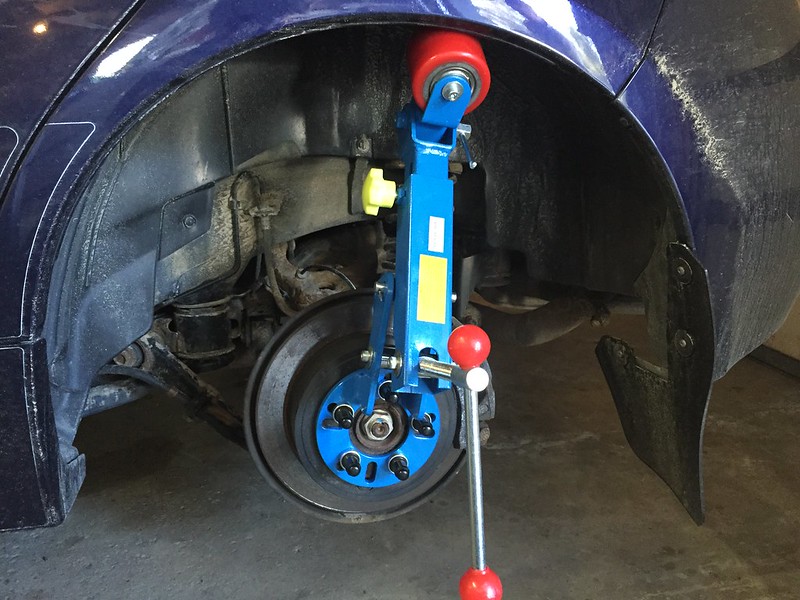
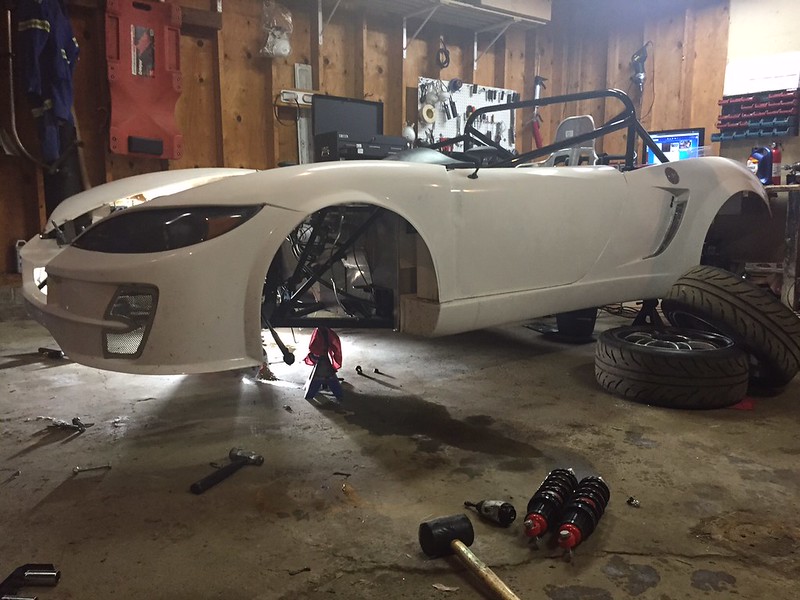
    Front suspension is well underway, with lots and lots of roadblocks.


    One such road block:


    Do you have to remove the steering rack to get this bolt in the race height slot??

  2. #602
    Senior Member Frank818's Avatar
    Join Date
    Jun 2013
    Location
    QC, Canada
    Posts
    5,732
    Post Thanks / Like
    About the bolt and the rack, what's the block? The bolt looks fully seated but on the pic it's hard to say the clearance on the nut side. For the street height you don't need to remove the rack. Is the race height located in the middle or top?
    Frank
    818 chassis #181 powered by a '93 VW VR6 Turbo GT3582R
    Go-karted Aug 5, 2016 - Then May 19+21, 2017
    Tracked May 27/July 26, 2017
    Build time before being driveable on Sep 27, 2019: over 6000h
    Build Completed Winter 2021

  3. #603
    Senior Member Pearldrummer7's Avatar
    Join Date
    Feb 2014
    Location
    Asheville, NC
    Posts
    1,230
    Post Thanks / Like
    Quote Originally Posted by Frank818 View Post
    About the bolt and the rack, what's the block? The bolt looks fully seated but on the pic it's hard to say the clearance on the nut side. For the street height you don't need to remove the rack. Is the race height located in the middle or top?
    Race height is on top. The angled frame piece stops you from putting it in the same way that you can put in the street height bolt. If it goes in from the other side I'm pretty sure the rack needs to come out. Or maybe just the rod end/tie rod if you steer all the way the other direction

  4. #604
    Senior Member Frank818's Avatar
    Join Date
    Jun 2013
    Location
    QC, Canada
    Posts
    5,732
    Post Thanks / Like
    Ha!! That damn angled frame piece! I have had that road block MANY times in different places, especially the engine side due to my totally different proportions and clearances (for examples I have trouble bolting the Porsche inner CV bolts and trouble with my exhaust fitment cuz of the angled frame piece). I symphatize with you. Can't help much on the top slot but how is it shown in the manual? If at all. Do they install the bolt before the rack?
    Frank
    818 chassis #181 powered by a '93 VW VR6 Turbo GT3582R
    Go-karted Aug 5, 2016 - Then May 19+21, 2017
    Tracked May 27/July 26, 2017
    Build time before being driveable on Sep 27, 2019: over 6000h
    Build Completed Winter 2021

  5. #605
    Senior Member Pearldrummer7's Avatar
    Join Date
    Feb 2014
    Location
    Asheville, NC
    Posts
    1,230
    Post Thanks / Like
    And she's fully legal! Just got the plates and ordered the custom vanity plates. LOLDOORS is ready to hit the road! Except that it's in pieces right now....

    Also got my bike permit for the GSX-R600 that I impulsively bought from a friend. Life's too short not to have toys, right?


    Timeline of 818 legality:
    11/13/15- Submitted paper work to NYS DMV (VS-103)
    12/9/15- Got appointment with local field investigation station (Syracuse)
    12/15/15- Went to appointment (in the pouring rain) and got a VIN
    12/30/15- Local NYS inspection
    3/13/16- 25th birthday/insurance coverage began
    3/14/16- Got plates and ordered vainity plates (LOLDOORS)
    ??- First street legal drive...coming soon!

    Approximate street legality costs:
    Windshield: $700 + $110 (install)
    Wipers: $185
    Bumper: $30
    Defroster: $20
    Misc: $40
    Cat: $110
    Lights/markers: $25
    Visors: $10
    Tax + Registration: $975
    Vanity Plates: $60
    Sold parts: -$140
    Net cost: ~$2,125

    Street legal burnout? Priceless.
    Last edited by Pearldrummer7; 03-29-2016 at 09:20 AM.

  6. #606
    Moonlight Performance
    Hindsight's Avatar
    Join Date
    May 2014
    Location
    Atlanta
    Posts
    3,402
    Post Thanks / Like
    Congrats! Better wait to insure that bike until after that upcoming 25th birthday lol

  7. #607
    Senior Member Pearldrummer7's Avatar
    Join Date
    Feb 2014
    Location
    Asheville, NC
    Posts
    1,230
    Post Thanks / Like
    Quote Originally Posted by Hindsight View Post
    Congrats! Better wait to insure that bike until after that upcoming 25th birthday lol
    It was yesterday Hence insurance on the 818! I'll insure the bike once I take it on track once or twice. I mean, I would never track something I have insured. No sir

  8. #608
    Senior Member Frank818's Avatar
    Join Date
    Jun 2013
    Location
    QC, Canada
    Posts
    5,732
    Post Thanks / Like
    Quote Originally Posted by Pearldrummer7 View Post
    Life's too short not to have toys, right?
    Absolutely! And toys are usually more fun when you're not too old. I mean we don't see an 80yo guy riding a GSX-R. There could be, but much less than 25yos.
    Frank
    818 chassis #181 powered by a '93 VW VR6 Turbo GT3582R
    Go-karted Aug 5, 2016 - Then May 19+21, 2017
    Tracked May 27/July 26, 2017
    Build time before being driveable on Sep 27, 2019: over 6000h
    Build Completed Winter 2021

  9. #609
    Senior Member Frank818's Avatar
    Join Date
    Jun 2013
    Location
    QC, Canada
    Posts
    5,732
    Post Thanks / Like
    Hey FrankyBolt! Check that out, man.

    2016-03-14 16.16.02_1.jpg

    Plenty o' space if you just turn the wheel.
    Frank
    818 chassis #181 powered by a '93 VW VR6 Turbo GT3582R
    Go-karted Aug 5, 2016 - Then May 19+21, 2017
    Tracked May 27/July 26, 2017
    Build time before being driveable on Sep 27, 2019: over 6000h
    Build Completed Winter 2021

  10. #610
    Senior Member Pearldrummer7's Avatar
    Join Date
    Feb 2014
    Location
    Asheville, NC
    Posts
    1,230
    Post Thanks / Like
    Quote Originally Posted by Frank818 View Post
    Hey FrankyBolt! Check that out, man.

    2016-03-14 16.16.02_1.jpg

    Plenty o' space if you just turn the wheel.
    Guess what I didn't even consider doing?

    Headed to the garage right now to try this out. Frank, you're a lifesaver if so.

  11. #611
    fasterer and furiouser longislandwrx's Avatar
    Join Date
    Aug 2012
    Location
    Long Island
    Posts
    2,540
    Post Thanks / Like
    Blog Entries
    6
    To run R height keep in mind you will need to do some clearancing on the aluminum control arms, they rub the frame.

    also if you buy the SPT arms they come with new ball joints so no need to buy new ones. just get new pinch bolts.
    A well stocked beverage fridge is the key to any successful project.

  12. #612
    Senior Member Pearldrummer7's Avatar
    Join Date
    Feb 2014
    Location
    Asheville, NC
    Posts
    1,230
    Post Thanks / Like
    Quote Originally Posted by longislandwrx View Post
    To run R height keep in mind you will need to do some clearancing on the aluminum control arms, they rub the frame.

    also if you buy the SPT arms they come with new ball joints so no need to buy new ones. just get new pinch bolts.
    I saw in the supplemental information where they mention potential rubbing. What part of the control arm rubs?

  13. #613
    Senior Member
    Join Date
    Jun 2013
    Location
    Bowling Green, KY
    Posts
    1,382
    Post Thanks / Like
    If I remember correctly when I installed mine I removed the casting tap on the bushing mount to clear the frame. It is quick work with a belt sander or grinder.

  14. #614
    Tazio Nuvolari wannabe Scargo's Avatar
    Join Date
    Nov 2013
    Location
    south-central CT
    Posts
    1,611
    Post Thanks / Like
    Quote Originally Posted by longislandwrx View Post
    ... they come with new ball joints so no need to buy new ones. just get new pinch bolts.
    Please explain the "new pinch bolts" comment. I had one come loose/fail. It was ugly.

  15. #615
    Senior Member Frank818's Avatar
    Join Date
    Jun 2013
    Location
    QC, Canada
    Posts
    5,732
    Post Thanks / Like
    Quote Originally Posted by Scargo View Post
    Please explain the "new pinch bolts" comment. I had one come loose/fail. It was ugly.
    Both of mines have bent.
    Frank
    818 chassis #181 powered by a '93 VW VR6 Turbo GT3582R
    Go-karted Aug 5, 2016 - Then May 19+21, 2017
    Tracked May 27/July 26, 2017
    Build time before being driveable on Sep 27, 2019: over 6000h
    Build Completed Winter 2021

  16. #616
    fasterer and furiouser longislandwrx's Avatar
    Join Date
    Aug 2012
    Location
    Long Island
    Posts
    2,540
    Post Thanks / Like
    Blog Entries
    6
    Quote Originally Posted by Scargo View Post
    Please explain the "new pinch bolts" comment. I had one come loose/fail. It was ugly.
    For clarity, and I know you know this Scargo, but others might not, the pinch bolt is the bolt that retains the ball joint in the knuckle.

    I don't recommend anyone reuse the pinch bolts ever, they are usually in rough shape when/if you remove them and god forbid you torque them and they break, it's a huge pain in the ***.

    Subaru part number is 901000060, they are like $1.25 so why not.

    Quote Originally Posted by Mitch Wright View Post
    If I remember correctly when I installed mine I removed the casting tap on the bushing mount to clear the frame. It is quick work with a belt sander or grinder.
    Correct, you have to take the casting flash and then a little more off too get a smooth movement and make sure there is no binding during bushing deflection. Plaven's thread shows the rub nicely.

    http://thefactoryfiveforum.com/showt...l=1#post121570
    Last edited by longislandwrx; 03-15-2016 at 11:46 AM.
    A well stocked beverage fridge is the key to any successful project.

  17. #617
    Senior Member
    Join Date
    Mar 2015
    Posts
    149
    Post Thanks / Like
    Thanks for letting me know about the flange bolts. I just ordered some and will switch them out. Proper torque is...?

  18. #618
    fasterer and furiouser longislandwrx's Avatar
    Join Date
    Aug 2012
    Location
    Long Island
    Posts
    2,540
    Post Thanks / Like
    Blog Entries
    6
    37ft/lbs
    A well stocked beverage fridge is the key to any successful project.

  19. #619
    Senior Member Pearldrummer7's Avatar
    Join Date
    Feb 2014
    Location
    Asheville, NC
    Posts
    1,230
    Post Thanks / Like
    All good comments on the pinch bolts. I'll be replacing mine, too.

    Here's the part I needed to shave down. It didn't look like it hit but no reason to chance it (weight savings, anyone?)


    Spacers are made! Just need the torque spec on these bolts going into the control arm (can't find it anywhere online?) and I can start making spacers

  20. #620
    Senior Member Frank818's Avatar
    Join Date
    Jun 2013
    Location
    QC, Canada
    Posts
    5,732
    Post Thanks / Like
    Quote Originally Posted by Pearldrummer7 View Post
    Spacers are made! Just need the torque spec on these bolts going into the control arm (can't find it anywhere online?) and I can start making spacers
    114ft-lbs
    Frank
    818 chassis #181 powered by a '93 VW VR6 Turbo GT3582R
    Go-karted Aug 5, 2016 - Then May 19+21, 2017
    Tracked May 27/July 26, 2017
    Build time before being driveable on Sep 27, 2019: over 6000h
    Build Completed Winter 2021

  21. #621
    Senior Member Pearldrummer7's Avatar
    Join Date
    Feb 2014
    Location
    Asheville, NC
    Posts
    1,230
    Post Thanks / Like
    Quote Originally Posted by Frank818 View Post
    114ft-lbs
    You are the man! I knew it was a lot but less than the 184 or whatever the rear bolt is.

  22. #622
    Senior Member Frank818's Avatar
    Join Date
    Jun 2013
    Location
    QC, Canada
    Posts
    5,732
    Post Thanks / Like
    184 on the big nut yes.

    What I have gathered for the Front suspension with Alu LCAs and Wilwood Big Brake kit is this:

    Front Suspension/rack
    Transverse bushing nut 140ft-lbs
    Transverse bolts to frame 184ft-lbs
    Crossmember bolt to frame 70ft-lbs
    Black transverse pin bolts 114ft-lbs
    Tie-rod end nut to spindle 20ft-lbs
    IFS bracket to spindle upper bolt 129ft-lbs
    IFS bracket to spindle lower bolt 129ft-lbs
    LCA ball joint end to spindle 37ft-lbs

    Backplate to spindle 20ft-lbs
    Wilwood Big Caliper kit bolts to spindle 47ft-lbs with Red Loctite
    A-arms to frame bolts 100-110ft-lbs
    A-arms pivot bolts 60ft-lbs
    A-arm ball joint bracket to spindle 129ft-lbss
    Axle nut to hub 162ft-lbss
    Steering rack to frame 44ft-lbss
    Steering joint to rack 17ft-lbss
    Frank
    818 chassis #181 powered by a '93 VW VR6 Turbo GT3582R
    Go-karted Aug 5, 2016 - Then May 19+21, 2017
    Tracked May 27/July 26, 2017
    Build time before being driveable on Sep 27, 2019: over 6000h
    Build Completed Winter 2021

  23. #623
    Senior Member Pearldrummer7's Avatar
    Join Date
    Feb 2014
    Location
    Asheville, NC
    Posts
    1,230
    Post Thanks / Like
    Quote Originally Posted by Frank818 View Post
    184 on the big nut yes.

    What I have gathered for the Front suspension with Alu LCAs and Wilwood Big Brake kit is this:

    Front Suspension/rack
    Transverse bushing nut 140ft-lbs
    Transverse bolts to frame 184ft-lbs
    Crossmember bolt to frame 70ft-lbs
    Black transverse pin bolts 114ft-lbs
    Tie-rod end nut to spindle 20ft-lbs
    IFS bracket to spindle upper bolt 129ft-lbs
    IFS bracket to spindle lower bolt 129ft-lbs
    LCA ball joint end to spindle 37ft-lbs

    Backplate to spindle 20ft-lbs
    Wilwood Big Caliper kit bolts to spindle 47ft-lbs with Red Loctite
    A-arms to frame bolts 100-110ft-lbs
    A-arms pivot bolts 60ft-lbs
    A-arm ball joint bracket to spindle 129ft-lbss
    Axle nut to hub 162ft-lbss
    Steering rack to frame 44ft-lbss
    Steering joint to rack 17ft-lbss
    Awesome. Thanks again, Frank. I made a Google Docs (here) with all of this information. I posted it in its own thread, too. Should be a good resource for all of this suspension crap. Any more that you have that I'm missing?

  24. #624
    Senior Member Frank818's Avatar
    Join Date
    Jun 2013
    Location
    QC, Canada
    Posts
    5,732
    Post Thanks / Like
    It looks like you already had the rear suspension specs so the front completes all I got.
    Judging by the number of times I torqued and untorqued these bolts, the info has been very useful already. Every time I torqued I thought it was the last time but no, I always needed to remove and I will probably again for some reason.
    Frank
    818 chassis #181 powered by a '93 VW VR6 Turbo GT3582R
    Go-karted Aug 5, 2016 - Then May 19+21, 2017
    Tracked May 27/July 26, 2017
    Build time before being driveable on Sep 27, 2019: over 6000h
    Build Completed Winter 2021

  25. #625
    Senior Member
    Join Date
    Jun 2015
    Posts
    678
    Post Thanks / Like
    We had to clearance the same casting marks off of ours. We went a little further by sanding off all the casting ridges. should have removed the sway bar mounts, but wanted to tune the handling first just to be sure we don't need a front bar.

  26. #626
    Senior Member Frank818's Avatar
    Join Date
    Jun 2013
    Location
    QC, Canada
    Posts
    5,732
    Post Thanks / Like
    Frankyboy, how thick are your LCA spacers? They are about 5mm to my eyes, is that correct? I am using 10mm thick, what are your expectations with yours? Gaining camber? Only caster? 1-2deg or aiming to 3-4deg gain?
    Frank
    818 chassis #181 powered by a '93 VW VR6 Turbo GT3582R
    Go-karted Aug 5, 2016 - Then May 19+21, 2017
    Tracked May 27/July 26, 2017
    Build time before being driveable on Sep 27, 2019: over 6000h
    Build Completed Winter 2021

  27. #627
    Senior Member Pearldrummer7's Avatar
    Join Date
    Feb 2014
    Location
    Asheville, NC
    Posts
    1,230
    Post Thanks / Like
    Quote Originally Posted by Frank818 View Post
    Frankyboy, how thick are your LCA spacers? They are about 5mm to my eyes, is that correct? I am using 10mm thick, what are your expectations with yours? Gaining camber? Only caster? 1-2deg or aiming to 3-4deg gain?
    They're 6.25 mm because I found a piece of steel lying around that was 75mm wide and 6.25 thick. Just had to trim the length and it was perfect!

    I expect to gain caster for sure. I was at 3.5 last year and expect 3 more out of this. I think that's reasonable from what I read? I don't know if I'll get any more camber out of it. I only ended up with the spacer and flipped hurricane bracket. The mount I flipped back since it was so much of an angle (I couldn't get the bolt through the front bushing). I used a 50mm long bolt for what it's worth.

  28. #628
    Senior Member Pearldrummer7's Avatar
    Join Date
    Feb 2014
    Location
    Asheville, NC
    Posts
    1,230
    Post Thanks / Like
    Busy weekend! Changed oil on 6 cars, finished up my front suspension:


    Started the adventure of making my own bump steer kit (don't have the spare cash for a Baer one):


    (the etched mark is the depth of the OEM threads)

    And refurbished my steering rack (with some help in getting the tie rods off from the rust bucket!):


    Also rolled the WRX fenders to fit my new Team Dynamics wheels:


    They look great and the 20mm extra width (255 wide tires) is appreciated already.

  29. #629
    Senior Member Pearldrummer7's Avatar
    Join Date
    Feb 2014
    Location
    Asheville, NC
    Posts
    1,230
    Post Thanks / Like
    Bonus pic- it was chilly in upstate NY this weekend (yes we got snow today):

  30. #630
    Senior Member FFRSpec72's Avatar
    Join Date
    Feb 2011
    Location
    Kirkland, WA
    Posts
    2,255
    Post Thanks / Like
    Have you tried something like the Perrin PSRS Offset Bushings (I'm sure others make something just like them), as you flip them and these take care of the need for the spacer. You can get another couples degrees of caster and about a degree of camber out of these.
    Tony Nadalin
    2018 SOVREN Big Bore Champion
    2015 SCCA Oregon Region VP3 Champion
    2012 ICSCC ITE Class Champion
    FFR MkII Challenge Car, Spec Racer, Street Legal, SCCA, ICSCC and NASA Racing
    818R Build in progress

  31. #631
    Senior Member Pearldrummer7's Avatar
    Join Date
    Feb 2014
    Location
    Asheville, NC
    Posts
    1,230
    Post Thanks / Like
    Quote Originally Posted by FFRSpec72 View Post
    Have you tried something like the Perrin PSRS Offset Bushings (I'm sure others make something just like them), as you flip them and these take care of the need for the spacer. You can get another couples degrees of caster and about a degree of camber out of these.
    Tony-
    I've seen those before. I was going to see what my alignment was like with the OEM hardware then see how much more I want from there. Does anyone on here have the Perrin offset bushings?

  32. #632
    Senior Member FFRSpec72's Avatar
    Join Date
    Feb 2011
    Location
    Kirkland, WA
    Posts
    2,255
    Post Thanks / Like
    Quote Originally Posted by Pearldrummer7 View Post
    Tony-
    I've seen those before. I was going to see what my alignment was like with the OEM hardware then see how much more I want from there. Does anyone on here have the Perrin offset bushings?
    The center drive 818 R is running these, they seemed pleased so far, they are somewhat worried about the wear on the front bushings since the rear are a lot stiffer
    Tony Nadalin
    2018 SOVREN Big Bore Champion
    2015 SCCA Oregon Region VP3 Champion
    2012 ICSCC ITE Class Champion
    FFR MkII Challenge Car, Spec Racer, Street Legal, SCCA, ICSCC and NASA Racing
    818R Build in progress

  33. #633
    Senior Member Pearldrummer7's Avatar
    Join Date
    Feb 2014
    Location
    Asheville, NC
    Posts
    1,230
    Post Thanks / Like
    Installed the new oil pan/pickup tube. I also removed the oil heater per Glyn's suggestion. Made a hard line out of copper to bypass it.


    Only reason the engine/transmission isn't in is because the shop forgot to send back my shift fork/throw out bearing with the transmission

    Besides that, it's all ready to bolt in and do some street legal burnouts!
    Frank - Build thread

  34. #634
    Senior Member Pearldrummer7's Avatar
    Join Date
    Feb 2014
    Location
    Asheville, NC
    Posts
    1,230
    Post Thanks / Like
    Not 818 related, but check out those Team Dynamics wheels on my daily driver! Had a wedding to attend in VT and had a ton of fun on the backroads on the way there. On the way back, I hit a snowstorm and regretted the whole summer tire thing.
    Frank - Build thread

  35. #635
    Senior Member FFRSpec72's Avatar
    Join Date
    Feb 2011
    Location
    Kirkland, WA
    Posts
    2,255
    Post Thanks / Like
    Quote Originally Posted by Pearldrummer7 View Post
    Installed the new oil pan/pickup tube. I also removed the oil heater per Glyn's suggestion. Made a hard line out of copper to bypass it.
    I assume that you have some sort of oil cooler ?
    Tony Nadalin
    2018 SOVREN Big Bore Champion
    2015 SCCA Oregon Region VP3 Champion
    2012 ICSCC ITE Class Champion
    FFR MkII Challenge Car, Spec Racer, Street Legal, SCCA, ICSCC and NASA Racing
    818R Build in progress

  36. #636
    Senior Member Pearldrummer7's Avatar
    Join Date
    Feb 2014
    Location
    Asheville, NC
    Posts
    1,230
    Post Thanks / Like
    Quote Originally Posted by FFRSpec72 View Post
    I assume that you have some sort of oil cooler ?
    I am not. I haven't had hot oil on this car (or my WRX for that matter) and planned to design/install a cooler this winter but I was sick for ~6 weeks and am way behind on car work. I figured when and if I saw oil temperatures that concerned me I would figure out a cooling solution, but they were cool the first 4 track days.

    Does everyone really think such a cooler is necessary?
    Frank - Build thread

  37. #637
    Senior Member FFRSpec72's Avatar
    Join Date
    Feb 2011
    Location
    Kirkland, WA
    Posts
    2,255
    Post Thanks / Like
    Quote Originally Posted by Pearldrummer7 View Post
    I am not. I haven't had hot oil on this car (or my WRX for that matter) and planned to design/install a cooler this winter but I was sick for ~6 weeks and am way behind on car work. I figured when and if I saw oil temperatures that concerned me I would figure out a cooling solution, but they were cool the first 4 track days.

    Does everyone really think such a cooler is necessary?
    The center drive car removed the stock oil "thing" and and ran no oil cooler and the oil temps were up almost 20 degrees, so they are now having to install and oil cooler
    Tony Nadalin
    2018 SOVREN Big Bore Champion
    2015 SCCA Oregon Region VP3 Champion
    2012 ICSCC ITE Class Champion
    FFR MkII Challenge Car, Spec Racer, Street Legal, SCCA, ICSCC and NASA Racing
    818R Build in progress

  38. #638
    Senior Member Pearldrummer7's Avatar
    Join Date
    Feb 2014
    Location
    Asheville, NC
    Posts
    1,230
    Post Thanks / Like
    Quote Originally Posted by FFRSpec72 View Post
    The center drive car removed the stock oil "thing" and and ran no oil cooler and the oil temps were up almost 20 degrees, so they are now having to install and oil cooler
    Huh. I guess I was under the impression that the stock oil "thing" heated the oil up more than it cooled it off. I think the quickest and cheapest solution will be to run the stock oil "thing" for now. I'm super short on time before track season (spending the rest of the month in Asia) so I don't think I'll be able to get a new oil cooler designed/installed by then
    Frank - Build thread

  39. #639
    Senior Member FFRSpec72's Avatar
    Join Date
    Feb 2011
    Location
    Kirkland, WA
    Posts
    2,255
    Post Thanks / Like
    Quote Originally Posted by Pearldrummer7 View Post
    Huh. I guess I was under the impression that the stock oil "thing" heated the oil up more than it cooled it off. I think the quickest and cheapest solution will be to run the stock oil "thing" for now. I'm super short on time before track season (spending the rest of the month in Asia) so I don't think I'll be able to get a new oil cooler designed/installed by then
    It seems that it really provides for heat transfer
    Tony Nadalin
    2018 SOVREN Big Bore Champion
    2015 SCCA Oregon Region VP3 Champion
    2012 ICSCC ITE Class Champion
    FFR MkII Challenge Car, Spec Racer, Street Legal, SCCA, ICSCC and NASA Racing
    818R Build in progress

  40. #640
    Senior Member
    Join Date
    Jun 2013
    Location
    Bowling Green, KY
    Posts
    1,382
    Post Thanks / Like
    Frank, based on what a few buddies are running on thier track and race Subaru's and not having water or oil temp issues I just replaced the OEM water/oil heat exchanger with a new one. If I have oil temp issues I at adding a water/oil cooler in the radiator coolant line.
    At my modest power level I don't anticipate a problem, we will see when we get to the middle of summer.

Page 16 of 26 FirstFirst ... 61415161718 ... LastLast

Tags for this Thread

Posting Permissions

  • You may not post new threads
  • You may not post replies
  • You may not post attachments
  • You may not edit your posts
  •  

Brown County Customs

Visit our community sponsor