-
Senior Member

-
Senior Member
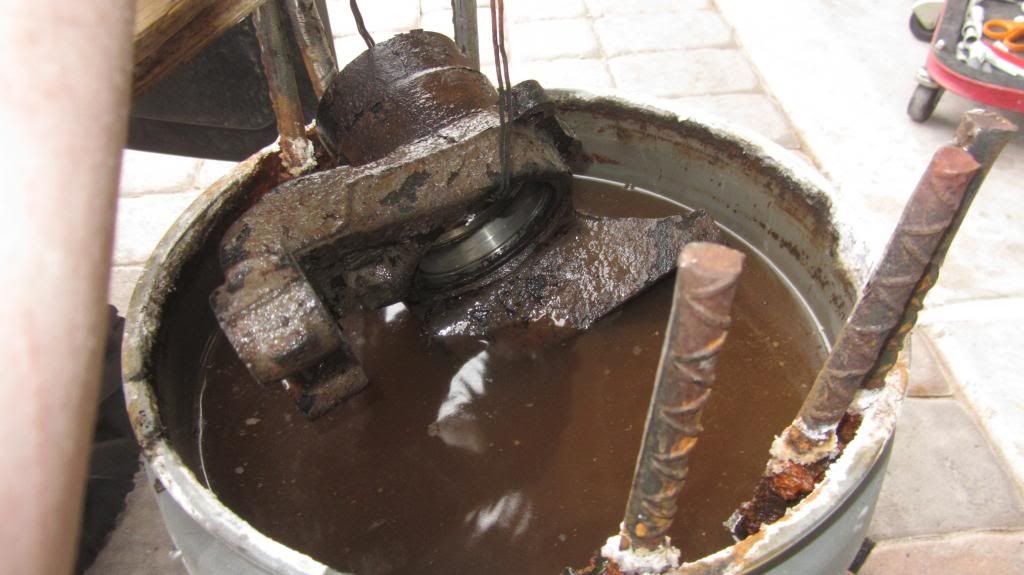
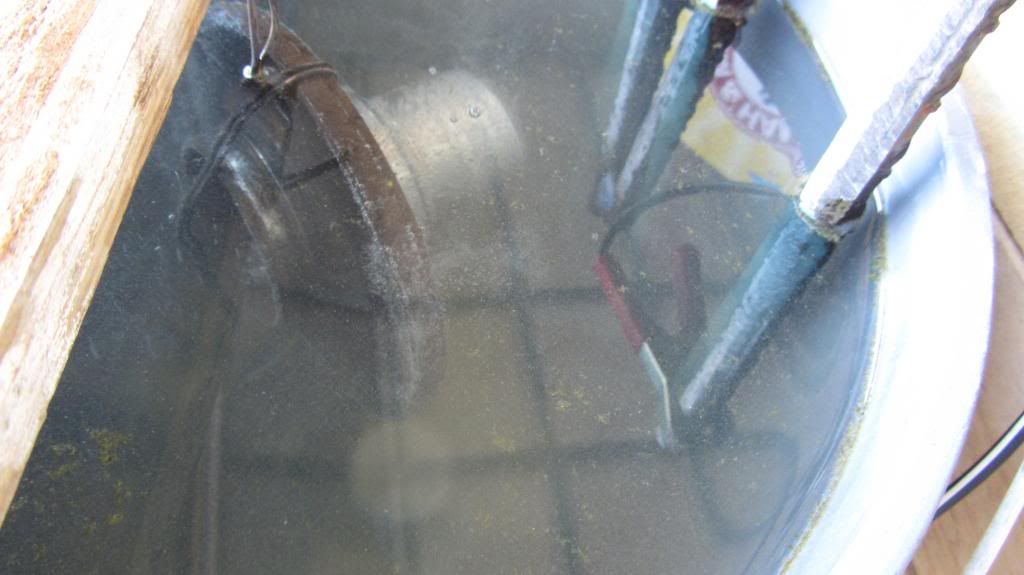
It amazes me how well and easy this rust electrolysis process performs. The above rear knuckle has been cathodizing for about 6 hours. All those rusty bits are just business card to postage stamp size surface flakes now. 95% of it came off with a 2 minute wire brushing and a garden hosing. Missed a few areas so I realigned the part and dunked it for another session. Line-of-sight issue. The anode got super rusty funky for session one.
And that's the same water and washing soda solution with which I started. I had to add a pint of water or so due to evaporation but the solution doesn't go bad. You just keep reusing it until the wife threatens to SuperFund the garage if you don't change it out.
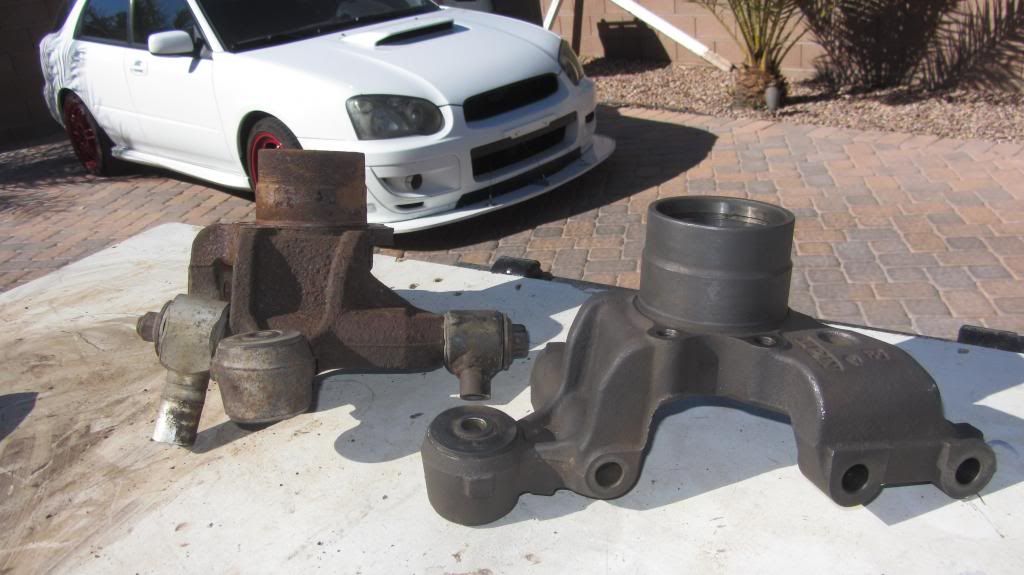
Here's a better before/after shot. After pulling the part out I wire brushed it down for 5 minutes then misted it with WD-40, to Displace the Water, then 10 minutes later wiped the WD-40 and water it displaced off. Parts come out dull charcoal black. I hypothesize the black is the "good rust", aka magnetite. Magnetite is Fe3O4. Red rust (or “hematite”) is Fe2O3. Unlike red rust, black rust is protective and prevents corrosion. Also, things bond better to magnetite than bare iron. Black rust is not sufficient by itself to protect cast iron from corrosion. It’s easily removed if you don't like it. It'll come off on your hands when you handle it.
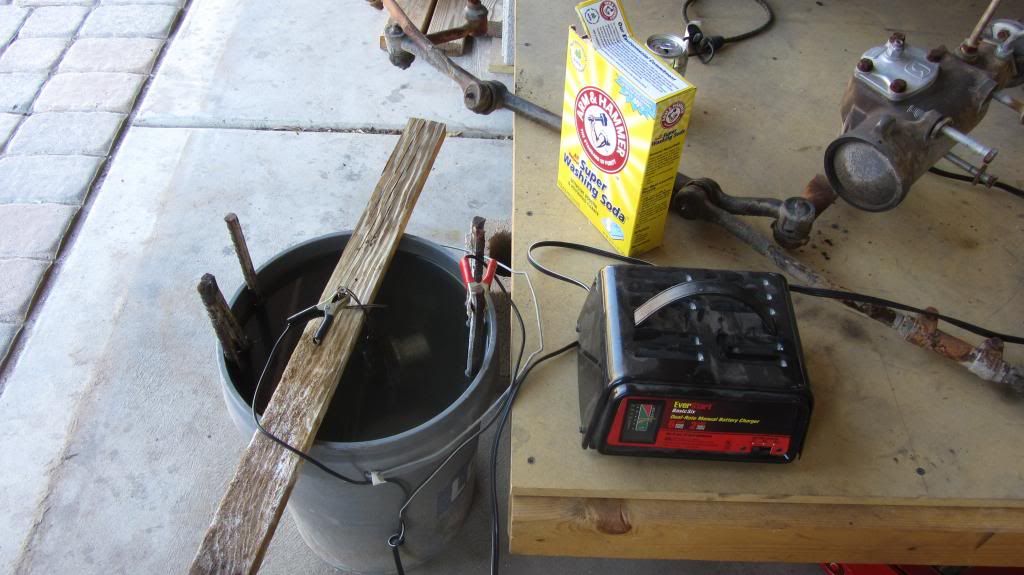
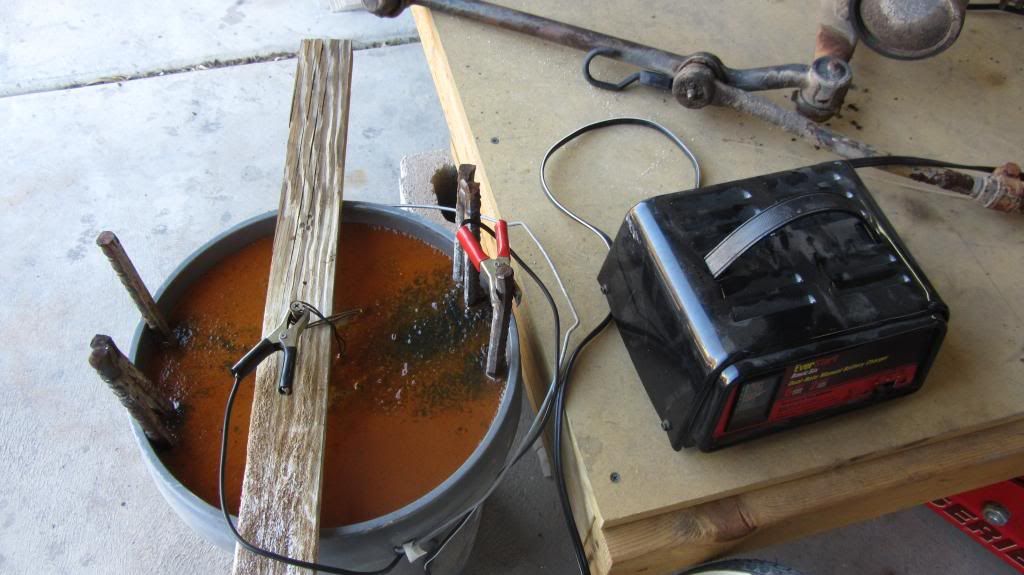
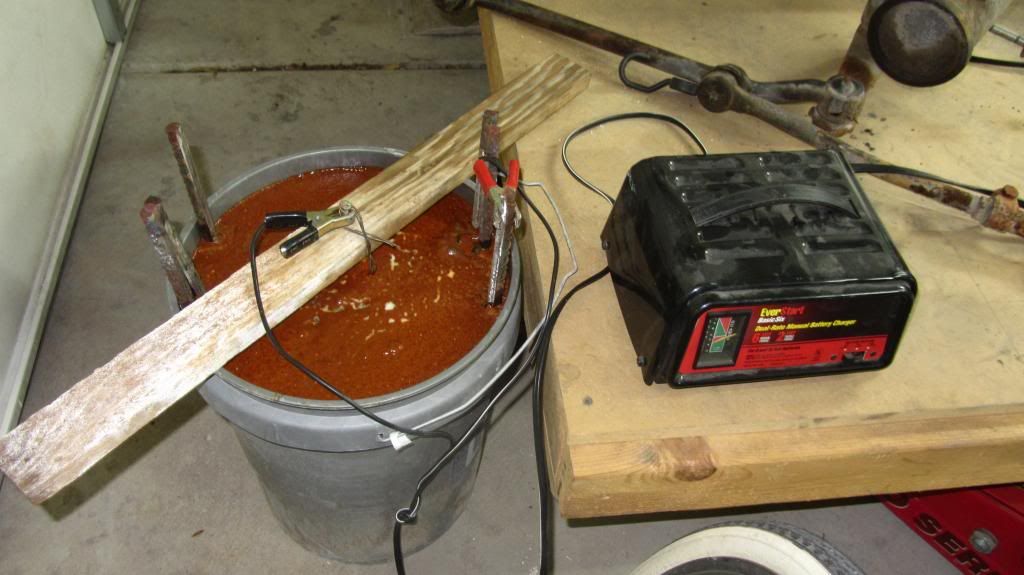
Our Frank818 found that the best settings to run the charger at are 12v@2 amps for about 3 hours. If it needs more: wire brush for a minute, set it back in the bucket at a different angle, then another 3 hours.
Tips for best results:
- Process works by line-of-sight. If the anode can't see a rusty section of the cathode (your part), it's not getting de-rusted.
- 12v@2 amps for about 3 hours, then brush. Repeat if necessary.
- Don't let the anode and cathode touch under the water/washing soda solution. You'll complete the circuit and electrolysis will stop.
- Hook the negative lead (black) up to the cathode/rusty part, and the positive lead (red) up to your anode. Do it the other way and you'll just make your part rustier.
- Once you've made your solution of 5 gallons of water / 5 tablespoons of washing soda you don't need to add more washing soda for future de-rusting sessions. It doesn't get used up in the process.
- You may end up having to add more water due to evaporation.
- Adding more than 5 tablespoons of washing soda to 5 gallons of water doesn't make the process work better or faster. It just wastes the washing soda. Not that it's all that expensive; it just doesn't do anything. More is not better in this case.
- You can use Baking Soda (Sodium-Bicarbonate) instead of Washing Soda (Sodium-Carbonate) but it's been reported as being half as effective. Meaning you'll have to run your parts longer and your results won't be as good.
- You can put your bare skin right into the water/washing soda/rust solution. It's about as caustic as a load of wet laundry in the washer.
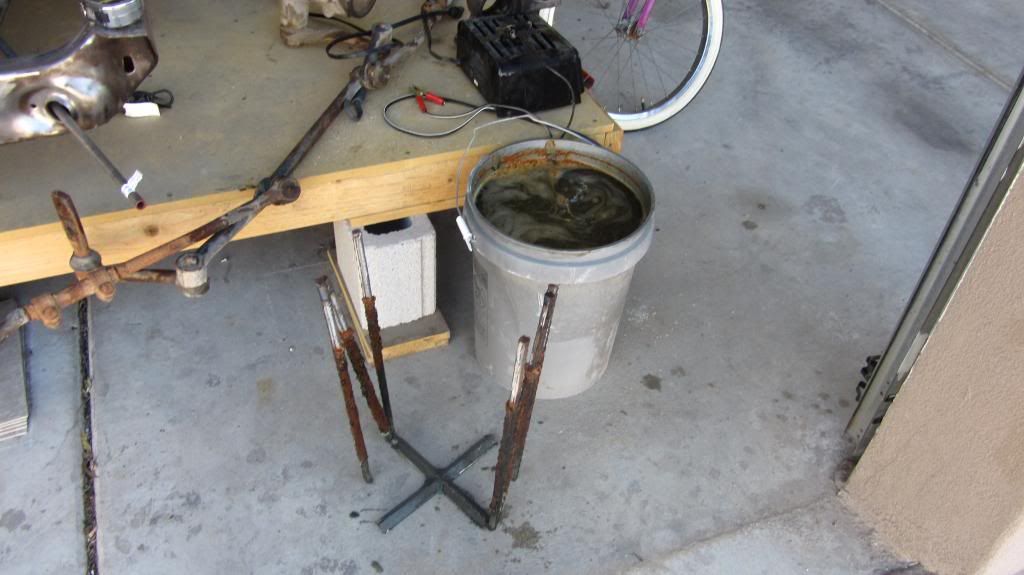
- The anode gets used up as you go. It will get thinner and thinner the more you do the process. So expect to replace it if you do a lot of de-rusting.
- You risk your health putting anything galvanized though this process. Be smart. Save your lungs.
Last edited by Rasmus; 03-30-2014 at 11:09 AM.
-
Post Thanks / Like - 0 Thanks, 1 Likes
-
Senior Member

Rasmus,
THANK YOU for this guide! Huge help to all of us who are new to magical chemistry stuff.
-
fasterer and furiouser

Arm and Hammer SUPER Washing Soda! Now with 25% more SUPER!
Thanks for dropping the knowledge on us.
A well stocked beverage fridge is the key to any successful project.
-
Senior Member

After seeing this on your build thread I have 4 hubs that will spend time in their own Bucket-O-Doom.
Last edited by svanlare; 03-28-2014 at 01:46 PM.
-
Senior Member
After seeing how popular the process is becoming I decided to strip the information out the various build threads it was spreading across and post it here in the general section. I didn't want future builders having to sift thought dozens of build thread pages trying to find all the info. So it here now under it's own topic.
-
Senior Member
Thank you for doing that.
My donor ended up pretty clean, but the uprights need attention. If the kit doesn't show up this weekend, job one instead will be pulling bearings and starting to clean uprights. What are your thoughts on painting with POR15 after finishing vs. leaving alone?
-
Senior Member

I agree with that process. It works even on super impossible rusty spindles from Canada! If it works for those salty spindles, it'll work for anything! For pix, see my build thread too.
Frank
818 chassis #181 powered by a '93 VW VR6 Turbo GT3582R
Go-karted Aug 5, 2016 - Then May 19+21, 2017
Tracked May 27/July 26, 2017
Build time before being driveable on Sep 27, 2019: over 6000h
Build Completed Winter 2021
-
Senior Member

Originally Posted by
svanlare

What are your thoughts on painting with POR15 after finishing vs. leaving alone?
San Jose, huh? That close to the ocean, with that much humidity you need to cover up the bare cast iron with something, otherwise they'll be orange in less than a week. I'm not a fan of POR-15 but that's personal preference. POR-15 doesn't take UV rays well and being that I'm in Vegas, you might get an idea why. I know others are big fans. Right now I'm into using VHT Roll Bar & Chassis Satin Black. It's self etching, and priced right. The satin black is great. It's not a "pay-attention-to-this!" color. So great for parts you don't want to feature but need to cover. VHT is a part of DupliColor which is part of Sherwin-Williams. So they know paint.
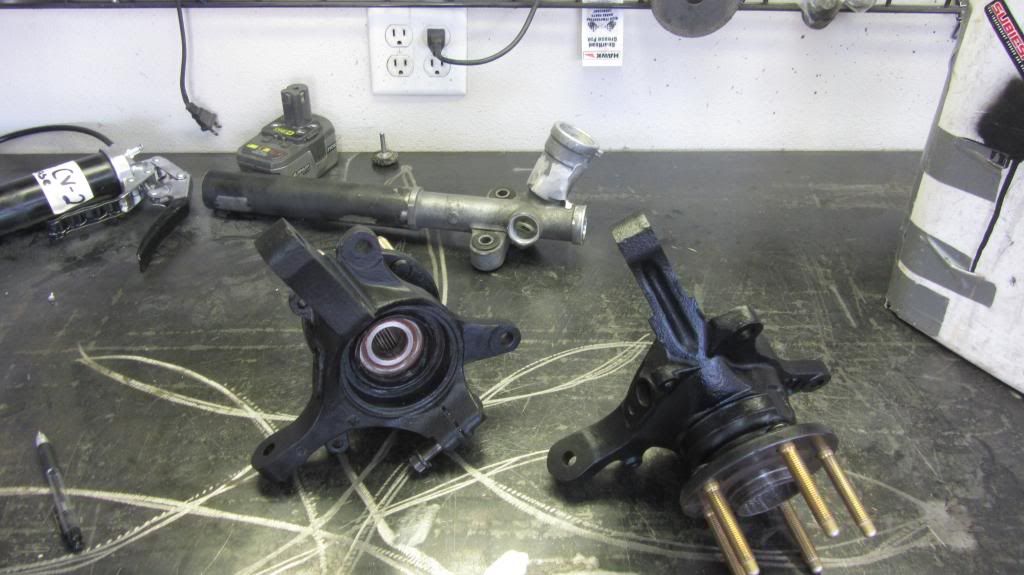
Here's how my front knuckles turned out after de-rusting and the VHT.
-
Senior Member

Thanks that fantastic write up... Much appreciated.
FFR Daytona Type 65 Coupe
67 427 Cobra
57' Belair
72 Pinto Wagon ,306" 1/4 miler
34 5 window coupe Ford
2003 Mustang GT
99' ZX9
85 Goldwing
All toys still in the Scuderia!
Every Saint has a past..................every sinner a future
Don't take yourself so seriously........no one else does.
You never see a motorcycle parked outside a Psychiatrists office.
-
Senior Member
I've used POR-15 in the past, but never on exposed parts. I'll have to check out VHT.
-
Senior Member

Yes this is a very helpful thread, as a matter of fact I emailed it to myself. My next project is a 64 Fairlane that will need some rust removal and this looks like the trick. I have some tall plastic 20 gallon buckets that will help with some of the long parts like trim etc. Thanks again!
-
It looks pretty economical, which is a plus.
I recently bought some stuff called Evaporust, which is (strangely) a water based rust remover. Not necessarily cheap, but i've seen it work and the parts come out just the same as the Bucket o' Doom, largely black and no sign of corrosion.
At that point in the process, I've used either Permatex or Duplicolor rust treatments, which sprays on a clear coat that contains an active rust converter. That stuff will withstand sitting in a chlorinated or salt treated swimming pool for years. I've also used it on a bike frame left outdoors which had popped rust under the chrome plating, and it was left out in the rain and sun for years - never rusted again. The color coat faded so much it was hard to discern the original tint.
If you can't soak a part in a bucket due to size, you can apply the solution to the part with a soaked paper towel held in place with magnets - their recommendation for sheet metal - and it will eliminate the rust. Plus, wring it out and store back in the jug for next time, too. It doesn't "wear out" using it for quite awhile.
-
Senior Member
-
Senior Member
Originally Posted by
Pearldrummer7
I tried this last night. The results are absolutely amazing. Here are my pictures from the adventure.
Even as OP, that is almost unbelievable. I'd think you were straight up lying, if I hadn't seen similar results for myself. Nice work.
-
Senior Member
Originally Posted by
Rasmus
Even as OP, that is almost unbelievable. I'd think you were straight up lying, if I hadn't seen similar results for myself. Nice work.
I thought you were totally full of sh** until i tried it 
Couldn't have done it without your nice write up!
Are there any parts you're not considering this for? Any reasons why not, if so?
-
Senior Member
Hey Pearl, nice black caliper!! 
I will not use that process for the steering rack (very rusty), cuz of the grease and rack and pinion stuff. Then other parts like pedal cable cuz I don't want water to go inside the rubber cable. My pedal metal stuff are also quite rusty, but not the cable itself.
Frank
818 chassis #181 powered by a '93 VW VR6 Turbo GT3582R
Go-karted Aug 5, 2016 - Then May 19+21, 2017
Tracked May 27/July 26, 2017
Build time before being driveable on Sep 27, 2019: over 6000h
Build Completed Winter 2021
-
Senior Member
Originally Posted by
Frank818
Hey Pearl, nice black caliper!!
I will not use that process for the steering rack (very rusty), cuz of the grease and rack and pinion stuff. Then other parts like pedal cable cuz I don't want water to go inside the rubber cable. My pedal metal stuff are also quite rusty, but not the cable itself.
Thanks Frank! I think they came out great.
That sounds right. Are you planning to use this process for the calipers themselves? Keep the gasket in or remove and replace it first?
Frank
-
Senior Member
My calipers are already in perfect shape cuz I bought a Wilwood kit.
I believe it shouldn't be a problem with the gasket in, I am not sure about water but it's supposed to be waterproof, no? If yes then dip them in.
Frank
818 chassis #181 powered by a '93 VW VR6 Turbo GT3582R
Go-karted Aug 5, 2016 - Then May 19+21, 2017
Tracked May 27/July 26, 2017
Build time before being driveable on Sep 27, 2019: over 6000h
Build Completed Winter 2021
-
Is it best to remove the black magnetite before painting? What's the best way to remove it?
Thanks,
-
Senior Member
Originally Posted by
lbperry
Is it best to remove the black magnetite before painting? What's the best way to remove it?
Thanks,
I don't. I just paint right over it with the VHT product I mentioned. That written, I do fully degrease the part with acetone before paint. I go over it like two or three times. It does take a bit of the magnetite off but that's not my objective. Grease/oils prevents the paint from sticking and will make the paint lift off. Magnetite seems to promote paint adhesion, but that's a gut feeling on my part. I do know that on my parts the presence of a small amount doesn't effect the paints I use.
Last edited by Rasmus; 03-30-2014 at 11:19 AM.
-
Senior Member
I don't either. I just paint right over it with Anti-Rust product.
Frank
818 chassis #181 powered by a '93 VW VR6 Turbo GT3582R
Go-karted Aug 5, 2016 - Then May 19+21, 2017
Tracked May 27/July 26, 2017
Build time before being driveable on Sep 27, 2019: over 6000h
Build Completed Winter 2021
-
I wonder if the rebuilders use a similiar process to prep their "cores". Is this the same as Baking soda. I just got a gallon of WD-40 Rust Remover Soak as a gift but have not tried it yet, has anybody ever used it. Just soak no battery charger. says no acid, non toxic ,water based and VOC free.
Kenny
-
Senior Member
Originally Posted by
first time builder
Is this the same as Baking soda.
No.
Originally Posted by
Rasmus
- You can use Baking Soda (Sodium-Bicarbonate) instead of Washing Soda (Sodium-Carbonate) but it's been reported as being half as effective. Meaning you'll have to run your parts longer and your results won't be as good.
-
Member

Awesome tip. I've heard about this, but never went looking for a how to. Your tips are very helpful and ill be doing this soon.
-
Some Tips and one WARNING...
Here are a few tips I've learned from many years of electrolytic de-rusting... but first the WARNING...
WARNING: Never use stainless steel or any other alloy containing chromium as the sacrificial anode in your de-rusting setup. If you do, you will create a highly toxic solution of hexavalent chromium. There is no legal way of getting rid of this hazardous waste, and no environmentally safe place to dump it. This is the only serious risk posed by electrolytic de-rusting, and one that is easily avoided by a proper choice of anode material.
One excellent choice for the anode is carbon. Scrap pieces of rods, sheets, and cylinders are available on ebay at low cost. The great thing about carbon is that it does not oxidize and only very slowly erodes away in the de-rusting bucket, keeping the solution much cleaner than if you use iron for the anode. I have pieces of carbon that have survived hundreds of hours in the bucket pretty much unscathed. A lot of these pieces are scraps and left-overs from EDM machine shops.
As Rasmus says, rebar from the local home improvement center is an excellent, completely safe, and inexpensive anode material. The only drawback is that it gets consumed rather quickly and adds a lot of rust to the bucket. If you see rust forming in your bucket it is not coming from the cathode (the part you are cleaning) because that rust is being chemically converted back to pure iron by reacting with the hydrogen at that electrode. The rust is comming from the anode, which (unfortunately for it) is bathed in pure corrosive oxygen.
Even if you do use rebar anodes, the water can get pretty digusting without effecting anything, so there's no need to change the water. I only change the water when I have a particularly tricky set-up and I want to see were the bubbles are forming on the part.
Baking soda, washing soda, and borax work well as electrolytes. I add about 1-2 tablespoons per gallon but it is really not critical. If you do not have a variable voltage power supply you can use the concentration of washing soda to regulate the amount of current so that you don't overheat your power supply. You only need enough current to form bubbles at the cathode... a few amps is plenty. Cranking up the current does not make the de-rusting go any faster.
As Frank and Rasmus have noted, de-rusting only occurs where there is line-of-sight coverage between the cathode and anode, so it might take a few different sessions to completely de-rust a complex shape. To de-rust deep threaded holes for example, you need to place an anode rod down into the hole for effective coverage. For my WRX spindles I used a 1 inch diameter carbon rod down through the middle to clean out the bearing area after de-rusting the outside surfaces with a different set-up.
When you remove a part from the de-rusting tank you will be amazed at how quickly a flash coating of new rust will form... it can happen in seconds right before your eyes as the part dries. Any other piece of metal hanging around your shop will have a protective surface layer... either purposely applied or a naturally forming oxide layer that protects the metal from further oxidation. But your freshly de-rusted part is virgin metal with no protective oxide layer and so it rusts the instant you remove it from the bucket. This flash layer is so thin that it does not affect anything, and you can paint right over it. But you can remove this rust and form a protective passivating layer by spraying on a "metal prep" solution containing phosphoric acid and zinc phosphate. Eastwood's product is called "After-Blast Metal Prep" and there are similar products from Jasco and others. This greatly improves the appearance of the part... it will literally look new and shiny after the prep treatment, and it does afford some amount of rust protection until the part gets painted.
Good luck... Jeff
-
Senior Member

Originally Posted by
Rasmus
After seeing how popular the process is becoming I decided to strip the information out the various build threads it was spreading across and post it here in the general section. I didn't want future builders having to sift thought dozens of build thread pages trying to find all the info. So it here now under it's own topic.
Thank you
-
Senior Member
Originally Posted by
JeffS
Here are a few tips I've learned from many years of electrolytic de-rusting... but first the WARNING...
WARNING: Never use stainless steel or any other alloy containing chromium as the sacrificial anode in your de-rusting setup. If you do, you will create a highly toxic solution of hexavalent chromium. There is no legal way of getting rid of this hazardous waste, and no environmentally safe place to dump it. This is the only serious risk posed by electrolytic de-rusting, and one that is easily avoided by a proper choice of anode material.
One excellent choice for the anode is carbon. Scrap pieces of rods, sheets, and cylinders are available on ebay at low cost. The great thing about carbon is that it does not oxidize and only very slowly erodes away in the de-rusting bucket, keeping the solution much cleaner than if you use iron for the anode. I have pieces of carbon that have survived hundreds of hours in the bucket pretty much unscathed. A lot of these pieces are scraps and left-overs from EDM machine shops.
As Rasmus says, rebar from the local home improvement center is an excellent, completely safe, and inexpensive anode material. The only drawback is that it gets consumed rather quickly and adds a lot of rust to the bucket. If you see rust forming in your bucket it is not coming from the cathode (the part you are cleaning) because that rust is being chemically converted back to pure iron by reacting with the hydrogen at that electrode. The rust is comming from the anode, which (unfortunately for it) is bathed in pure corrosive oxygen.
Even if you do use rebar anodes, the water can get pretty digusting without effecting anything, so there's no need to change the water. I only change the water when I have a particularly tricky set-up and I want to see were the bubbles are forming on the part.
Baking soda, washing soda, and borax work well as electrolytes. I add about 1-2 tablespoons per gallon but it is really not critical. If you do not have a variable voltage power supply you can use the concentration of washing soda to regulate the amount of current so that you don't overheat your power supply. You only need enough current to form bubbles at the cathode... a few amps is plenty. Cranking up the current does not make the de-rusting go any faster.
As Frank and Rasmus have noted, de-rusting only occurs where there is line-of-sight coverage between the cathode and anode, so it might take a few different sessions to completely de-rust a complex shape. To de-rust deep threaded holes for example, you need to place an anode rod down into the hole for effective coverage. For my WRX spindles I used a 1 inch diameter carbon rod down through the middle to clean out the bearing area after de-rusting the outside surfaces with a different set-up.
When you remove a part from the de-rusting tank you will be amazed at how quickly a flash coating of new rust will form... it can happen in seconds right before your eyes as the part dries. Any other piece of metal hanging around your shop will have a protective surface layer... either purposely applied or a naturally forming oxide layer that protects the metal from further oxidation. But your freshly de-rusted part is virgin metal with no protective oxide layer and so it rusts the instant you remove it from the bucket. This flash layer is so thin that it does not affect anything, and you can paint right over it. But you can remove this rust and form a protective passivating layer by spraying on a "metal prep" solution containing phosphoric acid and zinc phosphate. Eastwood's product is called "After-Blast Metal Prep" and there are similar products from Jasco and others. This greatly improves the appearance of the part... it will literally look new and shiny after the prep treatment, and it does afford some amount of rust protection until the part gets painted.
Good luck... Jeff
Jeff,
Lots of good information here. Thanks for that. How did you secure a 1" rod through the spindle to ensure it doesn't touch the bearing contact surface?
Thank you!!
Frank
-
Wd- 40
I tried the WD-40 de rust solution, works OK but doesnt look as good as what this system does.
Most times if its just to derust common nuts and bolts, I replace them. If uncommon or special markings for a restoration, I place in paint remover , clean then use glass bead booth.
Faster for me. But I can see a big advantage for cleaning bigger heavy rusted parts or tools.
Thanks for the knowledge.
Kenny
-
Senior Member
Can the clean derusted parts be powder coated?
-
Originally Posted by
Pearldrummer7
Jeff,
How did you secure a 1" rod through the spindle to ensure it doesn't touch the bearing contact surface?
Frank
DSC_0980.jpgDSC_0981.jpg
It's easier sometimes to set up the part and the anode in an empty bucket and afterwords add the electrolye.
Two things might happen if the anode and part touch... one is that you can short out the electrical circuit and your part will start to rust just like it was in any other bucket of disgusting rusty water. The more serious problem is that you might overload your power supply and potentially cause a fire. I use an old Lambda Model LP-530-FM power supply that I bought off ebay for $30. These supplies have a current limit knob that you can set just slightly higher that the actual working current. Then if something touches, the voltage folds back and the current limits to the preset value on the knob, keeping the supply cool and happy. My model does 0 to 10 volts at 0 to 10 Amps, but I usually have the current limit trip point set at about 4 amps just to be on the safe side.
-
Are there any parts you're not considering this for? Any reasons why not, if so?
If a cast iron part has other metals pressed into it such as brass bearing races or aluminum inserts you might want to think twice about electrolytic de-rusting. The galvanic potentials of the different metals could affect the process so that the aluminum is attacked before the rust. I am ashamed to say that I have never tried de-rusting such a part so I am guilty here of spreading unverified information that I've only read on various machine shop forums over the years.
I have had experience with hydrogen embrittlement. This is a particular problem with spring steel material such as the kind of spring you would find in a wind-up toy. If you leave such a spring in the de-rusting bucket for a short time the rust will be removed, but the spring will snap into pieces in your hand if you try to flex it. There is supposedly a "cure" for hydrogen embrittlement that involves heating the part to drive off the hydrogen, but it only works for a few hours after exposure. The better answer is to leave springs out of the de-rusting bucket.
-
Senior Member
Originally Posted by
JeffS
If a cast iron part has other metals pressed into it such as brass bearing races or aluminum inserts you might want to think twice about electrolytic de-rusting. The galvanic potentials of the different metals could affect the process so that the aluminum is attacked before the rust. I am ashamed to say that I have never tried de-rusting such a part so I am guilty here of spreading unverified information that I've only read on various machine shop forums over the years.
I have had experience with hydrogen embrittlement. This is a particular problem with spring steel material such as the kind of spring you would find in a wind-up toy. If you leave such a spring in the de-rusting bucket for a short time the rust will be removed, but the spring will snap into pieces in your hand if you try to flex it. There is supposedly a "cure" for hydrogen embrittlement that involves heating the part to drive off the hydrogen, but it only works for a few hours after exposure. The better answer is to leave springs out of the de-rusting bucket.
Chemistry is pure magic to me. That's good to realize.
Originally Posted by
JeffS
DSC_0980.jpgDSC_0981.jpg
It's easier sometimes to set up the part and the anode in an empty bucket and afterwords add the electrolye.
Two things might happen if the anode and part touch... one is that you can short out the electrical circuit and your part will start to rust just like it was in any other bucket of disgusting rusty water. The more serious problem is that you might overload your power supply and potentially cause a fire. I use an old Lambda Model LP-530-FM power supply that I bought off ebay for $30. These supplies have a current limit knob that you can set just slightly higher that the actual working current. Then if something touches, the voltage folds back and the current limits to the preset value on the knob, keeping the supply cool and happy. My model does 0 to 10 volts at 0 to 10 Amps, but I usually have the current limit trip point set at about 4 amps just to be on the safe side.
Ah! Makes sense. That's a much nicer way than "dipping" it into the bucket in terms of ensuring they don't touch.
What kind of current/voltage do you run typically? Does it vary by material? How does that affect duration?
Thanks, Jeff!
Frank
-
Originally Posted by
Pearldrummer7
What kind of current/voltage do you run typically? Does it vary by material? How does that affect duration?
Thanks, Jeff!
Frank
For large parts (5 to 10 lbs) like hubs and spindles I use 2 to 3 amps at 8 to 10 volts, but 12 volts from a charger works fine. If the rust is light I'll check the part in 3 hours. If the rust is heavy I'll run the part overnight, or all day while I'm at work. As Rasmus has pointed out, it sometimes helps to pull the part out and give it a quick wire brushing to remove the outer layer of crud, then put it back in for another session. You can't over do it on the time. I actually forgot about a part in the bucket and left it there for two weeks, but when I finally remembered and pulled it out it looked like new.
For little parts like nuts and bolts I hang them from steel coat hanger wire and run 1/2 to 1 amp. All you need is a very gentle stream of bubbles. If the bubbles are boiling off the part like crazy you are not de-rusting any faster.
I once added some detergent to the bucket hoping it would help combat the grease from a really dirty part. What it did was make hydrogen bubble foam at the cathode, which my lawyer advises "is NOT fun to light on fire so DO NOT DO IT unless you want to risk personal injury or burn your house down." Its not all that dramatic... but outside with safety goggles is always a prudent way to do science experiments.
-
Senior Member
2 weeks... wow where your brain has been? lolll
True, keep the part in for 3h, get it out, wire brush, remove crust that removes easily and put it back in. I do that cycle 3-4 times for all my spindles. They really don't de-rust after 3h, for mines.
And you can't over de-rust a part, if all of the rust has been removed, it won't harm at all to keep it in any longer.
Frank
818 chassis #181 powered by a '93 VW VR6 Turbo GT3582R
Go-karted Aug 5, 2016 - Then May 19+21, 2017
Tracked May 27/July 26, 2017
Build time before being driveable on Sep 27, 2019: over 6000h
Build Completed Winter 2021
-
Senior Member
Originally Posted by
JeffS
For large parts (5 to 10 lbs) like hubs and spindles I use 2 to 3 amps at 8 to 10 volts, but 12 volts from a charger works fine. If the rust is light I'll check the part in 3 hours. If the rust is heavy I'll run the part overnight, or all day while I'm at work. As Rasmus has pointed out, it sometimes helps to pull the part out and give it a quick wire brushing to remove the outer layer of crud, then put it back in for another session. You can't over do it on the time. I actually forgot about a part in the bucket and left it there for two weeks, but when I finally remembered and pulled it out it looked like new.
For little parts like nuts and bolts I hang them from steel coat hanger wire and run 1/2 to 1 amp. All you need is a very gentle stream of bubbles. If the bubbles are boiling off the part like crazy you are not de-rusting any faster.
I once added some detergent to the bucket hoping it would help combat the grease from a really dirty part. What it did was make hydrogen bubble foam at the cathode, which my lawyer advises "is NOT fun to light on fire so DO NOT DO IT unless you want to risk personal injury or burn your house down." Its not all that dramatic... but outside with safety goggles is always a prudent way to do science experiments.
Yup! As they say, safety third!
That sounds about right. I was checking the parts I've done every 2-3 hours and scraping the crap off, maybe lightly rotating it to get some different visibility.
Two weeks is crazy!
Originally Posted by
Frank818
2 weeks... wow where your brain has been? lolll
True, keep the part in for 3h, get it out, wire brush, remove crust that removes easily and put it back in. I do that cycle 3-4 times for all my spindles. They really don't de-rust after 3h, for mines.
That sounds like what I'm doing, too. Your parts are especially rusty, Frank. I'm sure most people's parts don't need as much BOD as your parts do!
And you can't over de-rust a part, if all of the rust has been removed, it won't harm at all to keep it in any longer.
That's what I thought. Anodes might wear down a little more, though?
Edit: Actually, maybe not, as no much is happening chemically^
-
gwarden, yes clean derusted parts can be powdered coated. Most shops will glass bead or sand blast the parts before powder coating. Check with your powder coater they might tell you not to bother derusting as they will blast anyway. Remember that there is other special treatment to powder coat such as removal of rubber parts and bearing races. Bolt holes and threads should also be protected. Most qualified powder shops will cover or plug holes/threads automaticly.
Kenny
-
Originally Posted by
Pearldrummer7
Anodes might wear down a little more, though?
Edit: Actually, maybe not, as no much is happening chemically^
Actually.... as long as corrosive oxygen is bubbling off the anode, it is being attacked and converted into rust. The red rust created on the anode does not form any kind of protective layer against further rusting... as we all know from experience with older cars.
-
Senior Member
For the photo's sake, I tried to get a similar picture of the bracket I did after I put a coating on it.
ChemE I know suggested VHT Engine Enamel. Figured I try it in satin black, and see if it was different than Rasmus' result with VHT Roll Bar in satin black.

Looks like it worked well. Not sure if one's better than the other.
-
Thank you for starting this thread Rasmus. This has been the most practical science lesson I have ever read. I have followed your instructions and I am saving myself a lot of manual labor preparing my rusted parts, (too broke after paying for the donor to buy a soda blaster LOL.)


 Thanks:
  Likes:


 Reply With Quote


