
Visit our community sponsor

Thanks:
0

Likes:
0
-
Senior Member

Upper Ball Joints
As part of my Spring work on #007 we're looking at putting in some other upper ball joints. We found some press-in units that look to be about the right length, etc to work as replacements. These are meant to be "top loaded" so should work and wear better than the originals. If we are successful, I'll post info on the parts, etc.
That reminds me, I should take some photos as we go through this step.
Best regards, Tom
-

Originally Posted by
Tom Veale

As part of my Spring work on #007 we're looking at putting in some other upper ball joints. We found some press-in units that look to be about the right length, etc to work as replacements. These are meant to be "top loaded" so should work and wear better than the originals. If we are successful, I'll post info on the parts, etc.
That reminds me, I should take some photos as we go through this step.
Best regards, Tom
Tom
I'm anxious to see what you came up with including any changes to install them.
Dale
-
EFI Rules and Carbs Drool

Just an FYI, the originals are not only welded but screwed in as well. So even when you grind off the welds, they have to be unscrewed from the collar.

-
Senior Member
Thanks Arrowhead, I'd already informed the guy doing the work that they wouldn't just fall out when he ground away the welds! :-)
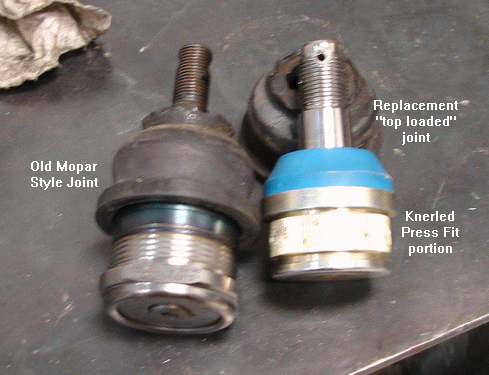
Here's some early shots of the pieces.
The two ball joints side by side:
The upper arm with the joint removed and ground down a bit.
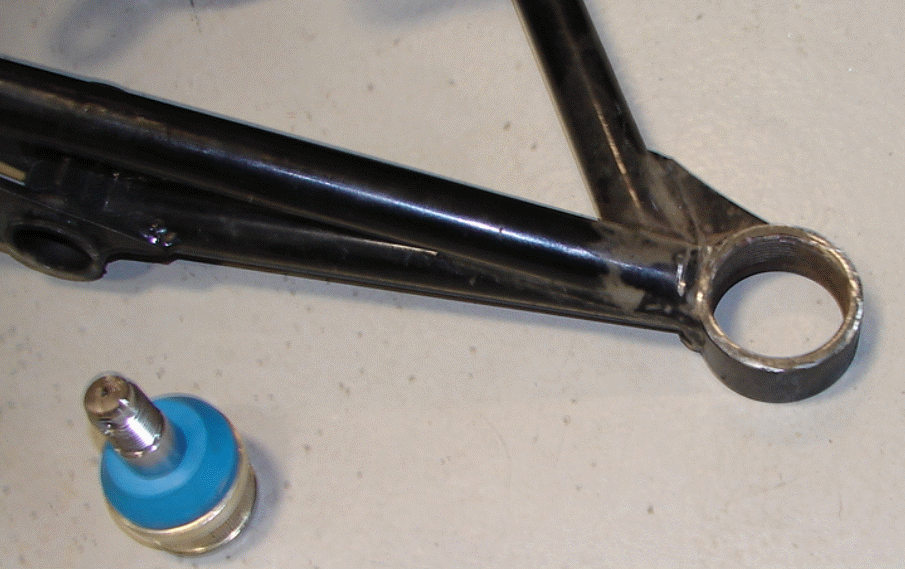
We'll be welding on a new collar to get the correct spacing between the upper and lower arms and it will be a press-fit joint. The new ball joint will press in from the bottom, so even the loading on the way it's installed will be in the correct direction. This one, being top loaded, should wear better than the Mopar style piece that came with the kit.
More after the weekend......
Tom
Last edited by Tom Veale; 04-09-2014 at 09:06 AM.
-
Originally Posted by
Tom Veale
Thanks Arrowhead, I'd already informed the guy doing the work that they wouldn't just fall out when he ground away the welds! :-)
Here's some early shots of the pieces.
The two ball joints side by side:
The upper arm with the joint removed and ground down a bit.
We'll be welding on a new collar to get the correct spacing between the upper and lower arms and it will be a press-fit joint. The new ball joint will press in from the bottom, so even the loading on the way it's installed will be in the correct direction. This one, being top loaded, should wear better than the Mopar style piece that came with the kit.
More after the weekend......
Tom
Tom
The new joint looks shorter?
Will the new smooth collar be welded in below the threaded one?
Dale
-
Senior Member
Hi Dale, I should have pulled off the old rubber boot to show the length to the center of the ball and the shoulder of the new joint. It's actually closer than it appears. It is a bit shorter and the new collar is going to require a bit of a step on the lower side to compensate.
I'll take a pic with the new collars in place as soon as I can and post.
Thanks for your help and photos of how you changed your upper arms. I think it helped open up discussion with the guy who's doing the welding, etc for me. It changed from "I don't know..." to "Anything's possible!"
Best regards, Tom
-
Originally Posted by
Tom Veale
Hi Dale, I should have pulled off the old rubber boot to show the length to the center of the ball and the shoulder of the new joint. It's actually closer than it appears. It is a bit shorter and the new collar is going to require a bit of a step on the lower side to compensate.
I'll take a pic with the new collars in place as soon as I can and post.
Thanks for your help and photos of how you changed your upper arms. I think it helped open up discussion with the guy who's doing the welding, etc for me. It changed from "I don't know..." to "Anything's possible!"
Best regards, Tom
Tom
The first one I removed I had a friend mount the arm in a mill and carefully cut away the weld, the second one I just took a dremel to the weld and left most of it on the ball joint for disposal. The second approach was much quicker and easier. On my set-up the new joints grease from the bottom so I just welded a cap on that old threaded socket. Does your new joint grease from the top? It looks like a circle track re-buildable type joint?
DB
frankenframe
In the anything's possible mode;
Have you thought about pressing them into a socket that screws into that sleeve or a socket welded to a plate that bolts on?
That type of a conversion would allow easier service/replacement and much easier plating/painting or powder-coating of the arms.
-
Are you guys having issues with the factory ball joints?
Are they loose?
-
Senior Member
Hi DB,
"Does your new joint grease from the top?"
This one still has a grease fitting on top, so we'll have to figure out how to make is cosmetically appealing. Darn, you would suggest screw in sockets for that work! Now I have to think about that!!!
Tom
-
Senior Member
Hi FWS, The Mopar style joint seemed to wear quickly and get noisy. Part of the reason is the wearing face of the socket is in the lower part of the joint. Road hazards and bumps tend to drive the ball out of the socket against the spring's tension. Not dangerous, but noisy and with time it will affect tire wear.
Tom
-
one for all
Originally Posted by
Tom Veale
Hi DB,
"Does your new joint grease from the top?"
This one still has a grease fitting on top, so we'll have to figure out how to make is cosmetically appealing. Darn, you would suggest screw in sockets for that work! Now I have to think about that!!!
Tom
Tom
Since you are trying to keep factory ride height and cure a known problem it makes sense that others will want to do the same thing. You could develop this with a vendor and let them market the result for a win win for the community like I did with the bolt on front sway bar set-up. I'm not a machinist and I don't do any vendor stuff but there are a lot of good machinist in this community, and most of them sell upgrades that are very good quality.
With that in mind I would also try to solve all the common issues of that ball joint design, grease versus plating the arms, how to grease it, better dust boots, remove-able ball joints, etc.
So here's my suggestions and they're worth exactly what you paid for em so use or dispose, no hard feelings.
Make a screw in plug for the top of the existing threaded sleeve. Keeps out dust, looks nice, hides but still gives access to the grease fitting.
Make a screw in adapter for the bottom that has the right smooth bore for the press in ball joint. IF you can keep good geometry that seems like the best pass it on kit design for all to use. If it gets too tall that needs more work on design maybe a different/shorter ball joint resolves that issue.
Put a lock screw through the existing barrel to keep the threaded lower insert from backing out. A roll pin would work but allow debris inside ;>(
You already have a better ball joint and it looks to have a better dust boot so the rest is all about parts that can be easily produced and installed by 33 owners at home with minimal work. I was also changing ride height and fender clearance for taller tires so my alterations weren't the answer for most of the 33's, but the sways were so I threw that out for everyone's benefit.
I loved seeing all the discoloration on your exhaust, it shows that you have been using your 33 for maximum fun factor.
Dale
Hemi 33
Last edited by myjones; 04-12-2014 at 11:38 AM.
-
Now you guys have my attention! I haven't started playing with the front suspension yet since I STILL DON'T HAVE MY SPINDLES! Why F5 would put mopar ball joints in this application befuddles me. With the inboard springs this application does not match the original design for an unloaded upper and a torsion bar lower control arm. Maybe I'm missing something in my trig app but wouldn't the old spring on the upper control arm like the 60's mustang be closer to this loading direction? Therefore an old ford style upper ball joint should work? Changed a lot of both many years ago, but usually after many miles on potholed roads.
Tom, you're not driving that car around the track on one wheel are you??? 

-
Originally Posted by
erlihemi
Now you guys have my attention! I haven't started playing with the front suspension yet since I STILL DON'T HAVE MY SPINDLES! Why F5 would put mopar ball joints in this application befuddles me. With the inboard springs this application does not match the original design for an unloaded upper and a torsion bar lower control arm. Maybe I'm missing something in my trig app but wouldn't the old spring on the upper control arm like the 60's mustang be closer to this loading direction? Therefore an old ford style upper ball joint should work? Changed a lot of both many years ago, but usually after many miles on potholed roads.
Tom, you're not driving that car around the track on one wheel are you???
The early mustang/any ford from the coil over the upper arm era has joints designed to work in compression load. After seeing a picture awhile back where one car already had the top cup distorted I changed mine to the bolt in Ford joints. The challenge is that the top hole in the spindle is for a larger stud than the early Mustangs had. Moog no longer releases all their dimensions so finding the right combo leaves you with mostly circle track parts options.
DB
-
Senior Member
We used a 1976 GMC Truck upper ball joint. NAPA part # 260-1343. It's for their K1500 1/2 ton 4 WD Pickup. This part has a larger diameter tapered shank than does the original, so we also had to bore the spindle to accept the new part.
The upper arm's collar threads were bored out to make enough clearance for the new sleeve to be welded into place. The sleeve's inside diameter was cut to be proper for the press fit ball joint. The shoulder of the new ball joint put the center of the socket very close to the old screw-in ball joint, so the collar itself looks essentially as it did before.
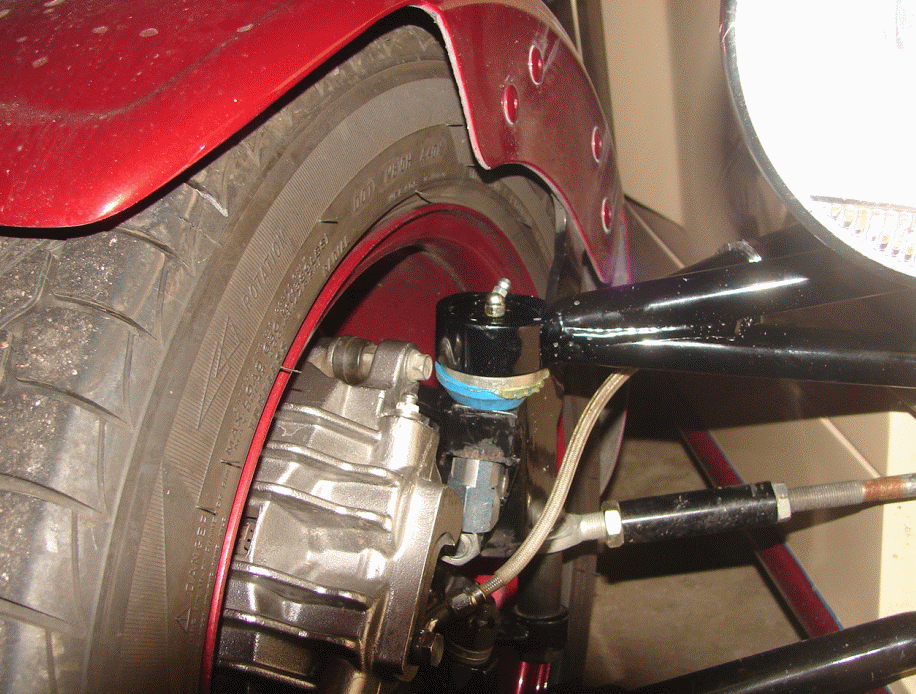
There's a relief of about 1/8" from the top of the collar to the top of the new ball joint when assembled. Again in appearance, there's hardly any difference between this new assembly and the old one.

Upon inspection, the old joints had some movement in them, but they weren't as bad as I had anticipated after 10K miles. Mine were still "contained" within the main socket and hadn't dimpled the cap with the old grease fitting as some others have reported. However, I'm certain I'll be happy knowing there isn't any further variance in alignment under heavy cornering loads next time I'm on the track with the car. The "noise" I was hearing appears to be gone, too. So, I assume it was the front upper ball joints that were creating the sound.
While looking over the front end, Dave Salvaggio of Salvaggio Auto Design (who did the work on the new ball joints and muffler fit-up) suggested he thinks he has some ideas for replacing the steering rack with a more robust piece which will lengthen the tie rods by a significant amount. He's pretty booked up right now through the rest of the summer, so this project will be a Fall one. I just thought I'd throw that teaser out there! The new design rack will install where the current one does, but will need some fabrication work. The idea is to create a bolt-in replacement that will be both sturdier and will by virtue of longer tie rods, reduce bump steer and improve steering stability at high speed and while cornering.
Best regards, Tom
Last edited by Tom Veale; 04-15-2014 at 12:17 PM.
-
Tom,
Interested in knowing more about the rack.
Unless I'm mistaken, if the pivot points for the inner tie rods is further apart than the stock rack, bump steer ( I see you have a bump steer kit installed ) will be increased? It was my understanding the rack inner rod pivot point needs to move more toward the center of the rack.
-
Senior Member
Hi Tim, Yes, the further the inner pivot point of the rack is from the steering arm, the less relative motion it has when the suspension is compressed or extended. Our stock racks with the FFR kit are about as short as are made. Dave has some ideas he's used on other cars that he feels will accomplish what we might need to reduce bump steer from the short radius we now have.
We did some quick measurements and it would appear this other rack idea will fit, but will need a fabricated base. The base will bolt to the existing rack location and the new rack to the base. He has a bunch of cars to deliver between now and the end of the summer and several shows to attend. So, this is going on the back burner until fall.
The bump steer kit I have installed improved things a great deal, but as you mentioned, the short radius from the inner pivot to the top of the steering arm bolt tends to move the toe quite a bit as the suspension cycles through load and unload.
More later as we sort out the parts.
Best regards, Tom
-
Thanks Tom. That's the same conclusion I came to when I developed the bump steer kit we offer for existing racks.
-
Senior Member
Hi Tim, If you'd developed the kit you now sell about three years earlier, you would have had my order! Yours is far prettier than what I put together. I'll post more info when it's available.
Tom
-
-
Tom, did you look at QA1 rebuildable upper ball joints?? They may have a threaded unit with correct socket and adjustable tension. Rack sounds interesting. I gotta drive better before I worry too much about the finer details.
-
Senior Member
Originally Posted by
erlihemi
........did you look at QA1 rebuildable upper ball joints??
Hi E, No, I was unaware of a QA1 part that might work. The part we used wasn't expensive, but the re-work made up for it. :-) If there is a threaded replacement that loads correctly, that would be a simpler resolution. Then you'd just have to break the tack welds and remove the old joint and install the new part. Further this would allow the upper arm to be chromed or powder coated with no additional consternation about messing up the FFR ball joint.
Thanks for bringing it up. If you do find a part number I know others here would appreciate anything you discover.
Best regards, Tom
 Posting Permissions
- You may not post new threads
- You may not post replies
- You may not post attachments
- You may not edit your posts
-
Forum Rules

Visit our community sponsor


 Reply With Quote