-
Senior Member

How to adjust Koni single adjustable shocks
I went on Koni's site to read about how to adjust the rebound of their shocks.
http://www.koni-na.com/adjustment.cfm
I believe our shocks are Series 82?
KoniAdjust1.jpg
Then we have to remove the big nut (21mm I think) to get the bump stop out?
KoniAdjust2.jpg
And we don't care about these 2 holes at the bottom of the rod, right?
KoniAdjust3.jpg
Then I start to get confused. We push it down to the max and turn it counterclockwise until we feel it goes into the adjustment cam.
Then, we continue to turn it counterclockwise until it reaches its max and then we turn it back half a turn.
Then what? Is that the softest setting?
Frank
818 chassis #181 powered by a '93 VW VR6 Turbo GT3582R
Go-karted Aug 5, 2016 - Then May 19+21, 2017
Tracked May 27/July 26, 2017
Build time before being driveable on Sep 27, 2019: over 6000h
Build Completed Winter 2021
-
Senior Member

Yes, once you follow the instructions turning to the left (counter clockwise) the shock is at the softest setting. Then turn to the right to increase firmness. This adjusts only the rebound, not the compression. Rebound is when the shock extends, i.e., recovers from compression (a bump).
From Koni-na.com
Rebound Adjustment Procedures
Remove the shock absorber from the vehicle and hold it vertically with the lower eye or pin attached in a vise. Use clamp plates to prevent damage.
Fully collapse the shock absorber, at the same time turning the dust cap or piston rod slowly to the left (counterclockwise), until it is felt that the cams of the adjustment nut engage in the recesses of the foot valve assembly.
Some shock absorbers include a bump rubber concealed under the dust cover and it must be removed prior to adjusting.
The damper may have already been adjusted. Therefore check whether the shock absorber is in the adjustment position or not by keeping it collapsed and gently turning it further to the left counting at the same time the half turns until a stop is felt. Stop turning then and do not use force.
Keeping the shock absorber collapsed, make 1 half turn (180 degrees) to the right (clockwise). In case of prior adjustment add the number of half the turns previously found. The total range is about 5 half turns.
Pull the shock absorber out vertically without turning for at least 1 cm to disengage the adjusting mechanism. The dust cap or piston rod may now be turned freely.
ADJUSTING DIRECTION
Clockwise = Firmer
Counter Clockwise = Softer
818S/C : Chassis #25 with 06 WRX 2.5 turbo, ABS, cruise, PS, A/C, Apple CarPlay, rear camera, power windows & locks, leather & other complexities. Sold 10/19 with 5,800 miles.
Mk3 Roadster #6228 4.6L, T45, IRS, PS, PB, ABS, Cruise, Koni's, 17" Halibrands, red w/ silver - 9K miles then sold @ Barrett-Jackson Jan 2011 (got back cash spent).
-
Senior Member
That's what I understood.
The part I don't, is this one
Keeping the shock absorber collapsed, make 1 half turn (180 degrees) to the right (clockwise).
Why do that? Wouldn't that stiffen the shock?
In my case I am looking for the softest setting, therefore where is the softest setting, fully counterclock or half a turn before full counterclock? 
Frank
818 chassis #181 powered by a '93 VW VR6 Turbo GT3582R
Go-karted Aug 5, 2016 - Then May 19+21, 2017
Tracked May 27/July 26, 2017
Build time before being driveable on Sep 27, 2019: over 6000h
Build Completed Winter 2021
-
Senior Member

Frank, you don't want the valve completely closed (because then you don't have a shock, right?!? you have a rod!), and this probably ensures the valve is minimally open, which would be the softest setting that still allows the shock to function correctly.
-
Senior Member

Originally Posted by
Xusia

you have a rod!
How am I supposed to read that?
Brian, I think I understand now. It doesn't work the same as shocks with pre-defined adjustments. For example my Bilsteins have 6 or 9 adjustments, with an external knob, with numbers on each adjustment and it clicks as well. There is no "in between" adjustment, if #1 is the softest, you put it there, nothing before 1 and after 1 it's #2 and it's the next click.
Looks like the 818 shocks you adjust the valve directly so if you go too far you can shut it off, sort of?
Half a turn clockwise. Why not 1/4, maybe it'll be softer and still work well. That's what I did on my KTM. Its rear suspension is really stiff, they recommend a certain amount of preload on the spring, but I realized if I preload it less, it's much softer and in my case, helps on the handling and comfort. Just a bit less! Not too much. So maybe it could be the same here. Just guessing!! I bet I'll be the first one to try.
I can confirm though that the 818S shocks should have 4 settings, including the one it's currently set on. And yes, the bump stop needs to be removed.
Last edited by Frank818; 04-15-2014 at 04:15 PM.
Frank
818 chassis #181 powered by a '93 VW VR6 Turbo GT3582R
Go-karted Aug 5, 2016 - Then May 19+21, 2017
Tracked May 27/July 26, 2017
Build time before being driveable on Sep 27, 2019: over 6000h
Build Completed Winter 2021
-
Senior Member
I just realized I was thinking turning the opposite direction - going to full stiff. So disregard what I said previously.
I hear what you are saying, and I'm not sure. Still, I'd do what they recommend!
-
Senior Member
I'll go a step further, I'll contact Koni and ask them. I know that may sound silly or picky, but there must be a valid reason for that half a turn back and I am very curious to understand. If I get an answer, I'll post!
Frank
818 chassis #181 powered by a '93 VW VR6 Turbo GT3582R
Go-karted Aug 5, 2016 - Then May 19+21, 2017
Tracked May 27/July 26, 2017
Build time before being driveable on Sep 27, 2019: over 6000h
Build Completed Winter 2021
-
Senior Member

Anybody have input on how to change the settings on the double adjustable R coilovers?
-
Senior Member
How does that red one look like and what is its Series #?
Race application or still Street?
Frank
818 chassis #181 powered by a '93 VW VR6 Turbo GT3582R
Go-karted Aug 5, 2016 - Then May 19+21, 2017
Tracked May 27/July 26, 2017
Build time before being driveable on Sep 27, 2019: over 6000h
Build Completed Winter 2021
-
Senior Member
Ok so Koni said that the 1 half turn or 180* is to find the adjustment indentation/mode, not to back off from being too far. Once you have the shock collapsed and in the adjustment indentation you can turn the shock in either direction, fully until it stops.
Frank
818 chassis #181 powered by a '93 VW VR6 Turbo GT3582R
Go-karted Aug 5, 2016 - Then May 19+21, 2017
Tracked May 27/July 26, 2017
Build time before being driveable on Sep 27, 2019: over 6000h
Build Completed Winter 2021
-
Senior Member

Where was the shock ajusted to from the factory?
Bob
-
Senior Member
I've heard from others here it's supposed to be adjusted to the softest setting. But I don't want to take the chance and assume all 4 are correctly setup the way I wish. I don't want to discover while driving that one of them, maybe only one out of 100, was at the stiffest setting and remove everything to check all 4 then.
I wanna know exactly what I'm installing on the car and how. That's the beauty of a kit car.
Frank
818 chassis #181 powered by a '93 VW VR6 Turbo GT3582R
Go-karted Aug 5, 2016 - Then May 19+21, 2017
Tracked May 27/July 26, 2017
Build time before being driveable on Sep 27, 2019: over 6000h
Build Completed Winter 2021
-
Senior Member
Originally Posted by
metros
Anybody have input on how to change the settings on the double adjustable R coilovers?
Metros, if no one is able to help here in the short term, I suggest you fill in the contact form on koni-na. They responded to me within 12hours, which is just... amazing. Make sure you provide the shock Series and tell them it's for the 818R red shocks double adjustables.
Frank
818 chassis #181 powered by a '93 VW VR6 Turbo GT3582R
Go-karted Aug 5, 2016 - Then May 19+21, 2017
Tracked May 27/July 26, 2017
Build time before being driveable on Sep 27, 2019: over 6000h
Build Completed Winter 2021
-
Senior Member

FYI- Regular 818R red shocks are not double adjustable. The only double adjustable shocks are the pricey upgrade ones.
Thanks- Chad
818R-SOLD!!!- Go Karted 7/20/14/ Officially raced NASA ST2- 2/28/15
2016 Elan NP01 Prototype Racecar Chassis #20
1969 Porsche 911ST Vintage Race Car
1972 Porsche 911T (#'s matching undergoing nut & bolt resto in my garage)
-
Senior Member
Originally Posted by
C.Plavan
FYI- Regular 818R red shocks are not double adjustable. The only double adjustable shocks are the pricey upgrade ones.
Oh so there are 3 types of shocks offered by FFR. Ok I get it.
Well Metros as long as you detail what you got, they should answer you straight forward.
Frank
818 chassis #181 powered by a '93 VW VR6 Turbo GT3582R
Go-karted Aug 5, 2016 - Then May 19+21, 2017
Tracked May 27/July 26, 2017
Build time before being driveable on Sep 27, 2019: over 6000h
Build Completed Winter 2021
-
Senior Member
Ok I did the adjustment on the single adjustable yellow shocks.
Tip #1: use a vise, really, otherwise good luck.
Tip #2: once you remove the nut on the top, remove the bump stop then put back the nut and the top metal cover and SCREW the nut a little bit. This will prevent you from unscrewing the metal cover once you adjust stiffness, cuz you turn that part clock wise or counterclock wise, so it can unscrew and lose all turning force.
You will see the rod go down slightly once it gets in the adjustment holes.
Tip #3: then I suggest you turn all over to one side. Move the rod just a bit on the other side to get it out of the holes and pull it, damn it! lolll Feel how hard it is. I say "how hard" and not "how hard or how smooth", cuz it's not that easy even at the softest setting. Soft is hard, stiff is harder. Then go again in the adjustment holes and turn all the damn way on the other side. Pull!!! Feel!!! lolll Then do the adjustment on either side you want.
Tip #4: I found out it was easier to have the shocks installed sideways on a vise and pushing via the yellow part. You have much better grip and feeling of what's going on than having the shocks straight up on the vise and collapsing the rod. Besides if you follow tip #3, you don't need to check which side you turn, cuz after trying the 2 opposite settings, you just then turn on the side you prefer.
I put mine all the way on the softest setting.
Frank
818 chassis #181 powered by a '93 VW VR6 Turbo GT3582R
Go-karted Aug 5, 2016 - Then May 19+21, 2017
Tracked May 27/July 26, 2017
Build time before being driveable on Sep 27, 2019: over 6000h
Build Completed Winter 2021
-
Senior Member
shock bump stop question
I know the Koni's have a bump stop that is used under compression.
But what about extension. Is there an internal bump stop?
Bob
-
Senior Member
This video may not tell everything, but maybe it helps.
https://www.youtube.com/watch?v=ONl44FPP6lM
It seems there is no internal bump stop. There is also minimal weight under extension, I mean a lot less stress than under compression with the weight of the car. Planning on some rallying, Bob?
Frank
818 chassis #181 powered by a '93 VW VR6 Turbo GT3582R
Go-karted Aug 5, 2016 - Then May 19+21, 2017
Tracked May 27/July 26, 2017
Build time before being driveable on Sep 27, 2019: over 6000h
Build Completed Winter 2021
-
Post Thanks / Like - 1 Thanks, 0 Likes
-
Senior Member
Originally Posted by
Frank818
Planning on some rallying, Bob?
No rallying for the 818, But I do get wheels in the air Autocrossing. IMG_2404_zps186ab162s.jpg
Bob
-
Senior Member

Very glad to have heads up on this.. With our Miata's Koni Yellows, we're able to quickly adjust damping at the track, then back for street use. There's a small flat on the top of the damper that you twist using an included knob.
This adjustment method makes it look like there's no chance at all of that, and to do it even at home is equal to replacing the shocks completely, as far as work is concerned?
Our order currently includes the R springs & dampers, but not the $$ double adjustable.
Does anyone know an alternate model that would allow for the adjustment to be done real-time, car-on-ground?
How is FFR making adjustments to their Rs for track use?
Last edited by xxguitarist; 07-29-2014 at 12:54 PM.
-
Senior Member
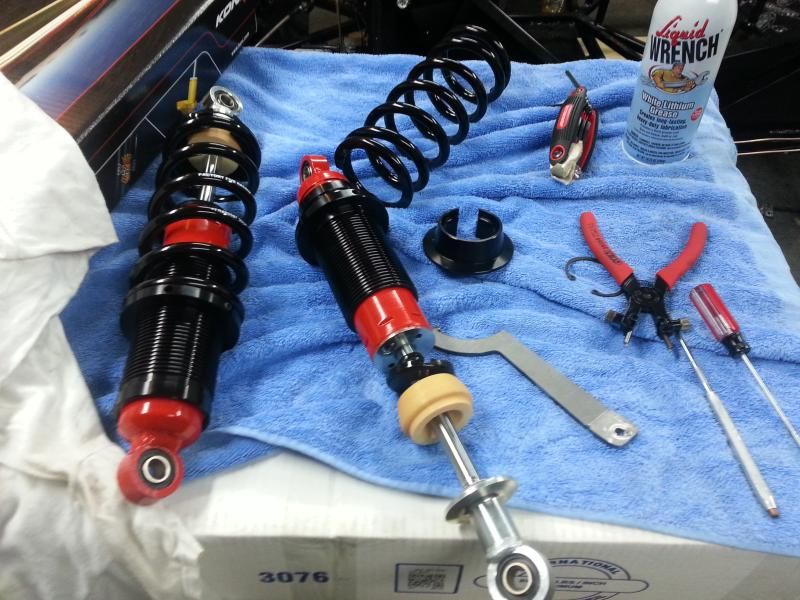
Here is a picture of the red/white 818r during assembly.
IMG-20140701-03898.jpg
They are using the red Koni's, I believe part# 30 1720
http://www.koni-na.com/adjustment.cfm
-
Senior Member
If they are a 30 series, here's an interesting note:
The 30 Series can be run inverted to reduce unsprung weight.
Does it seem like there might be clearance on the chassis to allow this?
I guess the good news, even if they have to be removed to adjust, is that they're only held in by 2 bolts. Won't be doing it while in the line for tech inspection, but it isn't awful.
The 30 series adjustment procedure looks a little easier than the series 82.
-
Senior Member
Originally Posted by
Bob_n_Cincy
Wow on a subie, I never thought they were doing like old VWs. lolll
That being said, maybe you won't with the 818.
Frank
818 chassis #181 powered by a '93 VW VR6 Turbo GT3582R
Go-karted Aug 5, 2016 - Then May 19+21, 2017
Tracked May 27/July 26, 2017
Build time before being driveable on Sep 27, 2019: over 6000h
Build Completed Winter 2021
-
Senior Member
Originally Posted by
Frank818
Wow on a subie, I never thought they were doing like old VWs. lolll
That being said, maybe you won't with the 818.
As you can see in this picture:
51bf9950.jpg
The stock 07 NA impreza has a LOT of body roll. With clean concrete, and warm Toyo 225 R888, we were driving right at the limit. The left side tires are barely touching the ground. The 818 will have a CG a lot lower than this car, so I'm hoping for a lot less body roll.
Back to my original question:
Does the Koni's have a internal bump stop that is used during extension?
-
Senior Member

Originally Posted by
Frank818
Wow on a subie, I never thought they were doing like old VWs. lolll
Yup, did that all the time in my A2 GTI 16V... two wheels stickin, one wheel slidin, one wheel flyin!
Originally Posted by
Frank818
That being said, maybe you won't with the 818.
Vintage 911's would lift an inside front wheel, but I'd hope the 818's cg should keep all four planted!
-
Moonlight Performance


Originally Posted by
xxguitarist
Does anyone know an alternate model that would allow for the adjustment to be done real-time, car-on-ground?
Would love to find out this answer as well. Given the weight of the 818, I'm guessing it might be a challenge finding something.
-
Senior Member

Koni ADJ.JPG
sure, the race shock option, approx $2000
Dan
818S #17 Picked up 8/1/13 First start 11/1/13 Go Kart 3/28/14
-
Moonlight Performance
The race shock option is adjustable while installed?
-
Senior Member
Dan
818S #17 Picked up 8/1/13 First start 11/1/13 Go Kart 3/28/14
-
Senior Member
The upgrade unit are 3012 series. They can be adjusted for rebound while the car is intact, using an allen key on the knob. May not be the easiest to get to, but ought to be better than removing the shock.
Compression damping is done off-car.
http://www.koniracing.com/images/Fil...ence_Sheet.pdf (for reference)
So, none of the above are quite as easy as a Koni yellow on our miata..
-
Moonlight Performance
Thanks for the info... good to know.
-
Senior Member
I'm waiting on info re: stroke length, etc.. to see if maybe Koni or others offer a more readily adjustable design which matches in spec, once you work out the damping requirements.
One that's double adjustable, without removal from car: http://www.koniracing.com/rr82.cfm
Maybe we're over-emphasizing it, but I sure have appreciated the easy adjustment on the yellows.
-
Senior Member
Shock Travel
How much shock travel should we have when the car is adjusted to ride height.
I believe there is 4" of total travel including the bumpstop rubber.
How much of the should be in the bump direction and how much in the rebound direction?
Bob
Last edited by Bob_n_Cincy; 10-18-2014 at 08:02 AM.
-
Ideally you would be in the middle of the range of adjustment such that you had a roughly equal amount of bump and droop travel.
Tony
-
Senior Member

Originally Posted by
xxguitarist
If they are a 30 series, here's an interesting note:
The 30 Series can be run inverted to reduce unsprung weight.
Does it seem like there might be clearance on the chassis to allow this?
I guess the good news, even if they have to be removed to adjust, is that they're only held in by 2 bolts. Won't be doing it while in the line for tech inspection, but it isn't awful.
The 30 series adjustment procedure looks a little easier than the series 82.
Definitely not. We were going to run our Reds on the R this way but the spring would be in constant contact with rear suspension. Works great in the front though, and gives some room if you have a silly huge front sway bar too.
Owner/builder - AEM Intakes 818R #85
-
Senior Member
Originally Posted by
SixStar
Definitely not. We were going to run our Reds on the R this way but the spring would be in constant contact with rear suspension. Works great in the front though, and gives some room if you have a silly huge front sway bar too.
Well, that beats neither, I guess.
Tony,
Is 50% static sag something you use for roadcourse cars, or rally? (both?) My experience is with motorcycles, where you shoot for around 1/3 static sag.
-
Originally Posted by
xxguitarist
My experience is with motorcycles, where you shoot for around 1/3 static sag.
Motorcycles put a lot of static load on the suspension around corners because they lean. Cars mostly side load the tires.
-
Senior Member
I wanted to come back and update this thread on the 818R shocks that many of us are using. These are the red shocks that are rebound adjustable, not the double adjustable $$ option.
With these shocks you don't need to compress the piston in order to adjust them. Put the top side (not the body end) into a vice. Remove the black dust cap. Press the button and hold it. Turn the shock body counter clockwise for softer and clockwise for harder. There are 4 main clicks of adjustment that you'll feel while turning the shock body.
Last edited by metros; 01-24-2015 at 07:30 PM.
-
Anyone know the part number for the red R shocks, looking to upgrade and trying to find them outside of contacting factory five and giving them more money this week.
-
Senior Member
Originally Posted by
07FIREBLADE
Anyone know the part number for the red R shocks, looking to upgrade and trying to find them outside of contacting factory five and giving them more money this week.
The part number for the RED is 30 1720
I think Koni makes them special for FFR. You can only get that part number from FFR.
Koni may have an equivalent shock in there catalog, but I couldn't find it.
here is info on the 30 series. http://www.koniracing.com/oval30.cfm
Bob
Last edited by Bob_n_Cincy; 11-26-2015 at 01:43 AM.


 Thanks:
  Likes:


 Reply With Quote
