FormaCars

Visit our community sponsor

Thanks Thanks:  0
Likes Likes:  0
Page 10 of 12 FirstFirst ... 89101112 LastLast
Results 361 to 400 of 470

Thread: Sponaugle's H6 EZ30R 818S

  1. #361
    fasterer and furiouser longislandwrx's Avatar
    Join Date
    Aug 2012
    Location
    Long Island
    Posts
    2,540
    Post Thanks / Like
    Blog Entries
    6
    wow. you are going to need more engine stands
    A well stocked beverage fridge is the key to any successful project.

  2. #362
    Mechie3's Avatar
    Join Date
    May 2012
    Location
    Indianapolis
    Posts
    5,174
    Post Thanks / Like
    I think you need more engines, just to be safe.
    Zero Decibel Motorsports
    Check out my new website!
    www.zerodecibelmotorsports.com
    www.facebook.com/zero.decibel.motorsports

  3. #363
    Senior Member JAubin's Avatar
    Join Date
    Mar 2012
    Location
    Goffstown, NH
    Posts
    232
    Post Thanks / Like
    Damn that's quite the score. I think the better move would be more 818(s) to put the motors in. Might as well get an R and a C...
    --Joe
    818S #234 V7 EJ207 Spec-C (VF34) Build Thread

  4. #364
    Research Calibrator sponaugle's Avatar
    Join Date
    Apr 2013
    Location
    Portland, OR
    Posts
    401
    Post Thanks / Like
    Quote Originally Posted by longislandwrx View Post
    wow. you are going to need more engine stands
    Quote Originally Posted by Mechie3 View Post
    I think you need more engines, just to be safe.
    Quote Originally Posted by JAubin View Post
    Damn that's quite the score. I think the better move would be more 818(s) to put the motors in. Might as well get an R and a C...

    Seee. this is why I love you guys. Such a supporting and understanding environment. When I was unpacking of the crates last night I said the exact same thing. I need more engine stands! Actually I do need to get another more beefy engine stand as I am about to start a rebuild on my GT-R VR38DETT engine, and those things are topheavy.

    I did talk to Kelford about the cams. The were indeed a special run, and are custom steel billet cams ($). The only downside is that Kelford said I should not run them without a DLC coating on the buckets. Have you guys heard of that before?

    A bit of google search says that is referring to "Diamond Like Coating"... I found lots of reference but no real links of someone who actually does the coating in small scale. Thoughts?

    Jeff

  5. #365
    Mechie3's Avatar
    Join Date
    May 2012
    Location
    Indianapolis
    Posts
    5,174
    Post Thanks / Like
    http://en.wikipedia.org/wiki/Diamond-like_carbon

    That search term might help you find better results.
    Zero Decibel Motorsports
    Check out my new website!
    www.zerodecibelmotorsports.com
    www.facebook.com/zero.decibel.motorsports

  6. #366
    Senior Member
    Join Date
    Feb 2011
    Location
    Orange, CA, USA
    Posts
    739
    Post Thanks / Like
    I wonder if WPC is a viable substitute for what Kelford is recommending. I think individual batches are fairly inexpensive.

    http://www.wpctreatment.com/documents/Why_WPC.pdf

  7. #367
    fasterer and furiouser longislandwrx's Avatar
    Join Date
    Aug 2012
    Location
    Long Island
    Posts
    2,540
    Post Thanks / Like
    Blog Entries
    6
    Quote Originally Posted by sponaugle View Post
    Actually I do need to get another more beefy engine stand as I am about to start a rebuild on my GT-R VR38DETT engine, and those things are topheavy.

    My OTC dream $tand, although their cheaper ones are just as nice.

    otc-1735b.gif

    http://www.factoryconnection.com DLC coats motorcycle parts... looks like they do it in house, or at least could point you in the right direction.

    I saw your post on NAS and one guys used it on his motorsports parts, so it may be a good lead.
    A well stocked beverage fridge is the key to any successful project.

  8. #368
    Research Calibrator sponaugle's Avatar
    Join Date
    Apr 2013
    Location
    Portland, OR
    Posts
    401
    Post Thanks / Like
    Quote Originally Posted by longislandwrx View Post
    My OTC dream $tand, although their cheaper ones are just as nice.
    otc-1735b.gif
    http://www.factoryconnection.com DLC coats motorcycle parts... looks like they do it in house, or at least could point you in the right direction.
    I saw your post on NAS and one guys used it on his motorsports parts, so it may be a good lead.
    Indeed it was. I contacted the guy at Morgan, and they can do DLC coatings. Cost is $1500 for a batch, pretty much regardless of size. I want to do 48 buckets ( 12 buckets in each head, and two sets of heads ). Of course I have to make sure the clearance is right as the buckets are all different sizes. I may do a few extra buckets of the thicker variety as it is always possible to machine down the valve stem just a bit.

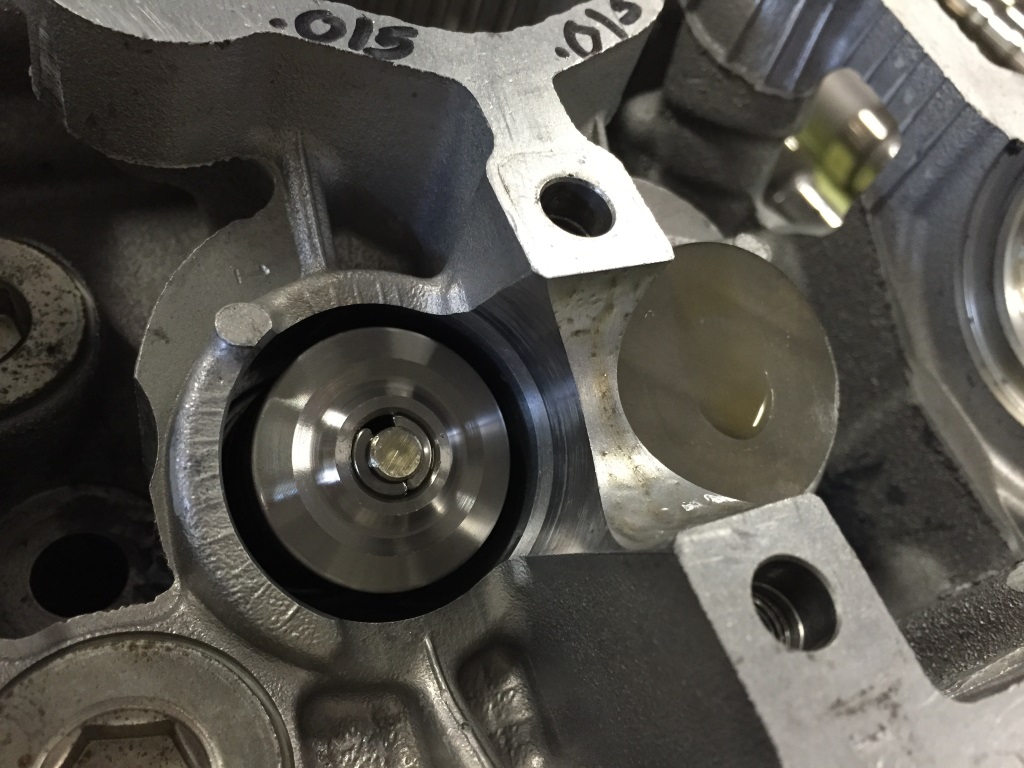
    The EZ30R buckets are slightly smaller in diameter then the EJ ones, and the stock intake ones are a very complicated piece owing to the variable lift. In my case I am using the exhaust cam buckets on both sides.

    The exhaust side looks just like an EJ. The buckets are of the same kind of construction, with the size printed on the bottom.. Ranging from 4.32 to 5.59.


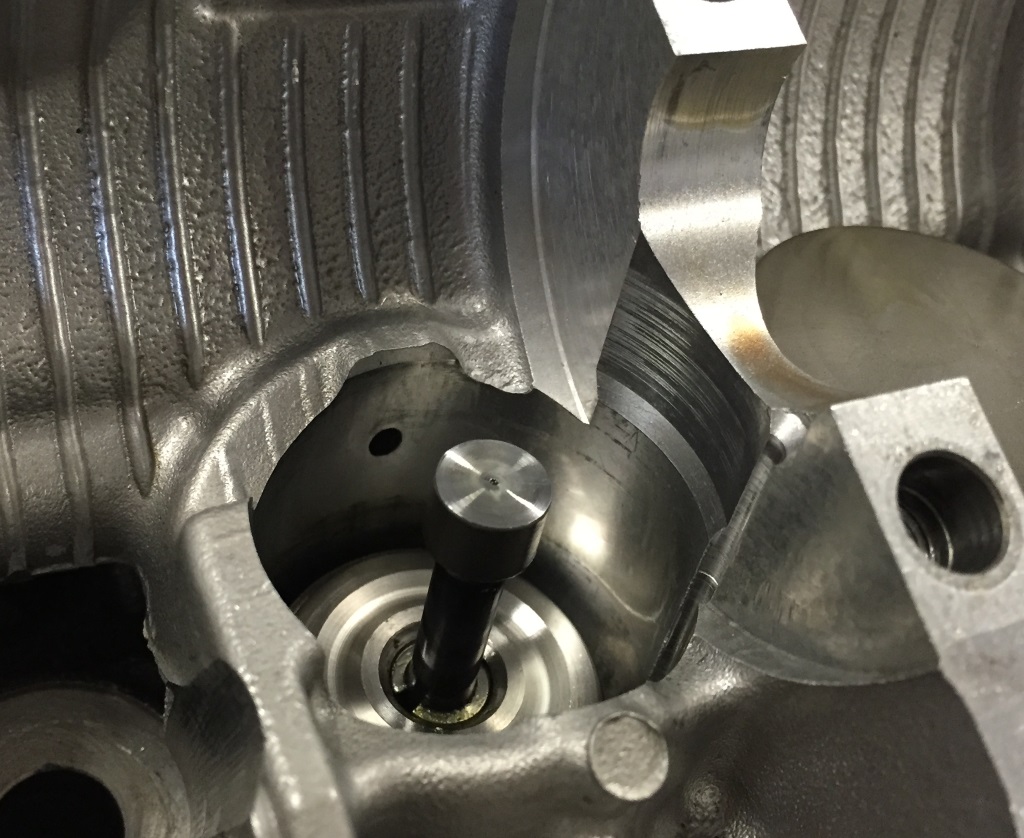
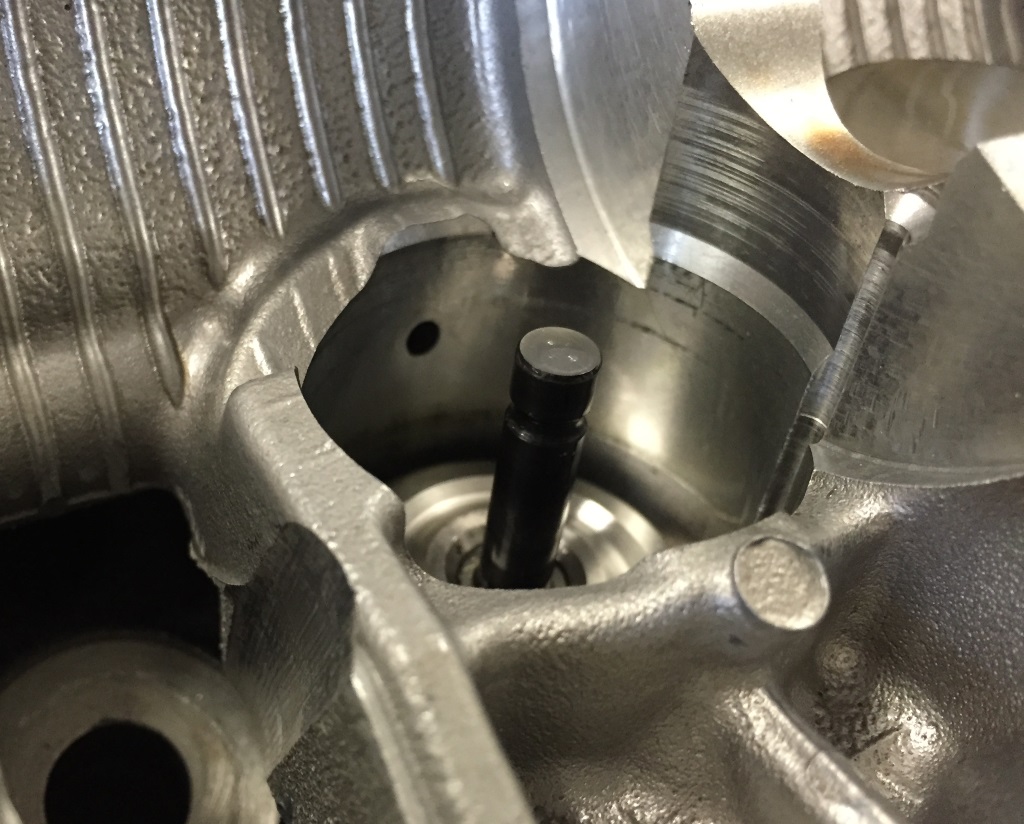
    The intake valves are much longer and stick up way past the retainers. This allows the dual lift bucket to follow one of two different cam paths. Since the intake buckets are so complicated they only come in one thickness, and you use the very small bucket you see here on the top of the valve to change the spacing.


    With the small bucket off the valve top is similar to the exhaust side, just a lot taller. You can also see the oil supply hole in the side of the bucket hole, as that is what gets oil pressure when the lift is turned on.


    With these cams I am getting rid of the multi-lift as the billet steel cams don's support it. That also reduced the weight of the valve train because the lift buckets are pretty heavy.

    Jeff
    Last edited by sponaugle; 04-14-2015 at 11:10 PM.

  9. #369
    Senior Member
    Join Date
    Jan 2014
    Location
    USA
    Posts
    587
    Post Thanks / Like
    Jeff, we do very exotic coatings at my work. DLC isn't really all that exotic, but we can do that. Usually we lay down a few hundred angstroms for extreme scratch resistance, so 2-4 microns like what is suggested for the forks seems excessive. I'm personally interested in this, so I'll ask a few of the coating scientists if depositing DLC on buckets with our equipment is plausible. Height is usually the biggest limiting factor in our coaters.

  10. #370
    Tazio Nuvolari wannabe Scargo's Avatar
    Join Date
    Nov 2013
    Location
    south-central CT
    Posts
    1,611
    Post Thanks / Like
    It seems that in extreme applications that the coatings are very helpful for piston wrist pins, cams and buckets.
    I just spent about $300 for new buckets because the cams had worn them so excessively that they were unusable for my new build.

  11. #371
    Research Calibrator sponaugle's Avatar
    Join Date
    Apr 2013
    Location
    Portland, OR
    Posts
    401
    Post Thanks / Like
    Quote Originally Posted by Aero STI View Post
    Jeff, we do very exotic coatings at my work. DLC isn't really all that exotic, but we can do that. Usually we lay down a few hundred angstroms for extreme scratch resistance, so 2-4 microns like what is suggested for the forks seems excessive. I'm personally interested in this, so I'll ask a few of the coating scientists if depositing DLC on buckets with our equipment is plausible. Height is usually the biggest limiting factor in our coaters.
    Thanks for looking. I'm not sure how much is typically done in a case like this. The purpose is to add hardness and prevent the steel billet cam from wearing the buckets quickly. Size wise, the buckets are pretty small, about an 1.5 inches tall or so. Let me know what you find out. I have 48 buckets total to 'coat'.

    Quote Originally Posted by Scargo View Post
    It seems that in extreme applications that the coatings are very helpful for piston wrist pins, cams and buckets.
    I just spent about $300 for new buckets because the cams had worn them so excessively that they were unusable for my new build.
    Yea, there are some wrist pins you can get that are DLC coated. I think the super heavy duty ones for the GT-R (for >1500whp builds) are DLC coated (As well as heavy).

    There are some long threads on Nasioc about cams and bucket wear. It seems that a surprising number of people have had either cam lobes wear down, or buckets damaged. I have personally never seen that, but then again I usually break something before I get to that kind of milage.

    Jeff

  12. #372
    Senior Member Frank818's Avatar
    Join Date
    Jun 2013
    Location
    QC, Canada
    Posts
    5,732
    Post Thanks / Like
    Spare parts? I thought you were fitting all the parts/engines in the 818? No spare.
    Frank
    818 chassis #181 powered by a '93 VW VR6 Turbo GT3582R
    Go-karted Aug 5, 2016 - Then May 19+21, 2017
    Tracked May 27/July 26, 2017
    Build time before being driveable on Sep 27, 2019: over 6000h
    Build Completed Winter 2021

  13. #373
    Senior Member
    Join Date
    Jan 2014
    Location
    USA
    Posts
    587
    Post Thanks / Like
    Quote Originally Posted by sponaugle View Post
    Thanks for looking. I'm not sure how much is typically done in a case like this. The purpose is to add hardness and prevent the steel billet cam from wearing the buckets quickly. Size wise, the buckets are pretty small, about an 1.5 inches tall or so. Let me know what you find out. I have 48 buckets total to 'coat'.
    I spoke to one of the guys this morning, he said the thickest coatings we do are typically in the 10's of nanometers. You're hitting the parts with an ION (plasma) beam and then injecting acetylene into the beam, or filling the chamber with acetylene and injecting argon into the beam. He said putting micron thick coatings is doable as long as the process parameters are dialed in. It turns out the department that I manage is a heavy user of this for machined parts, so this guy thought it was cool I was interested in knowing more about the process. The ION beam isn't simply depositing sp^2 or sp^3 and building up the surface, it is also removing some material in the process. So, even at 2-4 microns thick it's not purely additive. I put in a call to the guy that spent a few years developing DLC coatings. I'm waiting to hear back from him. He's a good friend and a gearhead. No promises, but if anyone is willing to do this at my company, he would be the guy.

  14. #374
    Senior Member
    Join Date
    Jan 2014
    Location
    USA
    Posts
    587
    Post Thanks / Like
    Jeff, I spoke to the "expert" on DLC at my company. He gave me way more information about the different methods of coating DLC. Our technique would be an experiment vs. tried and true. A coating would be deposited, at best it would do what you need, at worst it would wear off quickly and the part would behave as it would without a coating. The biggest concern is the throat on the entrance chamber to that coater because it is only 1" tall. It peaked his interest and we're going to try it out on some buckets for my CRF450R supermoto, but the outfits selling this as a service would be a much better route for you to take. Sorry if that's a let down.

  15. #375
    Research Calibrator sponaugle's Avatar
    Join Date
    Apr 2013
    Location
    Portland, OR
    Posts
    401
    Post Thanks / Like
    Quote Originally Posted by Frank818 View Post
    Spare parts? I thought you were fitting all the parts/engines in the 818? No spare.
    That's right..I forgot to mention I'll be running an EZ30R at each corner of the car... one per wheel.


    Quote Originally Posted by Aero STI View Post
    Jeff, I spoke to the "expert" on DLC at my company. He gave me way more information about the different methods of coating DLC. Our technique would be an experiment vs. tried and true. A coating would be deposited, at best it would do what you need, at worst it would wear off quickly and the part would behave as it would without a coating. The biggest concern is the throat on the entrance chamber to that coater because it is only 1" tall. It peaked his interest and we're going to try it out on some buckets for my CRF450R supermoto, but the outfits selling this as a service would be a much better route for you to take. Sorry if that's a let down.
    No worries, and thank you for looking into it. I have a quote from a place in CA that can do it, and I'm waiting to hear back from a place on the east coast. I'll post up what I find out. I am curious how long the buckets will last without a coating. I'll ask Kelford.

    Jeff

  16. #376
    Senior Member Pearldrummer7's Avatar
    Join Date
    Feb 2014
    Location
    Asheville, NC
    Posts
    1,230
    Post Thanks / Like
    Quote Originally Posted by sponaugle View Post
    GT-R VR38DETT engine
    Now that would be a cool donor engine. I don't know how you could make it cooperate transmission/electronic wise, but .... think of the power!

  17. #377
    Research Calibrator sponaugle's Avatar
    Join Date
    Apr 2013
    Location
    Portland, OR
    Posts
    401
    Post Thanks / Like
    Oh one other interesting this:

    Here are the various Subaru cam specs:


    All of the factory numbers are from the factory datasheets, which means they are more like 'advertised' numbers, not real numbers. Subaru does not specify the valve lift they use for the duration measurements, but based on past experience it is either .5mm, or even just 'contact'. For example the 2004 STI cams are shown as having 240 degrees of duration, but most aftermarket shops measure it at 204-206 degrees at .050" lift.

    I put the Kelford numbers at the bottom, both the real, and the 'advertised' numbers. I'm not sure if the advertised numbers really match up to the Subaru specs, but they are close.

    Here is what I am curious about: On the intake side these kelford cams have the same lift as stock. They are slightly longer in duration, but most interestingly the have a different centerline. The stock cam centerline is 488/128 degrees (488 measured from TDC of combustion, 128 degrees from TDC of exhaust/intake stroke). The Kelford cam has a 470/110 degree centerline. That means the Kelford cam opens earlier (more advanced) then the stock cams. The stock cam AVCS system can change by as much as 40 degrees, so this means the Kelford cams are similar to the stock cams running 18 degrees of AVCS advance.

    The exhaust Kelford cam has more lift then stock, and more duration, and a slightly later centerline, again increasing overlap.

    Of course all of this is based around using the 'advertised' numbers. If you look at the actual raw numbers from Kelford (the spec sheet numbers), the overlap with no AVCS is only 2 degrees. It is only when you try to 'convert' the numbers to 'advertised' that things look different. Also the Kelford spec is measured at 1mm of valve lift, which is even less then the standard 0.050".

    It is possible that the factory numbers are really measured at something like 0.5mm of lift, which means that even with 5-10 degrees of active AVCS you still really have very little overlap.

    What I need is a way to just get a picture of the cam profile of each!

    Jeff

  18. #378
    Research Calibrator sponaugle's Avatar
    Join Date
    Apr 2013
    Location
    Portland, OR
    Posts
    401
    Post Thanks / Like
    Quote Originally Posted by Pearldrummer7 View Post
    Now that would be a cool donor engine. I don't know how you could make it cooperate transmission/electronic wise, but .... think of the power!
    yea.. that would be cool.... The only problem is the height. It is a very tall engine.. but hey anything is possible!

  19. #379
    Research Calibrator sponaugle's Avatar
    Join Date
    Apr 2013
    Location
    Portland, OR
    Posts
    401
    Post Thanks / Like
    I am working on inventorying my score. One of the engines I got was an EZ30D (the first gen EZ30 motor). It is similar to the 2nd gen, but has a single combined exhaust port. I am not going to use it... so.. if anyone here on FF818 wants the motor, and are willing to come to my house to get it, it is yours for free.

    Only restriction is you have to bring a couple of friends with you help move it. I'm in the west hills in Portland on Skyline.

    Jeff
    Last edited by sponaugle; 04-16-2015 at 11:18 AM.

  20. #380
    Research Calibrator sponaugle's Avatar
    Join Date
    Apr 2013
    Location
    Portland, OR
    Posts
    401
    Post Thanks / Like
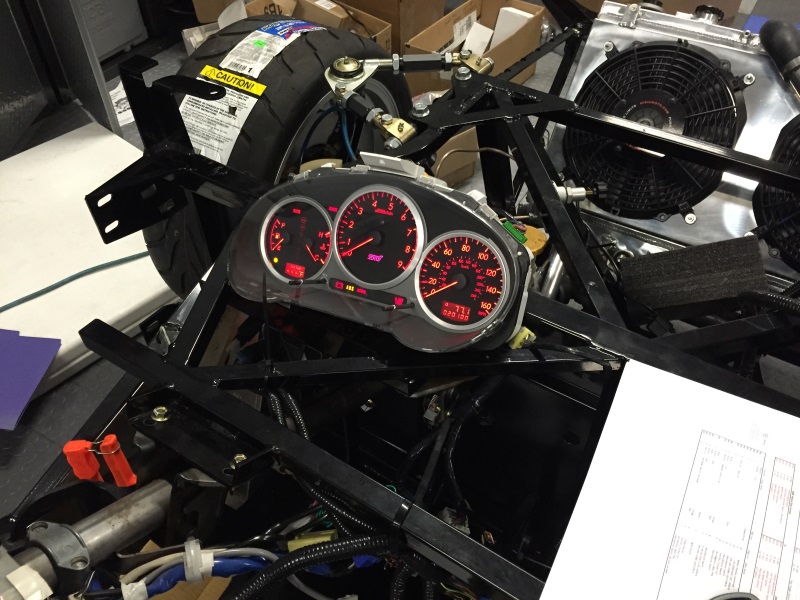
    I got some time over the weekend to get back into the 818, which felt good!

    I connected the battery, checked for shorts, and turned the ignition on for the first time. No Smoke!


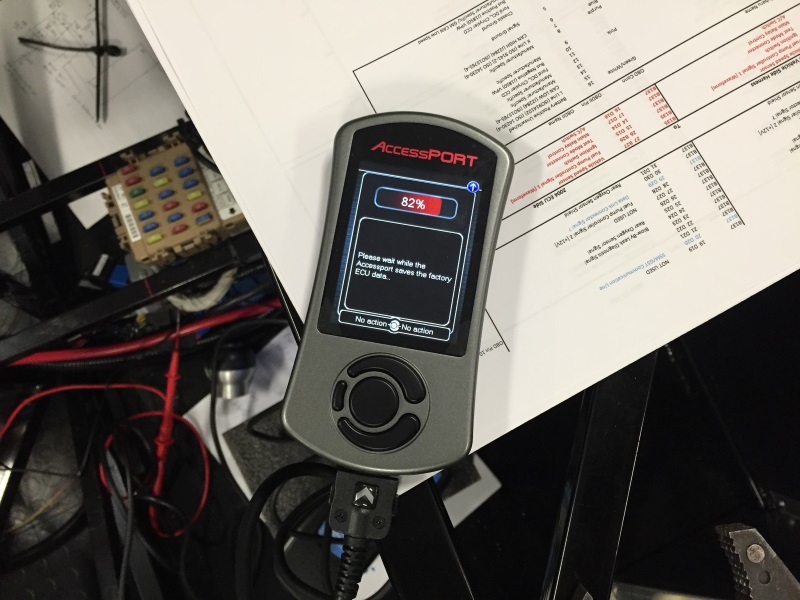
    With the 04 STI ECU plugged in, I married the AP


    Jeff Perrin stopped by and helped me weld up the downpipe. Once I get the body on I'll add the muffler section.


    I worked a bit on the turbo compressor output. I need to get a few 45 degree silicon bends, but it will be a very short connection to the intercooler.


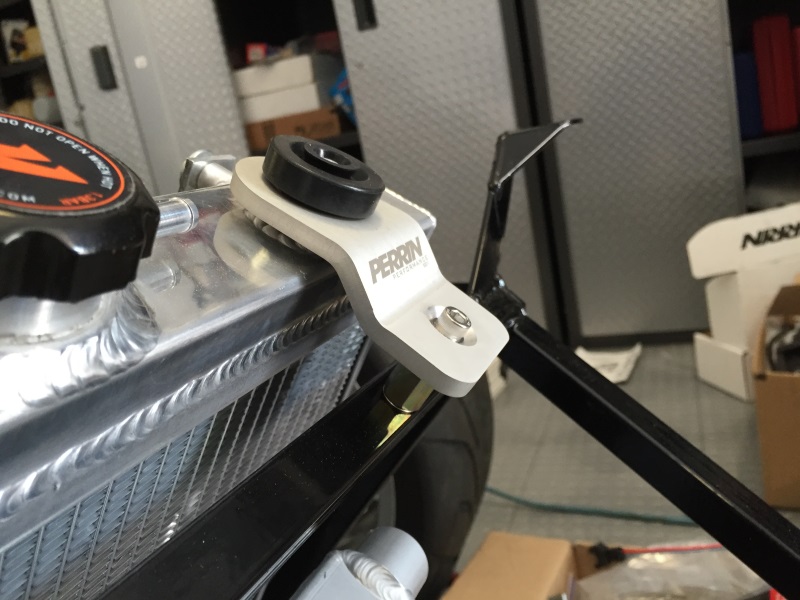
    I also got the radiator mounted up. Turns out I could use the Perrin rad mounts combined with a few small spacers:


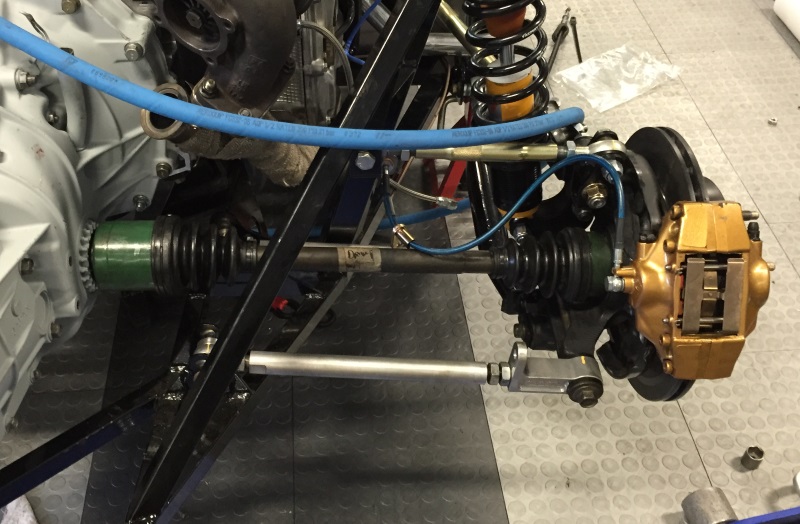
    I also installed the rear axles, which are 06 STI front axles with the front STI inner CVs and the rear outer STI CVs. These axles are about 5/8” longer than the factory five ones, but I had no problem extending the hubs out a bit with the links. I did order a 7” upper lateral link, as that one could use some more range.

    Last edited by sponaugle; 04-26-2015 at 08:15 PM.

  21. #381
    Research Calibrator sponaugle's Avatar
    Join Date
    Apr 2013
    Location
    Portland, OR
    Posts
    401
    Post Thanks / Like
    I got one of those vacuum systems for filling the coolant. I connected it to the garage/shop air and pulled a vacuum in the system to check for leaks. Once it was above 25" I removed the air and let it sit. You can quickly see if you have any leaks. Fortunately my system was tight and had no problem holding the vacuum.

    With that done, I connected the line to a 5 gallon bucket of coolant and it sucked it all in save about 1.4 gallons. Super slick and easy, and it realy helps to eliminate air bubbles. Took about 3 mins to do the entire system.

    This is a tool any car guy/gal should have. It makes refilling the system so easy and painless, even with a complicated layout like the 818.

    Video of the vacuum test.

    https://www.youtube.com/watch?v=wpzuj5-xbmY

    With that done, I connected the starter up so I could make sure the oil system was working.

    Here is a video of the engine turning over. I removed the spark plugs so there is no compression, which makes it an easy job for the starter. The pressure measurement is at the back of the block. 88psi of oil pressure is pretty good, of course the oil and engine are cold.

    Here s a video of the starter cranking the engine over:


    Jeff
    Last edited by sponaugle; 04-29-2015 at 11:03 PM.

  22. #382

    Join Date
    Oct 2013
    Location
    Puyallup, WA
    Posts
    576
    Post Thanks / Like
    Glad to see you making more progress. We all want to see your build in action. Keep it up.

  23. #383
    Research Calibrator sponaugle's Avatar
    Join Date
    Apr 2013
    Location
    Portland, OR
    Posts
    401
    Post Thanks / Like
    Quote Originally Posted by Kurk818 View Post
    Glad to see you making more progress. We all want to see your build in action. Keep it up.
    Thanks Kurk! I am looking forward to taking it for a drive! I need to get a few parts to finish the intake tract and then I can fire it up. I need to get this thing done, because I have an R32 Skyline from Japan inbound in about a month... and I know that will be a distraction!

    Jeff

  24. #384
    Harley818's Avatar
    Join Date
    Jan 2014
    Location
    Vancouver BC
    Posts
    788
    Post Thanks / Like
    Your build is looking good.
    That vacuum system looks slick......I'm not 100% that I got out all the air bubbles. Where did you get it?
    Harley
    Bought 2002 Donor Jan 2014
    First Start Jan 18, 2015
    First Drive Feb 14, 2015

  25. #385
    Research Calibrator sponaugle's Avatar
    Join Date
    Apr 2013
    Location
    Portland, OR
    Posts
    401
    Post Thanks / Like
    Quote Originally Posted by Harley818 View Post
    Your build is looking good.
    That vacuum system looks slick......I'm not 100% that I got out all the air bubbles. Where did you get it?
    http://www.amazon.com/gp/product/B00...?ie=UTF8&psc=1

    $125 on amazon. Totally worth it.

    Jeff

  26. #386

    Join Date
    Oct 2013
    Location
    Puyallup, WA
    Posts
    576
    Post Thanks / Like
    Quote Originally Posted by sponaugle View Post
    Thanks Kurk! I am looking forward to taking it for a drive! I need to get a few parts to finish the intake tract and then I can fire it up. I need to get this thing done, because I have an R32 Skyline from Japan inbound in about a month... and I know that will be a distraction!

    Jeff
    Wow, thats awesome. Lots of men wish they could do what you do. Keep it up. And of course, we love pics

  27. #387
    Senior Member STiPWRD's Avatar
    Join Date
    Jan 2014
    Location
    Leesburg, VA
    Posts
    1,624
    Post Thanks / Like
    Quote Originally Posted by sponaugle View Post
    I need to get this thing done, because I have an R32 Skyline from Japan inbound in about a month... and I know that will be a distraction!

    Jeff
    I wish I had your problems

  28. #388
    Research Calibrator sponaugle's Avatar
    Join Date
    Apr 2013
    Location
    Portland, OR
    Posts
    401
    Post Thanks / Like
    I got a quote back from BryCoat in regards to the bucket coatings that was very reasonable. The tech there suggested I consider Titanium Carbonnitride.

    http://www.brycoat.com/coating-servi...ings/ticn.html

    From Brycoat it would bt $12 a bucket. From IHC I can get a real DLC coating, but it would be $60 per bucket.

    Is anyone familiar with TiCN?

    Also, it is required to take the parts to 750F for this process. Anyone see a problem with that? The buckets are steel of course, but would they soften because of that temperature?

    Andrew: Could you by change ask you material experts?


    Jeff
    Last edited by sponaugle; 04-27-2015 at 12:40 PM.

  29. #389
    Research Calibrator sponaugle's Avatar
    Join Date
    Apr 2013
    Location
    Portland, OR
    Posts
    401
    Post Thanks / Like
    Quote Originally Posted by STiPWRD View Post
    I wish I had your problems
    I prefer to think of them as space-time compression and optimization challenges. My wife however thinks of them more as "Jeff is tinkering again".

    Jeff

  30. #390
    Senior Member
    Join Date
    Jan 2014
    Location
    USA
    Posts
    587
    Post Thanks / Like
    Quote Originally Posted by sponaugle View Post
    I got a quote back from BryCoat in regards to the bucket coatings that was very reasonable. The tech there suggested I consider Titanium Carbonnitride.

    http://www.brycoat.com/coating-servi...ings/ticn.html

    From Brycoat it would bt $12 a bucket. From IHC I can get a real DLC coating, but it would be $60 per bucket.

    Is anyone familiar with TiCN?

    Also, it is required to take the parts to 750F for this process. Anyone see a problem with that? The buckets are steel of course, but would they soften because of that temperature?

    Andrew: Could you by change ask you material experts?


    Jeff
    I checked with my SME...

    "TiCN is very hard but not as low friction as DLC. DLC is great for reducing friction/stiction. It is readily oxidized so no combustion areas. Look at what high RPM race engines are using"

    He offered this article: http://www.stle.org/assets/document/..._Polishing.pdf

    Also, "Vacuum ion implantation of carbon is common. Sort of a super carbonizing surface hardener"

    So are you ultimately trying to reduce wear from friction, or add hardness to the top of the bucket? I would put a lot of weight in the recommendations given by brycoat. I imagine they know their stuff.
    Last edited by Aero STI; 04-27-2015 at 09:43 PM. Reason: new info

  31. #391
    fasterer and furiouser longislandwrx's Avatar
    Join Date
    Aug 2012
    Location
    Long Island
    Posts
    2,540
    Post Thanks / Like
    Blog Entries
    6
    Quote Originally Posted by sponaugle View Post
    Jeff Perrin stopped by and helped me weld up the downpipe.
    Quote Originally Posted by sponaugle View Post
    I have an R32 Skyline from Japan inbound in about a month... and I know that will be a distraction!
    damn-it-feels-good-to-be-a-gansta.gif
    A well stocked beverage fridge is the key to any successful project.

  32. #392
    Research Calibrator sponaugle's Avatar
    Join Date
    Apr 2013
    Location
    Portland, OR
    Posts
    401
    Post Thanks / Like
    Quote Originally Posted by longislandwrx View Post
    Hahaha. That is awesome. I even work in a cube!

  33. #393
    Research Calibrator sponaugle's Avatar
    Join Date
    Apr 2013
    Location
    Portland, OR
    Posts
    401
    Post Thanks / Like
    Well, tonight was the night to see what I did wrong. Oil in the motor, gas in the gas tank, coolant in the coolant system, and a downpipe with no muffler or cat.

    I checked some connections, made sure the engine would spin over and not catch on any cables etc... then key on:


    It ran! It didn't catch fire! It didn't shoot rod bearings out the oil pan. It was also loud. I forgot how loud these engine are with no mufflers or cats. There was a bit of smoke from oil that I spilled on the header, but that will go away once I get it hot.

    Oil and fuel pressure looked good. I need to clean up a few small thing before I roll it out of the shop and let it warm up, but no fluids on the floor either.

    Feels good to have the engine running, especially since I built the engine.

    Jeff

  34. #394
    Senior Member TouchStone's Avatar
    Join Date
    Sep 2014
    Location
    Dallas, TX
    Posts
    512
    Post Thanks / Like
    Blog Entries
    1
    Congrats! Its always exciting to see another one of these start up. And I cant wait to start mine.
    818S Chassis #288 2.5L 323hp
    Ordered: 9/19/14 Received Kit: 11/2/14 First Start: 5/31/15 First Drive: 6/7/15 Registered: 3/10/2016 Completed: 2/10/2017
    Status: Complete Build Thread Sold 9/22/2017
    joshuajach.com

  35. #395

    Join Date
    Oct 2013
    Location
    Puyallup, WA
    Posts
    576
    Post Thanks / Like
    Right on!! Congrats. Huge step and an awesome motivator! Keep this pace going and you'll be done in no time.

  36. #396
    Senior Member Frank818's Avatar
    Join Date
    Jun 2013
    Location
    QC, Canada
    Posts
    5,732
    Post Thanks / Like
    Nice!
    Frank
    818 chassis #181 powered by a '93 VW VR6 Turbo GT3582R
    Go-karted Aug 5, 2016 - Then May 19+21, 2017
    Tracked May 27/July 26, 2017
    Build time before being driveable on Sep 27, 2019: over 6000h
    Build Completed Winter 2021

  37. #397
    fasterer and furiouser longislandwrx's Avatar
    Join Date
    Aug 2012
    Location
    Long Island
    Posts
    2,540
    Post Thanks / Like
    Blog Entries
    6
    BLFJkKZCAAAleFG.jpg

    awesome job man.
    A well stocked beverage fridge is the key to any successful project.

  38. #398
    Senior Member C.Plavan's Avatar
    Join Date
    Mar 2011
    Location
    Clovis, Ca
    Posts
    2,225
    Post Thanks / Like
    Congrats!
    Thanks- Chad
    818R-SOLD!!!- Go Karted 7/20/14/ Officially raced NASA ST2- 2/28/15
    2016 Elan NP01 Prototype Racecar Chassis #20
    1969 Porsche 911ST Vintage Race Car
    1972 Porsche 911T (#'s matching undergoing nut & bolt resto in my garage)

  39. #399
    Senior Member STiPWRD's Avatar
    Join Date
    Jan 2014
    Location
    Leesburg, VA
    Posts
    1,624
    Post Thanks / Like
    Congrats! Awesome job

  40. #400
    Research Calibrator sponaugle's Avatar
    Join Date
    Apr 2013
    Location
    Portland, OR
    Posts
    401
    Post Thanks / Like
    Thanks guys! Indeed I am driven to get this thing registered and plated so I can drop the EZ30R in. Of course before I do that I'll have to turn up the boost on this 35R and see how 500whp feels. Reminder to self: Order that Racelogic TC box today.

    I am mostly just excited that nothing caught on fire.

    Jeff

Page 10 of 12 FirstFirst ... 89101112 LastLast

Posting Permissions

  • You may not post new threads
  • You may not post replies
  • You may not post attachments
  • You may not edit your posts
  •  

Stewart Transport

Visit our community sponsor