FormaCars

Visit our community sponsor

Thanks Thanks:  0
Likes Likes:  0
Page 1 of 2 12 LastLast
Results 1 to 40 of 43

Thread: looping coolant lines together

  1. #1
    Senior Member Triathletedave's Avatar
    Join Date
    Sep 2012
    Location
    Calgary
    Posts
    232
    Post Thanks / Like

    looping coolant lines together

    I think I know the answer, but can anyone confirm if these two pictures both represent the same two cooling lines that need to be looped together at the back of the engine? The short connector in the first picture is recommended to be replaced with a 'fill tube'? What purpose does this serve?

    fill tube1.JPG

    fill tube2.JPG
    TriguyDave
    818 noobie builder
    First start: Sept 28, 2014
    Go-carted: Oct 4, 2014
    Registered and Street legal Sept 30, 2015
    Calgary, Alberta

  2. #2
    PLATNUM Supporting Member
    wallace18's Avatar
    Join Date
    Apr 2012
    Location
    Trenton, Florida
    Posts
    5,382
    Post Thanks / Like
    That is so someone can flush out the cooling system. An aftermarket part. You can leave it or get rid of it. Those are the correct lines.

  3. #3
    Senior Member AZPete's Avatar
    Join Date
    Feb 2011
    Location
    Scottsdale, AZ
    Posts
    2,374
    Post Thanks / Like
    Those coolant tubes feed the heater core in the donor, don't they? Can someone please tell me which is the outlet that goes to the heater core?
    818S/C : Chassis #25 with 06 WRX 2.5 turbo, ABS, cruise, PS, A/C, Apple CarPlay, rear camera, power windows & locks, leather & other complexities. Sold 10/19 with 5,800 miles.
    Mk3 Roadster #6228 4.6L, T45, IRS, PS, PB, ABS, Cruise, Koni's, 17" Halibrands, red w/ silver - 9K miles then sold @ Barrett-Jackson Jan 2011 (got back cash spent).

  4. #4
    Senior Member Triathletedave's Avatar
    Join Date
    Sep 2012
    Location
    Calgary
    Posts
    232
    Post Thanks / Like
    Thanks! This is as I suspected. I'll consider putting that in at some point after the car is finished. Certainly no need to rush on installing a flush valve now.
    TriguyDave
    818 noobie builder
    First start: Sept 28, 2014
    Go-carted: Oct 4, 2014
    Registered and Street legal Sept 30, 2015
    Calgary, Alberta

  5. #5
    Member
    Join Date
    Apr 2014
    Posts
    45
    Post Thanks / Like
    Fill tube not needed. Just maks sure what you are using isnt kinked. There are 180º bend silicone hoses. I have 2 in my spare parts collection

  6. #6
    Administrator
    Wayne Presley's Avatar
    Join Date
    Feb 2011
    Location
    Enterprise Alabama
    Posts
    2,804
    Post Thanks / Like
    Blog Entries
    3
    Quote Originally Posted by AZPete View Post
    Those coolant tubes feed the heater core in the donor, don't they? Can someone please tell me which is the outlet that goes to the heater core?
    The one coming from the coolant log on the top of the motor goes to the heater. The one that goes to the waterpump/thermostat housing is the return.

    Quote Originally Posted by Triathletedave View Post
    I think I know the answer, but can anyone confirm if these two pictures both represent the same two cooling lines that need to be looped together at the back of the engine? The short connector in the first picture is recommended to be replaced with a 'fill tube'? What purpose does this serve?

    fill tube1.JPG
    You must loop these or your thermostat will never open.
    Wayne Presley www.verycoolparts.com
    Xterminator 705 RWHP supercharged 4.6 DOHC with twin turbos

  7. #7
    Senior Member Triathletedave's Avatar
    Join Date
    Sep 2012
    Location
    Calgary
    Posts
    232
    Post Thanks / Like
    Quote Originally Posted by Wayne Presley View Post
    You must loop these or your thermostat will never open.
    Thanks Wayne. I understand the need for the loop, but I was questioning why it should be 'replaced' with the fill kit attachment instead of just having the simple loop. It just seemed like a very odd location for a fill attachment.

    Cheers,

    Dave
    TriguyDave
    818 noobie builder
    First start: Sept 28, 2014
    Go-carted: Oct 4, 2014
    Registered and Street legal Sept 30, 2015
    Calgary, Alberta

  8. #8
    Senior Member AZPete's Avatar
    Join Date
    Feb 2011
    Location
    Scottsdale, AZ
    Posts
    2,374
    Post Thanks / Like
    Wayne, you wrote, "The one coming from the coolant log on the top of the motor goes to the heater. The one that goes to the waterpump/thermostat housing is the return." I can't follow these tubes to see where they go among all the stuff on the engine.

    I've searched my photos from when I was cleaning the engine and found this one that shows to 2 tubes at the top of the engine. If that's the "coolant log" then the top tube goes to the heater, right? And, does this black tube (bottom tube) go to the water pump/thermostat housing? I want to be sure so I don't screw up the cooling system as I plumb the heater core. Thanks!
    engine top 2.jpg
    Last edited by AZPete; 04-30-2014 at 02:45 PM. Reason: typo
    818S/C : Chassis #25 with 06 WRX 2.5 turbo, ABS, cruise, PS, A/C, Apple CarPlay, rear camera, power windows & locks, leather & other complexities. Sold 10/19 with 5,800 miles.
    Mk3 Roadster #6228 4.6L, T45, IRS, PS, PB, ABS, Cruise, Koni's, 17" Halibrands, red w/ silver - 9K miles then sold @ Barrett-Jackson Jan 2011 (got back cash spent).

  9. #9
    Administrator
    Wayne Presley's Avatar
    Join Date
    Feb 2011
    Location
    Enterprise Alabama
    Posts
    2,804
    Post Thanks / Like
    Blog Entries
    3
    Quote Originally Posted by AZPete View Post
    Wayne, you wrote, "The one coming from the coolant log on the top of the motor goes to the heater. The one that goes to the waterpump/thermostat housing is the return." I can't follow these tubes to see where they go among all the stuff on the engine.

    I've searched my photos from when I was cleaning the engine and found this one that shows to 2 tubes at the top of the engine. If that's the "coolant log" then the top tube goes to the heater, right? And, does this black tube (bottom tube) go to the water pump/thermostat housing? I want to be sure so I don't screw up the cooling system as I plumb the heater core. Thanks!
    engine top 2.jpg
    Your photo is correct. Make sure you have a constant flow through the heater and your heat unit doesn't turn vary the water flow to control the heat. If it has a water valve then you will have to get a shuttle valve so total water flow stays constant, the valve varies how much water goes to the core and how much gets run to the motor.
    Wayne Presley www.verycoolparts.com
    Xterminator 705 RWHP supercharged 4.6 DOHC with twin turbos

  10. #10
    Senior Member AZPete's Avatar
    Join Date
    Feb 2011
    Location
    Scottsdale, AZ
    Posts
    2,374
    Post Thanks / Like
    Thanks Wayne. I tried to find the answer in the factory service manual before bothering you but I couldn't find it. I understand about the heater valve and keeping some flow. Actually I'm connecting to a heater core in a Vintage Air mini unit that fits nicely under the dash. Here in the AZ desert A/C adds 4 months to the fun. Thanks!

    BTW, a friend stopped by to see my build and he admired the K-Tuned shifter more than all the nice work I've done. Next time I'll cover it up!
    818S/C : Chassis #25 with 06 WRX 2.5 turbo, ABS, cruise, PS, A/C, Apple CarPlay, rear camera, power windows & locks, leather & other complexities. Sold 10/19 with 5,800 miles.
    Mk3 Roadster #6228 4.6L, T45, IRS, PS, PB, ABS, Cruise, Koni's, 17" Halibrands, red w/ silver - 9K miles then sold @ Barrett-Jackson Jan 2011 (got back cash spent).

  11. #11
    Administrator
    Wayne Presley's Avatar
    Join Date
    Feb 2011
    Location
    Enterprise Alabama
    Posts
    2,804
    Post Thanks / Like
    Blog Entries
    3
    Quote Originally Posted by AZPete View Post

    BTW, a friend stopped by to see my build and he admired the K-Tuned shifter more than all the nice work I've done. Next time I'll cover it up!

    It really is the coolest part to add to an 818
    Wayne Presley www.verycoolparts.com
    Xterminator 705 RWHP supercharged 4.6 DOHC with twin turbos

  12. #12
    Senior Member
    Join Date
    May 2012
    Location
    Suisun City, CA
    Posts
    851
    Post Thanks / Like
    Not sure it's been mentioned, but be VERY careful not to confuse the two caps. The one on the upper reservoir vents under pressure and draws a return on vacuum. The OEM cap on the radiator only opens under pressure.
    818S - #67 (SOLD IT!)
    Delivered: 18 November 2013
    Go Karted: 29 December 2013
    Titled/Registered: 28 March 2014
    Finished: NEVER!
    341 hp @ 4844 RPM / 389 tq @ 3717 RPM

  13. #13
    Senior Member Bob_n_Cincy's Avatar
    Join Date
    Sep 2012
    Location
    Cincinnati OH
    Posts
    3,904
    Post Thanks / Like
    Quote Originally Posted by JeromeS13 View Post
    Not sure it's been mentioned, but be VERY careful not to confuse the two caps. The one on the upper reservoir vents under pressure and draws a return on vacuum. The OEM cap on the radiator only opens under pressure.
    Subaru fixed that on the forester so you couldn't mix up the radiator caps. They didn't put one on the radiator.

    47775437.jpg

    Notice that there is an air bleed hose from the top passenger side of the radiator to the "Engine coolant filler tank" (degas tank) Wayne's hose take cares of that getting the air out of the top of the engine.

    Bob
    Last edited by Bob_n_Cincy; 04-30-2014 at 11:14 PM.

  14. #14
    Senior Member FFRSpec72's Avatar
    Join Date
    Feb 2011
    Location
    Kirkland, WA
    Posts
    2,255
    Post Thanks / Like
    OK, I went to do this over the weekend and I don't have these 2 lines, I only have one line, the engine is a JDM EJ207v7, anyone else have this issue?

    Here is a picture and you can see just the one line coming out near the starter area.

    WP_20140316_002.jpg
    Last edited by FFRSpec72; 08-18-2014 at 03:15 PM.
    Tony Nadalin
    2018 SOVREN Big Bore Champion
    2015 SCCA Oregon Region VP3 Champion
    2012 ICSCC ITE Class Champion
    FFR MkII Challenge Car, Spec Racer, Street Legal, SCCA, ICSCC and NASA Racing
    818R Build in progress

  15. #15
    Senior Member Bob_n_Cincy's Avatar
    Join Date
    Sep 2012
    Location
    Cincinnati OH
    Posts
    3,904
    Post Thanks / Like
    Quote Originally Posted by FFRSpec72 View Post
    OK, I went to do this over the weekend and I don't have these 2 lines, I only have one line, the engine is a JDM EJ207v7, anyone else have this issue?

    Here is a picture and you can see just the one line coming out near the starter area.

    WP_20140316_002.jpg
    Hi Tony
    The pipe by the starter is hot feed to the heater.
    My engine has a second tube that returns water to the bottom driver side port of the water pump.

    water pump.jpg

    I suspect your engine has a hose that goes there directly.
    Bob

  16. #16
    Senior Member FFRSpec72's Avatar
    Join Date
    Feb 2011
    Location
    Kirkland, WA
    Posts
    2,255
    Post Thanks / Like
    Quote Originally Posted by Bob_n_Cincy View Post
    Hi Tony
    The pipe by the starter is hot feed to the heater.
    My engine has a second tube that returns water to the bottom driver side port of the water pump.

    water pump.jpg

    I suspect your engine has a hose that goes there directly.
    Bob
    So still not sure what to do but i will chase down where the bottom hose on the water pump goes.
    Tony Nadalin
    2018 SOVREN Big Bore Champion
    2015 SCCA Oregon Region VP3 Champion
    2012 ICSCC ITE Class Champion
    FFR MkII Challenge Car, Spec Racer, Street Legal, SCCA, ICSCC and NASA Racing
    818R Build in progress

  17. #17
    Senior Member Bob_n_Cincy's Avatar
    Join Date
    Sep 2012
    Location
    Cincinnati OH
    Posts
    3,904
    Post Thanks / Like
    Tony,
    That hose is very important. It brings hot water to the engine side of the thermostat to control opening and closing.
    Bob

  18. #18
    Senior Member
    Join Date
    Feb 2011
    Posts
    607
    Post Thanks / Like
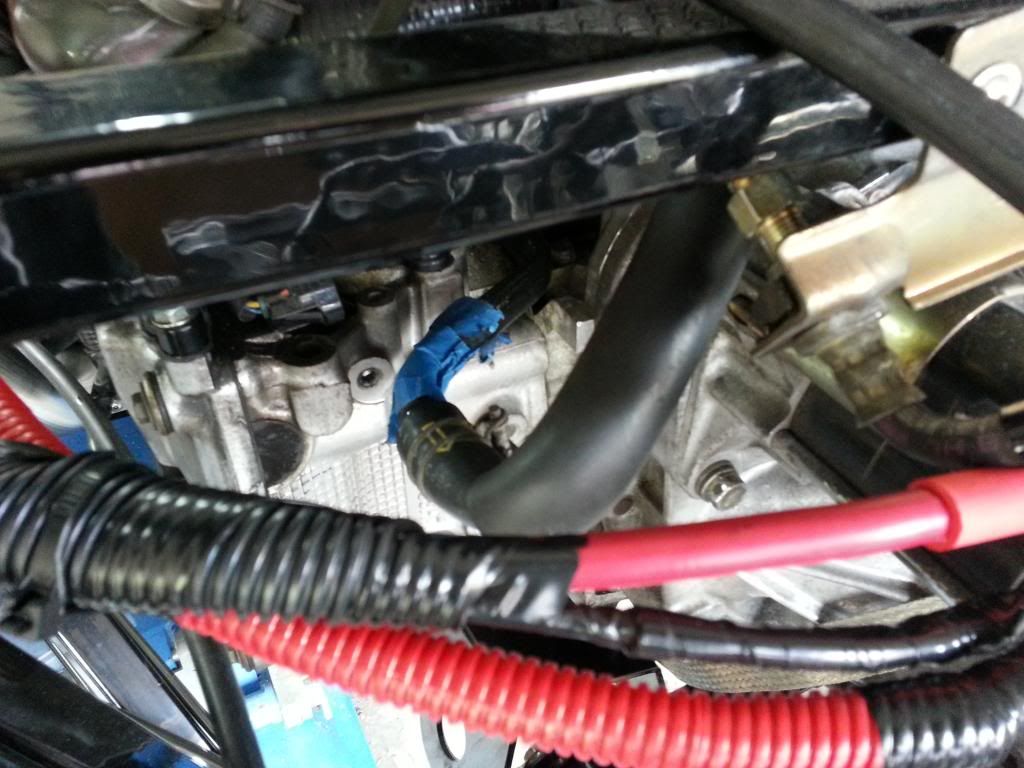
    FWIW, the 02 wrx doesn't look like the picture in the manual. Here's what I looped together (follow the line w/ the blue tape):


  19. #19
    Senior Member FFRSpec72's Avatar
    Join Date
    Feb 2011
    Location
    Kirkland, WA
    Posts
    2,255
    Post Thanks / Like
    Thanks, so it looks like its these 2 lines that I have circled

    HeaterLines-1.jpg
    Tony Nadalin
    2018 SOVREN Big Bore Champion
    2015 SCCA Oregon Region VP3 Champion
    2012 ICSCC ITE Class Champion
    FFR MkII Challenge Car, Spec Racer, Street Legal, SCCA, ICSCC and NASA Racing
    818R Build in progress

  20. #20
    Senior Member
    Join Date
    Feb 2011
    Posts
    607
    Post Thanks / Like
    Yup! Disclaimer: I haven't found any of this in writing however, I did label these when disassembling the donor and it's the only two lines that make sense. Also, car seems to run just fine .

  21. #21
    Senior Member gwarden's Avatar
    Join Date
    Jan 2012
    Location
    Surry Va
    Posts
    199
    Post Thanks / Like
    Quote Originally Posted by Bob_n_Cincy View Post
    Subaru fixed that on the forester so you couldn't mix up the radiator caps. They didn't put one on the radiator.

    47775437.jpg

    Notice that there is an air bleed hose from the top passenger side of the radiator to the "Engine coolant filler tank" (degas tank) Wayne's hose take cares of that getting the air out of the top of the engine.

    Bob
    I've read something about Wayne recommending a hose to help purge air from the system but can't find that post
    Can anyone help me find it?

  22. #22
    PLATNUM Supporting Member
    wallace18's Avatar
    Join Date
    Apr 2012
    Location
    Trenton, Florida
    Posts
    5,382
    Post Thanks / Like
    Quote Originally Posted by gwarden View Post
    I've read something about Wayne recommending a hose to help purge air from the system but can't find that post
    Can anyone help me find it?
    http://thefactoryfiveforum.com/showt...ooling-burping

    Here is one reference I also show it in my build thread.

  23. #23
    Senior Member gwarden's Avatar
    Join Date
    Jan 2012
    Location
    Surry Va
    Posts
    199
    Post Thanks / Like
    Quote Originally Posted by Wayne Presley View Post
    The one coming from the coolant log on the top of the motor goes to the heater. The one that goes to the waterpump/thermostat housing is the return.


    You must loop these or your thermostat will never open.
    I have an 02 wrx with the heater lines spread wider apart. it also had smaller lines going to the throttle body that I eliminated and looped over this is about a 1/4" line is it good enough for flow to make the thermostat work and can I just plug off the heater lines?

  24. #24
    Administrator
    Wayne Presley's Avatar
    Join Date
    Feb 2011
    Location
    Enterprise Alabama
    Posts
    2,804
    Post Thanks / Like
    Blog Entries
    3
    Not enough flow, you must loop them or your thermostat will never open
    Wayne Presley www.verycoolparts.com
    Xterminator 705 RWHP supercharged 4.6 DOHC with twin turbos

  25. #25
    Member
    Join Date
    Jul 2011
    Posts
    66
    Post Thanks / Like
    As mentioned you definitely need to loop the lines. If you don't cylinders 2 and 4 will run hotter than 1 and 3 which is bad considering that 4 is the "hottest" cylinder in the motor in terms of ECU tuning.

    Coolant flow for an older EJ turbo motor, but still more or less applies.


  26. #26
    Senior Member Bob_n_Cincy's Avatar
    Join Date
    Sep 2012
    Location
    Cincinnati OH
    Posts
    3,904
    Post Thanks / Like
    Tony,
    If you remove the oil warmer (under the oil filter) Can you just block off those lines or should you loop them?
    Bob
    818S #22 Candy Blue Frame, Front Gas Tank, 2.5L Turbo, Rear radiator, Shortened Transmission, Wookiee Compatible, Console mounted MR2 Shifter, Custom ECU panel, AWIC soon
    My Son Michael's Turbo ICE Build X22 http://thefactoryfiveforum.com/showt...rts-818S-Build
    My Electric Supercar Build X21 (on hold until winter) http://thefactoryfiveforum.com/showt...e-Build-Thread

  27. #27
    Senior Member billjr212's Avatar
    Join Date
    Feb 2011
    Location
    Frankfort, IL
    Posts
    734
    Post Thanks / Like
    Along the same line as Bob's comment, any reason to not just block off the throttle body lines at the source t's rather than looping them together?

  28. #28
    Senior Member gwarden's Avatar
    Join Date
    Jan 2012
    Location
    Surry Va
    Posts
    199
    Post Thanks / Like
    I don't think looping the throttle body lines would be needed as long as you are looping the heater lines

  29. #29
    Senior Member billjr212's Avatar
    Join Date
    Feb 2011
    Location
    Frankfort, IL
    Posts
    734
    Post Thanks / Like
    I ended up just going back to the sources and tying them together. It was such a short run and tucked away, so I figured why not.

  30. #30
    Member
    Join Date
    Jul 2011
    Posts
    66
    Post Thanks / Like
    You can block off the throttle body lines and the oil warmer lines without issue. If you do it though don't just use rubber caps as they will fail. A 1/4 npt plug fits the water pump well. Pull out the spigot for the line and tap the hole for the 1/4" plug. No drilling of the hole required. On the other end get the large threaded cap off an engine that does not have the warmer to cap it off permanently.

    Tony

  31. #31
    Mechie3's Avatar
    Join Date
    May 2012
    Location
    Indianapolis
    Posts
    5,174
    Post Thanks / Like
    I cut off the nipples for the throttle body feed and return lines and welded them shut. Put rubber caps on the nipples on the throttle body itself just to prevent dirt from getting in.
    Zero Decibel Motorsports
    Check out my new website!
    www.zerodecibelmotorsports.com
    www.facebook.com/zero.decibel.motorsports

  32. #32
    Senior Member FFRSpec72's Avatar
    Join Date
    Feb 2011
    Location
    Kirkland, WA
    Posts
    2,255
    Post Thanks / Like
    Quote Originally Posted by Mechie3 View Post
    I cut off the nipples for the throttle body feed and return lines and welded them shut. Put rubber caps on the nipples on the throttle body itself just to prevent dirt from getting in.
    So on my JDM the TB feed just connects to the 2 lines I looped, so why do the TB ?
    Tony Nadalin
    2018 SOVREN Big Bore Champion
    2015 SCCA Oregon Region VP3 Champion
    2012 ICSCC ITE Class Champion
    FFR MkII Challenge Car, Spec Racer, Street Legal, SCCA, ICSCC and NASA Racing
    818R Build in progress

  33. #33
    Senior Member C.Plavan's Avatar
    Join Date
    Mar 2011
    Location
    Clovis, Ca
    Posts
    2,225
    Post Thanks / Like
    I bypassed the throttle body nipples, then just looped the two lines together. Then put rubber caps on the throttle body nipples.

    I did that right, correct?
    Thanks- Chad
    818R-SOLD!!!- Go Karted 7/20/14/ Officially raced NASA ST2- 2/28/15
    2016 Elan NP01 Prototype Racecar Chassis #20
    1969 Porsche 911ST Vintage Race Car
    1972 Porsche 911T (#'s matching undergoing nut & bolt resto in my garage)

  34. #34
    Mechie3's Avatar
    Join Date
    May 2012
    Location
    Indianapolis
    Posts
    5,174
    Post Thanks / Like
    Quote Originally Posted by FFRSpec72 View Post
    So on my JDM the TB feed just connects to the 2 lines I looped, so why do the TB ?
    Not sure I wrote a good description. I welded shut the nipples on the aluminum crossover pipe and the steel coolant pipe under the manifold. You can just loop these together but, since my parts were off the car and easily accessible, it was a little bit cleaner to not have the loop. I bypass the TB so that I'm not heating it up.
    Zero Decibel Motorsports
    Check out my new website!
    www.zerodecibelmotorsports.com
    www.facebook.com/zero.decibel.motorsports

  35. #35
    Senior Member FFRSpec72's Avatar
    Join Date
    Feb 2011
    Location
    Kirkland, WA
    Posts
    2,255
    Post Thanks / Like
    Quote Originally Posted by Mechie3 View Post
    Not sure I wrote a good description. I welded shut the nipples on the aluminum crossover pipe and the steel coolant pipe under the manifold. You can just loop these together but, since my parts were off the car and easily accessible, it was a little bit cleaner to not have the loop. I bypass the TB so that I'm not heating it up.
    OK, understand, I will look at bypassing the TB also
    Tony Nadalin
    2018 SOVREN Big Bore Champion
    2015 SCCA Oregon Region VP3 Champion
    2012 ICSCC ITE Class Champion
    FFR MkII Challenge Car, Spec Racer, Street Legal, SCCA, ICSCC and NASA Racing
    818R Build in progress

  36. #36
    Senior Member
    Join Date
    Jan 2014
    Location
    Massachusetts
    Posts
    148
    Post Thanks / Like
    I have the 02 WRX donor with the heater lines about 12 in apart. How long of a hose do I need to loop them and what is the interior diameter? Also is there some pre bent hose from some car that fits?
    Dave

  37. #37
    Administrator
    Wayne Presley's Avatar
    Join Date
    Feb 2011
    Location
    Enterprise Alabama
    Posts
    2,804
    Post Thanks / Like
    Blog Entries
    3
    Quote Originally Posted by CU9DZ View Post
    I have the 02 WRX donor with the heater lines about 12 in apart. How long of a hose do I need to loop them and what is the interior diameter? Also is there some pre bent hose from some car that fits?
    Dave
    some 5/8" hose works fine
    Wayne Presley www.verycoolparts.com
    Xterminator 705 RWHP supercharged 4.6 DOHC with twin turbos

  38. #38
    Senior Member metros's Avatar
    Join Date
    Jun 2013
    Location
    NoVA
    Posts
    1,064
    Post Thanks / Like
    I believe I used 16" of hose to get a decent shape to line without kinks. Get a little more and trim it to your liking.

  39. #39
    Senior Member
    Join Date
    Jan 2014
    Location
    Massachusetts
    Posts
    148
    Post Thanks / Like
    Great Thanks. Next time I go to parts store. Will get 16"+ of 5/8" hose.
    Dave

  40. #40
    Senior Member
    Join Date
    Apr 2015
    Location
    Andover, MA
    Posts
    530
    Post Thanks / Like
    Thanks for all the input. I have same layout and glad to find all you contributions. Great community here!

    -Ben

Page 1 of 2 12 LastLast

Tags for this Thread

Posting Permissions

  • You may not post new threads
  • You may not post replies
  • You may not post attachments
  • You may not edit your posts
  •  

Brown County Customs

Visit our community sponsor