
Visit our community sponsor

Thanks:
0

Likes:
0
-
Senior Member

Tamra
The Loring course is too long to walk so they allow driving through it slowly... here is a slow drive thru of today's course
https://www.youtube.com/watch?v=DopcuWfjtR8
Dan
818S #17 Picked up 8/1/13 First start 11/1/13 Go Kart 3/28/14
-
Senior Member

We tried a different methodology today. We set the air compressor regulator at 120psi, then set the leak down regulator to 100psi, and watched the psi drop once connected to the engine. It consistently dropped to 95-96psi on all four at TDC, which would be a 4-5% leakage rate. Can you see any flaw in this method? We did do a test and turned the engine over 180 degrees, and it dropped to 80 psi, indicating 20% leakage.
Then, we tried using the gauge as it's meant to be used and set the leakdown regulator to about 10psi which made the leakage percentage gauge settle quickly to about 0%, then creep past 0 (could not get it to stay flat at 0), and got quickly settling readings of around 12-15% on the one cylinder that we checked. We are not sure why the gauge would have read 45% last night and 15% today... so still not totally confident in using it this way.
Could the high pressure have re-seated the rings/valves to give more accurate readings on the leakdown tester? Is the first method we tried today which gave us 5% leakage readings accurate? Air was still present through the oil filler but much less than last night per psi input.
-
Senior Member
Dan, that looks like a fun course. How long did it end up being at full speed? You definitely get your money's worth on courses that big. Our local club runs courses that are closer to 30-40 seconds, and tight.

Originally Posted by
RM1SepEx

-
818 builder

Originally Posted by
Tamra
We tried a different methodology today. We set the air compressor regulator at 120psi, then set the leak down regulator to 100psi, and watched the psi drop once connected to the engine. It consistently dropped to 95-96psi on all four at TDC, which would be a 4-5% leakage rate. Can you see any flaw in this method? We did do a test and turned the engine over 180 degrees, and it dropped to 80 psi, indicating 20% leakage.
Then, we tried using the gauge as it's meant to be used and set the leakdown regulator to about 10psi which made the leakage percentage gauge settle quickly to about 0%, then creep past 0 (could not get it to stay flat at 0), and got quickly settling readings of around 12-15% on the one cylinder that we checked. We are not sure why the gauge would have read 45% last night and 15% today... so still not totally confident in using it this way.
Could the high pressure have re-seated the rings/valves to give more accurate readings on the leakdown tester? Is the first method we tried today which gave us 5% leakage readings accurate? Air was still present through the oil filler but much less than last night per psi input.
4%-5% leakage is great, and I have done the test either method. Your results are not consistant, I am unsure why. With the motor cold your results can be higher on a newly rebuilt engine do you guys are prob ok. Like I said run it and when it's warm do a compression and leakdown. Mark on the crank bolt and plastic where tdc is so it's easy when engines in. Good luck
818S frame #13 Jdm version 8 ej207
-
Senior Member
Thanks Metalmaker, will do. We are very relieved. We will still have to chase down that CEL, but at least it doesn't seem like it's going to involve an engine rebuild. Knock on wood.
We pulled apart the axles and cleaned them up tonight, as well as the leakdown test done. Tomorrow is autocross with the Miata - hopefully I'll remember everything I learned at the Evo School. XXguitarist beat me by .002 seconds last time.
-
Senior Member
Originally Posted by
Tamra
Dan, that looks like a fun course. How long did it end up being at full speed? You definitely get your money's worth on courses that big. Our local club runs courses that are closer to 30-40 seconds, and tight.
Usually they are over 90 seconds, Here is the first real video that someone posted to facebook. Patrick has a Scion TC that makes serious HP and is lightened over 500 lbs from stock
http://youtu.be/MokMdbkWDKM
Pre reg had almost 100 people, we usually get 5-7 runs a day up at Loring, not bad for $35
Dan
818S #17 Picked up 8/1/13 First start 11/1/13 Go Kart 3/28/14
-
Senior Member
No wonder they let you guys drive the course instead of walk it, Dan!
Our autox went well this last weekend. Evo School must've made a huge difference, because I've been trailing two guys all season, one with a GTI by about 1 raw second, another with a BRZ by about .4 pax seconds. I came in ahead of the BRZ, and ended up .4 raw seconds ahead of the GTI (although he got me by .05 pax seconds! So close). Basically, it means I was driving about 1.4 raw seconds faster on a 45 second course than I was two weeks ago. I still have areas I can pick apart my runs, but I was still pretty excited to feel the progress. XXguitarist also shaved off nearly 1 raw second, and we are now tied in the overall standings by points.
Here's a video of my fastest lap. Ignore the vacuum/boost gauge, we forgot to remove that and so it's not calibrated correctly. Our Miata is stock, not turboed!
http://youtu.be/M7oqnVrJIHQ
-
Senior Member

Some stuff from HF is a great deal for the DIYer, some stuff is junk. The HF compression tester I bought was the later. It gave consistent readings, just about 50 psi low. I've heard very similar reports from others on another forum about this same unit.
I rented one from Autozone, their brand is called OEM, and it worked properly. I returned the HF unit.
I wouldn't be surprised if the HF leakdown tester was just as flawed as their compression tester. Try renting one from a local parts store.
-
Senior Member
Tamra, there are a bunch of videos up now, cumberland motor club on facebook
Couldn't agree more with Oppenheimer re HF stuff, great to get wrenches and stuff for limited use, other stuff can be hit or miss. When you need accuracy you need a good tool, beg or borrow as req.
Dan
818S #17 Picked up 8/1/13 First start 11/1/13 Go Kart 3/28/14
-
Senior Member

Originally Posted by
RM1SepEx
Couldn't agree more with Oppenheimer re HF stuff, great to get wrenches and stuff for limited use, other stuff can be hit or miss.
Agreed; I've bought a lot from HF recently to build my 818, but always check the reviews on their website before buying anything from them. Some things are built well and work great (their DA polisher seems just as good as the industry standard Porter Cable at less than half the price on sale). However, some tools are utter garbage.
Is this what you got?:
http://www.harborfreight.com/cylinde...ter-94190.html
If you look, there are a lot of bad reviews that say it doesn't work properly, so that's probably the root cause.
-
Senior Member
We've been absolutely awful about updates lately, for a couple reasons.
1, Sanding, sandblasting, de-greasing, and brake-parts-cleaning things isn't very exciting.
2, We also just got back from a week long roadtrip vacation in "Frog" our Miata up through Maine, New Brunswick, and around Nova Scotia, including the Cabot Trail. We had a great time, and thoroughly enjoyed the seafood!


Now that we're back, things are starting to come together.
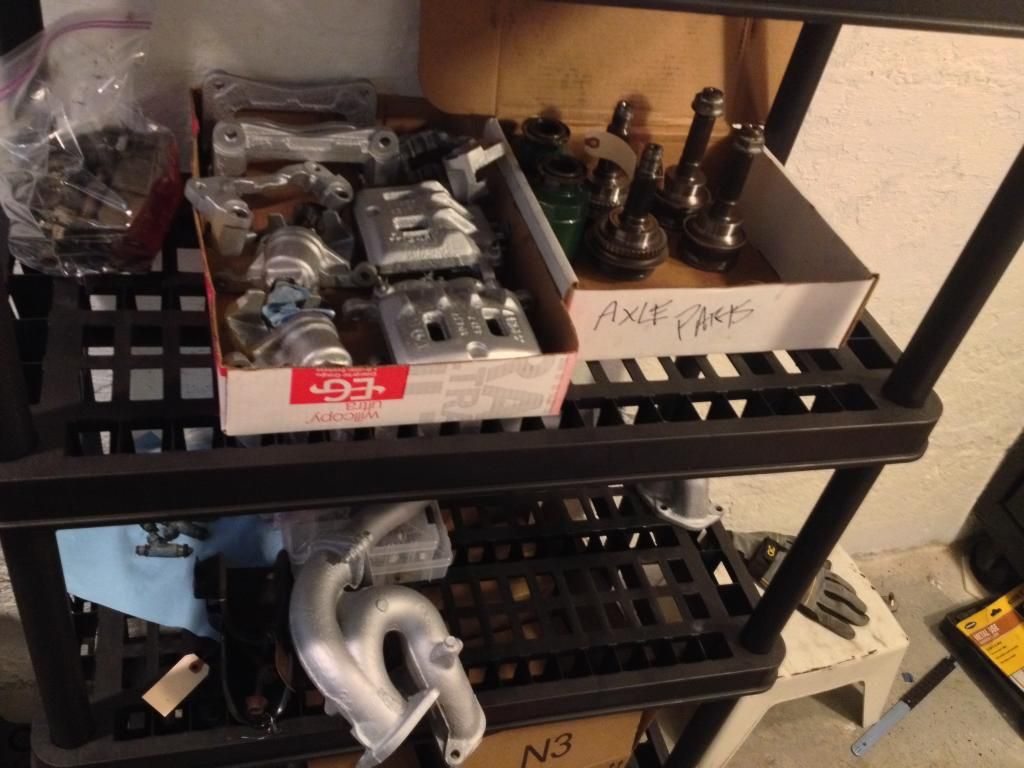
We got our Group N motor & transmission mounts, TGV to intake & block gaskets, Injector seals, OBX "front" LSD, placed a massive Subaru OEM parts order from North Coast Subaru (if you call them, they'll give you a better discount)- STi Oil pan (only $93!), valve cover gaskets, CV joint boots, lots of exhaust related gaskets, etc etc.
We also have finally been making progress on cleaning up parts in a way that feels rewarding. All the calipers are cleaned and painted with the VHT caliper paint, which looks great! The axle parts are all cleaned out from LOTS of old grease packed in there. Hint: Degreaser & a rag first, then when it's almost all out, use WD-40 as a solvent to finish, it worked better than brake parts cleaner to thin the grease.
We also painted the OEM header with another VHT product. Before & After:
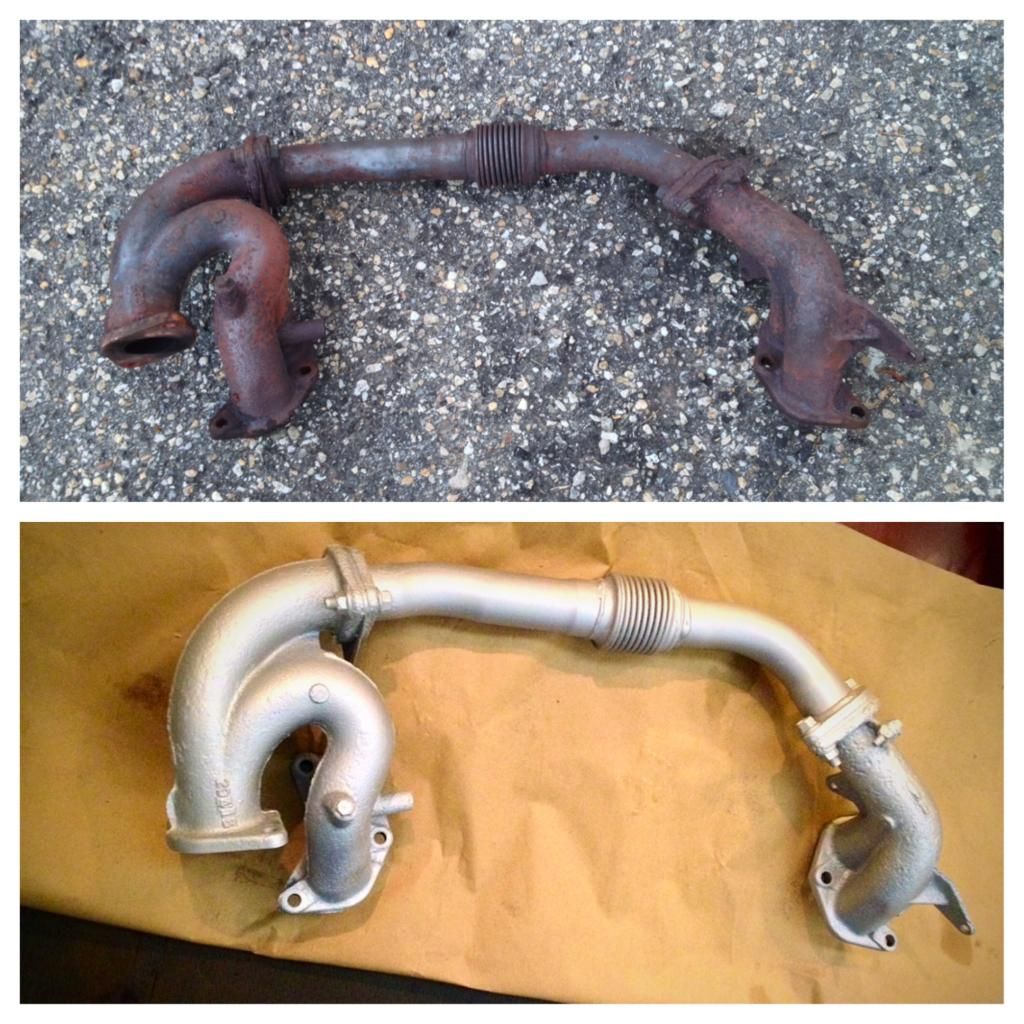
Other parts on the list to order are an Exedy Stage 1 Heavy Duty Clutch and ACT Street Lite flywheel, an AWIC (most likely Frozen Boost), FFR lateral links set, steel braided brake lines, a cheap CAT to get through emissions, and racing seats TBD.
On Tuesday we took another trip up to FFR to check out the new options, sit in the 818S that wasn't available last time we were there, and see the new red R car.
We knew we needed to get a better idea of what to expect with the kit, and it was a valuable trip.
Things we figured out:
- Wipers are an option, not included. We'll probably have a go at setting up our own, but FFR's kit looks pretty nice.
- The trunk kit is decent sized, and most of the way ready. We'll probably make our own to fit around the AWIC kit that we've decided to go with.
- Body panels are not perfect, but they're pretty good. We think we'll be OK with some wrap.
- Seating and steering positions are pretty good for us, although we will need a rather low seat mount to pass the "broomstick" rule.
- Kits will be coming with the "old" gas tank for a while still.
- Shifter as delivered isn't mushy at all, if anything, it's a bit too mechanical feeling, it'll take some time to get used to. It also sits really high if you don't undermount it in the tunnel.
The red R has a Frozen Boost kit installed:
We've sold a little over $3600 in donor parts so far. We haven't been promoting them as heavily lately, so things slowed down a bit. We are pretty confident we will still hit over $4k before long, especially since we just listed an STI TMIC and some extra exhaust parts.
Last edited by Tamra; 09-05-2014 at 12:23 PM.
-
Senior Member
Originally Posted by
Tamra
We also just got back from a week long roadtrip vacation in "Frog" our Miata up through Maine, New Brunswick, and around Nova Scotia, including the Cabot Trail. We had a great time, and thoroughly enjoyed the seafood!
Nice! Looks a lot like PCH through Big Sur. I've had some fun runs on that road in my Z (when not stuck behind an RV). Can't wait to take the 818 on a road-trip like that.
Originally Posted by
Tamra
use WD-40 as a solvent to finish, it worked better than brake parts cleaner to thin the grease.
Now you tell me! I went through a bunch of BrakeClean getting my CVs ready.
Originally Posted by
Tamra
Wipers are an option, not included. We'll probably have a go at setting up our own, but FFR's kit looks pretty nice.
The trunk kit is decent sized, and most of the way ready. We'll probably make our own to fit around the AWIC kit that we've decided to go with.
Good to know, I'll probably order the wipers soon, and will consider the trunk when there's more info on it.
Originally Posted by
Tamra
Seating and steering positions are pretty good for us, for me, I'll need a rather low seat mount to pass the "broomstick" rule.
If you go with fixed back racing seats on side-mounts with a little recline, like I did, you should have no trouble getting under the rollbar. You might, however want to drop the steering wheel a bit, some longer spacers and bolts is all it takes.
-
Senior Member

Originally Posted by
wleehendrick
Nice! Looks a lot like PCH through Big Sur. I've had some fun runs on that road in my Z (when not stuck behind an RV). Can't wait to take the 818 on a road-trip like that.
Now you tell me! I went through a bunch of BrakeClean getting my CVs ready.
Good to know, I'll probably order the wipers soon, and will consider the trunk when there's more info on it.
If you go with fixed back racing seats on side-mounts with a little recline, like I did, you should have no trouble getting under the rollbar. You might, however want to drop the steering wheel a bit, some longer spacers and bolts is all it takes.
The WD40 was especially useful on the ball/retainer style ones. The others, we weren't worried about just removing everything to clean, but after doing the fronts, we figured it might be hard to get everything back in!
We finished off with brake parts cleaner to get the WD40 off, but it would have taken a lot longer without that intermediate step.
That "I" was actually me- I'm around 5'11. FFR's S car has a nice kirkey road race seat mounted up on some 1.5" square tube, which put me almost completely level with the rollbar. We'll just have to get the sliders positioned quite low at the longer end, which should work well for both of us.
-
fasterer and furiouser

Are you planning on running heat shields? if not, cut all those extra bits off the manifolds, it really cleans it up and saves some weight.
FFRs wiper kit looks ok, but hacking up the hood seems pretty whack, I wonder if they'll offer a hood with a bump up near the lass instead.
A well stocked beverage fridge is the key to any successful project.
-
Senior Member
Originally Posted by
xxguitarist
That "I" was actually me- I'm around 5'11. FFR's S car has a nice kirkey road race seat mounted up on some 1.5" square tube, which put me almost completely level with the rollbar. We'll just have to get the sliders positioned quite low at the longer end, which should work well for both of us.
I'm 5'11" also, and with NRG seats mounted low I have adequate clearance. I have a slider for the driver's side so my wife will be able to reach the pedals. Without a Boyd tank, there's very little range of motion, with the firewall moved back around 3" it works for me pushed back, and she should be able to reach with it forward.
-
Senior Member
Tamra & I don't think we'll need the boyd or FFR's new tank, we hope. We both like to be up pretty tight on the wheel for auto-x.
I'll probably be a little closer than preferred for street driving, but oh well. Just hope I can get into & out of the car with the stock (non-quick release) steering wheel in place..
-
Senior Member
Yeah, get your seats first and mock it before you commit to replacing the tank. I got the Boyd tank and modded the firewall not for extra reach (a hub for an aftermarket wheel will probably push the wheel closer), but leg-room. I hate the bent-knee, straight-arm, 'Italian' ergonomics, so I had to tinker with it.
As I mentioned, I lowered my wheel, which you'll probably want to do also with a low mounted racing seat. I kept the tilt adjust on the column functional and set it up so adjusted high it's not too bad to get into/out of (with a 320mm wheel) but to high for comfortable driving. Once seated, use the tilt to drop it down. So I have a pretty low position, but didn't have to go to a removable or flat-bottomed wheel.
-
Senior Member
-
818 builder
Need more pics of crank, but the rest is definitely a scamer theme. I hope all runs well for you guys , next time your going to be around just give me a few days heads up and I can set something up.happy building
818S frame #13 Jdm version 8 ej207
-
Senior Member
What photos/angles would help with ID'ing the crank? (you know, within the restrictions of leaving the block built)
Will let you know next time we're going to be heading through!
-
818 builder
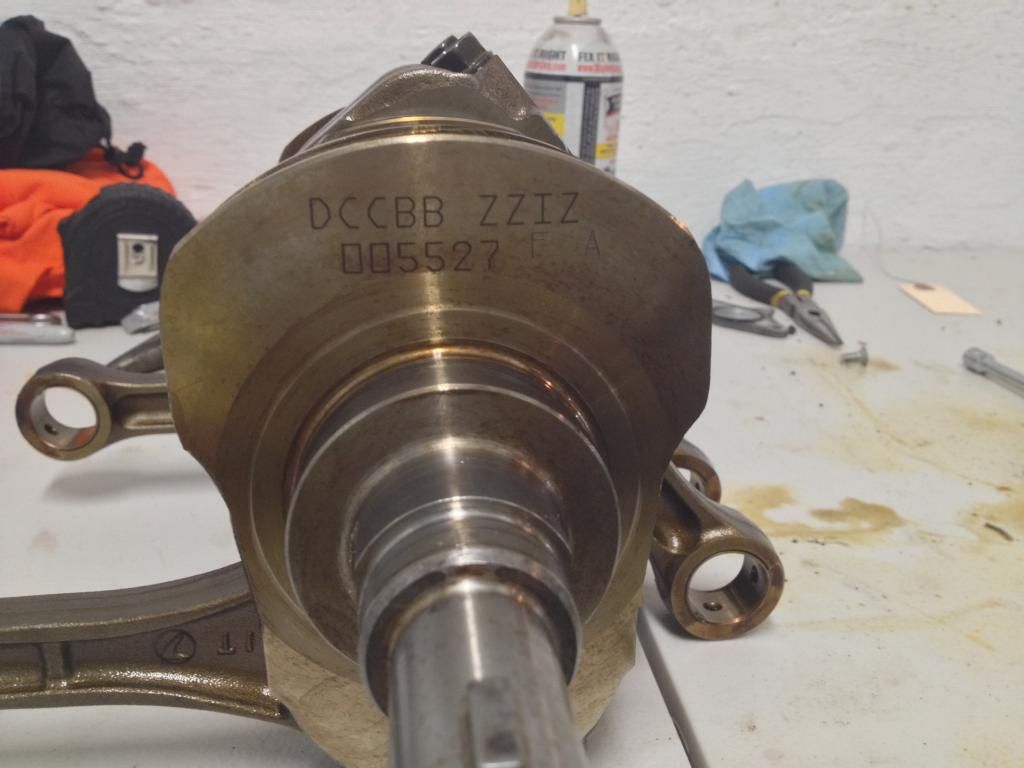
You gotta be able to see these numbers, remove the baffle and post what you have. We will go from there. Here's and example image.jpg
818S frame #13 Jdm version 8 ej207
-
Senior Member
Would that be on the extreme rearward or forward end of the crank?
None of the in-between surfaces had any markings.
The baffle that sits under the oil pickup is off. Not much to be seen.. Just a crank that's a little less black looking than anticipated, on the faces.
-
818 builder
You gotta be able to see these numbers, remove the baffle and post what you have. We will go from there. Here's and example image.jpg
818S frame #13 Jdm version 8 ej207
-
818 builder
Sorry posted it twice, thought it didn't post.
818S frame #13 Jdm version 8 ej207
-
818 builder
That's true you prob won't be able to see it. You might catch a slight viewing angle, but prob not good enough to make much out. That's about all I can say sadly. The ID is on the foward most side.
Last edited by metalmaker12; 09-15-2014 at 03:19 AM.
818S frame #13 Jdm version 8 ej207
-
fasterer and furiouser
Did he claim to have the motor built or bought the car with that setup?
My guess is "the guy I bought it from told me..."
I would return your valve cover gaskets and get a Subaru master gasket set, pull the heads and see if anything the guy said was accurate.
Best case you'll have some nice fresh head gaskets, worst case you'll realize you need a rebuild but you'll be halfway there.
Otherwise I would start to worry if I had a stock short block, and possibly a poorly assembled long block
Last edited by longislandwrx; 09-15-2014 at 07:26 AM.
A well stocked beverage fridge is the key to any successful project.
-
Senior Member
He built the motor aprox 16k mi before we bought the car from him, following blowing the stock motor.
It's certainly a 2.5L block, and I do believe they're 2L heads, and the car was running pretty well when we bought it.
The fuel pump, injectors, etc were upgraded as described, just the brand was wrong on the pump. Flow ability was comparable.
The oil pickup was listed as a "recent maintenance item" along with the timing belt & water pump (which do look relatively fresh)
-
fasterer and furiouser
ok then perhaps you are fine. I would just be concerned if I paid for a built block and ended up with a stock one, a killer b pickup is a pretty bold lie as its so prominent and easy to check.
A well stocked beverage fridge is the key to any successful project.
-
Senior Member
Agreed. We're deff considering pulling the heads. Not all that bad to do it at this point, and the JE pistons that it's supposed to have would have a significant impact on the CR that the engine actually has, being a hybrid build.
-
Senior Member
-
That's unfortunate your motor was "misrepresented". Do you still have the original seller's contact information? I think they owe you an explanation and some money.
-
Senior Member
Agreed.. We do have his contact information, and have tried to get in touch. We'll send him some registered mail for a fun little "date" next.
-
818 builder
What a liar, stock short block with miss matched head bowls, what a jerk.
818S frame #13 Jdm version 8 ej207
-
Senior Member
Yeeeep.
Opinions seem to vary on the heads. Some claim quench is improved by the mismatch, others say it's harder to tune around.
We'll have to decide which way to go, especially since when we install those low compression JE pistons, it'll be dropping our CR to about where we want, machining the heads might put us too low?
In other news, the turbo is juuuust within tolerance on axial play, and well within spec on the deflection at either end. We'll run it for a while, and probably start saving the pennies for an upgrade.
-
fasterer and furiouser
Originally Posted by
xxguitarist
others say it's harder to tune around.
Originally Posted by
metalmaker12
What a liar, stock short block with miss matched head bowls, what a jerk.
Originally Posted by
longislandwrx
Otherwise I would start to worry if I had a stock short block, and possibly a poorly assembled long block
bummer. :|
A well stocked beverage fridge is the key to any successful project.
-
Senior Member
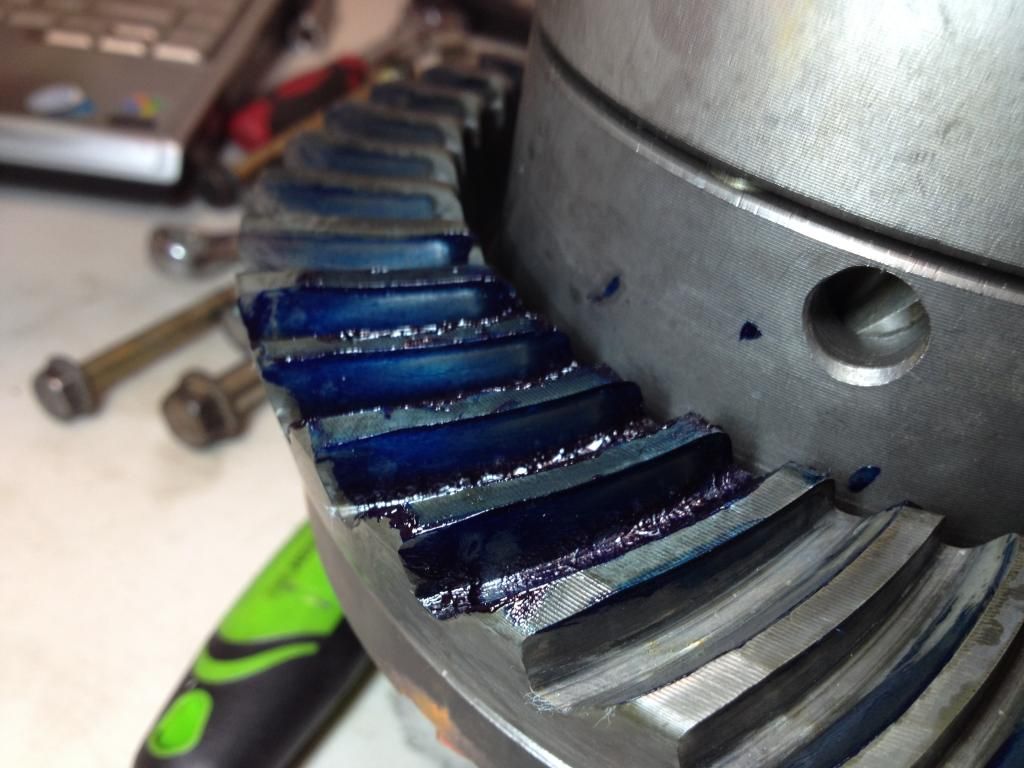
Well the short block is fully disassembled:
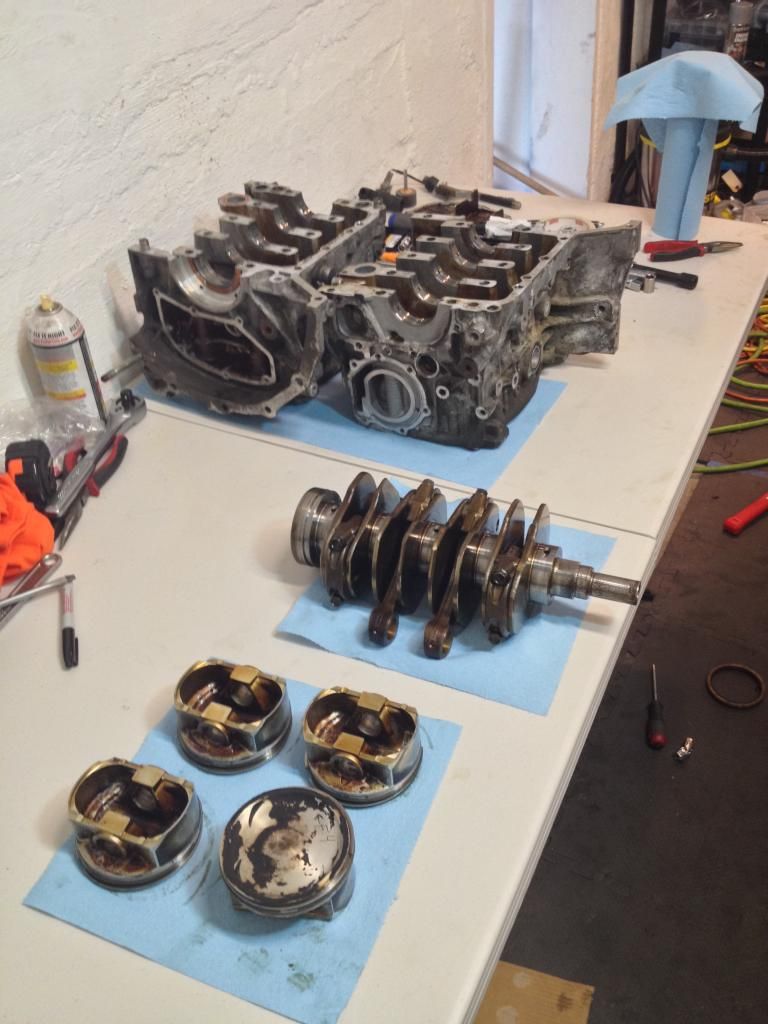
Looks like OEM pistons, rods, and crank, but it's been opened up before because the bearings were ACL. Everything looks in pretty good shape. Good crosshatching on the cylinder walls.
Metalmaker, you mentioned you could tell what our crankshaft was by these numbers? We tried Google and couldn't figure it out. Any ideas? We will measure tomorrow or the next day to confirm if it's 75mm or 79mm.
-
fasterer and furiouser
Those are just factory machining numbers and as far as I know don't tell you about the composition/treatment.
From the look of it that just looks like a plain ol' 12200AA370 pre 2008 crank. not a 12200AA430 (nitrided) or a 12200AA330 (induction hardened).
get those rods off... there's a chance he was getting rod knock and just changed out the bearings :/
Last edited by longislandwrx; 09-29-2014 at 06:50 AM.
A well stocked beverage fridge is the key to any successful project.
-
Senior Member
Thanks Longislandwrx. We'll be replacing everything... looking for opinions on our possible motor build now:
http://thefactoryfiveforum.com/showt...build-opinions
-
Senior Member
We decided on our engine build plan and purchased the parts today.
We are going to build a 2.34L destroked short block, built for up to 650whp, but we will be tuning it to around 350whp. 2.0 Heads will have an upgraded valve train. Oiling will be our limiting factor, so we will be running it at 8k rpm max to start. We are still deciding on the turbo.
Fidelis Motorsports is helping us meet our build goals (and budget) and will help us tune the car when we get it going. We will be doing all of the assembly. Larry's Power will be doing the machine work on the heads and block and balancing the rotating assembly.
2.34L destroked short block
-MPS +2mm H Tuff rods
-JE FSR Pistons
-75mm WRX crank
-upgraded Tool Steel Wrist Pins
-King Race and Main Bearings
-ARP Subaru EJ Series DOHC Headstuds
Supporting mods:
STI oil pan
Killer B Motorsport Ultimate Oil Pickup
Killer B Motorsport Oil Baffle Windage Tray
OEM oil pump
Partial TGV deletes
Cobb intake
NGK 1-step colder plugs
Header TBD for twin scroll
STI catless up-pipe (TBD for twin scroll)
Forge full recirc bpv
Grimmspeed ebcs
255lph fuel pump
Gates Racing Timing Belt
Group N engine and transmission mounts
Frozenboost AWIC
2.0 Chamber Matched Machined Heads
-Shimless buckets
-GSC Beehive Valve Springs w/ Titanium Retainer Valvetrain Kit
-GSC Chrome Polished Intake Valve
-GSC Chrome Polished Exhaust
-Injector Dynamics Fuel Injectors Top Feed 1000cc
Other items:
ACT StreetLite Flywheel
South Bend Stage 2 Endurance Clutch
OBX LSD (upgraded washers/bolts)
FFR adjustable lateral links
Stainless steel braided brake lines
Cobb 27mm sway bar (TBD if we use this or a smaller one)
Koni 30 series shocks with 500lb springs (R package)
Race seats TBD
Wheels TBD (likely RPF1's) with Hoosier A6's
The car will be street legal and registered
Other project creep TBD
Last edited by Tamra; 10-10-2014 at 05:24 AM.
-
Senior Member
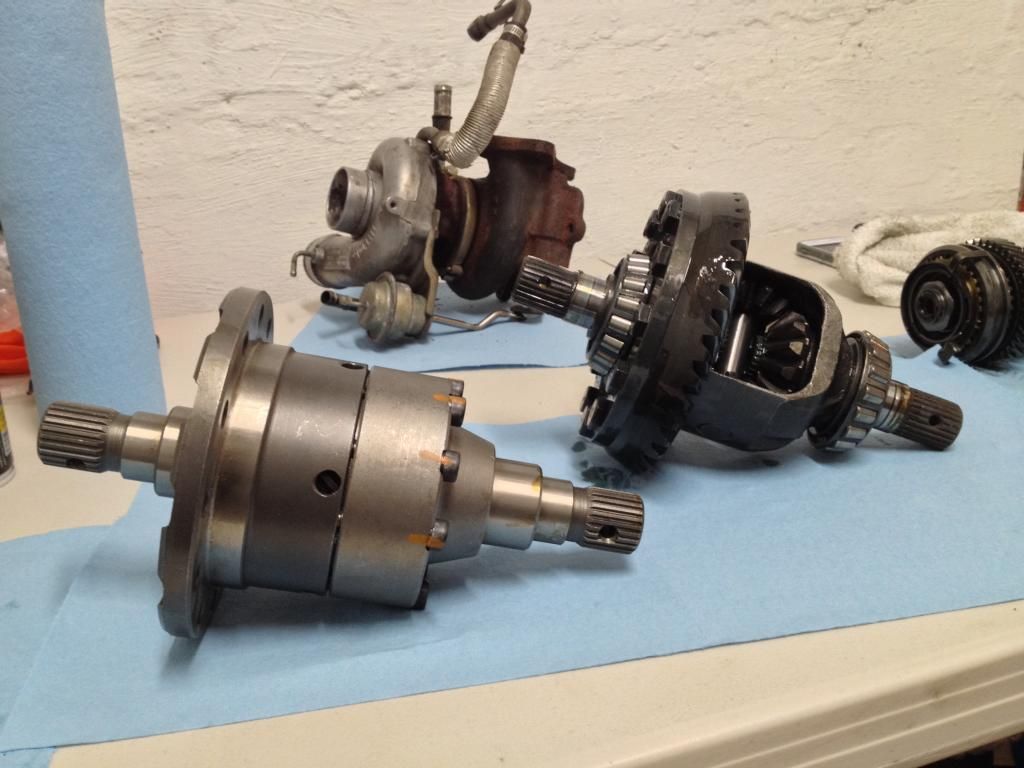
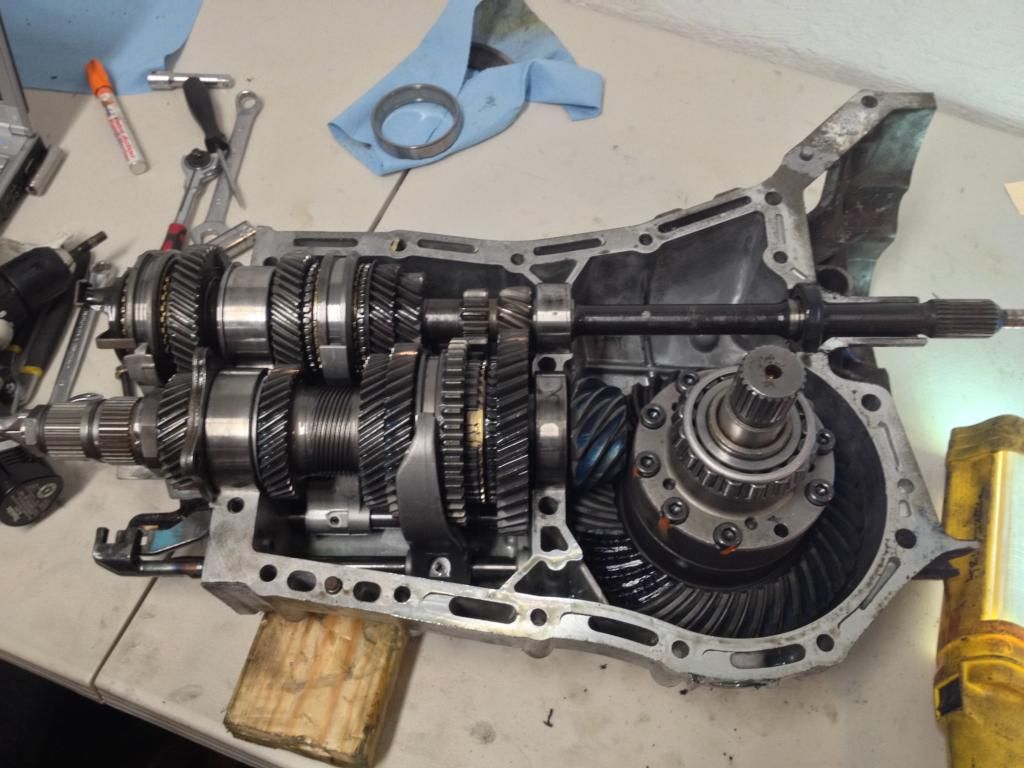
We installed the OBX limited slip today. We upgraded the washers and bolts, and followed Eric Treve's guide here. It was actually very easy, with the only pain being how much time it took to torque the bolts properly. We also swapped the bearings over from the old open front diff to the OBX. Removing them without damaging them was a little challenging, but using an arbor press, some thin walled aluminum tubing, and a piece of steel cut to match, we got them off. Pressing them on the OBX was a piece of cake since they just slide right on.
Old and new (prior to bearing swap):
Between the factory service manual and Jaime's thread here, we are pretty confident that we figured out how to adjust the backlash properly
Here's some photos of the marks - please critique away if you see any issues.
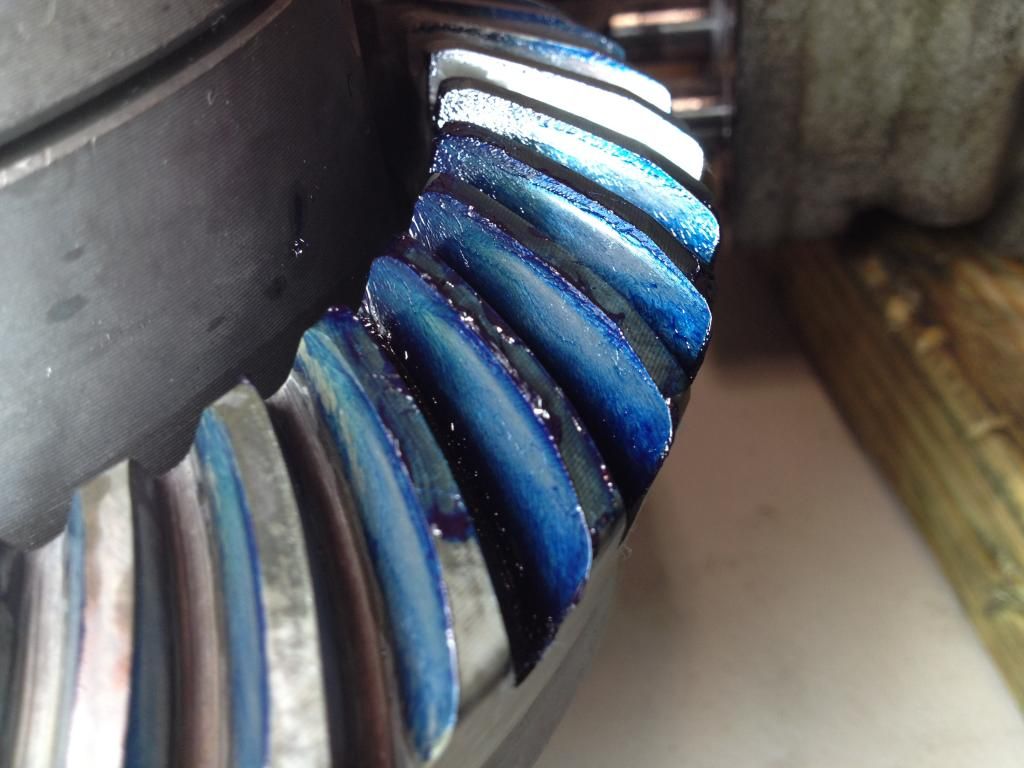
Final product:
Now we're just waiting on our latest order from Subaru to install some new seals and close it up.
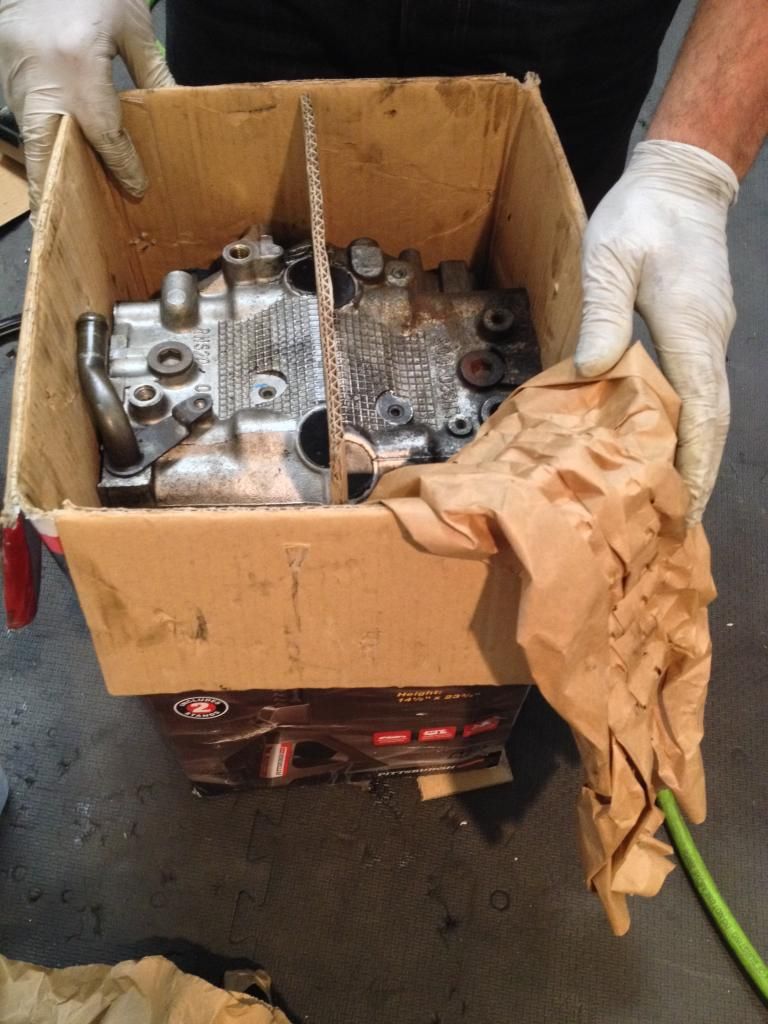
In case you ever need to ship your Subaru heads anywhere, Jackstand boxes are a perfect fit. Shipped ours off today to get the chambers matched the EJ257 block.
Exciting parts starting to filter in... We ordered from Fidelis on Thursday at lunch, and these packages showed up on Friday! The other half of our parts are due Monday. Now that's fast service! The Konis are for our Mazdaspeed3. Unfortunately we can't start our engine build yet, since our OEM Subaru parts aren't here yet... still waiting on the 75mm crank and then have to send it off to the machine shop for balancing. We're hoping to be able start putting our engine together the weekend of the 17th, which is the weekend before our 818 kit will be ready for pickup!

Still have the engine build and the wiring harness left as the big ones to work on, then just some general smaller parts cleanup left.
Lots of tools to buy too, since we'll need a micrometer good to a tenth of thou and a bore gauge to the same. Also, a good valve spring compressor and piston ring compressor. We've never done anything like this before, but we've been taking it one step at a time and it's been a fun learning experience so far.
Time to start researching turbos. It's hard to find a non twin scroll that is capable of 350whp and spool by 3.5k... so we're looking into what it would take to do the Borg Warner S200SX. Also, we have to figure out whether we are going to shim our 10mm oil pump or go with a different one too... so much research.
We are at over $4100 in parts sales to date, and just listed all of the engine parts and our VF22 turbo, which is already pending sale.
 Posting Permissions
- You may not post new threads
- You may not post replies
- You may not post attachments
- You may not edit your posts
-
Forum Rules

Visit our community sponsor


 Reply With Quote


