Forte's

Visit our community sponsor

Thanks Thanks:  0
Likes Likes:  0
Results 1 to 25 of 25

Thread: Mkiv dash installation

  1. #1
    Senior Member NICK C's Avatar
    Join Date
    Jul 2011
    Location
    Lawton, Oklahoma
    Posts
    299
    Post Thanks / Like

    Mkiv dash installation

    I am getting ready to start dash installation on my MKIV and am mot sure of how the ends of the dash are to be shaped and the best way to do it. I understand that they bend back in behind hinges but to what degree? Do the ends actually attach or just suspend out. Any pics of the process would be appreciated. Thanks Nick C

  2. #2
    Not a waxer Jeff Kleiner's Avatar
    Join Date
    Feb 2011
    Location
    Bloomington, Indiana
    Posts
    8,069
    Post Thanks / Like
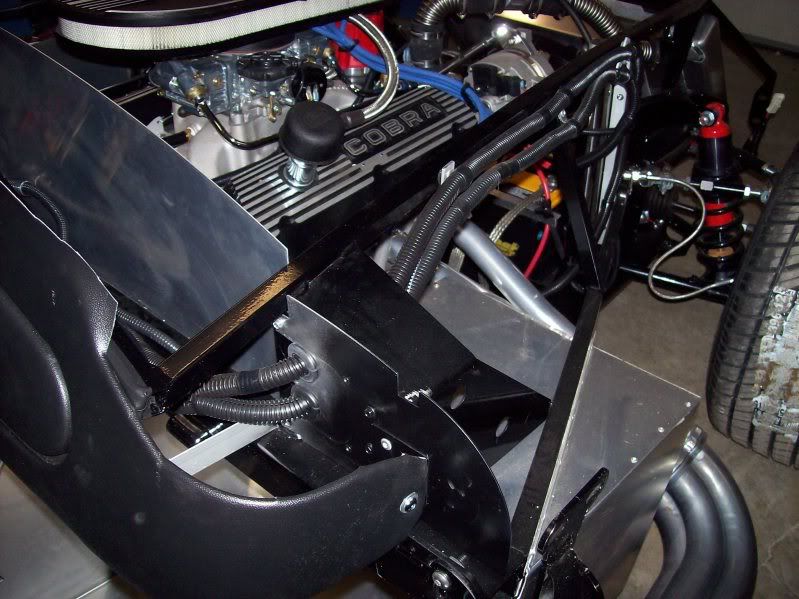
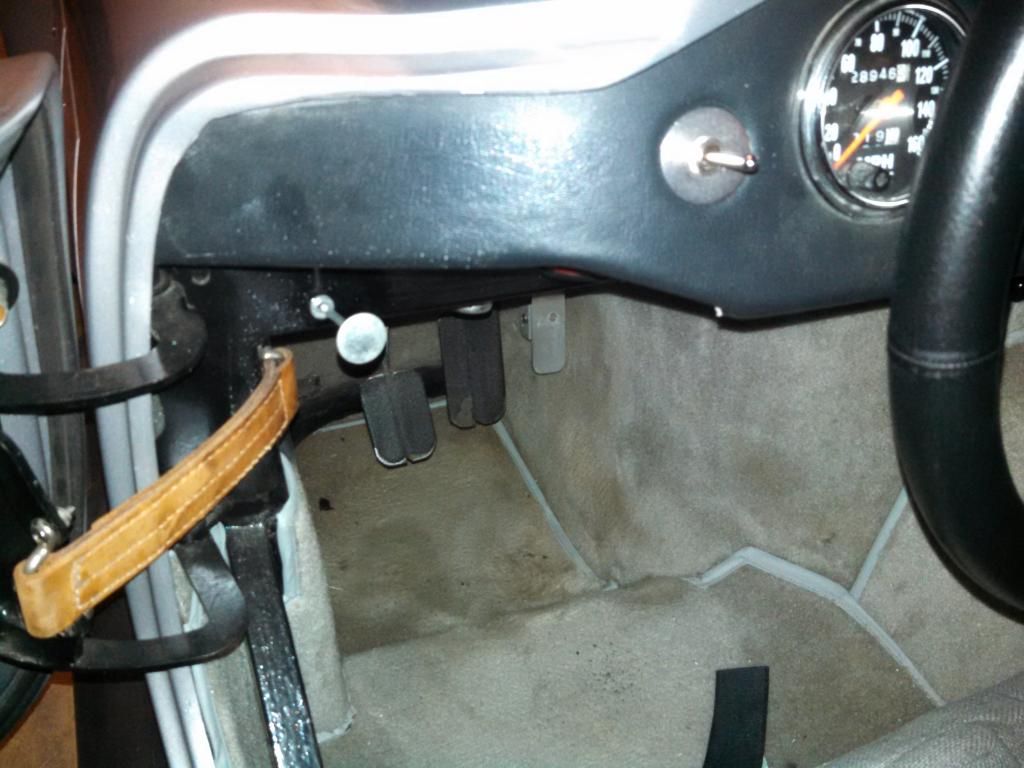
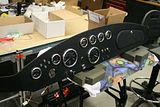
    FFR says to tuck the dash ends behind the hinges but I don't care for that and use some simple brackets to secure it to the firewall extension on the passenger side. The end is trimmed a bit to accomplish this. Although this photo isn't focused on it you can see how it was done:


    The driver's side does not have a firewall extension but a similar angle bracket attached to the 2X2 tube accomplishes the same thing (green arrow). BTW, the photo with the colored pointers is a leftover from another post but if you're curious the red arrow shows the location of one of the adjustable dash mounts and the blue arrow indicates one of the lower supports.


    If it ever needs to be removed the sides are secured using chrome buttonhead bolts with nuts on the backside which are accessable from below.

    Cheers,
    Jeff

  3. #3
    Senior Member CraigS's Avatar
    Join Date
    Feb 2011
    Location
    Blacksburg, Va
    Posts
    4,728
    Post Thanks / Like
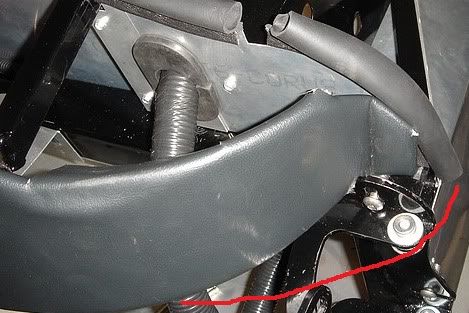
    I prefer to let it go out against the inside of the body like the red line in this pick.

    This covers up a lot of the top of the hinge and the frame. My MkII has the dash end just slightly shortened and it fits tightly between the hinge plate and the body so no attachment screws needed.

    Also while thinking about the dash, you might want to look into lowering the attachment points. If done per the manual the body covers the screws meaning the body needs to be moved to remove the dash. Look for Bill3422s' build thread to see what he did.
    FFR MkII, 408W, Tremec TKO 500, 2015 IRS, DA QA1s, Forte front bar, APE hardtop.

  4. #4
    Senior Member NICK C's Avatar
    Join Date
    Jul 2011
    Location
    Lawton, Oklahoma
    Posts
    299
    Post Thanks / Like
    Great photos Jeff. They help a lot. Do you just hand bend the ends or mechanically roll them? Much appreciated Nick

  5. #5
    Senior Member NICK C's Avatar
    Join Date
    Jul 2011
    Location
    Lawton, Oklahoma
    Posts
    299
    Post Thanks / Like
    Thanks for the info Craig. The manual isn't that clear. Nick

  6. #6
    Senior Member edwardb's Avatar
    Join Date
    Feb 2011
    Location
    Lake Orion, Michigan
    Posts
    10,568
    Post Thanks / Like
    The dash ends can be rolled by hand pretty easily using a round shape such as a quart paint can.
    Build 1: Mk3 Roadster #5125. Sold 11/08/2014. Build 2: Mk4 Roadster #7750. Sold 04/10/2017. Build Thread
    Build 3: Mk4 Roadster 20th Anniversary #8674. Sold 09/07/2020. Build Thread and Video. Build 4: Gen 3 Type 65 Coupe #59. Gen 3 Coyote. Legal 03/04/2020. Build Thread and Video
    Build 5: 35 Hot Rod Truck #138. LS3 and 4L65E auto. Rcvd 01/05/2021. Legal 04/20/2023. Build Thread. Sold 11/9/2023.

  7. #7
    Not a waxer Jeff Kleiner's Avatar
    Join Date
    Feb 2011
    Location
    Bloomington, Indiana
    Posts
    8,069
    Post Thanks / Like
    Quote Originally Posted by edwardb View Post
    The dash ends can be rolled by hand pretty easily using a round shape such as a quart paint can.
    Or not! I just eyeball them.

    Jeff

  8. #8
    Senior Member NICK C's Avatar
    Join Date
    Jul 2011
    Location
    Lawton, Oklahoma
    Posts
    299
    Post Thanks / Like
    Thank you gentlemen. Nick

  9. #9
    Senior Member CraigS's Avatar
    Join Date
    Feb 2011
    Location
    Blacksburg, Va
    Posts
    4,728
    Post Thanks / Like
    If you do it the way I did just give them a little bit of a start of a bend. Having outward spring to the panel keeps it tight against the underside of the body so it stays wedged in position.
    FFR MkII, 408W, Tremec TKO 500, 2015 IRS, DA QA1s, Forte front bar, APE hardtop.

  10. #10
    Senior Member NICK C's Avatar
    Join Date
    Jul 2011
    Location
    Lawton, Oklahoma
    Posts
    299
    Post Thanks / Like
    That makes sense Craig. Does the dash sit flush with the hoop or down some. Since I don't have the body on I'm trying to visualize if there's a gap to be seen between body and dash.

  11. #11
    Not a waxer Jeff Kleiner's Avatar
    Join Date
    Feb 2011
    Location
    Bloomington, Indiana
    Posts
    8,069
    Post Thanks / Like
    Nick,
    Let the vinyl run long along the top of the dash then tuck it back behind the body lip. Look at the pics I posted above and you'll see how it kinda' runs wild at the top edge.

    Jeff

  12. #12
    Senior Member NICK C's Avatar
    Join Date
    Jul 2011
    Location
    Lawton, Oklahoma
    Posts
    299
    Post Thanks / Like
    Ah I see that now. Ok Thanks Jeff.

  13. #13
    Senior Member Rotorcraft's Avatar
    Join Date
    Sep 2011
    Location
    Snohomish,Wa
    Posts
    116
    Post Thanks / Like
    So is it best to curve the aluminum at the edges before, or after gluing on the vinyl to it??

  14. #14
    Senior Member 68GT500MAN's Avatar
    Join Date
    Feb 2011
    Location
    Fresno, CA
    Posts
    1,808
    Post Thanks / Like
    I do not think that it will matter, I used contact cement to glue my dash cover to the aluminum and then bent the ends. No problems were incountered doing it this way.
    Doug

  15. #15
    Senior Member smithbks's Avatar
    Join Date
    Mar 2014
    Location
    Atlee, VA
    Posts
    152
    Post Thanks / Like
    I did the same and glued it first then bent it around a coffee can. Gluing it first seems easier because everything is flat and you can line it up well - especially with contact cement. The vinyl, and in my case padding, stretch without any problem.
    Mk4 #8340, 351w/427, 3-link, Wilwood 4 piston rear brakes, 3.27 gear, TKO600, delivered June 18th, 2014

  16. #16
    Senior Member edwardb's Avatar
    Join Date
    Feb 2011
    Location
    Lake Orion, Michigan
    Posts
    10,568
    Post Thanks / Like
    I've done it both ways. Covered then bent. Bent then covered. Either works and probably not worth worrying about. Either will work. Whichever you're more comfortable with.

    At the ends, I normally have about 1/2 inch wrapped around on the back side, with pie-cuts every inch or two and then glued to the back. The only very slight advantage I noticed was the wraparound on the back puckered a bit when bent after covering. The other consideration I had was I used Alec's glovebox and vinyl on my Mk4. I really like the look and the vinyl is nice. But it's relatively soft compared to the standard FFR stuff. I didn't want to bend with the vinyl in place just in case I might damage it. So for my Mk4, bent it first, confirmed the fit in the chassis, then covered.


    Last edited by edwardb; 11-12-2014 at 09:44 AM.
    Build 1: Mk3 Roadster #5125. Sold 11/08/2014. Build 2: Mk4 Roadster #7750. Sold 04/10/2017. Build Thread
    Build 3: Mk4 Roadster 20th Anniversary #8674. Sold 09/07/2020. Build Thread and Video. Build 4: Gen 3 Type 65 Coupe #59. Gen 3 Coyote. Legal 03/04/2020. Build Thread and Video
    Build 5: 35 Hot Rod Truck #138. LS3 and 4L65E auto. Rcvd 01/05/2021. Legal 04/20/2023. Build Thread. Sold 11/9/2023.

  17. #17
    On a roll Al_C's Avatar
    Join Date
    Aug 2014
    Location
    Wheaton, IL
    Posts
    1,413
    Post Thanks / Like
    Reviving an old thread because I need to address this challenge this weekend...

    1. I'm doing a veneer so I need to bend the dash before I glue anything. It looks like if I do Craig's approach, the dash goes OVER the door hinge, yes?

    2. If I take Jeff's approach, I mount the ends INSIDE the hinges? Did you fabricate the right angle pieces or do I have them in a box somewhere? (Cut me a little slack - I'm on the road...)

    3. I need to expand the openings for the speedo and tach, but probably not as much as the preset cuts in the dash - or does it not matter? Normally the folded vinyl would take up the slack. The question is if I need an exact hole or if screwing down the retaining ring will hold the gauge sufficiently. Your thoughts?
    Mk IV Roadster - #8650 - delivered 7-17-2015 - first start 7-28-2018 - first go-kart 10-13-2018 - licensed and on the road 9-9-19: body/paint completed 3-17-2020.
    Complete kit / 2015 Coyote / TKO600 / IRS / Wilwood brakes / Mid-Shift mod / Power Steering / Heater and Seat Heaters / RT turn signal / Breeze radiator shroud and mount

  18. #18
    Senior Member edwardb's Avatar
    Join Date
    Feb 2011
    Location
    Lake Orion, Michigan
    Posts
    10,568
    Post Thanks / Like
    Quote Originally Posted by Al_C View Post
    Reviving an old thread because I need to address this challenge this weekend...

    1. I'm doing a veneer so I need to bend the dash before I glue anything. It looks like if I do Craig's approach, the dash goes OVER the door hinge, yes?

    2. If I take Jeff's approach, I mount the ends INSIDE the hinges? Did you fabricate the right angle pieces or do I have them in a box somewhere? (Cut me a little slack - I'm on the road...)

    3. I need to expand the openings for the speedo and tach, but probably not as much as the preset cuts in the dash - or does it not matter? Normally the folded vinyl would take up the slack. The question is if I need an exact hole or if screwing down the retaining ring will hold the gauge sufficiently. Your thoughts?
    1. The ends can be inside or on top of the door hinge mounting tabs. Either works.

    2. There are no brackets included in the kit for mounting the dash ends. If you want them fixed, then you'll need to fab something. I've done it both ways. Fixed or left loose. Leaving them loose seems to be fine.

    3. I recommend having the holes in the dash fit the gauges pretty snuggly. I can only speak for Speedhut. The flanges aren't real large, so you don't want the holes too big.
    Build 1: Mk3 Roadster #5125. Sold 11/08/2014. Build 2: Mk4 Roadster #7750. Sold 04/10/2017. Build Thread
    Build 3: Mk4 Roadster 20th Anniversary #8674. Sold 09/07/2020. Build Thread and Video. Build 4: Gen 3 Type 65 Coupe #59. Gen 3 Coyote. Legal 03/04/2020. Build Thread and Video
    Build 5: 35 Hot Rod Truck #138. LS3 and 4L65E auto. Rcvd 01/05/2021. Legal 04/20/2023. Build Thread. Sold 11/9/2023.

  19. #19
    Senior Member
    Join Date
    Jul 2016
    Location
    Vermilion,OH
    Posts
    230
    Post Thanks / Like
    I would suggest test fitting the speedo and tach in the precut holes at the beginning before the cover is glued on. On the 289, precut holes were 3 3/8", much to my surprise, the vintage gauges supplied by FF needed 3 3/4" holes. I discovered this after gluing leather on. Fortunately, was able to open up the holes with a deburring bit carefully. Then the ring that tightens on the back of gauge hit the tube hoop the dash mounts to, so had to move entire dash down about 1/8" and re drill screw holes in the hoop tube.

  20. #20
    On a roll Al_C's Avatar
    Join Date
    Aug 2014
    Location
    Wheaton, IL
    Posts
    1,413
    Post Thanks / Like
    Yup, did trial fit the gauges. These are the vintage gauges. The fully cut hole in the dash is too small. For lack of a better way to describe it, there are pre-cuts that would be too large. If I'm going to get the diameter close - as EdwardB suggests - then I need to draw my own lines and cut out that way. I figured that's what I'd need to do - you guys are just confirming it. The dremel is probably the best way to accomplish that. I'll post some photos this evening and seek feedback before I do anything rash...
    Mk IV Roadster - #8650 - delivered 7-17-2015 - first start 7-28-2018 - first go-kart 10-13-2018 - licensed and on the road 9-9-19: body/paint completed 3-17-2020.
    Complete kit / 2015 Coyote / TKO600 / IRS / Wilwood brakes / Mid-Shift mod / Power Steering / Heater and Seat Heaters / RT turn signal / Breeze radiator shroud and mount

  21. #21
    Senior Member phileas_fogg's Avatar
    Join Date
    Jun 2015
    Location
    Fairfax Station VA
    Posts
    1,235
    Post Thanks / Like
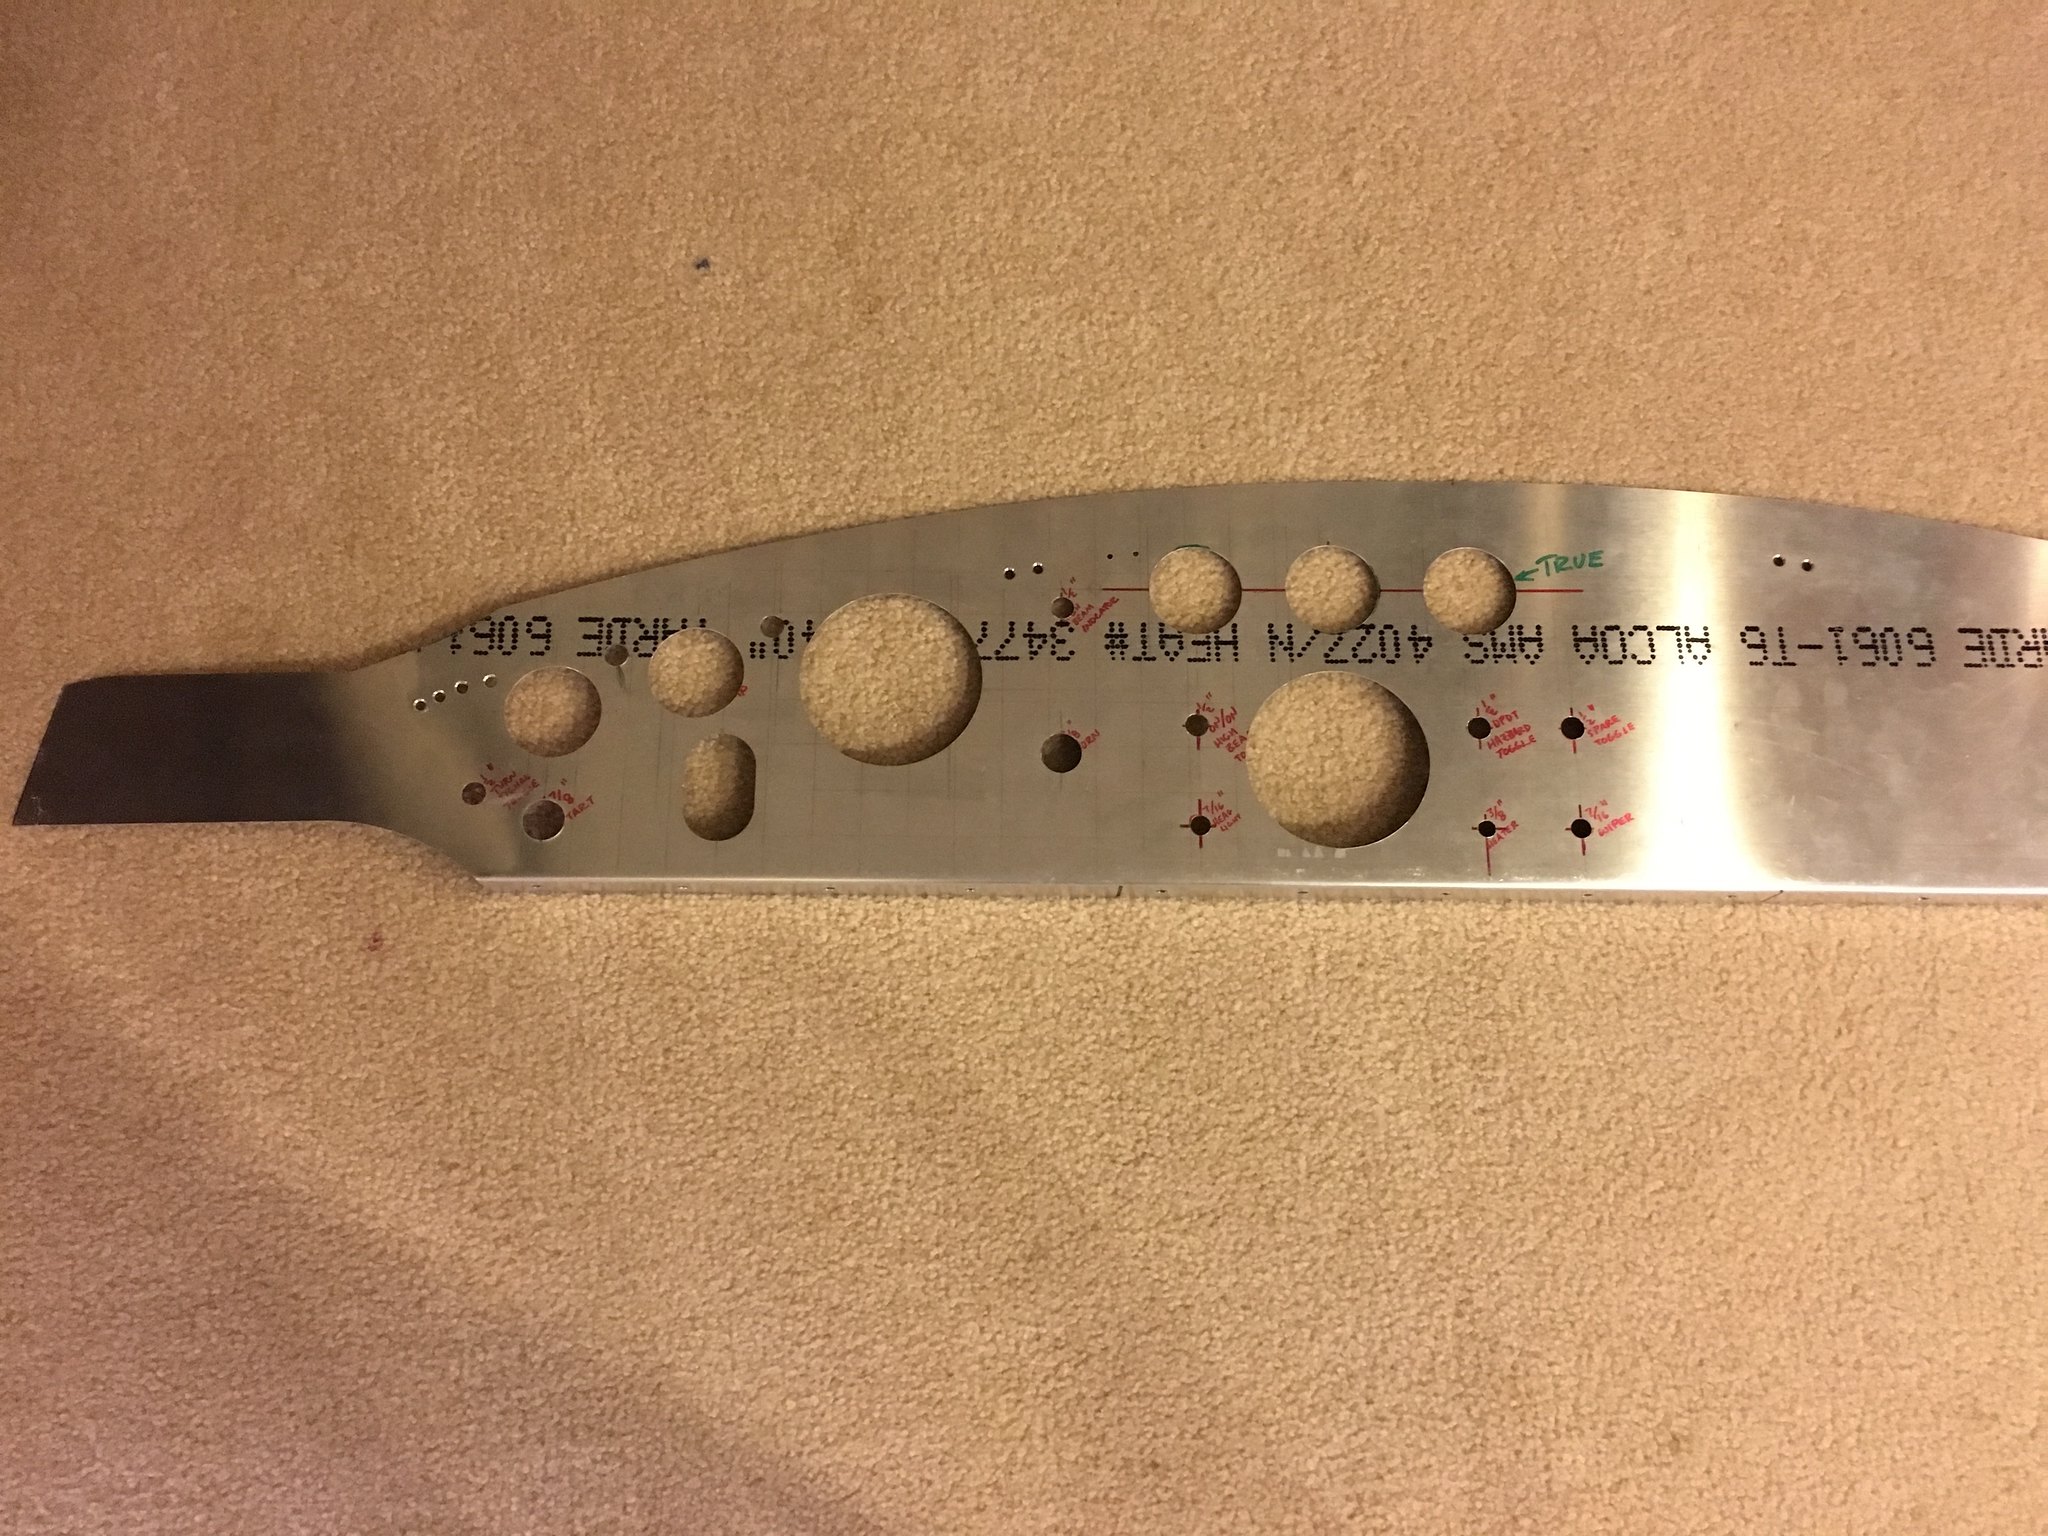
    I just cut holes in my blank dash for the F5 classic gauges. A "snug" diameter for the tach & speedo is 3.900 inches. 4" is definitely too big. The smaller gauges will work with a 2" hole, but if you go a skosh smaller they fit better.

    To get just the right diameter, I used one of these (https://smile.amazon.com/gp/product/...?ie=UTF8&psc=1) and a drill press. Nerve wracking, but it got the job done.

    Note that whatever you use, you'll almost certainly have to "massage" the holes to get the gauges to line up. So err on the side of too small.


    John

    EDIT: I should point out that my 3.9" and 2" dimensions for the gauge holes does NOT account for dash padding or material.

    IMG_3522 by jhsitton, on Flickr
    Last edited by phileas_fogg; 08-06-2017 at 07:16 PM.
    MK IV Roadster #8631
    Ford 302, Holley Terminator EFI, T5z, 3.55 Rear End, IRS, 17” Halibrand Replicas (9” front, 10.5” rear), Nitto 555 G2’s (275/40ZR17 front, 315/35ZR17 rear), Fast Freddie’s Power Steering, F5 Wilwood Brakes, FFMetal’s Firewall Forward, Forte’s Hydraulic Clutch & Throttle Linkage
    https://www.ffcars.com/threads/phile.../#post-4776313

  22. #22
    Straversi's Avatar
    Join Date
    Nov 2014
    Location
    Palos Verdes, CA
    Posts
    1,278
    Post Thanks / Like
    Quote Originally Posted by phileas_fogg View Post
    I just cut holes in my blank dash for the F5 classic gauges. A "snug" diameter for the tach & speedo is 3.900 inches. 4" is definitely too big. The smaller gauges will work with a 2" hole, but if you go a skosh smaller they fit better.

    To get just the right diameter, I used one of these (https://smile.amazon.com/gp/product/...?ie=UTF8&psc=1) and a drill press. Nerve wracking, but it got the job done.

    John
    With any of the hole saws, especially the one you linked to, if you use secure the dash to plywood with sheet metal screws (between the pilot hole and the cutter) and turn your drill press speed way down, the chatter will go away and be less nerve wracking. That's just a general comment, not instructions to you John. You obviously have it dialed in. That's a good looking dash.

    -Steve
    Mk IV #8901 - Complete kit, Coyote, TKO-600, IRS. Ordered 5/23/16, Delivered 7/14/16, First Start 8/13/17, First Go-Kart 10/22/17, Registered and Completed 10/18/18. Build Thread: http://thefactoryfiveforum.com/showt...V-Coyote-Build Graduation Thread: https://thefactoryfiveforum.com/show...-Roadster-8901

  23. #23
    Senior Member phileas_fogg's Avatar
    Join Date
    Jun 2015
    Location
    Fairfax Station VA
    Posts
    1,235
    Post Thanks / Like
    Thanks Steve. I was using my neighbor's drill press, and the slowest it goes is 620 rpm. The max safe speed on the bit is listed at 500 rpm. Yikes!

    We used a couple of woodworking clamps to keep the aluminum from moving around. Sheet metal screws between the pilot and cutter would have been a "hole" (see what I did there?) lot more secure. Next time, for sure.


    John

    EDIT: I should point out that my 3.9" and 2" dimensions for the gauge holes does NOT account for dash padding or material.
    Last edited by phileas_fogg; 03-23-2017 at 05:29 PM.
    MK IV Roadster #8631
    Ford 302, Holley Terminator EFI, T5z, 3.55 Rear End, IRS, 17” Halibrand Replicas (9” front, 10.5” rear), Nitto 555 G2’s (275/40ZR17 front, 315/35ZR17 rear), Fast Freddie’s Power Steering, F5 Wilwood Brakes, FFMetal’s Firewall Forward, Forte’s Hydraulic Clutch & Throttle Linkage
    https://www.ffcars.com/threads/phile.../#post-4776313

  24. #24
    Senior Member cnutting's Avatar
    Join Date
    Sep 2015
    Location
    Beachside
    Posts
    574
    Post Thanks / Like
    Quote Originally Posted by PeteH View Post
    I would suggest test fitting the speedo and tach in the precut holes at the beginning before the cover is glued on. On the 289, precut holes were 3 3/8", much to my surprise, the vintage gauges supplied by FF needed 3 3/4" holes. I discovered this after gluing leather on. Fortunately, was able to open up the holes with a deburring bit carefully. Then the ring that tightens on the back of gauge hit the tube hoop the dash mounts to, so had to move entire dash down about 1/8" and re drill screw holes in the hoop tube.
    I had the same issue with mine. Turns out FFR gave me the MkIV gauges instead of the 289 set. Courtnie straightened it out and everything fit as intended.
    FFR #8833 289 FIA 3-link
    1965 289, TKO600 from Forte's Parts Connection
    Body and Paint by Mike's Auto Restoration
    Picked up 3/5/2016, First start 4/22/2017, MA legal 7/11/2018
    Build Thread http://thefactoryfiveforum.com/showt...FIA-build-8833
    "Insanity is contagious" - Joseph Heller

  25. #25
    Senior Member
    Join Date
    Feb 2011
    Location
    Southport, NC
    Posts
    511
    Post Thanks / Like
    This is an old thread from 2014 and the ends of the dash are not supposed to be secured as Jeff suggested and I believe he has changed from doing this. The body needs to avoid contact with the ends of the dash. The dash ends need to be trimmed and allowed to float, unsecured. See post #5 j.miller in linked thread on mounting dash.

    http://www.ffcars.com/forums/17-fact...e-top-mk4.html

    George

Posting Permissions

  • You may not post new threads
  • You may not post replies
  • You may not post attachments
  • You may not edit your posts
  •  

FFMetal

Visit our community sponsor