Forte's

Visit our community sponsor

Thanks Thanks:  0
Likes Likes:  0
Page 2 of 2 FirstFirst 12
Results 41 to 74 of 74

Thread: Jaubin's NH 818S Build # 234

  1. #41
    Senior Member AZPete's Avatar
    Join Date
    Feb 2011
    Location
    Scottsdale, AZ
    Posts
    2,374
    Post Thanks / Like
    Joe, that picture of Lucas with his sister is one of the all-time cutest photos!
    Your brake lines are cute, too.
    818S/C : Chassis #25 with 06 WRX 2.5 turbo, ABS, cruise, PS, A/C, Apple CarPlay, rear camera, power windows & locks, leather & other complexities. Sold 10/19 with 5,800 miles.
    Mk3 Roadster #6228 4.6L, T45, IRS, PS, PB, ABS, Cruise, Koni's, 17" Halibrands, red w/ silver - 9K miles then sold @ Barrett-Jackson Jan 2011 (got back cash spent).

  2. #42
    Senior Member JAubin's Avatar
    Join Date
    Mar 2012
    Location
    Goffstown, NH
    Posts
    232
    Post Thanks / Like
    Thanks Pete! I can't disagree on that front!

    Inching closer, started on the coolant hoses, those certainly aren't user friendly, and the connection to the water pump is a bit odd too as the timing cover seems to force the corrugated tube in at an odd angle. Getting there either way...

    I also got in the 7' shifter cables I got from midwest control, I paid $80 for both cables shipped to my door. I imagined they wouldn't be as nice as the custom control cables or other more expensive ones but figured it was worth looking into. The straight line feel (no bends) is that they have a bit more stiction than the FFR cables, and pulling off the caps on the jointed segment, they're not evenly swaged like the FFR cables, it's a series of crimps. Seems to work ok, but I'd say it's a notch below the FFR supplied cables. That said, I got them installed and WOW, the MR2 shifter + linkage + short cables has massively improved the shift feel, even with these cables. Very intuitive to find gears and the throw is relatively short also. I'll grab some photos of the cables for comparison, but I think they're a good value...certainly good enough for now, it's a relatively easy upgrade if I ever decide to swap them out.

    Once the cooling system is in, I'm going to get to finally installing my iWire harness that's been sitting on my work bench wondering why I haven't gotten it in yet. I also need to spend 3-4 weeks cleaning my garage as I think every tool I own is scattered around there somewhere.
    --Joe
    818S #234 V7 EJ207 Spec-C (VF34) Build Thread

  3. #43
    Senior Member JAubin's Avatar
    Join Date
    Mar 2012
    Location
    Goffstown, NH
    Posts
    232
    Post Thanks / Like
    So after seeing the great shot of Andrew and Tamra's punchlist on their tweaks to their car, I had to throw on a pic of my Countdown to Ignition I have on the whiteboard. It is encrypted because even I can't read most of what I write down. Lots of small steps, but it's getting really close!
    IMG_20160109_145616054.jpg

    Here's a shot of the FFR supplied shift cables (top) and the Midwest Control cable (Bottom). You can see on the larger diameter the FFR is round, which the MC is crimped. I don't think I'd notice the difference when driving but now that it's dialed in the MR2 shifter and linkage setup is great...I would recommend anyone do that or Wayne's K-Tuned as either is much much better than the FFR supplied setup, I guess I just have an issue with the super long cable run and the loop in it.
    IMG_20160109_145751612.jpg

    "You said this shifted much better...I still can't find first in this thing..."
    IMG_20160109_170957648.jpg

    Beyond that got most of the harness laid out, but have a few additional things to wire (ie gauges, etc) Also decided that while A/C might be nice the units I can find are just too big...and for this first round I'm going to get just the heater/defrost setup. That will make packaging everything under the dash much easier.
    --Joe
    818S #234 V7 EJ207 Spec-C (VF34) Build Thread

  4. #44
    Senior Member JAubin's Avatar
    Join Date
    Mar 2012
    Location
    Goffstown, NH
    Posts
    232
    Post Thanks / Like
    Making progress. Got the harness mostly (rough) installed, added the grounding points, and got my gauges wired up. Had to see if things looked like they would turn on...
    YUP!

    I know it's been said plenty of time, but iWire is awesome. I even forgot to mention to Brian that I had a newer style radiator fan plugs, and after letting him know he's sending me the correct ones. Awesome service!

    Need to sort out why the pressure gauge isn't working, may be that I mistakenly put teflon tape on the threads (woops) need to look into that, but I did turn it over and that worked fine as well. Getting so close to firing it up!
    --Joe
    818S #234 V7 EJ207 Spec-C (VF34) Build Thread

  5. #45
    PLATNUM Supporting Member
    wallace18's Avatar
    Join Date
    Apr 2012
    Location
    Trenton, Florida
    Posts
    5,381
    Post Thanks / Like
    Congrats!

  6. #46
    Senior Member STiPWRD's Avatar
    Join Date
    Jan 2014
    Location
    Leesburg, VA
    Posts
    1,624
    Post Thanks / Like
    Which pressure gauge are you using? I've been looking for one that lights up red and does the sweep like that.

  7. #47
    Senior Member JAubin's Avatar
    Join Date
    Mar 2012
    Location
    Goffstown, NH
    Posts
    232
    Post Thanks / Like
    Thx Wallace! All 3 gauges (EGT is off camera) are Prosports Premium 60mm Amber/White.
    --Joe
    818S #234 V7 EJ207 Spec-C (VF34) Build Thread

  8. #48
    Senior Member STiPWRD's Avatar
    Join Date
    Jan 2014
    Location
    Leesburg, VA
    Posts
    1,624
    Post Thanks / Like
    Thanks

  9. #49
    Moonlight Performance
    Hindsight's Avatar
    Join Date
    May 2014
    Location
    Atlanta
    Posts
    3,402
    Post Thanks / Like
    I have the same gauges. Do they cut-out when you start the car? IE if you move the key to the on position and leave it there until the "opening ceremony" on the gauges is complete, then if you turn the key to the start position and start the car do they cut out? Mine do it no matter how I wire them (IE per the instructions, or having both the power and the accessory wire going directly to battery +).

  10. #50
    Senior Member JAubin's Avatar
    Join Date
    Mar 2012
    Location
    Goffstown, NH
    Posts
    232
    Post Thanks / Like
    I didn't notice that when I turned it over, but I can check next time I do. I wonder if there's an issue w/ their power side harness or something if it's multiple gauges, ie that the accessory power runs the opening ceremony. Their harnesses were a bit finicky when I was installing them, and I had to re-seat a couple. Otherwise I would wonder if the power is getting pulled to ground by something else once you turn the ignition on, but it sounds like you tested for that going straight to the battery.
    --Joe
    818S #234 V7 EJ207 Spec-C (VF34) Build Thread

  11. #51
    Senior Member JAubin's Avatar
    Join Date
    Mar 2012
    Location
    Goffstown, NH
    Posts
    232
    Post Thanks / Like
    Hindsight, I tried some more and I don't have any issues w/ the gauges turning off after I move to the start position. I actually messed around with turning the motor enough to be sure I could build oil pressure and that seems ok. If you're running them daisy chained I wonder if the first in the line is bad, maybe try starting at a different gauge?
    --Joe
    818S #234 V7 EJ207 Spec-C (VF34) Build Thread

  12. #52
    Senior Member JAubin's Avatar
    Join Date
    Mar 2012
    Location
    Goffstown, NH
    Posts
    232
    Post Thanks / Like
    Got it all set to go today, and decided that I wasn't going to kart, but just get it started as there's a ton of snow/mud on my driveway, and I don't think my tires would work well... I mean at all... so built up some oil pressure, around 90 psi, used my Airlift Coolant leak tester/filler. Had an issue that it was pulling pressure right through to my overflow tank, which I would've expected to be closed off, but maybe I have a bad cap? Either way threw a cap on the outlet there, and it help pressure well so I filled it up. That system is awesome! Dropped onto the dollies, wheeled to the edge of the garage, and turned it over. Oh, I put gas in there at some point too and primed it a few times...this was the first time turning the motor over with everything connected....


    Can I just say how awesome it is the first time it fires up? And the first try? Thanks Brian / iWire!!! Going to keep crunching on getting things cleaned up and sorted out...maybe gokart once things warm up and dry out...
    Last edited by JAubin; 02-24-2016 at 11:03 PM.
    --Joe
    818S #234 V7 EJ207 Spec-C (VF34) Build Thread

  13. #53
    Senior Member Bob_n_Cincy's Avatar
    Join Date
    Sep 2012
    Location
    Cincinnati OH
    Posts
    3,903
    Post Thanks / Like
    Quote Originally Posted by JAubin View Post
    Got it all set to go today, and decided that I wasn't going to kart, but just get it started as there's a ton of snow/mud on my driveway, and I don't think my tires would work well... I mean at all... so built up some oil pressure, around 90 psi, used my Airlift Coolant leak tester/filler. Had an issue that it was pulling pressure right through to my overflow tank, which I would've expected to be closed off, but maybe I have a bad cap? Either way threw a cap on the outlet there, and it help pressure well so I filled it up. That system is awesome! Dropped onto the dollies, wheeled to the edge of the garage, and turned it over. Oh, I put gas in there at some point too and primed it a few times...this was the first time turning the motor over with everything connected.... https://vimeo.com/154456693

    Can I just say how awesome it is the first time it fires up? And the first try? Thanks Brian / iWire!!! Going to keep crunching on getting things cleaned up and sorted out...maybe gokart once things warm up and dry out...
    Good job Joe
    818S #22 Candy Blue Frame, Front Gas Tank, 2.5L Turbo, Rear radiator, Shortened Transmission, Wookiee Compatible, Console mounted MR2 Shifter, Custom ECU panel, AWIC soon
    My Son Michael's Turbo ICE Build X22 http://thefactoryfiveforum.com/showt...rts-818S-Build
    My Electric Supercar Build X21 (on hold until winter) http://thefactoryfiveforum.com/showt...e-Build-Thread

  14. #54
    Moonlight Performance
    Hindsight's Avatar
    Join Date
    May 2014
    Location
    Atlanta
    Posts
    3,402
    Post Thanks / Like
    Congrats on the first start, and thx for the gauge info above; I missed it previously. Sounds like I have an issue with my gauges I need to look into.

  15. #55
    Senior Member JAubin's Avatar
    Join Date
    Mar 2012
    Location
    Goffstown, NH
    Posts
    232
    Post Thanks / Like
    After a few more days of cleaning things up, checking over a few more things, double checking tightness on all the suspension hardware (tightening my steering linkage...yikes) I dropped it down and went for...well, I pulled it out of the garage. So first Go-Kart! It's been a bit since I've driven a Subaru, clutch engagement point is as weird as I remember...plus I didn't want to go mach 10 out into the muddy/icy driveway. So I just abused the hell out of my clutch for a few minutes.

    The skier in me is going be pissed about this statement, but I'm really looking forward to spring so I can get out of my driveway. Still a pretty good punchlist to do before I even consider dusting off the body panels. Need to pull off the AAIC, and install the AWIC setup. Need to install my defroster/heater. Need to get the windshield installed (and then the wiper setup I just picked up from Frank, Thanks!) and need to buy or have an exhaust fabbed up. Interior has a bunch of work too...but feels like it's getting closer. Warmer temps are going to have me more motivated to get this finished up so I can get it registered...
    --Joe
    818S #234 V7 EJ207 Spec-C (VF34) Build Thread

  16. #56
    Senior Member Bob_n_Cincy's Avatar
    Join Date
    Sep 2012
    Location
    Cincinnati OH
    Posts
    3,903
    Post Thanks / Like
    Good job Joe.
    We have a track X that Mitch is putting on and an autocross that is snow or shine this weekend.
    Bob
    Last edited by Bob_n_Cincy; 02-26-2016 at 12:19 PM.
    818S #22 Candy Blue Frame, Front Gas Tank, 2.5L Turbo, Rear radiator, Shortened Transmission, Wookiee Compatible, Console mounted MR2 Shifter, Custom ECU panel, AWIC soon
    My Son Michael's Turbo ICE Build X22 http://thefactoryfiveforum.com/showt...rts-818S-Build
    My Electric Supercar Build X21 (on hold until winter) http://thefactoryfiveforum.com/showt...e-Build-Thread

  17. #57
    Senior Member Frank818's Avatar
    Join Date
    Jun 2013
    Location
    QC, Canada
    Posts
    5,732
    Post Thanks / Like
    Man the engine cranked very quickly! Nicely done.
    Frank
    818 chassis #181 powered by a '93 VW VR6 Turbo GT3582R
    Go-karted Aug 5, 2016 - Then May 19+21, 2017
    Tracked May 27/July 26, 2017
    Build time before being driveable on Sep 27, 2019: over 6000h
    Build Completed Winter 2021

  18. #58
    Senior Member Tamra's Avatar
    Join Date
    Apr 2014
    Location
    Shelton, CT
    Posts
    1,011
    Post Thanks / Like
    Congrats!!!

    Glad to see those wipers getting around. They worked for us, and for Frank, so hopefully they will for you too!
    Tamra
    Building 818SR #297 picked up 10/25/14 with Andrew (xxguitarist)
    First start 12/21/14, First "drive" 1/17/15
    First Dyno at EFI Logics 3/7/15- 310whp at 15psi for break in, full spool by ~3500rpm!
    First autocross 3/29/15
    1st Registered 818 in Connecticut 7/24/2015. 9 months - 1 day from kit pickup!

  19. #59
    Moonlight Performance
    Hindsight's Avatar
    Join Date
    May 2014
    Location
    Atlanta
    Posts
    3,402
    Post Thanks / Like
    Congrats on the first kart! Our kits were build at about the same time (I'm #225).

  20. #60
    Senior Member JAubin's Avatar
    Join Date
    Mar 2012
    Location
    Goffstown, NH
    Posts
    232
    Post Thanks / Like
    Thx for the nice words! Bob, that sounds pretty cool...at the time my situation was a 0% chance of getting out of the driveway tho, the warm temps and rain helped get rid of most of the ice, but washed out enough of that area that I still wouldn't make it out :|

    Frank - full disclosure, the fuel pump was already primed as my battery had run down a bunch and it didn't turn over the first try. The regular charger I had also wasn't correct for a small capacity AGM battery. Picked up a NOCO which has some really slick connectors, so you can permanently mount a charge port, and just plug the charger in when needed.
    --Joe
    818S #234 V7 EJ207 Spec-C (VF34) Build Thread

  21. #61
    Senior Member JAubin's Avatar
    Join Date
    Mar 2012
    Location
    Goffstown, NH
    Posts
    232
    Post Thanks / Like
    Hah, so it's only been....what 6 months? I've made what seems like almost no progress, but have been steadily hacking away at the punchlist:

    Got my ZDB AWIC Installed. IMG_20160810_202907160.jpgIMG_20160810_202809131.jpg
    Picked up an adapter plate for the Greddy BOV and attached the stock Recirc valve to it, had to use some RTV anyway as using it backwards wasn't a perfect fit.
    Wired up an in/out gauge for the intercooler also.
    The front firewall is a total mess now with all the hoses running around it. Here's a shot of the mess IMG_20160810_202824983.jpg
    Top two hoses are for my Heater (more in that in a sec) then below that I have two 3/4" hoses for the AWIC, as I ran those through the center tunnel. I did a quick and dirty method of attaching the AWIC pump, just riveted two T-Clamps to the frame, and then added a bracket that ties those to the diagonal frame member. Anyone pick out where
    that part was poached from? It's not pretty, but will keep things held together until I have time/resources to make one that looks nicer.

    We need defrost for NH Reg so I put in a Heater/Defroster from Vintage Air, and used the Old Air Electronic Valve to make sure I have coolant flowing back to the motor all the time. Put it right in the center of the firewall, with a quick bracket that's attached to the center frame member.
    Wired up and blows hot air....which, incidentally is the LAST thing anyone around here needs right now. that may get swapped for an AC long term if/when I do a hardtop. IMG_20160810_202849147.jpg

    A bit hard to see, but that's it right there, two holes are for defrost hoses, heat is in a trap door on the bottom.

    I'm getting it over to a local shop soon to have my exhaust fabbed (muffer + Cat) seat and harness mounts welded in, a base map thrown on the ECU, and a few other odds and ends. I'm going to consider it mechanically done at htat point (I hope) and then it's Just (GULP) the body! Hah
    Last edited by JAubin; 08-12-2016 at 08:28 PM.
    --Joe
    818S #234 V7 EJ207 Spec-C (VF34) Build Thread

  22. #62
    Senior Member Frank818's Avatar
    Join Date
    Jun 2013
    Location
    QC, Canada
    Posts
    5,732
    Post Thanks / Like
    Like the harness.

    On the top right of your AWIC HE I see something black there, like either a hose connector or wire connector. What is it?
    Frank
    818 chassis #181 powered by a '93 VW VR6 Turbo GT3582R
    Go-karted Aug 5, 2016 - Then May 19+21, 2017
    Tracked May 27/July 26, 2017
    Build time before being driveable on Sep 27, 2019: over 6000h
    Build Completed Winter 2021

  23. #63
    Senior Member JAubin's Avatar
    Join Date
    Mar 2012
    Location
    Goffstown, NH
    Posts
    232
    Post Thanks / Like
    Hey Frank, that's just a Rubber Cap over the overflow nipple. I'm pretty sure it will never see the pressure it would need to open given the low temps involved w/ the AWIC, but figured I'd rather just cap it either way.
    --Joe
    818S #234 V7 EJ207 Spec-C (VF34) Build Thread

  24. #64
    Senior Member Frank818's Avatar
    Join Date
    Jun 2013
    Location
    QC, Canada
    Posts
    5,732
    Post Thanks / Like
    Ok, you probably don't have the same HE as I do, I have no cap on the driver's side. It looks so similar to mine.
    Frank
    818 chassis #181 powered by a '93 VW VR6 Turbo GT3582R
    Go-karted Aug 5, 2016 - Then May 19+21, 2017
    Tracked May 27/July 26, 2017
    Build time before being driveable on Sep 27, 2019: over 6000h
    Build Completed Winter 2021

  25. #65
    Senior Member JAubin's Avatar
    Join Date
    Mar 2012
    Location
    Goffstown, NH
    Posts
    232
    Post Thanks / Like
    Recently got my car back from the shop that did some great work on my car.

    First on the list when it came home was the kids needed to go for a drive, so they clambered in and the oldest (3) needed the harness on and to do "drive to the grocery store."
    20160921_115921.jpg

    Here's a shot of the custom 3" exhaust they welded up. It's a slightly ovalized tube where it meets the turbo flange, so while not a bellmouth it should work well. Next is a Vibrant high performance cat, and a Magnaflow muffler. Have a nice SS tip to add to it all once the body is on. Sounds great! And yes this post is now worthless without a vid of it, but needs to be outside as it sounds pretty weird in the garage. Also you can see the IAG AOS. Mounted it back there since there wasn't a whole lot of room anywhere else...looks like I'll be doing a custom trunk when I get to that point, heh. Went with the IAG based on the shop's recommendation and from everything I've read on it it's a really well built unit. New AEM Wideband O2 sensor peeking out there too.
    20160921_121234.jpg

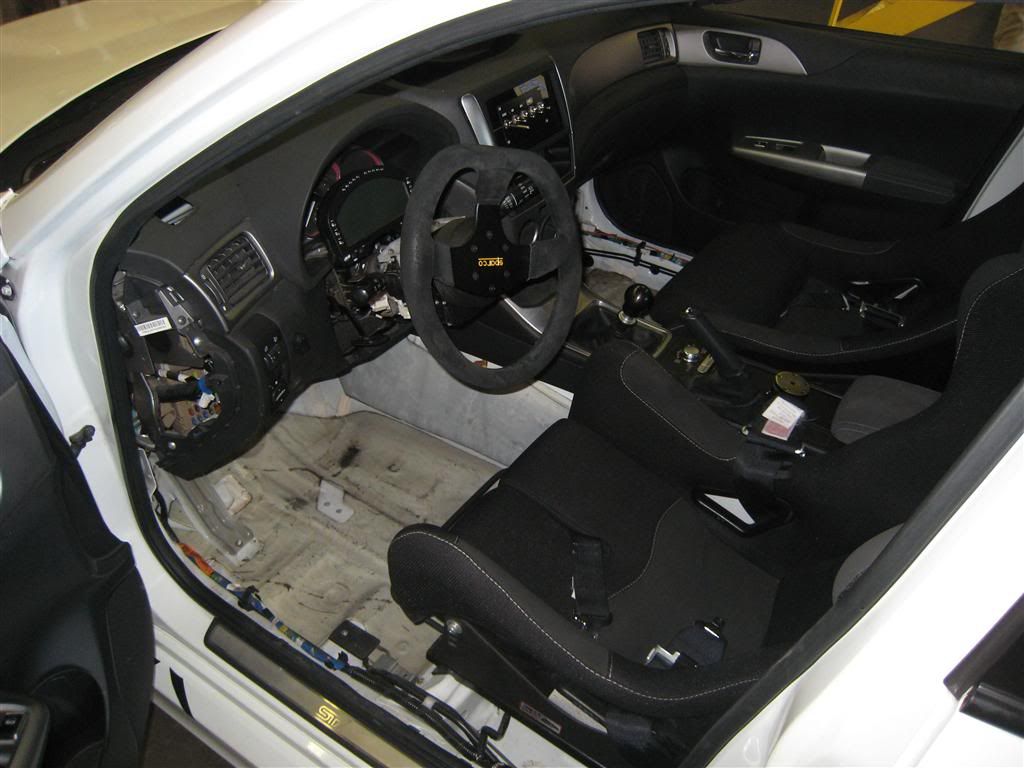
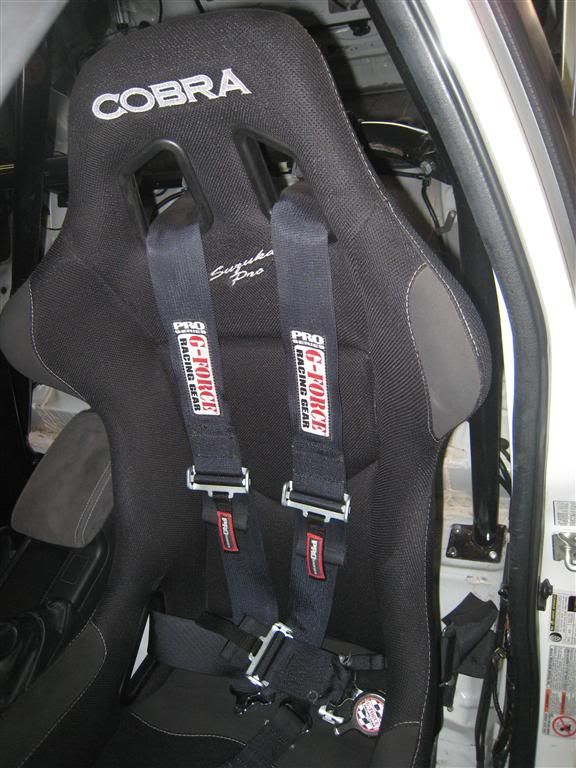
    Both seats are in solidly finally, welded in some steel channel and regular sidemounts, Driver is a Cobra Suzuka Pro GT, Pass is a Imola Pro GT, basically same seats but higher thigh bolsters on the Suzuka, lower bolsters on the Imola are easier to get into. OMP 6 Point Harnesses. Interestingly, NH doesn't mandate seat belts for hot rods / kit cars, so when asking about if it was ok to use DOT 6 Point harnesses (ie Schroth ASM I think) the Officer said, "Seat Belts? You don't need seat belts unless you want them..." Ummm ok...so I guess cam-locks are ok instead of a push release. Good to know.
    20160921_121242.jpg

    Overall Kart photo...interior console is just clamped in for now.
    20160921_200502.jpg

    And I couldn't resist...besides getting some more sheet metal done and the interior, it's Body time! This is way premature, but it's so tempting to take a peek...amazing how much more it looks like a car with just one side sail on. Hah.
    20160927_131602.jpg

    So I'm resigned to the fact that I'm not moving fast enough to get the body on and have it registered for this year (was a goal at one point...what did Douglas Adams say

    "I love deadlines...I love the whooshing sounds they make as they go by"

    but I'm actually happy about it in some way, now I have the whole winter to take my time, and get small things mechanically cleaned up, then sheet metal, and finally get the body on, and then do the body work. I'll be happy if I can pull that all off in the next 7 months or so, hah.
    Probably try and get it on the road prior to doing paint, etc so I can be sure I don't destroy my new paint job. Currently waffling between going inexpensive and doing plasti-dip, or spending the money and doing a full auto-paint set, as I have a friend that's building a large (ie a garage bay) furniture finishing booth. Either way, here's my rough plan for doing the body...picked from various sources and what I think makes sense as the new front end certainly has a bit of clean up to do, and this will likely apply to most panels:

    Step 1 - Paint Prep application (De-waxer Interlux Fiberglass surface prep?)
    Step 2 - Wipe w/ acetone/until clean
    Step 3 - sand out seams w/ 80 grit paper
    Step 4 - Fill Seams (Rage gold?)
    Step 5 - If voids/gelcoat in seam us 3m HSRF
    Step 6 - Sand incrementally up to 180 grit
    Step 7 - Spray with Slick Sand Primer
    Step 8 - Sand incrementally to 800 grit
    Step 9 - respray/appy rage gold
    Step 10 - Sand incrementally to 800 grit
    Step 11 - Add glaze (Upol Dolphin Glaze??)
    Step 12 - Sand incrementally up to 800 grit
    Step 13 - spray on guide coat
    Step 14 - wet sand high spots

    If I end up doing paint that 800 grit will likely be 2000, we'll see...have plenty to time before I'm to that point!
    --Joe
    818S #234 V7 EJ207 Spec-C (VF34) Build Thread

  26. #66
    Senior Member
    Join Date
    May 2012
    Location
    Suisun City, CA
    Posts
    851
    Post Thanks / Like
    Nice choice in seats. It's the same exact setup that I had in my old STi. They're some of the most comfortable, supportive racing buckets that you can get.


    818S - #67 (SOLD IT!)
    Delivered: 18 November 2013
    Go Karted: 29 December 2013
    Titled/Registered: 28 March 2014
    Finished: NEVER!
    341 hp @ 4844 RPM / 389 tq @ 3717 RPM

  27. #67
    Junior Member Brad's Avatar
    Join Date
    Feb 2011
    Posts
    6
    Post Thanks / Like
    Hey JAubin! Hopefully future builder here in Derry. Progress looks excellent!

  28. #68
    Senior Member JAubin's Avatar
    Join Date
    Mar 2012
    Location
    Goffstown, NH
    Posts
    232
    Post Thanks / Like
    Hey Frank, I'm realizing that you were talking about a different part, I'm pretty sure that was just an electrical connector sitting on top of the heat exchanger...

    Jerome, yeah I really like the setup so far, at least sitting in it, acting like I'm driving the car, hah.

    Brad, still a potential builder? Or did you purchase/build/sell your kit by now? Hah.

    So here's my way overdue update:
    Got to spend some time working on non 818 stuff, like replacing the hydraulic unit in my brand new floor jack...GRRRR, thankfully they shipped me a new one without any hassle.
    20161027_130409.jpg

    After cleaned up some stuff post getting it wrenched on at a local shop, I got to work on the new front end parts, and got the aluminum all mounted, did the drill/tap/screw method since I can imagine removing
    a lot of these parts.
    20161104_202023.jpg
    And, ok, let me throw on the rest of the body to see how it's looking...ok really just to get the parts out of the way while I clean up, heh. And wow, lots of work to come in getting this to all align nicely.
    20161108_124214.jpg
    And more side projects, let's tear down and clean up this MR2 shifter because I don't want surface rust lurking around on there...
    20170425_094104.jpg
    Holy crap, I'm never going to finish this thing, it's a mess, and there's parts everywhere and WTF...and...
    20170503_125317.jpg
    CLEANUP! Ok that's better, I can breathe again.
    20170503_135903.jpg
    Last but not least got my exhaust swaintech coated, and all ready to get re-installed.
    20170622_093304.jpg

    Currently finishing up adding vinyl to the interior aluminum tunnel/console area. Mocked it up with my lower gauges and defroster controls, also a dual USB plug in there as well. Leaving some space for a marine radio at some point, hence the large open area in the middle there.

    The front end body panels are already frustrating and I haven't done much with them yet...I imagine a lot of flexing, swearing, and twisting parts into place is going to come into play. I'm planning on loosening all the bolts, then tape everything with hte gaps I want, and go from there. I also need to install my wipes since they're required by the state.

    So here's my next question:

    -Does anyone in NH have a recommendation for a glass installer? I've tried every place I can find, and any larger franchised location basically says they don't do kit cars. I've called a few smaller places that people have recommended and haven't heard back. So frustrating, just want my windshield mounted! From everything I've read it's really not a DIY applicable item, so I'm going to hope that I hear back or someone has a good place to use.

    In other news, does anyone want to move to Goffstown? I love the area I'm in, and my garage is great, and the roads around here are pretty awesome too, but moving a bit farther south to be closer to family. Mission is to get the car finished in the next few months so I don't have to trailer/store it, etc during the move. Pressure's on!
    --Joe
    818S #234 V7 EJ207 Spec-C (VF34) Build Thread

  29. #69
    Senior Member RM1SepEx's Avatar
    Join Date
    Jul 2011
    Location
    Freeport, ME
    Posts
    3,801
    Post Thanks / Like
    Joe, I brought my windshield frame and glass to Portland Glass in Brunswick Maine. They just sealed it in with no gasket and I picked it up a day later. Anyone should be able to install it for you.
    Dan

    818S #17 Picked up 8/1/13 First start 11/1/13 Go Kart 3/28/14

  30. #70
    Senior Member
    Join Date
    Apr 2015
    Location
    Andover, MA
    Posts
    530
    Post Thanks / Like
    I had a safelite guy do mine.....he had never seen anything like it but did his best. Some problems we encountered:
    - glass was too tightly fit to frame....hard to get and maintain an equal gap all around
    - in order to remotely fit glass needed to be ~1/2" above frame, a gap that needs to be filled with more polyurethane than normally used. We did not use enough and the result was voids. I need to go back now and carefully mask and fill in with additional polyurethane .
    - holding glass an even 1/2" off of frame was near impossible without making small clamp aids that allowed us to shim/prop the glass while still clamping it in place.
    - there was NO WAY any sort of trim molding would have been possible with my glass and frame.....I wish it were possible as I think it would have looked MUCH better than it does without.
    - Factory Five said all of this was normal and that the windshield frame has not changed since day 1.....mine still didnt fit well
    - I ended up with glass tighter in frame at top middle and more flush to the frame at both sides.....hard to keep it even while setting up.....easy to squish out the adhesive if not careful
    -My frame had factory installed plastic edge trim around outside edge of fiberglass frame.....I added a piece all along the INSIDE edge, which is visible from inside the car.....it is worth looking at/considering BEFORE you bond the glass.....dry adhesive may make it hard/impossible to add it on later.

    Good luck! I hope yours goes better than mine....many seem to have had no problem....not sure what my problem was. We did it on the car (windshield frame installed). Maybe we would have had better luck with frame OFF of the car.....I would definitely try it this way next time.
    Last edited by ben1272; 06-28-2017 at 07:04 PM.

  31. #71
    Senior Member AZPete's Avatar
    Join Date
    Feb 2011
    Location
    Scottsdale, AZ
    Posts
    2,374
    Post Thanks / Like
    I had Safelite install the windshield in my 818S, then again in the 818C. I took the 818S frame and glass to their shop. The next day it was done and looked great. For the 818C, I couldn't fit the hardtop in my SUV so I took photos to Safelite and the manager scheduled his best guy, Jesse, to come to my house. Jesse installed the windshield, the rear hatch glass and the 2 quarter windows perfectly centered and with solid black sealant borders. It took nearly 3 hours and I paid the agreed $500, plus $50 tip. Jesse said he really enjoyed the job because it was different from the routine windshield jobs. Or maybe it was the tip.
    818S/C : Chassis #25 with 06 WRX 2.5 turbo, ABS, cruise, PS, A/C, Apple CarPlay, rear camera, power windows & locks, leather & other complexities. Sold 10/19 with 5,800 miles.
    Mk3 Roadster #6228 4.6L, T45, IRS, PS, PB, ABS, Cruise, Koni's, 17" Halibrands, red w/ silver - 9K miles then sold @ Barrett-Jackson Jan 2011 (got back cash spent).

  32. #72
    Member
    Join Date
    May 2014
    Posts
    88
    Post Thanks / Like
    I have a guy that goes to local junkyards and pulls used windshields and installs them for 150 total. Used him a couple times for the daily beaters. He came out and did my s for 100 dollars. Same issues with tight fit, no room for a gasket, but he just caulked an edge with urethane and it looks great. It's nothing to be scared of, the glass guys are just worried about warrantying their work, so ask for price with no warranty.

  33. #73
    Senior Member JAubin's Avatar
    Join Date
    Mar 2012
    Location
    Goffstown, NH
    Posts
    232
    Post Thanks / Like
    Thx Dan, Ben, Pete, Craig - I found a place that said they would be able to install the windshield here...hopefully set up a time after the 4th (Happy 4th!) Appreciate all the feedback, I was concerned about having it installed off the car, but after some searching (woops, lots of info, should've searched first!) seems like that's a pretty popular solution.

    Does anyone need an old-style front end? I have the one that came with my kit, just taking up space right now, Flexible one price, just let me know what you think is fair! Posted it here also: http://thefactoryfiveforum.com/showt...Located-in-NH)
    --Joe
    818S #234 V7 EJ207 Spec-C (VF34) Build Thread

  34. #74
    Senior Member JAubin's Avatar
    Join Date
    Mar 2012
    Location
    Goffstown, NH
    Posts
    232
    Post Thanks / Like
    Maybe I should update this thread? HAH.

    So it's been nearly 2 years since I've posted here, been busy, moved, finished the car, got it on the road, etc.

    So the summer of 2017 was crazy as I was working on trying to get the car on the road before I moved because I didn't want to move while I was mostly done w/ hte project and end up losing/missing/breaking stuff. I pushed hard but had to finish packing/moving the house too...it was less than ideal. Sufficed to say, I didn't get the car entirely finished, but I got the body on, lights installed, and glass installed enough that it was driveable to get it on a flatbed to transport to the new house.

    20170810_135528.jpg
    20170908_000008.jpg
    20170912_114603.jpg
    Body roughly on, install lights, get Mechie3's hood hinge sorted out. Bonded a block of wood w/ a few layers of fiberglass and then installed studs to that to attach to the hinge. Lights were a bit tricky, but look pretty good once they're in there.

    Few shots of the (mostly) finished setup.
    20180728_143035.jpg
    20180801_213501.jpg
    20180919_112806.jpg

    Since then I did some work to address the heat in the engine bay with some additional shielding around the AWIC hoses and gold foil on the AWIC Core. Mostly cosmetic stuff to sort out, and get a tune. I had a fun adventure (maybe the wrong word?) when driving to a highly recommended tuner in MA last summer...first time driving on the highway for an extended time, which was nerve racking enough, and then just after I pulled off the trans started making a lot of noise, like a synchro trying to engage or something...luckily I was off the highway on a quiet sidestreet when I heard a giant *BANG* and both rear wheels locked up simultaneously (Hey thanks limited slip diff) and again very luckily I was on a quiet road, and it was straight enough for me to keep the car on the road... Don't like the thought of it happening 5 minutes earlier on a major highway. Long story short, I had a shop fix a trans leak due to a cracked rear casing, and I wasn't clear with them on the fill level, and I didn't double check it. I know this has been said :

    *MAKE SURE YOU PUT IN THE FULL GEAR OIL AMOUNT*
    20181004_134244.jpg
    That's the bearing between 4th and 5th that failed somehow (best guess is due to overheating) but in any case locked up everything when it failed.

    So running a Forester XT 5 speed in there now, and I'm back on the road. Will drop a post into the reg section w/ all those details once I dig up my notes on it.
    --Joe
    818S #234 V7 EJ207 Spec-C (VF34) Build Thread

Page 2 of 2 FirstFirst 12

Posting Permissions

  • You may not post new threads
  • You may not post replies
  • You may not post attachments
  • You may not edit your posts
  •  

Stewart Transport

Visit our community sponsor