Very Cool Parts

Visit our community sponsor

Thanks Thanks:  0
Likes Likes:  0
Results 1 to 15 of 15

Thread: Fitting / Adjusting MK4 Doors

  1. #1
    Senior Member frankb's Avatar
    Join Date
    Feb 2014
    Location
    Marana, AZ
    Posts
    328
    Post Thanks / Like

    Question Fitting / Adjusting MK4 Doors

    I apologize to all readers if this is a duplicate thread, but I haven't been able to find it elsewhere. I am currently at the point of hanging and fitting my MK4 doors and don't want to hose it up, so I am looking for some advice. What is the proper way to fit the doors to the body prior to trimming? There may not be a "best way", but I'm sure not all of you builders did it the "same way". Any advice is welcome!
    Last edited by frankb; 10-25-2014 at 12:19 PM.

  2. #2
    cobra Handler skullandbones's Avatar
    Join Date
    Jul 2011
    Location
    Superstition Mtn foothills 5 miles west of Gold Canyon AZ
    Posts
    2,686
    Post Thanks / Like
    Blog Entries
    19
    You can use MKIII body work as a search and find a lot about it. The MKIV has the same problem with the door shape as the MKIII and the drivers side is the culprit. You will most likely not be able to fit it without using filler in the lower forward quadrant. I haven't gotten to my doors for final fitment but I have read and played with them a lot and I can tell you the difference between the driver's door and the passenger side door is like night and day. I don't think you need filler there if you're good at adjustment.

    There are experts on body work on this forum and they have not figured out how to get around this issue. So if not impossible then highly improbable that there won't be some body work on at least one door. I was even going to buy an MKIV door as a work around and found the commonality between the two MKs. Jeff K and others will be able to give you more details. I think Jeff's thread on bodywork is very good. It's hard to believe that something as small as these doors could be such a pain. Another reason I'm holding off is to remount my Lucas latches (both pieces) instead of just the striker post like in the manual. It looks much more finished with the other piece but requires some cutting and welding to re-engineer the support post. I've seen some pics of originals that have the complete Lucas latch set and it does look very nice. Also, while you're at it you should do the two mods on the latches to beef them up before installing them. Those improvements will save you some headaches down the road.

    To your specific question: don't trim first and then try to fit. It's better to mount the hinges and fit the door as well as possible. Then trim a little at a time until you can get them to close reasonably well. You know the old adage, "measure twice cut once".

    Good luck, WEK.
    Last edited by skullandbones; 10-25-2014 at 12:57 PM.
    FFR MkIII 302 (ATK), EFI 75mm TB with custom box plenum chamber, 24# injectors, 4 tube BBK ceramic, cold air sys, alum flywheel, crane roller rockers, T5, Wilwood pedals, custom five link with Watt's link, 4 rotors, coil overs, power steering with Heidt valve, alum FFR rad, driver's crash bar mod, mini dead pedal mod, quick release steering wheel hub #6046

  3. #3
    Senior Member CraigS's Avatar
    Join Date
    Feb 2011
    Location
    Blacksburg, Va
    Posts
    4,728
    Post Thanks / Like
    One thing that is really nice about the MkIV is the body mounts under the rocker area can be slotted. This will allow the body surface to be moved relative to the door surface. You will probably find that at some point about 2/3 of the door fits the body pretty well but a corner is too high or too low. this is where being able to move the body helps out.
    FFR MkII, 408W, Tremec TKO 500, 2015 IRS, DA QA1s, Forte front bar, APE hardtop.

  4. #4
    Senior Member frankb's Avatar
    Join Date
    Feb 2014
    Location
    Marana, AZ
    Posts
    328
    Post Thanks / Like
    Thanks for the info, gentlemen. I thought I may have done something wrong when I replaced the body on the frame, but your description pretty much matched what i am seeing. I may also need to build the top front edge of the doors up a bit as well.

  5. #5
    cobra Handler skullandbones's Avatar
    Join Date
    Jul 2011
    Location
    Superstition Mtn foothills 5 miles west of Gold Canyon AZ
    Posts
    2,686
    Post Thanks / Like
    Blog Entries
    19
    One thing I haven't tried yet is to slot the hinges on the doors a little more to see if that helps in the multi-angle adjustment that is necessary to get everything to line up. I'm not saying that it will definitely elevate the problem or bring all the corners out to where you don't need some body filler. It's just another something that could possibly improve your fitment. Can't hurt to try it.

    WEK.
    FFR MkIII 302 (ATK), EFI 75mm TB with custom box plenum chamber, 24# injectors, 4 tube BBK ceramic, cold air sys, alum flywheel, crane roller rockers, T5, Wilwood pedals, custom five link with Watt's link, 4 rotors, coil overs, power steering with Heidt valve, alum FFR rad, driver's crash bar mod, mini dead pedal mod, quick release steering wheel hub #6046

  6. #6
    Not a waxer Jeff Kleiner's Avatar
    Join Date
    Feb 2011
    Location
    Bloomington, Indiana
    Posts
    8,067
    Post Thanks / Like
    Frank,
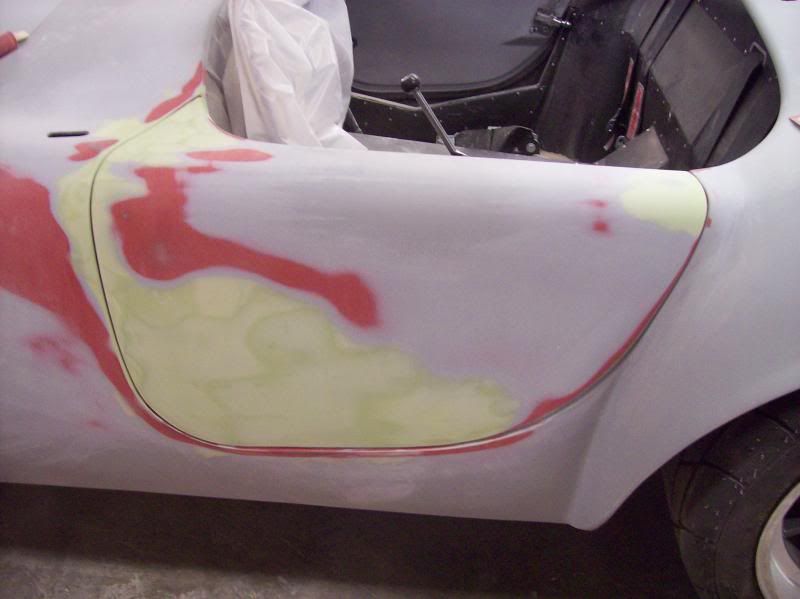
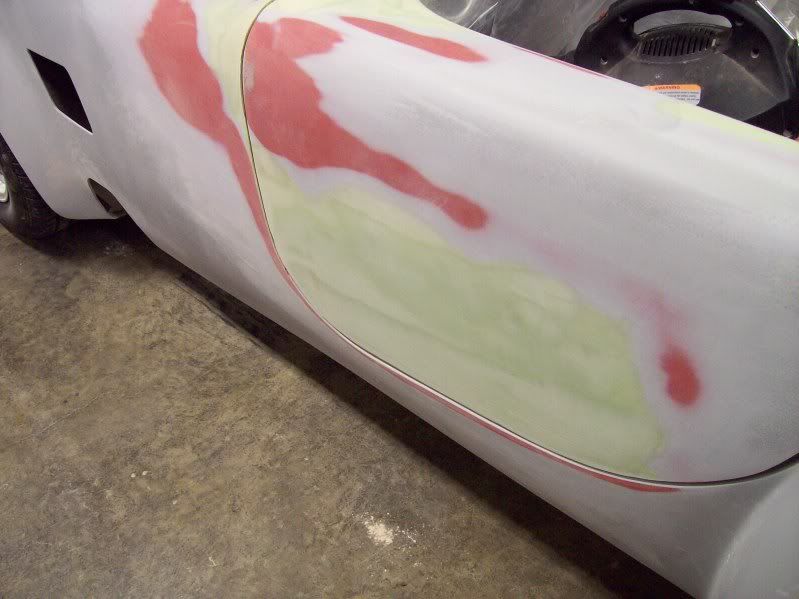
    Keep in mind that you aren't just adjusting the doors to fit into the hole but you are also moving the hole to fit the door. What I mean is that a big part of the equation is moving the body as well as the door to strike the best balance. There is a lot of give and take involved in the process. Although fitting them is tedious I have never used shims/washers between the doors and hinges, hinges and chassis or had to slot or enlarge any of the mounting holes in the hinges. That isn't to say that it might not ultimately be necessary is some case but I haven't encountered it. You are trying to strike a balance at 4 different places; the upper front of the door where it meets the cowl, the upper rear where it meets the rear cockpit opening, plus the lower front and lower rear. To further complicate things along the upper part of the doors we're dealing with both horizontal as well as vertical interfaces. Adjusting for one invariably affects at least one other. And people wonder why body men drink... I've had the best luck adjusting for the door tops first. While dealing with the top area of the doors do not completely ignore the lower door edge's intersection with the main body but keep in mind that the lower body can be moved in/out independently with little to no effect to the upper cockpit openings. On both Mk3s and Mk4s I've found that the passenger door has been easier than the driver's side; once the adjustments were made to get the tops in order it just took a bit of outward movement to the lower body to have it meet the bottom edge of the door. On the other hand with the drivers side once the tops were fitting the bodies had to go in at the lower front corner of the doors and move out a great deal at the rear. I've found that these cars and bodies are quite consistent and one of those constants is that you'll need to push the rocker panel in as far as possible in front of the driver's door and pull it out at the rear. I can assure you that you aren't going to get all 4 corners ro meet perfectly but your goal is to get them as close as possible so that they operate without interference and to minimize the bodywork necessary to match contours between the main body and moveable panels. This is another point of consistency; the areas that need attention to match contours, one of them being the door tops to cowl intersection that you mentioned. These photos are of two different cars but you can see that they both needed pretty much the same work:


    I just finished up another and although I didn't take any photos it looked exactly the same!

    Good luck Frank, ask questions if you run into a snag. It just takes time and beer

    Jeff

  7. #7
    Senior Member frankb's Avatar
    Join Date
    Feb 2014
    Location
    Marana, AZ
    Posts
    328
    Post Thanks / Like
    Thanks for the photos, Jeff. That really helped. I will also take the advice on the liquid refreshments...

  8. #8
    Senior Member Avalanche325's Avatar
    Join Date
    Nov 2011
    Location
    Jax Beach, FL
    Posts
    2,103
    Post Thanks / Like
    Quote Originally Posted by Jeff Kleiner View Post
    Keep in mind that you aren't just adjusting the doors to fit into the hole but you are also moving the hole to fit the door.
    I am starting to think that this guy knows what he a talking about! At least I hope so. I have been following a lot of his advice.

    My door looks pretty much like Jeff's picture. My front peaks where door meets the dash were a little low on both doors. I did a little HSRF to build it up. I also have a small bit of filler below the door where the body goes into the fender flare. I also put a lot of time, and beer, into my door gaps.

  9. #9
    Senior Member Walt's Avatar
    Join Date
    Dec 2013
    Location
    Navasota, Texas
    Posts
    412
    Post Thanks / Like
    What is the best way to sand the edges rounded?
    Thanks
    Walt

  10. #10
    Senior Member rmiller64's Avatar
    Join Date
    Aug 2014
    Location
    Ferndale, WA
    Posts
    337
    Post Thanks / Like
    Quote Originally Posted by Avalanche325 View Post
    I am starting to think that this guy knows what he a talking about! At least I hope so. I have been following a lot of his advice.

    My door looks pretty much like Jeff's picture. My front peaks where door meets the dash were a little low on both doors. I did a little HSRF to build it up. I also have a small bit of filler below the door where the body goes into the fender flare. I also put a lot of time, and beer, into my door gaps.
    Jeff's posts have been a great help to me and my kit hasn't landed on the Jack stands yet. I have studied he and Steve's bodywork post many times
    Rick
    #8442 MK4 Complete kit, 331 Stroker, T5, 3.73 Posi 3-Link, 15", Goodyear Billboards
    Order 8/22/14 Del 11/7/14 First Start 3/9/15 Go Cart 3/14/15 Paint 2/25/16
    http://thefactoryfiveforum.com/showt...MK4-8442-Build

  11. #11
    Senior Member rmiller64's Avatar
    Join Date
    Aug 2014
    Location
    Ferndale, WA
    Posts
    337
    Post Thanks / Like
    Quote Originally Posted by Walt View Post
    What is the best way to sand the edges rounded?
    Thanks
    Walt
    I read that you can slice a piece of PVC pipe down the middle but didn't say if it was 3/4 , 1" or other size
    Rick
    #8442 MK4 Complete kit, 331 Stroker, T5, 3.73 Posi 3-Link, 15", Goodyear Billboards
    Order 8/22/14 Del 11/7/14 First Start 3/9/15 Go Cart 3/14/15 Paint 2/25/16
    http://thefactoryfiveforum.com/showt...MK4-8442-Build

  12. #12
    Not a waxer Jeff Kleiner's Avatar
    Join Date
    Feb 2011
    Location
    Bloomington, Indiana
    Posts
    8,067
    Post Thanks / Like
    Quote Originally Posted by Avalanche325 View Post
    I am starting to think that this guy knows what he a talking about!...
    Ah good, the old "baffle 'em with BS" plan is working! Smoke and mirrors my friend, all smoke and mirrors.

    Quote Originally Posted by Walt View Post
    What is the best way to sand the edges rounded?
    Thanks
    Walt
    If you are asking about the top rollover of the doors I use a piece of rubber radiator hose about 4" long and split longways so that it curves around a little more than 180 degrees. I just cup it in my hand and use it to drag the mud. Some guys use split PVC pipe for the cockpit roll on pre-Mk4s but I couldn't ever get comfortable with that method.


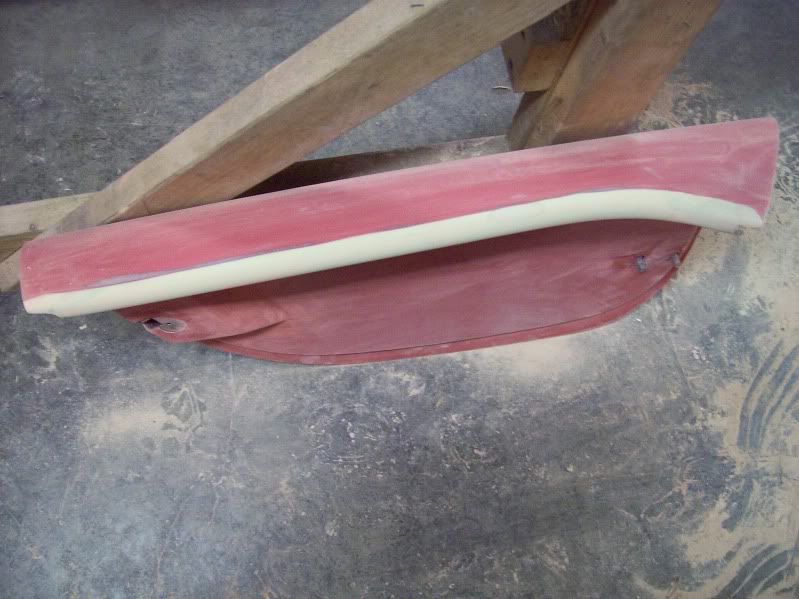
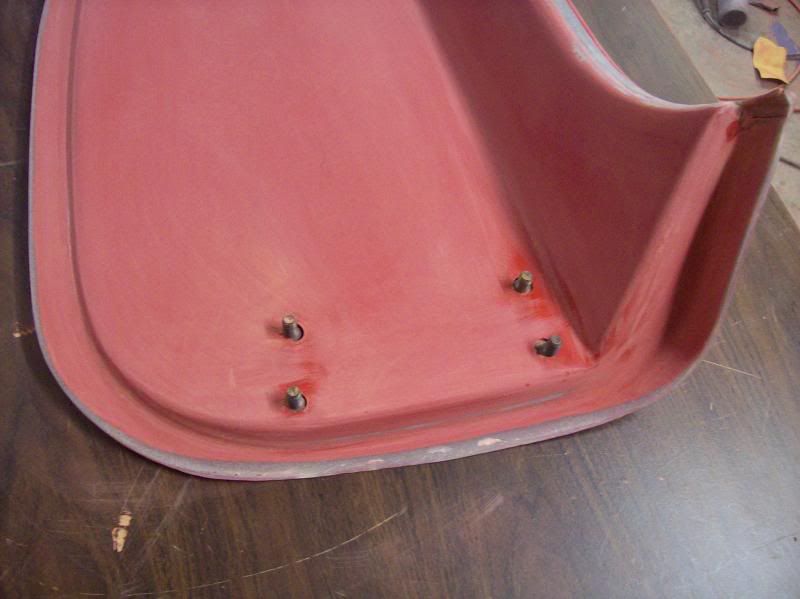
    If the "sand the edges" question relates to rolling the door, hood and trunk panel edges I just knock the point off of the corners and ease them over by giving them a few strikes along their length with 150 or 220. The buildup of high build primer, basecoat and clear will naturally form a some radius so there is no need to try to create too much in the fiberglass. As long as we're on the subject of door edges there are a couple of other things that I do. First is to back bevel the inside leading edge of the doors to allow more clearance to the body as they swing through their arc when opened. This will let you tighten up your gaps a bit.


    I do the underside top edge of the deck lid this way also for the same reason.

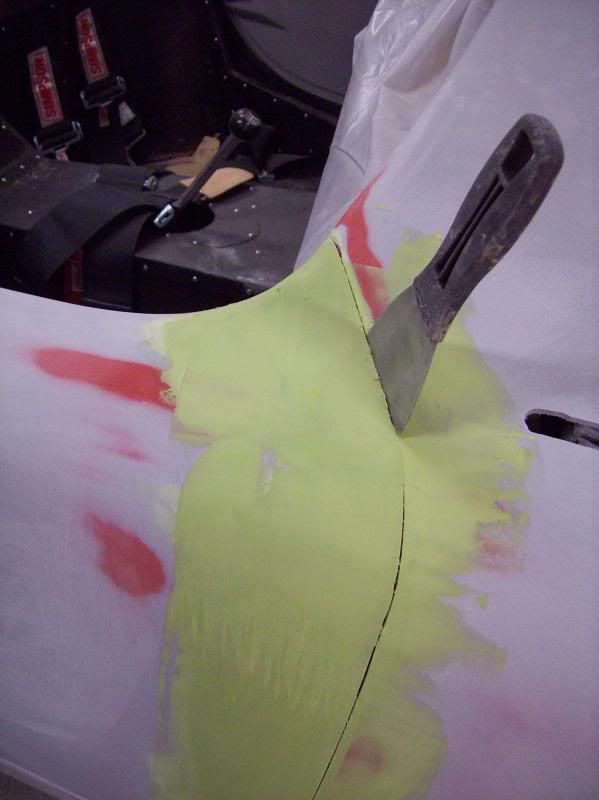
    When it comes to matching the contours between the doors and main body one of the first things that you'll notice is that the door tops are typically lower than the cowl and also that the main body takes a pretty severe dive or roll into the door opening. To straighten these areas out I bridge all the way across between the door and body with filler then cut through right before it cures:


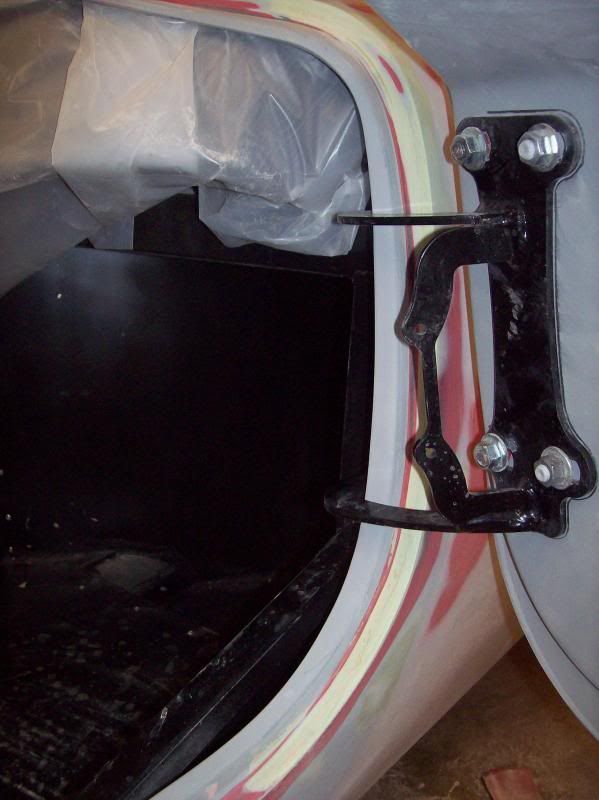
    I then start working to get the margin consistent all the way around. Note that I'm not building filler up on the door edge but rather on the body where it returns back into the jamb. After a couple of applications once the body and door lines are flowing nicely I butter it back into the door jamb and square the edge off:


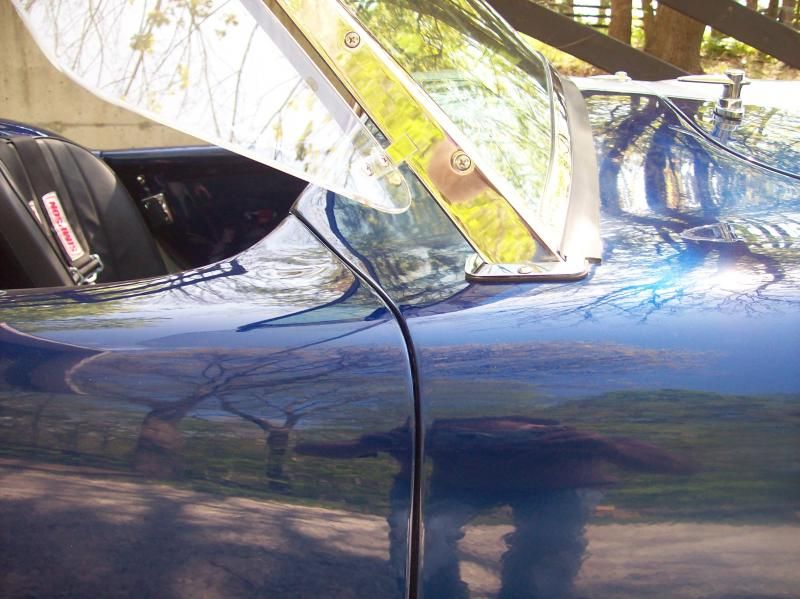
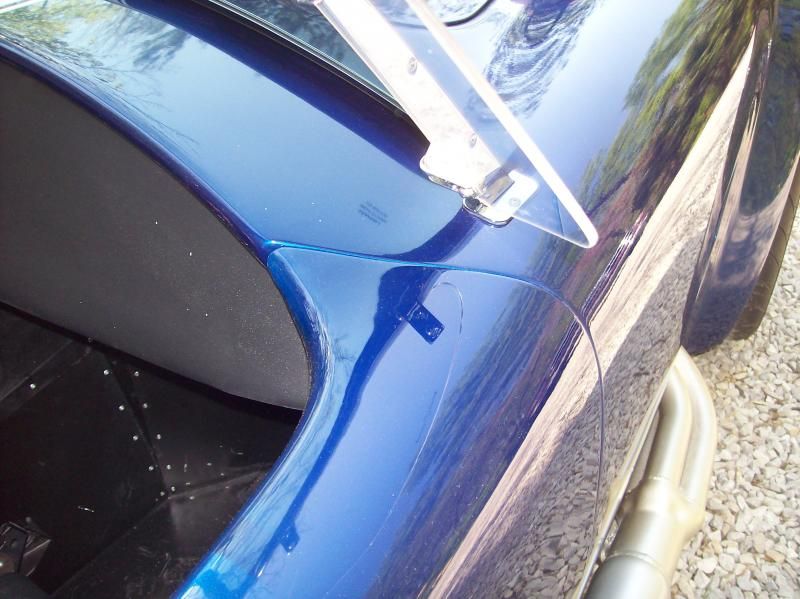
    Once it's all done you will wind up with something like this with consistent lines and margins:


    As mentioned earlier it's all a game of give and take working not only the door but also the hole that it goes into.

    Good luck,
    Jeff

  13. #13
    Out Drivin' Gumball's Avatar
    Join Date
    Feb 2011
    Location
    Blackberry Township, IL
    Posts
    2,653
    Post Thanks / Like
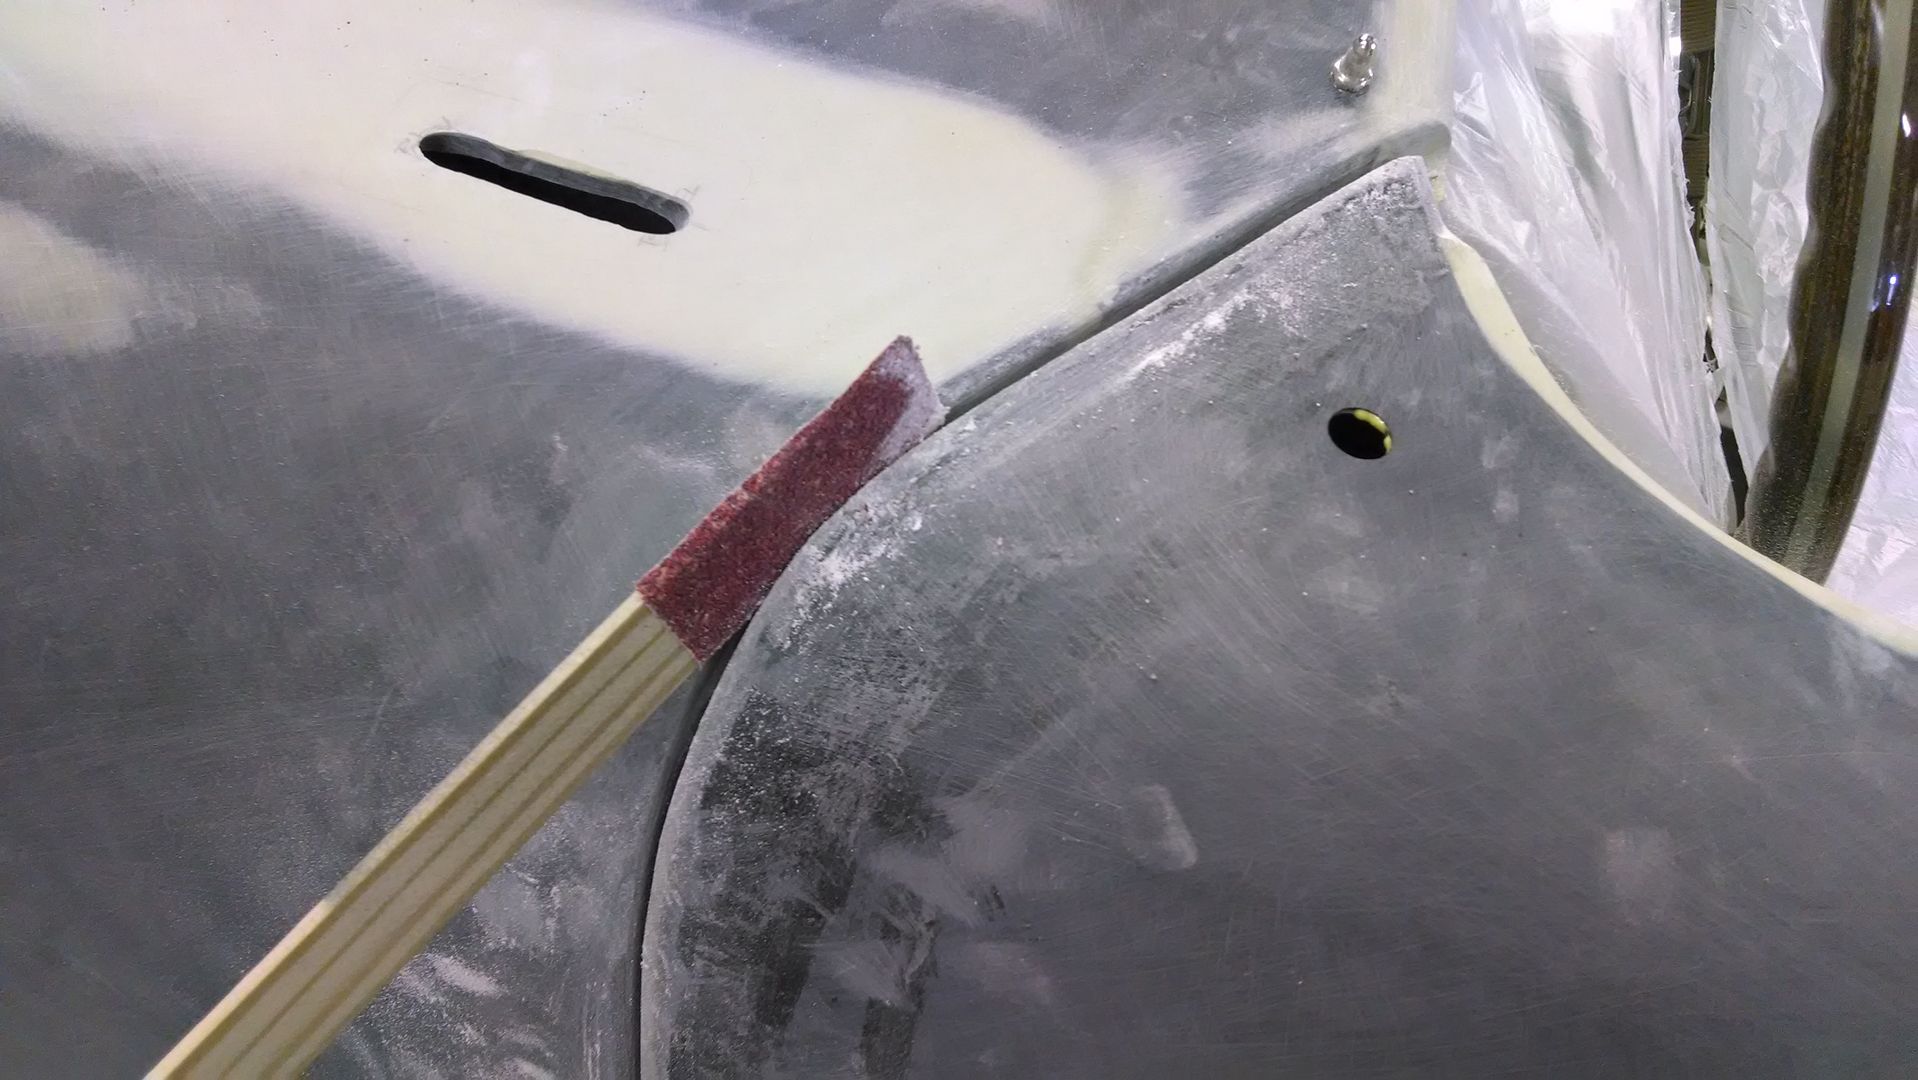
    What Jeff said about the doors. I followed a similar process to get them level with the body. To make the gaps uniform, I used successively thicker paint stir sticks with a small piece of adhesive sandpaper on one side (wood side to the body and grit side to the door edge).


    Later,
    Chris

    "There are no more monsters to fear, and so, we have to build our own."
    Mk3.1 #7074

  14. #14
    Senior Member frankb's Avatar
    Join Date
    Feb 2014
    Location
    Marana, AZ
    Posts
    328
    Post Thanks / Like
    All this info is a really big help. Keep it flowing!

  15. #15
    Out Drivin' Gumball's Avatar
    Join Date
    Feb 2011
    Location
    Blackberry Township, IL
    Posts
    2,653
    Post Thanks / Like
    Quote Originally Posted by frankb View Post
    All this info is a really big help. Keep it flowing!
    Here's a link to my bodywork thread - much more detail on doors and other parts. I'd never done bodywork before and learned from those on this site and ffcars. There are lots of other bodywork threads here and at the other site, so search on those, grab a cold one, and enjoy the reading.

    http://thefactoryfiveforum.com/showt...k-Thread-Mk3-1
    Later,
    Chris

    "There are no more monsters to fear, and so, we have to build our own."
    Mk3.1 #7074

Posting Permissions

  • You may not post new threads
  • You may not post replies
  • You may not post attachments
  • You may not edit your posts
  •  

Martin's Dent and Collision Shop

Visit our community sponsor