Forte's

Visit our community sponsor

Thanks Thanks:  1
Likes Likes:  3
Page 26 of 37 FirstFirst ... 16242526272836 ... LastLast
Results 1,001 to 1,040 of 1452

Thread: Andrew & Tamra's 818SR EM Autox Hybrid Destroked Long-Rod Build

  1. #1001
    Senior Member Bob_n_Cincy's Avatar
    Join Date
    Sep 2012
    Location
    Cincinnati OH
    Posts
    3,903
    Post Thanks / Like
    818S #22 Candy Blue Frame, Front Gas Tank, 2.5L Turbo, Rear radiator, Shortened Transmission, Wookiee Compatible, Console mounted MR2 Shifter, Custom ECU panel, AWIC soon
    My Son Michael's Turbo ICE Build X22 http://thefactoryfiveforum.com/showt...rts-818S-Build
    My Electric Supercar Build X21 (on hold until winter) http://thefactoryfiveforum.com/showt...e-Build-Thread

  2. #1002
    Senior Member Tamra's Avatar
    Join Date
    Apr 2014
    Location
    Shelton, CT
    Posts
    1,011
    Post Thanks / Like
    Hindsight, just some fiddling to get it right and a lot of luck. We're still not happy with it because we want it to sit more flush, but that will take some adjusting of the hinge, which isn't final yet.

    Getting ready to race tomorrow. This will be the first time out with body panels and first time out with the untested aero. Hope everything works because it's about 2 hours away! We've packed a ton of tools so we can hopefully solve most problems on site. Although the car is street legal, we are towing in case we have any problems (thanks for loaning us your trailer Glyn!).

    We haven't finished putting the ride height and alignment back, but we'll just do it in the morning before the race starts. The site opens at 7 and racing doesn't start until 10, so it shouldn't be a problem. We also packed some 450lb Hypercoil springs in case the 300lb ones in the rear aren't enough with the aero. If we are ambitious maybe we'll just swap them in the morning while we're doing the alignment, rather than waiting until the lunch break

    It's going to be COLD in the morning (weather says 49 degrees at 8am). Guess that heat from the engine bay may not be so bad after all!
    Tamra
    Building 818SR #297 picked up 10/25/14 with Andrew (xxguitarist)
    First start 12/21/14, First "drive" 1/17/15
    First Dyno at EFI Logics 3/7/15- 310whp at 15psi for break in, full spool by ~3500rpm!
    First autocross 3/29/15
    1st Registered 818 in Connecticut 7/24/2015. 9 months - 1 day from kit pickup!

  3. #1003
    Senior Member Tamra's Avatar
    Join Date
    Apr 2014
    Location
    Shelton, CT
    Posts
    1,011
    Post Thanks / Like
    Well, we broke the car today.

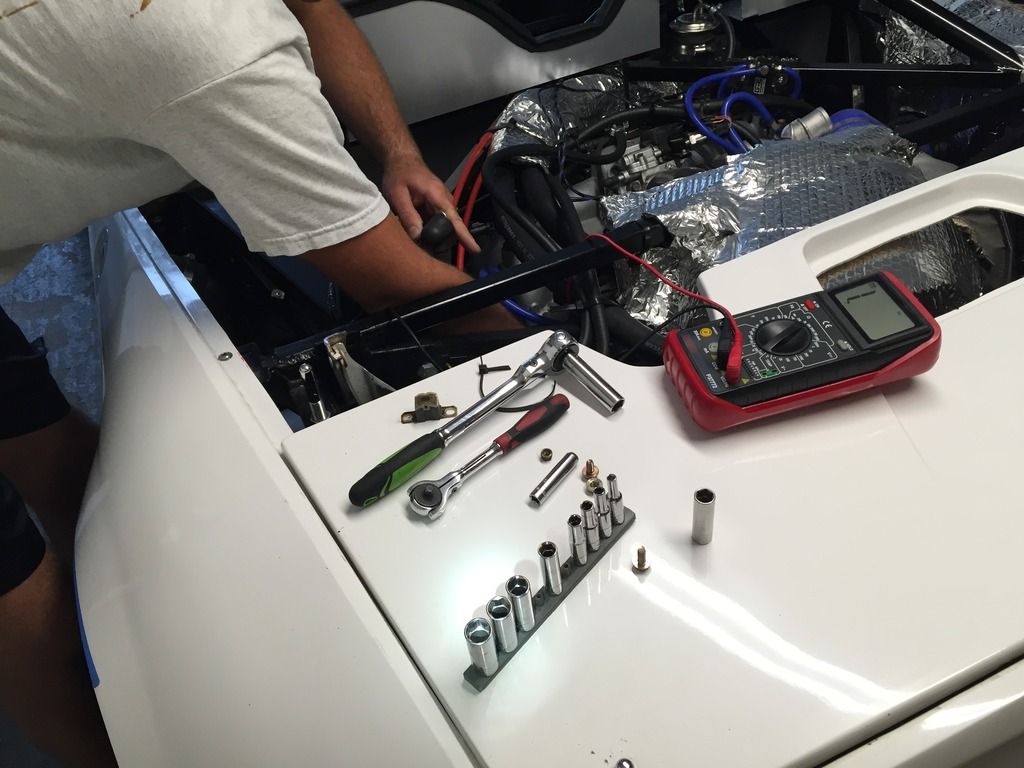
    We figured it would be an axle, or maybe the transmission. Nope, we had an electrical short. The car was driving fine for the first half of the day (10 runs combined), and then suddenly refused to start, acting like the battery was dead. A multimeter showed that our battery's positive and negative terminals were both grounding on the chassis. That parked us for the rest of the day, unfortunately, but not before we got some entertaining videos!!

    We will need to do some more setup work, as the car is now very loose and not confidence inspiring. A lot of changes have been made since our previous outing, including ride height, alignment, and aero. On the plus side, the front splitter protected the bumper from many cone hits (one center peg which actually knocked it off of its rearmost F-bracket mounting point, which you'll see in the video. Easy fix though).

    Blooper reel:


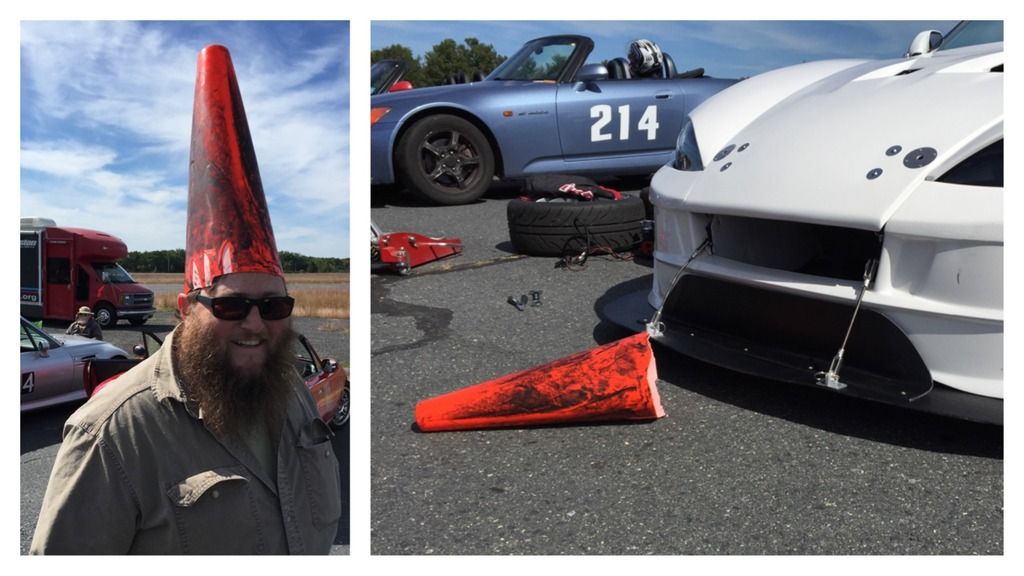
    Video of this moment included in the blooper reel video. Our friend and course worker at the time showing off Andrew's lovely prize. Isn't the definition of splitter "Split-ter: Noun: Device used to separate items into two parts."

    Last edited by Tamra; 09-26-2015 at 09:35 PM.
    Tamra
    Building 818SR #297 picked up 10/25/14 with Andrew (xxguitarist)
    First start 12/21/14, First "drive" 1/17/15
    First Dyno at EFI Logics 3/7/15- 310whp at 15psi for break in, full spool by ~3500rpm!
    First autocross 3/29/15
    1st Registered 818 in Connecticut 7/24/2015. 9 months - 1 day from kit pickup!

  4. #1004
    Senior Member Tamra's Avatar
    Join Date
    Apr 2014
    Location
    Shelton, CT
    Posts
    1,011
    Post Thanks / Like
    Rear aero view. Looks like we'll need to add more support.

    Tamra
    Building 818SR #297 picked up 10/25/14 with Andrew (xxguitarist)
    First start 12/21/14, First "drive" 1/17/15
    First Dyno at EFI Logics 3/7/15- 310whp at 15psi for break in, full spool by ~3500rpm!
    First autocross 3/29/15
    1st Registered 818 in Connecticut 7/24/2015. 9 months - 1 day from kit pickup!

  5. #1005
    Senior Member Tamra's Avatar
    Join Date
    Apr 2014
    Location
    Shelton, CT
    Posts
    1,011
    Post Thanks / Like
    My one clean run before the car died. Not my best driving but I did manage to get it around the course without hitting any cones or spinning.

    Tamra
    Building 818SR #297 picked up 10/25/14 with Andrew (xxguitarist)
    First start 12/21/14, First "drive" 1/17/15
    First Dyno at EFI Logics 3/7/15- 310whp at 15psi for break in, full spool by ~3500rpm!
    First autocross 3/29/15
    1st Registered 818 in Connecticut 7/24/2015. 9 months - 1 day from kit pickup!

  6. #1006
    Moonlight Performance
    Hindsight's Avatar
    Join Date
    May 2014
    Location
    Atlanta
    Posts
    3,402
    Post Thanks / Like
    Looks nice.... very smooth.

  7. #1007
    Senior Member RM1SepEx's Avatar
    Join Date
    Jul 2011
    Location
    Freeport, ME
    Posts
    3,801
    Post Thanks / Like
    I like Josh's hat He hits a lot of cones with our club...
    Dan

    818S #17 Picked up 8/1/13 First start 11/1/13 Go Kart 3/28/14

  8. #1008
    Senior Member Rasmus's Avatar
    Join Date
    Mar 2012
    Location
    Las Vegas, USA
    Posts
    983
    Post Thanks / Like
    Quote Originally Posted by Tamra View Post
    We will need to do some more setup work, as the car is now very loose and not confidence inspiring.
    I with you there. When you can't trust the car not to snap around on you, you'll tend to drive timid. Which makes it frustrating.
    Fast Cars, Fast Women, Fast Haircuts!

  9. #1009
    Senior Member Tamra's Avatar
    Join Date
    Apr 2014
    Location
    Shelton, CT
    Posts
    1,011
    Post Thanks / Like
    Quote Originally Posted by Hindsight View Post
    Looks nice.... very smooth.
    I'm guessing you're not referring to the blooper video

    Quote Originally Posted by RM1SepEx View Post
    I like Josh's hat He hits a lot of cones with our club...
    You realize that cone was hit by the 818, right? The splitter literally sliced the cone off its base! Josh is great.

    Quote Originally Posted by Rasmus View Post
    I with you there. When you can't trust the car not to snap around on you, you'll tend to drive timid. Which makes it frustrating.
    Agreed. We've got a long road of development ahead of us. I'm sure it will make us better drivers in the meantime!
    Tamra
    Building 818SR #297 picked up 10/25/14 with Andrew (xxguitarist)
    First start 12/21/14, First "drive" 1/17/15
    First Dyno at EFI Logics 3/7/15- 310whp at 15psi for break in, full spool by ~3500rpm!
    First autocross 3/29/15
    1st Registered 818 in Connecticut 7/24/2015. 9 months - 1 day from kit pickup!

  10. #1010
    Senior Member Bob_n_Cincy's Avatar
    Join Date
    Sep 2012
    Location
    Cincinnati OH
    Posts
    3,903
    Post Thanks / Like
    Quote Originally Posted by Tamra View Post
    You realize that cone was hit by the 818, right? The splitter literally sliced the cone off its base! Josh is great.
    Did the bottom of the cone stay in the box?
    818S #22 Candy Blue Frame, Front Gas Tank, 2.5L Turbo, Rear radiator, Shortened Transmission, Wookiee Compatible, Console mounted MR2 Shifter, Custom ECU panel, AWIC soon
    My Son Michael's Turbo ICE Build X22 http://thefactoryfiveforum.com/showt...rts-818S-Build
    My Electric Supercar Build X21 (on hold until winter) http://thefactoryfiveforum.com/showt...e-Build-Thread

  11. #1011
    Senior Member Rasmus's Avatar
    Join Date
    Mar 2012
    Location
    Las Vegas, USA
    Posts
    983
    Post Thanks / Like
    SCCA Solo cones are so stank. I'm no germ-a-phobe but yuck. Might as well put a halo of used bathroom floor tile from a NASCAR event on your head. Nasty. I started wearing gloves to shag cones shortly after I realized that local clubs never wash the cones.

    Quote Originally Posted by Bob_n_Cincy View Post
    Did the bottom of the cone stay in the box?
    I thought I knew the rules of Solo. I'd guess that if the cone was cut by the car, the two parts would have to both land upright and in the box. But if I was slicing cones with my car I'd expect a stern talking to from the Safety Steward and a halt to my runs until I fixed it.
    Fast Cars, Fast Women, Fast Haircuts!

  12. #1012
    Senior Member Tamra's Avatar
    Join Date
    Apr 2014
    Location
    Shelton, CT
    Posts
    1,011
    Post Thanks / Like
    Quote Originally Posted by Bob_n_Cincy View Post
    Did the bottom of the cone stay in the box?
    No, but that would have been epic!

    Quote Originally Posted by Rasmus View Post
    SCCA Solo cones are so stank. I'm no germ-a-phobe but yuck. Might as well put a halo of used bathroom floor tile from a NASCAR event on your head. Nasty. I started wearing gloves to shag cones shortly after I realized that local clubs never wash the cones.

    I thought I knew the rules of Solo. I'd guess that if the cone was cut by the car, the two parts would have to both land upright and in the box. But if I was slicing cones with my car I'd expect a stern talking to from the Safety Steward and a halt to my runs until I fixed it.
    eh, whatever. I get greasy and gross working on a car, the cones don't phase me! Before we eat lunch I just use hand sanitizer Or I don't eat the crust of the pizza where I held it....

    I think people were impressed that we actually sliced a cone! It was quite the entertainment for everyone lol. BTW, it's a 3/16" blunt edge. He must have used the length of the splitter to slice across it during his spin. Not a word from the safety steward
    Tamra
    Building 818SR #297 picked up 10/25/14 with Andrew (xxguitarist)
    First start 12/21/14, First "drive" 1/17/15
    First Dyno at EFI Logics 3/7/15- 310whp at 15psi for break in, full spool by ~3500rpm!
    First autocross 3/29/15
    1st Registered 818 in Connecticut 7/24/2015. 9 months - 1 day from kit pickup!

  13. #1013
    Senior Member Tamra's Avatar
    Join Date
    Apr 2014
    Location
    Shelton, CT
    Posts
    1,011
    Post Thanks / Like
    So to give everyone an update... our electrical issue from the weekend has turned into a major problem. We have been chasing it down the last few nights and not having much luck yet. If anyone has any ideas other than to just continue looking for our needle(s) in a haystack, we'd love to hear them.

    I'll give you the run down of the steps we've taken. These were the results using a multimeter.


    So basically we worked on process of elimination for which items were shorted:
    1) the battery was shorted. Disconnected the power, the battery was then good.
    2) the main power line was shorted. Disconnected the power line from the starter, and it was then good, indicating the main power line was good.
    3) Starter was then shorted. Disconnected small pink cables between starter and fuse block, and starter was then good.
    4) small pink wires were shorted, so disconnected them from the fuse block, they were then good.
    5) Fuse block was shorted. Started pulling fuses until we figured out which fuse (50amp) caused the short to go away. This means that something downstream of that 50amp fuse (somewhere in the wiring harness) is shorted.
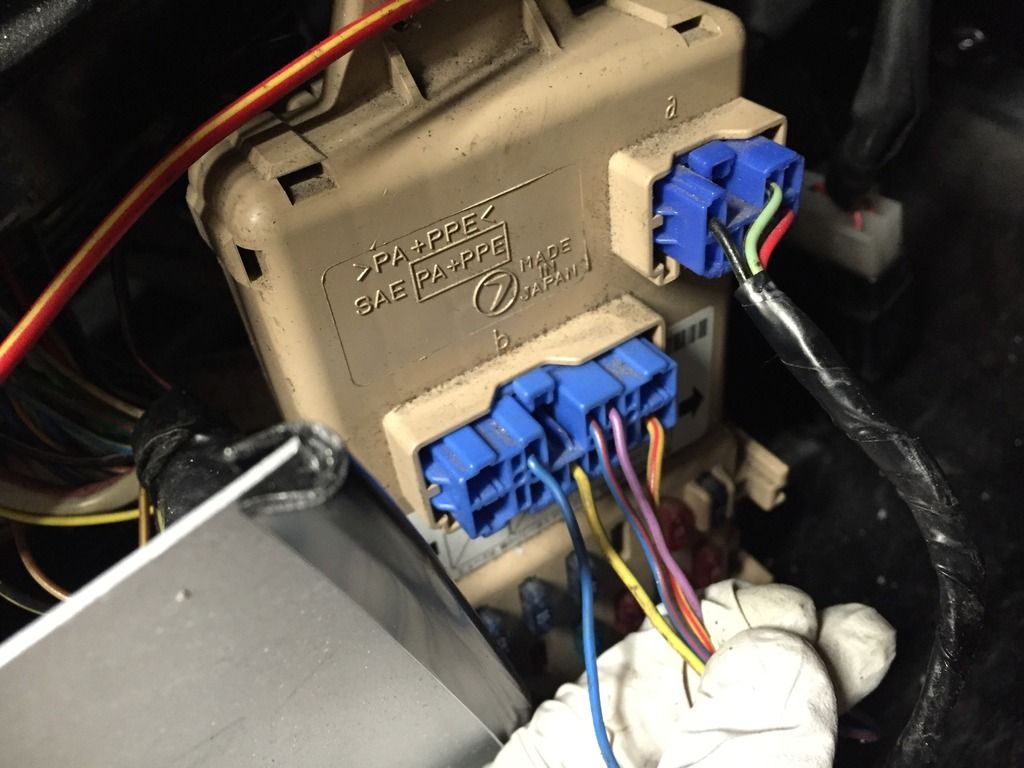
    6) Worked our way to the fuse box in the passenger footwell and fuse #4 was causing the short. This is where it gets confusing. Disconnecting the fuse only got rid of part of the short, which would indicate that the line running between the main fuse and the passenger fuse box is shorted, AND there is another short after the passenger fuse box somewhere. It's possible that when one shorted, it then heated up further down the line and caused another point to heat up and melt, and then short. Not sure yet.
    7) Multiple wires in the blue connector on the front of the fuse block are shorted. Purple, yellow/red, and yellow/green are shorted.


    Other variables:
    The short is only present with the key in the on position.

    That's about as far as we've made it so far.

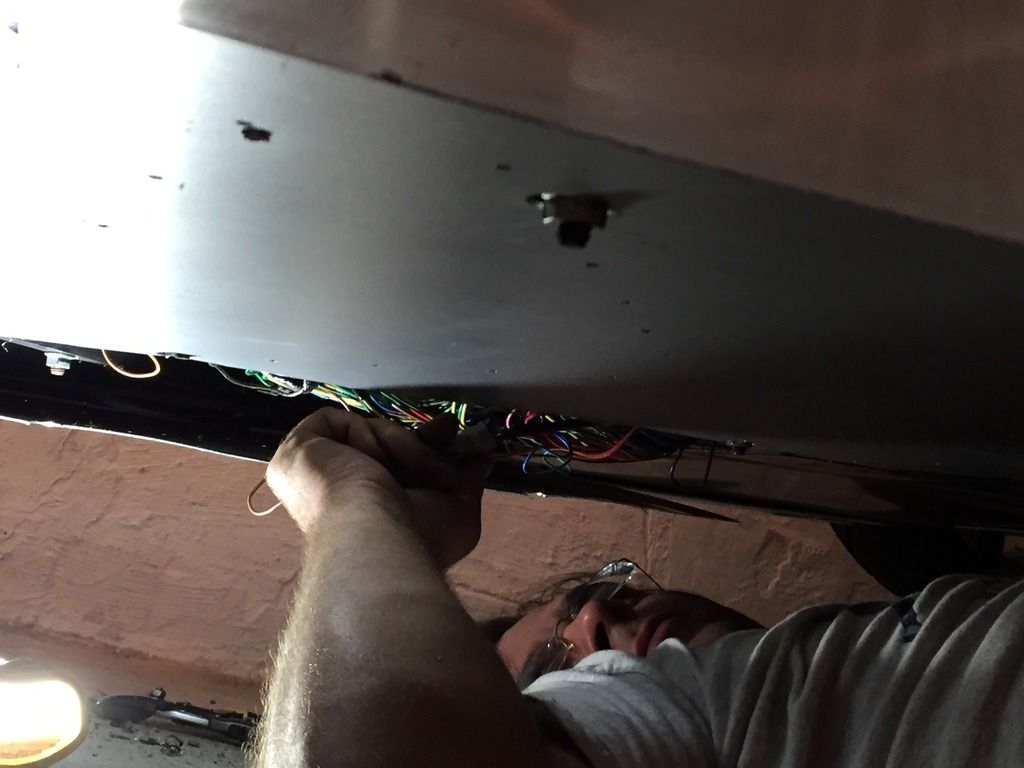
    We cut an access hole in the undertray. In case you didn't know, the undertray is riveted UNDER the side side sails, making it impossible to remove with them on. We didn't want to remove body panels, so we cut the under tray instead. We'll make a new plate to cover the hole after we figure things out.


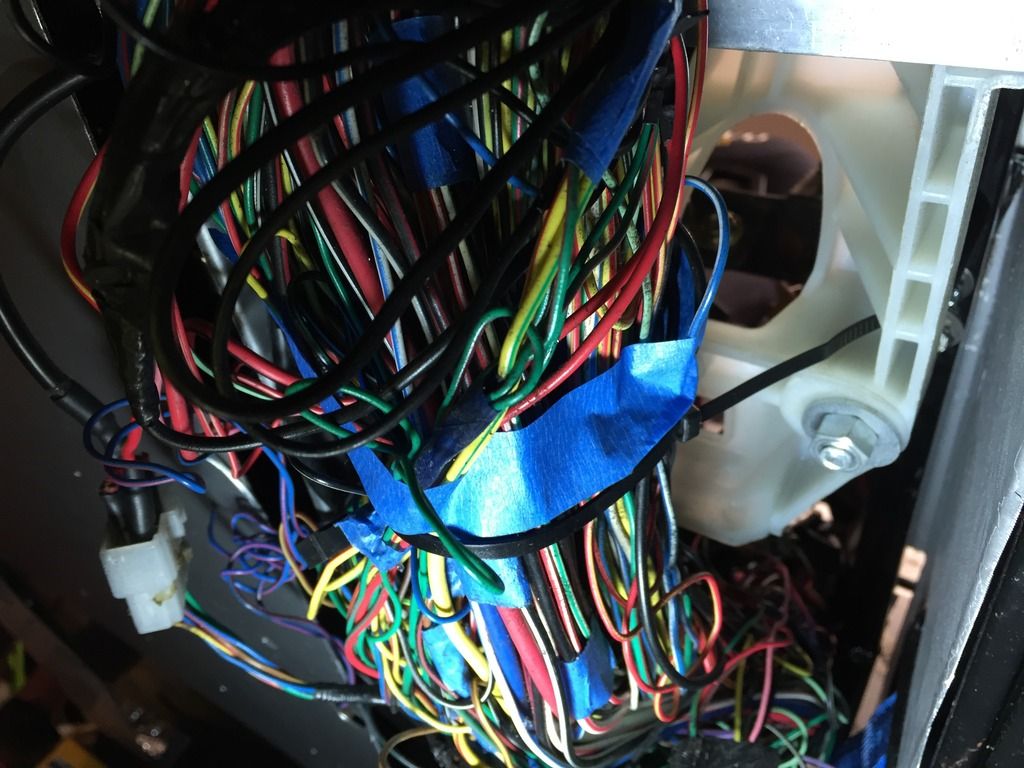
    Wiggling the bundle of wires for awhile started to point to the short(s) being somewhere near the tape on this bundle under the shifter. Moving up and down didn't seem to make a difference, so that would indicate that the wires are shorting on each other rather than frame.


    Something else we have learned from this experience is the necessity of having fuse boxes accessible. Center of the firewall above the fuel tank is not accessible.... add that to the list of winter improvement projects.
    Tamra
    Building 818SR #297 picked up 10/25/14 with Andrew (xxguitarist)
    First start 12/21/14, First "drive" 1/17/15
    First Dyno at EFI Logics 3/7/15- 310whp at 15psi for break in, full spool by ~3500rpm!
    First autocross 3/29/15
    1st Registered 818 in Connecticut 7/24/2015. 9 months - 1 day from kit pickup!

  14. #1014
    Senior Member
    Join Date
    Dec 2014
    Location
    north east ct
    Posts
    160
    Post Thanks / Like
    tamra see brian at iwire and for get all your problums i know lots of money but he makes it real simple and would be real easy to find problums brian

  15. #1015
    Senior Member D Clary's Avatar
    Join Date
    Aug 2013
    Location
    Santa Rosa CA
    Posts
    407
    Post Thanks / Like
    How are you checking for the short? Are there blown fuses or just no power? If you are just using an ohm meter to check to ground t can be misleading as you will get continuity through normal circuits to ground. I suspect you have a loose connection some where. If you connect the battery is there voltage at the battery? If yes. make sure there is voltage to the ignition switch. If no, test the battery. If there is power at the switch but goes away when you turn it on, there is a bad connection before the switch or at the switch. Your diagnosis will be easier with a test light than an ohm meter. If you had a short to ground there would be blown fuses and or smoke. What you are looking for I think is an open circuit, either ground or hot. If everything went dead it is probably athe the battery, main fuse panel or ignition switch. I would start with the largest circuits and work my way down. Stop taking the car apart and reason it out.
    Last edited by D Clary; 09-29-2015 at 10:12 AM.

  16. #1016
    Senior Member
    Join Date
    Dec 2014
    Location
    north east ct
    Posts
    160
    Post Thanks / Like
    tamra what year harness are you using brian

  17. #1017
    Senior Member xxguitarist's Avatar
    Join Date
    Nov 2013
    Posts
    389
    Post Thanks / Like
    Quote Originally Posted by D Clary View Post
    How are you checking for the short? Are there blown fuses or just no power? If you are just using an ohm meter to check to ground t can be misleading as you will get continuity through normal circuits to ground. I suspect you have a loose connection some where. If you connect the battery is there voltage at the battery? If yes. make sure there is voltage to the ignition switch. If no, test the battery. If there is power at the switch but goes away when you turn it on, there is a bad connection before the switch or at the switch. Your diagnosis will be easier with a test light than an ohm meter. If you had a short to ground there would be blown fuses and or smoke. What you are looking for I think is an open circuit, either ground or hot. If everything went dead it is probably athe the battery, main fuse panel or ignition switch. I would start with the largest circuits and work my way down. Stop taking the car apart and reason it out.
    We are checking for short with a multimeter.
    1.6 ohms from starter B+ lead to chassis ground can't be normal.
    I=V/R, 7.5A going through the short. Not enough to blow a 50A fuse, or to toast the wires.

    The battery has voltage. It's probably a bit toast now from the short, but it has resting voltage over 12v.
    The chassis to B- shows a voltage ~9v when the B+is connected, so there is a short to the chassis or other ground that there should not be.

    Given the current and chassis going high, I'm going to re-check the main chassis ground, and make sure it has good contact. I'd think it would pull the chassis back to ground better than that, so I think there's some resistance in that grounding also.

    We have been working progressively, and working our way away from the battery.

    The fact that we found an area that gets rid of the short suggests there is more at play than an unplugged connector..


    Brian, it's an 02.
    -Andrew

    Building 818S/R #297 with Tamra
    08 Mazdaspeed3 | '12 F800R | '97 Miata

  18. #1018
    Senior Member D Clary's Avatar
    Join Date
    Aug 2013
    Location
    Santa Rosa CA
    Posts
    407
    Post Thanks / Like
    7.5a not enough to kill the car

  19. #1019
    Senior Member xxguitarist's Avatar
    Join Date
    Nov 2013
    Posts
    389
    Post Thanks / Like
    It is when the chassis (gnd) to +12v is a 3v differential. Ground reference is being pulled up by the short. Anything chassis ground referenced is not seeing 12v.
    -Andrew

    Building 818S/R #297 with Tamra
    08 Mazdaspeed3 | '12 F800R | '97 Miata

  20. #1020
    Senior Member D Clary's Avatar
    Join Date
    Aug 2013
    Location
    Santa Rosa CA
    Posts
    407
    Post Thanks / Like
    What I am saying that a 7.5 amp short will not pull the battery down 3 volts. It sounds like you have a ground problem.

  21. #1021
    Senior Member
    Join Date
    Dec 2014
    Location
    north east ct
    Posts
    160
    Post Thanks / Like
    call me

  22. #1022
    818 builder metalmaker12's Avatar
    Join Date
    Mar 2012
    Location
    Exeter R.I
    Posts
    2,834
    Post Thanks / Like
    Blog Entries
    1
    Check Starter ground, engine harness ground, all grounds and wires, connections to all grounds. Maybe a connection you Mae came loose from beating on the car.
    818S frame #13 Jdm version 8 ej207

  23. #1023
    Senior Member xxguitarist's Avatar
    Join Date
    Nov 2013
    Posts
    389
    Post Thanks / Like
    Well, Bug started tonight!

    We had checked thoroughly the main ground to chassis, starter strap, and ground lug on the battery to the terminal, but we missed that the terminal then clamped onto a crimp connector on the main ground wire.

    I found it while watching the current off the positive terminal through one meter and the voltage across the terminals on another, the moved the current meter to voltage, and checked another spot on the terminal- a bare spot of wire on the ground just past the crimp. Noticed the difference. The actual wires were showing that they were floating above ground by ~9v.

    This connection was a little loose, and rather corroded. Brushed/scraped, and tightened back down. All signs looked good, so we fired it up!


    My reservation in declaring the car fixed:
    We saw a short when looking on the inside (protected side) of MB-4 50A fuse. It was intermittent, and dependent on wiggling a section of wires in the center console. We have not *yet* found a visibly abraded wire, but the intermittent nature is worrying for me. It definitely responded to wire movement, and those wires cannot result in moving the main battery ground.
    My understanding of the meter's resistance measurement gets a little fuzzy, when the lower reference point is not as expected. It's possible that with no battery ground, I was making some incorrect assumptions on what the resistance meant between two points, since the frame/battery/ground wasn't quite as constant as expected, I'm not sure how the meter interprets its resistance signal voltage/current.
    -Andrew

    Building 818S/R #297 with Tamra
    08 Mazdaspeed3 | '12 F800R | '97 Miata

  24. #1024
    Senior Member Bob_n_Cincy's Avatar
    Join Date
    Sep 2012
    Location
    Cincinnati OH
    Posts
    3,903
    Post Thanks / Like
    Quote Originally Posted by xxguitarist View Post
    Well, Bug started tonight!

    My reservation in declaring the car fixed:
    We saw a short when looking on the inside (protected side) of MB-4 50A fuse. It was intermittent, and dependent on wiggling a section of wires in the center console. We have not *yet* found a visibly abraded wire, but the intermittent nature is worrying for me. It definitely responded to wire movement, and those wires cannot result in moving the main battery ground.
    .
    Andrew
    A corroded connect will change resistance with very little movement. while you were wiggling wire there was probably small car movement.
    I suspect your good to go.
    Bob
    818S #22 Candy Blue Frame, Front Gas Tank, 2.5L Turbo, Rear radiator, Shortened Transmission, Wookiee Compatible, Console mounted MR2 Shifter, Custom ECU panel, AWIC soon
    My Son Michael's Turbo ICE Build X22 http://thefactoryfiveforum.com/showt...rts-818S-Build
    My Electric Supercar Build X21 (on hold until winter) http://thefactoryfiveforum.com/showt...e-Build-Thread

  25. #1025
    Senior Member xxguitarist's Avatar
    Join Date
    Nov 2013
    Posts
    389
    Post Thanks / Like
    Thanks Bob,
    My concern is that there is no tangible connection between the wiring harness and the primary ground. It goes to chassis, and the wiring is secured away from the service loop.
    Anything is possible, but it's an odd situation.
    -Andrew

    Building 818S/R #297 with Tamra
    08 Mazdaspeed3 | '12 F800R | '97 Miata

  26. #1026
    Senior Member Bob_n_Cincy's Avatar
    Join Date
    Sep 2012
    Location
    Cincinnati OH
    Posts
    3,903
    Post Thanks / Like
    Quote Originally Posted by xxguitarist View Post
    Thanks Bob,
    My concern is that there is no tangible connection between the wiring harness and the primary ground. It goes to chassis, and the wiring is secured away from the service loop.
    Anything is possible, but it's an odd situation.
    Hi Andrew,
    On my donor there 2 wires coming out of the battery negative connector.
    1. The large wire (#4 or#6) went to the engine block making the block the primary ground point for all engine related functions.
    2. The small wire (#6 or#8) went to the chassis. Making the chassis the primary ground point for other junk. (lights, horn, fans, locks, windows, ect.)

    I would wire your car the same as donor.

    Bob
    818S #22 Candy Blue Frame, Front Gas Tank, 2.5L Turbo, Rear radiator, Shortened Transmission, Wookiee Compatible, Console mounted MR2 Shifter, Custom ECU panel, AWIC soon
    My Son Michael's Turbo ICE Build X22 http://thefactoryfiveforum.com/showt...rts-818S-Build
    My Electric Supercar Build X21 (on hold until winter) http://thefactoryfiveforum.com/showt...e-Build-Thread

  27. #1027
    Senior Member STiPWRD's Avatar
    Join Date
    Jan 2014
    Location
    Leesburg, VA
    Posts
    1,624
    Post Thanks / Like
    There are several ground terminal lugs throughout the harness, have you made sure those have all been attached to chassis? I had at least 3-4 ground terminal lugs attached along the center tunnel frame. I think this is what Bob is alluding to.

  28. #1028
    Senior Member xxguitarist's Avatar
    Join Date
    Nov 2013
    Posts
    389
    Post Thanks / Like
    Bob, valid point.
    What's your opinion: OK to leave using chassis as a ground path to the engine until we relocate our battery this winter?

    I'd rather not run a 12' 2 awg wire the length of the car if not necessary for maybe one more event and a few street miles. We'll move it in the winter to behind the passenger seat, and then ground to the engine & chassis each directly.

    STi,
    I know what Bob means, and it's about the main battery grounds, but yes, we have a pile of grounds in the center frame rails. Maybe closer to 6.
    -Andrew

    Building 818S/R #297 with Tamra
    08 Mazdaspeed3 | '12 F800R | '97 Miata

  29. #1029
    Moonlight Performance
    Hindsight's Avatar
    Join Date
    May 2014
    Location
    Atlanta
    Posts
    3,402
    Post Thanks / Like
    Andrew, some really good info here on grounding, ground loops, dangers, etc: http://www.w8ji.com/negative_lead_to_battery.htm

    And more on battery wiring in general: http://www.w8ji.com/battery_wiring.htm

  30. #1030
    Senior Member Bob_n_Cincy's Avatar
    Join Date
    Sep 2012
    Location
    Cincinnati OH
    Posts
    3,903
    Post Thanks / Like
    Quote Originally Posted by xxguitarist View Post
    Bob, valid point.
    What's your opinion: OK to leave using chassis as a ground path to the engine until we relocate our battery this winter?
    Hi Andrew,
    Leave it the same until this winter. Just make sure you have very good connections on both ends of your engine ground strap.
    You don't want starting current going through the #18 sensor ground wires.
    Bob
    818S #22 Candy Blue Frame, Front Gas Tank, 2.5L Turbo, Rear radiator, Shortened Transmission, Wookiee Compatible, Console mounted MR2 Shifter, Custom ECU panel, AWIC soon
    My Son Michael's Turbo ICE Build X22 http://thefactoryfiveforum.com/showt...rts-818S-Build
    My Electric Supercar Build X21 (on hold until winter) http://thefactoryfiveforum.com/showt...e-Build-Thread

  31. #1031
    Senior Member
    Join Date
    Dec 2014
    Location
    north east ct
    Posts
    160
    Post Thanks / Like
    andrew call me i when you have a chance 860 982 3477

  32. #1032
    Senior Member Oppenheimer's Avatar
    Join Date
    Feb 2011
    Location
    Milford, CT
    Posts
    946
    Post Thanks / Like
    For crimps like this, I like to coat the bare wire ends with grease to prevent corrosion. They say to use dielectric grease, but I prefer conductive grease (I want current to easily pass from conductor strand to strand, and from conductor to crimp). Just a thin coat, then crimp, then seal it in with heat shrink tubing.

    One thing that is confusing is the issue you fixed is an open (or a partial open), while the issue you were troubleshooting for was a short. But it sounds like it really was an open all along, a grounding issue, that resulted in ground floating several volts above zero, such that components were not getting their full 12v, and failing to operate (car acted like battery was not supplying the full 12v). Do you think there is still an intermittent short? (another, separate issue?)

  33. #1033
    818 builder metalmaker12's Avatar
    Join Date
    Mar 2012
    Location
    Exeter R.I
    Posts
    2,834
    Post Thanks / Like
    Blog Entries
    1
    Wow your all talking about a simple fix for way too long, but glad you found it.
    818S frame #13 Jdm version 8 ej207

  34. #1034
    Senior Member Tamra's Avatar
    Join Date
    Apr 2014
    Location
    Shelton, CT
    Posts
    1,011
    Post Thanks / Like
    Oppenheimer, we did some more testing and there is no indication of a short now that the ground issue is corrected. Since the frame was reading 9 volts during the issue, we are thinking it must have been messing up the multimeter's reading. The very first thing we checked was the terminals - cleaned them, made sure they were tight etc. Little did we know we were 1" away from the issue!


    The car is all put back together now and the ride height is halfway done. We are putting the car back to how it was for our initial autocrossing back in April (we marked all of the settings). It's low - too low probably. The springs have settled significantly, so although we started with a ~4" ride height initially, I think we are closer to 3.5" now (will get final measurements later tonight once it's back on the ground), and probably under 3" with the race tires on. In April we had around 1/4" of forward rake, but last weekend we had 1/2". We think this contributed to the looseness. In April, the setup felt forgiving and very fun, so we want to go back to it as our baseline, and make adjustments from there.

    We did not have any rubbing issue last weekend (except one time when I locked up the brakes in a very sharp corner, and the front right rubbed slightly), despite the fact that our Hoosiers poke out of the wheel wells significantly. The smaller diameter probably helped (15's in the front and 16's in the rear). Considering we just lowered the car around 1/2" all around, we will have to watch closely again.

    This week we will also reinforce the splitter and ducktail a little more.

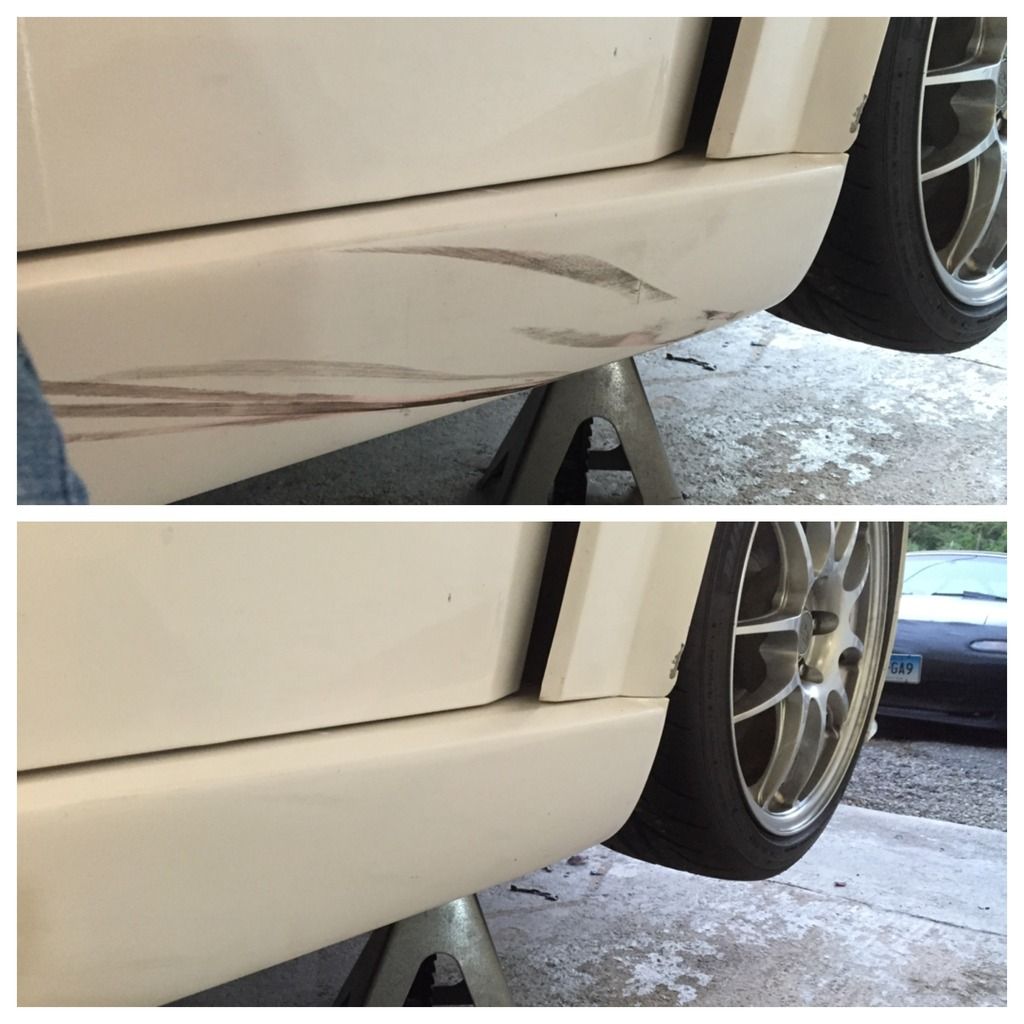
    Last night I spent a few minutes removing cone scuffs. A little rubbing alcohol and clay bar did the trick quickly. We also polished and waxed one small spot to test it out, and it made a huge difference. We'd probably get less cone scuffs if we did the entire car. You can see where a cone took out a chunk of gel coat on the fender.
    Tamra
    Building 818SR #297 picked up 10/25/14 with Andrew (xxguitarist)
    First start 12/21/14, First "drive" 1/17/15
    First Dyno at EFI Logics 3/7/15- 310whp at 15psi for break in, full spool by ~3500rpm!
    First autocross 3/29/15
    1st Registered 818 in Connecticut 7/24/2015. 9 months - 1 day from kit pickup!

  35. #1035
    Senior Member Tamra's Avatar
    Join Date
    Apr 2014
    Location
    Shelton, CT
    Posts
    1,011
    Post Thanks / Like
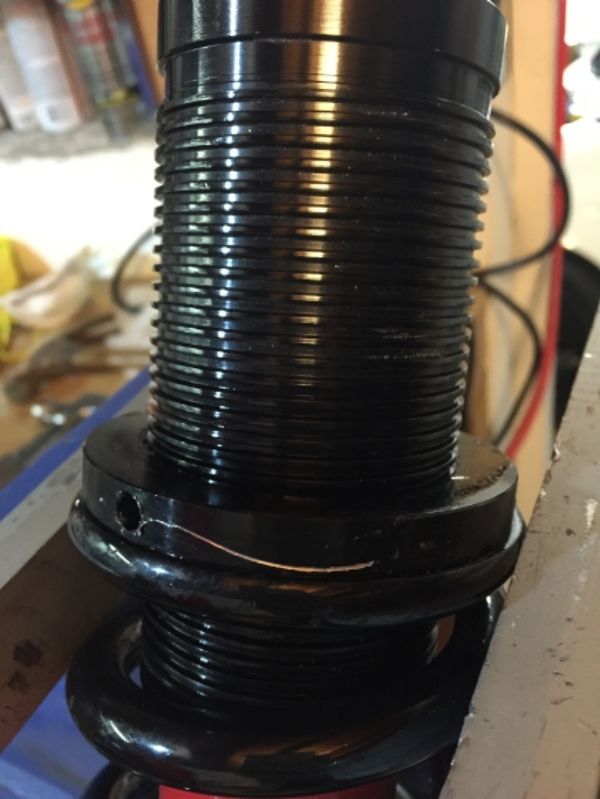
    Tonight was not fun, but we finished adjusting the ride height. After putting pre-load into our Konis (the race shocks) in order to hit minimum ride height to pass inspection (slightly over 4"), the collars froze to the sleeves. When we tried to spin the collars, the sleeves would just spin on the shock bodies. All of them were clean, free of dirt, and rust free.

    Clean sleeves:


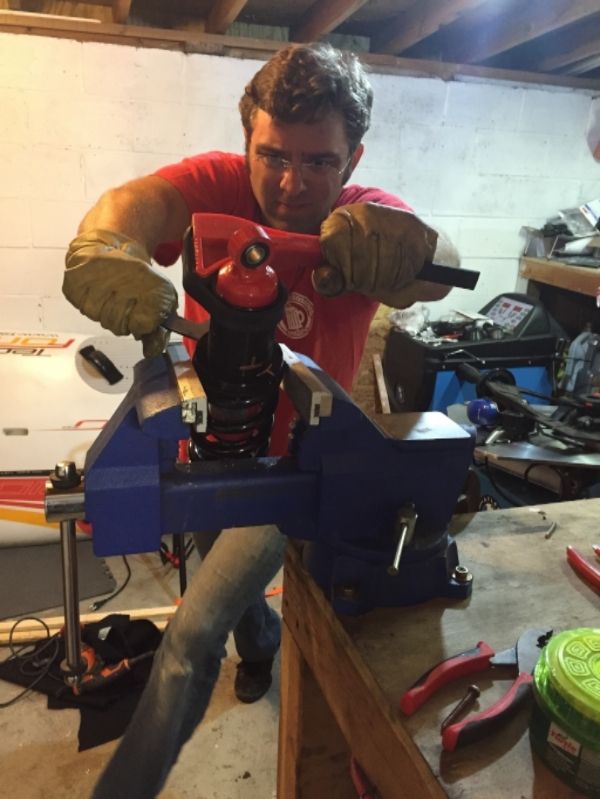
    Three of the four corners we were able to grease the collar and use a strap wrench on the sleeve, combined with a lot of effort, and got them to move. The 4th (front driver), would not budge. We even tried using a torch sparingly (didn't want to damage the powder coat). We finally had to pull it off and put it in the vice, combined with using a strap wrench, and an extension on the arm of the shock adjuster, before we could get it to budge.


    So in our experience, if you put preload into your shocks, you may never be able to adjust them again. Has anyone found a solution for this?

    Our final ride height with our race Konis set at "just snugged" (minimum preload at full droop), front upper shock at the R bolt hole (lower), rear shock at the street holes:
    2 7/8" front, 3 1/16" rear, at the rocker panel.

    This is with 245/40/15 (22.7" diameter) and 245/45/16 (23.7" diameter) Hoosiers.

    We estimate that our street ride height would be 3 5/8" front and 3 3/4" rear, with our 215/40/17 (23.8" diameter) front and 255/40/17 (25.0" diameter) rear. We will not make it over speed bumps at this height, so it is not practical.

    I'm not sure what the solution is to get a taller ride height, because putting preload into the springs obviously binds them badly. The front we could just put into the other bolt hole, but not the rear. We could go stiffer springs, perhaps. Not sure if that would be enough.
    Tamra
    Building 818SR #297 picked up 10/25/14 with Andrew (xxguitarist)
    First start 12/21/14, First "drive" 1/17/15
    First Dyno at EFI Logics 3/7/15- 310whp at 15psi for break in, full spool by ~3500rpm!
    First autocross 3/29/15
    1st Registered 818 in Connecticut 7/24/2015. 9 months - 1 day from kit pickup!

  36. #1036
    Senior Member Bob_n_Cincy's Avatar
    Join Date
    Sep 2012
    Location
    Cincinnati OH
    Posts
    3,903
    Post Thanks / Like
    Quote Originally Posted by Tamra View Post
    Tonight was not fun, but we finished adjusting the ride height. After putting pre-load into our Konis (the race shocks) in order to hit minimum ride height to pass inspection (slightly over 4"), the collars froze to the sleeves. When we tried to spin the collars, the sleeves would just spin on the shock bodies. All of them were clean, free of dirt, and rust free.

    Three of the four corners we were able to grease the collar and use a strap wrench on the sleeve, combined with a lot of effort, and got them to move. The 4th (front driver), would not budge. We even tried using a torch sparingly (didn't want to damage the powder coat). We finally had to pull it off and put it in the vice, combined with using a strap wrench, and an extension on the arm of the shock adjuster, before we could get it to budge.

    So in our experience, if you put preload into your shocks, you may never be able to adjust them again. Has anyone found a solution for this?

    Our final ride height with our race Konis set at "just snugged" (minimum preload at full droop), front upper shock at the R bolt hole (lower), rear shock at the street holes:
    2 7/8" front, 3 1/16" rear, at the rocker panel.

    This is with 245/40/15 (22.7" diameter) and 245/45/16 (23.7" diameter) Hoosiers.

    We estimate that our street ride height would be 3 5/8" front and 3 3/4" rear, with our 215/40/17 (23.8" diameter) front and 255/40/17 (25.0" diameter) rear. We will not make it over speed bumps at this height, so it is not practical.

    I'm not sure what the solution is to get a taller ride height, because putting preload into the springs obviously binds them badly. The front we could just put into the other bolt hole, but not the rear. We could go stiffer springs, perhaps. Not sure if that would be enough.
    Tamra,
    I have preload on all my springs and have re-adjusted them 3 or 4 times. No Problems.

    Maybe dirt or grit is running down the thread tube and getting into the lock ring threads.

    Preload should not really matter. The weight of each corner is the amount of pressure on each locking ring.

    My locking ring set screws have nylon tips. I have been careful not to over tighten them and damage the threads.

    Overall I don't like the locking rings. They are a pain to adjust under preload.

    These Koni locking rings lock by tightening 2 rings together. I might try these on my second car.

    locking rings.jpg
    Bob
    Last edited by Bob_n_Cincy; 10-05-2015 at 10:30 PM.
    818S #22 Candy Blue Frame, Front Gas Tank, 2.5L Turbo, Rear radiator, Shortened Transmission, Wookiee Compatible, Console mounted MR2 Shifter, Custom ECU panel, AWIC soon
    My Son Michael's Turbo ICE Build X22 http://thefactoryfiveforum.com/showt...rts-818S-Build
    My Electric Supercar Build X21 (on hold until winter) http://thefactoryfiveforum.com/showt...e-Build-Thread

  37. #1037
    Senior Member Tamra's Avatar
    Join Date
    Apr 2014
    Location
    Shelton, CT
    Posts
    1,011
    Post Thanks / Like
    We were adjusting them with the car in the air (0 corner weight), so the only load was preload. We don't think ours have nylon tips but we will double check tomorrow.

    Andrew likes the locknut approach and the pinch bolt approach, so maybe we will try one of those.

    We are pretty sure they were clean. Even after spinning them out they still looked clean. They got easier and easier until we could spin them freely by hand as the preload reduced.
    Tamra
    Building 818SR #297 picked up 10/25/14 with Andrew (xxguitarist)
    First start 12/21/14, First "drive" 1/17/15
    First Dyno at EFI Logics 3/7/15- 310whp at 15psi for break in, full spool by ~3500rpm!
    First autocross 3/29/15
    1st Registered 818 in Connecticut 7/24/2015. 9 months - 1 day from kit pickup!

  38. #1038
    Senior Member RM1SepEx's Avatar
    Join Date
    Jul 2011
    Location
    Freeport, ME
    Posts
    3,801
    Post Thanks / Like
    I had to use a strap wrench on mine too but they all spin freely with the wheel in the air.
    Dan

    818S #17 Picked up 8/1/13 First start 11/1/13 Go Kart 3/28/14

  39. #1039
    East Coast Speed Machines Erik W. Treves's Avatar
    Join Date
    Feb 2011
    Location
    Huntsville, Al
    Posts
    2,108
    Post Thanks / Like
    I always put a little bit of anti-seize on the collar just to keep the collar and ring from becoming one.
    FFR 1879, Blown DSS 306,REDLINE management, VeryCoolParts Tuned 460RWHP

    FFR 818S, The Flash, Chassis #5, 2.0L, LSD, Electromotive TEC-S, VCP Tuned, 278RWHP 265 RWTQ

    FFR 6651, Green Lantern, 408W Crate, Hellion 66mm Turbo, JGS Waste gate / Blowoff valve, Tec-GT management, VCP Tuned, 575 RWHP, 690 RWTQ

    FFR 8335, Black Mamba, 289 FIA CSX 2001 tribute car, 347, 48 IDA webers, VCP Tuned, 311 RWHP 386 RWTQ, 3-link, Trigo's

    FFR 0004, Gen 3 , Hawk Coupe, Coyote twin turbo, 683 RWHP 559 RWTQ, IRS, VCP Tuned. "not too shabby"

    US ARMY Maintenance Test Pilot (CW4 Retired)

  40. #1040
    Senior Member
    Join Date
    Jul 2011
    Location
    Joliet, IL
    Posts
    138
    Post Thanks / Like
    Long time follower, first time poster.

    You two seem to be pretty o top of things so you may have tried this but didn't mention it. Have you tried to use a spring compressor to take the load off the collars when you adjust your shocks?I know those are smaller diameter than most OEM springs but you should be able to get one in there. There are several styles so it may take some trial and error. Probably can't use them while the shocks are on the car.

    Keep up the great work! I love seeing your scientific method approach to just about everything on the car. Great ideas.

    Joe
    FFR Spec Racer

Page 26 of 37 FirstFirst ... 16242526272836 ... LastLast

Posting Permissions

  • You may not post new threads
  • You may not post replies
  • You may not post attachments
  • You may not edit your posts
  •  

Replica Parts

Visit our community sponsor