Boig Motorsports

Visit our community sponsor

Thanks Thanks:  1
Likes Likes:  3
Page 4 of 37 FirstFirst ... 2345614 ... LastLast
Results 121 to 160 of 1452

Thread: Andrew & Tamra's 818SR EM Autox Hybrid Destroked Long-Rod Build

  1. #121
    Senior Member
    Join Date
    Feb 2014
    Posts
    278
    Post Thanks / Like
    Heat and a pry bar will fix those headers right up.

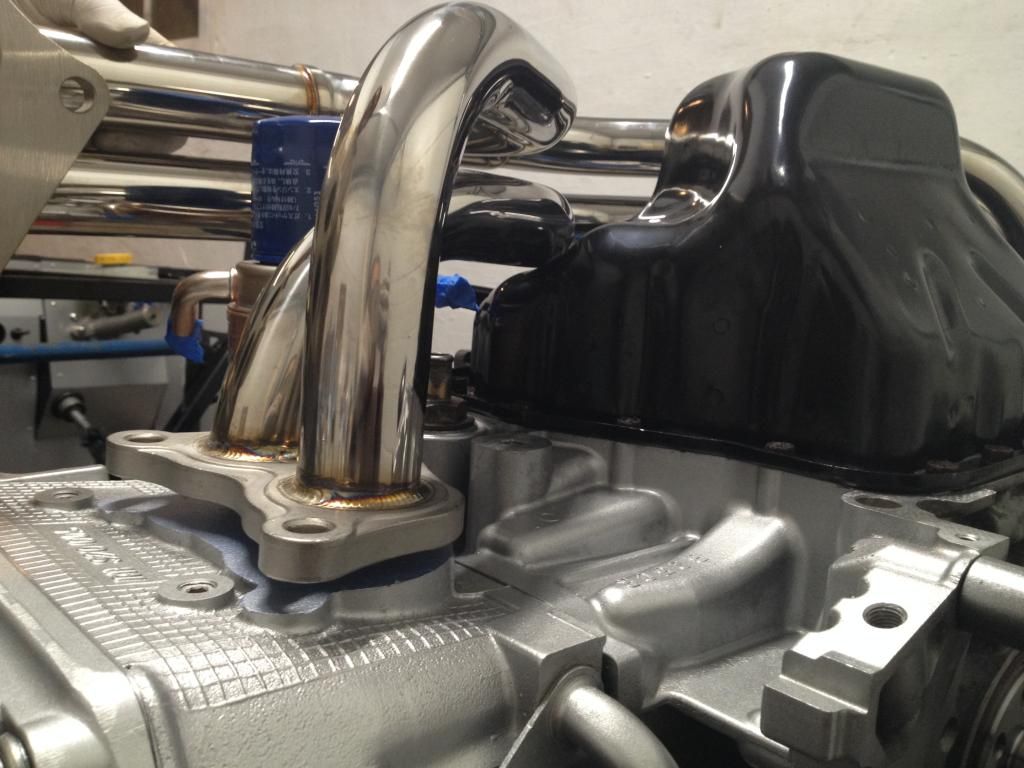
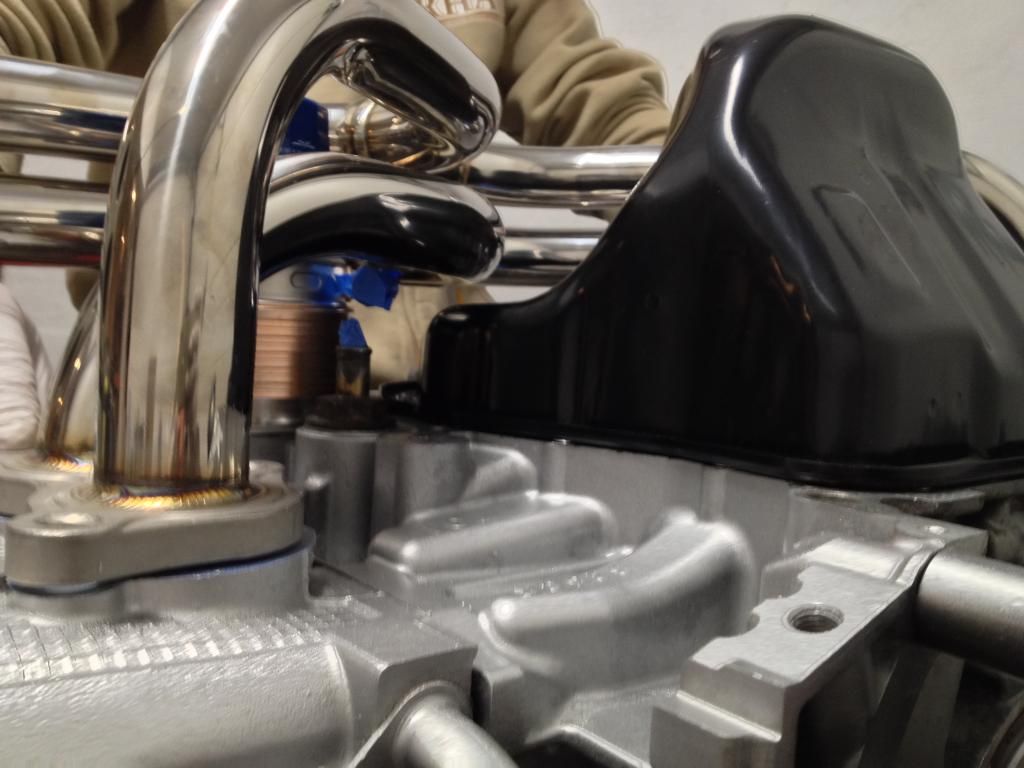
    Those are actually not that bad. Have seen worse from Kinugawa. Decent headers, especially for the price, but they don't generally fit great out of the box.

    I'd also suggest a GS 2x thick gasket for those.

  2. #122
    Tazio Nuvolari wannabe Scargo's Avatar
    Join Date
    Nov 2013
    Location
    south-central CT
    Posts
    1,611
    Post Thanks / Like
    That's funny ssssly. "Have seen worse from Kinugawa". Hard to imagine. But then, one pair of my Full Race (FR) headers was almost as bad against the KB pan. A Moroso pan was not better, either. Did not check a stock STi pan... I ended up cutting about 2/3 through that pipe at the flange and just before the Y and inserting crescent-shaped pieces. That was with schedule 10, 316 SS pipe though. I wanted to get close to a half-inch clearance so I could wrap the hell out of it.
    I suspect ssssly is right... that with that thin-wall 304 you can just heat and bend.

    I've never heard of GS 2X gaskets before. My concern would be that you will bend the flanges if not extremely careful. Though possibly over-torqued, I have bent the FR 1/2" thick flanges, trying to insure that the gaskets didn't blow out. If your flanges are sitting crooked when loose prior to torquing, and you can't get them flat, then that thick gasket might make the difference.
    With my track car I had constant problems with failing gaskets with the FR headers. They are rigid as hell to begin with and heat expansion and cycling seemed to loosen the gaskets in a hurry. Believe it or not, SS 3/8" ARP bolts made a big difference in the header to up-pipe connection. This was recommended by FR. Then I double-nutted the 12 point bolts. In my latest fix for the FR headers I am using staggered V-bands and Inconel bellows.
    The pisser is that I believe FR headers are the most expensive ones you can buy and there's no weight savings. OTOH, you will never burn through them.

  3. #123
    Senior Member
    Join Date
    Mar 2011
    Location
    Houston
    Posts
    477
    Post Thanks / Like

    General Good Advice on sealing exhausts

    Previously posted in Assembly Tips:

    Check That EVERY Flange is Flat
    Valuable advice from Charles (Service Mngr. Gillman Subaru in Houston). None of the flanges on the exhaust parts that I have were "true flat", including the FFr after-turbo adapters. Some were terrible! and would almost certainly have leaked, if not immediately...pretty soon thereafter. (and I would probably have blamed the gaskets, and tightened the bolts unreasonably).

    Time with a good straight edge and large flat file is time well spent. The flanges won't bend with "normal" torque, and relying on thick gaskets to deform unevenly across a flange surface is asking a lot.

  4. #124
    fasterer and furiouser longislandwrx's Avatar
    Join Date
    Aug 2012
    Location
    Long Island
    Posts
    2,540
    Post Thanks / Like
    Blog Entries
    6
    get a few extra studs, PN 800910550

    in case you mess up the threads bending the header
    A well stocked beverage fridge is the key to any successful project.

  5. #125
    Tazio Nuvolari wannabe Scargo's Avatar
    Join Date
    Nov 2013
    Location
    south-central CT
    Posts
    1,611
    Post Thanks / Like
    I have my mock-up engine you could borrow to do this bending on. I do not have oxy-acetylene (yet) but I do have a nice MAP gas torch if you want to come here and try bending it. Two torches-one for each end, would be best. You need an excuse to come visit... PS: I now have a 10" Logan lathe!

  6. #126
    Senior Member Tamra's Avatar
    Join Date
    Apr 2014
    Location
    Shelton, CT
    Posts
    1,011
    Post Thanks / Like
    Does anyone have a suggested method of how to bend the headers?

    Glyn, that is very nice of you to offer. If we decide to go the route of bending the headers, then we will likely take you up on it.

    What do you guys think about adding an exhaust flange to each side and getting longer exhaust studs? They are around 3/8" thick and would "lift" the headers off the pan.
    Tamra
    Building 818SR #297 picked up 10/25/14 with Andrew (xxguitarist)
    First start 12/21/14, First "drive" 1/17/15
    First Dyno at EFI Logics 3/7/15- 310whp at 15psi for break in, full spool by ~3500rpm!
    First autocross 3/29/15
    1st Registered 818 in Connecticut 7/24/2015. 9 months - 1 day from kit pickup!

  7. #127
    Senior Member RM1SepEx's Avatar
    Join Date
    Jul 2011
    Location
    Freeport, ME
    Posts
    3,801
    Post Thanks / Like
    Adding a flange doubles your opportunities for gasket failure but it should be workable and is a simple, elegant solution. I'd try it.

    My headers needed to be tweaked a bit, I opened the holes a small amount to get them to start on the studs. I used a heat wrench to apply generalized heat and tightened them down slowly. When I removed them to go from stock 05 to STI pan and pickup etc... they slid right on the second installation. Time, stress and temperature did the trick
    Dan

    818S #17 Picked up 8/1/13 First start 11/1/13 Go Kart 3/28/14

  8. #128
    Senior Member Tamra's Avatar
    Join Date
    Apr 2014
    Location
    Shelton, CT
    Posts
    1,011
    Post Thanks / Like
    Pretty sure we figured out the issue, and it's not with Kinuguwa. I bought an 04 sti pan, not realizing there were differences. The 06-07 is more cut-away in that location where the header hits. Anyone need an sti pan and don't have headers that loop between the oil cooler and pan? $90 and the pan is yours.
    Tamra
    Building 818SR #297 picked up 10/25/14 with Andrew (xxguitarist)
    First start 12/21/14, First "drive" 1/17/15
    First Dyno at EFI Logics 3/7/15- 310whp at 15psi for break in, full spool by ~3500rpm!
    First autocross 3/29/15
    1st Registered 818 in Connecticut 7/24/2015. 9 months - 1 day from kit pickup!

  9. #129
    FlatironsTuning's Avatar
    Join Date
    Mar 2014
    Location
    Boulder Colorado
    Posts
    39
    Post Thanks / Like
    Quote Originally Posted by Tamra View Post
    We installed our Killer B pickup and windage tray tonight, our new STI oil pan, and our new OEM oil cooler and oil filter. We decided to get a new oil cooler as insurance, since we didn't know the previous history of this motor (plus it had ACL bearings in it when we initially opened it up, meaning it had a bearing failure at some point in its life). After reading too many horror stories about not being able to get the metal particles out, we decided not to risk it (despite the fact that our existing oil cooler did not have any grit come out when I cleaned it).

    In our excitement, we decided to test fit our Kinuguwa Twin Scroll Headers... only to find they didn't fit. They hit the STI oil pan and have about 1/4" before they would reach the heads. Has anyone experienced this? Any ideas on how to resolve the issue? We have reached out to Flatirons Tuning who we purchased the kit from and are awaiting their response.
    The good news is that they sit flush with the pan with the 1/4" gap, so we hopefully shouldn't have too big of an issue with them hanging below the frame rails too far. Does anyone know if the STI oil pan hangs below the frame rails?

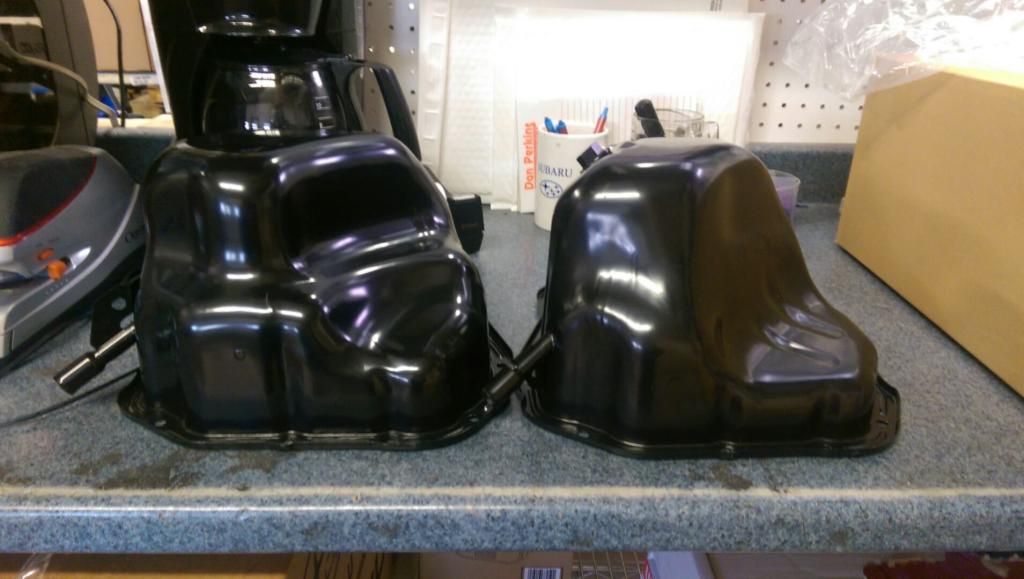
    For what it is worth, it looks like the STI Oil Pan being used here is an early pan, and the 06+ pans design was changed, and should fit with the header with no issues. You can see that there is a "double dip" in the pan above, and the newer pans drop down lower, and make a single dip to clear the headers.
    www.flatironstuning.com

    303.402.5142

    Your source for any Subaru parts that you may need to build your 818 from engine parts to gear sets, etc. We have what you need.

  10. #130
    Senior Member D Clary's Avatar
    Join Date
    Aug 2013
    Location
    Santa Rosa CA
    Posts
    407
    Post Thanks / Like
    While you have the pan off, you can weld a bung on the side for the oil temp sender.

  11. #131
    Senior Member Tamra's Avatar
    Join Date
    Apr 2014
    Location
    Shelton, CT
    Posts
    1,011
    Post Thanks / Like
    Now this is definitely better. The 06/07 sti pan is definitely different.


    Our friend that works at subaru took this photo, showing the difference:
    Tamra
    Building 818SR #297 picked up 10/25/14 with Andrew (xxguitarist)
    First start 12/21/14, First "drive" 1/17/15
    First Dyno at EFI Logics 3/7/15- 310whp at 15psi for break in, full spool by ~3500rpm!
    First autocross 3/29/15
    1st Registered 818 in Connecticut 7/24/2015. 9 months - 1 day from kit pickup!

  12. #132
    818 builder metalmaker12's Avatar
    Join Date
    Mar 2012
    Location
    Exeter R.I
    Posts
    2,834
    Post Thanks / Like
    Blog Entries
    1
    I did not even notice you had old style Sti pan, congrats
    818S frame #13 Jdm version 8 ej207

  13. #133
    Tazio Nuvolari wannabe Scargo's Avatar
    Join Date
    Nov 2013
    Location
    south-central CT
    Posts
    1,611
    Post Thanks / Like
    If you want it, I have a Moroso pan and all pieces. Increases capacity.
    moroso-oil-pan-6-quarts-aluminum.jpg

  14. #134
    Senior Member Tamra's Avatar
    Join Date
    Apr 2014
    Location
    Shelton, CT
    Posts
    1,011
    Post Thanks / Like
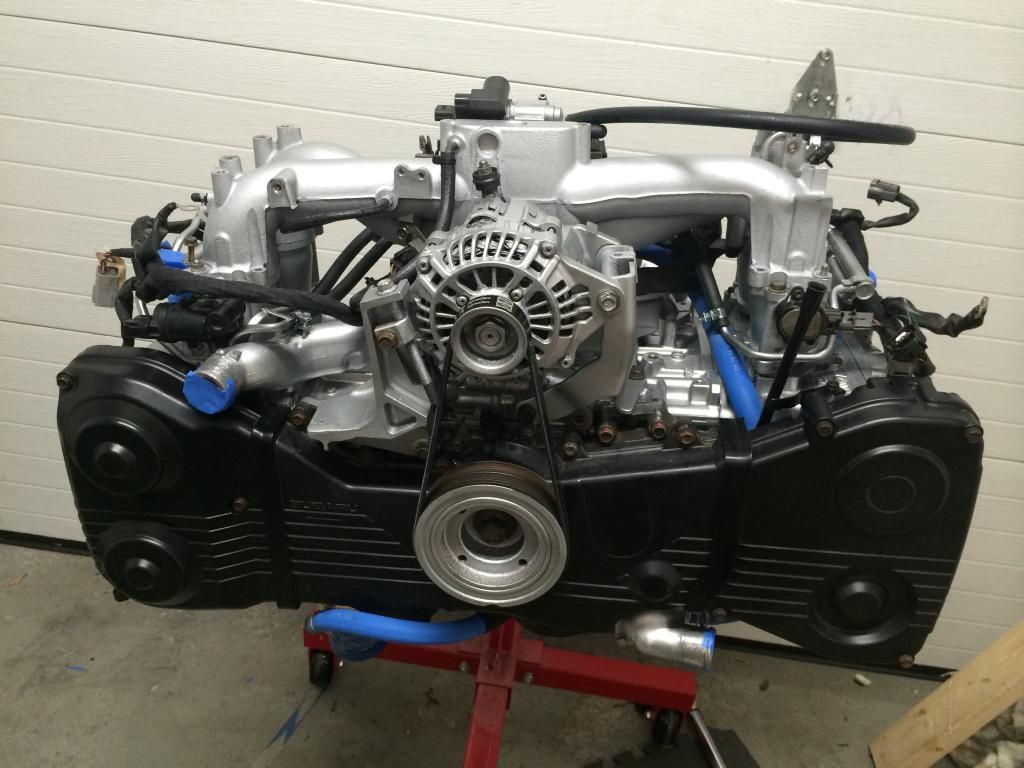
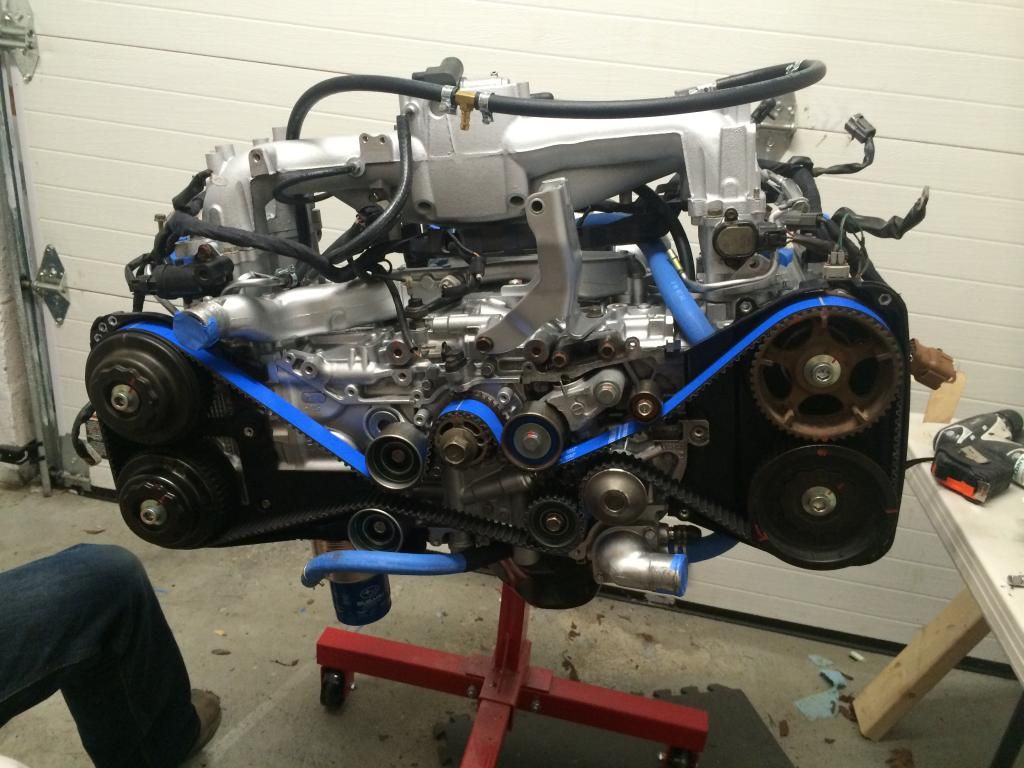
    No more excuses... this baby is going into the 818 tomorrow! Only 75 hours spent from tear down to build up.... and we haven't even figured out our turbo solution yet or mounted the AWIC.


    Okay, going back 9 hours earlier......

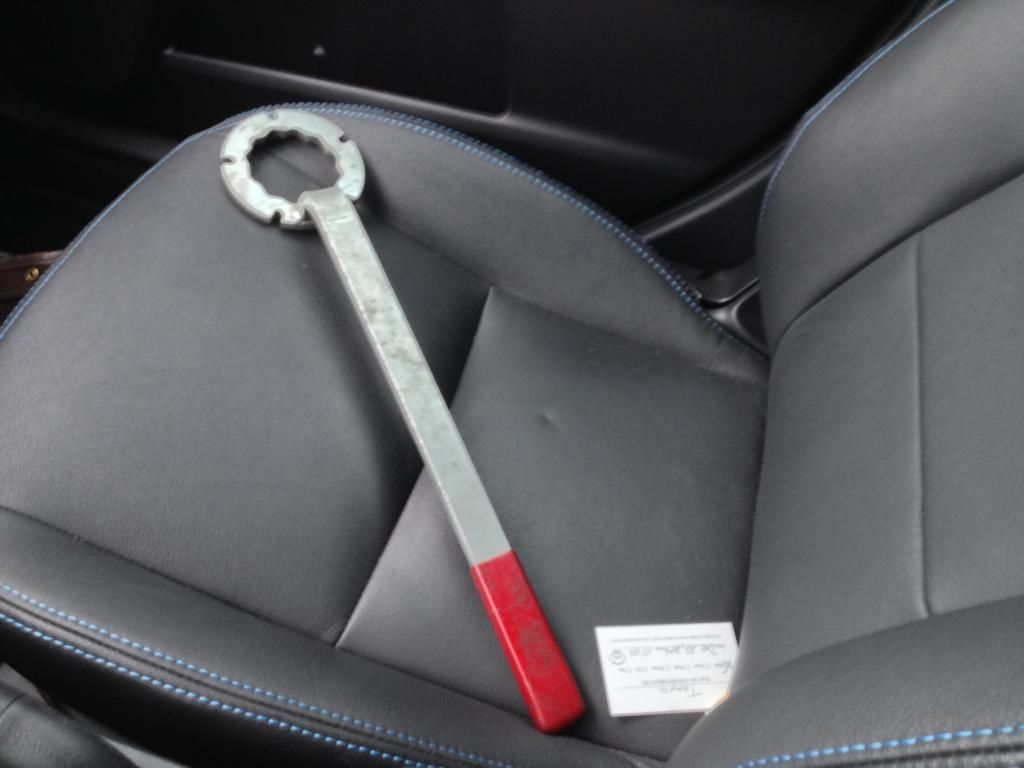
    This tool is AMAZING. Did we mention amazing? Thank you to our friend who works at Subaru (10 min away from our house) and let us borrow it, putting the cam sprockets back on took less than 2 minutes.


    Gates racing timing belt installed. This will have a more frequent change interval (30k miles), but should hold up to the high rpm's better.


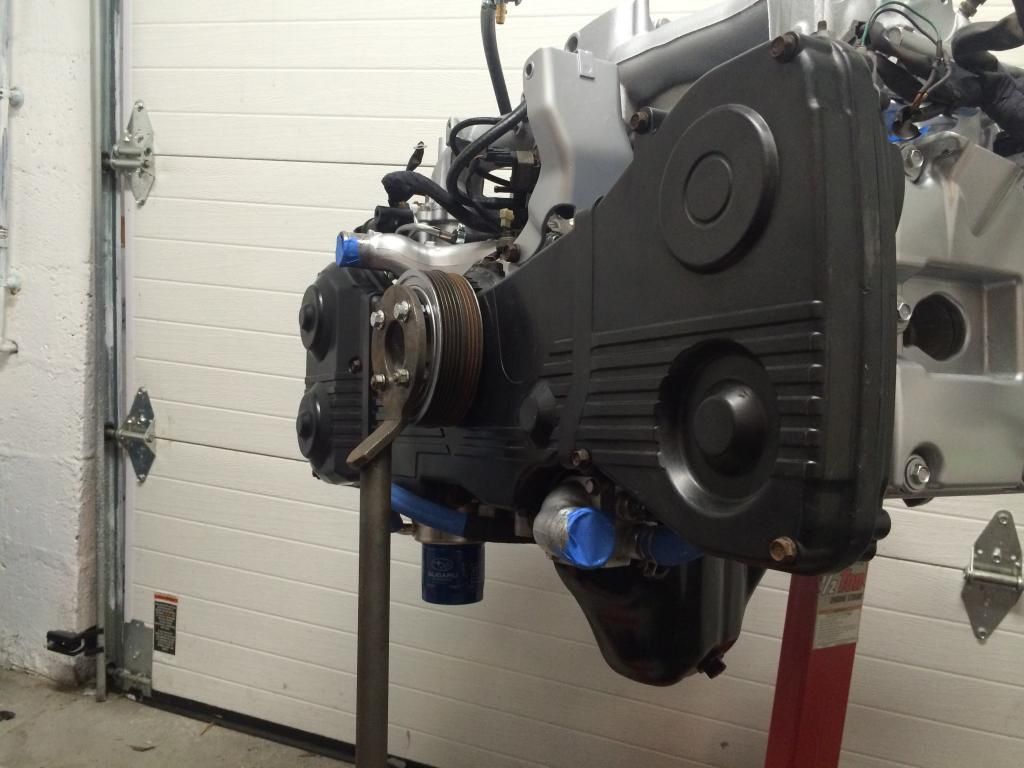
    Did I mention that the crankshaft tool is awesome too? Yup, such a simple tool, but made life so much easier.


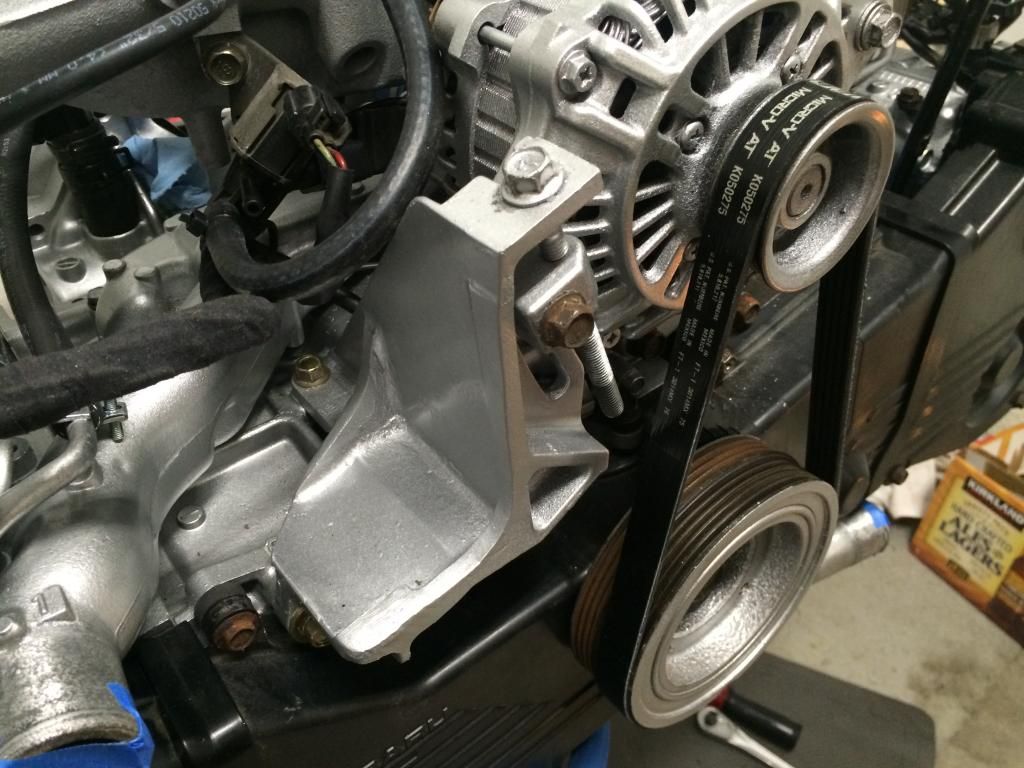
    We also cut down our power steering pump bracket to just make use of the tensioner. The bracket itself was surprisingly light on its own:


    Fun video of our engine making its first noises! The rings haven't even been bedded in yet, but listen to that whistle!
    Tamra
    Building 818SR #297 picked up 10/25/14 with Andrew (xxguitarist)
    First start 12/21/14, First "drive" 1/17/15
    First Dyno at EFI Logics 3/7/15- 310whp at 15psi for break in, full spool by ~3500rpm!
    First autocross 3/29/15
    1st Registered 818 in Connecticut 7/24/2015. 9 months - 1 day from kit pickup!

  15. #135
    Senior Member Frank818's Avatar
    Join Date
    Jun 2013
    Location
    QC, Canada
    Posts
    5,732
    Post Thanks / Like
    This belt is awesome!!!! More awesome than your colorless sprocket tool. lolll
    Frank
    818 chassis #181 powered by a '93 VW VR6 Turbo GT3582R
    Go-karted Aug 5, 2016 - Then May 19+21, 2017
    Tracked May 27/July 26, 2017
    Build time before being driveable on Sep 27, 2019: over 6000h
    Build Completed Winter 2021

  16. #136
    Senior Member Tamra's Avatar
    Join Date
    Apr 2014
    Location
    Shelton, CT
    Posts
    1,011
    Post Thanks / Like
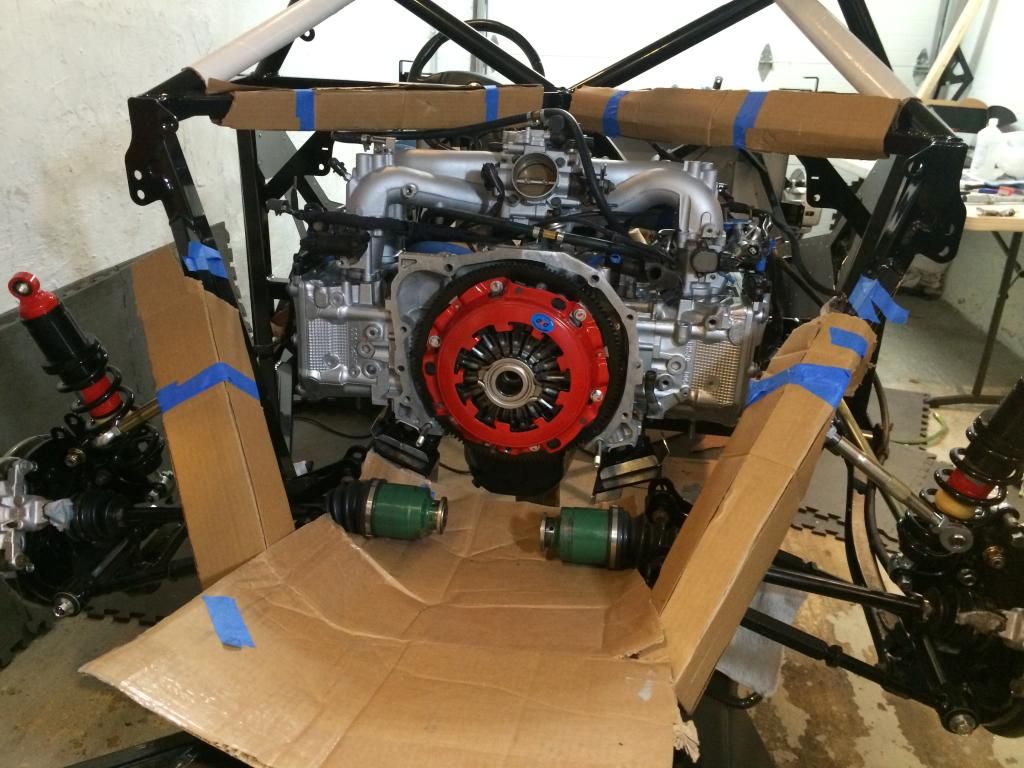
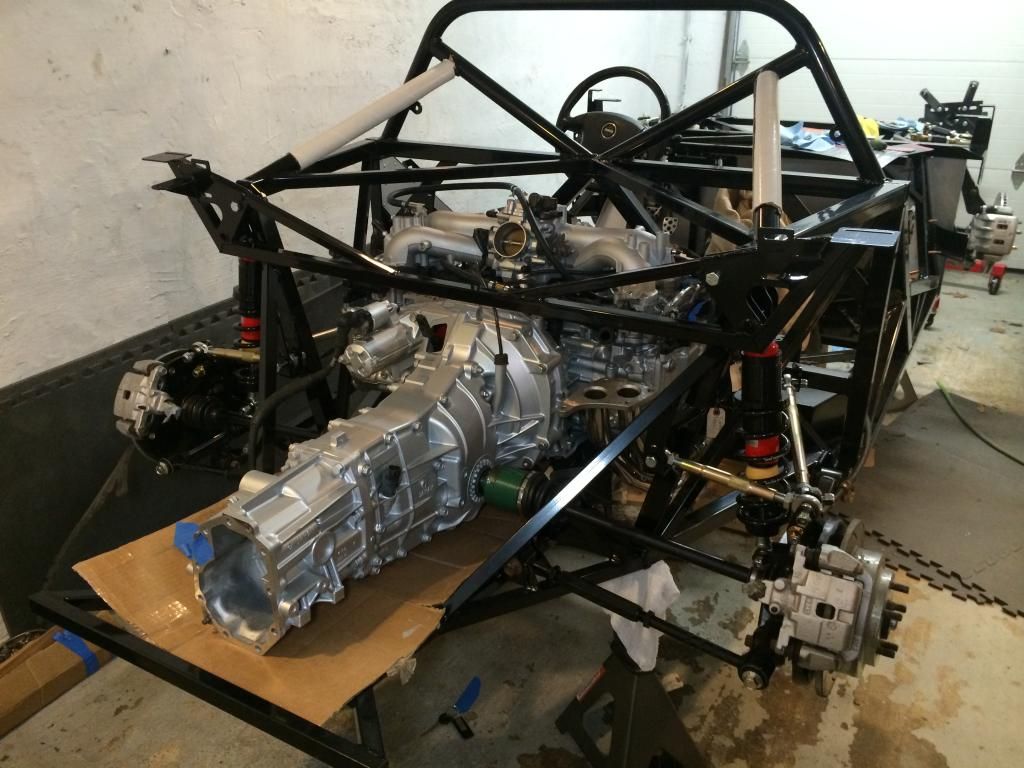
    Between the two of us, a friend, and an engine hoist, we got the engine and transmission into the car! We installed our ACT streetlite flywheel (14lbs vs the 24lb stocker) and South Bend Stage 2 Enduro Clutch and pressure plate (rated at 450 ft lbs torque, and the only organic clutch we could find that was rated this highly). Our Flywheel and pressure plate were also balanced by Larry's Power of Groton, CT.


    After a little more effort, the transmission was on, axles installed, and suspension put back into place. We are going to have some figuring to do for our BW S200SX turbo.... there's no way it's going to fit in the stock location, and even rotated might not work. It's looking like we will have to modify the cross brace. Oh, and the whole up-pipe situation is still TBD since it's a T-4 flange turbo...


    Time lapse of the past 20 hours or so, leading up to the final install!
    Tamra
    Building 818SR #297 picked up 10/25/14 with Andrew (xxguitarist)
    First start 12/21/14, First "drive" 1/17/15
    First Dyno at EFI Logics 3/7/15- 310whp at 15psi for break in, full spool by ~3500rpm!
    First autocross 3/29/15
    1st Registered 818 in Connecticut 7/24/2015. 9 months - 1 day from kit pickup!

  17. #137
    818 builder metalmaker12's Avatar
    Join Date
    Mar 2012
    Location
    Exeter R.I
    Posts
    2,834
    Post Thanks / Like
    Blog Entries
    1
    Christmas is around the corner, get her done!! Looks great guys, I am happy for you!!!
    818S frame #13 Jdm version 8 ej207

  18. #138
    Senior Member xxguitarist's Avatar
    Join Date
    Nov 2013
    Posts
    389
    Post Thanks / Like
    We're sure trying! The turbo fit will be a little bit of a wrench in the works, but we are still optimistic.

  19. #139
    Moonlight Performance
    Hindsight's Avatar
    Join Date
    May 2014
    Location
    Atlanta
    Posts
    3,402
    Post Thanks / Like
    Looking great! I dont think you will have much trouble modifying the cross brace. Saw someone else post pics of theirs and it didnt look too elaborate.

  20. #140
    Member Ellimist's Avatar
    Join Date
    Sep 2013
    Location
    Salt Lake City, UT
    Posts
    90
    Post Thanks / Like
    Quote Originally Posted by xxguitarist View Post
    still optimistic.
    That's the key! I've thoroughly enjoyed this thread. Keep up the good work!

  21. #141
    Senior Member
    Join Date
    Oct 2014
    Location
    Denver, CO
    Posts
    119
    Post Thanks / Like
    I'm so jelly that you got your motor in over the weekend. Looking good you guys! Keep up the good work.

  22. #142
    Senior Member STiPWRD's Avatar
    Join Date
    Jan 2014
    Location
    Leesburg, VA
    Posts
    1,624
    Post Thanks / Like
    Do you know the part number on the cam sprocket tool? I've found a few variants. Great progress guys!

  23. #143
    Senior Member xxguitarist's Avatar
    Join Date
    Nov 2013
    Posts
    389
    Post Thanks / Like
    Looks like it was probably subaru # 499207400, per the FSM & some googling.
    Note: That's for an 02, non-AVCS, with plastic gears. It has external features for the one metal intake gear & an internal soft gear shape for the plastic sections.

    I'd guess that this will work if you can't borrow the $ubaru one.
    http://www.amazon.com/Subaru-STD-Int.../dp/B009ZCLNOG

  24. #144
    Senior Member STiPWRD's Avatar
    Join Date
    Jan 2014
    Location
    Leesburg, VA
    Posts
    1,624
    Post Thanks / Like
    Thanks, that's the one I was thinking of getting. Those cam bolts can be impossible to remove even with air tools and $59 isn't that bad.

  25. #145
    Senior Member xxguitarist's Avatar
    Join Date
    Nov 2013
    Posts
    389
    Post Thanks / Like
    Do you also have the socket cap screw type (allen key) on your motor?

    I nearly stripped one of them on dis-assembly, using a biig breaker bar & with the cam locked up with the old timing belt routed around in circles.. We got a new set, and they went on beautifully with the tool.

  26. #146
    Senior Member
    Join Date
    Aug 2011
    Location
    Logan, UT
    Posts
    242
    Post Thanks / Like
    Quote Originally Posted by xxguitarist View Post
    I haven't seen anything about a CEL-free TGV delete option.. Do you have a link? My understanding was that it was just an easy code to delete, but CT is picky on not-ready sensors. I'm trying to avoid having to make a shortened version of the TGV rods to activate the sensors.
    I was meaning there's the writeup for the CEL Free Simplification of the EVAP system, not the TGV's. Somehow my slow posting got mixed up with changing subjects. http://forums.nasioc.com/forums/show....php?t=2485979

  27. #147
    Senior Member xxguitarist's Avatar
    Join Date
    Nov 2013
    Posts
    389
    Post Thanks / Like
    Ah, OK. Yep, we are planning to follow approximately that procedure to get rid of some of the mess. We have most of the hoses hooked up & secured already, just need to add the lines to the charcoal canister (required in CT) and gas tank.

  28. #148
    Senior Member STiPWRD's Avatar
    Join Date
    Jan 2014
    Location
    Leesburg, VA
    Posts
    1,624
    Post Thanks / Like
    Quote Originally Posted by xxguitarist View Post
    Do you also have the socket cap screw type (allen key) on your motor?

    I nearly stripped one of them on dis-assembly, using a biig breaker bar & with the cam locked up with the old timing belt routed around in circles.. We got a new set, and they went on beautifully with the tool.
    Yea, same bolts. I couldn't get them loose with an impact gun and trying to keep the cams from spinning. Long story short - my old motor died when one of the cam sprockets seized up, which ripped the timing belt and disintegrated one of the plastic cam gears so it's difficult to keep the other cams from spinning to loosen the bolts. I took the opportunity to replace my other 13 year old plastic cam gears on the new rebuilt heads. That cam gear tool will make a good stocking stuffer.
    Last edited by STiPWRD; 12-09-2014 at 09:22 AM. Reason: clarity

  29. #149
    Tazio Nuvolari wannabe Scargo's Avatar
    Join Date
    Nov 2013
    Location
    south-central CT
    Posts
    1,611
    Post Thanks / Like
    There's a lot written about the cam sprocket bolts... Some say the easiest method is to drill the bolt head till the metal gets thin enough to stretch, then it comes right out. I had to do that on one. New bolts are not very expensive.
    For you guys, it may be too late, and you seem to have a Subaru mechanic friend nearby, but I just purchased a comprehensive set of Subaru specialty tools for less than half price.
    Company 23 tools:
    AVCS Int Cam Sprocket Tool
    Dual AVCS Exh Cam Sprocket Tool
    Camlock Tool 1
    AVCS Security Socket
    Axle Pin Tool


    Grimmspeed - crank pulley tool
    Snap On - Subaru ball joint removal tool

    If anyone in the area needs to borrow any of these you are welcome to use them. I'll have them in a couple of days.

  30. #150
    Senior Member
    Join Date
    Jan 2014
    Location
    USA
    Posts
    587
    Post Thanks / Like
    Quote Originally Posted by xxguitarist View Post
    We're sure trying! The turbo fit will be a little bit of a wrench in the works, but we are still optimistic.
    This may be of use when you fab your uppipe.


    http://elmerracing.com/raceshop/exha...-t4dual-detail

  31. #151
    Senior Member Tamra's Avatar
    Join Date
    Apr 2014
    Location
    Shelton, CT
    Posts
    1,011
    Post Thanks / Like
    Wow, that is a beautiful part. It will not work, unfortunately. It looks like we will need to rotate our BW ~45 degrees, in which case one EWG (per this design) would go under the cold side toward our block (and away from the exhaust, which we must pipe our EWG's into to pass inspection) which won't work.

    But dang, Andrew is impressed that they can carve that out of a block of steel!
    Tamra
    Building 818SR #297 picked up 10/25/14 with Andrew (xxguitarist)
    First start 12/21/14, First "drive" 1/17/15
    First Dyno at EFI Logics 3/7/15- 310whp at 15psi for break in, full spool by ~3500rpm!
    First autocross 3/29/15
    1st Registered 818 in Connecticut 7/24/2015. 9 months - 1 day from kit pickup!

  32. #152
    Senior Member
    Join Date
    Jan 2014
    Posts
    617
    Post Thanks / Like
    I surprised that they tried. Stainless generally isn't happy to be CNC'd and tig welding up something that shape seems like it would be a lot easier. It's just a plate and four partial tubes.

    Also, that part is S355/A572Gr50 steel. It's the type they build ships and bridges out of. Some of the datasheets I found for it have warnings about not using it in places that see high temperatures.

  33. #153
    Senior Member xxguitarist's Avatar
    Join Date
    Nov 2013
    Posts
    389
    Post Thanks / Like
    Quote Originally Posted by Jaime View Post
    I surprised that they tried. Stainless generally isn't happy to be CNC'd and tig welding up something that shape seems like it would be a lot easier. It's just a plate and four partial tubes.

    Also, that part is S355/A572Gr50 steel. It's the type they build ships and bridges out of. Some of the datasheets I found for it have warnings about not using it in places that see high temperatures.
    Better yet, cast it!

  34. #154
    Senior Member
    Join Date
    Jan 2014
    Location
    USA
    Posts
    587
    Post Thanks / Like
    Good catch, I didn't look closely at the material. I just assumed 304 or 321 since it was for an exhaust.

    I drew up my own design for my EFR turbo, not sure if I'm going to have it machined or just build something from a flange and tube as mentioned.

    The best TO4 flange I've found so far is here. http://www.stainlessheaders.com/turboflanges

  35. #155
    Tazio Nuvolari wannabe Scargo's Avatar
    Join Date
    Nov 2013
    Location
    south-central CT
    Posts
    1,611
    Post Thanks / Like
    Vibrant makes one. I have one of them. About $57, shipped (on Amazon).

  36. #156
    Member
    Join Date
    Feb 2011
    Posts
    44
    Post Thanks / Like
    Maybe have the stock flange cut off and another welded in place at a lower height?

    Couple more turbo flange sources:

    http://www.turbo-flanges.com/index.php?cPath=25

    http://www.mandrel-bends.com/catalog...bo-flanges-62/

    http://www.racepartsolutions.com/ind...nuf?Itemid=564
    Last edited by rtz; 12-10-2014 at 10:21 PM.

  37. #157
    Senior Member xxguitarist's Avatar
    Join Date
    Nov 2013
    Posts
    389
    Post Thanks / Like
    Thanks for the links, guys.

    Last night we did a little chopping/bending of the up-pipe that we had, then switched over to a cardboard routing sketch to figure out what tubing to order. We're going to start from scratch basically.

    Fingers crossed, the 2x 45* 2' lengths & additional 90* should be able to get us up to the flange if we handle the rotation of each pipe carefully.

  38. #158
    Moonlight Performance
    Hindsight's Avatar
    Join Date
    May 2014
    Location
    Atlanta
    Posts
    3,402
    Post Thanks / Like
    Looking forward to seeing this implemented. Have you ever thought of becoming a vendor??

  39. #159
    Tazio Nuvolari wannabe Scargo's Avatar
    Join Date
    Nov 2013
    Location
    south-central CT
    Posts
    1,611
    Post Thanks / Like
    This is how I started the process.
    1961013_1010454425638336_528918939888493635_o.jpg

  40. #160
    Senior Member xxguitarist's Avatar
    Join Date
    Nov 2013
    Posts
    389
    Post Thanks / Like
    Quote Originally Posted by Hindsight View Post
    Looking forward to seeing this implemented. Have you ever thought of becoming a vendor??
    Heh! If I work up something that is simple enough to reproduce that I can then send a second sample off to a welding house, we'll see about it.

Page 4 of 37 FirstFirst ... 2345614 ... LastLast

Posting Permissions

  • You may not post new threads
  • You may not post replies
  • You may not post attachments
  • You may not edit your posts
  •  

Breeze

Visit our community sponsor