Forte's

Visit our community sponsor

Thanks Thanks:  0
Likes Likes:  0
Results 1 to 22 of 22

Thread: throttle cable

  1. #1
    Senior Member billjr212's Avatar
    Join Date
    Feb 2011
    Location
    Frankfort, IL
    Posts
    734
    Post Thanks / Like

    throttle cable

    2 things, first is a super mini rant.

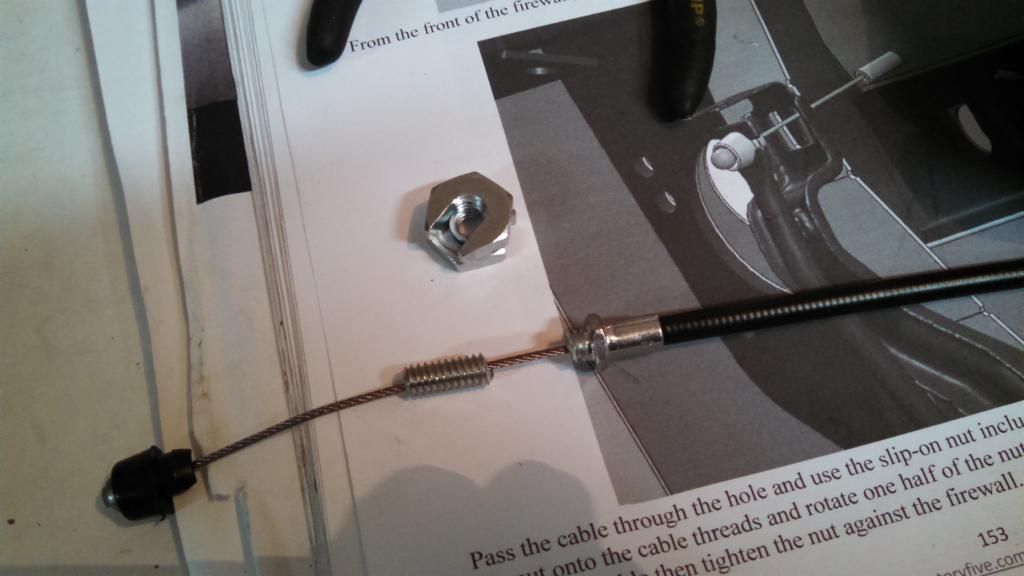
    1. The rev 1i manual is not properly updated in the way the 1i update shows for the throttle cable.

    2. Am I the only one too stupid to use this ridiculous slip nut? I knew I should have just gone out and bought a proper one. Any ideas? Or a part number for the throttle cable?

  2. #2
    Senior Member billjr212's Avatar
    Join Date
    Feb 2011
    Location
    Frankfort, IL
    Posts
    734
    Post Thanks / Like

  3. #3
    Senior Member RM1SepEx's Avatar
    Join Date
    Jul 2011
    Location
    Freeport, ME
    Posts
    3,801
    Post Thanks / Like
    How did you break the cable? The nut was tricky, been a long time but I wrote up directions on my thread

    The manual is full of "suggestions" can't be followed verbatum
    Dan

    818S #17 Picked up 8/1/13 First start 11/1/13 Go Kart 3/28/14

  4. #4
    Senior Member billjr212's Avatar
    Join Date
    Feb 2011
    Location
    Frankfort, IL
    Posts
    734
    Post Thanks / Like
    Cable didn't break, the threaded part did when I tried to spin the spin nut to 180 positions.

  5. #5
    Senior Member billjr212's Avatar
    Join Date
    Feb 2011
    Location
    Frankfort, IL
    Posts
    734
    Post Thanks / Like
    I'm thinking I can slot 2 normal nuts, bridge the gap and weld them together, then slot a third nut for inside the firewall.

  6. #6
    Senior Member RM1SepEx's Avatar
    Join Date
    Jul 2011
    Location
    Freeport, ME
    Posts
    3,801
    Post Thanks / Like
    it's just a stop, you can't spin the two nuts 180 degrees, they only spin relative to the slots one flat to keep the threads aligned
    Dan

    818S #17 Picked up 8/1/13 First start 11/1/13 Go Kart 3/28/14

  7. #7
    K3LAG's Avatar
    Join Date
    May 2013
    Location
    Greensburg, PA
    Posts
    552
    Post Thanks / Like
    We did the same thing. Ended up ordering a new cable from Factory Five. I forget how much it was.

    Larry

  8. #8
    Harley818's Avatar
    Join Date
    Jan 2014
    Location
    Vancouver BC
    Posts
    788
    Post Thanks / Like
    Hey Bill,
    I feel for you.
    I just went through this install with my cable. I didn't try to spin 180, I just tightened the outer nut and it tightened up nicely against the firewall........ after alot of screwing around trying to get it aligned and flush. Then of course, I had a bit of slack in the cable, so I had to undo it all and add a spacer so that when the pedal is released, that the throttle cable is just barely tight.
    I would just get a couple nuts, cut them one one side with the zip cut blade on the angle grinder (so that you can slip them over the cable) and tighten the first one, then the second one against the first to lock it in position.

  9. #9
    Senior Member
    Join Date
    Jan 2014
    Posts
    617
    Post Thanks / Like
    I threw it away and slotted a standard nut. The slot only needs to be wide enough to fit the cable through.

  10. #10
    Junior Member
    Join Date
    Mar 2014
    Posts
    10
    Post Thanks / Like
    I was able to get the slip nut on but when I went to insert the plastic black end into the hole in the pedal arm I broke the plastic retaining clip. I tried to compress the plastic ends before inserting it into the hole and that's when it broke. New cable for me also

  11. #11
    Senior Member metros's Avatar
    Join Date
    Jun 2013
    Location
    NoVA
    Posts
    1,064
    Post Thanks / Like
    Bill - Had the exact same thing happen to mine. The threads on the cable should be longer as I had barely snugged it up and the threaded end broke. FFR sent me another without issue.

  12. #12
    Senior Member
    Join Date
    Oct 2013
    Posts
    322
    Post Thanks / Like
    Perfect timing as I am looking at this set up and wonder how it will hold up with any vibration, the piezo nut can only be snugged then it deflects on the threads, piezo stands for piezo junk!
    The black plastic retainer is larger than the hole in the throttle pedal, we will have to open it up with a unibit, see pictures.
    In the last picture you see the cable laying in the pedal mount, I will be drilling out a piece of 1/2" thick material and welding it into the pedal mount then threading the cable into it. More pictures tomorrow as it will be made tonight.
    image.jpgimage.jpgimage.jpg
    Last edited by DMC7492; 11-29-2014 at 01:09 PM.

  13. #13
    Senior Member billjr212's Avatar
    Join Date
    Feb 2011
    Location
    Frankfort, IL
    Posts
    734
    Post Thanks / Like
    Wish I would have checked back in on this thread a second time this morning before heading back out to the garage. Managed to fix the broken threaded section with a nut bridging the break and a little welding and then proceeded to break the little black plastic piece when I tried to push it into the too small hole in the pedal.

  14. #14
    Senior Member
    Join Date
    Jan 2014
    Location
    Massachusetts
    Posts
    148
    Post Thanks / Like
    I had a lot of trouble getting the crazy slip nut to tighten on the threaded piece. Must have dropped it on floor of car 20 times before I got it tight. The slot is wide enough that when you turn it so the slot is up the whole nut just falls. When I finally got that on I broke the same black plastic piece that everybody else is talking about. I put some silicone sealant on it. Looks OK for now but the car is not running yet. If the cable end comes off while driving I will have a big problem
    Dave

  15. #15
    Senior Member
    Join Date
    Oct 2013
    Posts
    322
    Post Thanks / Like
    Okay here is the Donnybuilt version. The threaded disk will be slotted to slip the cable in then it will thread into the disc. The disk will be welded into the donor pedal braket. The "new" ferrule will be held in the pedal rod with an e clip and there will be a new neco press wire rope termination crimped on the cable, which requires a bit of shortening anyway.
    image.jpgimage.jpgimage.jpg
    Here is the finished modified cable ready to be installed,added E clip slot and a spring to take up slack in the cable and allow some shock absorption if the cable expands or contracts from heat.
    Last edited by DMC7492; 12-01-2014 at 02:58 AM.

  16. #16
    Senior Member billjr212's Avatar
    Join Date
    Feb 2011
    Location
    Frankfort, IL
    Posts
    734
    Post Thanks / Like
    Wow - that's a robust solution.

    I ended up ordering a new throttle cable from FFR. $25 shipped. I didn't push it since I take at least half blame for being stubborn.

    I did not use the slip nut, and went with a slotted nut on each side of the firewall. I did drill out the pedal with a 3/8" bit before attempting to push the black retaining clip in as effectively suggested by DMC in post #12. No problem this time around.

  17. #17
    Senior Member
    Join Date
    Jun 2013
    Location
    Bowling Green, KY
    Posts
    1,382
    Post Thanks / Like
    I went to insert the plastic black end into the hole in the pedal arm I broke it like a few others. Someone here is making a replacement plastic socket. Can anyone point me in the that direction???

    Thanks

  18. #18
    Senior Member
    Join Date
    Mar 2015
    Location
    Belmar, NJ
    Posts
    364
    Post Thanks / Like
    would anyone have pictures on how they attached the cable to the engine?
    I was sent a ball and cable end. I cannot figure out how this is attached
    818S #343 Delivered 5-20-2015
    First Start 10-17-2015
    First Drive 10-17-2017 ( 100 feet back and forth until I can get off driveway)
    First Drive with a non leaking tuned motor 11-12-2015 (wow)
    Passed NJ State constructed inspection 8/30/2016

  19. #19
    Senior Member
    Join Date
    Jul 2013
    Location
    Richmond, VA
    Posts
    127
    Post Thanks / Like
    Mitch, like many others, I also broke the throttle. It was one of the easiest fixes I have ever had. Never could have happened just a couple years ago.

    When I broke it, I went on the forum and found the person with the file and contacted him. He emailed it to me. I don't have a 3D printer or know anyone with one, so I went to

    https://www.3dhubs.com/


    Found a printer in my area, uploaded the file, paid with paypal, and the part was sent to me in the mail in about a week.

    I never had to drive around to stores looking for a solution. I just had to wait. Total cost with shipping was under $8. I'd have paid more.

    The part fit great.

    PM me your email address and I will send you the file.

    Travis
    818S - #200

    "To finish first, you must first finish"
    "If the car feels like it is on rails, you are probably driving too slow." -Ross Bentley
    "Never run out of real estate, ideas and traction at the same time."

  20. #20
    Senior Member billjr212's Avatar
    Join Date
    Feb 2011
    Location
    Frankfort, IL
    Posts
    734
    Post Thanks / Like
    Quote Originally Posted by insurance guy View Post
    would anyone have pictures on how they attached the cable to the engine?
    I was sent a ball and cable end. I cannot figure out how this is attached
    You sure you don't have the cable flipped around backwards? The ball should be on the pedal side and a little cylinder on the engine side, IIRC.

  21. #21
    Senior Member Pearldrummer7's Avatar
    Join Date
    Feb 2014
    Location
    Asheville, NC
    Posts
    1,230
    Post Thanks / Like
    Quote Originally Posted by billjr212 View Post
    You sure you don't have the cable flipped around backwards? The ball should be on the pedal side and a little cylinder on the engine side, IIRC.
    This is correct.


    I didn't have an issue with this, knock on wood. I don't like the solution at all, though. And I had the manual before FFR ever installed a drive by cable, as far as I understand, so I just had to "wing" it. I slotted my aluminum and made a hole big enough for the ball a few 90* turns away. Slipped it in, slid it over, and put on the crappy slip nut.

  22. #22
    Senior Member
    Join Date
    Mar 2015
    Location
    Belmar, NJ
    Posts
    364
    Post Thanks / Like
    are you able to send close up picture of that?
    818S #343 Delivered 5-20-2015
    First Start 10-17-2015
    First Drive 10-17-2017 ( 100 feet back and forth until I can get off driveway)
    First Drive with a non leaking tuned motor 11-12-2015 (wow)
    Passed NJ State constructed inspection 8/30/2016

Posting Permissions

  • You may not post new threads
  • You may not post replies
  • You may not post attachments
  • You may not edit your posts
  •  

Breeze

Visit our community sponsor