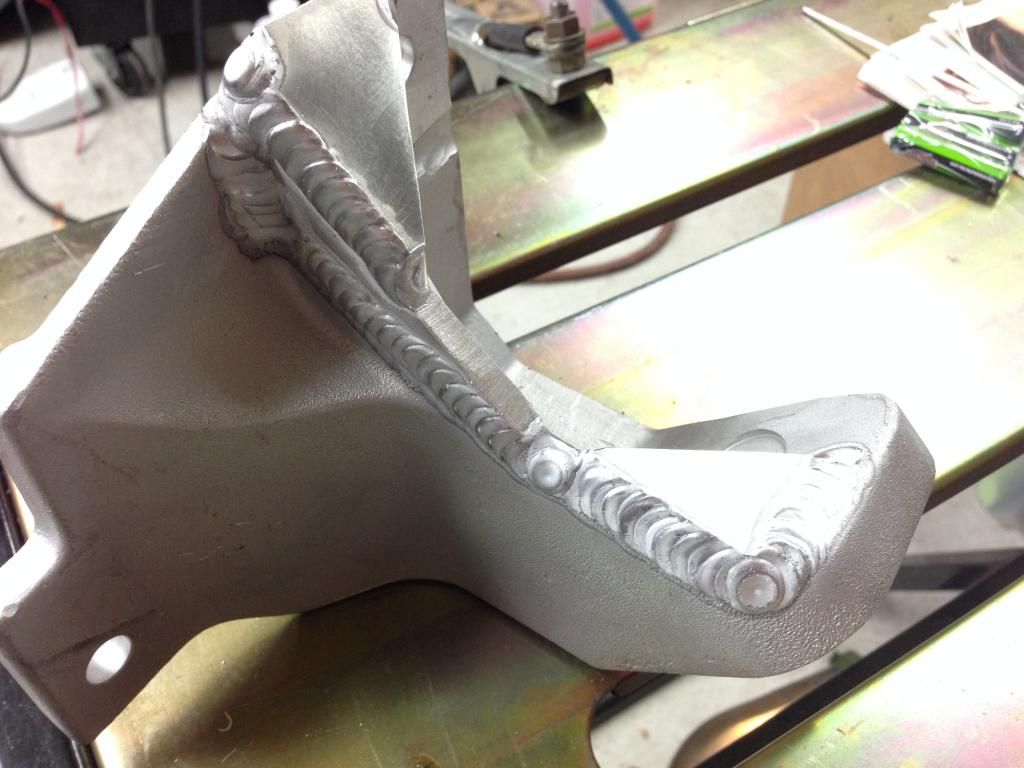
Very Cool Parts

Visit our community sponsor

Thanks Thanks:  0
Likes Likes:  0
Results 1 to 25 of 25

Thread: Begginer TIG Welder Critique?

  1. #1
    Senior Member
    Join Date
    Oct 2014
    Location
    Redondo Beach, CA
    Posts
    161
    Post Thanks / Like

    Begginer TIG Welder Critique?

    IMG_2324.JPG
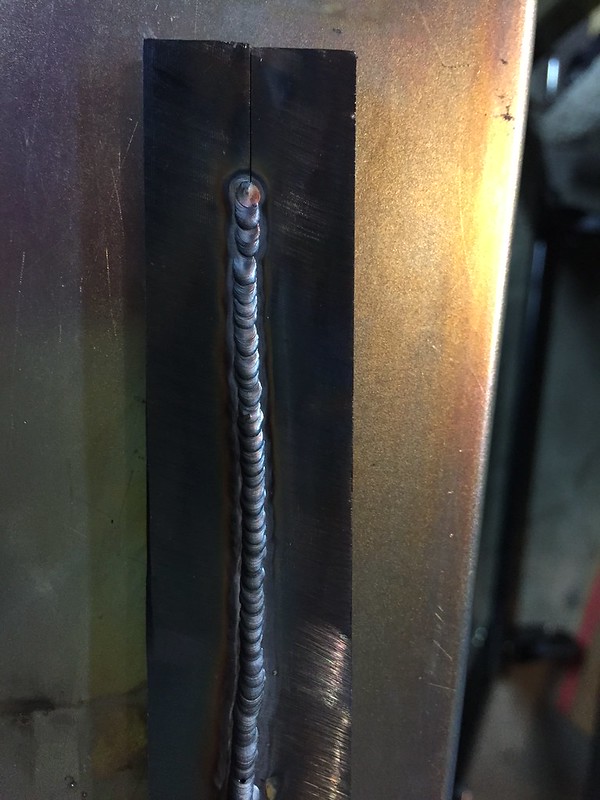
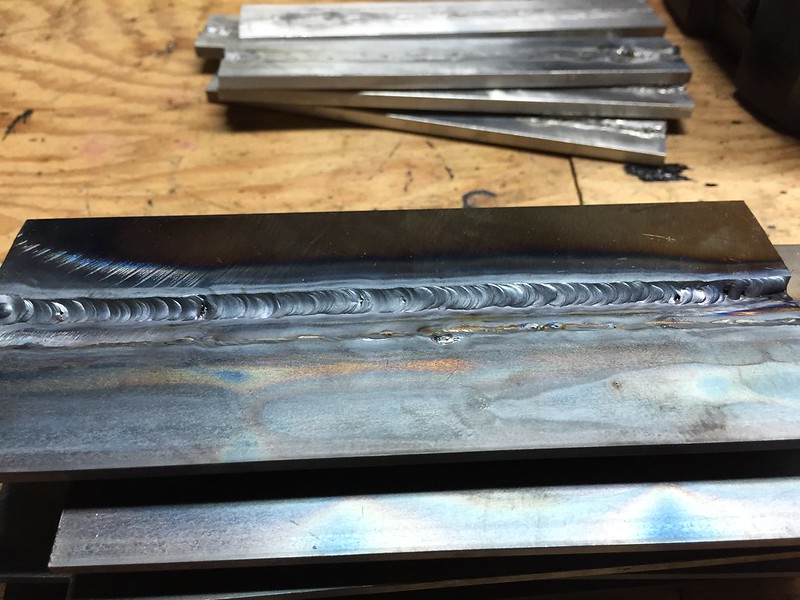
    My second time welding TIG and I believe I got the speed and current about right. I keep getting a little pit at the end of my bead though (bead started right and ended left). I backed off current and positioned the torch a little back, but didn't add a whole lot of filler. Is that why I'm getting a small pit at the end? Any other tips would be much appreciated.

  2. #2
    cobra Handler skullandbones's Avatar
    Join Date
    Jul 2011
    Location
    Superstition Mtn foothills 5 miles west of Gold Canyon AZ
    Posts
    2,686
    Post Thanks / Like
    Blog Entries
    19
    Hi Nick,

    What welder are you using and settings? I think those beads look pretty good for flat welding. It might be a better to do an inside angle and show pics. That way you would have better puddle control and line control. Welding on the flat is tough with nothing to use as a guide. What do you plan on welding mostly with your new skill?

    Good luck, WEK.
    FFR MkIII 302 (ATK), EFI 75mm TB with custom box plenum chamber, 24# injectors, 4 tube BBK ceramic, cold air sys, alum flywheel, crane roller rockers, T5, Wilwood pedals, custom five link with Watt's link, 4 rotors, coil overs, power steering with Heidt valve, alum FFR rad, driver's crash bar mod, mini dead pedal mod, quick release steering wheel hub #6046

  3. #3
    Senior Member
    Join Date
    Oct 2014
    Location
    Redondo Beach, CA
    Posts
    161
    Post Thanks / Like
    I'm using an Eastwood TIG 200 AC/DC set around 80A. The foot pedal is a little tough to get modulate and to me it's still binary. I do plan on welding in harness brackets and some battery mounts. The 818 I'm starting will be electric similar to Erik's build, but I plan on going the DC route. Each box should be roughly 100-125lbs. so I figure angle iron between cross members would be sufficient. I'll be practicing some more and will try a fillet weld. All the tutorials I've watched seem to indicate flat welding is best to start out.

  4. #4
    Senior Member Canadian818's Avatar
    Join Date
    Nov 2011
    Location
    Edmonton, Alberta
    Posts
    1,378
    Post Thanks / Like
    The little pit is commonly referred to as a crater, and crater cracks are the number one fault with tig welding. Your puddle is shrinking too fast. There's a few techniques. If you can really slowly taper off your amperage that's best, also adding some filler just before breaking off the arc will help as it'll quench the puddle. You can also back step a little over your weld to spread the heat. If it's just too much, you can always go back and re-melt the crater, just remember to add a little filler. When using spray transfer (steel mig) or globular (steel flux) craters always form at the end because it's such a big puddle, which is why we either back step or trigger the end of the weld. It's much more common in aluminum tig welding.

    Too much info?
    Adam _____ Instagram @PopesProjects____ YouTube Channel
    818 SRX - #91
    Arrived 01/02/2014
    First Start 10/31/2016
    First Drive 05/22/2017
    Registered 10/25/2019 BRAP818

  5. #5
    Administrator
    Wayne Presley's Avatar
    Join Date
    Feb 2011
    Location
    Enterprise Alabama
    Posts
    2,804
    Post Thanks / Like
    Blog Entries
    3
    Adam is correct, back off the amperage a little to only heat the top of the puddle and add a little rod. I taper off my weld over 2-3 seconds on aluminum. Then keep the torch over the weld area for another 5 sec on aluminum.
    Wayne Presley www.verycoolparts.com
    Xterminator 705 RWHP supercharged 4.6 DOHC with twin turbos

  6. #6
    Senior Member Canadian818's Avatar
    Join Date
    Nov 2011
    Location
    Edmonton, Alberta
    Posts
    1,378
    Post Thanks / Like
    Holding the torch over the weld after breaking the arc is to continue shielding the cooling puddle with gas. Most machines have a Post-Flow setting. The amount of Post-Flow time required is directly related to the thermal conductivity of the material and the amount of amperage being applied. It's a common misconseption that aluminum needs a lot of post flow because aluminum requires higher amperage to weld. Aluminum transfers heat so well that little to no post flow is needed especially if your tapering off your amperage to fill your crater as the oxidizing layer forms almost instantly.

    Steel on the other hand requires less amperage to weld because the thermal conductivity is much less than aluminum, so the "heat" stays closer to where your working. For this same reason the the puddle takes longer too cool and will require more post flow. A easy rule of thumb is 2-3secs after the weld is no longer red. I've done a lot stainless steel tig where 10-30+ seconds of post flow was required due to it's low conductivity. I've talked to a few welders with titanium tickets and they often use a trailing gas nozzle, because the weld needs to be shielded for so long. In factories it's usually just done in a gas filled chamber to make it easier.

    Too much info?
    Adam _____ Instagram @PopesProjects____ YouTube Channel
    818 SRX - #91
    Arrived 01/02/2014
    First Start 10/31/2016
    First Drive 05/22/2017
    Registered 10/25/2019 BRAP818

  7. #7
    Senior Member
    Join Date
    Oct 2014
    Location
    Redondo Beach, CA
    Posts
    161
    Post Thanks / Like
    Great info! Thanks a bunch!

  8. #8
    Administrator
    Wayne Presley's Avatar
    Join Date
    Feb 2011
    Location
    Enterprise Alabama
    Posts
    2,804
    Post Thanks / Like
    Blog Entries
    3
    go to weldingtipsandtricks.com for instructional videos and info
    Wayne Presley www.verycoolparts.com
    Xterminator 705 RWHP supercharged 4.6 DOHC with twin turbos

  9. #9
    Member kabacj's Avatar
    Join Date
    Mar 2011
    Location
    Long Island
    Posts
    1,103
    Post Thanks / Like
    Welds look good. You can see the bottom weld the piece of plate was hotter and the bead is flatter. Flip over the plate and see how far you are penetrating. I'd want to be just near melting through but not leaving areas where you completely melt through. After some practice you can tell when you melt through as the puddle sags flat. I agree with Wayne welding tips and tricks is a great guide. When welding steel make sure the area is clean. You can see the little bit if slag next to your craters on the later passes because you did not wire brush between passes.

    Now that you have a nice bead on flat plate start welding all the scrap you have together. Add thin pieces to thick pieces. Weld pipes and thin tubes to flat plate. Weld fillets in tight spaces.
    These practice welds are much more like what you will encounter when you are welding on your car.

    You will learn how to control the heat and the torch angle. After searching and reading quite a bit , I think you can read and be told the basics of welding, but I have found the only way to learn is to practice. Empty a bottle of argon practicing at least before you weld on the car.


    I picked up a tig torch for the first time when I started my build. No training, just watching folks and practice. Welding stuff up comes in very handy. I wish I was welding right now!


    John
    XTF #2
    build start date June 19 2023

    GTM # 344
    Build Start December 2010
    First track day April 2013

  10. #10
    Administrator
    Wayne Presley's Avatar
    Join Date
    Feb 2011
    Location
    Enterprise Alabama
    Posts
    2,804
    Post Thanks / Like
    Blog Entries
    3
    And when you are welding aluminum, there is no such this as too clean. I clean as much as possible then hit both surfaces with a stainless brush.
    Wayne Presley www.verycoolparts.com
    Xterminator 705 RWHP supercharged 4.6 DOHC with twin turbos

  11. #11
    Senior Member
    Join Date
    Oct 2014
    Location
    Redondo Beach, CA
    Posts
    161
    Post Thanks / Like
    Yes cleaning ... I did forget to wire brush after each bead. Need to remember that ... I get caught up sitting down and practicing that I forgot. I'm going to get more scrap flat pieces and practice this weekend. Thanks again for all the tips.

    I did read that aluminum oxidizes quite quickly. Is there a specific time frame to re-clean?

  12. #12
    Senior Member dallas_'s Avatar
    Join Date
    Feb 2011
    Location
    Dallas, TX
    Posts
    449
    Post Thanks / Like
    Blog Entries
    2
    Good start.

    Most recommend cleaning immediately before welding. Also, use a dedicated stainless steel brush that you only use for cleaning aluminum. Then acetone after brushing. Also, when you grind your tungsten, use a dedicated grinding wheel also. It's easy to contaminate your tungsten.
    FFR 7123 tilt front, Levy 5link/wilwoods/LCA's, webers.
    SL-C, LS3 525, Mendeola SDR5,

  13. #13
    Member kabacj's Avatar
    Join Date
    Mar 2011
    Location
    Long Island
    Posts
    1,103
    Post Thanks / Like
    Quote Originally Posted by ninjanick View Post
    Yes cleaning ... I did forget to wire brush after each bead. Need to remember that ... I get caught up sitting down and practicing that I forgot. I'm going to get more scrap flat pieces and practice this weekend. Thanks again for all the tips.

    I did read that aluminum oxidizes quite quickly. Is there a specific time frame to re-clean?

    I agree clean before you sit down and weld regardless of the metal type. On Aluminum you can make pass after pass on the part without cleaning. The stainless wire brush will ruin your pretty stack of dimes and the cleaning cycle of A/C current welding takes care of the slight oxidation that you will get after your initial clean up.

    DC welding on steel does not have the benefit of a cleaning phase so you need to keep after the blue/ black oxide that builds up in the heated zone of your weld.

    Now that you are getting into welding it's time to get a bead blast cabinet. A few min in the blasting cabinet really makes getting your parts clean much faster and easier.

    John
    XTF #2
    build start date June 19 2023

    GTM # 344
    Build Start December 2010
    First track day April 2013

  14. #14
    Senior Member
    Join Date
    Oct 2014
    Location
    Redondo Beach, CA
    Posts
    161
    Post Thanks / Like
    Dedicated steel brush and grinder ... check! Need to get some Acetone.

  15. #15
    Senior Member Mike N's Avatar
    Join Date
    Feb 2011
    Location
    Mooresville NC
    Posts
    801
    Post Thanks / Like
    Not mentioned here and worth bringing up. DO NOT use Brake Clean or any chlorinated solvent to clean parts you are going to weld. Also, be very wary of certain paint thinners. If you think the parts may have been previously cleaned with Brake Clean re-clean them with Acetone. The mix of tetrachloroethylene and high heat in an argon atmosphere produces Phosgene gas a nerve agent used in the first World War. The vapors produced will do severe damage to your body and can kill you. Stick with Acetone or IPA.

    Less dangerous but also worth bringing up. If you weld any galvanized or zincated steel completely remove the coating by sanding or grinding before welding. The fumes will give you flu like symptoms (metal fume fever) very quickly. Rarely deadly but very unpleasant.
    Last edited by Mike N; 01-06-2015 at 08:19 AM.
    Mike............

    FFR2100 - 331 with KB supercharger - T5 - 5 link rear 3.08's and T2 Torsen.

  16. #16
    Senior Member
    Join Date
    Oct 2014
    Location
    Redondo Beach, CA
    Posts
    161
    Post Thanks / Like
    Butt joints I seem to be getting, but fillets and lap I need more practice. Any rhyme or reason as to cup size and tungsten stick out? I'm using a #6 cup now and I feel as though I need to stick my tungsten out quite a bit to get close enough for a fillet weld.


  17. #17
    Administrator
    Wayne Presley's Avatar
    Join Date
    Feb 2011
    Location
    Enterprise Alabama
    Posts
    2,804
    Post Thanks / Like
    Blog Entries
    3
    Tungsten stick out is no more than half the diameter of the cup. What do you have the gas flow set at?

    Are you using a cup or a gas lens?
    Wayne Presley www.verycoolparts.com
    Xterminator 705 RWHP supercharged 4.6 DOHC with twin turbos

  18. #18
    Senior Member
    Join Date
    Oct 2014
    Location
    Redondo Beach, CA
    Posts
    161
    Post Thanks / Like
    15cfh

  19. #19
    Senior Member
    Join Date
    Mar 2011
    Location
    Orlando, FL
    Posts
    1,284
    Post Thanks / Like
    Interesting thread. I have no clue on how to weld. All the tech talk on welding is greek to me. I find this to be interesting though

  20. #20
    Administrator
    Wayne Presley's Avatar
    Join Date
    Feb 2011
    Location
    Enterprise Alabama
    Posts
    2,804
    Post Thanks / Like
    Blog Entries
    3
    I'd run a little more gas with the 6 cup, 15 would be good with a 4 cup.
    Wayne Presley www.verycoolparts.com
    Xterminator 705 RWHP supercharged 4.6 DOHC with twin turbos

  21. #21
    818 builder metalmaker12's Avatar
    Join Date
    Mar 2012
    Location
    Exeter R.I
    Posts
    2,834
    Post Thanks / Like
    Blog Entries
    1
    25cfh #6- #7 and as you do fillets dip twice on the bead face. Once on top and once on bottom or one bigger dip in middle and keep washing in. Remember to start a nice puddle and keep that consistency. Use the cup as your guide and keep it even. Butt looks decent, practice makes perfect.
    818S frame #13 Jdm version 8 ej207

  22. #22
    Tazio Nuvolari wannabe Scargo's Avatar
    Join Date
    Nov 2013
    Location
    south-central CT
    Posts
    1,611
    Post Thanks / Like
    I got a few gas lens when I started outfitting myself for TIG welding. Not sure when and where to use them but from what I've read it seems I should use nothing else...
    Mostly I've been welding 16ga 316 SS. I typically use a #6 cup, 1/16" tungsten and only about 15 cfh or 7 lb/m. Does that seem about right and how would I change anything if I used a gas lens?

  23. #23
    Administrator
    Wayne Presley's Avatar
    Join Date
    Feb 2011
    Location
    Enterprise Alabama
    Posts
    2,804
    Post Thanks / Like
    Blog Entries
    3
    I'd go up on the flow and you get better shielding gas coverage with a gas lens.
    Wayne Presley www.verycoolparts.com
    Xterminator 705 RWHP supercharged 4.6 DOHC with twin turbos

  24. #24
    Member kabacj's Avatar
    Join Date
    Mar 2011
    Location
    Long Island
    Posts
    1,103
    Post Thanks / Like
    Quote Originally Posted by ninjanick View Post
    Butt joints I seem to be getting, but fillets and lap I need more practice. Any rhyme or reason as to cup size and tungsten stick out? I'm using a #6 cup now and I feel as though I need to stick my tungsten out quite a bit to get close enough for a fillet weld.

    Looks nice Nick. It also looks like a thick piece of steel. If you notice the heat effected zone is not very wide so that tells me the metal was soaking up the heat quickly. This makes the bead stand up above the surrounding metal as well. In this case you would crank up the amperage and possibly v the joint so you could get enough penetration. Or of course do two passes on either side as well as v grooving the joint is also an option on a bench welded piece. You can't always do that when welding the car.

    Next try to make a nice bead like that welding a piece of 1/8 inch steel to the thicker piece. Then 18 guage then 20 guage. Learning to balance the heat between two parts that absorb heat differently will prepare you for the situations you will encounter on your car.

    John
    XTF #2
    build start date June 19 2023

    GTM # 344
    Build Start December 2010
    First track day April 2013

  25. #25
    Senior Member
    Join Date
    Oct 2014
    Location
    Redondo Beach, CA
    Posts
    161
    Post Thanks / Like
    Spent most of the day welding steel and I'm getting more comfortable with fillets. Still looks like I have some porosity issues, but the lay wire technique seems to be the ticket for me. Can't do the dab and move yet on these types of joints. I tried my hand at some aluminum and I just made a hot mess ...


Posting Permissions

  • You may not post new threads
  • You may not post replies
  • You may not post attachments
  • You may not edit your posts
  •  

FFMetal

Visit our community sponsor