Very Cool Parts

Visit our community sponsor

Thanks Thanks:  0
Likes Likes:  3
Page 6 of 12 FirstFirst ... 45678 ... LastLast
Results 201 to 240 of 477

Thread: JJ's 818s Build

  1. #201
    Senior Member Frank818's Avatar
    Join Date
    Jun 2013
    Location
    QC, Canada
    Posts
    5,732
    Post Thanks / Like
    Wow that's nice! Hopefully the ceramic will help!
    Frank
    818 chassis #181 powered by a '93 VW VR6 Turbo GT3582R
    Go-karted Aug 5, 2016 - Then May 19+21, 2017
    Tracked May 27/July 26, 2017
    Build time before being driveable on Sep 27, 2019: over 6000h
    Build Completed Winter 2021

  2. #202
    nkw8181's Avatar
    Join Date
    Sep 2013
    Location
    Dallas, TX
    Posts
    762
    Post Thanks / Like
    Looking great!
    Nolan
    65 coupe Gen 3 "Phoenix" build
    http://thefactoryfiveforum.com/showt...032#post297032

    818 s (with r windscreen ) 350 rwhp. Registered and street legal (SOLD)

  3. #203
    Senior Member Zodiac's Avatar
    Join Date
    Jun 2012
    Location
    Southern California
    Posts
    187
    Post Thanks / Like
    Great work on the wiring harness. I'll looking into redoing mine soon. Do you have a list of which fuse/relays you are keeping and/or removing? It would really help me narrow some things down. Especially the SBF fuses cause I have no idea what they do, if they're needed, or if I can replace them with normal mini fuses.

    looking to use THIS for everything as it has 10 relay positions (hope it's enough) and 40 mini fuses. Any advice as far as which terminals I should order for it or any other advice is greatly appreciated.
    Last edited by Zodiac; 09-15-2015 at 03:14 PM.

  4. #204
    Senior Member TouchStone's Avatar
    Join Date
    Sep 2014
    Location
    Dallas, TX
    Posts
    512
    Post Thanks / Like
    Blog Entries
    1
    A Short Blow Fuse (SBF) is fuse that is designed to burn up quickly when too much current (more than the rated value) is passed through it. During normal operation a SBF is viewed as a closed/shorted wire. It is a required safety device that will sacrifice itself or disconnect power when something goes wrong in the wiring. Nobody wants to see the effect of a battery turning a bundle of wires into a flaming ball of death. I replaced the main 80Amp SBF with this http://www.waytekwire.com/item/46691...rcuit-Breaker/ Conveniently placed I can manually open this fuse to disconnect power which I'll use as an additional anti-theft device.

    You can use your 10 relay power block (call them to find out what pins, rubber seals and crimper your need), I only needed 8 mini-relays since I reused the donor's main,fuel-pump, and high beam relays.

    Check out my google drive folder below for the parts I ordered and schematics (2nd page for fuses and relays) I used for wiring.

    https://drive.google.com/folderview?...Xc&usp=sharing


    Donor was a 2003 Wagon.

    *Dont forget the brackets for the power block, sold individually you need 2.
    818S Chassis #288 2.5L 323hp
    Ordered: 9/19/14 Received Kit: 11/2/14 First Start: 5/31/15 First Drive: 6/7/15 Registered: 3/10/2016 Completed: 2/10/2017
    Status: Complete Build Thread Sold 9/22/2017
    joshuajach.com

  5. #205
    Senior Member Zodiac's Avatar
    Join Date
    Jun 2012
    Location
    Southern California
    Posts
    187
    Post Thanks / Like
    Thanks I'll start more homework tonight haha

    So did you put the entire system through the 80amp circuit breaker and disregard all the other SBF that come after it and just leave it as going through a normal mini fuse?

    Also Is yours a 80amp because that's what a 2003 wagon uses? Mine is a 2006 and the diagram shows a 120amp main SBF.
    Last edited by Zodiac; 09-16-2015 at 08:55 AM.

  6. #206
    Senior Member TouchStone's Avatar
    Join Date
    Sep 2014
    Location
    Dallas, TX
    Posts
    512
    Post Thanks / Like
    Blog Entries
    1
    Quote Originally Posted by Zodiac View Post
    Thanks I'll start more homework tonight haha

    So did you put the entire system through the 80amp circuit breaker and disregard all the other SBF that come after it and just leave it as going through a normal mini fuse?

    Also Is yours a 80amp because that's what a 2003 wagon uses? Mine is a 2006 and the diagram shows a 120amp main SBF.
    I dont think it is critical to use SBF I just used the 80 amp fuse as the main and then a number of normal mini fuses. 80amps came from the 2003 wagon diagram.
    818S Chassis #288 2.5L 323hp
    Ordered: 9/19/14 Received Kit: 11/2/14 First Start: 5/31/15 First Drive: 6/7/15 Registered: 3/10/2016 Completed: 2/10/2017
    Status: Complete Build Thread Sold 9/22/2017
    joshuajach.com

  7. #207
    Senior Member TouchStone's Avatar
    Join Date
    Sep 2014
    Location
    Dallas, TX
    Posts
    512
    Post Thanks / Like
    Blog Entries
    1
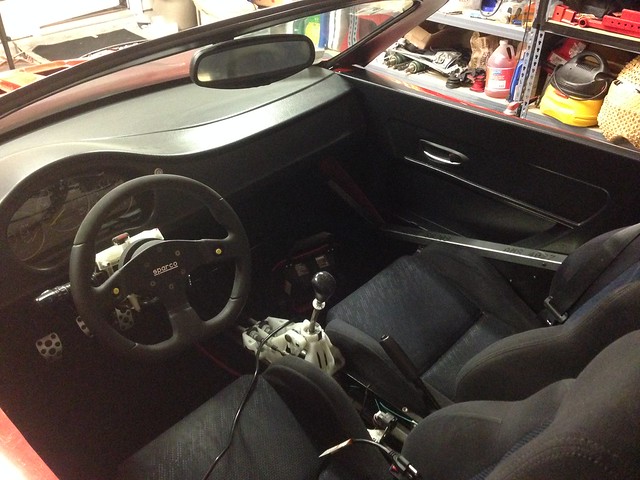
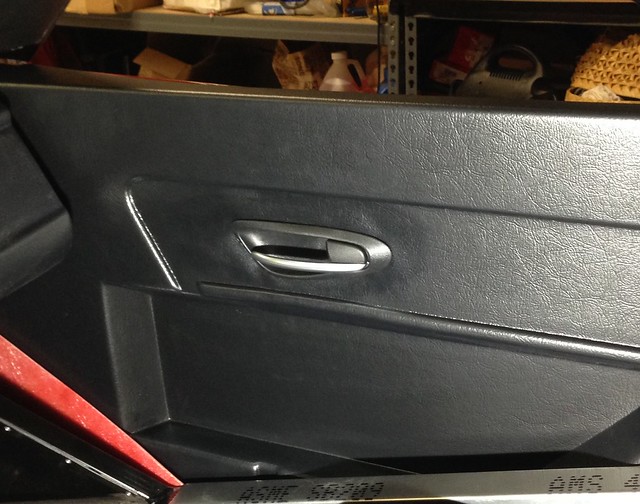
    Finally made some progress after getting back from my trip. I've installed a different door handle since I didn't like the donor's. This took much longer than I had hoped due to the curvature of the plastic inset and I still have the other side to do.


    818S Chassis #288 2.5L 323hp
    Ordered: 9/19/14 Received Kit: 11/2/14 First Start: 5/31/15 First Drive: 6/7/15 Registered: 3/10/2016 Completed: 2/10/2017
    Status: Complete Build Thread Sold 9/22/2017
    joshuajach.com

  8. #208
    nkw8181's Avatar
    Join Date
    Sep 2013
    Location
    Dallas, TX
    Posts
    762
    Post Thanks / Like
    Nice!
    Nolan
    65 coupe Gen 3 "Phoenix" build
    http://thefactoryfiveforum.com/showt...032#post297032

    818 s (with r windscreen ) 350 rwhp. Registered and street legal (SOLD)

  9. #209
    Senior Member AZPete's Avatar
    Join Date
    Feb 2011
    Location
    Scottsdale, AZ
    Posts
    2,374
    Post Thanks / Like
    Nice work. I'm looking for an upgraded door handle so your timing is good.
    "This took much longer than I had hoped . . . "
    Is there any project that doesn't apply to? I'm thinking I should get that quote tattooed on the back of my hand.
    818S/C : Chassis #25 with 06 WRX 2.5 turbo, ABS, cruise, PS, A/C, Apple CarPlay, rear camera, power windows & locks, leather & other complexities. Sold 10/19 with 5,800 miles.
    Mk3 Roadster #6228 4.6L, T45, IRS, PS, PB, ABS, Cruise, Koni's, 17" Halibrands, red w/ silver - 9K miles then sold @ Barrett-Jackson Jan 2011 (got back cash spent).

  10. #210
    Senior Member TouchStone's Avatar
    Join Date
    Sep 2014
    Location
    Dallas, TX
    Posts
    512
    Post Thanks / Like
    Blog Entries
    1
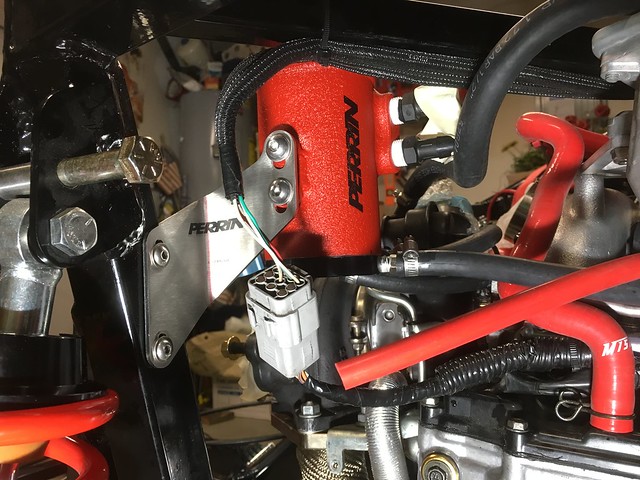
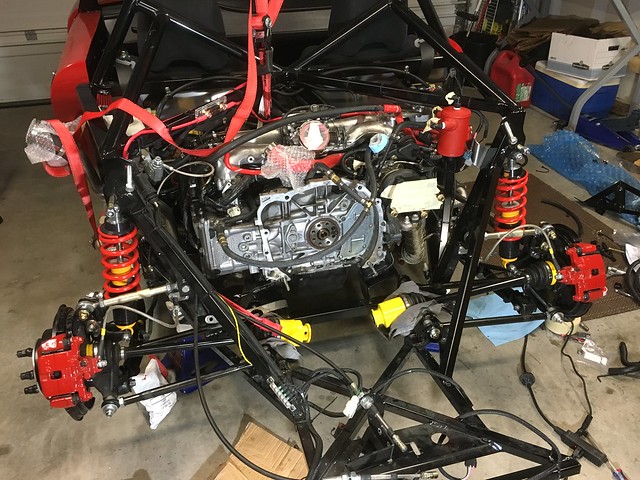
    Over the last two weekends I managed to pull the turbo, trany and clutch. Installed ID1000's, vf39, Wayne's rear trailing arms and lateral links. Unfortunately the vf39 does not work with Craig's heat shield and has very little clearance from the shock bar. I'm currently midway through the Perrin aos install. Still need to install a clutch and the awic system before it will run again.


    818S Chassis #288 2.5L 323hp
    Ordered: 9/19/14 Received Kit: 11/2/14 First Start: 5/31/15 First Drive: 6/7/15 Registered: 3/10/2016 Completed: 2/10/2017
    Status: Complete Build Thread Sold 9/22/2017
    joshuajach.com

  11. #211
    Senior Member
    Join Date
    Jan 2012
    Posts
    1,112
    Post Thanks / Like
    Nice, what springs are those? The ones off the R setup?

  12. #212
    Mechie3's Avatar
    Join Date
    May 2012
    Location
    Indianapolis
    Posts
    5,174
    Post Thanks / Like
    Quote Originally Posted by TouchStone View Post
    Unfortunately the vf39 does not work with Craig's heat shield and has very little clearance from the shock bar.
    Hmm...a couple of people are running non stock turbos with that heatshield. Don't recall off hand if one of them is a VF39 though.
    Zero Decibel Motorsports
    Check out my new website!
    www.zerodecibelmotorsports.com
    www.facebook.com/zero.decibel.motorsports

  13. #213

    Join Date
    Oct 2013
    Location
    Puyallup, WA
    Posts
    576
    Post Thanks / Like
    I originally had the VF39 which required the notching on the crossbar to not interfere with the wastegate actuator. Your heat shield would not work with a VF39.

    After the installation of the Blouch 2.5 Dom, your shield fit with minor modification.

  14. #214
    Mechie3's Avatar
    Join Date
    May 2012
    Location
    Indianapolis
    Posts
    5,174
    Post Thanks / Like
    Thanks Kurk. You were one of the people I was thinking of. Surprised the 39 is larger package wise than the Dom. I'll make a note of this on my site.
    Zero Decibel Motorsports
    Check out my new website!
    www.zerodecibelmotorsports.com
    www.facebook.com/zero.decibel.motorsports

  15. #215
    Senior Member TouchStone's Avatar
    Join Date
    Sep 2014
    Location
    Dallas, TX
    Posts
    512
    Post Thanks / Like
    Blog Entries
    1
    Quote Originally Posted by 07FIREBLADE View Post
    Nice, what springs are those? The ones off the R setup?
    Eibach 2.5" x 8" #550

    http://www.summitracing.com/parts/ei...0550/overview/
    818S Chassis #288 2.5L 323hp
    Ordered: 9/19/14 Received Kit: 11/2/14 First Start: 5/31/15 First Drive: 6/7/15 Registered: 3/10/2016 Completed: 2/10/2017
    Status: Complete Build Thread Sold 9/22/2017
    joshuajach.com

  16. #216
    Senior Member TouchStone's Avatar
    Join Date
    Sep 2014
    Location
    Dallas, TX
    Posts
    512
    Post Thanks / Like
    Blog Entries
    1
    Quote Originally Posted by Kurk818 View Post
    I originally had the VF39 which required the notching on the crossbar to not interfere with the wastegate actuator. Your heat shield would not work with a VF39.

    After the installation of the Blouch 2.5 Dom, your shield fit with minor modification.
    How much clearance to the crossbar is required?
    818S Chassis #288 2.5L 323hp
    Ordered: 9/19/14 Received Kit: 11/2/14 First Start: 5/31/15 First Drive: 6/7/15 Registered: 3/10/2016 Completed: 2/10/2017
    Status: Complete Build Thread Sold 9/22/2017
    joshuajach.com

  17. #217
    nkw8181's Avatar
    Join Date
    Sep 2013
    Location
    Dallas, TX
    Posts
    762
    Post Thanks / Like
    I thought it was more of the waste gate that caused issues not the body of the turbo?
    Nolan
    65 coupe Gen 3 "Phoenix" build
    http://thefactoryfiveforum.com/showt...032#post297032

    818 s (with r windscreen ) 350 rwhp. Registered and street legal (SOLD)

  18. #218

    Join Date
    Oct 2013
    Location
    Puyallup, WA
    Posts
    576
    Post Thanks / Like
    Quote Originally Posted by TouchStone View Post
    How much clearance to the crossbar is required?
    This is the blouch


    And vf39

  19. #219
    Moonlight Performance
    Hindsight's Avatar
    Join Date
    May 2014
    Location
    Atlanta
    Posts
    3,402
    Post Thanks / Like
    While on the subject of turbo clearances, does anyone know if the stock-location turbos (from the WRX IHI to the VF39 to the Dom 1.5 XTR etc) all have their outlet flange in EXACTLY the same spot? I'm curious because I'm very close to building my exhaust and while I wills use the stock turbo at first, I will upgrade later - probably to a larger stock location and I don't want to have to alter the exhaust system I build.

  20. #220

    Join Date
    Oct 2013
    Location
    Puyallup, WA
    Posts
    576
    Post Thanks / Like
    Quote Originally Posted by Hindsight View Post
    While on the subject of turbo clearances, does anyone know if the stock-location turbos (from the WRX IHI to the VF39 to the Dom 1.5 XTR etc) all have their outlet flange in EXACTLY the same spot? I'm curious because I'm very close to building my exhaust and while I wills use the stock turbo at first, I will upgrade later - probably to a larger stock location and I don't want to have to alter the exhaust system I build.
    They are all considered bolt on turbos with no modification required. The bottom turbo support brace is reused in all cases that I'm aware of, thus not changing the positioning.

    Anyone else know something different?

  21. #221
    Moonlight Performance
    Hindsight's Avatar
    Join Date
    May 2014
    Location
    Atlanta
    Posts
    3,402
    Post Thanks / Like
    Thx, I figured it would be very close. Am hoping it's exact.

  22. #222
    Senior Member STiPWRD's Avatar
    Join Date
    Jan 2014
    Location
    Leesburg, VA
    Posts
    1,624
    Post Thanks / Like
    It's more or less exact (to within casting tolerances). BTW, my TD06 18G clears the cross bar with no modification but uses different water and oil fittings than stock.

  23. #223
    Senior Member TouchStone's Avatar
    Join Date
    Sep 2014
    Location
    Dallas, TX
    Posts
    512
    Post Thanks / Like
    Blog Entries
    1
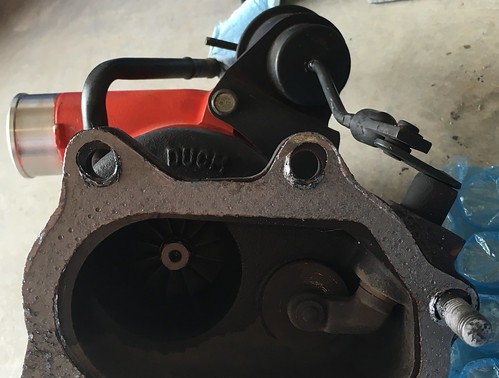
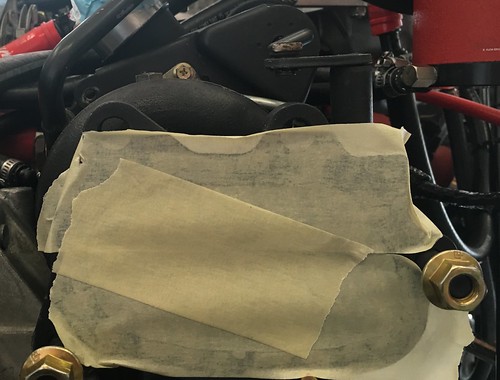
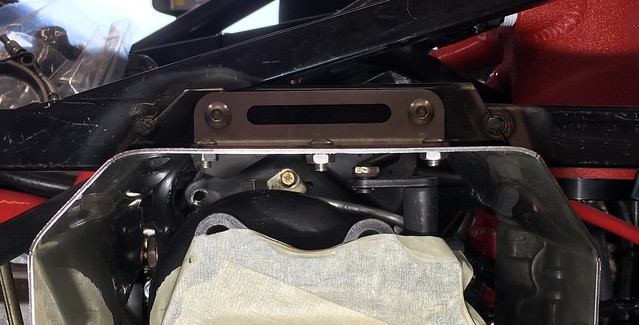
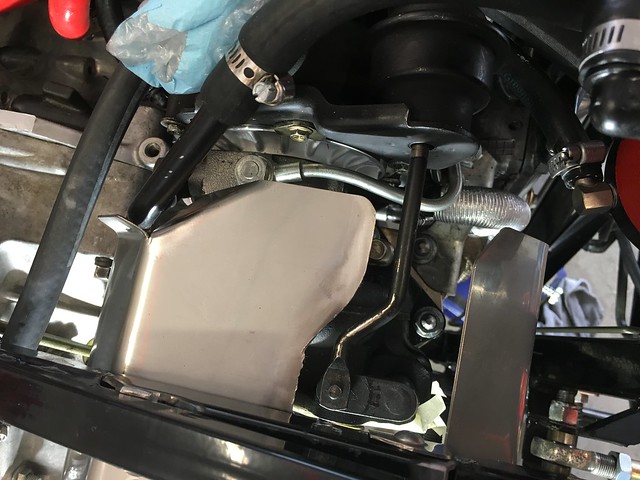
    The VF39 has poor clearance to the shock bar at the wastegate actuator and if using the heat shield it hits the housing.

    Left TD04; Right VF39 notice the difference in the housing size and wastegate actuator location.


    Since I wanted to keep using the heat shield and increase clearance I made several modifications to the heat shield and shock bar.


    818S Chassis #288 2.5L 323hp
    Ordered: 9/19/14 Received Kit: 11/2/14 First Start: 5/31/15 First Drive: 6/7/15 Registered: 3/10/2016 Completed: 2/10/2017
    Status: Complete Build Thread Sold 9/22/2017
    joshuajach.com

  24. #224
    nkw8181's Avatar
    Join Date
    Sep 2013
    Location
    Dallas, TX
    Posts
    762
    Post Thanks / Like
    That's how you do it!
    Nolan
    65 coupe Gen 3 "Phoenix" build
    http://thefactoryfiveforum.com/showt...032#post297032

    818 s (with r windscreen ) 350 rwhp. Registered and street legal (SOLD)

  25. #225
    Senior Member Frank818's Avatar
    Join Date
    Jun 2013
    Location
    QC, Canada
    Posts
    5,732
    Post Thanks / Like
    Pretty cool!
    Frank
    818 chassis #181 powered by a '93 VW VR6 Turbo GT3582R
    Go-karted Aug 5, 2016 - Then May 19+21, 2017
    Tracked May 27/July 26, 2017
    Build time before being driveable on Sep 27, 2019: over 6000h
    Build Completed Winter 2021

  26. #226
    Member
    Join Date
    Oct 2015
    Location
    Quebec, Canada
    Posts
    41
    Post Thanks / Like
    Very nice build

  27. #227
    Senior Member TouchStone's Avatar
    Join Date
    Sep 2014
    Location
    Dallas, TX
    Posts
    512
    Post Thanks / Like
    Blog Entries
    1

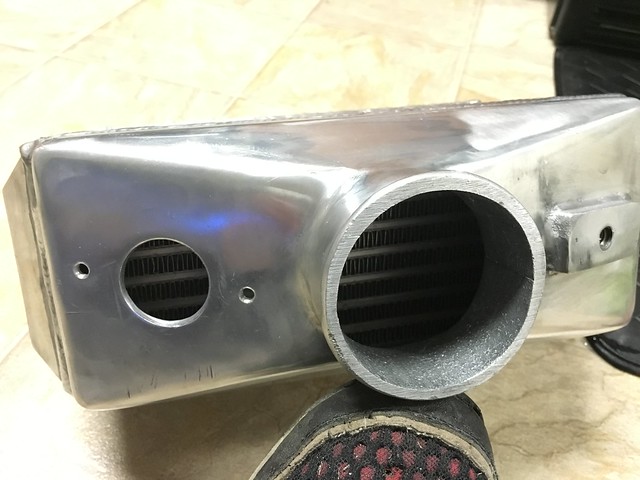
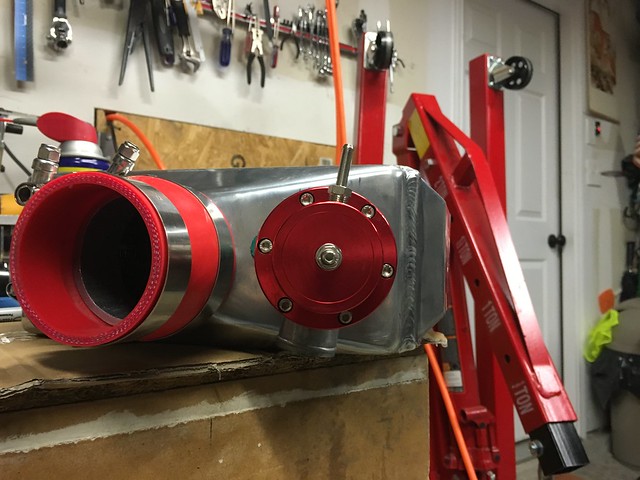
    Clocked AWIC Install

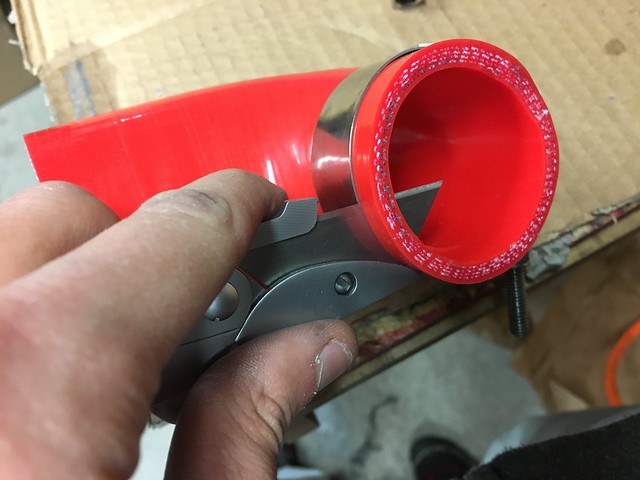
    Used a hose clamp and a new razor blade to make very clean cuts.


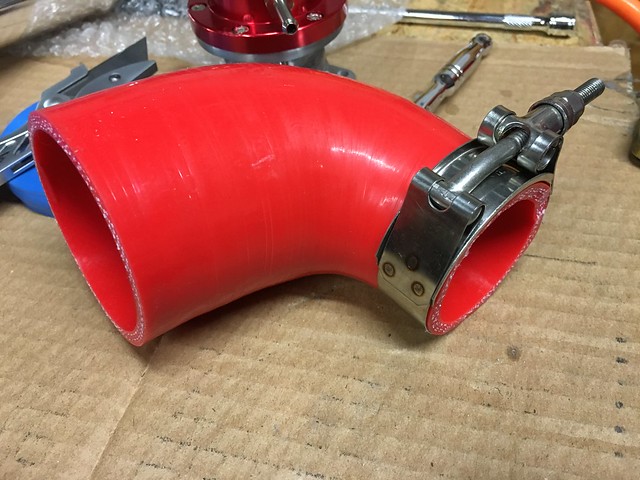
    Needed a slight angle to mate properly with the hose.


    I'm not sure what to do about this. Maybe nothing, after visual inspection the airflow does not appear to be restricted. Clocking the turbo any further would require heavy modifications to the wastegate.


    818S Chassis #288 2.5L 323hp
    Ordered: 9/19/14 Received Kit: 11/2/14 First Start: 5/31/15 First Drive: 6/7/15 Registered: 3/10/2016 Completed: 2/10/2017
    Status: Complete Build Thread Sold 9/22/2017
    joshuajach.com

  28. #228
    Senior Member TouchStone's Avatar
    Join Date
    Sep 2014
    Location
    Dallas, TX
    Posts
    512
    Post Thanks / Like
    Blog Entries
    1
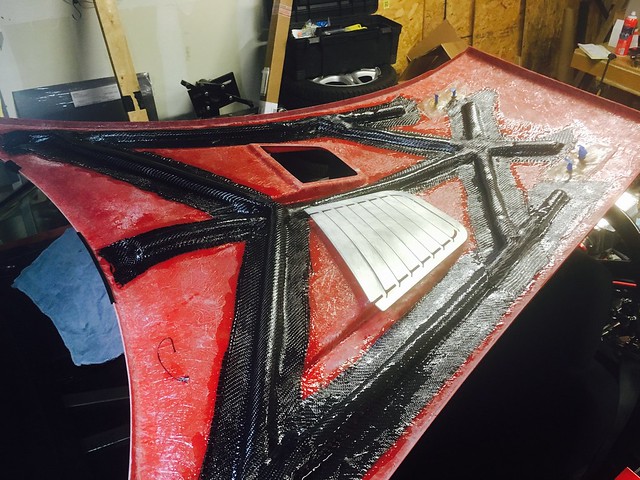
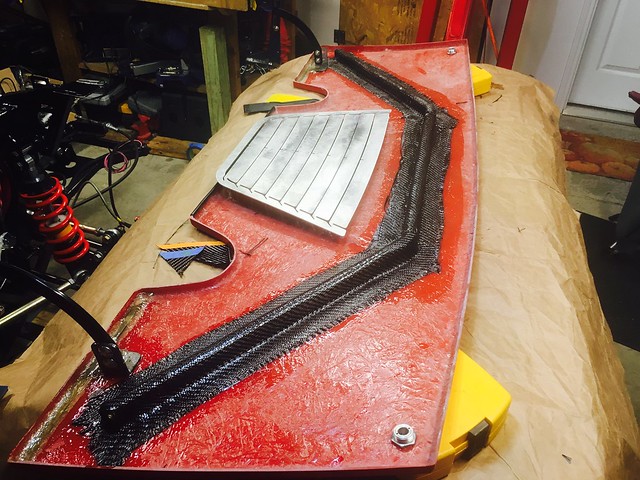
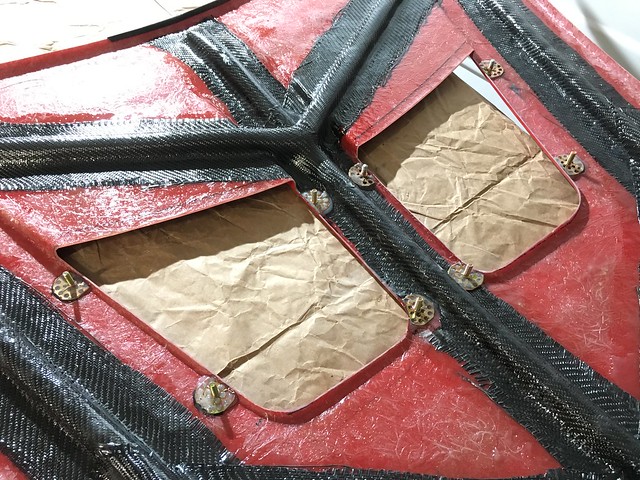
    Also worked with Nolan to reinforce the hood with carbon fiber and vinyl resin. Currently waiting for better weather conditions before application.

    818S Chassis #288 2.5L 323hp
    Ordered: 9/19/14 Received Kit: 11/2/14 First Start: 5/31/15 First Drive: 6/7/15 Registered: 3/10/2016 Completed: 2/10/2017
    Status: Complete Build Thread Sold 9/22/2017
    joshuajach.com

  29. #229
    Senior Member TouchStone's Avatar
    Join Date
    Sep 2014
    Location
    Dallas, TX
    Posts
    512
    Post Thanks / Like
    Blog Entries
    1
    Short test run:
    818S Chassis #288 2.5L 323hp
    Ordered: 9/19/14 Received Kit: 11/2/14 First Start: 5/31/15 First Drive: 6/7/15 Registered: 3/10/2016 Completed: 2/10/2017
    Status: Complete Build Thread Sold 9/22/2017
    joshuajach.com

  30. #230
    Mechie3's Avatar
    Join Date
    May 2012
    Location
    Indianapolis
    Posts
    5,174
    Post Thanks / Like
    I wouldn't worry about airflow in that section just potential for wear. I'd keep an eye on it to make sure it isn't vibrating.

    I like your hose cutting trick. So simple yet not so obvious.
    Zero Decibel Motorsports
    Check out my new website!
    www.zerodecibelmotorsports.com
    www.facebook.com/zero.decibel.motorsports

  31. #231
    nkw8181's Avatar
    Join Date
    Sep 2013
    Location
    Dallas, TX
    Posts
    762
    Post Thanks / Like
    Sounds mean!
    Nolan
    65 coupe Gen 3 "Phoenix" build
    http://thefactoryfiveforum.com/showt...032#post297032

    818 s (with r windscreen ) 350 rwhp. Registered and street legal (SOLD)

  32. #232
    Senior Member
    Join Date
    Apr 2015
    Location
    Andover, MA
    Posts
    530
    Post Thanks / Like
    I think I like what you're doing here....look forward to seeing more of it. (re: the hood reinforcement)
    Last edited by ben1272; 12-03-2015 at 08:17 PM. Reason: clarification

  33. #233
    Senior Member TouchStone's Avatar
    Join Date
    Sep 2014
    Location
    Dallas, TX
    Posts
    512
    Post Thanks / Like
    Blog Entries
    1
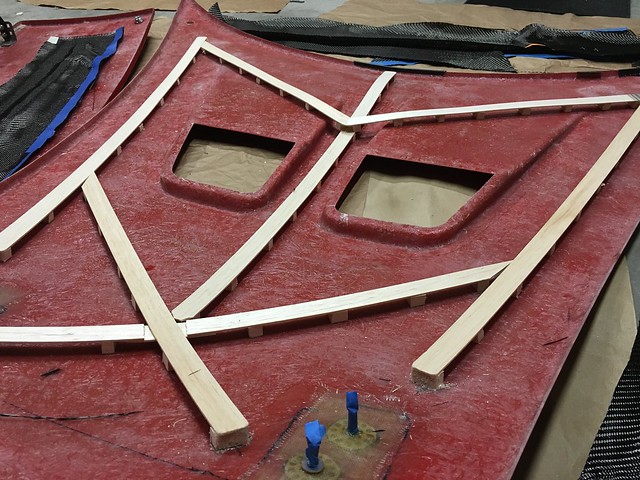
    Mostly done, will see how much this stiffens the hood tomorrow. If I were to do it again I'd stay away from the complicated crosses.


    818S Chassis #288 2.5L 323hp
    Ordered: 9/19/14 Received Kit: 11/2/14 First Start: 5/31/15 First Drive: 6/7/15 Registered: 3/10/2016 Completed: 2/10/2017
    Status: Complete Build Thread Sold 9/22/2017
    joshuajach.com

  34. #234
    Moonlight Performance
    Hindsight's Avatar
    Join Date
    May 2014
    Location
    Atlanta
    Posts
    3,402
    Post Thanks / Like
    Looks nice!!!

  35. #235
    Senior Member Bob_n_Cincy's Avatar
    Join Date
    Sep 2012
    Location
    Cincinnati OH
    Posts
    3,904
    Post Thanks / Like
    Quote Originally Posted by TouchStone View Post
    Mostly done, will see how much this stiffens the hood tomorrow. If I were to do it again I'd stay away from the complicated crosses.

    JJ,
    Looks strong.
    Did you leave it dry on the table or on the car?
    My rear deck gets flexed by the hood pins to pull the rear corners down.
    Does yours sit on the car with out flexing?
    bob
    Last edited by Bob_n_Cincy; 12-06-2015 at 12:16 PM.
    818S #22 Candy Blue Frame, Front Gas Tank, 2.5L Turbo, Rear radiator, Shortened Transmission, Wookiee Compatible, Console mounted MR2 Shifter, Custom ECU panel, AWIC soon
    My Son Michael's Turbo ICE Build X22 http://thefactoryfiveforum.com/showt...rts-818S-Build
    My Electric Supercar Build X21 (on hold until winter) http://thefactoryfiveforum.com/showt...e-Build-Thread

  36. #236
    Senior Member TouchStone's Avatar
    Join Date
    Sep 2014
    Location
    Dallas, TX
    Posts
    512
    Post Thanks / Like
    Blog Entries
    1
    Quote Originally Posted by Bob_n_Cincy View Post
    Did you leave it dry on the table or on the car?
    My rear deck gets flexed by the hood pins to pull the rear corners down.
    Does yours sit on the car with out flexing?
    bob
    I flex it a little to get the corners down. I did support the corners while it was drying. Also with the way the supports were added I should still be able to bend the corners with latches slightly.
    818S Chassis #288 2.5L 323hp
    Ordered: 9/19/14 Received Kit: 11/2/14 First Start: 5/31/15 First Drive: 6/7/15 Registered: 3/10/2016 Completed: 2/10/2017
    Status: Complete Build Thread Sold 9/22/2017
    joshuajach.com

  37. #237
    Member
    Join Date
    Sep 2012
    Location
    DFW, Texas
    Posts
    94
    Post Thanks / Like
    Looks really good..

  38. #238
    Senior Member TouchStone's Avatar
    Join Date
    Sep 2014
    Location
    Dallas, TX
    Posts
    512
    Post Thanks / Like
    Blog Entries
    1
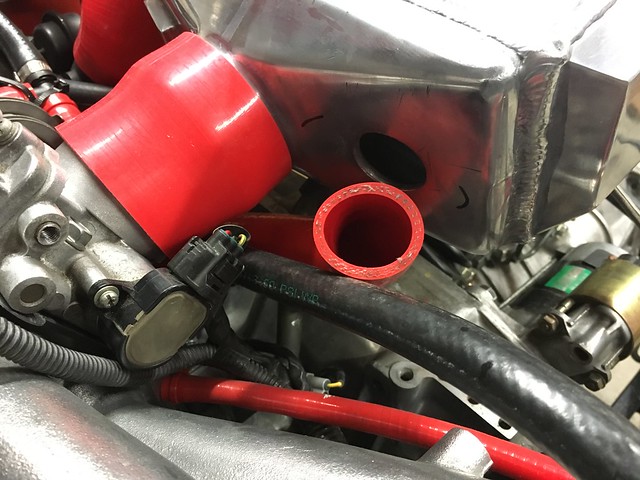
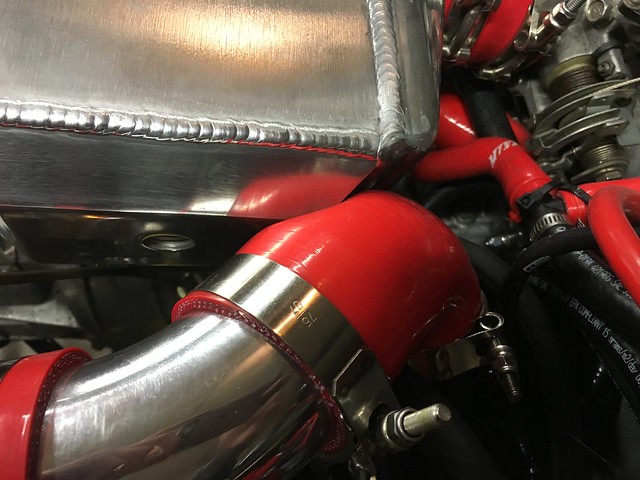
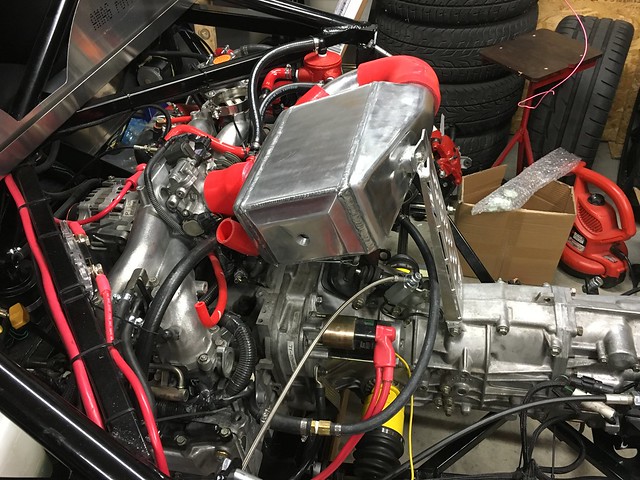
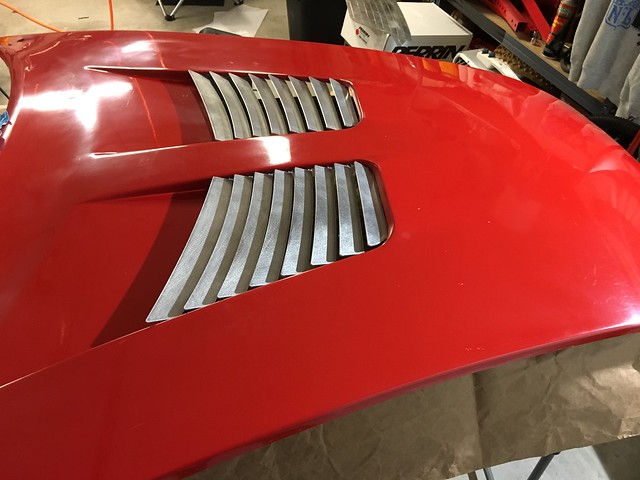
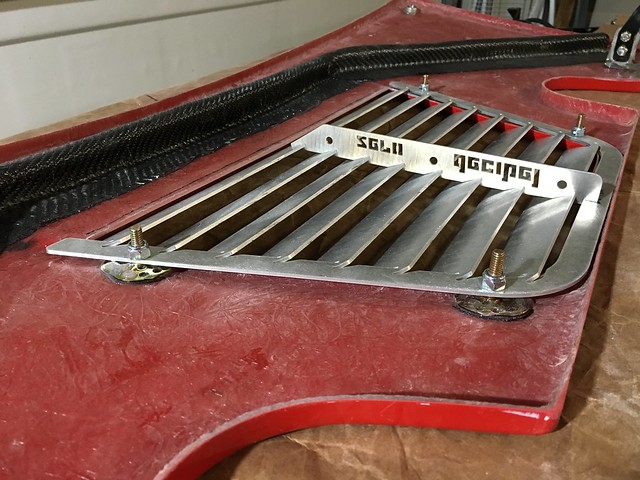
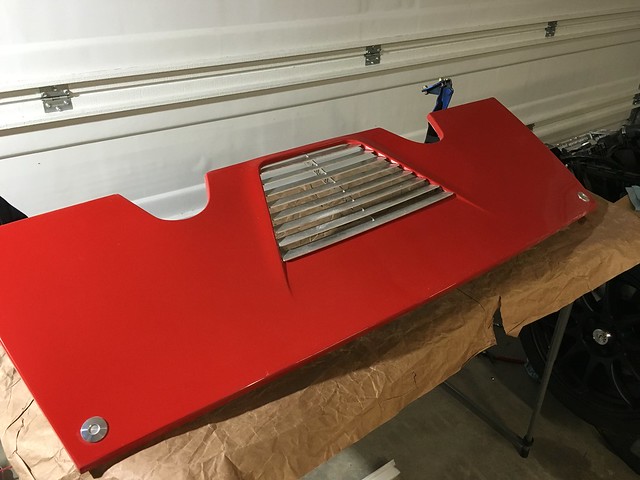
    I'm happy! These are such cool parts...Thanks Craig!


    Last edited by TouchStone; 12-08-2015 at 10:08 AM. Reason: added a picture
    818S Chassis #288 2.5L 323hp
    Ordered: 9/19/14 Received Kit: 11/2/14 First Start: 5/31/15 First Drive: 6/7/15 Registered: 3/10/2016 Completed: 2/10/2017
    Status: Complete Build Thread Sold 9/22/2017
    joshuajach.com

  39. #239
    Mechie3's Avatar
    Join Date
    May 2012
    Location
    Indianapolis
    Posts
    5,174
    Post Thanks / Like
    . Glad you like them. I like the removable installation too.
    Zero Decibel Motorsports
    Check out my new website!
    www.zerodecibelmotorsports.com
    www.facebook.com/zero.decibel.motorsports

  40. #240
    Senior Member RM1SepEx's Avatar
    Join Date
    Jul 2011
    Location
    Freeport, ME
    Posts
    3,801
    Post Thanks / Like
    Quote Originally Posted by Mechie3 View Post
    . Glad you like them. I like the removable installation too.
    I wish I would have done that! Nice job
    Dan

    818S #17 Picked up 8/1/13 First start 11/1/13 Go Kart 3/28/14

Page 6 of 12 FirstFirst ... 45678 ... LastLast

Posting Permissions

  • You may not post new threads
  • You may not post replies
  • You may not post attachments
  • You may not edit your posts
  •  

FFMetal

Visit our community sponsor