Very Cool Parts

Visit our community sponsor

Thanks Thanks:  0
Likes Likes:  0
Results 1 to 17 of 17

Thread: NRG harness length?

  1. #1
    Senior Member
    Join Date
    Jul 2014
    Location
    Strathroy, Ontario Canada
    Posts
    479
    Post Thanks / Like

    NRG harness length?

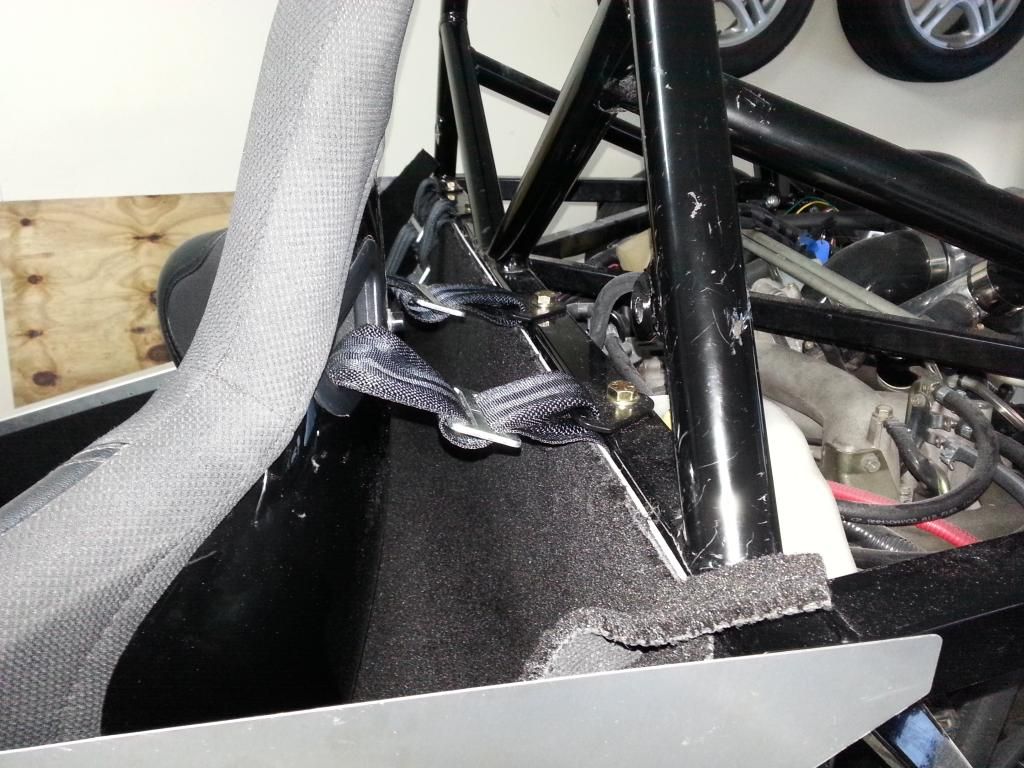
    Does anyone have NRG seat harness? I have run my shoulder harness over the rear horizontal square tubing that the roll bar mounts on and shortened the harness as much as I can but It is way to long. I am gonna fab a welded bar in to attach them to but the harness will be down by the front of the engine!?!

    my question is does anyone have the NRG 4 point cam lock harness and did you have this problem? or is there a fix? belt shortener?

    seats 016.JPGseats 017.JPGseats 018.JPG

  2. #2
    Senior Member ehansen007's Avatar
    Join Date
    Mar 2011
    Location
    Aliso Viejo, CA
    Posts
    1,625
    Post Thanks / Like
    Just cut it, loop it through like the pic below and then burn the ends of the nylon to keep it from fraying.


  3. #3
    Senior Member Bob_n_Cincy's Avatar
    Join Date
    Sep 2012
    Location
    Cincinnati OH
    Posts
    3,904
    Post Thanks / Like
    Quote Originally Posted by Lumpyguy View Post
    Does anyone have NRG seat harness? I have run my shoulder harness over the rear horizontal square tubing that the roll bar mounts on and shortened the harness as much as I can but It is way to long. I am gonna fab a welded bar in to attach them to but the harness will be down by the front of the engine!?!

    my question is does anyone have the NRG 4 point cam lock harness and did you have this problem? or is there a fix? belt shortener?

    seats 016.JPGseats 017.JPGseats 018.JPG
    Lumpyguy
    I mounted mine similarly.
    Bob
    1009142104a.jpg P1050112c.jpg
    818S #22 Candy Blue Frame, Front Gas Tank, 2.5L Turbo, Rear radiator, Shortened Transmission, Wookiee Compatible, Console mounted MR2 Shifter, Custom ECU panel, AWIC soon
    My Son Michael's Turbo ICE Build X22 http://thefactoryfiveforum.com/showt...rts-818S-Build
    My Electric Supercar Build X21 (on hold until winter) http://thefactoryfiveforum.com/showt...e-Build-Thread

  4. #4
    Senior Member wleehendrick's Avatar
    Join Date
    Jul 2012
    Location
    Encinitas, CA
    Posts
    1,653
    Post Thanks / Like
    Blog Entries
    2
    Quote Originally Posted by Lumpyguy View Post
    Does anyone have NRG seat harness? I have run my shoulder harness over the rear horizontal square tubing that the roll bar mounts on and shortened the harness as much as I can but It is way to long. I am gonna fab a welded bar in to attach them to but the harness will be down by the front of the engine!?!
    seats 016.JPGseats 017.JPGseats 018.JPG
    I also have the NRG harnesses. I removed the attachment hardware that came with them and used eyebolts and clip-ins for the lap and sub straps (fairly cheap from Jegs). I'm not sure if I'll install a harness bar for the shoulder straps, or attach lower like Bob. As you found, there's more than enough length for the shoulder straps; after properly securing, just cut the excess and leave at least 4" past the 3-bar slide. The graphic Erik posted comes from the Schroth manual which has a lot of good diagrams for properly locating the anchor points.

    Quote Originally Posted by Lumpyguy View Post
    or is there a fix? belt shortener?


    Much easier to shorten than lengthen!

  5. #5
    Senior Member Bob_n_Cincy's Avatar
    Join Date
    Sep 2012
    Location
    Cincinnati OH
    Posts
    3,904
    Post Thanks / Like
    When you cut them off, can you melt the ends to keep them from fraying like nylon rope?
    818S #22 Candy Blue Frame, Front Gas Tank, 2.5L Turbo, Rear radiator, Shortened Transmission, Wookiee Compatible, Console mounted MR2 Shifter, Custom ECU panel, AWIC soon
    My Son Michael's Turbo ICE Build X22 http://thefactoryfiveforum.com/showt...rts-818S-Build
    My Electric Supercar Build X21 (on hold until winter) http://thefactoryfiveforum.com/showt...e-Build-Thread

  6. #6
    Senior Member wleehendrick's Avatar
    Join Date
    Jul 2012
    Location
    Encinitas, CA
    Posts
    1,653
    Post Thanks / Like
    Blog Entries
    2
    Quote Originally Posted by Bob_n_Cincy View Post
    When you cut them off, can you melt the ends to keep them from fraying like nylon rope?
    I haven't trimmed mine yet, but that was my plan.

  7. #7
    Senior Member
    Join Date
    Feb 2011
    Posts
    607
    Post Thanks / Like
    Yup, I cut mine as well. Mine are bolted to the chassis. You can burn the ends, but mine still fray a bit. I'm not too worried about it since there is sooooo much extra slack.


  8. #8
    Senior Member wleehendrick's Avatar
    Join Date
    Jul 2012
    Location
    Encinitas, CA
    Posts
    1,653
    Post Thanks / Like
    Blog Entries
    2
    Quote Originally Posted by GUNS View Post
    Yup, I cut mine as well. Mine are bolted to the chassis. You can burn the ends, but mine still fray a bit. I'm not too worried about it since there is sooooo much extra slack.
    Hi Guns,

    I'm contemplating drilling the square bar like you did as another mounting option. How did you get in there? Access is so tight around the roll bar and other frame members! I have right angle adapters for both my Dremel (which could drill an accurate pilot) and a 3/8" drill. However, the hole needs to be 7/16", so cutting a bit down won't work and I can't find a 7/16" stubby bit with 3/8" shank. I'm thinking that a close quarters drill and short step bit might work, but that would need access from both sides, obviously. Is that how you did it?

    Thanks,

    Lee

  9. #9
    Senior Member
    Join Date
    May 2012
    Location
    Suisun City, CA
    Posts
    851
    Post Thanks / Like
    Quote Originally Posted by wleehendrick View Post
    Hi Guns,

    I'm contemplating drilling the square bar like you did as another mounting option. How did you get in there? Access is so tight around the roll bar and other frame members! I have right angle adapters for both my Dremel (which could drill an accurate pilot) and a 3/8" drill. However, the hole needs to be 7/16", so cutting a bit down won't work and I can't find a 7/16" stubby bit with 3/8" shank. I'm thinking that a close quarters drill and short step bit might work, but that would need access from both sides, obviously. Is that how you did it?

    Thanks,

    Lee
    I did the same and drilled from the bottom up.
    818S - #67 (SOLD IT!)
    Delivered: 18 November 2013
    Go Karted: 29 December 2013
    Titled/Registered: 28 March 2014
    Finished: NEVER!
    341 hp @ 4844 RPM / 389 tq @ 3717 RPM

  10. #10
    Senior Member wleehendrick's Avatar
    Join Date
    Jul 2012
    Location
    Encinitas, CA
    Posts
    1,653
    Post Thanks / Like
    Blog Entries
    2
    Yeah, there's just enough room to get in there from the bottom side, with a short enough bit (and 90degree or close quarters drill), but the only 7/16" I can find short enough is a step bit, which would also have to go in from the top, since I don't want to open the hole any more. What bit/drill did you use?

  11. #11
    Senior Member
    Join Date
    Feb 2011
    Posts
    607
    Post Thanks / Like
    I drilled through the top w/ a pilot hole and then drilled w/ the 7/16 from the bottom.

  12. #12
    Senior Member wleehendrick's Avatar
    Join Date
    Jul 2012
    Location
    Encinitas, CA
    Posts
    1,653
    Post Thanks / Like
    Blog Entries
    2
    Quote Originally Posted by GUNS View Post
    I drilled through the top w/ a pilot hole and then drilled w/ the 7/16 from the bottom.
    Did you find a 7/16" stubby bit with 3/8" shank or have a close quarters drill? This is driving me crazy as I can't find the right combo of drill/adapter and bit that able to get in there... I'd really appreciate it if you or Jerome could point me to what specifically worked for you. Thanks!

  13. #13
    Senior Member Bob_n_Cincy's Avatar
    Join Date
    Sep 2012
    Location
    Cincinnati OH
    Posts
    3,904
    Post Thanks / Like
    Quote Originally Posted by wleehendrick View Post
    Did you find a 7/16" stubby bit with 3/8" shank or have a close quarters drill? This is driving me crazy as I can't find the right combo of drill/adapter and bit that able to get in there... I'd really appreciate it if you or Jerome could point me to what specifically worked for you. Thanks!
    use a step drill bit, it is short.]
    image_11970.jpg
    818S #22 Candy Blue Frame, Front Gas Tank, 2.5L Turbo, Rear radiator, Shortened Transmission, Wookiee Compatible, Console mounted MR2 Shifter, Custom ECU panel, AWIC soon
    My Son Michael's Turbo ICE Build X22 http://thefactoryfiveforum.com/showt...rts-818S-Build
    My Electric Supercar Build X21 (on hold until winter) http://thefactoryfiveforum.com/showt...e-Build-Thread

  14. #14
    Senior Member wleehendrick's Avatar
    Join Date
    Jul 2012
    Location
    Encinitas, CA
    Posts
    1,653
    Post Thanks / Like
    Blog Entries
    2
    Quote Originally Posted by Bob_n_Cincy View Post
    use a step drill bit, it is short.]
    image_11970.jpg
    Yeah, but a step bit requires access to the top of the tube if you don't want to oversize the bottom hole. And there is very little clearance on top of where the inboard hole need to be drilled (not enough for any tools I have). I've ordered the smallest close quarter drill I could find, but I'm really curious as to how Guns and Jerome got in there.

  15. #15
    Senior Member
    Join Date
    Feb 2011
    Posts
    607
    Post Thanks / Like
    I have a relatively small drill, but it was still a tight fit. I did have one hole that didn't turn out perfectly straight.

  16. #16
    Senior Member wleehendrick's Avatar
    Join Date
    Jul 2012
    Location
    Encinitas, CA
    Posts
    1,653
    Post Thanks / Like
    Blog Entries
    2
    Yeah, been there with 'not perfectly straight' a couple times. I ordered the lowest close quarters drill I could find, since neither of my drills can get in there, even with a right angle attachment. Hopefully it'll fit with a step bit. I just got all the other points drilled for the harness, so next weekend I'll get to the shoulders. Would be nice if I had the capability to weld a bar in, but I think I'll make do. Thanks!

  17. #17
    Senior Member
    Join Date
    May 2012
    Location
    Suisun City, CA
    Posts
    851
    Post Thanks / Like
    I believe I may have used the step bit on the bottom to get the correct size. Once that hole was created, I switched to a regular bit from the bottom.
    818S - #67 (SOLD IT!)
    Delivered: 18 November 2013
    Go Karted: 29 December 2013
    Titled/Registered: 28 March 2014
    Finished: NEVER!
    341 hp @ 4844 RPM / 389 tq @ 3717 RPM

Posting Permissions

  • You may not post new threads
  • You may not post replies
  • You may not post attachments
  • You may not edit your posts
  •  

Breeze

Visit our community sponsor