Boig Motorsports

Visit our community sponsor

Thanks Thanks:  0
Likes Likes:  0
Results 1 to 36 of 36

Thread: Trailing Arm Alignment

  1. #1
    Senior Member metros's Avatar
    Join Date
    Jun 2013
    Location
    NoVA
    Posts
    1,064
    Post Thanks / Like

    Trailing Arm Alignment

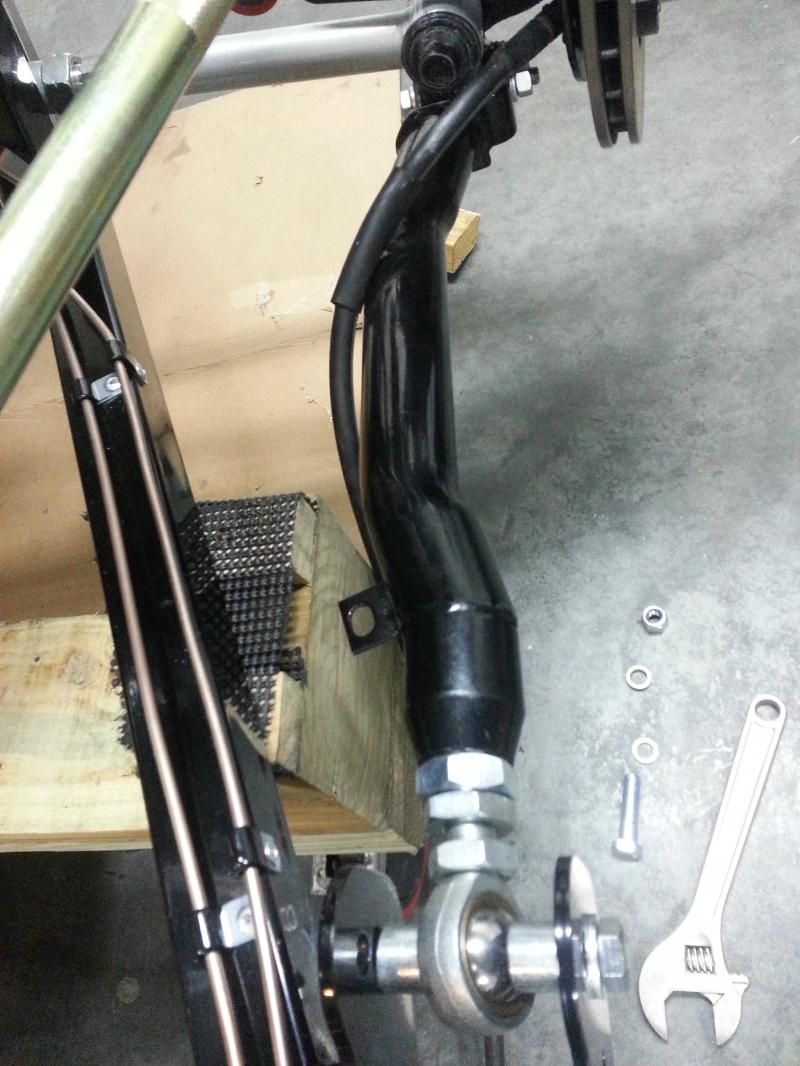
    I've been working around this issue for awhile now and haven't been able to figure out how to adjust everything to get it synced up correctly. I have the VCP trailing arms to allow for wider wheels. The connection to the bottom of the knuckle seems really off. What am I doing wrong and what do I need to adjust?

    Pics:


    Trouble spot

  2. #2
    Senior Member D Clary's Avatar
    Join Date
    Aug 2013
    Location
    Santa Rosa CA
    Posts
    407
    Post Thanks / Like
    You might ask Wayne about this one. I had the same problem I ended up not using them. It seem that the only solution is cutting the end off and welding it on at the proper angle. I tried re-drilling the holes to align it but it came out to short. I didn't want the hiem extended that far.

  3. #3
    East Coast Speed Machines Erik W. Treves's Avatar
    Join Date
    Feb 2011
    Location
    Huntsville, Al
    Posts
    2,109
    Post Thanks / Like
    you need to put it all at ride height before you tighten everything up.
    FFR 1879, Blown DSS 306,REDLINE management, VeryCoolParts Tuned 460RWHP

    FFR 818S, The Flash, Chassis #5, 2.0L, LSD, Electromotive TEC-S, VCP Tuned, 278RWHP 265 RWTQ

    FFR 6651, Green Lantern, 408W Crate, Hellion 66mm Turbo, JGS Waste gate / Blowoff valve, Tec-GT management, VCP Tuned, 575 RWHP, 690 RWTQ

    FFR 8335, Black Mamba, 289 FIA CSX 2001 tribute car, 347, 48 IDA webers, VCP Tuned, 311 RWHP 386 RWTQ, 3-link, Trigo's

    FFR 0004, Gen 3 , Hawk Coupe, Coyote twin turbo, 683 RWHP 559 RWTQ, IRS, VCP Tuned. "not too shabby"

    US ARMY Maintenance Test Pilot (CW4 Retired)
  4. #4
    Senior Member metros's Avatar
    Join Date
    Jun 2013
    Location
    NoVA
    Posts
    1,064
    Post Thanks / Like
    This kind of came about because I was getting ready to finish the suspension. Yesterday I adjusted the koni and was getting ready to bolt them up in the rear. They don't want to bolt in because of the twisting that happens due to getting the trailing arm to play with the bottom of the knuckle.

    Any in depth recommendations would be greatly appreciated.

    D Clary - I emailed Wayne a link to this thread. Maybe this will help someone else in the future as well.

  5. #5
    Administrator
    Wayne Presley's Avatar
    Join Date
    Feb 2011
    Location
    Enterprise Alabama
    Posts
    2,804
    Post Thanks / Like
    Blog Entries
    3
    The ears will be pulled into position when you tighten the bolt. Put the bolt through and then put the front rod end in.
    Wayne Presley www.verycoolparts.com
    Xterminator 705 RWHP supercharged 4.6 DOHC with twin turbos

  6. #6
    Moonlight Performance
    Hindsight's Avatar
    Join Date
    May 2014
    Location
    Atlanta
    Posts
    3,402
    Post Thanks / Like
    These are my VCP rear arms installed with the bolt tightened. As Wayne mentioned, tightening the bolt brings the tabs in, but also you may have the lateral links adjusted all the way out which just magnifies the issue before the bolt is tightened.


  7. #7
    Senior Member metros's Avatar
    Join Date
    Jun 2013
    Location
    NoVA
    Posts
    1,064
    Post Thanks / Like
    So I should tighten the knuckle end 100% before putting into the chassis side?

    Hopefully tomorrow I'll be able to give that a shot. Hoping to get a snow day from the few inches we're projected. NoVA snow chaos lulz.

    <---Upstate NY Native

  8. #8
    Moonlight Performance
    Hindsight's Avatar
    Join Date
    May 2014
    Location
    Atlanta
    Posts
    3,402
    Post Thanks / Like
    I don't think the order matters personally. I have installed everything, then removed just the trailing arms in order to tweak their length adjustment, then put them back in. If I had to choose an order, I would say bolt the trailing arms to the knuckle first, then install the lateral links.

  9. #9
    Administrator
    Wayne Presley's Avatar
    Join Date
    Feb 2011
    Location
    Enterprise Alabama
    Posts
    2,804
    Post Thanks / Like
    Blog Entries
    3
    Hindsight, you know you can adjust the without removing the arms/bolts right?
    Wayne Presley www.verycoolparts.com
    Xterminator 705 RWHP supercharged 4.6 DOHC with twin turbos

  10. #10
    Moonlight Performance
    Hindsight's Avatar
    Join Date
    May 2014
    Location
    Atlanta
    Posts
    3,402
    Post Thanks / Like
    Yeah i did that to help the arm install. It needed an amount of toe in or out to line up best to tighten the bolt.
  11. #11
    Senior Member metros's Avatar
    Join Date
    Jun 2013
    Location
    NoVA
    Posts
    1,064
    Post Thanks / Like
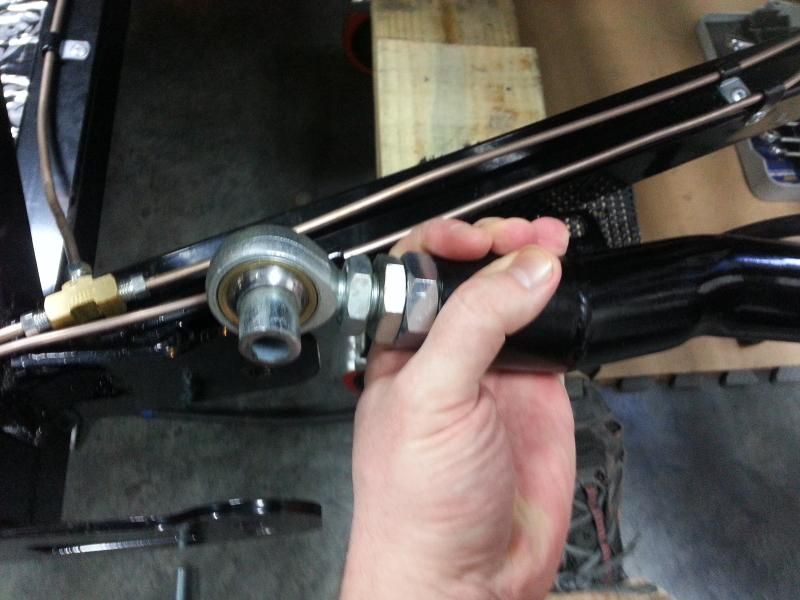
    So I'm just getting back to the garage. Sick kids suck and no snow days means no time for the garage.

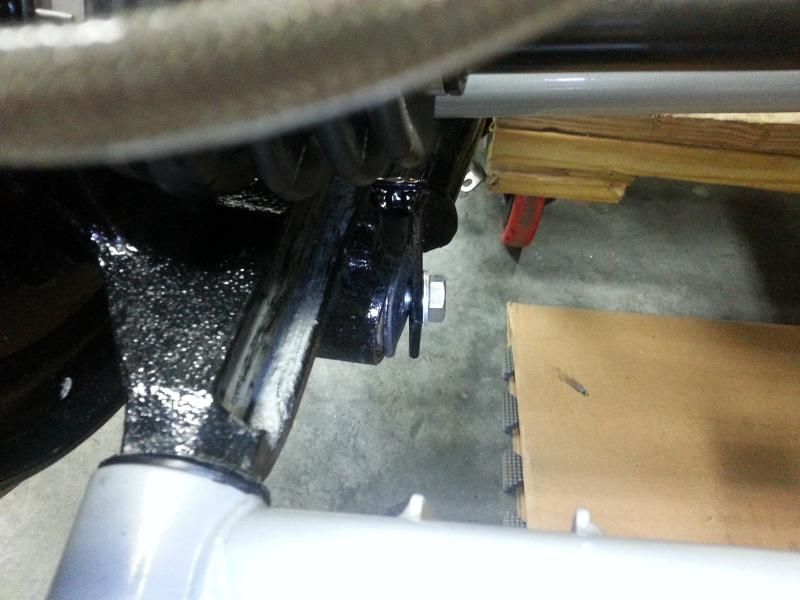
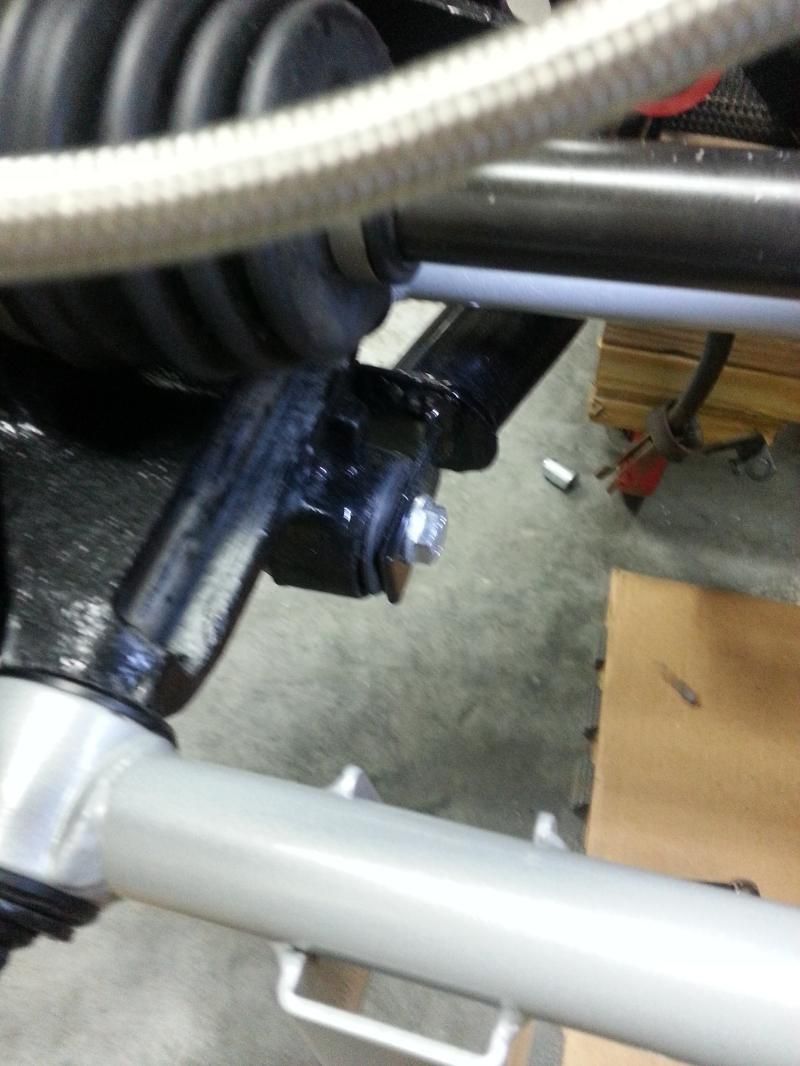
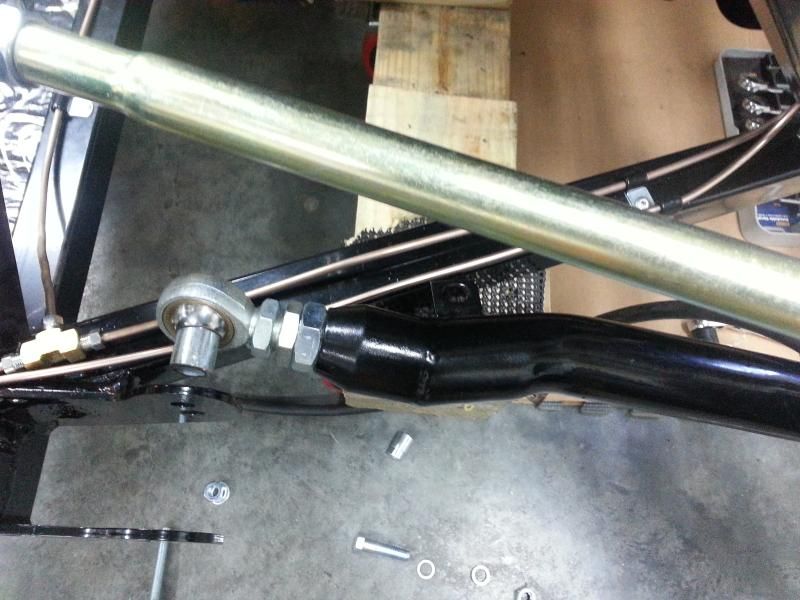
    I pulled the front of the trailing arm out of the chassis and tightened the knuckle side down, which looks fine. But then reinstalling the front of the trailing arm is near impossible. If I force it then it's going to put a ton of stress on the lower bushing. I have the whiteline adjustable lateral links. Regardless of how much toe in I try to adjust it still doesn't line up nicely. Even if it did then adjusting the toe back to where I want it would go back to putting stress on the lower bushing.

    Help?
    Front uninstalled


    As it sits at rest with knuckle side tightened down.


    Pulling it where it needs to go with a fair amount of force. Still has at least another inch before it's close to installing.


    The passenger side is in a much better place. Although I haven't gotten the shock bolted up just yet.

  12. #12
    Senior Member Frank818's Avatar
    Join Date
    Jun 2013
    Location
    QC, Canada
    Posts
    5,732
    Post Thanks / Like
    I have the same problem. Ended up bending the tabs on the lower spindle bushing, which caused the polyurethane bushings to squeeze on their ends. I don't like that at all. I am not at ride height.
    Frank
    818 chassis #181 powered by a '93 VW VR6 Turbo GT3582R
    Go-karted Aug 5, 2016 - Then May 19+21, 2017
    Tracked May 27/July 26, 2017
    Build time before being driveable on Sep 27, 2019: over 6000h
    Build Completed Winter 2021

  13. #13
    Senior Member
    Join Date
    Apr 2012
    Location
    Nepa
    Posts
    685
    Post Thanks / Like
    unhook the top shock mount so the suspension moves free might drop in place when it's not at full droop.
    Also a good practice to just be able to check the full movement of all corners.

  14. #14
    Senior Member metros's Avatar
    Join Date
    Jun 2013
    Location
    NoVA
    Posts
    1,064
    Post Thanks / Like
    Quote Originally Posted by Samiam1017 View Post
    unhook (Hook up?) the top shock mount so the suspension moves free might drop in place when it's not at full droop.
    Also a good practice to just be able to check the full movement of all corners.
    I'm assuming you meant to say hook up the top shock mount? That's kind of why I'm addressing this now. I went to hook up the shocks and the knuckle was slightly twisted forward to accommodate the poor alignment of the trailing arm.

  15. #15
    Senior Member
    Join Date
    Apr 2012
    Location
    Nepa
    Posts
    685
    Post Thanks / Like
    I ment to unhook it. So the arms arms are free to move around more without the shock and spring holding the arms in a position that makes it more difficult to align the bolt and mounts. It will also allow you to run the suspension up and down from full droop to full compression to see if everything moves freely and nothing else is actually in the way. My lower shock mount appeared twisted in full droop and was hard to get the shocks mounted (I know not the same problem you have but it worked for me)

  16. #16
    Senior Member metros's Avatar
    Join Date
    Jun 2013
    Location
    NoVA
    Posts
    1,064
    Post Thanks / Like
    Kind of the same problem then. I decided to address this now as I couldn't hook up the driver side rear shock due to the poor alignment of the trailing arm. As it sits right now and in the pictures everything is at full droop.

    The passenger side everything looks good. I have since adjusted all my driver side lengths to match the passenger side.

    Any more tips or recommendations?

  17. #17
    Senior Member
    Join Date
    Apr 2012
    Location
    Nepa
    Posts
    685
    Post Thanks / Like
    here's my lengths. all measurements bolt center to bolt center I don't have the lengths of the FFR supplied arms but I can get them for you they aren't set to anything yet so its kinda useless
    but here's the factory length's I used trailing arms 20 3/8 lateral/toe links 16 1/8
    im not far enough along to align it yet so that's where I started

  18. #18
    Senior Member metros's Avatar
    Join Date
    Jun 2013
    Location
    NoVA
    Posts
    1,064
    Post Thanks / Like
    Any other ideas? Should I take the trailing arm off and try to bend the tabs a touch?

    Anybody else with the wide trailing arms have this problem?

  19. #19
    Senior Member svanlare's Avatar
    Join Date
    Feb 2012
    Location
    San Jose, CA
    Posts
    545
    Post Thanks / Like
    I have everything mounted and yes, the tabs look like they do in your first post. I haven't "pulled them tight yet" as I'm planning on getting more of the car together to see how it all shakes out, but I expect that will bend the tabs over nicely. To get it all together, I connected the trailing arm first and then bolted on the rest of the control arms and finally the shocks. The trailing arm was the only part that seemed "mod-to-fit" so I started with it and it all went together fine.
    -Steve

  20. #20
    Senior Member metros's Avatar
    Join Date
    Jun 2013
    Location
    NoVA
    Posts
    1,064
    Post Thanks / Like
    You have your axles installed yet?

  21. #21
    Senior Member svanlare's Avatar
    Join Date
    Feb 2012
    Location
    San Jose, CA
    Posts
    545
    Post Thanks / Like
    I installed the driver side to see how it fits and had no issues with it. I disconnected the shock and the upper control arms. Inserted the axel and put it back together.

    The other side has to wait until I pull the car out of the garage and turn it around :-) Page 3 of my blog has the photos of both the same issue you had and and above picture with the axel installed (post #115)

    As things stand now, I was waiting to tighten the trailing arms when after I do a rough pass at alignment before a first drive.
    -Steve

  22. #22
    Senior Member metros's Avatar
    Join Date
    Jun 2013
    Location
    NoVA
    Posts
    1,064
    Post Thanks / Like
    Still looking for some help here fellas.

    Wayne?

  23. #23
    Senior Member STiPWRD's Avatar
    Join Date
    Jan 2014
    Location
    Leesburg, VA
    Posts
    1,624
    Post Thanks / Like
    Quote Originally Posted by metros View Post
    Still looking for some help here fellas.

    Wayne?
    Have you tried slotting the holes on the spindle end of the trailing arm? A combination of that and bending the tabs seems like the only way to get it to line up. If you're uncomfortable with slotting the holes we can weld on some plates to the tabs once we find the right positions for the holes.

  24. #24
    Administrator
    Wayne Presley's Avatar
    Join Date
    Feb 2011
    Location
    Enterprise Alabama
    Posts
    2,804
    Post Thanks / Like
    Blog Entries
    3
    If you want to send them back I'll adjust them
    Wayne Presley www.verycoolparts.com
    Xterminator 705 RWHP supercharged 4.6 DOHC with twin turbos

  25. #25
    Senior Member metros's Avatar
    Join Date
    Jun 2013
    Location
    NoVA
    Posts
    1,064
    Post Thanks / Like
    Got this taken care of today. I anticipated the tabs on the spindle end being difficult to bend. But they were really quite easy to adjust to where they needed to be. Put one tab in the vice at a time and used the trailing arm for leverage. Everything is all bolted up and looks much better now. Thanks for all the tips and replies guys.

  26. #26
    Senior Member Frank818's Avatar
    Join Date
    Jun 2013
    Location
    QC, Canada
    Posts
    5,732
    Post Thanks / Like
    Any pix yet?
    Frank
    818 chassis #181 powered by a '93 VW VR6 Turbo GT3582R
    Go-karted Aug 5, 2016 - Then May 19+21, 2017
    Tracked May 27/July 26, 2017
    Build time before being driveable on Sep 27, 2019: over 6000h
    Build Completed Winter 2021

  27. #27
    Senior Member
    Join Date
    Feb 2013
    Location
    Bowling Green OHIO
    Posts
    178
    Post Thanks / Like
    Blog Entries
    2
    Metros
    are your arms these?
    link arms.JPG

    has anyone tried these arms?
    I have stock right now and am not liking the fact that there is not much adjustment (almost none) and the cam on the one arm only moves that arm about 3/8 of an inch. My stock arms took some muscle to get in but I got them. the 245$ these arms cost may be a good investment in trying to get everything, wheels, clearances, alignment to go.

  28. #28
    Senior Member metros's Avatar
    Join Date
    Jun 2013
    Location
    NoVA
    Posts
    1,064
    Post Thanks / Like
    Mine are from Wayne @ VCP. It looks like identical trailing arms, just the spindle end has been cut off and welded offset to provide additional wheel clearance.

  29. #29
    Senior Member
    Join Date
    Mar 2014
    Location
    Hingham, MA
    Posts
    271
    Post Thanks / Like
    Mine look identical, but weren't from Godspeed. I paid about $180. I cut the unneeded brackets off. All of the rod ends needed to be cut down to fit, but once done they fit fine and are easily adjustable.

  30. #30
    Senior Member STiPWRD's Avatar
    Join Date
    Jan 2014
    Location
    Leesburg, VA
    Posts
    1,624
    Post Thanks / Like
    rear suspension.jpg
    I also got a set of these aftermarket arms from deep stage garage (ebay). It went together fairly well and I didn't have to cut any rod ends. Here's an older pic:

    IMAG0596.jpg
    I ended up cutting off the sway bar brackets later.

  31. #31
    Senior Member
    Join Date
    Feb 2013
    Location
    Bowling Green OHIO
    Posts
    178
    Post Thanks / Like
    Blog Entries
    2
    thanks all for the feedback; stipwrd- the arms look great.
    stipwrd & IDF,
    have you fit up your wheels and tires yet? just wondering what size you decided on and if I should just stick with the recommended sizes with these arms.

    Thanks, Doug

  32. #32
    Senior Member STiPWRD's Avatar
    Join Date
    Jan 2014
    Location
    Leesburg, VA
    Posts
    1,624
    Post Thanks / Like
    Quote Originally Posted by dougkirkbride View Post
    thanks all for the feedback; stipwrd- the arms look great.
    stipwrd & IDF,
    have you fit up your wheels and tires yet? just wondering what size you decided on and if I should just stick with the recommended sizes with these arms.

    Thanks, Doug
    I did a quick test fit and it was very close at the trailing arms and upper links. There may have been an interference when I snugged down the lug nuts but I can't remember. I'm running rear wheels with a higher offset (18x9.5 with 38mm offset). I ended up buying some ARP extended studs and 10mm spacers but havent installed them on yet. I thought about getting Wayne's trailing arms but I would have still had the low clearance by the upper link and also I think the spacers will help fill the rear fenders better.

  33. #33
    Senior Member metros's Avatar
    Join Date
    Jun 2013
    Location
    NoVA
    Posts
    1,064
    Post Thanks / Like
    ^^What wheels are you running? IIRC my rear wheels are the same specs. Wondering if we'll match.

    I'm hoping to pick up my wheels tomorrow. Depends if the shop gets a chance to mount the tires that just arrived today.

  34. #34
    Senior Member STiPWRD's Avatar
    Join Date
    Jan 2014
    Location
    Leesburg, VA
    Posts
    1,624
    Post Thanks / Like
    I got the Drag DR31s
    IMAG1046.jpgIMAG1044.jpgIMAG1045.jpg
    The last pic is the clearance with the 10mm spacers

  35. #35
    Senior Member
    Join Date
    Mar 2014
    Location
    Hingham, MA
    Posts
    271
    Post Thanks / Like
    Quote Originally Posted by dougkirkbride View Post
    thanks all for the feedback; stipwrd- the arms look great.
    stipwrd & IDF,
    have you fit up your wheels and tires yet? just wondering what size you decided on and if I should just stick with the recommended sizes with these arms.

    Thanks, Doug
    My wheels are XXR 530 18X8.75, 33MM offset with Federal 595, 255 35 18 tires. The tires clear the trailing arms by about 1/4 inch. I'm trying to decide if this is adequate,but may add a spacer.

  36. #36
    Senior Member metros's Avatar
    Join Date
    Jun 2013
    Location
    NoVA
    Posts
    1,064
    Post Thanks / Like
    Nice looking wheels. I'm using the Mach V wheels. I just realized mine are 18x9.5 +42 offset. I'll probably need a 5 mm spacer, using the offset trailing arms to provide a touch more clearance.

Posting Permissions

  • You may not post new threads
  • You may not post replies
  • You may not post attachments
  • You may not edit your posts
  •  

Replica Parts

Visit our community sponsor