Very Cool Parts

Visit our community sponsor

Thanks Thanks:  0
Likes Likes:  0
Page 2 of 3 FirstFirst 123 LastLast
Results 41 to 80 of 86

Thread: Jason's 33 "Scootin' Thunder"

  1. #41
    Member 3dGuy's Avatar
    Join Date
    Feb 2015
    Location
    San Jose
    Posts
    98
    Post Thanks / Like
    Motor_Freak, here is the latest update, been so busy i don't make the time to post.
    6tdart, I thought about the olive grab at first but like a bit more of the flashy aluminum that was common on other bombers over the pacific. May not be accurate but will look great as a car. The bomber gauges there are actually the frames that i plan on putting in the car with a different gauge face. I love the look. I'm even trying to source a asi gauge, artificial horizon, and other gauges to add a bit more interest. Just sourced a few nice push buttons for the the power steering, and other elements of the dash.

    Over all the build has been going well. I just need to run the fuel lines, wire harness, brake lines, and a few other small things here and there and ill be in need of an engine and stage 2. I'm surprised i'm this far ahead of where i thought id be. i sent a few parts out to be chrome plated and hopefully will have them back this week. (grill mounts, engine mounts, alternator relocation mount) the power steering and coyote modification have been installed finally.

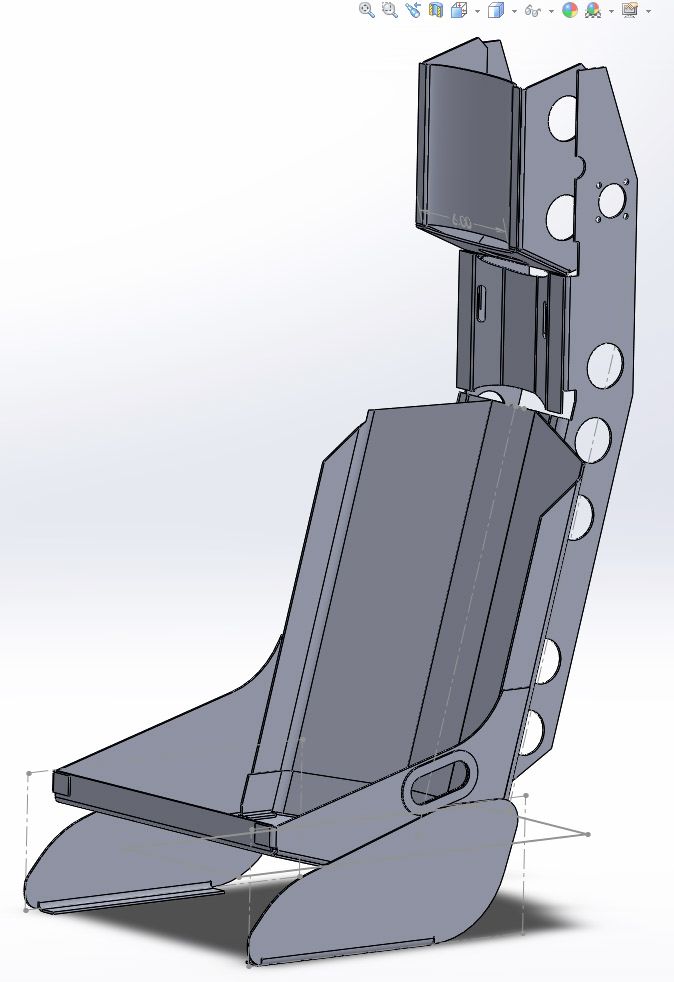
    in the mean time im working out new "ejection seats" for the car. I like the kirkey seats but they just don't have the right aesthetics that i want for the car. Since i have the time why not. I'm basing the seat itself off of the seats i already have and the headrest and other features are based off of this ejection seat.
    along with the seat i'm doing a kinematic study for a new trunk hinge so i can open the trunk without needing to dissemble the trunk bulges and not have them hit the roll hoops


    hinge study

    current state
    My build site : www.ScootinThunder33.com

  2. #42
    Member 3dGuy's Avatar
    Join Date
    Feb 2015
    Location
    San Jose
    Posts
    98
    Post Thanks / Like
    back from the chromer

    My build site : www.ScootinThunder33.com

  3. #43
    Member 3dGuy's Avatar
    Join Date
    Feb 2015
    Location
    San Jose
    Posts
    98
    Post Thanks / Like
    needed to take out the trash, made a quick walk around on my way back.
    https://youtu.be/CmSG9UHKVFA
    My build site : www.ScootinThunder33.com

  4. #44
    Member 3dGuy's Avatar
    Join Date
    Feb 2015
    Location
    San Jose
    Posts
    98
    Post Thanks / Like
    one last update for the night
    My build site : www.ScootinThunder33.com

  5. #45
    Dreamer j33ptj's Avatar
    Join Date
    Feb 2012
    Location
    Wassenaar, The Netherlands
    Posts
    243
    Post Thanks / Like
    What software do you use to do your design work?

    Thanks
    Robert

  6. #46
    Member 3dGuy's Avatar
    Join Date
    Feb 2015
    Location
    San Jose
    Posts
    98
    Post Thanks / Like
    My day to day software is Maya and vray for modeling and rendering. As for the kinetic study that was done with autodesk forceEffect motion. The seat and and parts that will end up being fabricated I create in solid works.
    My build site : www.ScootinThunder33.com

  7. #47
    Member 3dGuy's Avatar
    Join Date
    Feb 2015
    Location
    San Jose
    Posts
    98
    Post Thanks / Like
    Here is where I ended up with the seat tonight. Still thinking about how to mount the chair to the floor and if it should be an adjustable seat.
    My build site : www.ScootinThunder33.com

  8. #48
    Dreamer j33ptj's Avatar
    Join Date
    Feb 2012
    Location
    Wassenaar, The Netherlands
    Posts
    243
    Post Thanks / Like
    Quote Originally Posted by 3dGuy View Post
    My day to day software is Maya and vray for modeling and rendering. As for the kinetic study that was done with autodesk forceEffect motion. The seat and and parts that will end up being fabricated I create in solid works.
    Thanks!!!

    Going to look in to some of those.... although not for work....

  9. #49
    Senior Member 68GT500MAN's Avatar
    Join Date
    Feb 2011
    Location
    Fresno, CA
    Posts
    1,808
    Post Thanks / Like
    Jason, what chrome shop did you use?
    Doug
    Built FFR5196 MKII in 2003, 427w
    Building FFR0058HR, Edlebrock 347-AOD

  10. #50
    Member 3dGuy's Avatar
    Join Date
    Feb 2015
    Location
    San Jose
    Posts
    98
    Post Thanks / Like
    Quote Originally Posted by 68GT500MAN View Post
    Jason, what chrome shop did you use?
    Doug
    I went to superior chrome in San Jose. Only took a couple days to get the parts back.
    My build site : www.ScootinThunder33.com

  11. #51
    Member 3dGuy's Avatar
    Join Date
    Feb 2015
    Location
    San Jose
    Posts
    98
    Post Thanks / Like
    Update: seats

    To quote dock Brown " Please excuse the crudity of this model."
    , just finished the mockup of the seat, found out I miss judged the back height with cushion in and seat depth. But that's what this was for. And Meng helped model the seat for me. Made from layered chipboard and pop rivets.


    My build site : www.ScootinThunder33.com

  12. #52
    Member 3dGuy's Avatar
    Join Date
    Feb 2015
    Location
    San Jose
    Posts
    98
    Post Thanks / Like
    Minor update, stage 2 ordered, now just finalizeing design. Better idea for windshields.
    My build site : www.ScootinThunder33.com

  13. #53
    Member 3dGuy's Avatar
    Join Date
    Feb 2015
    Location
    San Jose
    Posts
    98
    Post Thanks / Like
    I think this will be the final design for the seat...
    My build site : www.ScootinThunder33.com

  14. #54
    Dreamer j33ptj's Avatar
    Join Date
    Feb 2012
    Location
    Wassenaar, The Netherlands
    Posts
    243
    Post Thanks / Like
    Don't you need slots for the seat belts around the hips? Or will they fit round the outside?

    RJ

  15. #55
    Senior Member maczter's Avatar
    Join Date
    Feb 2013
    Location
    Xenia, OH
    Posts
    277
    Post Thanks / Like
    Blog Entries
    1
    Couple of things, you have nice ideas, don't completely design the mounts for your seat until you have the waterfall in (made that mistake) and can check the layback, and check with your DMV on the windshield idea, would hate for you to make it and find out they won't certify.
    FFR HR #530
    Race car theme, Tim Whitaker roll bar, Autometer Autolite Gauges, Satin Black, SBC 383/700R4, 8.8 rear with Cobra Brakes, 3.29 gear, Boyd Tank, QA1 springs and shocks,

    My build blog: http://jacks33hotrod.blogspot.com/

  16. #56
    Member 3dGuy's Avatar
    Join Date
    Feb 2015
    Location
    San Jose
    Posts
    98
    Post Thanks / Like
    Quote Originally Posted by j33ptj View Post
    Don't you need slots for the seat belts around the hips? Or will they fit round the outside?

    RJ
    Yes, once i build the seats and get final height and placement worked out ill figure out the best place for the lap belts.

    Quote Originally Posted by maczter View Post
    Couple of things, you have nice ideas, don't completely design the mounts for your seat until you have the waterfall in (made that mistake) and can check the layback, and check with your DMV on the windshield idea, would hate for you to make it and find out they won't certify.
    I should have the waterfall soon so ill be able to take measurements then. at the moment i have things based off quick measurements from another kit. Ill make a new mockup of the latest seat after i get my stage 2. I spoke to a local custom windshield builder and was told its easy to get dot approval for this but will defiantly double check regulations before pulling the trigger. I have the windshield on order so i will have that just in case.
    My build site : www.ScootinThunder33.com

  17. #57
    Member 3dGuy's Avatar
    Join Date
    Feb 2015
    Location
    San Jose
    Posts
    98
    Post Thanks / Like
    did a quick check and the only thing it says is that the windshield must be made of safety glass, and have self wiping wipers, one on the left and right unless one does both side to meet the required wiping area.
    http://www.leginfo.ca.gov/cgi-bin/di...le=26700-26712
    My build site : www.ScootinThunder33.com

  18. #58
    Member 3dGuy's Avatar
    Join Date
    Feb 2015
    Location
    San Jose
    Posts
    98
    Post Thanks / Like
    Update:
    Stage 2 is here!
    Haven't had time to start on stage 2 but have been working on finally building the seats. Ended up taking a class at techshop San Jose to use the water jet cutter there, and after 3 solid hours of waiting for the machine to cut my parts I finally getting to see the seats realized. Just tonight I started bending the flat patterns into the final parts.

    I can't believe it but I got my hands on a 2011 coyote cheap. There is possible damage to one of the cylinders due to superchager misinstalled but worth the money even if I just use it as a mock up engine waiting for the fin one. Still need to get it looked at to see if it can be salvaged. Got the 2015 plenum cover from another seller real cheap as well. If only I could find a t56. Fingers crossed
    It has been unseasonably muggy the last month making working in the garage miserable. Once that changes my fiancée probably won't see my for a while.


    Last edited by 3dGuy; 11-12-2015 at 11:58 PM.
    My build site : www.ScootinThunder33.com

  19. #59
    Member
    Join Date
    Jul 2013
    Location
    southern NJ
    Posts
    99
    Post Thanks / Like
    Wow great deal on the engine. Keep up the great work.
    Brett

  20. #60
    Member 3dGuy's Avatar
    Join Date
    Feb 2015
    Location
    San Jose
    Posts
    98
    Post Thanks / Like
    Nearly done with the seats, here's the first one clamped up. Does anyone know anyone that can create the cushions?


    My build site : www.ScootinThunder33.com

  21. #61
    Member 3dGuy's Avatar
    Join Date
    Feb 2015
    Location
    San Jose
    Posts
    98
    Post Thanks / Like
    I Finally got the 2015 coyote engine after selling the 2011 engine i had picked up. I'm noticing a few difference but one seems like it could turn into a real problem. I'm hoping I'm wrong. i don't see this part at the back of the engine in any photos or referencing in the installation guide for the coyote for the 33 and i didn't see in on the 2011 engine that i had. What is this part and do i need it. It seems like it would cause an interference to the firewall. In the manual it says that the fit back there is so tight that you might have to grid down some of the bolts and if that's the case i don't see how this engine will fit since this part sits proud of the back of the engine. Any help or incite will be greatly appreciated.


    My build site : www.ScootinThunder33.com

  22. #62
    Member 3dGuy's Avatar
    Join Date
    Feb 2015
    Location
    San Jose
    Posts
    98
    Post Thanks / Like
    About time for an update. I figured out that there is no way to use the stock intake for the 2016 coyote so i replaced it with a boss 302 intake. I finally took the plunge to cut the alternator boss off of the engine block. It took about an hour but there is no going back now. The T56 Mag finally is here along with the rm-8080 bell-housing. the boyde tank is installed now and plumed although i will need to find a way to rout the hoses behind the waterfall so they dont bind or pinch. I cant wait to get the engine in but sadly still waiting on the flywheel stretch bolts and the correct slave mount for the t56 clutch fork. Making alot of progress lately and all it took was to cancel my cable.


    Last edited by 3dGuy; 01-11-2016 at 10:37 PM.
    My build site : www.ScootinThunder33.com

  23. #63
    Member 3dGuy's Avatar
    Join Date
    Feb 2015
    Location
    San Jose
    Posts
    98
    Post Thanks / Like
    Engine is in! Progress!


    My build site : www.ScootinThunder33.com

  24. #64
    Administrator David Hodgkins's Avatar
    Join Date
    Feb 2011
    Location
    Corona del Mar, CA
    Posts
    6,062
    Post Thanks / Like
    Blog Entries
    7
    Looking GREAT! Those seats are insane. Any chance of you trailering it down to HB in April?


    FFR 5369 Pin Drive, IRS, Trigos, Torsen, Wilwoods, FMS BOSS 302 "B" cam , Mass-flo. CA SB100 (SPCN) Registered
    Delivered 4/23/06. "Finished" 4/2012 (still not done!)


  25. #65
    Member 3dGuy's Avatar
    Join Date
    Feb 2015
    Location
    San Jose
    Posts
    98
    Post Thanks / Like
    I would like to. just depends on work and where the build is by that time. im hoping i can get thingsa in time to possibly drive it down instead of trailer it. Might be dreaming but still will shoot for it.
    My build site : www.ScootinThunder33.com

  26. #66
    Senior Member
    Join Date
    Aug 2015
    Posts
    1,217
    Post Thanks / Like
    I have to say the fabrication work on the seats is amazing. I am totally stoked with your build

  27. #67
    Member 3dGuy's Avatar
    Join Date
    Feb 2015
    Location
    San Jose
    Posts
    98
    Post Thanks / Like
    Thank you. Its been a real learning experience building the car and these seats. Looking at how the seats are fitting now that i have the full body i might have to change the curve at the back of the seats to better match the final seat height relative to the rear waterfall. still deciding how high the seats really need to be.
    My build site : www.ScootinThunder33.com

  28. #68
    Member 3dGuy's Avatar
    Join Date
    Feb 2015
    Location
    San Jose
    Posts
    98
    Post Thanks / Like
    I thought id post a small update. The remote oil filter has been nothing but trouble to place and rout but i think i found a solution. Ford is finally shipping the control pack for the 2015 engine and hopefully i should get it in a few weeks.


    My build site : www.ScootinThunder33.com

  29. #69
    Member 3dGuy's Avatar
    Join Date
    Feb 2015
    Location
    San Jose
    Posts
    98
    Post Thanks / Like
    one last thing, , gauges


    My build site : www.ScootinThunder33.com

  30. #70
    Senior Member
    Join Date
    Mar 2011
    Location
    Orlando, FL
    Posts
    1,284
    Post Thanks / Like
    A lot going on with your build. The seats are really cool! , you put a lot of work into those. Great job!

    Reminds me of when I was in the Navy back in the 80s as a avionics tech.

    Those gauges look familiar, but I can't think of the brand right now.

    Keep up the great work. Look fwd to seeing the windscreens.

    David

  31. #71
    Member 3dGuy's Avatar
    Join Date
    Feb 2015
    Location
    San Jose
    Posts
    98
    Post Thanks / Like
    Thank you. The gauges were custom made by classic instruments Moal and v8 speedster gauges. I sent them some rough designs based on the two gauges that i likes from them along with the orange accents and simplified text and about a week later this was the end result.
    My build site : www.ScootinThunder33.com

  32. #72
    Senior Member
    Join Date
    Mar 2011
    Location
    Orlando, FL
    Posts
    1,284
    Post Thanks / Like
    Quote Originally Posted by 3dGuy View Post
    Thank you. The gauges were custom made by classic instruments Moal and v8 speedster gauges. I sent them some rough designs based on the two gauges that i likes from them along with the orange accents and simplified text and about a week later this was the end result.
    Ah, I thought they might have been the Moal Bomber series, but I didn't see the Moal wing logo in them, so I wasn't sure. Wow a week that is a really good turn around. Classic Instruments does some really cool stuff.

    The more I look at those gauges, now that I know what to look for, I can see the moal and V8 speedster touches. Very Nice

    I have a question for you, but I'll send it in a pvt msg.

    David

  33. #73
    Senior Member
    Join Date
    Feb 2011
    Location
    Myrtle Beach, SC
    Posts
    2,108
    Post Thanks / Like
    She looks great! I really like the gauges, and they fit the theme you are creating perfectly.

    I enjoy reading your updates, and seeing your progress.

    Thanks for posting, and for the inspiration!

    Regards,

    Steve

  34. #74
    Senior Member
    Join Date
    Jan 2016
    Posts
    100
    Post Thanks / Like
    Glad I found your build thread, thanks for the help on the FB page. Your build looks great!

  35. #75
    Member 3dGuy's Avatar
    Join Date
    Feb 2015
    Location
    San Jose
    Posts
    98
    Post Thanks / Like
    It has been awhile since my last post so i thought id update. I finally have the car up and running and I'm currently in the process of getting the car registered. First trip to the DMV went well and just need to get the chp inspection done and I'm street legal. Here are a couple starts of the car. If you wondered what the new factory five baffled mufflers sound like on the coyote click below.

    second start, no mufflers

    https://youtu.be/xPQ-VT_LIGM

    mufflers start

    https://youtu.be/xfWMp87mR-c

    mufflers idle

    https://youtu.be/BRSyLMHRCGY
    My build site : www.ScootinThunder33.com

  36. #76
    Member 3dGuy's Avatar
    Join Date
    Feb 2015
    Location
    San Jose
    Posts
    98
    Post Thanks / Like
    It has been a while since i posted so i thought id add a few photos and videos of the current progress. I have since go carted the car twice and getting ready to put the body on for door fitment. once that is done ill be able to get the registration completed and on the street. Things that have been built since the last post:
    Seats have been brushed and powder coated, starting work now on a wind inspired center console, molded the two areo screen fairings, starting the boss 302 intake hood relief, fabricated and added an assess door for the fuel pump, completed the aluminum dash and gauge inserts. still cant wait until i can take this thing out on the road when ever i feel like it.

    Two videos of the first and second drives:
    First: https://youtu.be/hjflbNXkMmw
    second: https://youtu.be/QKvWzhRAYng


    My build site : www.ScootinThunder33.com

  37. #77
    Member 3dGuy's Avatar
    Join Date
    Feb 2015
    Location
    San Jose
    Posts
    98
    Post Thanks / Like
    A couple more from the weekend, Body finally back on

    My build site : www.ScootinThunder33.com

  38. #78
    Member 3dGuy's Avatar
    Join Date
    Feb 2015
    Location
    San Jose
    Posts
    98
    Post Thanks / Like
    I thought id give a bit of an update. Getting close to being street legal. a couple recent drive videos as well.

    3rd gear
    https://youtu.be/gyFgNrjmy8Q

    full drive
    https://youtu.be/V3o05h2wi7U


    My build site : www.ScootinThunder33.com

  39. #79
    Member 3dGuy's Avatar
    Join Date
    Feb 2015
    Location
    San Jose
    Posts
    98
    Post Thanks / Like
    Its getting close to a year since my last post so i tohught id post some update photos. still a few months of work left to get it finished but its on the road, street legal, painted, and a blast to drive.


    My build site : www.ScootinThunder33.com

  40. #80
    Ol Skool
    Join Date
    Oct 2013
    Location
    upstate NY
    Posts
    816
    Post Thanks / Like
    Looks great! Awesome job on the modifications. Thanks for posting the update.

Page 2 of 3 FirstFirst 123 LastLast

Tags for this Thread

Posting Permissions

  • You may not post new threads
  • You may not post replies
  • You may not post attachments
  • You may not edit your posts
  •  

Replica Parts

Visit our community sponsor