I do a mod to bleed all the air the first time you fill it. what happens is there is an air pocket that gets trapped in the motor that would normally go uphill to the radiator in the WRX. In the 818 the water outlet goes down and traps the air. You put in a barb nipple in the water outlet and run it up to the degas tank. If you face the motor from the seating compartment, you drill and tap a 1/8 NPT hole at about 2 O'clock position in the water outlet. Run a line from there to the degas tank and fill as usual. All the air moves up to the degas tank and your overheating problems will be gone.
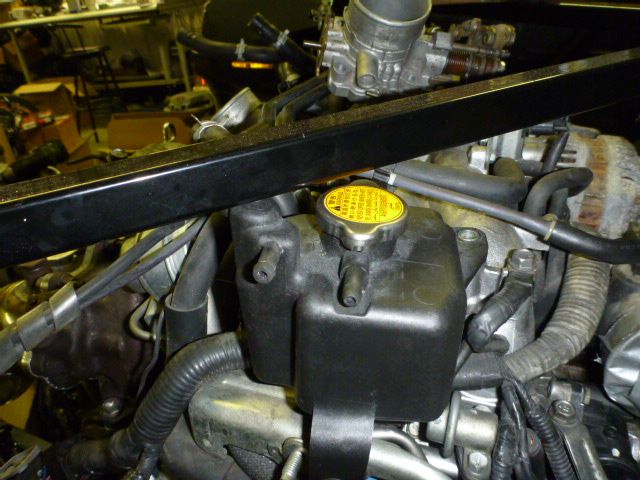
Brass barb fitting
Hook to the left nipple on the degas tank
Wayne Presley www.verycoolparts.com
Xterminator 705 RWHP supercharged 4.6 DOHC with twin turbos
Same here. I did it and it worked perfectly. Sticky?
818S/C : Chassis #25 with 06 WRX 2.5 turbo, ABS, cruise, PS, A/C, Apple CarPlay, rear camera, power windows & locks, leather & other complexities. Sold 10/19 with 5,800 miles.
Mk3 Roadster #6228 4.6L, T45, IRS, PS, PB, ABS, Cruise, Koni's, 17" Halibrands, red w/ silver - 9K miles then sold @ Barrett-Jackson Jan 2011 (got back cash spent).
I'm not even sure you need the front. The rear cap should be lower pressure than the front so if the system pressure gets high enough to require venting, all venting should be taken care of at the rear cap. I think Wayne at one point suggested just capping off the front cap so it doesn't suck air when the system is cooling down.
I cap the over flow port on the radiator, put a 1.3 Bar cap on the radiator, put a 1.1 bar cap on the degas tank and normal coolant recovery tank on it.
Wayne Presley www.verycoolparts.com
Xterminator 705 RWHP supercharged 4.6 DOHC with twin turbos
Thanks Wayne.... yeah when I said cap the front cap, I meant front port. I remember you saying you did this a while back and it made sense, and also saves space due to lack of front overflow tank.
I'm only using one overflow tank coming off the degas tank in the engine bay. I capped off the overflow nipple on the radiator. The small hose right under the degas tank cap (I think the one you're referring to on the right) is the one that goes to the overflow tank.
If you run two degas lines (one from the top of the engine and one from the radiator), you'll need a T to splice these two together and connect them to the medium sized barb on the degas tank.
This requires a line run up front.
So it sounds like there are two options:
1.) Run medium barb connection to a T which goes up front to overflow reservoir and radiator cap vent. Cap off front right hand side vent on radiator. Overflow res can be mounted front or back. One hose running along side of car. Perform Wayne's drill tap.
2.) Run medium barb from expansion tank to rear mounted overflow reservoir. Run radiator cap vent to front mounted overflow reservoir. Cap right side radiator vent. Perform Wayne's drill tap mod. No hose running along side of car.
The nipple directly below the radiator cap is capped off, as I mentioned. There is also a coolant nipple on the top corner of the radiator that I also capped off.
Edit: My understanding of Wayne's mod is that it shifts the coolant connection on the degas tank from the top corner of the radiator to the top of the coolant cross-over pipe on the engine. I know some are running this configuration so that's what I'm planning to do. Here's some info from the 02 wrx FSM: rad.jpg
Last edited by STiPWRD; 08-04-2015 at 03:37 PM.
Reason: To elaborate
This requires a line run up front.
So it sounds like there are two options:
1.) Run medium barb connection to a T which goes up front to overflow reservoir and radiator cap vent. Cap off front right hand side vent on radiator. Overflow res can be mounted front or back. One hose running along side of car. Perform Wayne's drill tap.
2.) Run medium barb from expansion tank to rear mounted overflow reservoir. Run radiator cap vent to front mounted overflow reservoir. Cap right side radiator vent. Perform Wayne's drill tap mod. No hose running along side of car.
Which is better?
Not quite.
Front barb on the radiator neck goes to an overflow only, not a degas. You either use a front overflow or you cap it and clamp it to ensure it doesn't leak.
Front barb on the side of the radiator that vents air can either be capped too, or can be routed back to the rear degas medium barb.
If you do Wayne's mod, you'll add the barb to the upper aluminum coolant pipe on the engine and route that to the degas medium barb.
If you do Wayne's mod AND run a hose from the radiator side fitting all the way back to the degas, you'll need a T to connect both these lines to the medium degas barb.
Large degas barb goes to turbo, small degas barb goes to rear overflow.
How can you just cap front radiator cap neck vent? If air is up front, it can't escape?
The cap neck vent isn't for air, it's for overflow. You don't need a front and a rear overflow really. The rear cap has a lower venting point than the front so if the system exceeds pressure, only the rear cap should be venting. The front cap should never vent. I suppose if something went REALLY wrong and the back cap couldn't keep up with the amount of overflow required (probably due to something very substantial like a head gasket failure), then and only then would the front cap need to vent.
If you are talking about needing to bleed air from the radiator, there is another barb on the side/top of the radiator for that. You can route that to the rear degas. If you cap it, you may need to check to see if there is air in the radiator by jacking the front of the car up and removing the radiator cap then topping off as needed.
How can you just cap front radiator cap neck vent? If air is up front, it can't escape?
I added some info to my previous post. Since the coolant flows through the radiator top to bottom and there is no heat generation inside the radiator (only heat absorption by the air), there is no chance that you will get vapor bubbles that will need to be vented so it's ok if there's a small air bubble at the very top of the radiator, the coolant will still circulate.
Got it, thank you for the information. The original information in this thread doesn't really mention anything about the front end of the car. I am still a bit hesitant to block of the front rad cap vent, that was put there for a reason?
Nevermind...I think I just figured the answer to my own question...the front is designed to pull coolant in, the top/engine reservoir is designed to discharge. This way the subaru system is constantly purging any potential air/overpressure and filling from the lower point, i.e., the rad cap. right?
I know each is designed for overflow/expansion, but if there is air at the top of the front radiator, when that overpressures and vents, it will purge the air automatically. Given all the overheating issues this car is having, I didn't want to take any chances. I like the idea of tipping the car up to fill it though.
Anyways, I may just keep the stock overflow reservoir up front mounted where I have it and run the rad cap neck vent from the front radiator to this overflow and T off to go to the small barb on the expansion tank as it is in my 06 legacy. I heard from a coworker that the medium barb does not even exist on some older subaru models.
I only run the rear coolant overflow tank. If you run both, you run the risk of one tank being sucked dry and introducing air back in the system due to different height potentials. With one overflow tank, the expansion and subsequent draw back is controlled in one spot.
Wayne Presley www.verycoolparts.com
Xterminator 705 RWHP supercharged 4.6 DOHC with twin turbos
Why not use the throttle body warm-up outlet already built into the water manifold for this purpose? On my engine it's located at the top/high point of the manifold just below the throttle body. Seems like a built-in solution for getting air out of the top of the engine?
I debated doing this, but I checked it with a laser level and the point at which it comes off the water manifold is not the highest point in the system. Right where Wayne taps the water manifold (where the hose goes on) is the highest point. Putting it on the throttle body outlet would still help prevent air lock when filling the system, and would provide some measure of automatic bleeding of air, but the best possible spot is right where Wayne does his.
Is it necessary to put some type of sealant on the threads of the new barb you are putting in?
Yes, either teflon tape or blue loctite.
And you can shortcut your fill time by using a wet/dry shop vac. Put the hose on the barb fitting, use the vacuum on the hose while keeping the degas tank filled, apply vacuum until you get water out the hose and then the system will be 95% bled and will self bleed the rest in the first heat cycle.
Wayne Presley www.verycoolparts.com
Xterminator 705 RWHP supercharged 4.6 DOHC with twin turbos
when you look inside the pipe you have screwed in the 1/8" NPT into, does it need to be flush or can it be screwed in further, so the threads of the NPT come out. Will that be fine or will the that give the air bubbles a place to gather around and not be flushed out the NPT nipple
when you look inside the pipe you have screwed in the 1/8" NPT into, does it need to be flush or can it be screwed in further, so the threads of the NPT come out. Will that be fine or will the that give the air bubbles a place to gather around and not be flushed out the NPT nipple
you can thread it in deeper
Wayne Presley www.verycoolparts.com
Xterminator 705 RWHP supercharged 4.6 DOHC with twin turbos
Interestingly enough, the factory radiator on WRXs built til July 2002 had no cap on the radiator. It was only added later to ease burping of the system.
Does anyone have the pictures from the first few posts, or is there a trick to get photobucket to show them?
The photos are actually stored at PhotoBucket and referenced here. PhotoBucket, at the first of July 2017, changed their policy of free referencing of photos to requiring a hefty subscription model. The photos can not be shown unless Wayne's upgrade's his PhotoBucket account at about $400/year.
I suspect Wayne will evetually get this done. Hopefully others can help (Wayne is very busy) and add the photos. I will soon also need this trick!
~ Mark
818C S/N 429ES: Start Date 1 September 2016
2001 NB Miata LS3 V8 440 rwhp
2004 Miata MazdaSpeed Factory Turbo


 Thanks:
  Likes:


 Reply With Quote


