
Visit our community sponsor

Thanks:
0

Likes:
0
-
Carbon Canister/Evap line pluming
Hi all,
I have a 2003 wrx donor and I have tried to research on here as to how to do the pluming on the subaru carbon canister and evap hoses but there isn't quite enough detail. Most guys are removing all of the purge valve solenoids from their intake but I unfortunately do not have a COBB Accessport to delete the codes that would result from that. The only person I have seen install the original carbon canister is GoldWing but the pictures don't show enough detail inorder for me to be able to repeat it. I was wondering if someone would be willing to help me determine where these hoses connect to? (see pictures).
IMG_0582.jpgIMG_0583.jpgIMG_0584.jpg
1st picture:
#1 The large hose connection: Unsure as to where this was from
#2 This was a large vent from the main tank, as I don't have one with the new FFR tank what should I do? Cap it off?
#3 I think this would connect to the vent valve on the tank supplied from FFR (correct me if I am wrong)
2nd picture:
#4 I am not sure where this goes as it was cut from the donor and sent to me.
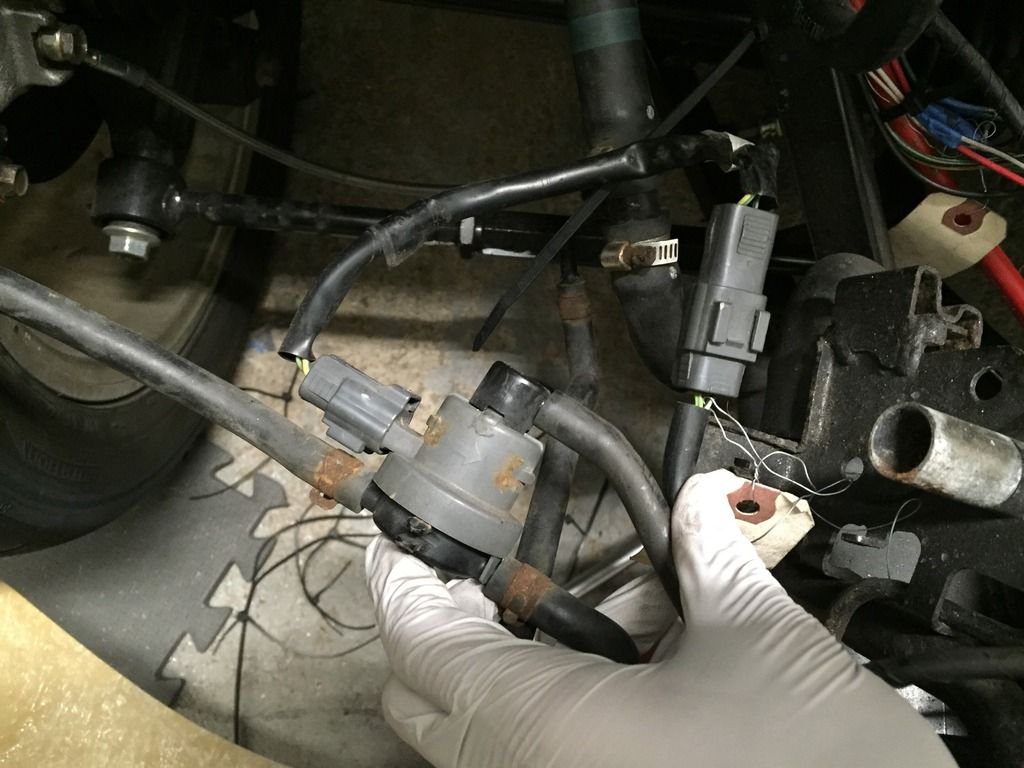
3rd picture:
#5 I really don't know what this is for or even if I still need it?
Any help is much appreciated! I am very confused at this moment as this is the first non-carborated cars fuel system I have worked on!
Thanks,
Ian
Last edited by iblackwe; 06-15-2015 at 12:35 PM.
-
Moonlight Performance


I feel like Tamra and Andrew used the factory setup initially. Might check their build thread.
If you are just worried about the codes, have you looked into the open-source tuning software options? There is one that people commonly and successfully use for Subies. I forget the name of it though.... think you need some "Tactrix" cable or something for it. I'm not 100% certain that open source will allow you to delete codes but it's something you could consider exploring.
-
Senior Member

Yep, we used the OEM set up and have no codes relating to the system (and we have not cleared them either). I'll take some pictures in a bit and post them here for you.
Tamra
Building 818SR #297 picked up 10/25/14 with Andrew (xxguitarist)
First start 12/21/14,
First "drive" 1/17/15
First Dyno at EFI Logics 3/7/15- 310whp at 15psi for break in, full spool by ~3500rpm!
First autocross 3/29/15
1st Registered 818 in Connecticut 7/24/2015. 9 months - 1 day from kit pickup!
-
Awesome thank you very much! I am also just wondering if I can delete some of those sensors in the second picture, did you? Thanks in advance
-
Senior Member

I need these details too. I haven't gotten to that part but I'm very close. You'll be helping at least 2 people =]
-
Senior Member
1st picture:
#1 The large hose connection: Unsure as to where this was from
Tamra: Ours is vented open, as you can see in the photo under #2
#2 This was a large vent from the main tank, as I don't have one with the new FFR tank what should I do? Cap it off?
Tamra: We have this one vented to the FFR tank vent valve. It's the one with the two hose connections going off the left of the photo.
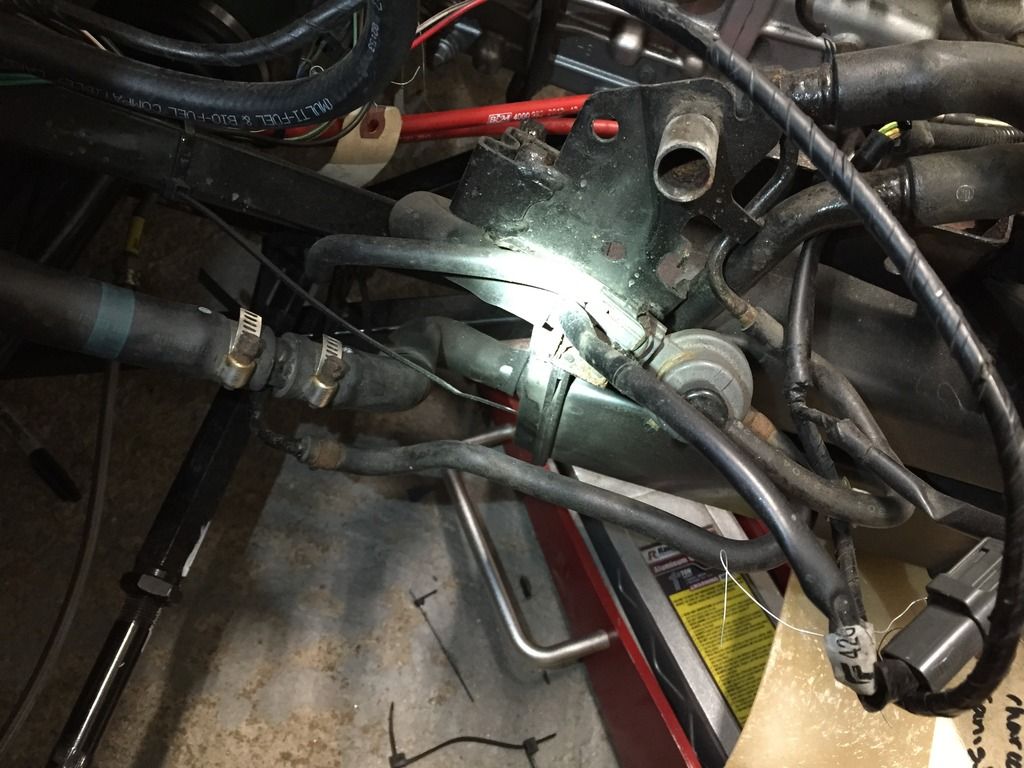
#3 I think this would connect to the vent valve on the tank supplied from FFR (correct me if I am wrong)
Tamra:
This one is open air.
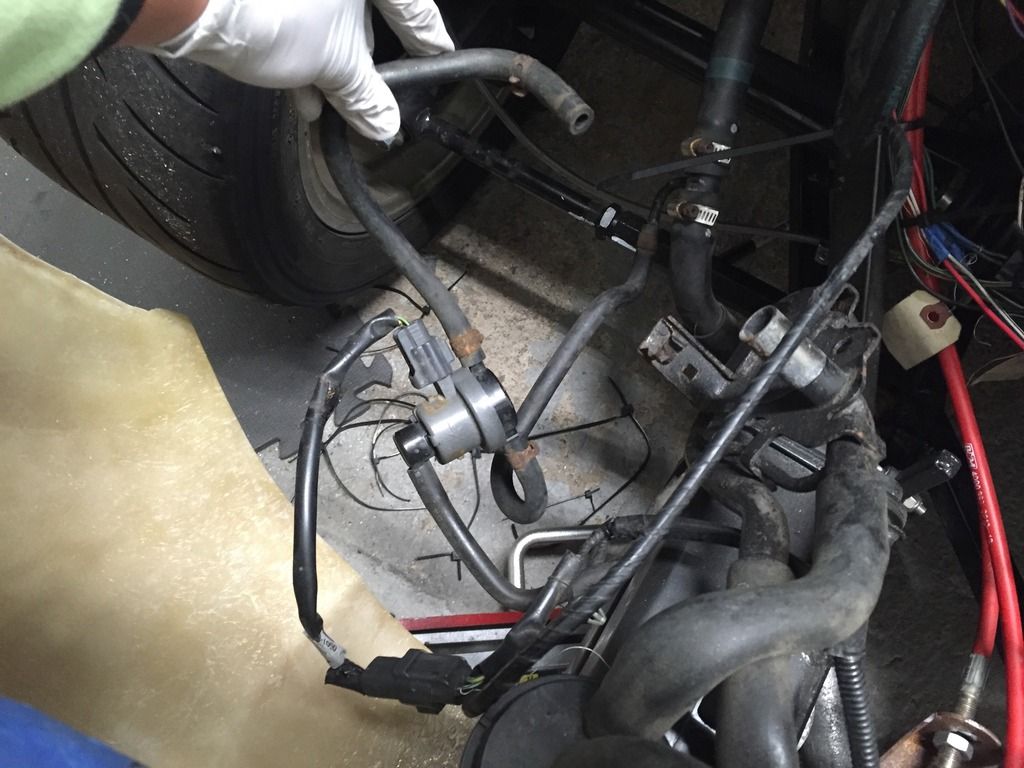
2nd picture:
#4 I am not sure where this goes as it was cut from the donor and sent to me.
3rd picture:
#5 I really don't know what this is for or even if I still need it?
Tamra: I don't recognize these, so I have attached photos of our only wiring connections (total of 3) relating to the charcoal canister:
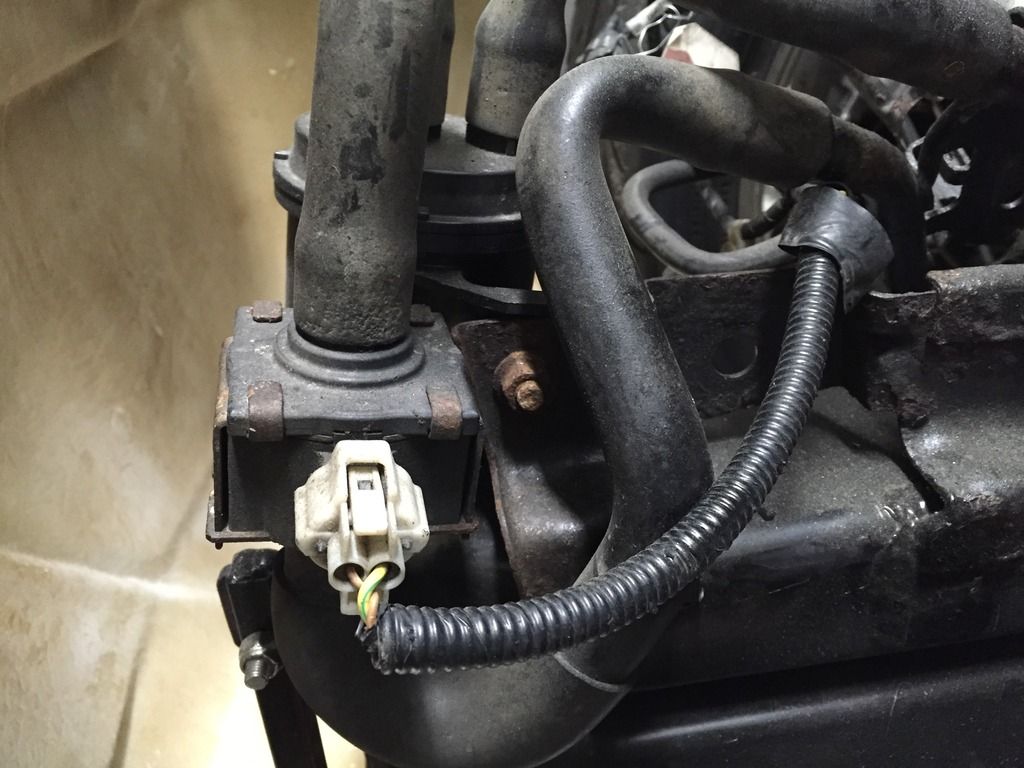
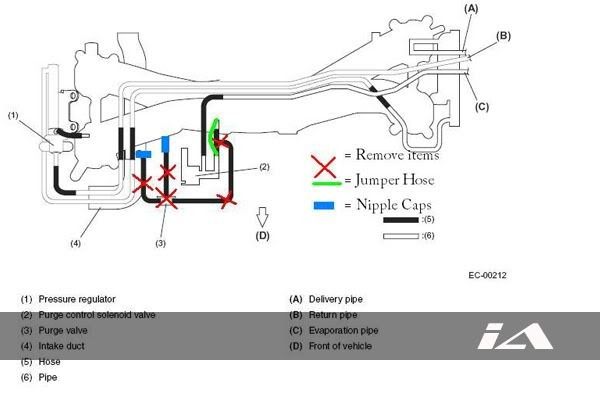
We also found a diagram that explains which evap items can be eliminated around the "T" section (purge control solenoid valve). This is by the intake manifold. Deleting these will not cause a CEL and shouldn't give any problems passing emissions if you are in a state that requires it. This is how the JDM ver7/8 STi cars are setup, apparently. We did do this in our build, and we have not had a CEL relating to it. I can't remember, but I think one of the hoses we have venting to open air in the photos above originally went to the pcv.
I hope this helps you. No guarantees that ours is entirely correct, but we haven't had any CEL's relating to it.
Tamra
Building 818SR #297 picked up 10/25/14 with Andrew (xxguitarist)
First start 12/21/14,
First "drive" 1/17/15
First Dyno at EFI Logics 3/7/15- 310whp at 15psi for break in, full spool by ~3500rpm!
First autocross 3/29/15
1st Registered 818 in Connecticut 7/24/2015. 9 months - 1 day from kit pickup!
-
Senior Member

I believe the two paths we have dangling went to the purge solenoid to vent pressure off of the charcoal canister/ clear it out, via the intake & the other may have gone to the fuel filler neck. No CELS related, we're just venting some things to atmosphere instead of burning them, but basically no gas odors in our garage as of yet.
We'll probably be trying deleting the canister, but may wind up with a simpler one on the vent if it winds up smelly.
-Andrew
Building 818S/R #297 with Tamra
08 Mazdaspeed3 | '12 F800R | '97 Miata
-
This is very helpful! thank you. In the second picture with the two other connectors one is fuel temperature and the other is fuel pressure. Did you keep these? They are wired right next to the fuel sending unit. Thanks in advance!
-
Senior Member

So now I know where my fuel temp code came from!
Dan
818S #17 Picked up 8/1/13 First start 11/1/13 Go Kart 3/28/14
-
Senior Member
We epoxied the fuel temp sensor onto the side of our FFR fuel tank- probably why Tamra didn't see it in the pile of wires & hoses out back!
-Andrew
Building 818S/R #297 with Tamra
08 Mazdaspeed3 | '12 F800R | '97 Miata
-
Senior Member
My iWire harness doesn't have one...
Dan
818S #17 Picked up 8/1/13 First start 11/1/13 Go Kart 3/28/14
-

Originally Posted by
Hindsight

If you are just worried about the codes, have you looked into the open-source tuning software options? There is one that people commonly and successfully use for Subies. I forget the name of it though.... think you need some "Tactrix" cable or something for it. I'm not 100% certain that open source will allow you to delete codes but it's something you could consider exploring.
You'd need a Tactrix Openport 2.0 and the free EcuFlash software, which would allow you disable any trouble code source so that if you no longer have some component in question you can remove it as a CEL trigger source. Another fun thing to check out for those early 16 bit Subaru ECUs is the Carberry ROM. It's a collection of custom code that lets you add things like launch control, anti-lag, and tons of other features.
http://www.romraider.com/forum/viewt...hp?f=36&t=7594
He's also working on a flex fuel system at the moment as well. There's a link in that same forum with details on that.
-
Originally Posted by
xxguitarist
We epoxied the fuel temp sensor onto the side of our FFR fuel tank- probably why Tamra didn't see it in the pile of wires & hoses out back!
WHat about the fuel pressure sensor? did you just splice into the fuel return line?
-
Originally Posted by
MikeyPSF
You'd need a Tactrix Openport 2.0 and the free EcuFlash software, which would allow you disable any trouble code source so that if you no longer have some component in question you can remove it as a CEL trigger source. Another fun thing to check out for those early 16 bit Subaru ECUs is the Carberry ROM. It's a collection of custom code that lets you add things like launch control, anti-lag, and tons of other features.
http://www.romraider.com/forum/viewt...hp?f=36&t=7594
He's also working on a flex fuel system at the moment as well. There's a link in that same forum with details on that.
Awesome, is it hard to program, I am not the most tech savy and I would hate to mess with my cars electronics in risk of it causing problems
-
Originally Posted by
iblackwe
Awesome, is it hard to program, I am not the most tech savy and I would hate to mess with my cars electronics in risk of it causing problems
EcuFlash works by uploading a software kernel in to a temporary location in the ECU. This kernel oversees/manages the reflashing process so a lot can go wrong but as long as you don't turn the ignition 'OFF' you can recover just by restarting the process. For instance, if the laptop battery ran out, the USB cable came unplugged mid-reflash, etc, you just click the write button again and EcuFlash will even pick up where it left off so that you're not starting from the beginning.
This video series does a good job of giving an overview. It's focused on tuning an Evo, but the concepts are basically the same for any Subaru or Mitsubishi ECU you can tune with EcuFlash.
https://www.youtube.com/watch?v=sKRohS_WSq8
Last edited by MikeyPSF; 06-17-2015 at 01:49 PM.
Reason: clarification
-
Senior Member
Originally Posted by
iblackwe
WHat about the fuel pressure sensor? did you just splice into the fuel return line?
I'm not familiar with this part. Is it present on the 02 wrx? (looks like no)
http://forums.nasioc.com/forums/show....php?t=1897457
Maybe you mean a fuel tank vapor pressure sensor?
In which case it's probably still in that bundle of things on the charcoal canister, we removed it as a pile, and stuck it all in together.
On the chance you meant the fuel pressure regulator, yes, that's on the return line. We switched to a STi part, and modified our fuel path to reduce pressure drop across the injectors. (semi-parallel mod, see our thread)
-Andrew
Building 818S/R #297 with Tamra
08 Mazdaspeed3 | '12 F800R | '97 Miata
-
I think I meant fuel tank vapour pressure sensor, because I believe it ran off one of the extra lines from the OEM tank. I had an 2003 so it should be the same wiring and if you have just lumped the original canister together then I am assuming it won't be much of an issue?
It would be the line coming from this sensor here that also connects to the fuel temperature sensor
IMG_0583.jpg
 Posting Permissions
- You may not post new threads
- You may not post replies
- You may not post attachments
- You may not edit your posts
-
Forum Rules

Visit our community sponsor


 Reply With Quote


