FormaCars

Visit our community sponsor

Thanks Thanks:  1
Likes Likes:  10
Page 2 of 5 FirstFirst 1234 ... LastLast
Results 41 to 80 of 184

Thread: Al C's MK4 Coyote Build

  1. #41
    Senior Member wareaglescott's Avatar
    Join Date
    Apr 2016
    Location
    Auburn, AL
    Posts
    2,146
    Post Thanks / Like
    Good update Al. We will look for another about Sept 1! Haha
    MK4 #8900 - complete kit - Coyote, TKO600, IRS - Delivered 6/28/16 First Start 10/6/16 Go cart - 10/16/16 Build completed - 4/26/17 - 302 days to build my 302 CI Coyote Cobra - Registered and street legal 5/17/17
    Build Thread http://thefactoryfiveforum.com/showt...e-build-thread
    PHIL 4:13 INSTAGRAM - @scottsrides

  2. #42
    Not a waxer Jeff Kleiner's Avatar
    Join Date
    Feb 2011
    Location
    Bloomington, Indiana
    Posts
    8,066
    Post Thanks / Like
    Looking really good Al!

    Jeff

  3. #43
    Senior Member
    Join Date
    Feb 2011
    Location
    Bourne-Cape Cod, MA
    Posts
    813
    Post Thanks / Like
    Quote Originally Posted by Al_C View Post
    Almost forgot. Frankeeski told me that the best way to line up the dashboard vertically is to put the gauges in the dash, trial fit the body and see where everything goes. The dash, with gauges, but no switches, is temporarily clamped and ready for a body fit! As a side benefit to having the body on, I’m thinking about trial fitting the in-line fuse. Typically, this box
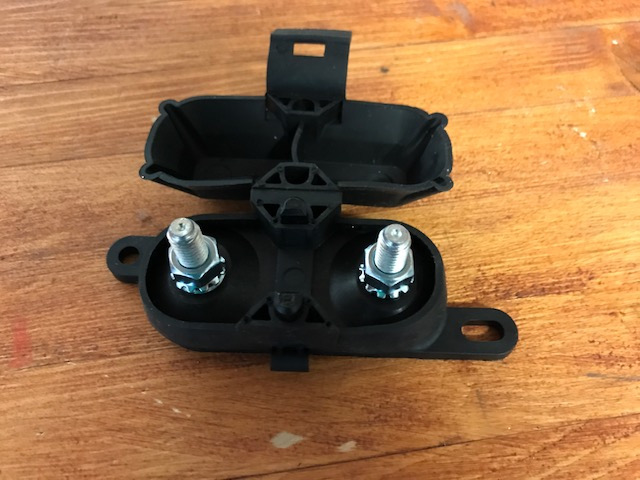


    would go behind the dash. That’s about a four foot run from the battery. Even the Ford instructions say install it within a foot of the battery. I’m thinking of mounting it on a trunk sidewall, but want to check accessibility. Yup, let’s get the body on. Opinions on this are welcome, too.

    Next up: get the coyote where it belongs. Mr. Impatient wants this done and out of the way. I have to move the engine on the dolly just to get at my tool box. Mr. Rational has been doing his best to delay this little job. I think we’re ready. I’ve taken care of just about everything in the engine bay that will be inaccessible afterwards. I got rid of the small crane and got one that should work (2 ton). The only things I haven’t done in preparation are installing mounts on the block and oil/water senders. The headers, mounts and transmission spacers are good to go. My engine stand is in the way of the header and sender spots, but my buddy Dan and I agree that we can deal with those things when the engine is on the lift. Sunday is the day. I’ll probably have three guys helping. That should be more than enough.

    As I write this, I’m thinking “hey wait, you don’t have much to deal with on Saturday. Why not trial fit the body then?” A good idea, but is it too optimistic? (Yes…) We’ll see. Maybe we’ll get another update next week!
    I put those behind the dash, with the fuse box. Yep its about 6 feet from the battery, But nobody cares.! Pretty sure it has no idea.
    FFinisher/AKA RE63

  4. #44
    On a roll Al_C's Avatar
    Join Date
    Aug 2014
    Location
    Wheaton, IL
    Posts
    1,413
    Post Thanks / Like
    Can you believe it? Only one week between updates!

    Yesterday was a good day. The engine is in. The actual installation didn’t take all that long, but getting ready certainly did. Nothing is quick, at least not in my garage. I spent the better part of Saturday afternoon getting everything prepped, and got the group together Sunday afternoon for the event. Ted was debating if we needed him (as the fourth). I’m glad he was there. Here’s what I learned and how it all came together.

    Fortunately, on Friday I decided to check the header bolts. I went the stage 8 locking bolt route. I had ordered the coarse thread bolts from Summit, based on what it said in the catalog. If I had thought about that for a minute or so, I would have remembered that the studs I pulled from the block were fine thread. Needless to say, the coarse thread bolts didn’t fit. Thank God for Saturday delivery! It was an expensive (in shipping) lesson, but I got the right bolts delivered on time. Next up was getting all the prep work done on the engine itself – like motor mounts, transmission mounts, water temp sender and oil pressure sender. Everything was good with the exception of the water temp sender adapter. I described that little obstacle in this thread here:

    http://thefactoryfiveforum.com/showt...hange-the-size

    After I posted that thread, I took a quick trip to the hardware store and got an adapter that did the trick. Then I saw JDAV’s response that he found one in the kit. Yes, I had one too – it was in the oil filter relocation bag. Like JDAV, I used that one and can return the other one to Ace.

    Here are some photos of the install.


    Four people worked well because it allowed us to have one on the crane, one on each side and one holding the transmission down. We raised the front end just enough to get the crane legs under the frame, and had the rear end up on jack stands. The angle helped a lot. Having the right engine hoist also helped. Last time I tried this exercise it was with a one-ton hoist. It just didn’t have enough reach. I sold that one, got the two-ton and everything worked much, much better. Having the experience from the trial fit last fall also helped. We knew where the problems were going to be and were able to avoid just about all of them. It’s a much tighter fit when the headers are mounted!

    Next up: this week will be all about getting everything organized again and moving ahead on fine points, like tightening all of the bolts and lining up the transmission. There are some questions about how much clearance I have for the J-pipes. I used the older style “L-shaped” motor mount spacers on both sides of the block. I’m wondering if I’m going to need shims on the mounts to keep the J-pipes from rubbing the frame. Thoughts on that subject (or the torque specs for the driveshaft, which I didn’t see in the manual) are appreciated! I’m excited about moving into a new phase of the build. The good news is that I feel like we’ve made a lot of progress over the past three weeks and things are starting to come together.
    Mk IV Roadster - #8650 - delivered 7-17-2015 - first start 7-28-2018 - first go-kart 10-13-2018 - licensed and on the road 9-9-19: body/paint completed 3-17-2020.
    Complete kit / 2015 Coyote / TKO600 / IRS / Wilwood brakes / Mid-Shift mod / Power Steering / Heater and Seat Heaters / RT turn signal / Breeze radiator shroud and mount

  5. #45
    Senior Member wareaglescott's Avatar
    Join Date
    Apr 2016
    Location
    Auburn, AL
    Posts
    2,146
    Post Thanks / Like
    Congrats Al that is a huge step. I know you are proud when you head out to the garage and see it sitting in place!
    Have you held the J pipes in position to see if they rub or not?
    MK4 #8900 - complete kit - Coyote, TKO600, IRS - Delivered 6/28/16 First Start 10/6/16 Go cart - 10/16/16 Build completed - 4/26/17 - 302 days to build my 302 CI Coyote Cobra - Registered and street legal 5/17/17
    Build Thread http://thefactoryfiveforum.com/showt...e-build-thread
    PHIL 4:13 INSTAGRAM - @scottsrides

  6. #46
    On a roll Al_C's Avatar
    Join Date
    Aug 2014
    Location
    Wheaton, IL
    Posts
    1,413
    Post Thanks / Like
    Quote Originally Posted by wareaglescott View Post
    Congrats Al that is a huge step. I know you are proud when you head out to the garage and see it sitting in place!
    Have you held the J pipes in position to see if they rub or not?
    I plan to check that when I get home later today. I believe you have a similar setup. How close are yours to the frame?
    Mk IV Roadster - #8650 - delivered 7-17-2015 - first start 7-28-2018 - first go-kart 10-13-2018 - licensed and on the road 9-9-19: body/paint completed 3-17-2020.
    Complete kit / 2015 Coyote / TKO600 / IRS / Wilwood brakes / Mid-Shift mod / Power Steering / Heater and Seat Heaters / RT turn signal / Breeze radiator shroud and mount

  7. #47
    Senior Member wareaglescott's Avatar
    Join Date
    Apr 2016
    Location
    Auburn, AL
    Posts
    2,146
    Post Thanks / Like
    I couldn't find a good picture and I'm not home. Not close enough that I had any concern about them hitting. I guess it just depends on the difference of the mount thickness like you said. Hope it works out without any issues.
    MK4 #8900 - complete kit - Coyote, TKO600, IRS - Delivered 6/28/16 First Start 10/6/16 Go cart - 10/16/16 Build completed - 4/26/17 - 302 days to build my 302 CI Coyote Cobra - Registered and street legal 5/17/17
    Build Thread http://thefactoryfiveforum.com/showt...e-build-thread
    PHIL 4:13 INSTAGRAM - @scottsrides

  8. #48
    On a roll Al_C's Avatar
    Join Date
    Aug 2014
    Location
    Wheaton, IL
    Posts
    1,413
    Post Thanks / Like
    Well, Scott thought my next update would be Sept 1. Pretty close. It’s the 3rd, today!

    The end of July and all of August really zipped by. Too much travel for work, and a bunch of family related stuff. It’s all good. Mostly. Let’s get to it:
    In our last update, the engine went in. It’s still there. Being there, it raised a number of questions, some of which we’ve answered and others that remain. Perhaps you have some of them!

    1. J-pipes. Answered.
    2. Clutch cable. Not answered.
    3. Speedo cable. Not answered.
    4. Mid shift. Not answered.
    5. Backup light switch. Sort of answered.
    6. Power steering reservoir location. Not answered.
    7. Dash position. Sort of answered.
    8. Oil plug on pan. Not answered

    Here’s the detail.

    J-pipes. Here’s what they look like in place.


    Based on feedback from Dan at FFR, they should be fine. I know that Wareagle Scott had a problem with the weld giving way – let’s hope these are OK.

    Clutch cable. Based on my experience at build school, I decided to go with a cable operated clutch. It was pretty easy on a small block. Not sure if it’s easy here or not. Whatever. Here’s the issue:

    I can run the cable on the inside of the steering shaft and underneath the headers. So far, so good. I have this lovely bracket on the cable:


    The thought is that I can chop off the end of the bracket, drill a rather large hole to match the lift bracket bolt, and attach the cable to the block at one of the lift mount positions. Opinions???

    Speedo cable. I attempted to hijack Bill3422’s thread here: http://thefactoryfiveforum.com/showt...do-Calibration

    But that didn’t work out so well. Got one reply that said it didn’t make any difference which way you connect it. I’d love to get some more opinions on that. Here’s the photo that shows the problem: pigtail wires are both white; cable to the gauge is one white one black. Which way?


    Mid shift. I thought this was solved. Not so. Now that I have the proper spacers in place on the engine and the tranny, the tranny is much higher relative to the frame. That “little” change made a world of difference on the mid-shift. Here are a few photos that highlight the issue:


    The last time I raised this topic, there was a pretty good discussion (with no real conclusion) on whether to chop out the brace or notch it and back it up with steel bar. I had decided I was going to leave it and see what happened. Considering that I can’t get the holes lined up in order to bolt it in, I have to do one or the other. Got an opinion? I’m interested in hearing it. BTW – which way does this go? It looks like it fits either way and the instructions (hand drawn…) don’t really specify.
    Mk IV Roadster - #8650 - delivered 7-17-2015 - first start 7-28-2018 - first go-kart 10-13-2018 - licensed and on the road 9-9-19: body/paint completed 3-17-2020.
    Complete kit / 2015 Coyote / TKO600 / IRS / Wilwood brakes / Mid-Shift mod / Power Steering / Heater and Seat Heaters / RT turn signal / Breeze radiator shroud and mount

  9. #49
    On a roll Al_C's Avatar
    Join Date
    Aug 2014
    Location
    Wheaton, IL
    Posts
    1,413
    Post Thanks / Like
    9/3 continues.
    ..

    Back up lights. I have the backup light switch. Given that, I might as well have a backup light, right? Straversi started a thread here: http://thefactoryfiveforum.com/showt...ght-California that was helpful. I like the solution that Boat737 came up with. I think that’s the approach I’m going to take. I believe I just need to run a wire through the rear harness to go to the light; the other line off the fixture will be the ground. Then I need one line to the fuse box for power. Not sure where I’m going to connect that yet.

    Power Steering reservoir. I’ve been struggling with where to mount the PS reservoir. The perfect spot in my mind is already taken up by the PS cylinder head, so that’s out. How about this spot? Opinions?


    Top frame rail, the front of the reservoir body is about 2 ½ inches behind the X frame member.

    Dash position. Last weekend, Ted, Dan and Nancy helped me trial fit the body. That little adventure was mentioned here: http://thefactoryfiveforum.com/showt...t-fit-question

    The net of that test was that I have a good approximate place to mount right angle brackets so I can mount the dash. Ted, my airplane-builder friend, has all sorts of interesting aluminum tools and rivets and he’s promised a good solution. We’ll get that done in a few weeks, probably.

    Last issue: oil pan plug. Here’s the item in question:


    Maybe I just haven’t looked hard enough yet. Nevertheless, I can’t find anything indicating what, if anything get’s plugged into this thing. Your insights are appreciated!

    OK, now that we got through the list of open items, what did I actually get done? Well…. I guess I raised more questions than got things done. Monday (Labor Day) should be a good day – I plan to work on the radiator shroud and mounts. I’d like to finish the power steering connections before I do the radiator for accessibility, but I need to get the hoses sorted out first. I’ll go as far as I can…
    Mk IV Roadster - #8650 - delivered 7-17-2015 - first start 7-28-2018 - first go-kart 10-13-2018 - licensed and on the road 9-9-19: body/paint completed 3-17-2020.
    Complete kit / 2015 Coyote / TKO600 / IRS / Wilwood brakes / Mid-Shift mod / Power Steering / Heater and Seat Heaters / RT turn signal / Breeze radiator shroud and mount

  10. #50
    Senior Member edwardb's Avatar
    Join Date
    Feb 2011
    Location
    Lake Orion, Michigan
    Posts
    10,567
    Post Thanks / Like
    Couple of responses to your questions:

    Speedo cable. Here I don't understand your picture. You show a connector that I believe is meant to go into the speed sensor on the TKO? And you show a 2-wire pigtail that looks to me like the cable from the Speedhut gauge package. You shouldn't need either. Your Ron Francis rear harness should already have a plug that goes directly into the TKO speed sensor. I used the internal sensor on the PS (right) side of the TKO. You'll need a plug for the external sensor location on the DS (left) side. Then the only connections for the speed sensor are the two wires in the RF dash harness directly to the gauge. And polarity doesn't matter on those wires.

    Oil pan plug. That's an oil level sensor. I've been told that sensor input isn't active for the 2011-2014 Coyote crate. Might be the same for the 2015+ version, but I don't know for sure. There should be a pigtail already on your engine harness. I went ahead and plugged it in.

    Power Steering reservoir. Where you pictured yours is right where I put mine as well. It's working out OK. I had to work a little to get the gravity feed hose from the bottom of the reservoir connected to the pump. It was pretty close and a tight bend. But I found some hose that was flexible enough. You have a different reservoir and pump than me, so orientations could be different. Just something to check before finalizing the location.
    Build 1: Mk3 Roadster #5125. Sold 11/08/2014. Build 2: Mk4 Roadster #7750. Sold 04/10/2017. Build Thread
    Build 3: Mk4 Roadster 20th Anniversary #8674. Sold 09/07/2020. Build Thread and Video. Build 4: Gen 3 Type 65 Coupe #59. Gen 3 Coyote. Legal 03/04/2020. Build Thread and Video
    Build 5: 35 Hot Rod Truck #138. LS3 and 4L65E auto. Rcvd 01/05/2021. Legal 04/20/2023. Build Thread. Sold 11/9/2023.

  11. #51
    On a roll Al_C's Avatar
    Join Date
    Aug 2014
    Location
    Wheaton, IL
    Posts
    1,413
    Post Thanks / Like
    Quote Originally Posted by edwardb View Post
    Couple of responses to your questions:

    Speedo cable. Here I don't understand your picture. You show a connector that I believe is meant to go into the speed sensor on the TKO? And you show a 2-wire pigtail that looks to me like the cable from the Speedhut gauge package. You shouldn't need either. Your Ron Francis rear harness should already have a plug that goes directly into the TKO speed sensor. I used the internal sensor on the PS (right) side of the TKO. You'll need a plug for the external sensor location on the DS (left) side. Then the only connections for the speed sensor are the two wires in the RF dash harness directly to the gauge. And polarity doesn't matter on those wires.

    Oil pan plug. That's an oil level sensor. I've been told that sensor input isn't active for the 2011-2014 Coyote crate. Might be the same for the 2015+ version, but I don't know for sure. There should be a pigtail already on your engine harness. I went ahead and plugged it in.

    Power Steering reservoir. Where you pictured yours is right where I put mine as well. It's working out OK. I had to work a little to get the gravity feed hose from the bottom of the reservoir connected to the pump. It was pretty close and a tight bend. But I found some hose that was flexible enough. You have a different reservoir and pump than me, so orientations could be different. Just something to check before finalizing the location.
    Yup, there it is, hiding under the firewall. I just didn't pull the rear harness back enough to see it. The connection is right there where you'd said it would be! That makes life easier. Thanks!
    Mk IV Roadster - #8650 - delivered 7-17-2015 - first start 7-28-2018 - first go-kart 10-13-2018 - licensed and on the road 9-9-19: body/paint completed 3-17-2020.
    Complete kit / 2015 Coyote / TKO600 / IRS / Wilwood brakes / Mid-Shift mod / Power Steering / Heater and Seat Heaters / RT turn signal / Breeze radiator shroud and mount

  12. #52
    2bking's Avatar
    Join Date
    Jul 2013
    Location
    Garland, Texas
    Posts
    799
    Post Thanks / Like
    Quote Originally Posted by Al_C View Post
    Mid shift. I thought this was solved. Not so. Now that I have the proper spacers in place on the engine and the tranny, the tranny is much higher relative to the frame. That “little” change made a world of difference on the mid-shift. Here are a few photos that highlight the issue:


    The last time I raised this topic, there was a pretty good discussion (with no real conclusion) on whether to chop out the brace or notch it and back it up with steel bar. I had decided I was going to leave it and see what happened. Considering that I can’t get the holes lined up in order to bolt it in, I have to do one or the other. Got an opinion? I’m interested in hearing it. BTW – which way does this go? It looks like it fits either way and the instructions (hand drawn…) don’t really specify.
    I have the same Mid shift and it lined up almost exactly as yours. I didn't think I would ever have to get the transmission out once installed for the final time but Murphy knows better. To get the transmission out without pulling the engine, the mid shift has to be removed so you will need access to the four bolts below the frame tube and the top of the tunnel needs to be removable to do this. I cut and rewelded the frame tube for clearance around the mid shift just because I had a welder handy but you don't have to do it that way. Unless you are racing and can tell the difference in the stiffness change of the frame with that piece of frame removed, the method of clearancing around the mid shift is mute except for needing access to the four bolts from inside the car with the tunnel top removed.

    The problem with removing just the transmission is that it needs to slide backwards over the 4" cross tube until the input shaft can clear the bell housing hole. The further back the transmission slides the narrower the tunnel gets and less room to manipulate it. The shift lever sticking out and the tower hit the frame tubes in other places than the one that needs to be clearance no matter how it is twisted thus stopping rearward travel. Removing the mid shift tower allows the transmission to slide backward for removal. I've had mine out four or more times chasing a vibration issue and it takes about 30 minutes to have it on the ground using a lift to get the car in the air.

    As for which way it mounts, I don't remember it making a difference. If it does make a difference, the location that makes the shift lever vertical when in neutral would be the correct one.
    Last edited by 2bking; 09-04-2017 at 10:36 AM.
    King
    Roadster #8127, ordered 7/12/13, received 9/11/13
    http://thefactoryfiveforum.com/showt...4-Coyote-Build

  13. #53
    On a roll Al_C's Avatar
    Join Date
    Aug 2014
    Location
    Wheaton, IL
    Posts
    1,413
    Post Thanks / Like
    Thanks, King. No plans on racing. That said, I still like the re-weld option best. If I can find somebody in the next month or so, I'll go that route. Otherwise, I cut it out and be done with it.
    Mk IV Roadster - #8650 - delivered 7-17-2015 - first start 7-28-2018 - first go-kart 10-13-2018 - licensed and on the road 9-9-19: body/paint completed 3-17-2020.
    Complete kit / 2015 Coyote / TKO600 / IRS / Wilwood brakes / Mid-Shift mod / Power Steering / Heater and Seat Heaters / RT turn signal / Breeze radiator shroud and mount

  14. #54
    On a roll Al_C's Avatar
    Join Date
    Aug 2014
    Location
    Wheaton, IL
    Posts
    1,413
    Post Thanks / Like
    Made some decent progress today. The goal was to get the radiator and shroud out of the way. Everything is assembled and ready to install. I used Breeze's shroud, upper and lower mounting kits. As others have noted, Mark's stuff works pretty well. I think the most time-consuming task was marking and cutting the shroud. My photo here resembles many others. Gee - I wonder why? Thank God for this forum! Here's the before:


    And the after:


    Here's the hinge. 14 rivets! They may not all be in a perfect line, but I highly doubt anybody is going to be looking at them...


    and ready to go:


    Next up: get it mounted. Maybe next weekend? We'll see how it goes. I need to get the Power Steering dealt with, too, but that's on hold pending a couple of connectors.
    Mk IV Roadster - #8650 - delivered 7-17-2015 - first start 7-28-2018 - first go-kart 10-13-2018 - licensed and on the road 9-9-19: body/paint completed 3-17-2020.
    Complete kit / 2015 Coyote / TKO600 / IRS / Wilwood brakes / Mid-Shift mod / Power Steering / Heater and Seat Heaters / RT turn signal / Breeze radiator shroud and mount

  15. #55

    Steve >> aka: GoDadGo
    GoDadGo's Avatar
    Join Date
    Feb 2015
    Location
    Slidell, Louisiana
    Posts
    6,567
    Post Thanks / Like
    Blog Entries
    1
    1. You Will Be Kicking Some Asphalt Sooner Than You Think!
    2. Masterpieces take longer to paint than your living room.
    3. #8,515 was delivered on 01/27/2015 so don't fret.
    4. We did our 1st start in June & now Go-Karting.

    https://youtu.be/aYq4PubfeMU

    https://youtu.be/yL4UmpII9ek
    Last edited by GoDadGo; 09-04-2017 at 09:08 PM.

  16. #56
    On a roll Al_C's Avatar
    Join Date
    Aug 2014
    Location
    Wheaton, IL
    Posts
    1,413
    Post Thanks / Like
    Thanks, Steve! Congrats on your go-kart run. I have to check out your video... I've started comparing photos from when I started to now and that usually makes me feel better about my progress!
    Mk IV Roadster - #8650 - delivered 7-17-2015 - first start 7-28-2018 - first go-kart 10-13-2018 - licensed and on the road 9-9-19: body/paint completed 3-17-2020.
    Complete kit / 2015 Coyote / TKO600 / IRS / Wilwood brakes / Mid-Shift mod / Power Steering / Heater and Seat Heaters / RT turn signal / Breeze radiator shroud and mount

  17. #57
    On a roll Al_C's Avatar
    Join Date
    Aug 2014
    Location
    Wheaton, IL
    Posts
    1,413
    Post Thanks / Like
    It’s high time I update this thread. It’s only been 7 weeks… Last time we were all set to mount the radiator. The PS reservoir was in and ready to get connected. You’ve heard the old story about three steps forward and two back? That guy was optimistic!
    Before I put the radiator in place, I thought it would make sense to get all the connections for the power steering in place. I had already mounted the reservoir on the PS frame rail, and I got my hoses and fittings from Breeze. I got everything all connected, secured the hoses in place and thought I was good to go. It is easier to deal with this stuff without other parts in the way. Next, get the radiator mounted before something bumps into it in the garage.
    The radiator went in uneventfully. I used the Breeze upper and lower mounts and they worked as advertised. Ted the airplane builder had an angle finder that makes easy work of stuff like this: the radiator is sitting at a perfect 51 degrees. That’s probably the only thing that’s perfectly aligned on the car at this point.

    Once that was in place I started working on the cooling system. That, in and of itself, raised a whole host of questions. Consider that we’re dealing with the factory assembly manual and the Coyote assembly manual. And that I’m dealing with a heater. It will be OK. Suck it up, Al. Here are the issues: 1) the instructions are unclear on how to route the hoses to and from the heater with the Coyote. Dan at FFR was a huge help. He explained it, I drew out a schematic of what I understood, and he confirmed it.


    Crappy drawing, but it got the point across. Additionally, we talked about the expansion tank. A lot. I also talked about that little item with a number of you! There were a variety of responses ranging from “use the kit piece” to “get a different tank” to “try it and see how it goes”. That’s the approach I’m choosing. Next item: where am I going to mount the expansion tank? I posted the question here:
    http://thefactoryfiveforum.com/showt...s-your-opinion
    The net effect of that conversation was “Hey! You gotta move the reservoir!” Terrific. That means move the item itself along with all the hoses, which incidentally will need to be adjusted, lengthwise. Whatever. It’s better that I deal with this now rather than later. So, over the past few weeks, I’ve fabricated and powder coated new brackets to mount the PS reservoir and expansion tank on the X frame. Here are some less-than-outstanding shots of those:


    Mk IV Roadster - #8650 - delivered 7-17-2015 - first start 7-28-2018 - first go-kart 10-13-2018 - licensed and on the road 9-9-19: body/paint completed 3-17-2020.
    Complete kit / 2015 Coyote / TKO600 / IRS / Wilwood brakes / Mid-Shift mod / Power Steering / Heater and Seat Heaters / RT turn signal / Breeze radiator shroud and mount

  18. #58
    On a roll Al_C's Avatar
    Join Date
    Aug 2014
    Location
    Wheaton, IL
    Posts
    1,413
    Post Thanks / Like
    Just to be sure about the location and that I wouldn’t be causing more problems down the road, I decided to get the air filter in place. I got the nice, shiny elbow out, assembled the MAF into it’s new home and plopped the air filter on the end. But… it doesn’t fit. What’s up with that? It’s like 2 inches too long! A review of other logs proved, that yes, yours truly is not the first person to notice that little blip. So, do I trim the elbow or what? Check it out:


    Wareaglescott gave me the part number for a shorter air filter. That will solve the problem. Then Dan stopped by. He had helped with the engine install (and a bunch of other things). His recommendation: extend the air intake tubing and get the intake outside the engine bay. Good idea, but now we’re looking at more fabrication… Still debating that, but open to suggestions.
    Back to the power steering. When I took the rack to reservoir hose connection off the reservoir, I thought it was much harder to loosen than it was to tighten. When I finally got it all apart, the threads on the bottom of the reservoir looked questionable. Consider that the reservoir is aluminum and the fittings are brass. That shouldn’t make that much difference (hopefully) and it had Teflon tape on it. I would think that would lubricate it from an installation perspective rather than make things bind. Nevertheless, this is a potential problem. Here’s what we’re dealing with:


    Dan recommends I get aluminum fittings to replace the brass ones, so that everything will expand and contract at the same rate. The potential concern here is that cracks could develop around the openings in the bottom of the reservoir. I suspect that a number of you will have an opinion. I’d love to hear it!
    It seems I have a lot of sub-projects going on right now. Wiring, PS, cooling system, trans tunnel adjustment, battery box, air filter, dashboard. I need to start checking some of these off as “complete”! To that end, I advanced my dashboard a bit over the past several weeks. I may have documented here at one point or another that I’d doing a wood veneer on the dash. I’m using a cherry veneer that I’ll stain and coat with exterior clear gloss urethane. I was thinking about how I’m going to hold everything in place so I can cement the veneer onto the dash itself. So, I grabbed a couple of 2x8s, trimmed the ends to match the curve in the aluminum piece and voila! I have a dashboard buck. Probably overkill, but it works pretty well. It will be a lot easier to get the veneer on, at least in my mind. As soon as I finish laying out switches and lights, as well as drill the holes for them, I can get that part wrapped up. Here’s what I’m describing:


    While we’re on the dashboard topic, I was thinking about lights. Here’s what I have:


    Two green (turn signals)
    One blue (high beams)
    One orange
    One red
    From the looks of it, the orange is generally used as an alternator light. I’m wondering if I’m going to need/want that in a Coyote environment. Especially considering I need to have a MIL in the mix. That could be the red, or it could be the orange. I’m sure there are a million uses for a light, but I’m coming up blank right now.
    Finally, I got the battery box done, so that can be checked off as “done”!
    Mk IV Roadster - #8650 - delivered 7-17-2015 - first start 7-28-2018 - first go-kart 10-13-2018 - licensed and on the road 9-9-19: body/paint completed 3-17-2020.
    Complete kit / 2015 Coyote / TKO600 / IRS / Wilwood brakes / Mid-Shift mod / Power Steering / Heater and Seat Heaters / RT turn signal / Breeze radiator shroud and mount

  19. #59
    On a roll Al_C's Avatar
    Join Date
    Aug 2014
    Location
    Wheaton, IL
    Posts
    1,413
    Post Thanks / Like
    I’ve been procrastinating on wiring – frankly, because I’m a bit overwhelmed by it. This weekend I decided that it was time to bite the proverbial bullet and deal with it. This past week included two business trips, so I had enough airplane time that I could re-read the Coyote controls pack manual, the RF wiring manual, and printed commentary (build threads) from a number of Coyote builders. Yes, people do look at me like I’m from another planet when I’m going through all this stuff on-board… Wareaglescott gets away with it because he has a door between him and everybody else!
    I decided I needed to label everything and then install the wires. It’s much easier when the real thing (wire harness) is right in front of you. So that’s what I did. The scary part is that I think I’m starting to understand it all. The problem with that is that every time I think I know what I’m doing, I get my head handed to me. Well, we did OK this weekend. I worked through the control pack and now I have a whole bunch of questions. Here goes. Maybe you even have an answer/opinion…
    1. I’m going to run the RF rear harness down the passenger side of the transmission tunnel. That really isn’t a question. Then, the speedo connection will fit better and the battery box won’t be in the way. The question part of it is that I may run the coyote power cable on the driver side. Then again, maybe I can eliminate one of the battery cables? I’m thinking yes. Need to read more on that.
    2. On the Coyote controls pack: I’m thinking of running “takeout HH” horizontally between the lower frame rail and the pedal box (nope, no pedal interference). This way the clutch switches will fit on top and bottom. I can run the OBDII cable along the outside bottom frame rail.
    3. I’m thinking of mounting the OBDII connection on the vertical 2x2 frame piece. So it would be on the inside of the 2x2 vertical piece, facing toward the rear. I can do it in one of two places: on the bottom of the horizontal tube or on the side of the vertical tube.

    THOUGHTS?
    4. C160A pigtail (again, Coyote controls pack…): the blunt lead (4) goes to the black wire on the MIL light. The instructions say the blunt lead 9 goes to the same place. Really?
    5. Leads 12 and 13: What the heck are CAN lines?

    6. The power cable that connects the power distribution box to the battery has two connections on each end. The engine compartment ends connect to the ground connection off the controls pack harness and the other lead connects to the power distribution box. I can pull that all the way back to the battery (I have the FFMetal battery box in the trunk). Which leads to this question:
    7. Where to put the in-line fuse? Battery box? Behind the dash? Near the battery box? I have to cut the cable anyway, so it doesn’t really matter. Or maybe I run one cable from the battery to a bus, then split what I need for the engine (hot at all times) and for the RF Harness. Then I can put the FFR cutoff switch on the RF side. Just thinking out loud, so to speak.
    8. UEGOs: The wire connections seem rather short. It would appear (at least to this novice eye) that there is only ONE connection on the rear of the PS cylinder head.

    How the heck am I supposed to connect to this thing and have it reach the J-pipe? The instructions seem to frown on extensions…
    9. OK, after the fact, I read the FFR coyote book again. It seems to dismiss the instructions relative to the C160A pigtail. Hmmm? Go with the Ford instructions or go with what FFR documents?
    With your opinions, I can start cutting and splicing and crimping. And soldering. Fun. Well, all of it is fun except the soldering. That’s a PITA. Now I can look at integrating the RF harness better, and finalize the rear harness. I’m not even going to try to guess when first start will be. Too much going on between work and family to venture a guess. Whatever. It will happen soon.
    Mk IV Roadster - #8650 - delivered 7-17-2015 - first start 7-28-2018 - first go-kart 10-13-2018 - licensed and on the road 9-9-19: body/paint completed 3-17-2020.
    Complete kit / 2015 Coyote / TKO600 / IRS / Wilwood brakes / Mid-Shift mod / Power Steering / Heater and Seat Heaters / RT turn signal / Breeze radiator shroud and mount

  20. #60
    Senior Member Jdav's Avatar
    Join Date
    Sep 2016
    Location
    ATL GA
    Posts
    443
    Post Thanks / Like
    EdwardBs wiring spreadsheet helped me immensely: http://thefactoryfiveforum.com/showt...l=1#post243285
    MK4 #9028 - Coyote - TKO600
    Delivery: 1/30/17 First Start: 7/23/17 Legal: 10/5/17 Graduated: 10/15/18
    Build thread: http://thefactoryfiveforum.com/showt...8-Build-Thread

  21. #61
    Straversi's Avatar
    Join Date
    Nov 2014
    Location
    Palos Verdes, CA
    Posts
    1,278
    Post Thanks / Like
    Man, you have a lot going on at one time. Everyone works differently but your questions are starting to overlap so it might help if you tackle and master one system at a time.

    You have a Coyote engine. If you wire it like EdwardB and you have the Speedhut gauges you won't have a speedo connection on your transmission. When you get your engine wiring sorted out you will find you probably won't need all of the indicator lights so I'd slow down on the dash.

    You are running a heater with your Coyote so I'd get your coolant system sorted out before you worry about mounting your overflow tank.

    All of this was new to me so I tackled them in order:
    Battery to engine bay wiring first
    Install engine
    Engine and gauge wiring
    Coolant system
    Power steering
    Air intake
    Dash mounting, switches etc.

    I'm an ex-aerospace guy and we overthink. You might want to remind your airplane buddy Dan that this is a car and not a jet fighter. Brass fitting in an aluminum tank will be fine. Nothing should be getting hot enough to worry about different expansion coefficients. Not sure where he is recommending you mount your air filter outside the engine bay. Outside the engine bay is inside the wheel well. I trimmed the elbow and used the shorter air filter. Keep it simple.

    I hope you don't take offence to any of these comments. If you can handle all of these projects at once, more power to you. I'm sure people read my build thread and think, this dude moves so slow.

    -Steve
    Mk IV #8901 - Complete kit, Coyote, TKO-600, IRS. Ordered 5/23/16, Delivered 7/14/16, First Start 8/13/17, First Go-Kart 10/22/17, Registered and Completed 10/18/18. Build Thread: http://thefactoryfiveforum.com/showt...V-Coyote-Build Graduation Thread: https://thefactoryfiveforum.com/show...-Roadster-8901

  22. #62
    Senior Member edwardb's Avatar
    Join Date
    Feb 2011
    Location
    Lake Orion, Michigan
    Posts
    10,567
    Post Thanks / Like
    Random thoughts while going through your updates:

    1. I haven't seen any solutions to hooking up an alternator light using the Coyote harness. Personally, I wouldn't bother trying to figure it out. You have a voltage gauge. You'll find you're scanning the gauges regularly (oil pressure, water temp, etc.) so a light doesn't add anything IMO. Plus the Coyote alternator is OE rock solid.

    2. You absolutely need the MIL from the Coyote harness. So be sure it's one of your indicator lights. The Ford instructions are confusing and contradictory on how to hook it up though. Rather than explain it here, hooking it up as described in the spreadsheet that Jdav linked works.

    3. Nothing in your installation is going to use the CAN bus wires.

    4. My recommendation would be to move the ODB2 connector somewhere else. It's congested in the areas you show, plus kind of in the path of getting in and out. If you ever want a tuner attached for loading, real time monitoring, etc., nice to have the connection away from where you're driving. I'd recommend more to the center or even on the passenger side. There's plenty of cable in the harness to locate it elsewhere.

    5. You obviously found the O2 cable connector on the right side of the engine by the rear of the cylinder head. The left side connector is low on the engine down near the engine mount. I would not recommend trying to cut and solder extensions to the O2 cables. I did, and it's very tedious with the insulation and wire used. Plus it's not recommended, although I did extend mine (after some work...) and they seem to work OK. I'd recommend getting plug-in extensions as needed though. That's what I'll be doing the next time.

    6.The FF Coyote instructions don't go into any detail on the C160A Inline to I/P Pigtail Connector. Follow the Ford instructions. Also show this quite a bit in my build thread FWIW.

    7. Not sure I understand Steve's (Straversi) comment that if you wire like mine with the Speedhut gauges you won't have a speedo connection on your transmission. If you have the GPS gauges (like mine), the vehicle speed sensor (VSS) connection at the trans isn't required. If you don't have GPS gauges, just wire it like shown in the Ron Francis schematic. All separate from the Coyote wiring.

    8. Looks like you received the longer air filter that Forte has been providing in the Coyote setup. Use the shorter one others have mentioned and you'll be fine. I don't doubt that routing the intake away from the engine compartment and pulling in cooler air is better. Ford boxes their intake for a reason. But I'm not sure it's worth the trouble unless you're trying to wring the last bit of performance from the engine. Especially for street only use. I would recommend rotating your MAP sensor around a little bit more. The instructions seem pretty adamant about it being on the front of the intake, 180 degrees from the throttle body.

    Hope these comments are useful. Good luck. You're at a challenging point. But it's worth it!
    Last edited by edwardb; 10-24-2017 at 12:32 AM.
    Build 1: Mk3 Roadster #5125. Sold 11/08/2014. Build 2: Mk4 Roadster #7750. Sold 04/10/2017. Build Thread
    Build 3: Mk4 Roadster 20th Anniversary #8674. Sold 09/07/2020. Build Thread and Video. Build 4: Gen 3 Type 65 Coupe #59. Gen 3 Coyote. Legal 03/04/2020. Build Thread and Video
    Build 5: 35 Hot Rod Truck #138. LS3 and 4L65E auto. Rcvd 01/05/2021. Legal 04/20/2023. Build Thread. Sold 11/9/2023.

  23. #63
    Senior Member wareaglescott's Avatar
    Join Date
    Apr 2016
    Location
    Auburn, AL
    Posts
    2,146
    Post Thanks / Like
    My OBD plug is positioned as you show in your first photo in post 59. Works fine there for me. The only time it was an issue was when I was data logging for the custom tune and had to run my tuner cord over the top of the steering wheel to plug into the laptop in the passenger seat. EdwardBs location suggestion would help in that scenario. Other than that I like it where it is.

    For dash lights I have the 2 green for the blinkers, one blue for the high beams, and 1 amber for the MIL. I have not felt the need for anything other than those at any point so far. As EdwardB mentioned the voltage gauge is regularly in your scan.

    In theory moving the air filter out of the engine compartment sounds reasonable but the reality of doing so does not seem like a great idea. As Steve mentioned that would put it in the wheel well. I have been very pleased with the shorter filter. Easiest solution to that one.

    LOL at your implication that I am studying my FFR material on the flight deck. Plenty of discussions with my copilots about the project but I am not reading up there. haha
    MK4 #8900 - complete kit - Coyote, TKO600, IRS - Delivered 6/28/16 First Start 10/6/16 Go cart - 10/16/16 Build completed - 4/26/17 - 302 days to build my 302 CI Coyote Cobra - Registered and street legal 5/17/17
    Build Thread http://thefactoryfiveforum.com/showt...e-build-thread
    PHIL 4:13 INSTAGRAM - @scottsrides

  24. #64
    On a roll Al_C's Avatar
    Join Date
    Aug 2014
    Location
    Wheaton, IL
    Posts
    1,413
    Post Thanks / Like
    Quote Originally Posted by wareaglescott View Post

    LOL at your implication that I am studying my FFR material on the flight deck. Plenty of discussions with my copilots about the project but I am not reading up there. haha
    No disrespect intended... my brother-in-law is a retired 737 captain and he always described the level of activity once they reached cruising altitude. He read a lot of newspapers...

    Gentlemen, thanks for all the input! Steve - you are correct - I have probably too many things going at once. That happens because I run into a question and then start something else rather than lose the time waiting for answers. It will all work out.
    Mk IV Roadster - #8650 - delivered 7-17-2015 - first start 7-28-2018 - first go-kart 10-13-2018 - licensed and on the road 9-9-19: body/paint completed 3-17-2020.
    Complete kit / 2015 Coyote / TKO600 / IRS / Wilwood brakes / Mid-Shift mod / Power Steering / Heater and Seat Heaters / RT turn signal / Breeze radiator shroud and mount

  25. #65
    On a roll Al_C's Avatar
    Join Date
    Aug 2014
    Location
    Wheaton, IL
    Posts
    1,413
    Post Thanks / Like
    Quote Originally Posted by Jdav View Post
    EdwardBs wiring spreadsheet helped me immensely: http://thefactoryfiveforum.com/showt...l=1#post243285
    Not sure how I missed this first time around... JDAV, thanks for the heads up; EdwardB, thanks for compiling it!
    Mk IV Roadster - #8650 - delivered 7-17-2015 - first start 7-28-2018 - first go-kart 10-13-2018 - licensed and on the road 9-9-19: body/paint completed 3-17-2020.
    Complete kit / 2015 Coyote / TKO600 / IRS / Wilwood brakes / Mid-Shift mod / Power Steering / Heater and Seat Heaters / RT turn signal / Breeze radiator shroud and mount

  26. #66
    Straversi's Avatar
    Join Date
    Nov 2014
    Location
    Palos Verdes, CA
    Posts
    1,278
    Post Thanks / Like
    I re read your post and my response and realized that I should have just offered constructive help or kept my mouth shut. You are at the stage when a lot is coming together at once. Last thing you need is someone discouraging you from asking questions. I apologize.
    -Steve
    Mk IV #8901 - Complete kit, Coyote, TKO-600, IRS. Ordered 5/23/16, Delivered 7/14/16, First Start 8/13/17, First Go-Kart 10/22/17, Registered and Completed 10/18/18. Build Thread: http://thefactoryfiveforum.com/showt...V-Coyote-Build Graduation Thread: https://thefactoryfiveforum.com/show...-Roadster-8901

  27. #67
    On a roll Al_C's Avatar
    Join Date
    Aug 2014
    Location
    Wheaton, IL
    Posts
    1,413
    Post Thanks / Like
    Quote Originally Posted by Straversi View Post
    I re read your post and my response and realized that I should have just offered constructive help or kept my mouth shut. You are at the stage when a lot is coming together at once. Last thing you need is someone discouraging you from asking questions. I apologize.
    -Steve
    Steve, No apology necessary! I didn't see a discouraging word in your remarks. I appreciate the fact that people will eyeball my comments and offer their thoughts. I need all the input I can get. You are probably ahead of me, progress-wise. I'll take any and all advice.

    With the input I got today, I think I have a direction on a few fronts:

    1. Get the short air filter. Forget the cold air approach.
    2. 4 lights on the dash: 2 turn signal, 1 high beam, 1 MIL
    3. see how far the obdII wire will reach toward the center of the frame
    4. keep the brass fittings.
    5. see if i can find extensions for the uego fittings. (default approach: google search)
    6. spend some quality time with the RF instructions and Paul's spreadsheet.
    Mk IV Roadster - #8650 - delivered 7-17-2015 - first start 7-28-2018 - first go-kart 10-13-2018 - licensed and on the road 9-9-19: body/paint completed 3-17-2020.
    Complete kit / 2015 Coyote / TKO600 / IRS / Wilwood brakes / Mid-Shift mod / Power Steering / Heater and Seat Heaters / RT turn signal / Breeze radiator shroud and mount

  28. #68
    David aka Ducky2009 Ducky2009's Avatar
    Join Date
    Dec 2016
    Location
    Lilburn, GA
    Posts
    775
    Post Thanks / Like
    Quote Originally Posted by Al_C View Post
    Once that was in place I started working on the cooling system. That, in and of itself, raised a whole host of questions. Consider that we’re dealing with the factory assembly manual and the Coyote assembly manual. And that I’m dealing with a heater. It will be OK. Suck it up, Al. Here are the issues: 1) the instructions are unclear on how to route the hoses to and from the heater with the Coyote. Dan at FFR was a huge help. He explained it, I drew out a schematic of what I understood, and he confirmed it.
    I also installed a heater, but used a four-way valve on the coolant lines. This allows coolant to recirculate when shut off and heat when open. Has to make a small bracket to install and cut the control cable down a lot. I used loom clamps (Home Depot - electrical clamps) and the heater hoses fit under to engine cover. The box to move the heater more into the engine compartment is to allow me to have a glove box too.
    NOTE: If I turn the blower on with the 4 way valve closed, it's outside air temp when moving..... warmer if sitting still (engine heat).

    Heater Hoses.JPG Heater 4-Way Valve Bracket.jpg Heater Hoses Installed.jpg
    Last edited by Ducky2009; 11-06-2017 at 11:40 PM.
    MK4 Build #9035 Delivered 2/17/17, First Start & Go-Kart 6/2/17, Licensed 9/1/17
    Paint - Lightning Blue Metallic, No Hood Scoop, No Stripes
    Gen 2 Coyote Engine & TKO-600. Solid Axle, 8.8-3.55, Power Steering, Power Brakes, Dual Roll Bars
    Heater and Glove Box, Drop Trunk, Wipers, Radio, FFR Vintage Gauges, Custom Dash
    Build Thread: http://thefactoryfiveforum.com/showt...MK4-Build-9035

  29. #69
    David aka Ducky2009 Ducky2009's Avatar
    Join Date
    Dec 2016
    Location
    Lilburn, GA
    Posts
    775
    Post Thanks / Like
    Quote Originally Posted by Al_C View Post
    How the heck am I supposed to connect to this thing and have it reach the J-pipe?
    I have the same cables as you, but I'm using the headers, and they reach. The censors in the headers are approx 6" from the body.... not sure where the're located on the J pipe. I did remove the plastic L clamp on the DS.
    MK4 Build #9035 Delivered 2/17/17, First Start & Go-Kart 6/2/17, Licensed 9/1/17
    Paint - Lightning Blue Metallic, No Hood Scoop, No Stripes
    Gen 2 Coyote Engine & TKO-600. Solid Axle, 8.8-3.55, Power Steering, Power Brakes, Dual Roll Bars
    Heater and Glove Box, Drop Trunk, Wipers, Radio, FFR Vintage Gauges, Custom Dash
    Build Thread: http://thefactoryfiveforum.com/showt...MK4-Build-9035

  30. #70
    On a roll Al_C's Avatar
    Join Date
    Aug 2014
    Location
    Wheaton, IL
    Posts
    1,413
    Post Thanks / Like
    Quote Originally Posted by Ducky2009 View Post
    I have the same cables as you, but I'm using the headers, and they reach. The censors in the headers are approx 6" from the body.... not sure where the're located on the J pipe. I did remove the plastic L clamp on the DS.
    6" from the body sounds pretty close to the location for the sensor on the J-pipe. I'll try to measure it this evening and get a photo.
    Mk IV Roadster - #8650 - delivered 7-17-2015 - first start 7-28-2018 - first go-kart 10-13-2018 - licensed and on the road 9-9-19: body/paint completed 3-17-2020.
    Complete kit / 2015 Coyote / TKO600 / IRS / Wilwood brakes / Mid-Shift mod / Power Steering / Heater and Seat Heaters / RT turn signal / Breeze radiator shroud and mount

  31. #71
    Senior Member wareaglescott's Avatar
    Join Date
    Apr 2016
    Location
    Auburn, AL
    Posts
    2,146
    Post Thanks / Like
    If you are using J-pipes they should reach. I used both stock pieces to my J-pipes with no problem.
    MK4 #8900 - complete kit - Coyote, TKO600, IRS - Delivered 6/28/16 First Start 10/6/16 Go cart - 10/16/16 Build completed - 4/26/17 - 302 days to build my 302 CI Coyote Cobra - Registered and street legal 5/17/17
    Build Thread http://thefactoryfiveforum.com/showt...e-build-thread
    PHIL 4:13 INSTAGRAM - @scottsrides

  32. #72
    On a roll Al_C's Avatar
    Join Date
    Aug 2014
    Location
    Wheaton, IL
    Posts
    1,413
    Post Thanks / Like
    Based on Ducky2009's question, I checked the O2 sensor cable lengths and location of the connectors off the block. Here's what we're dealing with.


    That's the driver side. The O2 connector is the one that looks to be closer to the oil filter. It's maybe 6 inches from the bung (I don't know what else to call it) on the J-pipe. Here's the Passenger side:


    While the DS connector is conveniently low on the block, the PS connector is inconveniently at the top of the cylinder. Fortunately, as Wareaglescott confirmed above, it will fit. The distance from this connector to the bung is about 19 inches. The cable on the UEGO is about 21. Should be good to go. Now I just have to figure out what the other connector in the DS photo is for... that's part of the engine harness, not the controls pack. We'll figure it out.
    Mk IV Roadster - #8650 - delivered 7-17-2015 - first start 7-28-2018 - first go-kart 10-13-2018 - licensed and on the road 9-9-19: body/paint completed 3-17-2020.
    Complete kit / 2015 Coyote / TKO600 / IRS / Wilwood brakes / Mid-Shift mod / Power Steering / Heater and Seat Heaters / RT turn signal / Breeze radiator shroud and mount

  33. #73
    David aka Ducky2009 Ducky2009's Avatar
    Join Date
    Dec 2016
    Location
    Lilburn, GA
    Posts
    775
    Post Thanks / Like
    Quote Originally Posted by Al_C View Post
    ..... DS Connection... Now I just have to figure out what the other connector in the DS photo is for... that's part of the engine harness, not the controls pack. We'll figure it out.
    This is the harness oil pressure plug (maybe not needed), but not the correct plug for the gauge sending unit. Edwardb suggested (in someones post) to use the harness wires all the way to the sensors, connect the gauge wires directly to the harness wires under the dash, instead of running the gauge wires (extra wires besides the harness) all the way to the sending units. Pro's and con's..... You don't have to run a wire all the way from the gauge (at the dash) to the sending unit vs. Need to splice the wires under the dash and hood. IMO, I don't want extra non-factory connections that could fail or corrode. It's really your preference.
    Last edited by Ducky2009; 10-24-2017 at 08:00 PM.
    MK4 Build #9035 Delivered 2/17/17, First Start & Go-Kart 6/2/17, Licensed 9/1/17
    Paint - Lightning Blue Metallic, No Hood Scoop, No Stripes
    Gen 2 Coyote Engine & TKO-600. Solid Axle, 8.8-3.55, Power Steering, Power Brakes, Dual Roll Bars
    Heater and Glove Box, Drop Trunk, Wipers, Radio, FFR Vintage Gauges, Custom Dash
    Build Thread: http://thefactoryfiveforum.com/showt...MK4-Build-9035

  34. #74
    Senior Member Jdav's Avatar
    Join Date
    Sep 2016
    Location
    ATL GA
    Posts
    443
    Post Thanks / Like
    Quote Originally Posted by Al_C View Post
    Now I just have to figure out what the other connector in the DS photo is for... that's part of the engine harness, not the controls pack. We'll figure it out.
    If I remember correctly, that plug isn't used. I wire tied it to the other wires to keep it out of the way. Can't remember what it was for that we don't have.
    MK4 #9028 - Coyote - TKO600
    Delivery: 1/30/17 First Start: 7/23/17 Legal: 10/5/17 Graduated: 10/15/18
    Build thread: http://thefactoryfiveforum.com/showt...8-Build-Thread

  35. #75
    Senior Member edwardb's Avatar
    Join Date
    Feb 2011
    Location
    Lake Orion, Michigan
    Posts
    10,567
    Post Thanks / Like
    Quote Originally Posted by Al_C View Post
    Now I just have to figure out what the other connector in the DS photo is for... that's part of the engine harness, not the controls pack. We'll figure it out.
    Quote Originally Posted by Ducky2009 View Post
    This is the harness oil pressure plug (maybe not needed), but not the correct plug for the gauge sending unit...
    Quote Originally Posted by Jdav View Post
    If I remember correctly, that plug isn't used. I wire tied it to the other wires to keep it out of the way. Can't remember what it was for that we don't have.
    In addition to the O2 sensor plug on the PS by the motor mount, there are two other plugs. One goes toward the front to the factory oil pressure sensor. It's used along with the added Speedhut sensor and cable for the oil pressure gauge on the dash. The other one -- and the one I suspect you're not sure about -- is for the oil level sensor on the side of the oil pan. Directly down from where the cables are attached to the engine. You would have unplugged that one from the stock oil pan when swapping for the aftermarket lower profile oil pan. Some discussion about whether this sensor is active in the revised crate motor ECU. Apparently it wasn't in the Gen 1 Coyote crates. I haven't seen a definitive answer on the Gen 2. Since the Moroso pan has the bung, I went ahead and moved the sensor to the Moroso pan and plugged in the connector. Even if not used, keeps it from dangling around or needing to be tied back.
    Build 1: Mk3 Roadster #5125. Sold 11/08/2014. Build 2: Mk4 Roadster #7750. Sold 04/10/2017. Build Thread
    Build 3: Mk4 Roadster 20th Anniversary #8674. Sold 09/07/2020. Build Thread and Video. Build 4: Gen 3 Type 65 Coupe #59. Gen 3 Coyote. Legal 03/04/2020. Build Thread and Video
    Build 5: 35 Hot Rod Truck #138. LS3 and 4L65E auto. Rcvd 01/05/2021. Legal 04/20/2023. Build Thread. Sold 11/9/2023.

  36. #76
    David aka Ducky2009 Ducky2009's Avatar
    Join Date
    Dec 2016
    Location
    Lilburn, GA
    Posts
    775
    Post Thanks / Like
    FYI.... The 2017 Coyote engines (at least from Ford Racing) does not have low oil sensor in the oil pan and no bung in the pan.
    MK4 Build #9035 Delivered 2/17/17, First Start & Go-Kart 6/2/17, Licensed 9/1/17
    Paint - Lightning Blue Metallic, No Hood Scoop, No Stripes
    Gen 2 Coyote Engine & TKO-600. Solid Axle, 8.8-3.55, Power Steering, Power Brakes, Dual Roll Bars
    Heater and Glove Box, Drop Trunk, Wipers, Radio, FFR Vintage Gauges, Custom Dash
    Build Thread: http://thefactoryfiveforum.com/showt...MK4-Build-9035

  37. #77
    Senior Member edwardb's Avatar
    Join Date
    Feb 2011
    Location
    Lake Orion, Michigan
    Posts
    10,567
    Post Thanks / Like
    Quote Originally Posted by Ducky2009 View Post
    FYI.... The 2017 Coyote engines (at least from Ford Racing) does not have low oil sensor in the oil pan and no bung in the pan.
    Interesting. Clearly one of the differences from my 2015 Ford Racing crate Coyote. Thanks for pointing it out. Does that mean the connector lead that would go to the oil level sensor is also not in your engine harness? Can't imagine the bean counters would remove the sensor but leave the connector in the harness.

    Not sure which year Al_C is using here. Hopefully these responses help him sort out the connector in question.
    Build 1: Mk3 Roadster #5125. Sold 11/08/2014. Build 2: Mk4 Roadster #7750. Sold 04/10/2017. Build Thread
    Build 3: Mk4 Roadster 20th Anniversary #8674. Sold 09/07/2020. Build Thread and Video. Build 4: Gen 3 Type 65 Coupe #59. Gen 3 Coyote. Legal 03/04/2020. Build Thread and Video
    Build 5: 35 Hot Rod Truck #138. LS3 and 4L65E auto. Rcvd 01/05/2021. Legal 04/20/2023. Build Thread. Sold 11/9/2023.

  38. #78
    On a roll Al_C's Avatar
    Join Date
    Aug 2014
    Location
    Wheaton, IL
    Posts
    1,413
    Post Thanks / Like
    The engine is a 2015 Coyote. No clue what generation it is, but it was ordered in May of 2016 and arrived in June of 2016. Mike Forte put the Moroso oil pan on it and it has the sensor in the bung on the driver side. Thanks, guys for the info on that plug! That was one of the things I was going to research today - you answered it for me!

    Now that we're all talking about oil level and oil level sensors, it strikes me that there is no mention of that in the controls pack instructions. There is no mention of any connection for an oil level gauge on the pigtail connection instructions, either. The only thing I can think of (and I'm certainly no expert!) is if it's active it provides data to the PCM which might communicate a low oil situation via the MIL??? Whatever. As Paul stated above, even if it isn't used, plugging it in keeps it out of the way.
    Mk IV Roadster - #8650 - delivered 7-17-2015 - first start 7-28-2018 - first go-kart 10-13-2018 - licensed and on the road 9-9-19: body/paint completed 3-17-2020.
    Complete kit / 2015 Coyote / TKO600 / IRS / Wilwood brakes / Mid-Shift mod / Power Steering / Heater and Seat Heaters / RT turn signal / Breeze radiator shroud and mount

  39. #79
    David aka Ducky2009 Ducky2009's Avatar
    Join Date
    Dec 2016
    Location
    Lilburn, GA
    Posts
    775
    Post Thanks / Like
    Quote Originally Posted by edwardb View Post
    Interesting. Clearly one of the differences from my 2015 Ford Racing crate Coyote. Thanks for pointing it out. Does that mean the connector lead that would go to the oil level sensor is also not in your engine harness? Can't imagine the bean counters would remove the sensor but leave the connector in the harness.

    Not sure which year Al_C is using here. Hopefully these responses help him sort out the connector in question.
    FYI... Just reviewed the wiring harness manual supplied with my 2017 Coyote engine. It still shows a Low Oil Sensor wire in the diagram, but no place to attach to the supplied stock pan. I never would have thought it still was included.
    Looks like Edwardb have the approx same vintage engine as you. Your plug is probably the low oil sensor as suggested. Good catch Paul
    Last edited by Ducky2009; 10-25-2017 at 09:41 PM.
    MK4 Build #9035 Delivered 2/17/17, First Start & Go-Kart 6/2/17, Licensed 9/1/17
    Paint - Lightning Blue Metallic, No Hood Scoop, No Stripes
    Gen 2 Coyote Engine & TKO-600. Solid Axle, 8.8-3.55, Power Steering, Power Brakes, Dual Roll Bars
    Heater and Glove Box, Drop Trunk, Wipers, Radio, FFR Vintage Gauges, Custom Dash
    Build Thread: http://thefactoryfiveforum.com/showt...MK4-Build-9035

  40. #80
    Senior Member broku518's Avatar
    Join Date
    Sep 2017
    Location
    Jupiter, FL
    Posts
    472
    Post Thanks / Like
    Hi Al,
    Hope you can figure out that spaghetti mess. Let me know if you want us to come over. I have no idea what I am doing, but can follow directions and hold thing here or there.

    Honestly, this was the main reason for getting carbureted engine, simplicity.

    Cheers,
    Martin
    Life is short, so start living it.
    Build thread: http://thefactoryfiveforum.com/showt...-in-the-garage!
    delivery date: 10/31/2017, first start 2/24/2018, title and registration passed 6/22/2018

Page 2 of 5 FirstFirst 1234 ... LastLast

Posting Permissions

  • You may not post new threads
  • You may not post replies
  • You may not post attachments
  • You may not edit your posts
  •  

Replica Parts

Visit our community sponsor