-
05-27-2016, 05:05 PM
#281
Senior Member

Coyote Moroso Oil Pan / Dipstick
In another build thread, there was discussion about the Coyote dipstick and Moroso oil pan not playing nice together. After further review, I determined mine needed a little rework. So thought I would post about it in my build thread since many are following it and may have the same issue with their Coyote.
The original problem was found a couple of years ago, and discussed in this thread: http://www.ffcars.com/forums/45-ford...-much-oil.html
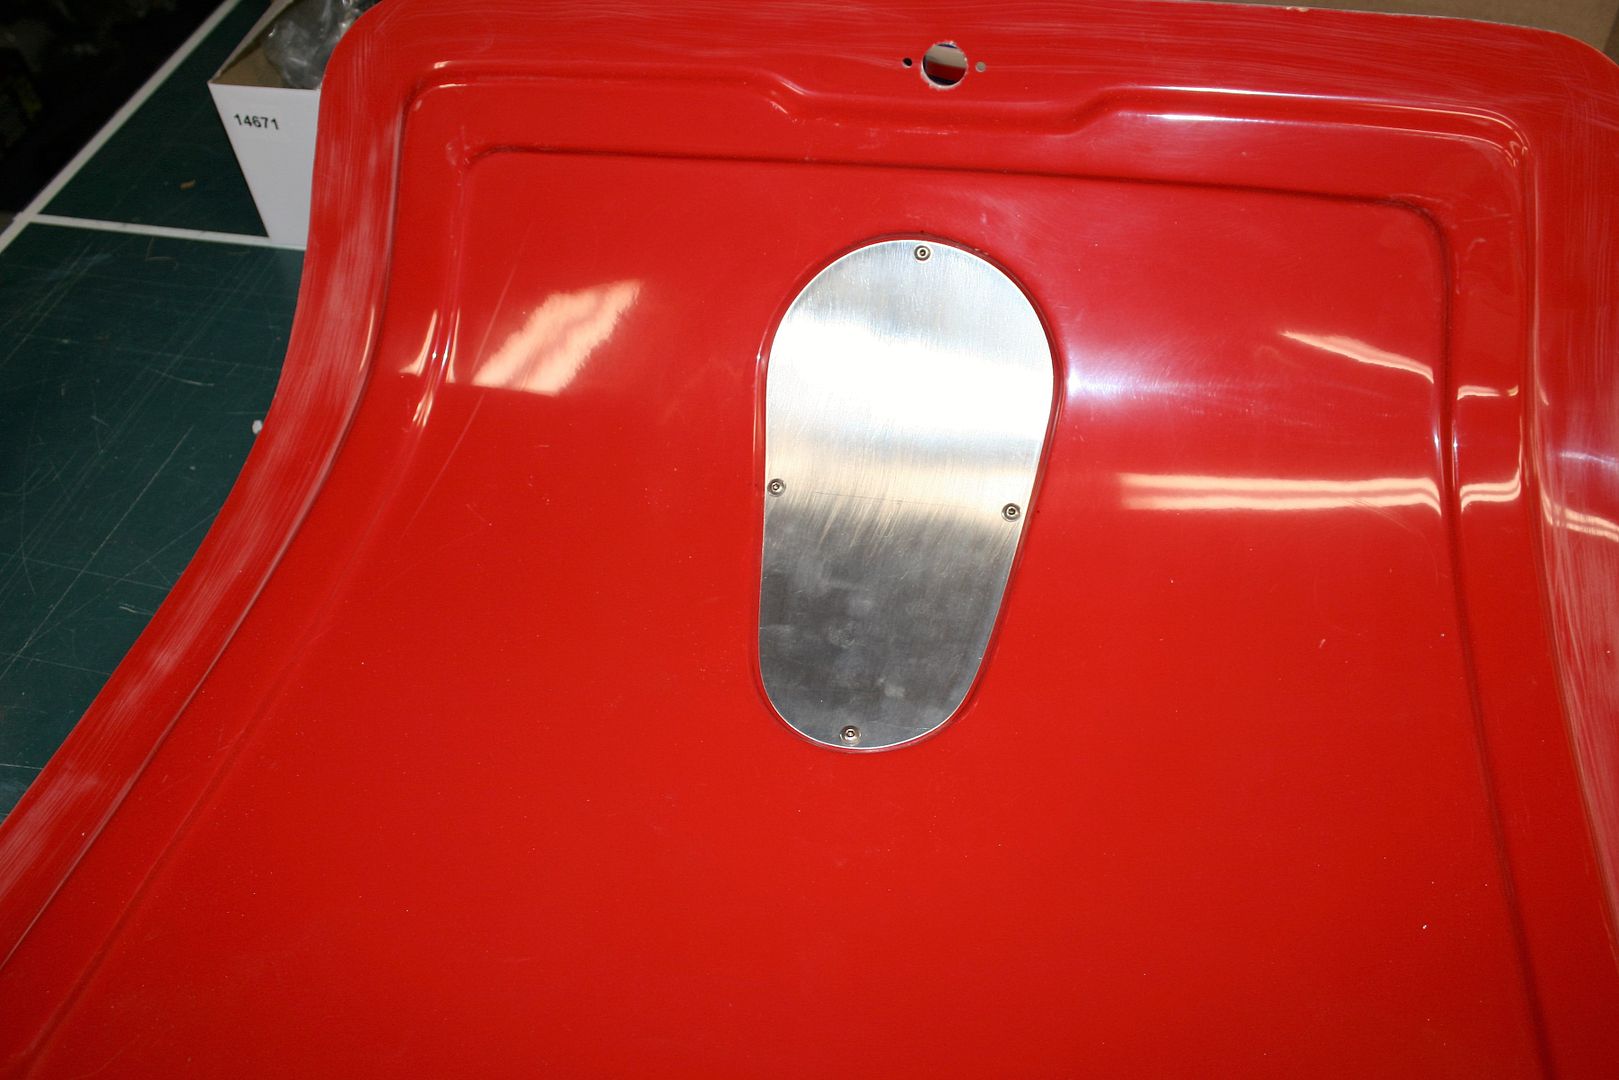
It seemed that Moroso fixed the problem, so I was a little surprised to read in a current build thread that there was still a potential problem. I had noticed that the dipstick on mine didnt go in all that smoothly, especially near the end. But it follows a rather curvey path, so didnt think anything of it. But based on the recent discussion, decided to investigate further.
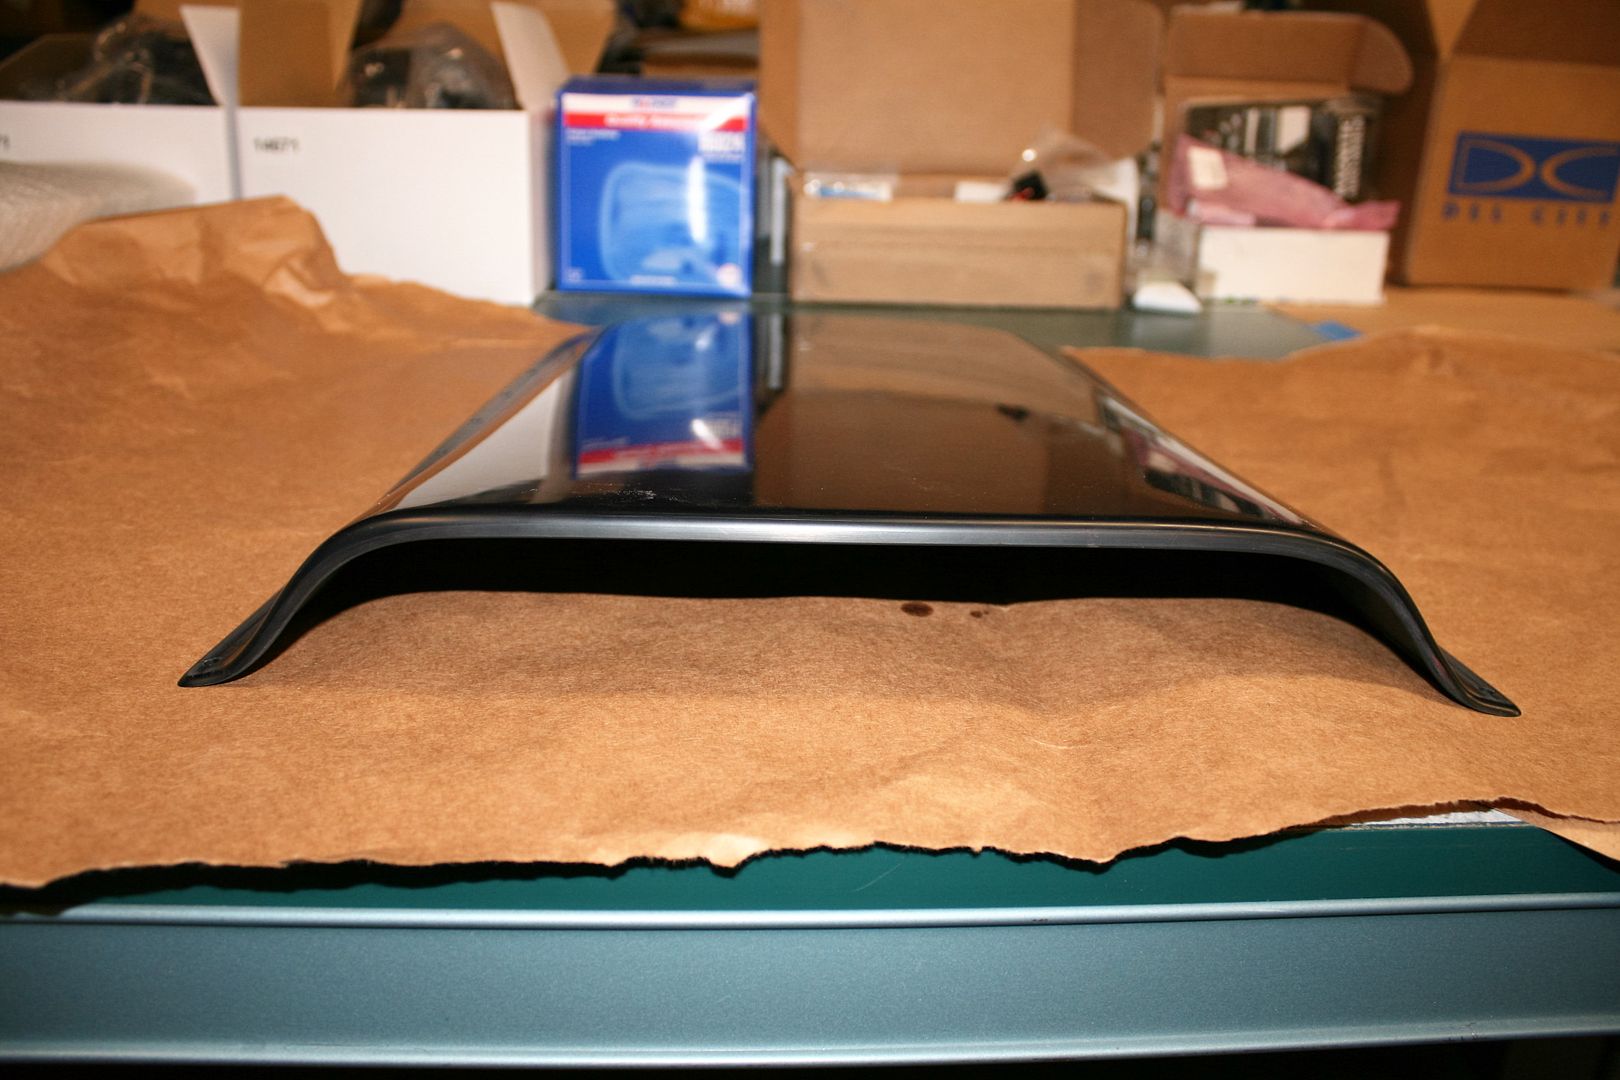
Fortunately, my engine is still out of the car and doesnt have oil in it. So easy to check. I loosened the bolts on my Moroso pan enough to peek inside and see what was happening with the dip stick. Sure enough it was hitting something and deflecting. So I completely removed the pan. I confirmed it does have the oval cut-out discussed in the link above, so it's obviously been updated. But still there was interference and may not read correctly. I put some plumbers putty in the area where it appeared to be hitting, and put the pan back in place. Pushed the dip stick down until it hit, removed, rotated 180 degrees, and back in again. Removed the pan and there were two marks, about 1/4-inch apart. They hit in the area of the oval (barely) but also exactly in the area where the metal baffle underneath crosses into the oval cutout. That was the problem.
I debated just trimming a little off the end of the dipstick since the acceptable range of measurement is actually slightly above this area. But decided to go ahead and clearance the area of the baffle that was hitting so that a stock length dip stick can be used now and in the future. Took about 5 minutes with a Dremel and die grinder, and a lot longer to clean everything up. No place for metal shavings. Put everything back together and the dipstick now drops through the oval cutout.
This is something other Coyote builds that use a Moroso pan should also check. This picture shows where the interference occurs.
Build 1: Mk3 Roadster #5125. Sold 11/08/2014.
Build 2: Mk4 Roadster #7750. Sold 04/10/2017.
Build Thread
Build 3: Mk4 Roadster 20th Anniversary #8674. Sold 09/07/2020.
Build Thread and
Video.
Build 4: Gen 3 Type 65 Coupe #59. Gen 3 Coyote. Legal 03/04/2020.
Build Thread and
Video
Build 5: 35 Hot Rod Truck #138. LS3 and 4L65E auto. Rcvd 01/05/2021. Legal 04/20/2023.
Build Thread. Sold 11/9/2023.
-
06-11-2016, 01:09 PM
#282
Senior Member
More Detail Stuff
Some non-build activity since my last update getting needed things done around the old homestead, plus apparently it was time for my semi-annual back tweak. Barely leaning over to put something in the trash can. Good grief. Dont get it, but on the mend I think. Ive gotten another few things off the build list. Some of this stuff is pretty routine, but I know there are first time builders following this thread and have told me repeatedly they like the detail, so here goes.
The replica door latches have a reputation for not being the best quality. This was one of the last items on my backorder list, and Jay told me FF was buying up supplies everywhere they could find them. Im pretty sure they all come from the same place, and quality is not getting any better. These were the poorest Ive had to date. Usually there are three different problems. There is a swaged joint inside that likes to come apart, the little knob can fall off the handle, and the pin doesnt fit well into the catch. Mine had all three problems, plus a lot of flash and just generally poor workmanship. Returning them and getting a different set might be an option, but theres a good chance they wouldnt be any better. The good news is theyre not too hard to fix.
There is a well-known mod thats been posted on the forum. Doors, door latches, hinges, FAQ, FFR FAQ. I completed this mod with one slight difference. I used a shim between the pivot and the handle instead of replacing the wavy washer that was originally there. I happened to find just the right size and thickness in one of my washer junk drawers. Makes the handle a little more solid IMO. For the knobs, I drilled and tapped for a 10-32 x 3/8-inch SS button head through the handle and into the knob. Finally, I used stones on a Dremel and die grinder to open up the hole in the catch enough for the pin to seat properly. I dont know if they dont allow for the plating or what, but as delivered the pin would barely go in past the initial taper. This in my experience is why guys have trouble getting the doors to latch or the pin gets stuck in the latch.
Two stories come to mind. The very first time my wife went for a ride in my first build, a Mk3, when we pulled back into the garage her door wouldnt open. No amount of tugging or banging changed anything. She had to sit there while I removed the cover and took the latch assembly completely off the door in order to get it open. Talk about first impressions! That triggered me to search and do all the mods listed here. Another time I was taking a guy for a ride and helping him strap in. He said this was important to him because the last one he rode in the door flew open around every turn. I assured him that wasnt going to happen. Just do the mods. Here are pictures of the finished products. Note some guys recommend not replacing the small spring visible here and only using the spring internal to the latching pin. I prefer to use both. Note also the latches come assembled dry with no lubrication. I don't understand that. Use some white lithium or similar when re-assembling. Makes a difference.
Next up I worked on the hood scoop. #7750 Mk4 had the fiberglass scoop. This one has the plastic molded version. Certainly less prep and a bit more symmetrical. The main perimeter was in pretty good shape. The lip on the opening needed to be trimmed and sanded. Im going to bolt the scoop to the hood like #7750 with 10-32 button heads and acorn nuts on the inside. This sort of looks like rivets and is a nice clean way to do it. But all those holes need to be drilled. This spacing closing resembles several originals. Take your time to get them exactly the same distance from the edge all around and the back holes exactly centered side-to-side. If you do stripes, you want the holes to line up with the stripes. Especially the one in the exact center along the back. Dont just mark the holes and drill them to the final size. Even with a drill press its easy for the bit to wander. After marking, I center punch them, and then drill with a pretty small bit. Then check each for alignment to the mark and tweak with a needle file as necessary. Then a bit bigger bit and check again. Adjusting again if needed. Then I drill the final size. Not great pics, but ready to mount:
One other hint about the hood scoop. The FF instructions give dimensions for the hole in the hood, and some guys dive right in and cut the hole based on those dimensions. Some have gotten in trouble doing it this way. Theres a better way IMO. First fit the hood, find the center and where the scoop should be mounted using the provided dimensions, paying attention to the raised areas on the back of the hood. Then drill the holes using the scoop for the layout. Check carefully as you go to keep everything centered. That scoop is pretty flexible. With all the holes drilled, lay out the opening in the hood relative to the holes and following the same curve. Then cut the hole.
Next up I sanded and filled the cracks and voids along the top of both doors with HSRF. Ready for the next level of body work by my painter.
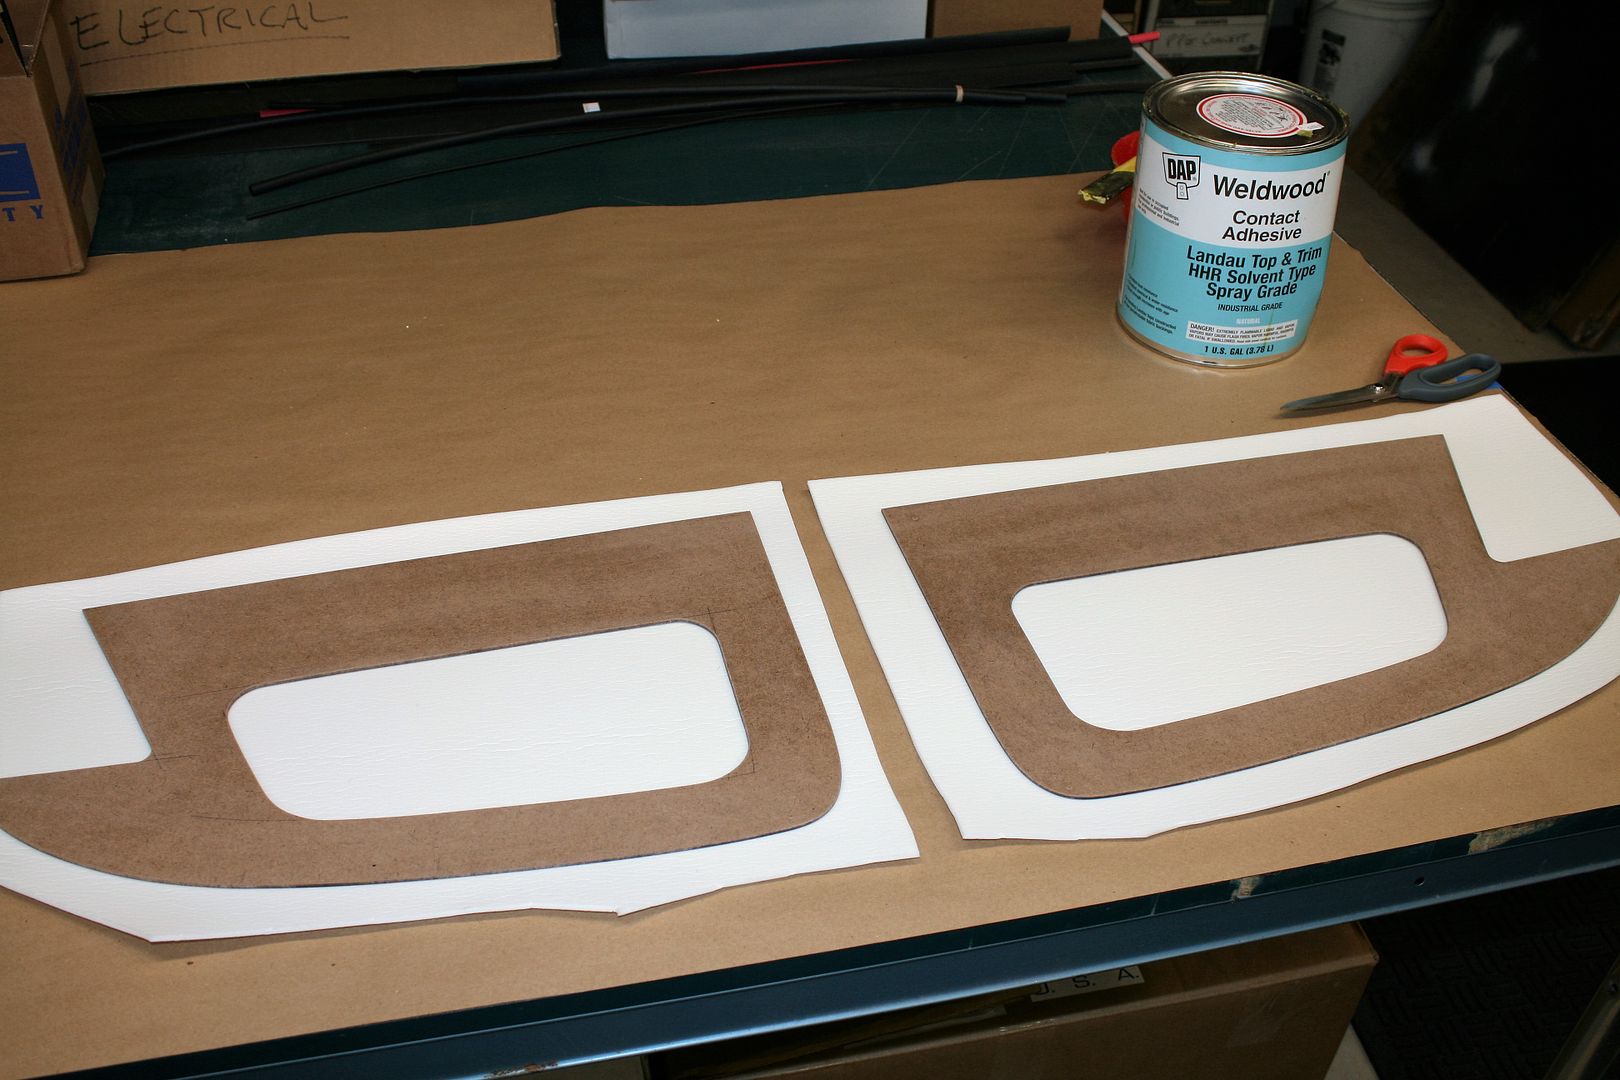
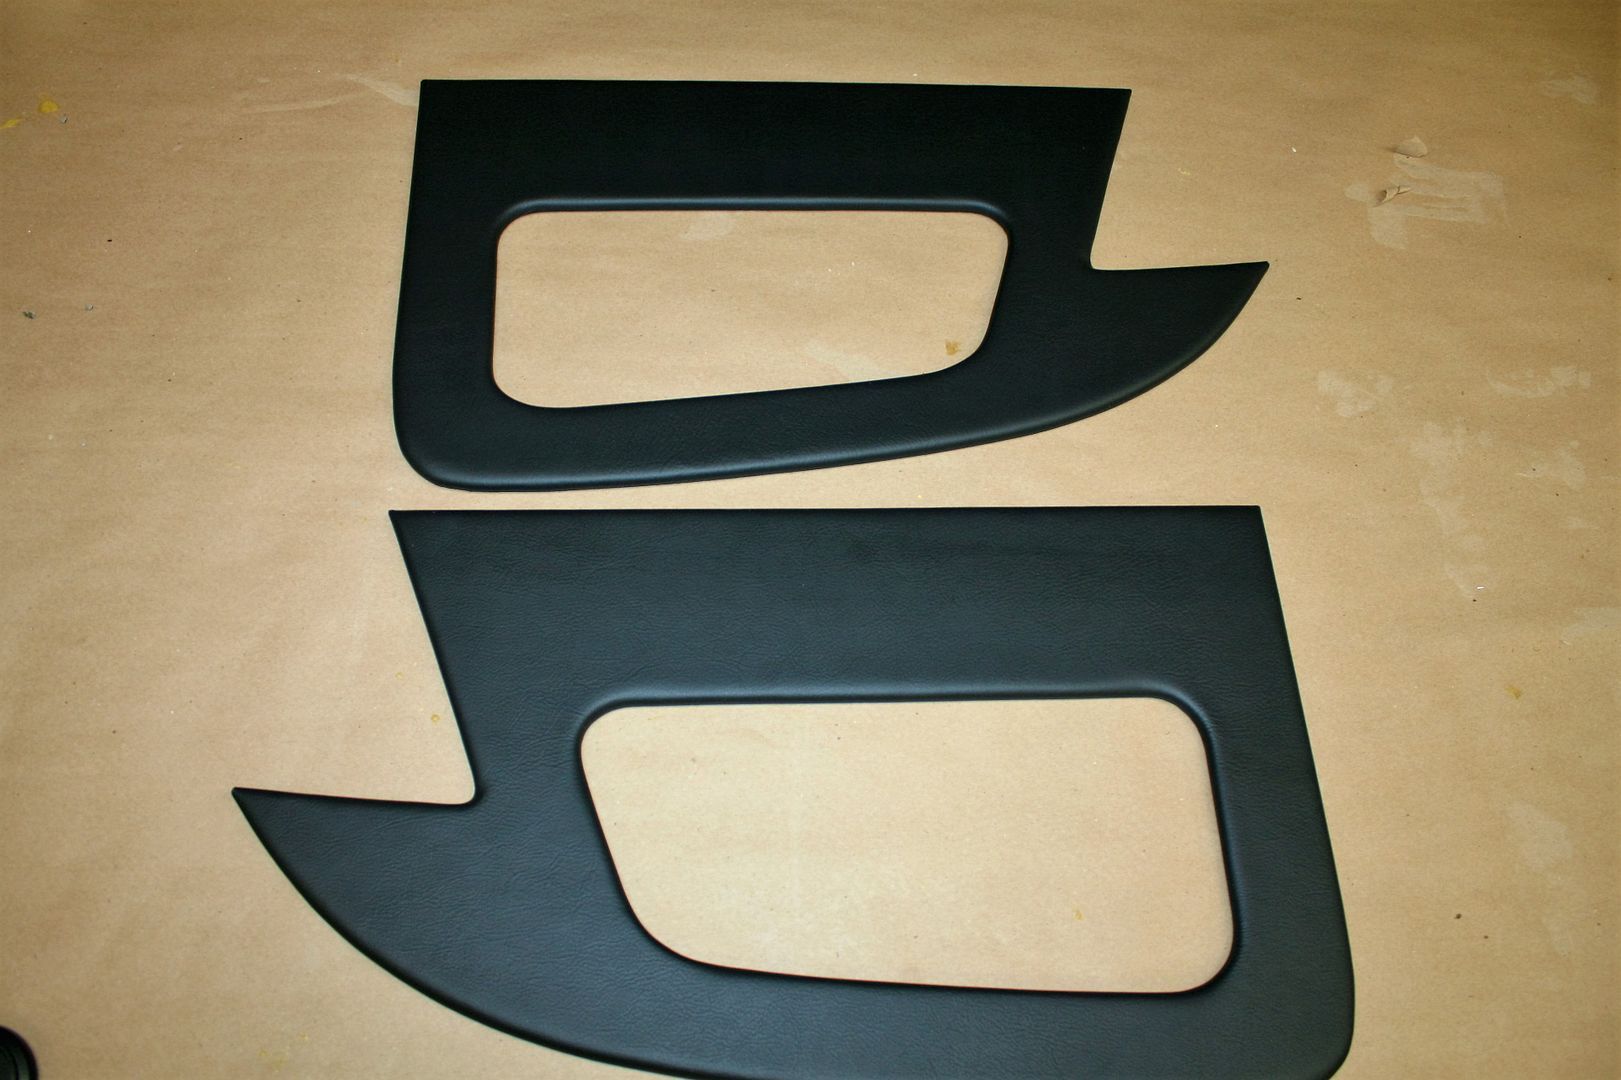
Ive used Herbs door panels on my last builds. The Anniversary edition kit comes with door panels. FF provided the ones from **********. Theyre OK. But with the leather seats, leather dash, planned leather covering on the transmission cover, and the big hunk of leather I have left over, decided to do leather door panels. I could have sent the leather to Herb and he would make them. But since I had all the materials (and the time) decided to take a stab at it myself. Im shamelessly copying Herbs standard panels with a center pocket. I cut the backing out of 1/8-inch tempered Masonite. Then, using the same 1/8-inch foam, Weldwood Landau adhesive, and leather as my dash, wrapped the panels. The pros use steam to stretch and shrink around pieces like this. I used a lot of pie cuts (and patience) and they turned out pretty good. I have the pocket pieces ready to install, but need one of the pieces stitched, which Ill have done at an upholstery shop when I get the carpet binding installed. For attaching them to the doors, Herb uses wide Velcro strips and Ive added a couple of screws. My wife likes to put a water bottle in her pocket and thought I needed the extra strength. Im trying some 3M Dual Lock Reclosable Fastener material on these and no screws. Similar to Velcro, but supposedly stronger. Well see.
Build 1: Mk3 Roadster #5125. Sold 11/08/2014.
Build 2: Mk4 Roadster #7750. Sold 04/10/2017.
Build Thread
Build 3: Mk4 Roadster 20th Anniversary #8674. Sold 09/07/2020.
Build Thread and
Video.
Build 4: Gen 3 Type 65 Coupe #59. Gen 3 Coyote. Legal 03/04/2020.
Build Thread and
Video
Build 5: 35 Hot Rod Truck #138. LS3 and 4L65E auto. Rcvd 01/05/2021. Legal 04/20/2023.
Build Thread. Sold 11/9/2023.
-
06-11-2016, 01:09 PM
#283
Senior Member
More Detail Stuff (continued)
I retrieved the trunk lid from where I have the body stored and prepped it for installation. Just a little clean up, and then made a cover for the license plate light access area. Easy enough from .040 aluminum, bent over a post in my basement, and attached with button head screws and nut plates bonded inside with HSRF. This will get painted along with everything else.
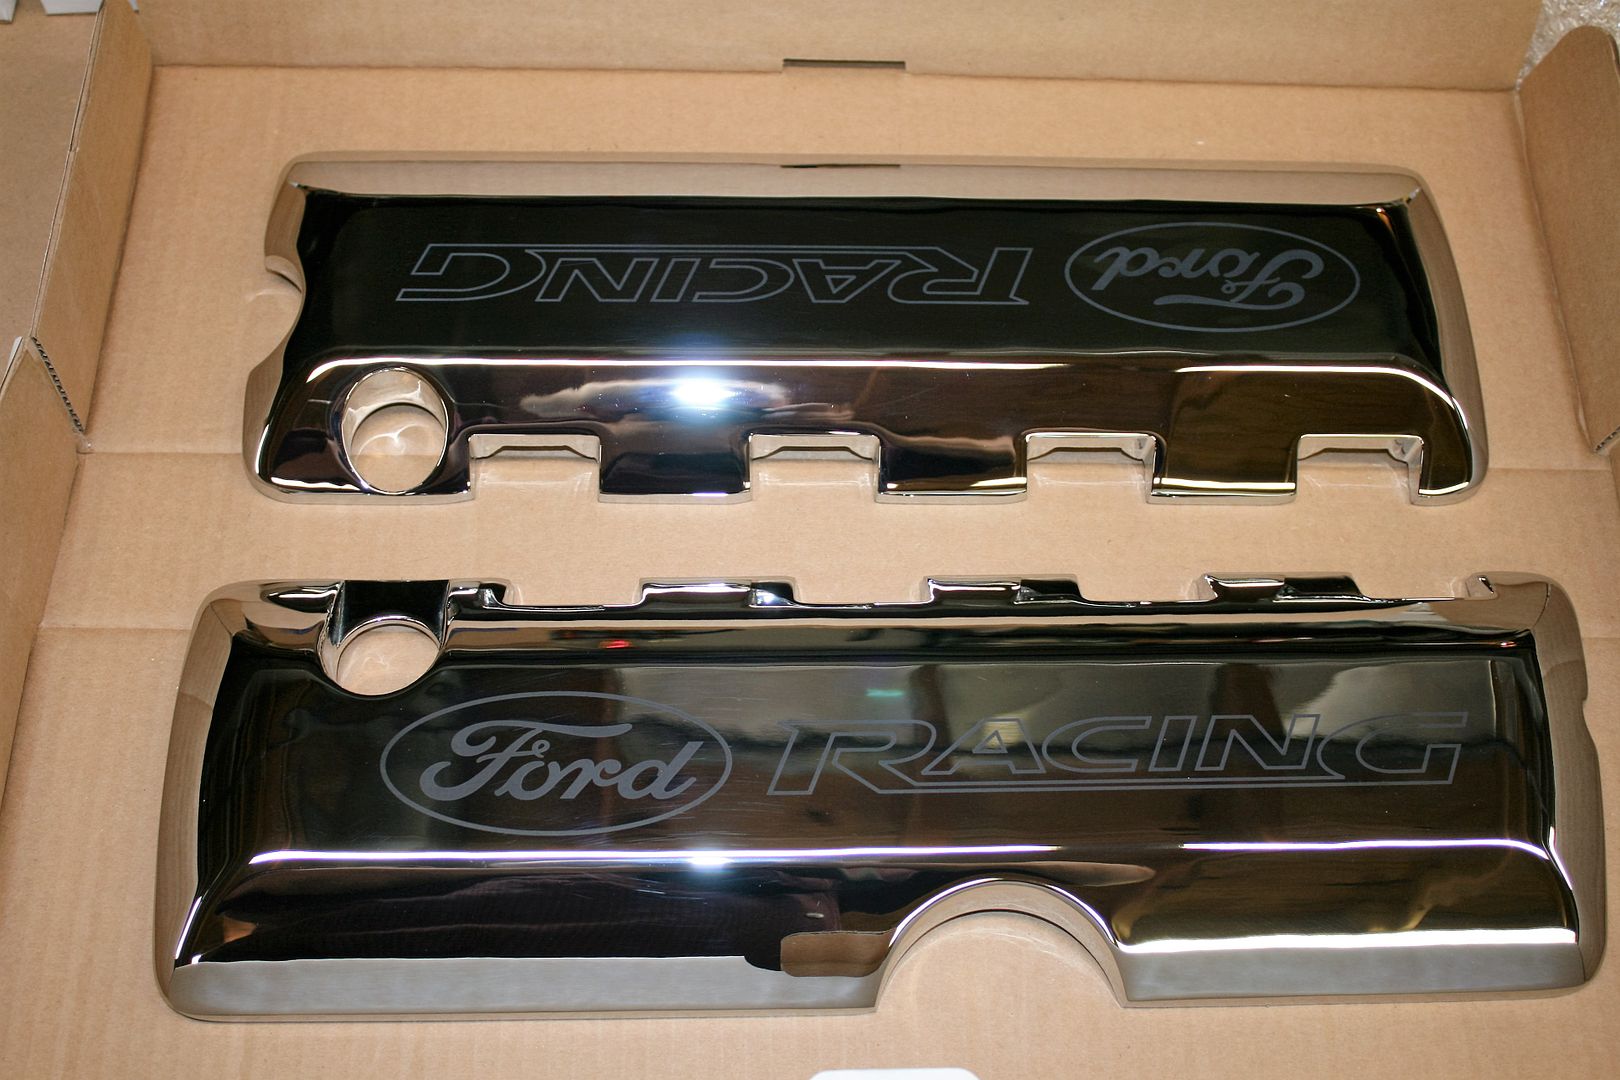
Here’s where all you guys who don’t like bling just need to look away… Me, I like the bling. I’ve been looking at some custom things I want to do with the coil and intake covers on the Coyote. There are lots of options, including carbon fiber (real and dipped), various colors, body color, etc. But I never could get past the shiny Ford Racing coil covers that FF had on the Anniversary edition prototype. So I treated myself to a Father’s Day present and picked some up. The pictures make them look like black chrome, but they’re not. Regular chrome over aluminum. Very nice pieces. And made in California! At least that’s what’s molded into them on the back. The part number M-6067-50C says they’re for 2011-2014 Coyote, but I tried them on and they fit the 2015 Coyote perfectly. Now to decide what to do with the intake cover. Right now I suspect I’ll be integrating the body color into that.
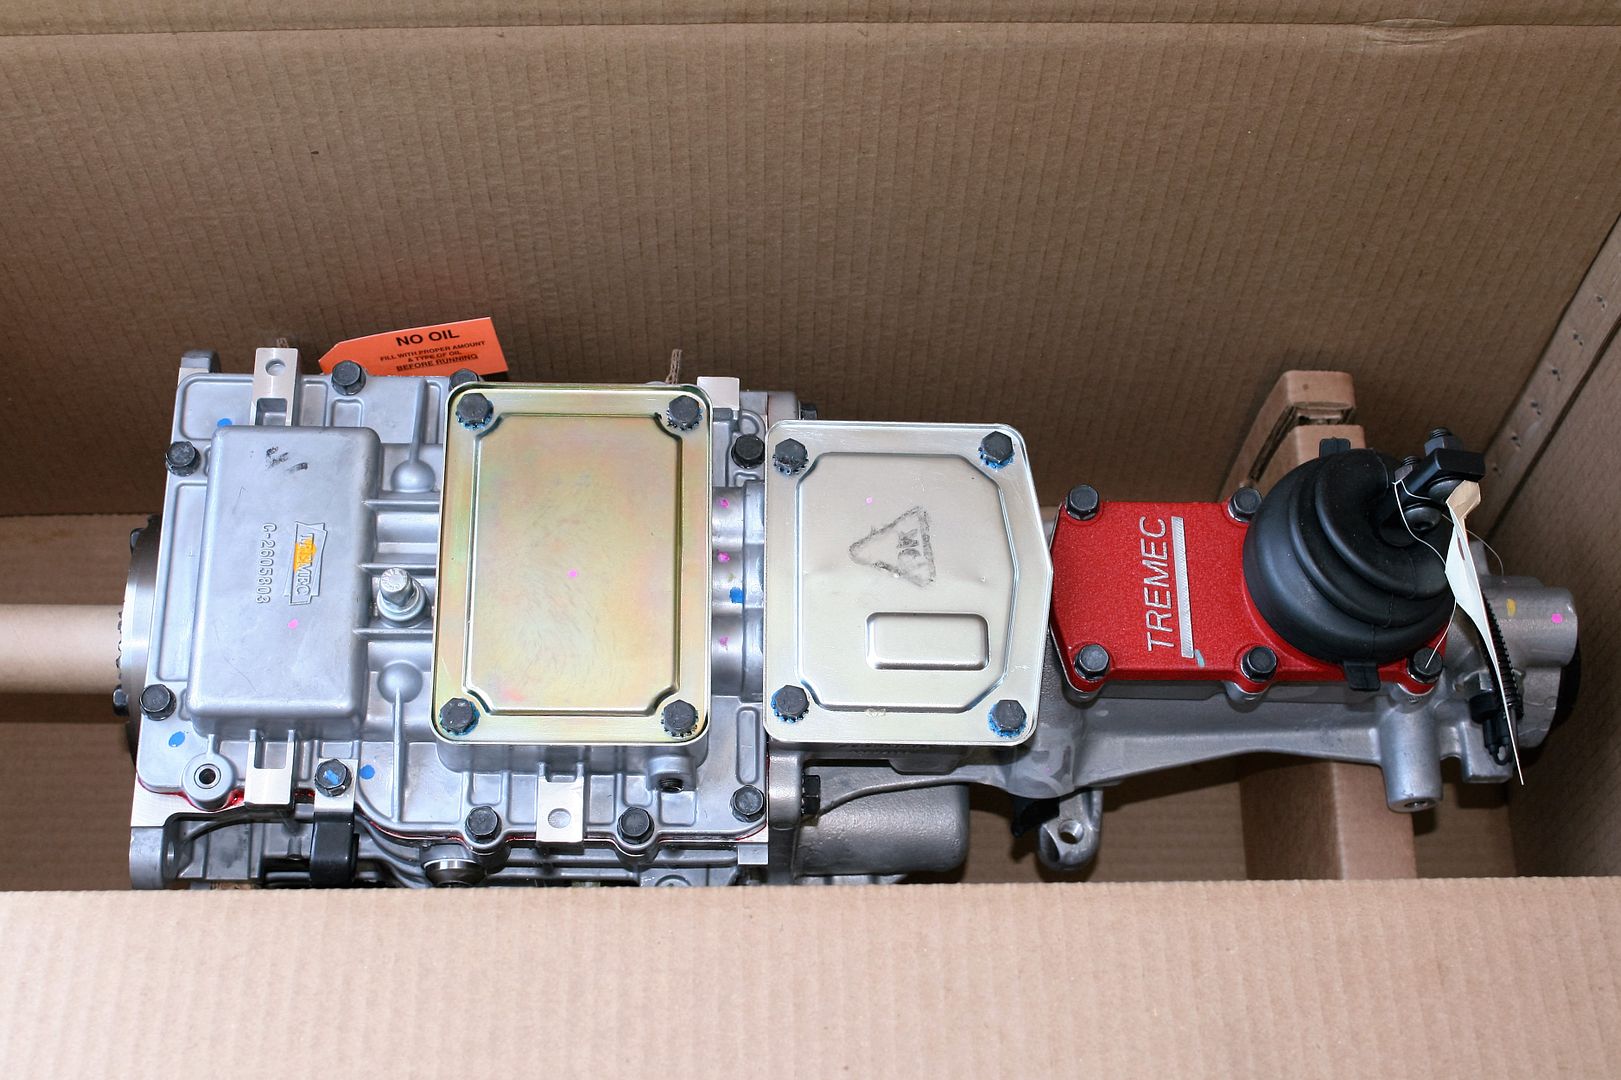
Finally, received “the call” on Friday that my TKO-600 was ready for pickup. Eight weeks almost exactly. Drove across town to Liberty and it’s now in my garage. Whoo-hoo! It has the Liberty upgraded shifter and syncros, plus they machined off the unneeded web mount on the tailshaft. I'm planning to use the rear shift location, but will flip it around like on #7750. Since they had the shifter off to do the mods, they replaced it without any sealant at my request. So it will be easy to change. That's what the hang tag on the shifter says. Unsealed at customer request.
If everything fits as it’s supposed to, next update should be with the engine installed. Now that will be progress.
Last edited by edwardb; 06-12-2016 at 06:42 AM.
Build 1: Mk3 Roadster #5125. Sold 11/08/2014.
Build 2: Mk4 Roadster #7750. Sold 04/10/2017.
Build Thread
Build 3: Mk4 Roadster 20th Anniversary #8674. Sold 09/07/2020.
Build Thread and
Video.
Build 4: Gen 3 Type 65 Coupe #59. Gen 3 Coyote. Legal 03/04/2020.
Build Thread and
Video
Build 5: 35 Hot Rod Truck #138. LS3 and 4L65E auto. Rcvd 01/05/2021. Legal 04/20/2023.
Build Thread. Sold 11/9/2023.
-
06-12-2016, 05:17 AM
#284
Carl

"Now that will be progress." Looks to me that you have had tremendous progress .... looking very nice and very timely for me as well (he says somewhat selfishly).
I am getting ready to do the doors, the trunk cover and the hood scoop.
You mentioned nut plates for the cover on the trunk ... what size and type did you use? The one's I have seen at McCarr state they are for welding but looks like they could be installed with HSRF or similar materials.
Carl
Mk 4 Roadster
October 25, 2012 - Kit Arrives
April 8, 2013 - Build Starts
August 23, 2015 - Rolling Chassis/Engine & Transmission Installed
March 26, 2016 - Go Cart
-
06-12-2016, 06:54 AM
#285
Senior Member

Originally Posted by
carlewms

You mentioned nut plates for the cover on the trunk ... what size and type did you use? The one's I have seen at McCarr state they are for welding but looks like they could be installed with HSRF or similar materials. Carl
Yes they are "Tab Base Weld Nuts" from McMaster. 10-32 threads. Their part number 98001A125. I rough up the back and also the glass location where they'll be bonded. In this case, I also put a small hole in each end so the HSRF would flow in for an even better grip. Once the cover is bolted on, it wouldn't take much to hold them. But I don't want them falling off during body work and paint. BTW, these are the same nut plates I used to hang the dash and I also use them for the hood handles. Fit nicely between the hood layers for a clean install. Probably a couple other places I'm not thinking of right now. Often work where a nutsert doesn't. Handy little guys.
Build 1: Mk3 Roadster #5125. Sold 11/08/2014.
Build 2: Mk4 Roadster #7750. Sold 04/10/2017.
Build Thread
Build 3: Mk4 Roadster 20th Anniversary #8674. Sold 09/07/2020.
Build Thread and
Video.
Build 4: Gen 3 Type 65 Coupe #59. Gen 3 Coyote. Legal 03/04/2020.
Build Thread and
Video
Build 5: 35 Hot Rod Truck #138. LS3 and 4L65E auto. Rcvd 01/05/2021. Legal 04/20/2023.
Build Thread. Sold 11/9/2023.
-
06-12-2016, 07:31 AM
#286
Dixie Build
I just want to say thanks for all of the ideas and tips you guys have given me on my 2015 Coyote build. I have two 3 ring note books with information all of you have shared. I read this information several times a day as I take breaks. This is a great vehicle for sharing and I have plenty of questions for the future. Hopefully I will also be able to add to the conversation something worthwhile. I received my Roadster (109494) the first of December this past year. I had a deal with my son in law that I would pay the bills and we had to do all the work in my shop. He and my daughter divorced the first week of 2016. Go figure! I have had open heart surgery, two back surgeries and a hip replacement so I work about ten minutes and pet Tucker while looking at your write ups! Tuff getting old! So I had a big investment and no help other than my wife and three daughters to help. The engine, transmission, brake s, fuel line,etc have all been installed. A funny thing happened. I find myself self absolutely enjoying the work and after a few hours I am pretty loose. I love having a reason to put my pants on again! So I have mounted my computer and started on the wiring. I also plan that build another after completion of 109494. This is better than any therapy program for the body or mind. Again, thanks I appreciate your help. I will post pictures as soon as I figure out how to.
-
06-12-2016, 11:07 AM
#287
Senior Member
Originally Posted by
Stanley Mcclellan
I just want to say thanks for all of the ideas and tips you guys have given me on my 2015 Coyote build. I have two 3 ring note books with information all of you have shared. I read this information several times a day as I take breaks. This is a great vehicle for sharing and I have plenty of questions for the future. Hopefully I will also be able to add to the conversation something worthwhile. I received my Roadster (109494) the first of December this past year. I had a deal with my son in law that I would pay the bills and we had to do all the work in my shop. He and my daughter divorced the first week of 2016. Go figure! I have had open heart surgery, two back surgeries and a hip replacement so I work about ten minutes and pet Tucker while looking at your write ups! Tuff getting old! So I had a big investment and no help other than my wife and three daughters to help. The engine, transmission, brake s, fuel line,etc have all been installed. A funny thing happened. I find myself self absolutely enjoying the work and after a few hours I am pretty loose. I love having a reason to put my pants on again! So I have mounted my computer and started on the wiring. I also plan that build another after completion of 109494. This is better than any therapy program for the body or mind. Again, thanks I appreciate your help. I will post pictures as soon as I figure out how to.
Really sorry to hear about what's happened in your family, but it's great the build is something you can enjoy and focus on. Sounds like you're making good progress, and glad the various build threads including mine give ideas and inspiration. I too really enjoy the build process, and this community is the best supporting each other. So carry on! BTW, the number you're citing is from the tag on the front of the car when it was delivered, right? That's probably your sales order number. The actual chassis number that we typically cite (like mine is #8674) is in the Factory Five serial number on your Certificate of Origin and also etched on the 2x2 inch dash tube just by your left knee if you were sitting in the car. Mine is marked F5R1008674RD.
Received your PM and will respond shortly.
Last edited by edwardb; 06-12-2016 at 11:26 AM.
Build 1: Mk3 Roadster #5125. Sold 11/08/2014.
Build 2: Mk4 Roadster #7750. Sold 04/10/2017.
Build Thread
Build 3: Mk4 Roadster 20th Anniversary #8674. Sold 09/07/2020.
Build Thread and
Video.
Build 4: Gen 3 Type 65 Coupe #59. Gen 3 Coyote. Legal 03/04/2020.
Build Thread and
Video
Build 5: 35 Hot Rod Truck #138. LS3 and 4L65E auto. Rcvd 01/05/2021. Legal 04/20/2023.
Build Thread. Sold 11/9/2023.
-
06-13-2016, 02:05 PM
#288
Member

EdwardB: i just yesterday finished going through your build thread for #7750. Really enjoyed it and am stealing some of your ideas for my build plan (for my as-of-yet unpurchased roadster kit).
Now I am going to start going through this build thread for #8674, and I anticipate another enjoyable and enlightening read! I am assuming you are "still having fun"?
Alan
"Meet the new boss. Same as the old boss."
- Pete Townshend
-
06-13-2016, 02:27 PM
#289
Senior Member
Originally Posted by
aks801
EdwardB: i just yesterday finished going through your build thread for #7750. Really enjoyed it and am stealing some of your ideas for my build plan (for my as-of-yet unpurchased roadster kit).
Now I am going to start going through this build thread for #8674, and I anticipate another enjoyable and enlightening read! I am assuming you are "still having fun"?
Absolutely! 
Build 1: Mk3 Roadster #5125. Sold 11/08/2014.
Build 2: Mk4 Roadster #7750. Sold 04/10/2017.
Build Thread
Build 3: Mk4 Roadster 20th Anniversary #8674. Sold 09/07/2020.
Build Thread and
Video.
Build 4: Gen 3 Type 65 Coupe #59. Gen 3 Coyote. Legal 03/04/2020.
Build Thread and
Video
Build 5: 35 Hot Rod Truck #138. LS3 and 4L65E auto. Rcvd 01/05/2021. Legal 04/20/2023.
Build Thread. Sold 11/9/2023.
-
06-14-2016, 07:23 AM
#290
Senior Member

Thanks for the details and pictures. This is very helpful for me as I'm just starting the wiring 
-
06-14-2016, 12:34 PM
#291
Senior Member
Ready for Engine Install
I said my next update would be with the engine installed. I guess I lied. Have everything ready to go so thought I would go head and post. This will be short though (for a change).
The TKO-600 slid right in and bolted up perfectly to the Coyote/Quicktime assembly. I torqued the four mounting bolts to the recommended 50 ft-lbs also with a little blue Loctite. Can’t hurt. Also bolted on the Forte hydraulic clutch setup and the rear transmission mount. Not much else to do. It’s ready to go into the chassis.
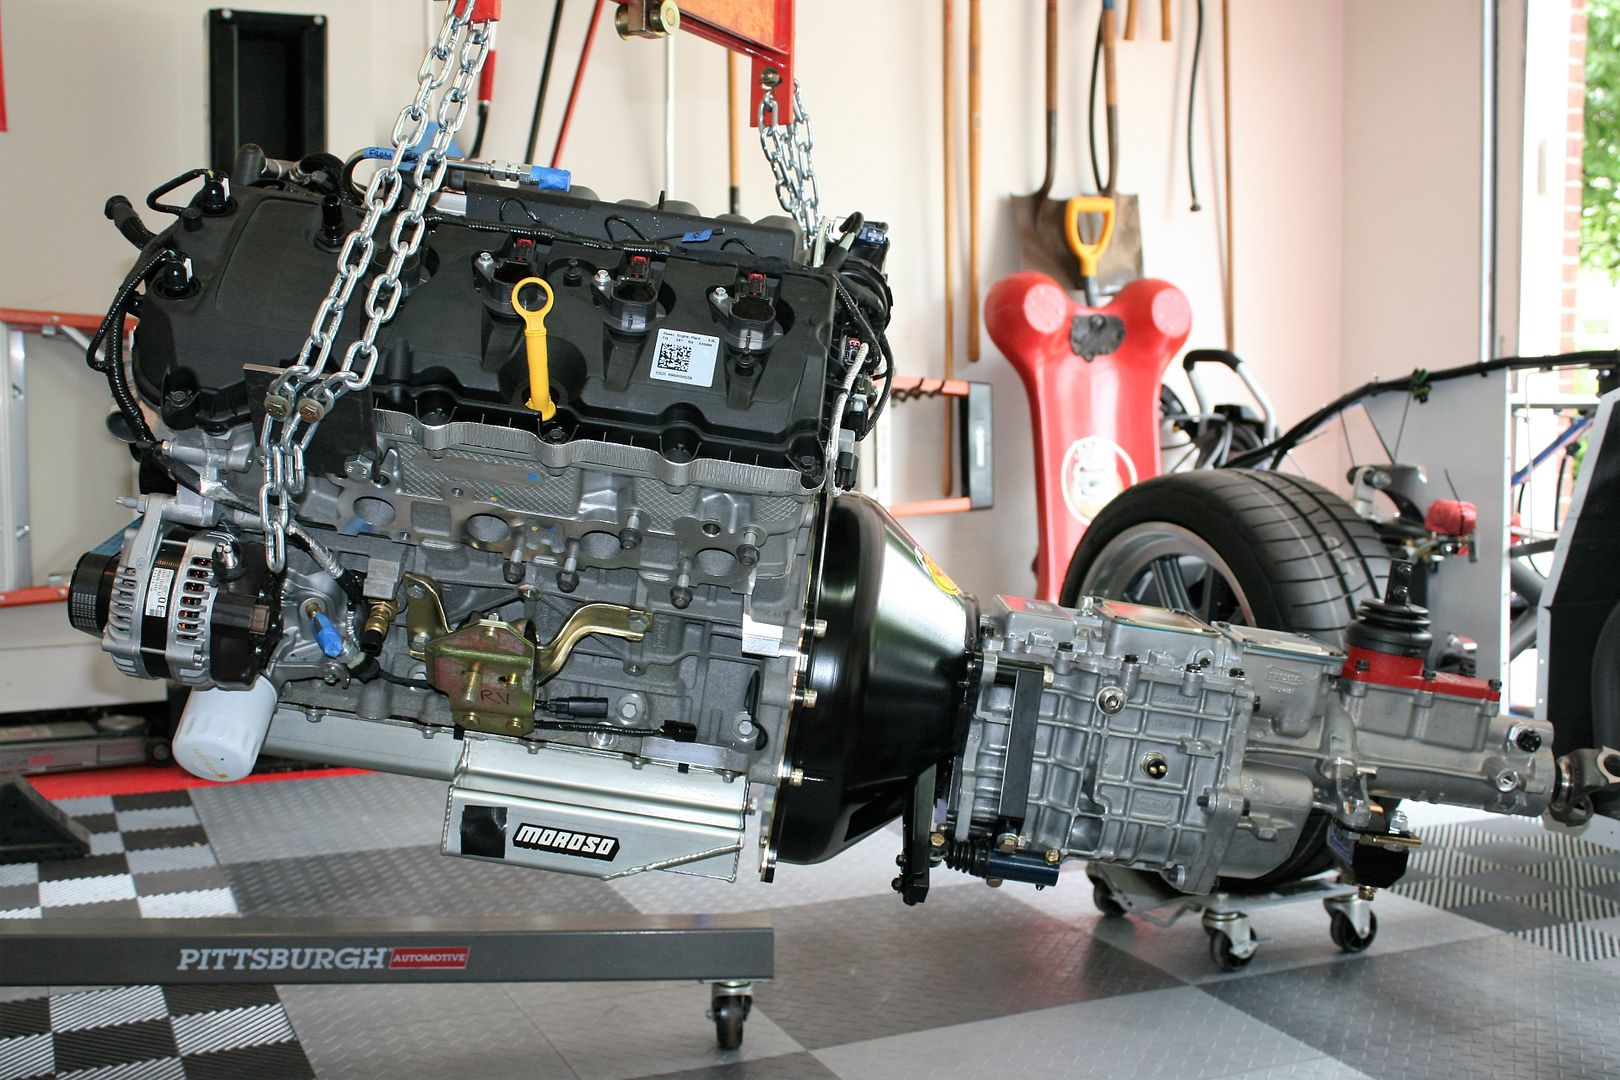
One of the things I did with my last build was to test the hydraulic clutch setup before dropping the engine in. This was based on multiple stories of guys struggling to get it working properly and even having to remove the engine to correct. Wasn't interested in that the last time, and not this time either. So I positioned the engine next to the chassis close enough to hook up the pressure line. Put some brake fluid in the reservoir and did the usual pressure bleed using the CNC reservoir pressure cap. It’s a simple circuit and bleeds very quickly. The pushrod needs to be cut to length and I purposely left it slightly long. First tests confirmed it was too long. There was little/no slack with the clutch all the way out. Trimmed about 1/8-inch off and all works perfectly. I tested the clutch engagement by slowly releasing the clutch with the transmission in gear and my trusty pit assistant (my wife, again) turning a spare slip yoke in the output I have just for that purpose. The clutch started engaging right where I expected and was fully engaged soon after. Also confirmed the Coyote “down” switch was closing at the bottom of the travel. The effort of the Ford Racing (Centerforce dual friction) clutch feels similar to the McLeod in #7750. Firm but completely manageable. But hard to tell too much at this point. Anyway, a successful test and ready to go. Drained the fluid from the clutch circuit, gave all the bolts a final tightening, and called it done.
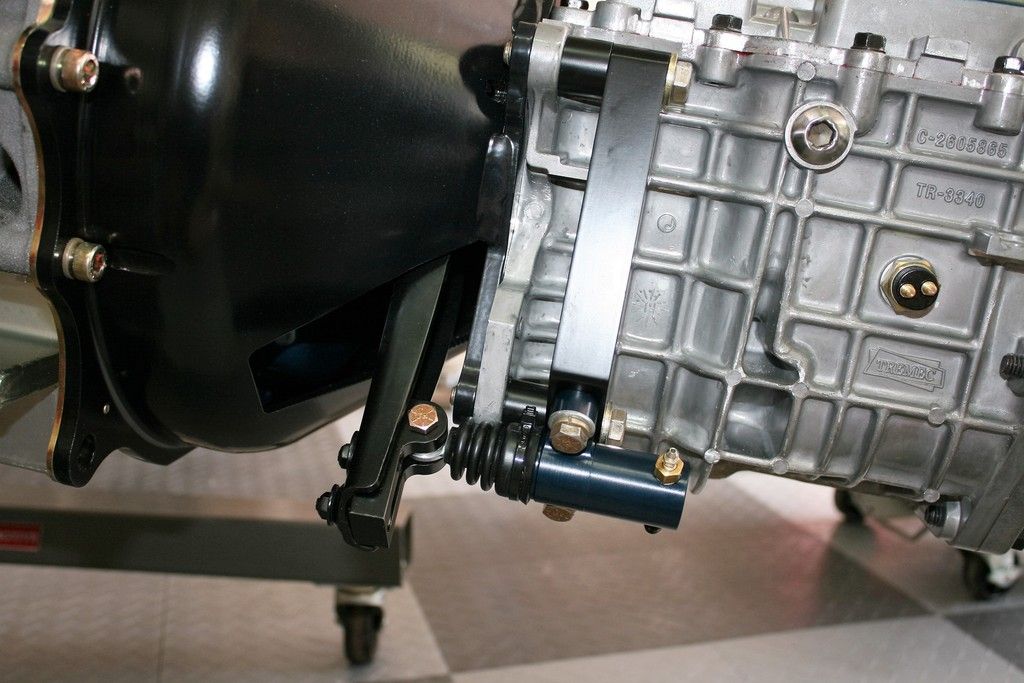
This final pic shows several things. First is the extension plate FF provides for the Coyote installation on the transmission mount. Haven’t required this on my previous SBF builds, so obviously the Coyote sits a little bit forward compared to those. Second this shows where I’m planning my shifter. The rear location but in the forward position. A quick tape measure check shows this very likely will put the shifter right on one of the cross braces in the transmission tunnel. We’ll see once it gets installed and decide how to address. Finally, this shows the cover over the external VSS (Vehicle Speed Sensor) mounting location. The TKO comes with two speed sensor options. This one which requires a sensor to be mounted here or one on the opposite side that is internal and only needs the harness to be attached. The difference is this one can be used with a sensor that also drives an actual speedo cable if you are of that persuasion. Personally, haven’t seen or used a speedo cable in a whole bunch of years. The other side is an electronic only sensor. In my case, I really don’t need either because I have a GPS speedo. But what isn’t 100% clear or some don’t know is that the TKO comes with a rubber plug in this side that is intended for shipping only. If you’re not going to put a sensor there, you need a cover plate with an O-ring like this one from Forte. Tremec also has one. I think there are other brands as well.

No pictures, but I took the chassis off the lift and it's sitting on the wheels/tires for the first time. It is on vehicle dollies still, but another nice step forward to have it on the ground. As soon as I can muster up a couple helpers, the engine will be going in. Nothing stopping that now. It’s tempting to try it on my own, but I’m not going to do it. Too much at stake and I promised my pit assistant I wouldn’t.
Last edited by edwardb; 06-15-2016 at 04:54 PM.
Build 1: Mk3 Roadster #5125. Sold 11/08/2014.
Build 2: Mk4 Roadster #7750. Sold 04/10/2017.
Build Thread
Build 3: Mk4 Roadster 20th Anniversary #8674. Sold 09/07/2020.
Build Thread and
Video.
Build 4: Gen 3 Type 65 Coupe #59. Gen 3 Coyote. Legal 03/04/2020.
Build Thread and
Video
Build 5: 35 Hot Rod Truck #138. LS3 and 4L65E auto. Rcvd 01/05/2021. Legal 04/20/2023.
Build Thread. Sold 11/9/2023.
-
06-16-2016, 05:15 PM
#292
Can't express how much these forums help.....
Ran across Edwards post #291 and saw the plug for the mechanical speedo and thought, hmmm. When I ordered all my stuff from Mike he didn't mention anything about getting this plug but I didn't realize I needed one so can't blame anyone but me. Heading out for the power tour this week so Monday I decided, well I better get that in the mail and I will install it when I get back. I mean, I have almost 400 miles on the car with the rubber speedo plug and no issues.
Well I met up with the tour in my hometown of Wichita this afternoon, had a blast talking to a couple of the guys at the FFR booth and drooling over their beautiful cars, especially that 33! (Next project maybe)
Anyway I return home to pack the car for the final leg of the tour and notice a good size puddle under the car. Well s**t what is that. Sure enough it is transmission fluid so I jack up the car and roll under it to find........the rubber speedo plug gone. And coincidentally while I am under the car the friendly UPS guy comes up and says I have a package, the plug. So clearly I am on someone's good side as this little event would have sidelined me for tomorrow's leg of the tour.
But more importantly, if Edward didn't document things like he does, I wouldn't have been educated about the plug and got it coming in the mail. So simply want to say thank you Edward! Your documentation of your builds enabled me to attain a once in a lifetime memory on the Hot Rod Power Tour!
If I ever get the opportunity to meet you, I owe you a beer or four!
-
06-16-2016, 11:41 PM
#293
Senior Member
Originally Posted by
jcjorgensen
Can't express how much these forums help.....
Ran across Edwards post #291 and saw the plug for the mechanical speedo and thought, hmmm. When I ordered all my stuff from Mike he didn't mention anything about getting this plug but I didn't realize I needed one so can't blame anyone but me. Heading out for the power tour this week so Monday I decided, well I better get that in the mail and I will install it when I get back. I mean, I have almost 400 miles on the car with the rubber speedo plug and no issues.
Well I met up with the tour in my hometown of Wichita this afternoon, had a blast talking to a couple of the guys at the FFR booth and drooling over their beautiful cars, especially that 33!
(Next project maybe)
Anyway I return home to pack the car for the final leg of the tour and notice a good size puddle under the car. Well s**t what is that. Sure enough it is transmission fluid so I jack up the car and roll under it to find........the rubber speedo plug gone. And coincidentally while I am under the car the friendly UPS guy comes up and says I have a package, the plug. So clearly I am on someone's good side as this little event would have sidelined me for tomorrow's leg of the tour.
But more importantly, if Edward didn't document things like he does, I wouldn't have been educated about the plug and got it coming in the mail. So simply want to say thank you Edward! Your documentation of your builds enabled me to attain a once in a lifetime memory on the Hot Rod Power Tour!
If I ever get the opportunity to meet you, I owe you a beer or four!
Great story! Thanks for sharing and glad I was able to help. Enjoy the Power Tour tomorrow! I'd like to try that some day.
Busy day today. Coyote is in now safely in the chassis. Went well. Pictures and write-up hopefully tomorrow.
Build 1: Mk3 Roadster #5125. Sold 11/08/2014.
Build 2: Mk4 Roadster #7750. Sold 04/10/2017.
Build Thread
Build 3: Mk4 Roadster 20th Anniversary #8674. Sold 09/07/2020.
Build Thread and
Video.
Build 4: Gen 3 Type 65 Coupe #59. Gen 3 Coyote. Legal 03/04/2020.
Build Thread and
Video
Build 5: 35 Hot Rod Truck #138. LS3 and 4L65E auto. Rcvd 01/05/2021. Legal 04/20/2023.
Build Thread. Sold 11/9/2023.
-
06-17-2016, 10:05 AM
#294
Paul-
I like your new picture. That badge will look great on the car! Did you have that made up, or did FFR supply that with the anniversary cars?
Regards,
Steve
-
06-17-2016, 10:09 AM
#295
 Administrator

Steve,
Those badges are exclusive to the 20th anniversary cars. Of course, they are merely replicas of the originals...:


PS Seriously, The amount of detail edwardb is posting is inspiring. It's got me thinking I'd like to do a Coyote build some day, because I know that type of build has been fully documented thanks to his posts...
FFR 5369 Pin Drive, IRS, Trigos, Torsen, Wilwoods, FMS BOSS 302 "B" cam , Mass-flo. CA SB100 (SPCN) Registered
Delivered 4/23/06. "Finished" 4/2012 (still not done!)
-
06-17-2016, 12:18 PM
#296
Senior Member
Originally Posted by
WIS89
Paul-
I like your new picture. That badge will look great on the car! Did you have that made up, or did FFR supply that with the anniversary cars?
Regards,
Steve
Hey Steve. Thanks for noticing! As David said, FF supplies the special badges with the Anniversary editions. Played around way too long getting a decent picture of it, doing a few special effects, and then shrinking enough to be my avatar. Still can't get the other forum to take it.
Build 1: Mk3 Roadster #5125. Sold 11/08/2014.
Build 2: Mk4 Roadster #7750. Sold 04/10/2017.
Build Thread
Build 3: Mk4 Roadster 20th Anniversary #8674. Sold 09/07/2020.
Build Thread and
Video.
Build 4: Gen 3 Type 65 Coupe #59. Gen 3 Coyote. Legal 03/04/2020.
Build Thread and
Video
Build 5: 35 Hot Rod Truck #138. LS3 and 4L65E auto. Rcvd 01/05/2021. Legal 04/20/2023.
Build Thread. Sold 11/9/2023.
-
06-17-2016, 01:14 PM
#297

Steve >> aka: GoDadGo

EdwardB,
Are you going to have enough room to fit the Slave Cylinder?
I had to make a little access panel/dog house for mine, but my drivetrain combo is totally different from yours.
Steve
-
06-17-2016, 02:15 PM
#298
Senior Member
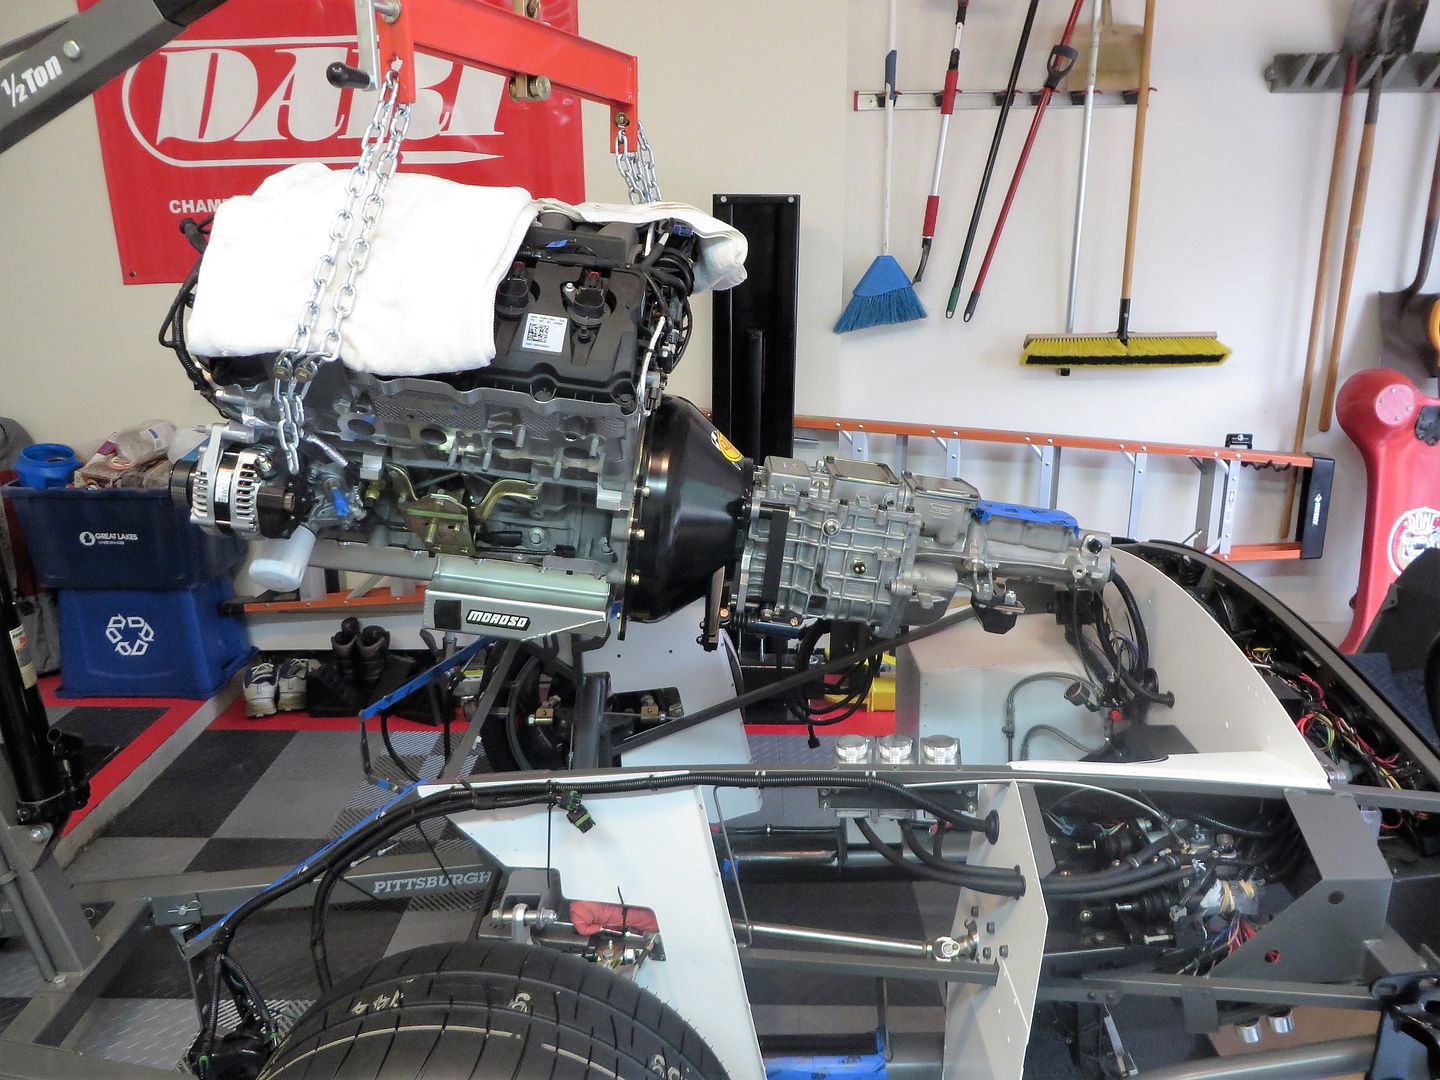
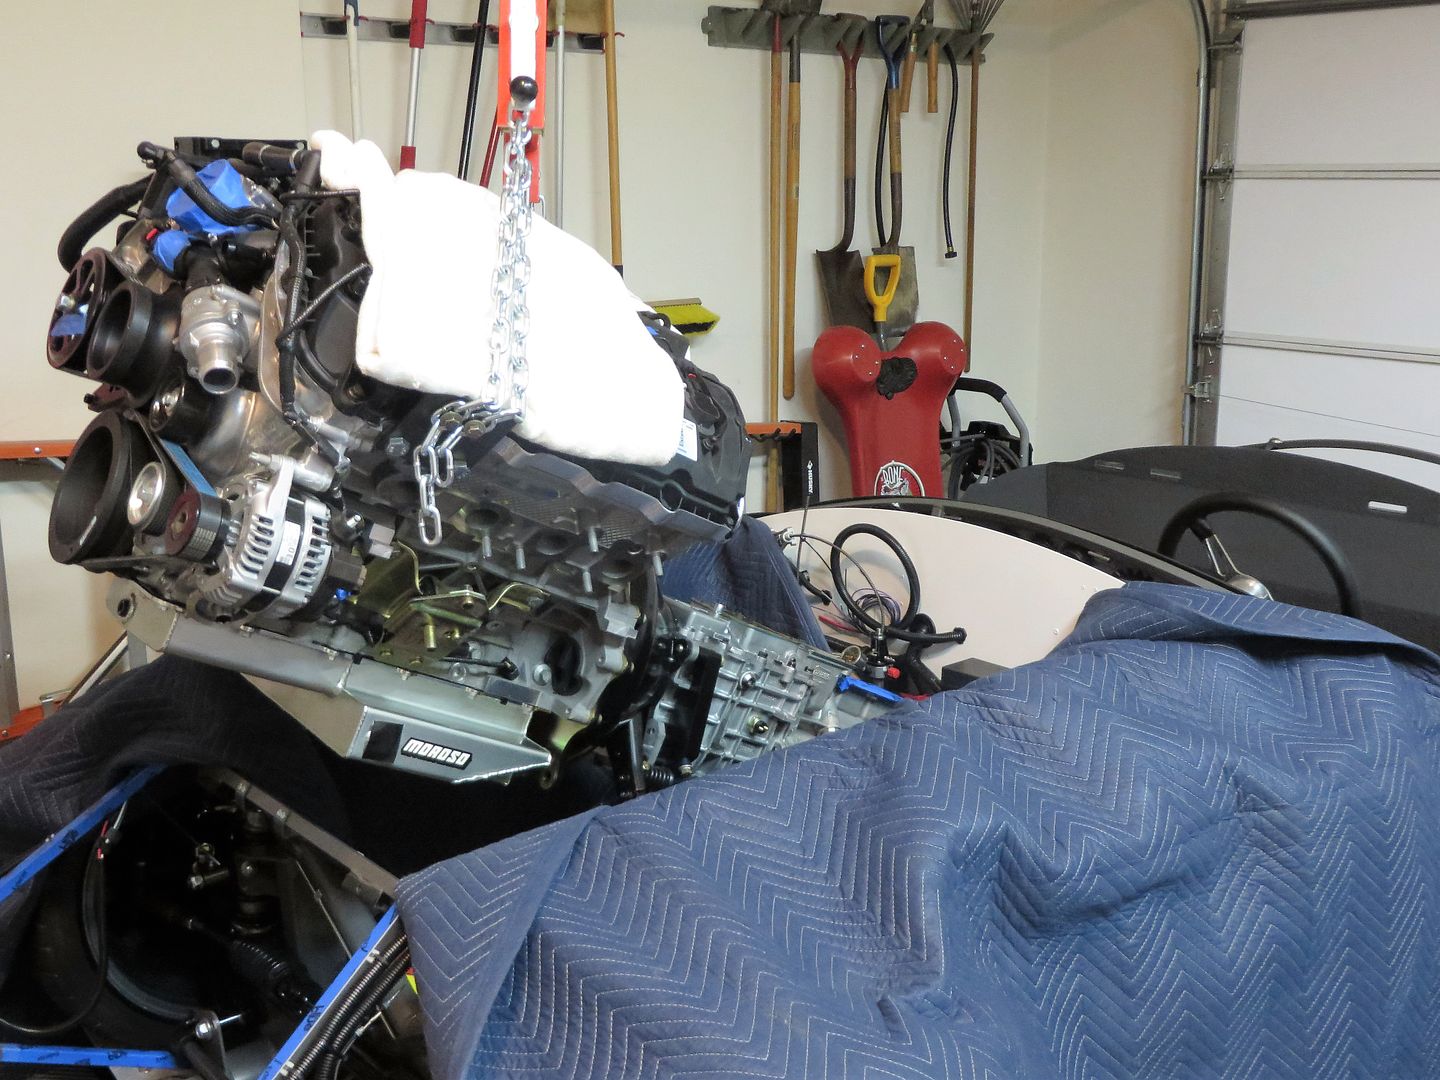
Coyote Installed
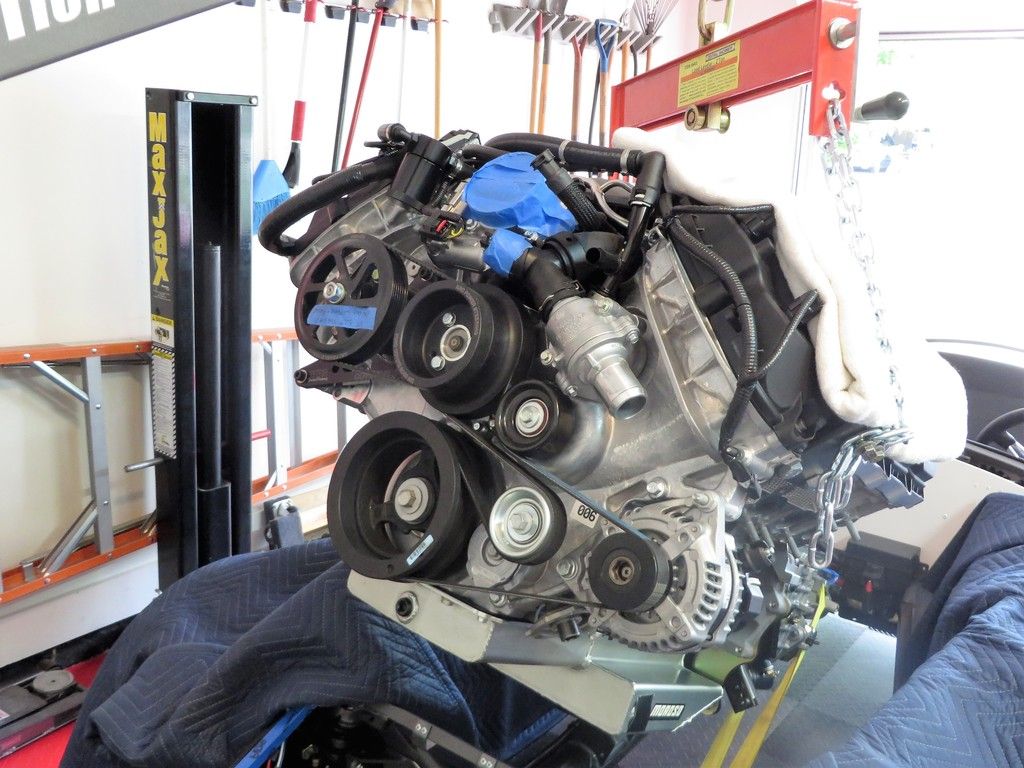
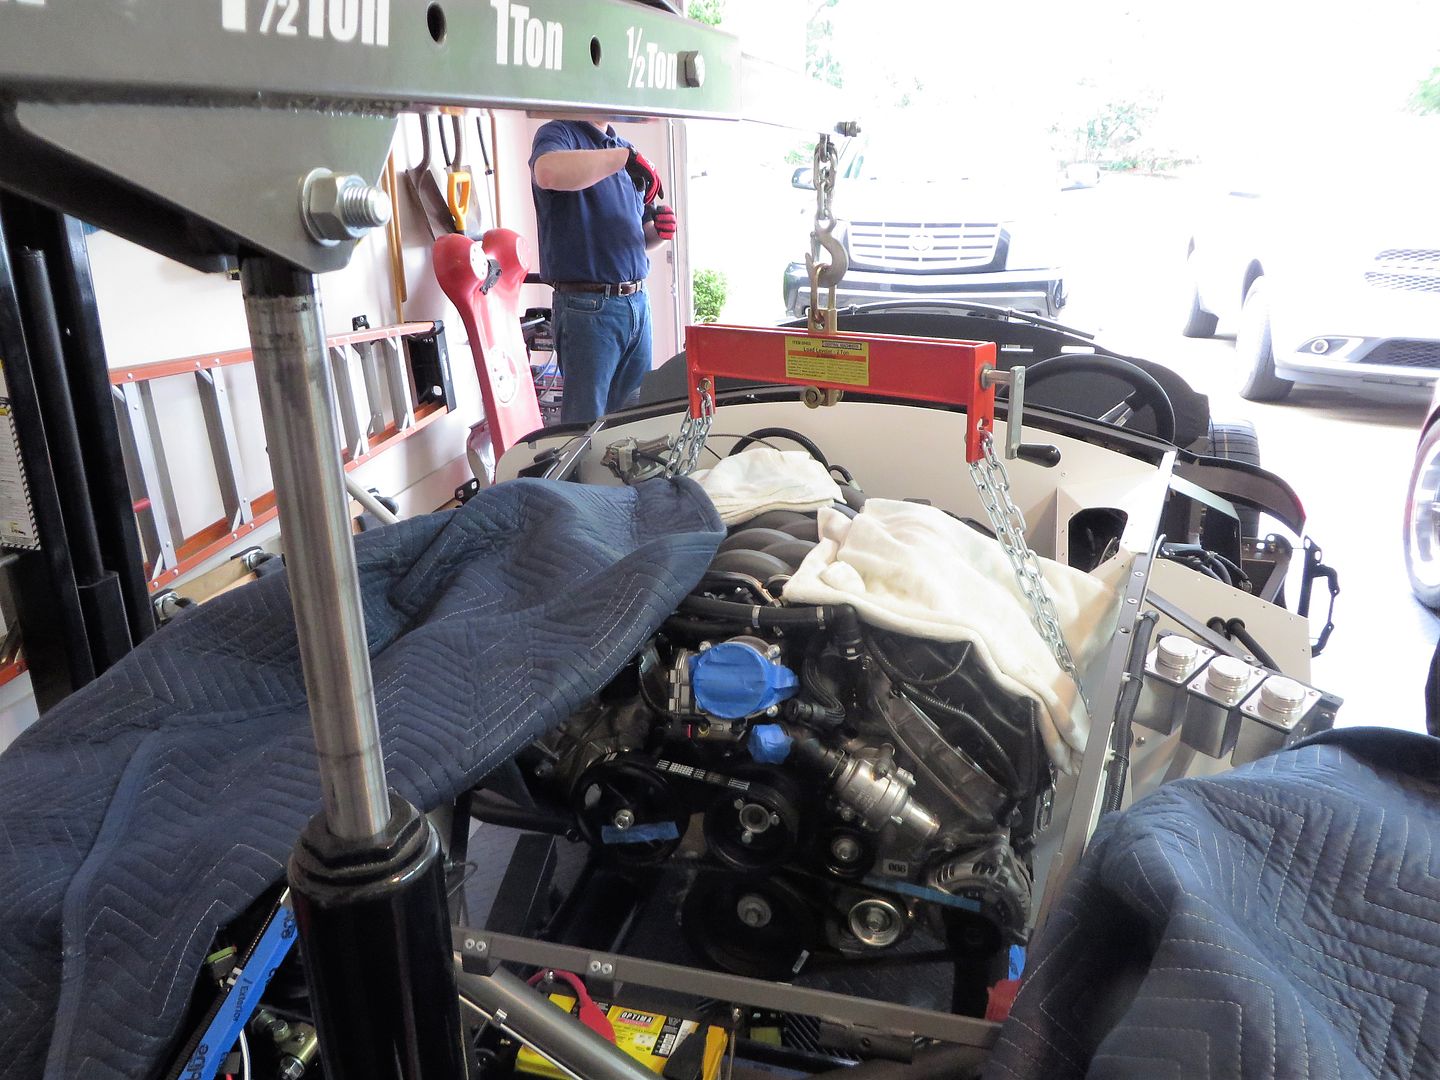
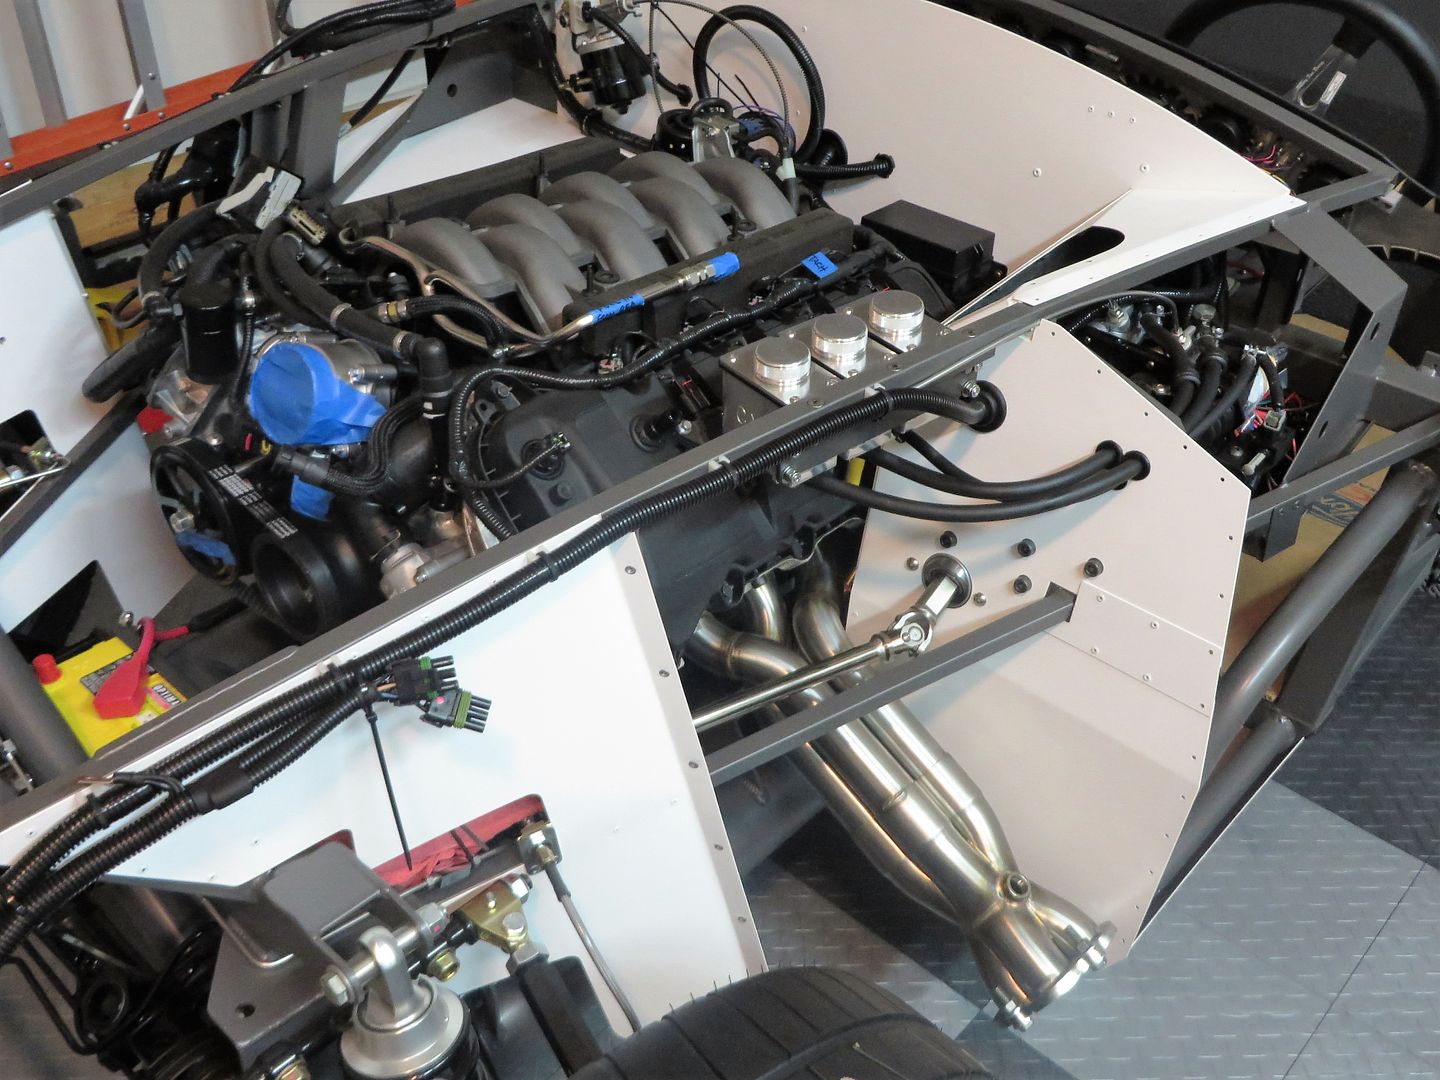
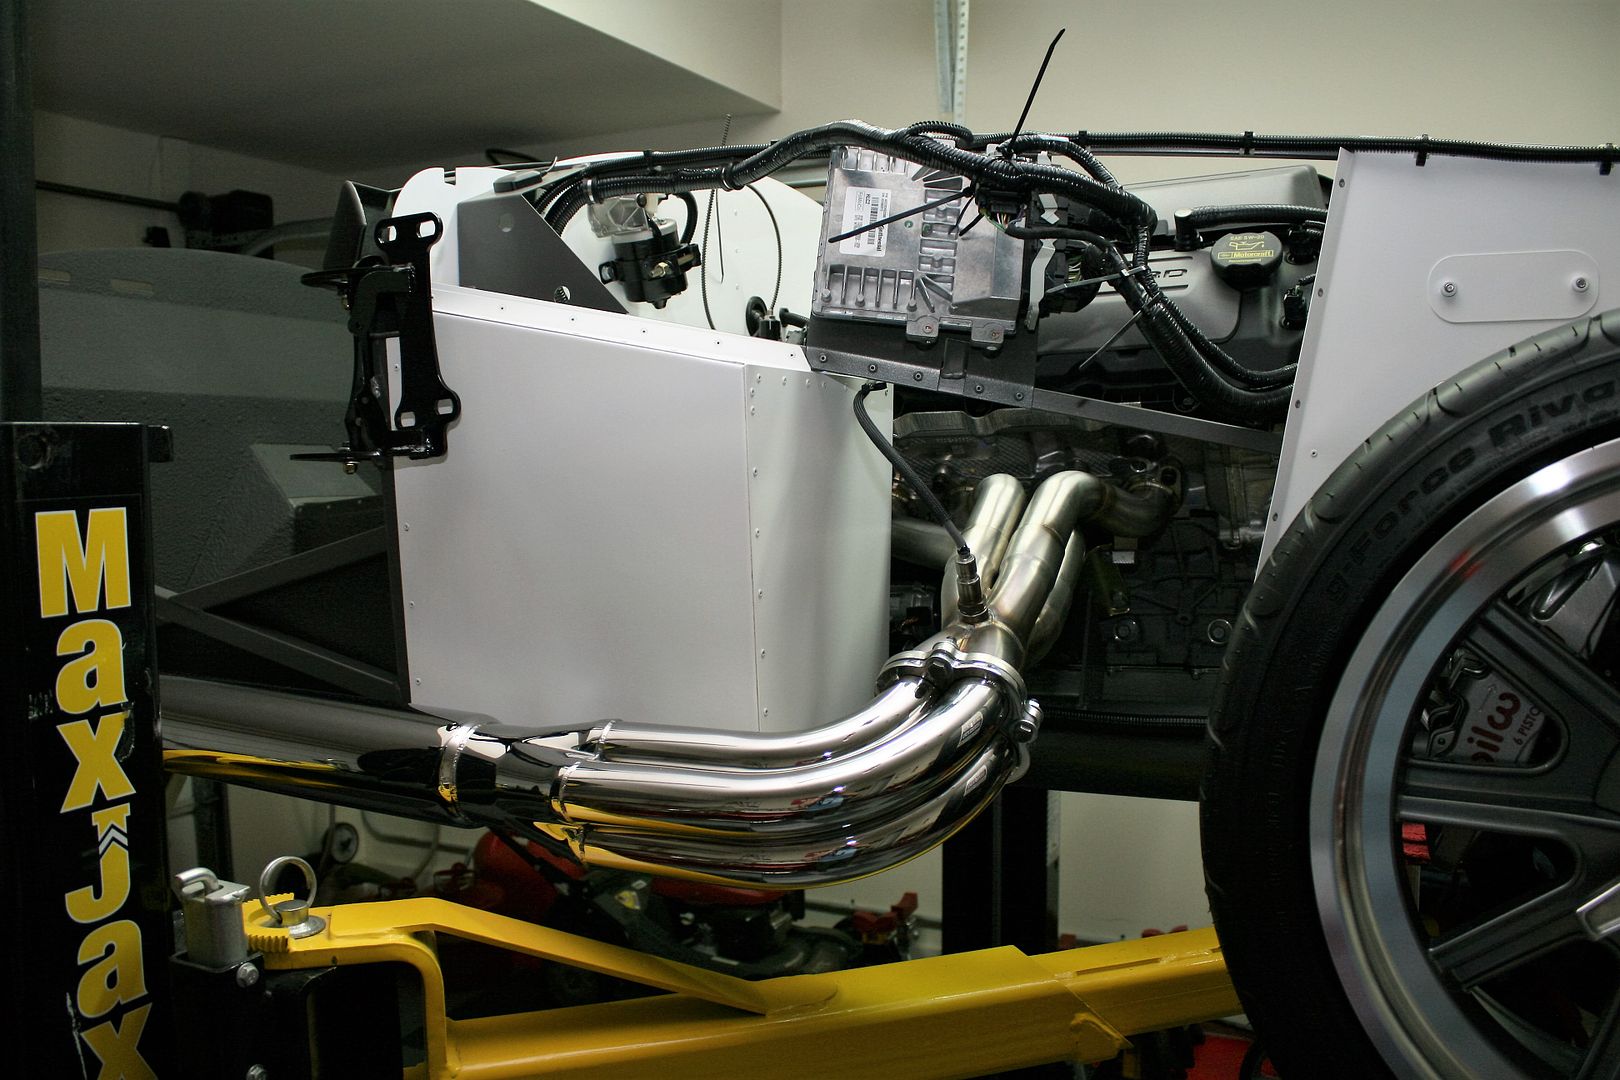
Yesterday my fellow club member, forum member, Anniversary edition owner (15th) and all around good buddy Bob stopped over and the Coyote is now installed into the chassis. I had everything pretty much ready to go. With four hands on it, only took 30 minutes or so. It went in surprisingly easily. Tight but all good. I used homemade lift plates attached to the standard Coyote lift locations and an engine load leveler attached to my HF 2-ton shop crane. No matter how much I tried, using these lift points and even with the leveler, couldn’t get the rear of the engine tipped down too much. So I put a lifting strap around the tail of the TKO, down under the cross 4-inch chassis tube, and attached to the shop crane. Using the ratchet on the lifting strap, it was possible to control the angle of the engine without a lot of pushing. Worked quite well. Another tip I’ve learned from doing several of these is that I find it way easier to have the chassis on vehicle dollies and move the chassis around for the engine install instead of the shop crane. It pushes much easier (especially until the engine is installed) and you can move it around small amounts with a lot of control and without the engine swinging around on the end of the shop crane.
One of the challenges with a Coyote is how tight the DS exhaust header bolts are to the DS footbox. Access is really right. I had an idea to bolt the DS header in place during the engine installation, e.g. once the engine was far enough in to get the header under the 3/4-inch tube then mount the header while there is still some additional room. The idea had one major flaw though. Even though I had the steering column disconnected at the rack and moved out of the way (the Coyote won’t go in with the column attached to the rack) it was still in the way for the header installation. I was finally able to get the header to seat with the engine hovering 1-2 inches over the chassis mount. Better than nothing, but still tight. After some initial messing around (and frustration) found if I removed the motor mount from the engine nearly all of the bolts were accessible from the bottom. So that will be my strategy from the start the next time around. I used Remflex gaskets on the headers and a combination of studs on the hard to reach locations and cap screws for the balance. Really hope that’s all set for a real long time. PS header added after the engine was in its final location. Pretty easy to reach all the bolts on that side. As you'll see in the pics I had to swing the brake and clutch reservoirs out of the way. Other than those and the steering column, everything else cleared. Unlike the previous SBF installs, once the motor mount bolts were lined up in their locations on the chassis, the engine dropped right into place with one push. No rocking, pulling, bad language, etc. as with getting the SBF's to drop into place even with the motor mounts quite loose.
I used Whitby 3/8-inch spacers under both motor mounts. It’s very close to level, with the PS being just slightly lower than the DS, assuming the bottom of the engine and Moroso pan are level indicators. Having just one spacer on the DS as FF recommends would have put the engine quite out of level IMO. Just not getting that one. Head clears the PS footbox by an inch or so. Only about 1/4-inch on the DS footbox. But it clears. With the transmission frame installed, determined I need a 3/4-inch spacer under the rear transmission mount. I’ll make one up. This puts the pinion angle at just over 1 degree and brings the rear of the oil pan right at the bottom of the 4-inch chassis tubes. With the GP headers on and now the GAS-N side pipes mocked into place, pipe alignment looks pretty decent. Side-to-side height and distance from the frame rails is very similar. Way closer than my previous builds. Looks like I will need a little bit of wedge on the DS. But all in all, looking good. For all you builders aligning headers and side pipes for the first time, this can be pretty frustrating and takes up lots of forum bandwidth. This is one of those areas you can’t measure with a micrometer. Use a tape measure and level, and then put those away and use your eyes. Even at best, they’re not going to be exact. Keep in mind you can’t see both sides at the same time. Within reason and any differences will not be noticeable.
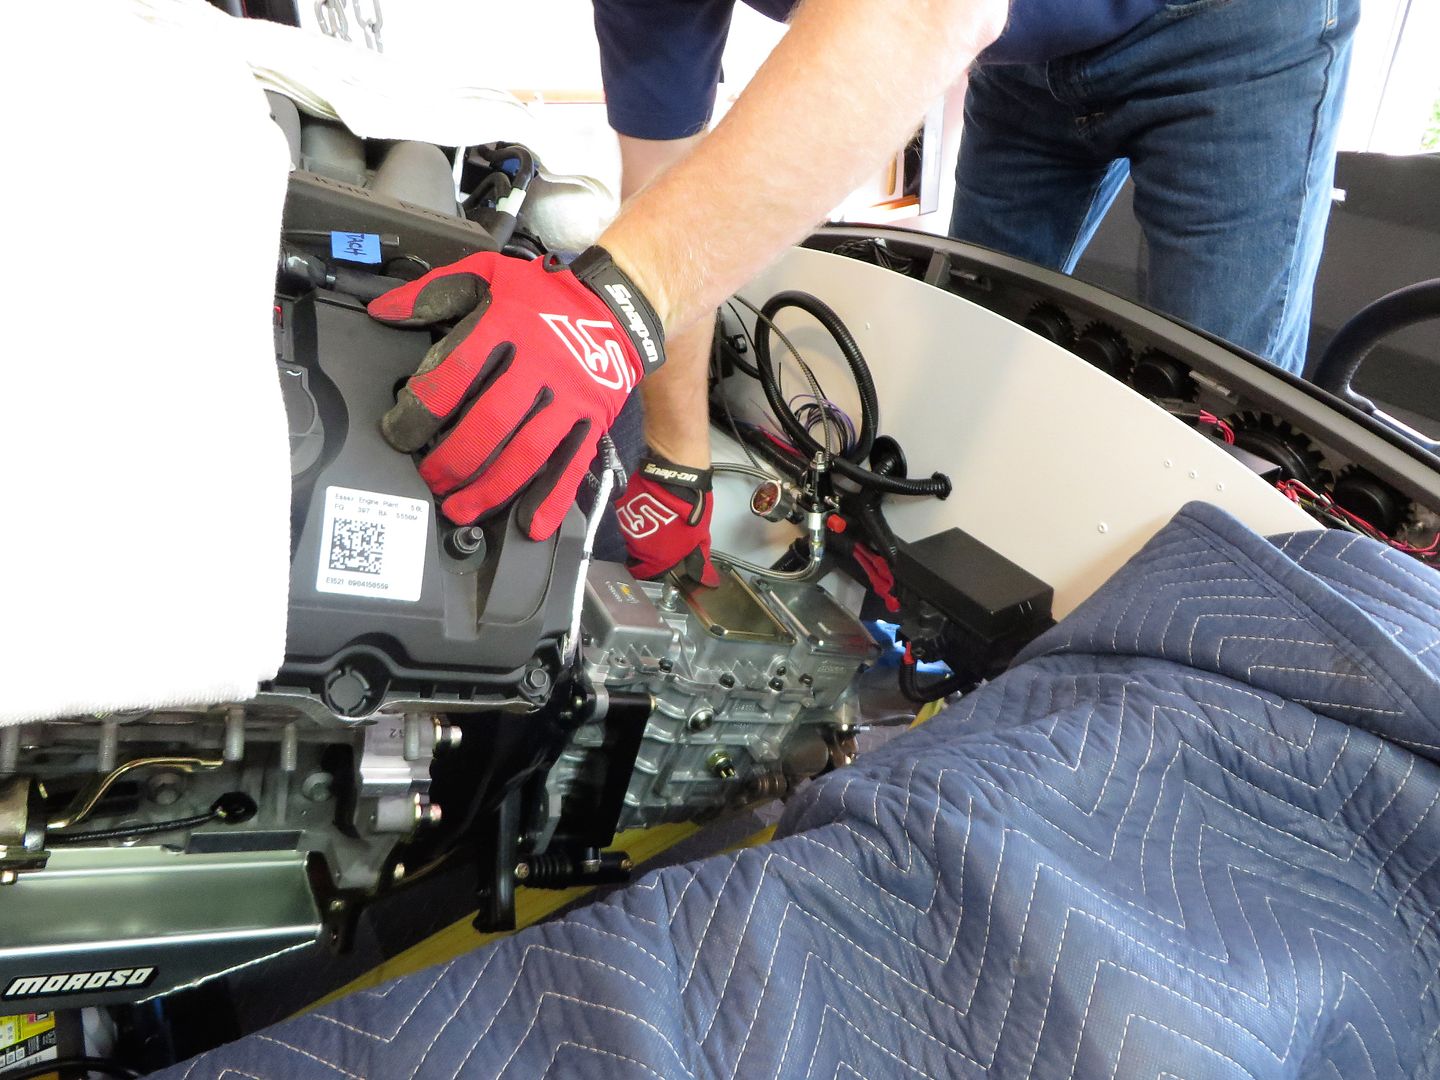
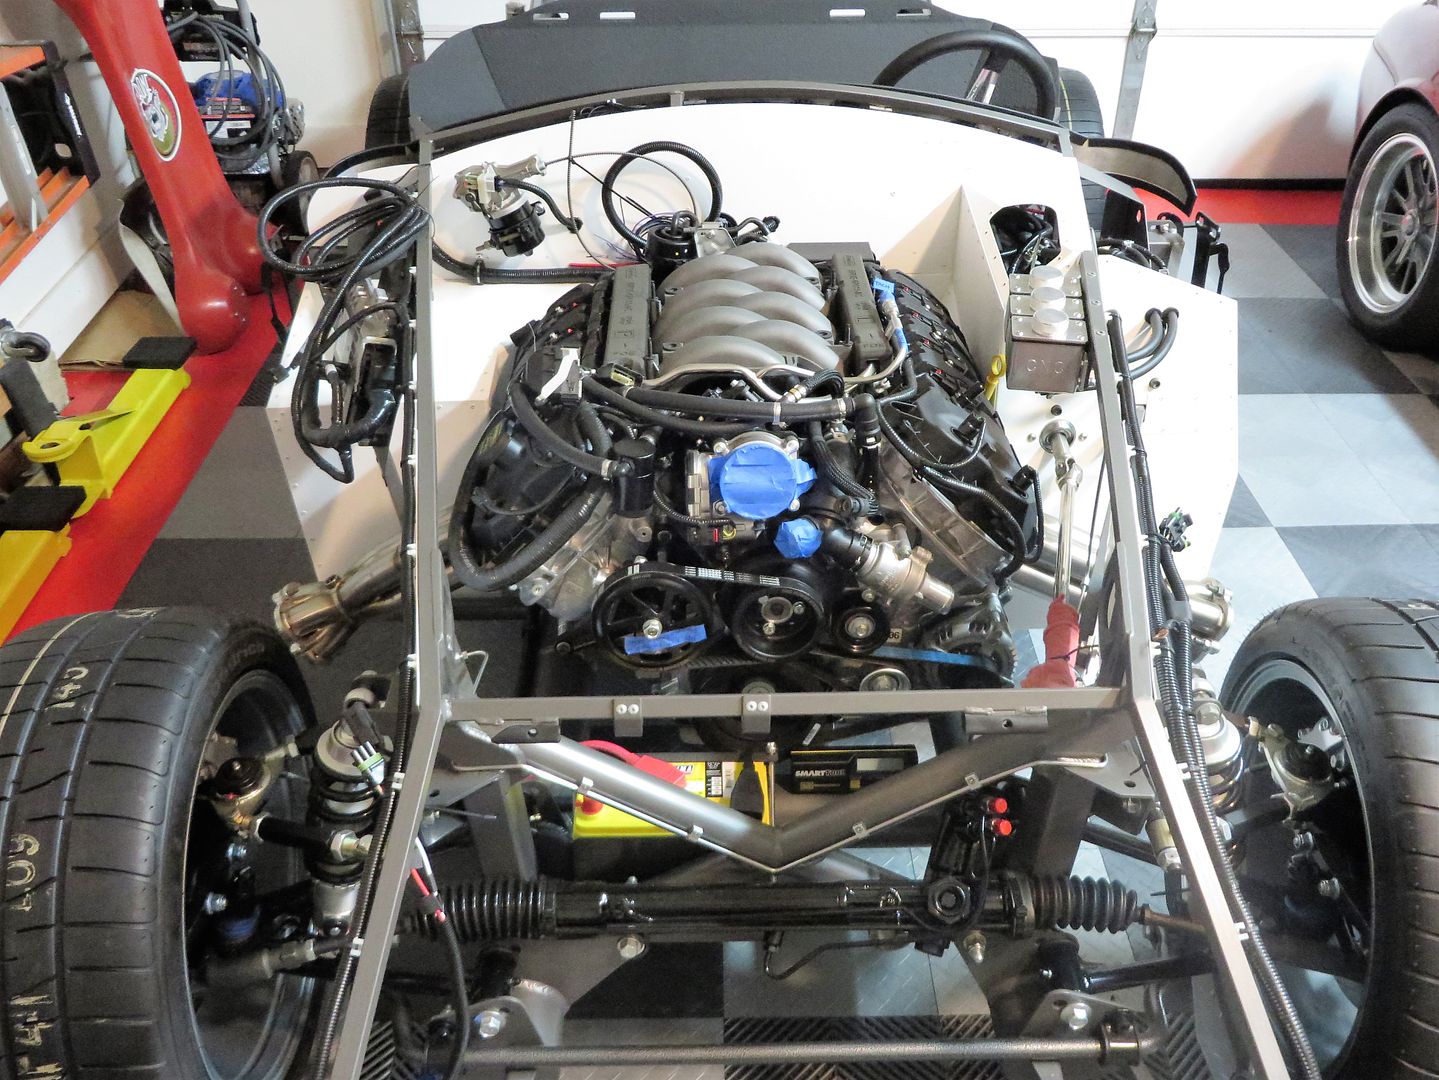
Started adding a few parts. Starter went in fine and my carefully measured and located starter wires fall onto the two starter threaded posts OK. (Whew) Oil filter goes in and clears the 4-inch chassis tube very nicely. Started looking at routing for the balance of the engine harness and the O2 sensors. Looks like all will be OK, but more work to get the best routing and hidden as much as possible. Everything on the firewall clears the engine just fine (fuel regulator, fuel lines, power distribution box and harness) and doesn't look nearly so busy now with that big chunky engine blocking the view. Checked the shift location and I'll need to move (or remove) one of the cross braces in the transmission tunnel if I want to use the forward location in the rear of the TKO. Also checked the FF supplied driveshaft, and looks like it's the right length.
Here are some pictures. Lots of stuff to be added still, but most everything I’ve had mounted during mock-up, so hopefully should go quickly. First start can’t be too far away.
Last edited by edwardb; 06-17-2016 at 06:29 PM.
Build 1: Mk3 Roadster #5125. Sold 11/08/2014.
Build 2: Mk4 Roadster #7750. Sold 04/10/2017.
Build Thread
Build 3: Mk4 Roadster 20th Anniversary #8674. Sold 09/07/2020.
Build Thread and
Video.
Build 4: Gen 3 Type 65 Coupe #59. Gen 3 Coyote. Legal 03/04/2020.
Build Thread and
Video
Build 5: 35 Hot Rod Truck #138. LS3 and 4L65E auto. Rcvd 01/05/2021. Legal 04/20/2023.
Build Thread. Sold 11/9/2023.
-
06-17-2016, 02:15 PM
#299
Senior Member
Coyote Installed (continued)
All in. Now just need to add everything else back.
Build 1: Mk3 Roadster #5125. Sold 11/08/2014.
Build 2: Mk4 Roadster #7750. Sold 04/10/2017.
Build Thread
Build 3: Mk4 Roadster 20th Anniversary #8674. Sold 09/07/2020.
Build Thread and
Video.
Build 4: Gen 3 Type 65 Coupe #59. Gen 3 Coyote. Legal 03/04/2020.
Build Thread and
Video
Build 5: 35 Hot Rod Truck #138. LS3 and 4L65E auto. Rcvd 01/05/2021. Legal 04/20/2023.
Build Thread. Sold 11/9/2023.
-
06-17-2016, 02:17 PM
#300
Senior Member
Originally Posted by
GoDadGo
EdwardB,
Are you going to have enough room to fit the Slave Cylinder?
I had to make a little access panel/dog house for mine, but my drivetrain combo is totally different from yours.
Steve
No issues. The clutch slave cylinder and related parts/bracketry are pretty much hanging in space on the driver's side bottom.
Build 1: Mk3 Roadster #5125. Sold 11/08/2014.
Build 2: Mk4 Roadster #7750. Sold 04/10/2017.
Build Thread
Build 3: Mk4 Roadster 20th Anniversary #8674. Sold 09/07/2020.
Build Thread and
Video.
Build 4: Gen 3 Type 65 Coupe #59. Gen 3 Coyote. Legal 03/04/2020.
Build Thread and
Video
Build 5: 35 Hot Rod Truck #138. LS3 and 4L65E auto. Rcvd 01/05/2021. Legal 04/20/2023.
Build Thread. Sold 11/9/2023.
-
06-19-2016, 03:57 PM
#301
Senior Member
Coyote Installation Continues
This will be another brief update. Time to prep for London and then away for four days at the event. So there won't be much progress to report for the next week or so. I was going to finish the engine installation and get ready for first start and go-kart with the chassis on the vehicle dollies. But after a day or so of crawling around on the ground, decided to put it back on the lift. I am officially completely spoiled. But it’s a big difference and my back thanks me.
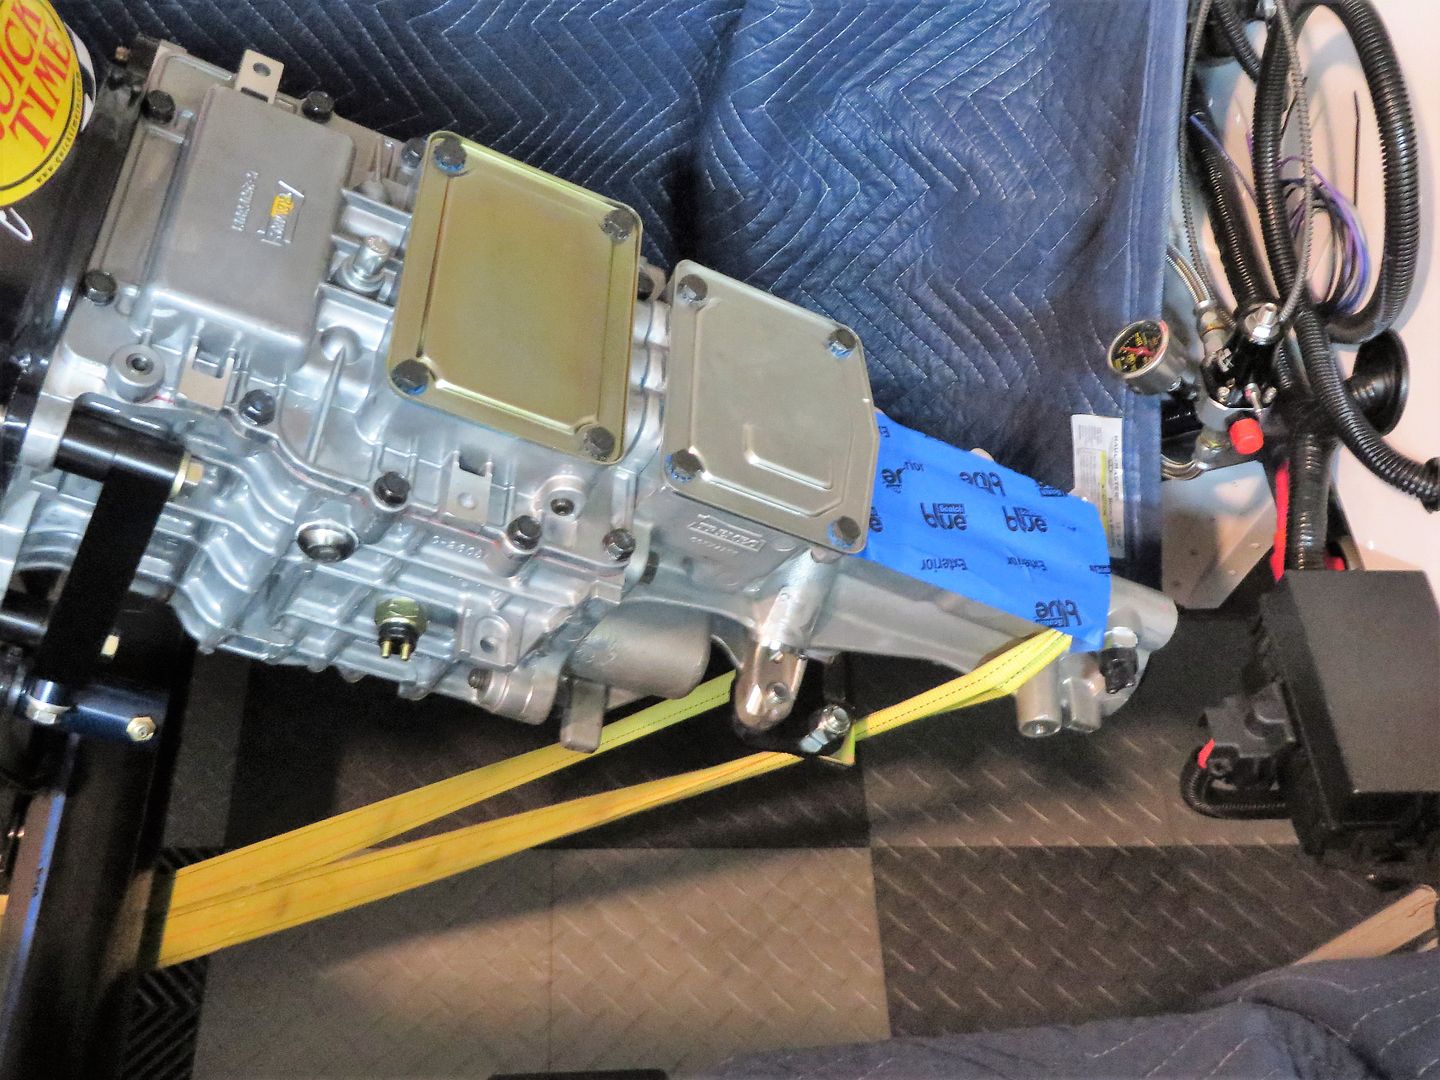
Since the last update, installed the driveshaft and it fits perfectly. Also confirmed I’m going to use the rear TKO position turned toward the back. On my last build I turned it around in the rear position, but as I suspected, in this case that puts the shifter directly on the tunnel cross brace. But because the TKO sits 1-1/2 inches or so closer to the front with a Coyote versus the SBF, the shifter using the same ********** 427 shifter as my last build ends up in exactly the same position that I find very comfortable. So I’m good with that. I’ve started working on routing all the last wires as well as the O2 sensors and engine ground straps. Nothing too exciting, just need to get through it. Trying to keep everything as neat and hidden as possible. This is where it sits right now:
Looking forward to the London show, as always. As of now, the weather looks pretty promising. Hope to see some of you there. I’m also looking forward to seeing the 001 20th Anniversary raffle car. Maybe I’ll get a few last minute build ideas.
Last edited by edwardb; 06-19-2016 at 04:00 PM.
Build 1: Mk3 Roadster #5125. Sold 11/08/2014.
Build 2: Mk4 Roadster #7750. Sold 04/10/2017.
Build Thread
Build 3: Mk4 Roadster 20th Anniversary #8674. Sold 09/07/2020.
Build Thread and
Video.
Build 4: Gen 3 Type 65 Coupe #59. Gen 3 Coyote. Legal 03/04/2020.
Build Thread and
Video
Build 5: 35 Hot Rod Truck #138. LS3 and 4L65E auto. Rcvd 01/05/2021. Legal 04/20/2023.
Build Thread. Sold 11/9/2023.
-
06-19-2016, 07:17 PM
#302
Looking good!
Ask them about the matching paint job on the Rousch Coyote engine covers for 001. Nice looking touch and a pretty good story too.
-
06-21-2016, 12:09 AM
#303
Member

Hi Edward,
It's always nice to read your comment: "...nothing too exciting..." . I can tell you I'm getting really exited every time I see you have and update to your build. If my boss would know how much time I spend to read and learn here... As your 7750 build this one is as well just so cool, I love it! Keep on going the updates but first enjoy London this weekend!
Georg
-
06-21-2016, 02:33 PM
#304
thank you for reminding me to buy a raffle ticket.
I don't know why i chanced it waiting so long.
brett
-
06-22-2016, 07:26 AM
#305
Senior Member

Looking great! Do you happen to have a photo looking down at the transmission tunnel that shows how the cross bracing lines up with the transmission? I am curious to know more about the potential interference at various shifter locations.
-
06-22-2016, 10:20 AM
#306
Senior Member
Originally Posted by
wareaglescott
Looking great! Do you happen to have a photo looking down at the transmission tunnel that shows how the cross bracing lines up with the transmission? I am curious to know more about the potential interference at various shifter locations.
Here's a couple pics from this AM. Ignore the wood blocks while I'm finishing up the transmission spacer. First pic shows the location of the rear and mid shift locations compared to the tunnel cross braces. This is specific to the Coyote/TKO installation. In the rear location, the red plate can be switched around, but as you can see would be directly on the brace.
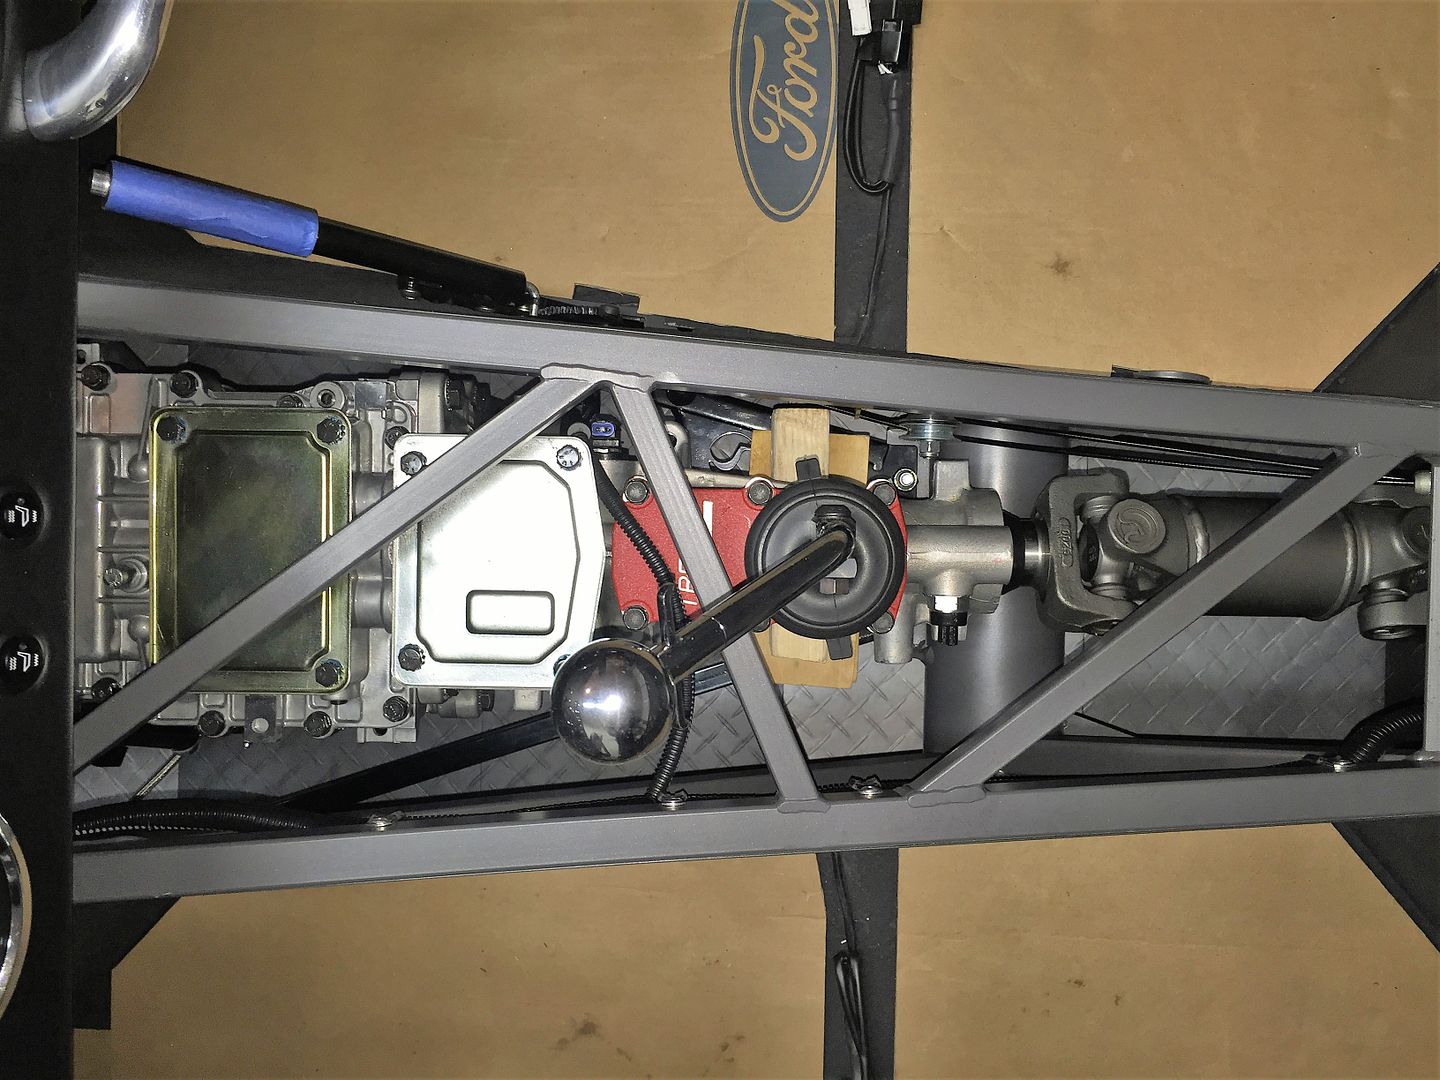
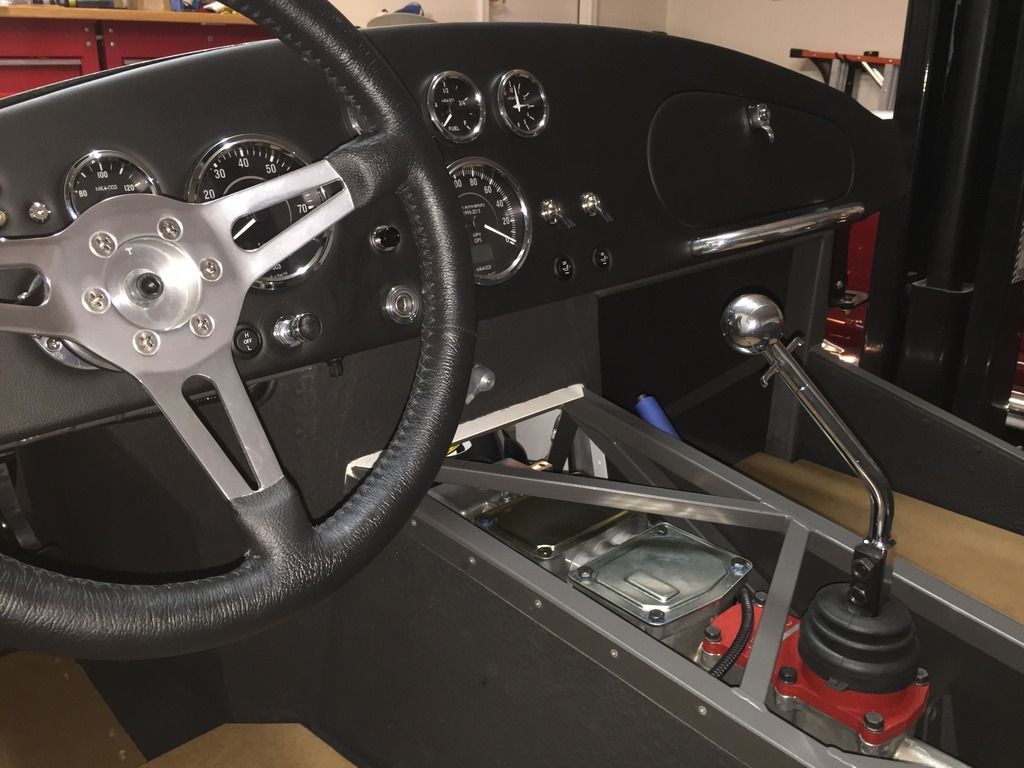
But as I mentioned before, turns out this shift location is exactly the same as #7750 with the plate switched around because the Coyote/TKO sits forward of the SBF in #7750. Here is a pic also from this morning showing where the shifter falls. Note this is a ********** 427 shifter, not the stock FF shifter. In this configuration, the shift ball is exactly 8-inches from the dash while in neutral. This location fits me perfectly. Sitting in the seat (yes I set it there temporarily and didn't make engine sounds...) my hand falls right on the shifter. The motion is almost completely front to back vs. up and down. Note also it's very close to where a straight shifter would be in the mid shift location.
Last edited by edwardb; 06-22-2016 at 10:23 AM.
Build 1: Mk3 Roadster #5125. Sold 11/08/2014.
Build 2: Mk4 Roadster #7750. Sold 04/10/2017.
Build Thread
Build 3: Mk4 Roadster 20th Anniversary #8674. Sold 09/07/2020.
Build Thread and
Video.
Build 4: Gen 3 Type 65 Coupe #59. Gen 3 Coyote. Legal 03/04/2020.
Build Thread and
Video
Build 5: 35 Hot Rod Truck #138. LS3 and 4L65E auto. Rcvd 01/05/2021. Legal 04/20/2023.
Build Thread. Sold 11/9/2023.
-
06-22-2016, 12:06 PM
#307
Senior Member
Hydraulic Clutch Update
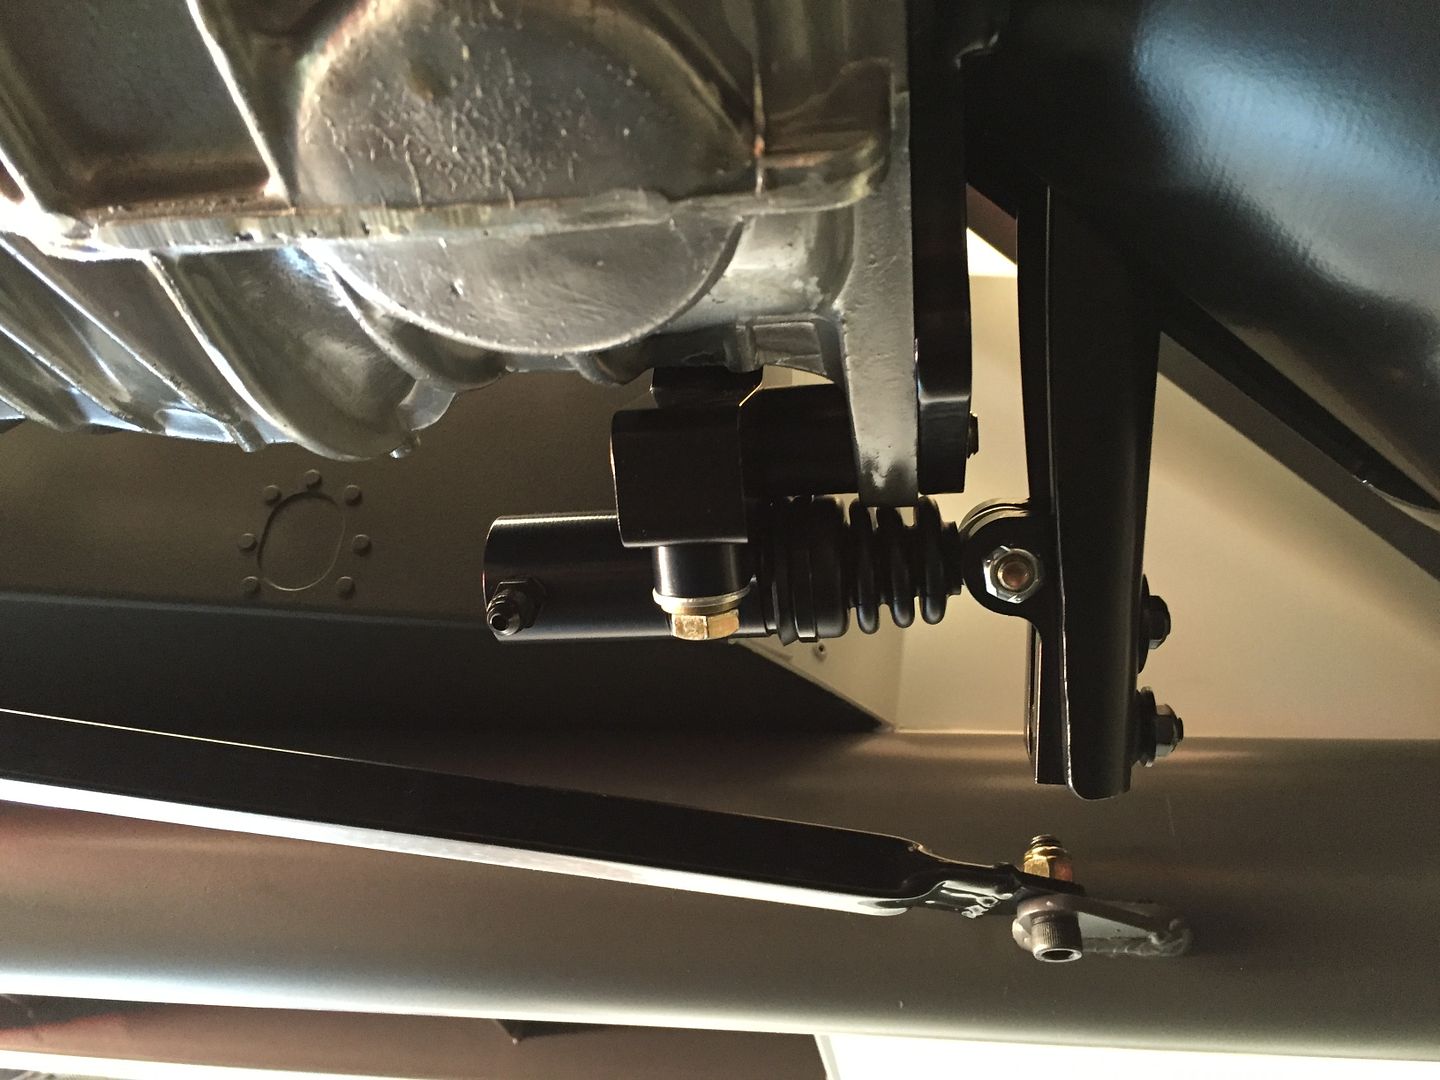
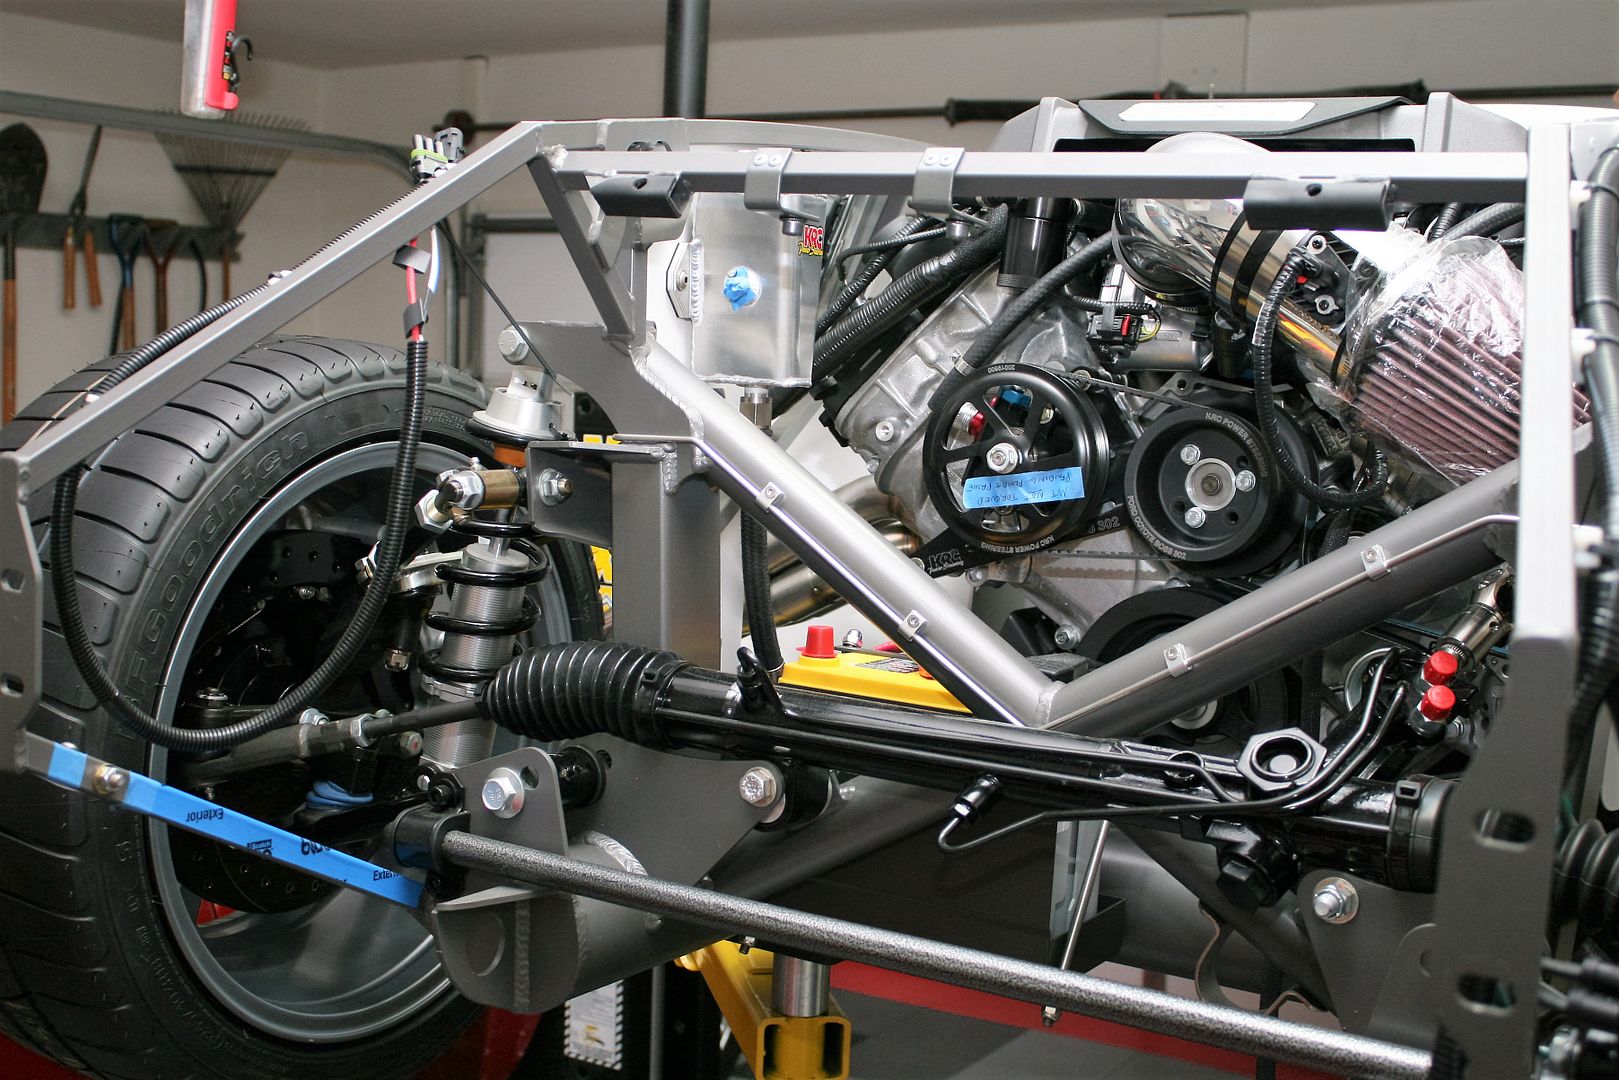
I’ve had a little time to keep working while getting ready to leave for London, and thought I would share what I think is pretty important. I have Mike Forte’s hydraulic clutch setup for the Coyote/TKO combination as mentioned before. For the connection between the master and slave, Mike provides a -3AN SS hose with a straight fitting on one end and a right angle fitting on the other. The slave has a straight fitting, and he provides an aluminum right angle fitting for the 1/8-27 NPT outlet on the master. So this week I was finalizing these connections. The right angle hose connection works best at the slave, so I was left with using the straight hose connection to the right angle fitting on the master. Because of the limited space, it’s necessary to properly orient the right angle fitting. In doing so, I needed to move it “just a little more” (you know where this is going…) and it was immediately clear that I had stripped something. It's not that fragile. I just was way too heavy handed. Took the fitting out, and the threads were completely gone from the right angle fitting and pretty banged up inside the Wilwood master. Given the location of the master in the footbox, it would not be easy to change later and certainly don’t want any brake fluid leaking in there. So I felt I had no choice but to start new with both pieces. For me, the price of mistakes always starts at about $100, and this one looked to be no different. But I think the story has a happy ending.
The master I received from Mike is a Wilwood 260-10376 1-1/8 diameter piece. In looking at a replacement, noted they come in sizes started at 5/8 inch and up. When I mocked up the hydraulic clutch before, as I noted, everything worked fine. But I did notice with the clutch pedal all the way to the floor, the CNC slave moved further than it probably should. The piston was starting to come out the end. Not far enough to completely come out, but further than the rated approx 1-1/8 max movement it’s supposed to have. I rationalized this as “OK” since the footbox doesn’t have carpet yet so that will limit it a little. Plus I typically wouldn’t push the clutch pedal all the way to the floor since the clutch was fully actuated well before that. But since I had to replace the master, it occurred to me to use a smaller size to eliminate a possible problem with the slave plus that could reduce pedal effort. So after some searching and attempted calculations (not too conclusive for me anyway…) I decided to try a 1 inch master. Wilwood 260-10375. At the same time, looked for a different fitting and found Wilwood 220-6956. Straight (vs. right angle) and also steel (vs. aluminum). Parts arrived from Summit in their usual ridiculously fast way. I have them installed and this morning bled and tested with the new master. The straight fitting routes much better. The effort is significantly less. Clutch engagement is also exactly how it should be. Huge success!
Kind of how it works with these things. Every build is a combination of parts and they all work together a little differently in each. So why 1-1/8 inch master in #7750 and 1 inch worked so much better here? Take a look at these two pictures:
#7750 with SBF, Quiktime bell and TKO. I added spacers to align the slave with the pivot:
Current build with Coyote, Quicktime bell and TKO. Completely stock as received from Mike:
Not exactly hard to figure out. The clutch arm pivot point is closer to the TOB on the new build. It's more pronounced than the angle of these pics show. Therefore requiring less movement so the 1-inch master with less movement and resulting reduced effort was the right choice. Something to look at for those of you considering this setup. I’m sure Mike would send a 1-inch master vs. the 1-1/8 if you request when ordering.
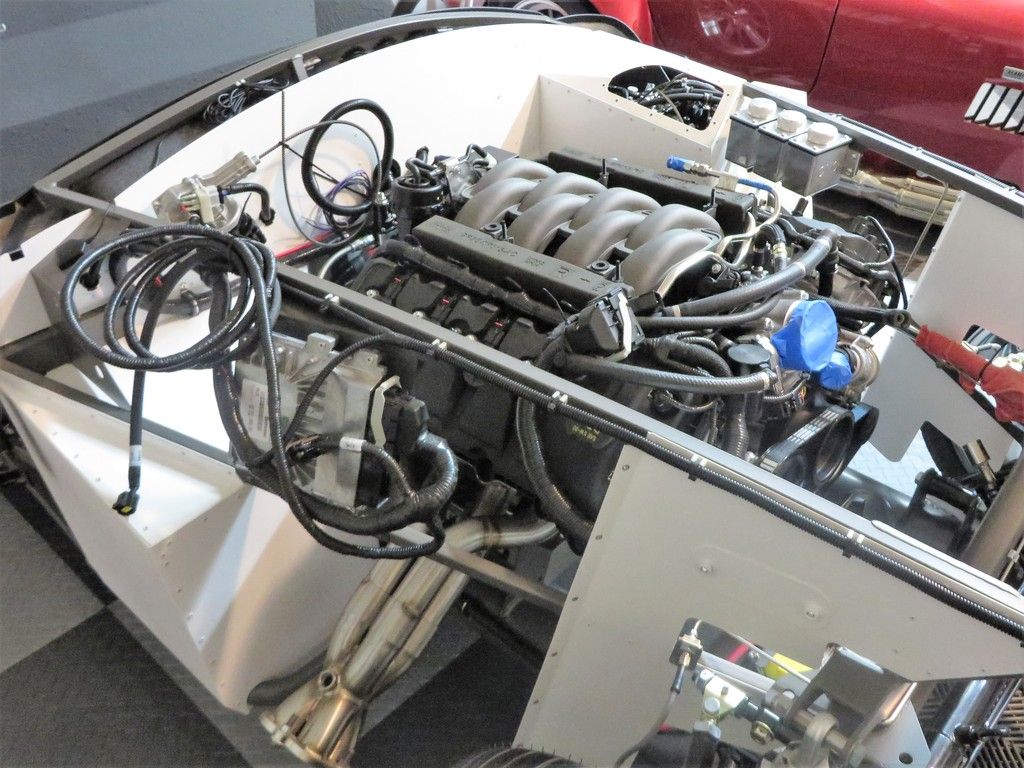
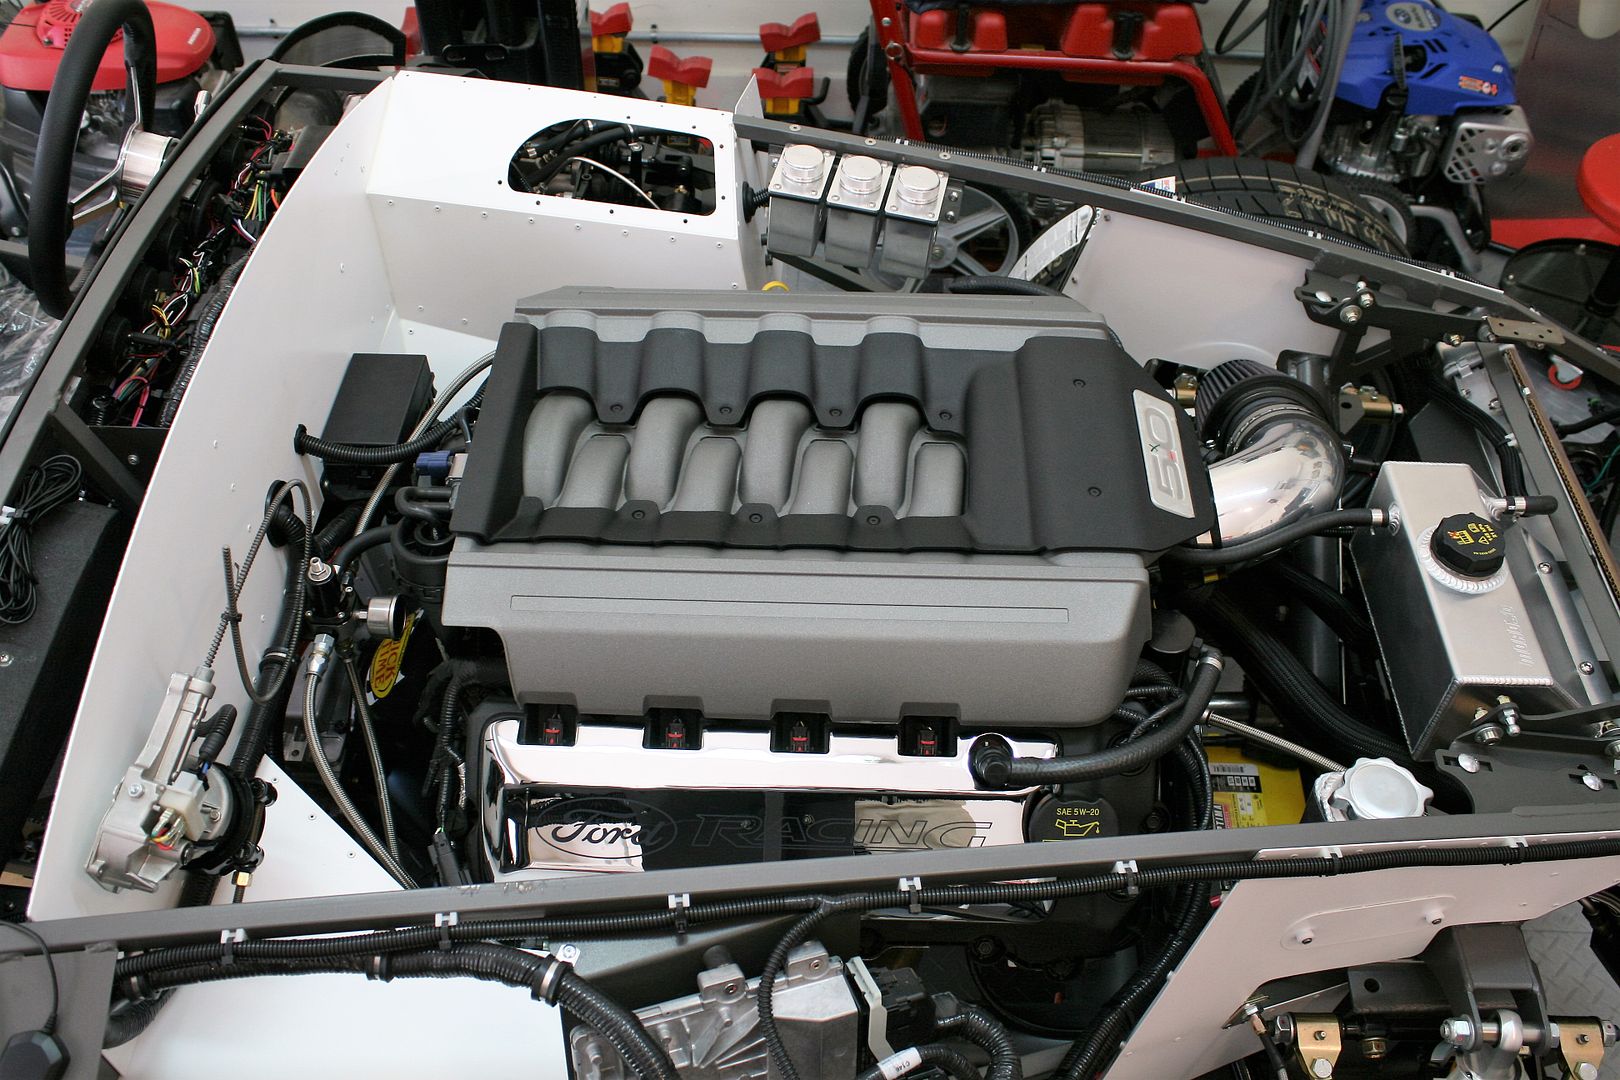
Since I’m updating, might as well show a progress report. Stuff is going in pretty quickly as suspected. Steering column completed and locked down. Power steering all installed and primed. No leaks yet. Hopefully stays that way. Cooling system all installed. Did have to change the upper half of the lower radiator hose from what I originally mocked up. I just wasn’t happy with how much the hose I had needed to bend (and kink…) to get to the Coyote connection. Turns out a piece of the 2015 Mustang hose included with the controls pack worked much better. Last night I made the 3/4-inch transmission spacer. $8 dollar piece of 1-1/4 x 3/4 x 12 inch chunk of 6061 from McMaster with two 1/2-inch holes on 5-9/16 centers and a little paint and it’s ready to install. Mainly just need to finish up the wiring, add some fluids, and it should be ready for first start. With everything connected, I did power up the car and the throttle body initialized with a couple chirps and moves when the DBW accelerator is pushed. Cool! Here's what it looks like now. The engine compartment is certainly filling up. Saving those shiny coil covers I showed before until final assembly.


Final comment. Maybe some of you saw that Courtnie from FF posted a notice that FF now has updated Coyote installation instructions for the 2015 Coyote. I requested and received a copy and had a chance to study for a bit. It’s not a separate version. They added 2015 to the current version and then call out where there are differences. The good news is I didn’t find anything that I would do differently. They mounted the PCM in the same place I did with a similar looking panel. They made up some pieces so that the provided top and bottom clutch switches can be used. Nice, but specifically for the cable version. Still on your own if you do a hydraulic clutch. They note the speed dial is not needed, so again confirmation about that. They didn’t go into any detail about where to mount the 2015 PDB. Only to mount it per the Ford instructions. There is one picture that makes it look like the harness is going behind the dash. But nothing else. I’m still satisfied that I put mine on the firewall in the engine compartment. I just don’t see it behind the dash except maybe with a firewall forward mod. Also depends on what you want to do with heat, A/C and a glovebox. They are now showing using spacers on both motor mounts. Not just the DS as before. Nice they take the motor mount apart and add thicker pieces inside vs. using a separate spacer. Going to look into that. They also take a slightly different direction with the power wiring and start circuit than I did. But definitely this is a must read for all 2015 Coyote installations, and much like the previous version, everyone may have a slightly different take on what works best for them.
Ok, that’s really it until after London. Load up #7750 in a bit and off in the AM.
Last edited by edwardb; 07-26-2016 at 07:05 AM.
Build 1: Mk3 Roadster #5125. Sold 11/08/2014.
Build 2: Mk4 Roadster #7750. Sold 04/10/2017.
Build Thread
Build 3: Mk4 Roadster 20th Anniversary #8674. Sold 09/07/2020.
Build Thread and
Video.
Build 4: Gen 3 Type 65 Coupe #59. Gen 3 Coyote. Legal 03/04/2020.
Build Thread and
Video
Build 5: 35 Hot Rod Truck #138. LS3 and 4L65E auto. Rcvd 01/05/2021. Legal 04/20/2023.
Build Thread. Sold 11/9/2023.
-
06-22-2016, 12:31 PM
#308
Senior Member
Thanks for the transmission picture. Just what I hoped to see.
-
06-29-2016, 04:47 PM
#309
Senior Member
First Start!!!
Today was finally the day. This morning I finished all the last bits of wiring. Then filled all the fluids, put gas in the tank for the first time, and ran out of excuses. I did turn it over a few times with nothing switched on and just jumped the two terminals on the starter. Wanted to confirm the starter worked, meshed OK, plus circulate some oil. Worked as expected.
Next I wanted to set the fuel pressure regulator. The Aeromotive instructions say to turn on the ignition, and with the fuel pump running, set the regulator. The Coyote instructions say “Set regulator to maintain 55 psi delta fuel pressure across injector (55 psi at fuel rail with engine off).” When I turned on the key, the fuel pump started. But only ran a few seconds and then shut off. I could hear a relay in the Coyote PDB click, obviously cutting the voltage because immediately the relay in the RF fuse panel also clicked. This is not what I was expecting. I thought the pump would run continuously. After trying it a few more times with the same result, I checked the gauge on the regulator and it was showing 40-50psi (didn’t look real close) so clearly the pump was working and I had pressure in the lines. There must be a pressure sensor of some type in the fuel system and it's shutting down the pump when pressure achieved.
I wasn’t sure what to expect, but did go ahead with the first start. With the video running, pushed the clutch in and turned the key. The engine started almost immediately. Crazy. Thinking maybe something wasn’t right with the fuel system, I thought it might start and then stop, but it didn’t. I was intently watching the gauges, and noted I had good oil pressure, the voltage was 14+ so the alternator was working, and the tach was working. Yeah! That was probably the one I was most worried about. I still can’t believe Ford didn’t include a tach connection in the 2015 controls pack. But the single wire connection to one of the coil on plug wires and the proper calibration as described by Speedhut works! I detailed this earlier in the build thread. So without further ado, here is the first start video. Note you can hear how long the fuel pump runs when the key is turned on:
https://youtu.be/XZwCmZg0qz0
After the first start, I checked everywhere for any leaks or anything that didn’t seem right. Nothing. All looked perfect. Started it a couple more times and noted the temp gauge was starting to move. Then took another video, this time hitting the throttle a few times. I found it a little interesting that the accelerator pedal (DBW) at first seem a little sluggish and even a bit delayed. But the more I ran the engine, it became more sensitive and now feels quite normal. I don’t know if this was just the engine warming up or maybe part of the learning process by the PCM. The cooling fan came on near the end of this video (more wiring confirmed) although the temp gauge was only indicating 65-70C. These aren’t really related since the gauge is reading the Speedhut temp sensor and the Coyote PCM “infers” the temperature based on several sensor inputs. So kind of different but as I understand most likely normal. I'm trusting the computer to know when the fan should run.
https://youtu.be/qXwz4C-OVws
Finally took one last video this time from the driver’s seat and scanning the instruments. The engine sounds strong, to say the least. Couple of throttle hits and still only peaking at 3,500 rpm or so. Interesting to see how much the oil pressure swings when doing that.
https://youtu.be/MGiRDLwrwrU
Not much else to add. While it was running, I clicked through all five gears with the back wheels spinning away. All seems normal. Also while it was running went back to the fuel tank and confirmed the fuel pump was indeed running. Kind of a no-brainer since the engine wouldn't run long if it weren't, but I was happy to hear it humming away in there. After I shut things down, checked everything over and not a drop of fluid or any problems noted (so far...). Just need to figure out how I’m supposed to set the fuel regulator. Next step will be to drop it on its wheels and do a quick/rough alignment. Then it should be go-kart time. Woo-hoo!
Last edited by edwardb; 06-30-2016 at 12:50 PM.
Build 1: Mk3 Roadster #5125. Sold 11/08/2014.
Build 2: Mk4 Roadster #7750. Sold 04/10/2017.
Build Thread
Build 3: Mk4 Roadster 20th Anniversary #8674. Sold 09/07/2020.
Build Thread and
Video.
Build 4: Gen 3 Type 65 Coupe #59. Gen 3 Coyote. Legal 03/04/2020.
Build Thread and
Video
Build 5: 35 Hot Rod Truck #138. LS3 and 4L65E auto. Rcvd 01/05/2021. Legal 04/20/2023.
Build Thread. Sold 11/9/2023.
-
06-29-2016, 05:10 PM
#310
Member

Beautiful! Sounds as good as it looks! Congratulations
Mk4 Roadster #8843. Kit Pickup: 03/19/2016
Roush Performance 331 SRXE Crate Engine, TKO-600, 3-link rear, 17x9 and 17x10.5 Halibrand wheels w/ Nitto NT05 tires
Doug's Mk4 Build Thread - Annapolis, MD
-
06-29-2016, 07:20 PM
#311
Senior Member
-
06-29-2016, 08:39 PM
#312
Senior Member
Oh yea...

-
06-29-2016, 09:15 PM
#313
-
06-29-2016, 11:53 PM
#314
Congratulation, seems uneventful like most other Coyotes. My fan comes on at 180*F (82*C) and the oil pressure is 100 psi until the engine warms up and then drops to about 30-40 psi while idling. The cycling fuel pump is something new apparently in the 2015 PCM. The Quiet pipes exhaust sounds mellow, very good manners, similar to the Flowmaster Slimlines I have on mine.
-
06-30-2016, 08:26 PM
#315
Senior Member
First Start Follow-Up
Couple final details and updates after yesterday’s successful first start.
Regarding the fuel pump behavior I described, I've heard from other Coyote owners and this is new for the 2015 version. The crate motor Coyote installation is a return style fuel system compared to the returnless system used on factory Mustangs. So there’s no issue with the fuel pump running continuously like the 2011-2014 Coyote crate version. But clearly Ford decided to change things with the 2015 version. According to the controls pack instructions, there is no active fuel rail pressure sensor. So I’m guessing it’s a timing thing. If the engine doesn’t start within a certain duration the fuel pump is switched off. However they’re doing it, makes it a little difficult to adjust the regulator as described in the Aeromotive instructions with the pump on and the engine not running. I thought about temporarily hot wiring the fuel pump. But I was able to set the regulator pressure by watching the gauge during the short time the pump runs and making repeated adjustments until it was at the recommended 55psi setting before it shut off and started bleeding back down. I later confirmed it was indicating exactly 55psi while running. For now, I consider this closed.
I did spend a little time today with the chassis up on the lift looking at everything, checking for any leaks, topping the fluids where necessary, etc. Everything looks good. Of course I’ll continue to keep an eye on it, but nothing at this point that needs any attention. I resisted the temptation to start it again and rev the engine some more. But it wasn’t easy. I did add an ounce (the recommended amount) of Stabil 360 to the 5 gallons of fuel I put in the tank. That fuel will probably be in there for 6-8 months at least before the build is done and the driving season begins. Seemed like a prudent thing to do.
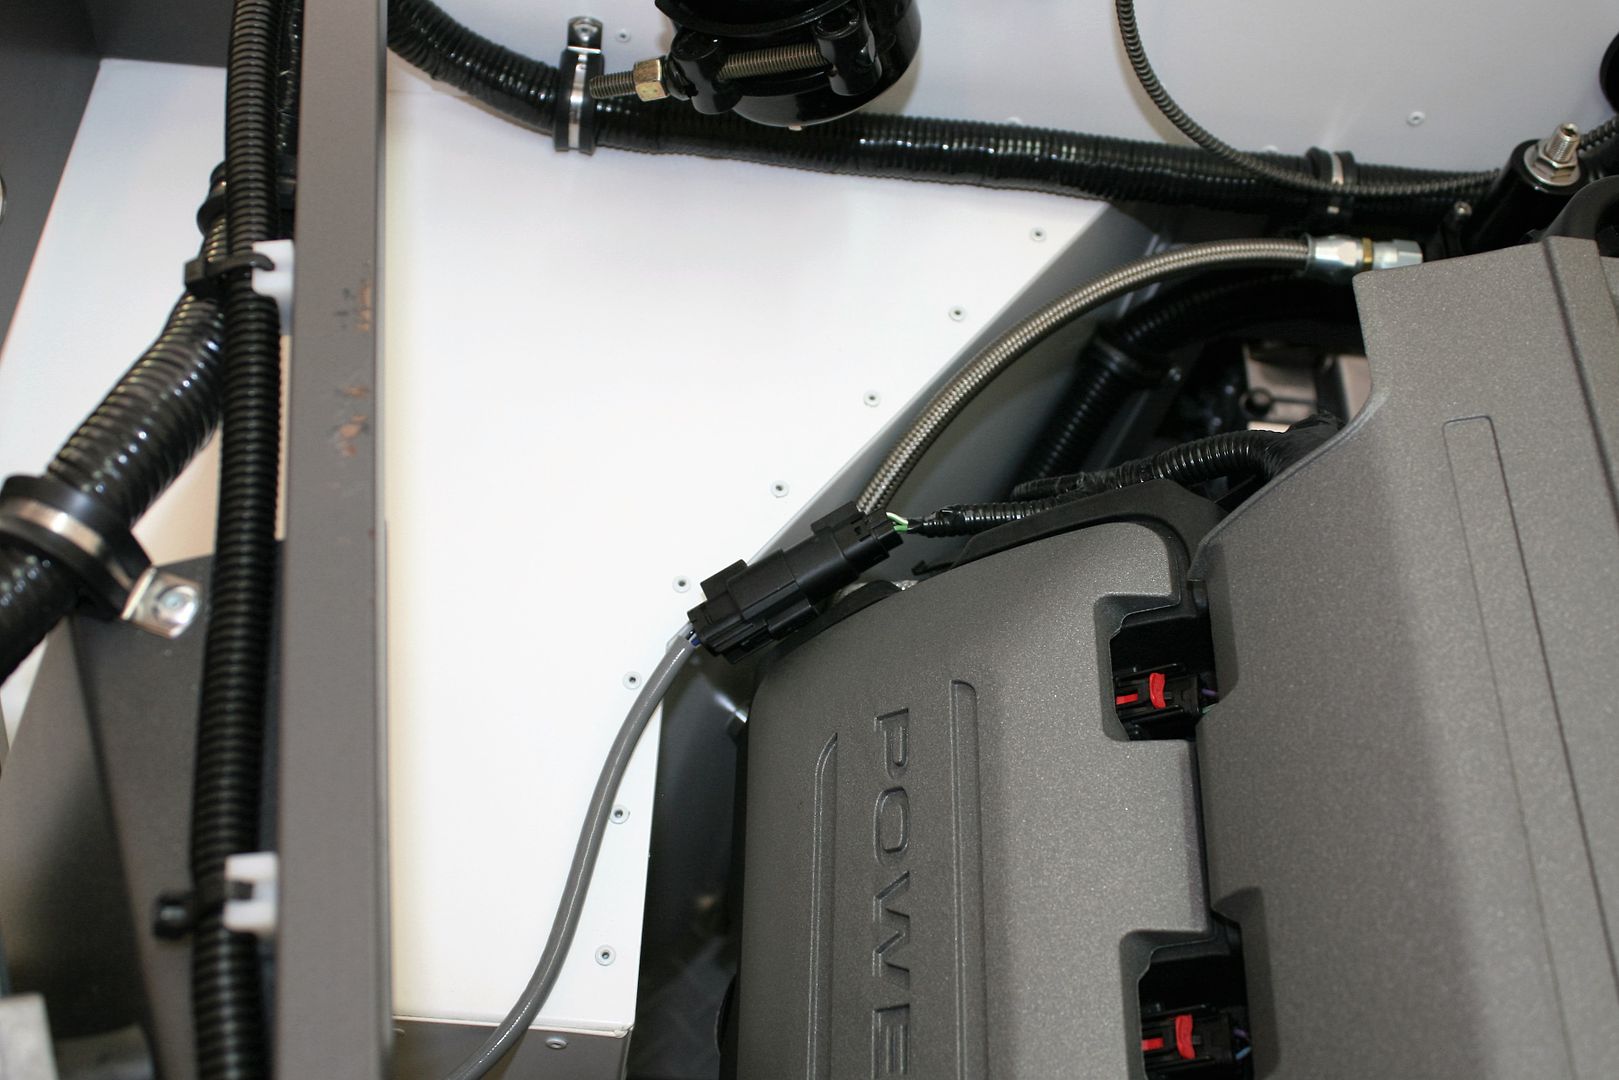
A detail I didn’t quite completely finish before the first start was the O2 sensors. As I’ve described previously, the 2015 Coyote has the O2 sensor connections as part of the engine harness. They are not part of the crate motor controls pack harness like the 2011-2014 version. So you’re pretty much stuck with where they’re located on the engine. The DS (LH) is low under the header close to the oil filter and engine mount. The PS (RH) is high at the rear outer corner of the head. Ford provides two different length O2 sensors:
FR3Z-9F472-E (DY-1346) long lead for the left side in a Mustang
FR3Z-9F472-C (DY-1308) short lead for the right side in a Mustang
I can’t speak for the FF shorty headers and J-pipe setup. But for the straight tube GP Headers I’m using, the FR3Z-9F472-C (DY-1308) short lead is IMO too short for either side. It could maybe be used on the DS, but it would be pulled quite tight and low over the header. However, the FR3Z-9F472-E (DY-1346) long lead is a workable length for both sides. Plus it has a nice insulated sleeve on the lower half, right where it’s above the straight tube headers. As I also described before, I received one of the early 2015 controls pack and the O2 sensors provided didn’t match the engine harness. So Ford sent me a pair of the O2 sensors described here. A month or two later, I received another box from Ford that they apparently sent to all 2015 Coyote crate motor buyers that had another set of O2 sensors, plus some other various parts like upper and lower radiator hoses, etc. So I had two sets of O2 sensors, and pretty easy decision to use the two long ones for this build. For other builders who aren’t so lucky, two choices. You can get an extension and use the shorter O2 sensor. Or you could pony up and buy a second FR3Z-9F472-E (DY-1346). They’re in the $40-50 range.
Here are pictures of the installed O2 sensors. This is the driver’s side. You can see the connection just behind the alternator. The cable has a nice plastic clip with a mounting hole that you can slide where you need it. It’s not visible in this picture, but it’s being held to the underside of the 3/4-inch tube with one of my trusty 10-32 nutserts and flange bolts that I installed today.
This is the passenger side. You can just see the retaining clip, also being held with a 10-32 nutsert and flange bolt. The second pic is where it comes up over the PS footbox and attaches to the connector. My OCD side would like it to be just slightly longer so it dropped over the corner of the footbox. But I’ll live with it like this.
A lot of forum talk is about build budgets. Over the last couple weeks, as I was procuring and installing all the necessary fluids for this build, it occurred to me I bet most don’t realize just how expensive this chemistry set on wheels can get. This is all the stuff I gathered:
(2) quarts Motorcraft synthetic diff lube
(1) 4 ounce bottle Motorcraft friction modifier
(9) quarts Pennzoil Ultra Platinum 5W-20 synthetic motor oil and filter
(3) quarts GM Synchromesh 88900333 transmission fluid
(15) quarts Peak anti-freeze. (Yep, that’s how much it took)
(32) ounces (2-1/2 bottles) Honda mineral based power steering fluid
(2) 32 ounce bottles DOT 3/4 Valvoline synthetic brake (and clutch) fluid
I haven’t added up the cost, but at least several hundred dollars right there. Good thing most of it has a pretty long service life, especially in my relatively low mileage street driven cruiser.
Finally, I just couldn’t help dragging out one of the shiny coil covers and also snapping on the intake cover to see what the final engine will look like. It will look a little better with the body on to take the back and sides out of the sight lines. But it’s going to be OK I think. Still thinking to do something with body color on a portion of the intake cover.
Tomorrow it’s coming down off the lift and I’ll work on ride height and alignment. Then go-kart time.
Last edited by edwardb; 06-30-2016 at 08:49 PM.
Build 1: Mk3 Roadster #5125. Sold 11/08/2014.
Build 2: Mk4 Roadster #7750. Sold 04/10/2017.
Build Thread
Build 3: Mk4 Roadster 20th Anniversary #8674. Sold 09/07/2020.
Build Thread and
Video.
Build 4: Gen 3 Type 65 Coupe #59. Gen 3 Coyote. Legal 03/04/2020.
Build Thread and
Video
Build 5: 35 Hot Rod Truck #138. LS3 and 4L65E auto. Rcvd 01/05/2021. Legal 04/20/2023.
Build Thread. Sold 11/9/2023.
-
07-01-2016, 12:52 AM
#316
Senior Member

Amazing. I can't wait till i get to the first start stage. I can only imagine what a great feeling. Congrats.
-
07-02-2016, 02:04 PM
#317
Senior Member
Go-Kart Time!
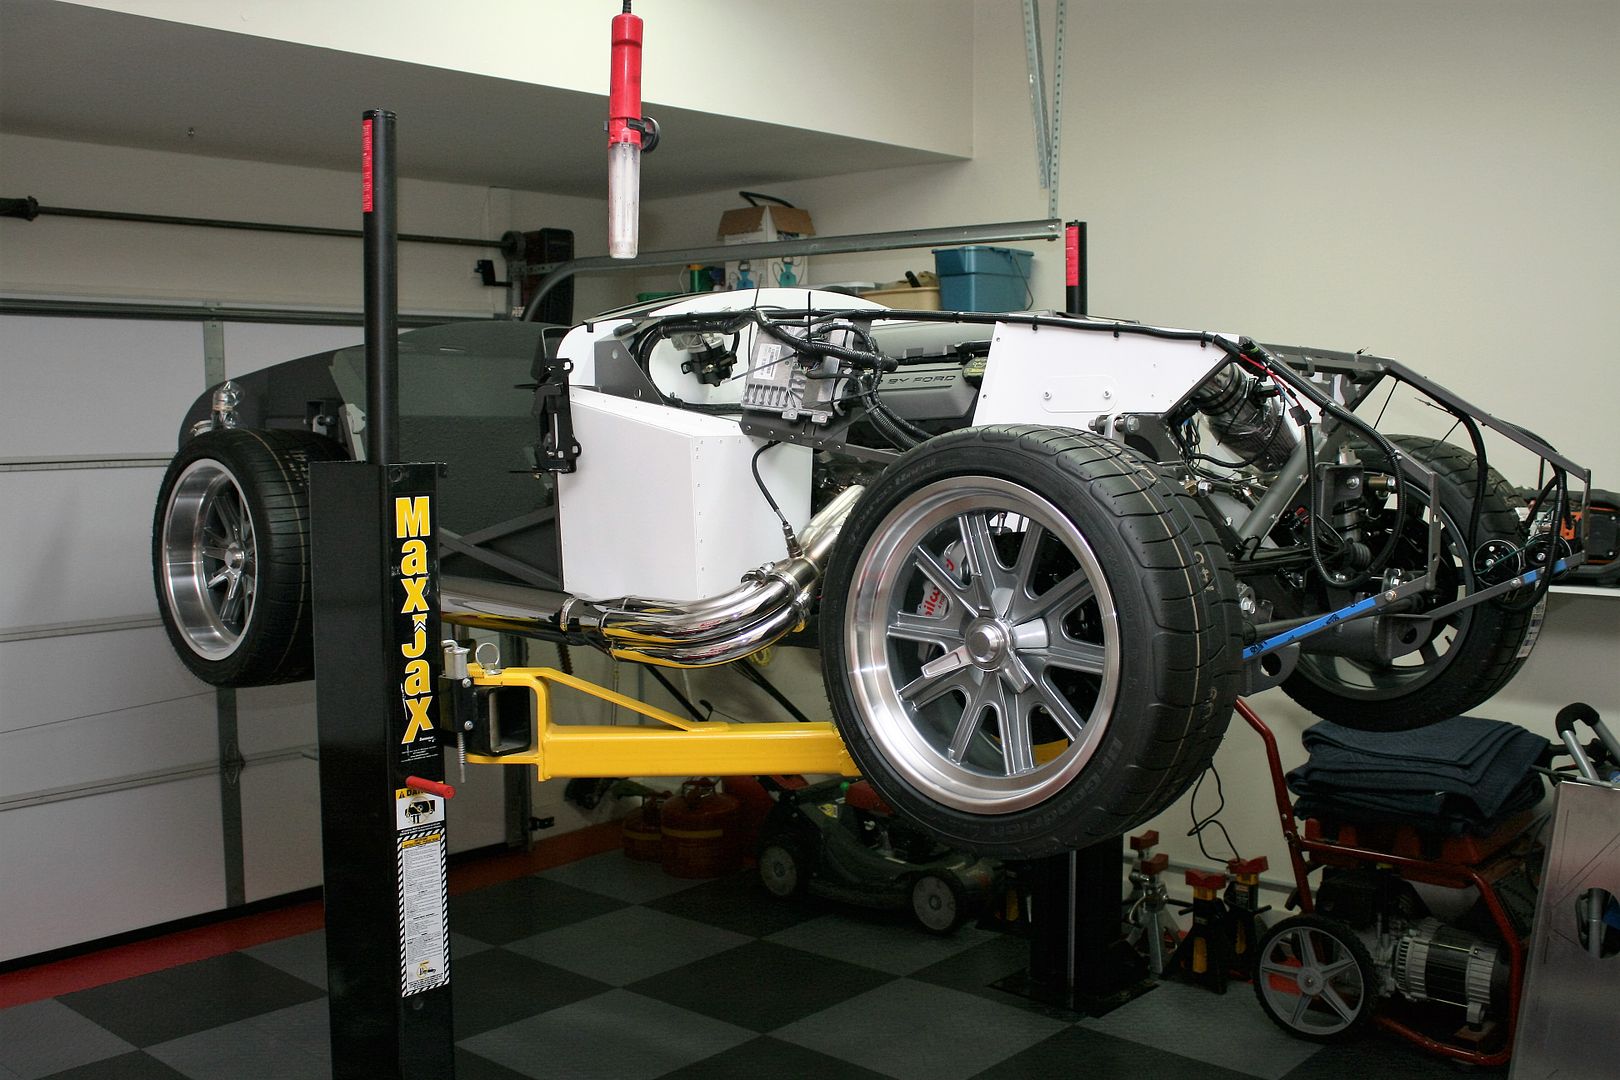
Spent yesterday wrapping up the final details for the go-kart. Dropped the chassis off the lift and onto its wheels for the first time. Found the place that mounted my tires had them at 40psi. So backed them down to 22 front and 24 rear. Then set ride height. I left it about 1/2-inch high front and back. Normally ride height will settle a little, plus still a few hundred pounds to go with the body and related.
Then I took my first pass at front and rear alignment. I havent done an IRS build before, so this was a first. The new 2015 Mustang IRS is easy, as I understand, compared to the former T-Bird version. Nothing to take apart. Loosen two lock nuts to adjust camber, and two more to adjust toe. They do interact a bit, but generally was pretty easy. The specs are camber: -0.5° to -0.75° and total toe: 1/8-inch toe in. Probably the biggest challenge was to get my Fastrax camber/caster gauge to fit onto the new wheels. The large radius on the wheel lip is cool looking, but doesnt give much to hang onto. I figured out a way and got the rear alignment set. Then moved to the front. Here I was shooting for camber: -0.5°, caster: +8°, and total toe: 1/16-inch toe in. Note the higher caster number is possible with power steering. Manual steering would be lower. Took a couple hours because they were pretty far off from the build and they all interact to some extent. But got them real close I think. I was happy to get the higher caster number without having to modify the rear adjuster on the UCA. Ive read where some had to shorten it a bit. In addition to the Fastrax tool, I use Heidts steel toe plates and a magnetic laser level. The combination of toe plates and the laser level replaces the use of strings that a lot of guys do.
Couple other quick comments. Ive noticed after starting the Coyote now a number of times that in addition to it starting almost immediately, the ignition key start position initiates the start sequence as soon as you turn the key. And its not necessary to hold the key in start until the engine is running. Basically it works just like a start button, which of course us how a Mustang is set up. Note this is only the case if using the Coyote controls pack start function and wire to the starter. The updated Coyote instructions from FF show using the RF harness for the ignition key and starter. It would work in the more traditional manner. Also, just for grins I plugged my Innovate LM-2 into the ODB port just to see if it worked (it does) and what I could read. There is a ton of stuff, and lots more to learn about there. But what I did note was three ODB trouble codes. I looked them up. One was related to engine temp and sensor, the other two were bank 1 and bank 2 intake manifold runner controls. I cleared the codes, and ran the engine several times and no codes noted. After my go-karts this AM, where it probably ran 30 minutes or more, also still no codes. So maybe those were from sometime during the engine install where the PCM was powered up but not everything was hooked up yet. But Ill keep an eye on it. I have the Coyote check engine light as an indicator on my dash, and it hasnt lit yet.
OK, so on with the go-kart. Really nothing earthshaking to report. Everything seems to be working OK. The GPS speedo is working and Im now showing .7 miles on the odometer. Thats just going up and down a side street maybe 6-8 times. The clutch engagement is in just the right place and the pedal force is smooth and relatively light. That 1-inch clutch MC is perfect. Just the slightest amount of clutch chatter while starting out. But thats maybe me getting used to it plus I was being very gentle with the throttle. The manual Wilwood brakes are OK, but clearly need to be bedded and broken in further. The accelerator (DBW) felt quite normal. I have heard from others there is a delay when pushing in and releasing. But Im not noticing that at all. Feels pretty direct to me. Power steering works very well and maybe is a bit light. But we'll see after real driving. Easy enough to adjust by changing a valve on the KRC pump. I only used 1st and 2nd, and max speed according to the GPS speedo memory was 27 mph. So not exactly killing it. Speed limit in our sub is 25, plus just taking it easy and trying not to attract too much attention. The main takeaway from the entire experience was those sticky Goodrich tires were pelting me with every manner of small stones from the street. The trunk and cockpit are full of them now. Next order of business will be to get out the shop vac.
This is the very first drive after backing out of my driveway. I was obviously being very gentle getting the feel for things and making sure all worked OK:
https://youtu.be/tHi0rsHEoas
Took it up a notch the second time around:
https://youtu.be/G-JP9hmSwis
And maybe just a bit more this time. Still baby steps though.
https://youtu.be/I55VraeTBU4
I can tell the Coyote is going to be very responsive and strong. It certainly has a different sound than previous SBF builds. Just a couple more details and Ill be starting body work and install.
Build 1: Mk3 Roadster #5125. Sold 11/08/2014.
Build 2: Mk4 Roadster #7750. Sold 04/10/2017.
Build Thread
Build 3: Mk4 Roadster 20th Anniversary #8674. Sold 09/07/2020.
Build Thread and
Video.
Build 4: Gen 3 Type 65 Coupe #59. Gen 3 Coyote. Legal 03/04/2020.
Build Thread and
Video
Build 5: 35 Hot Rod Truck #138. LS3 and 4L65E auto. Rcvd 01/05/2021. Legal 04/20/2023.
Build Thread. Sold 11/9/2023.
-
Post Thanks / Like - 0 Thanks, 1 Likes
-
07-02-2016, 09:13 PM
#318
Member

-
07-04-2016, 03:29 PM
#319
Senior Member
First Car Show
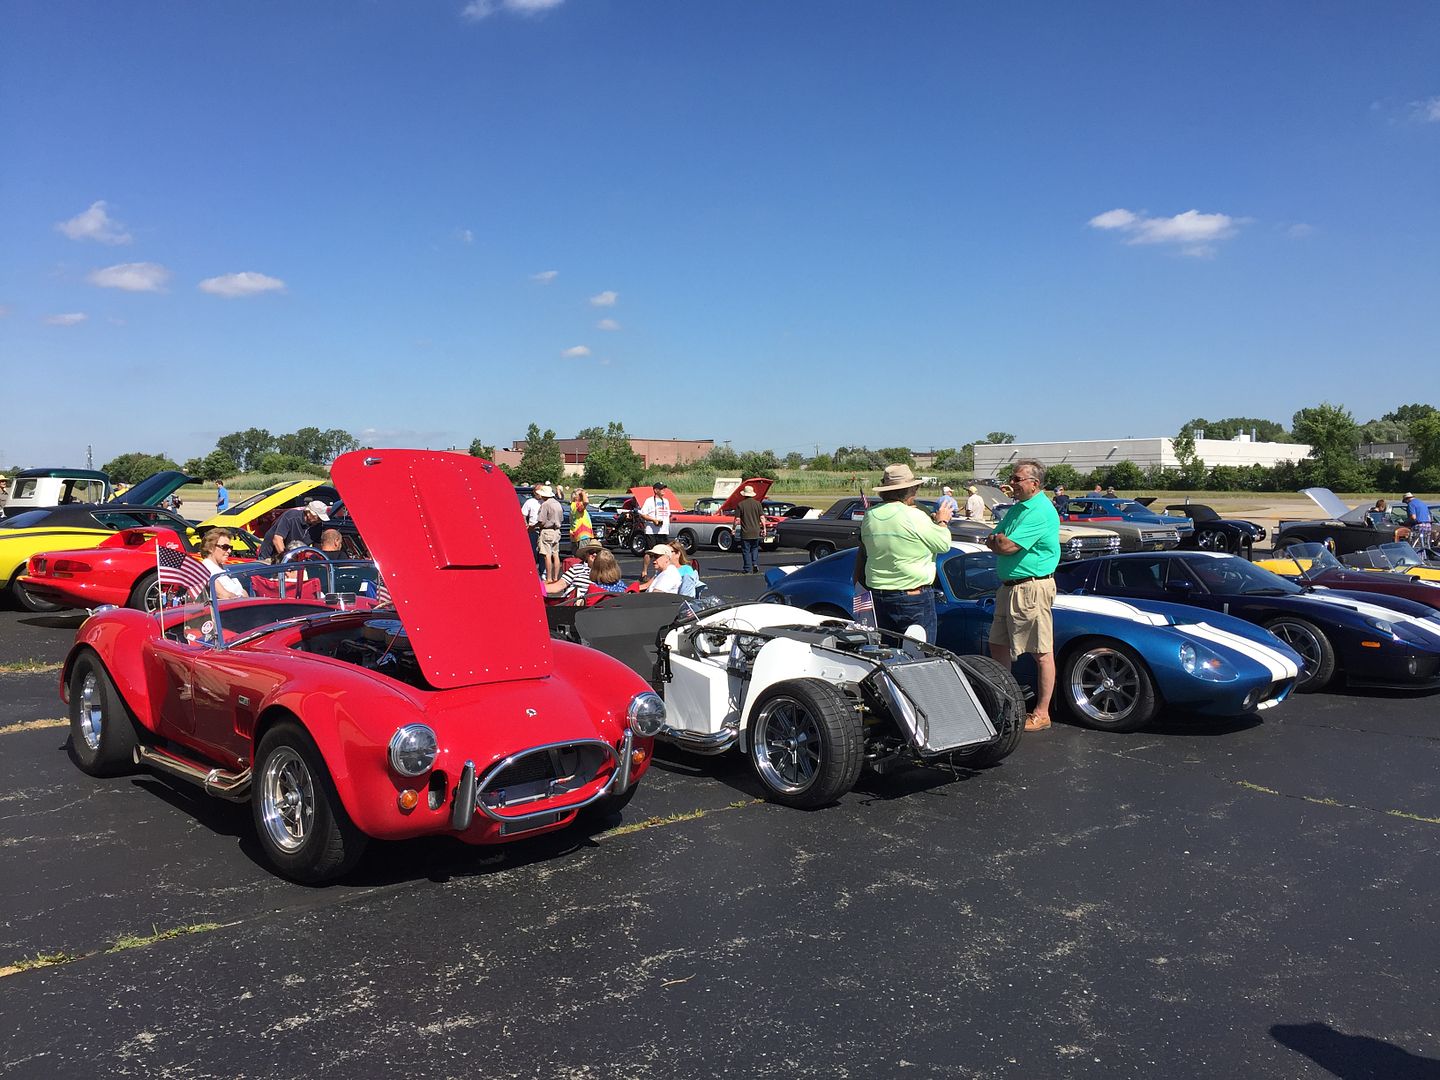
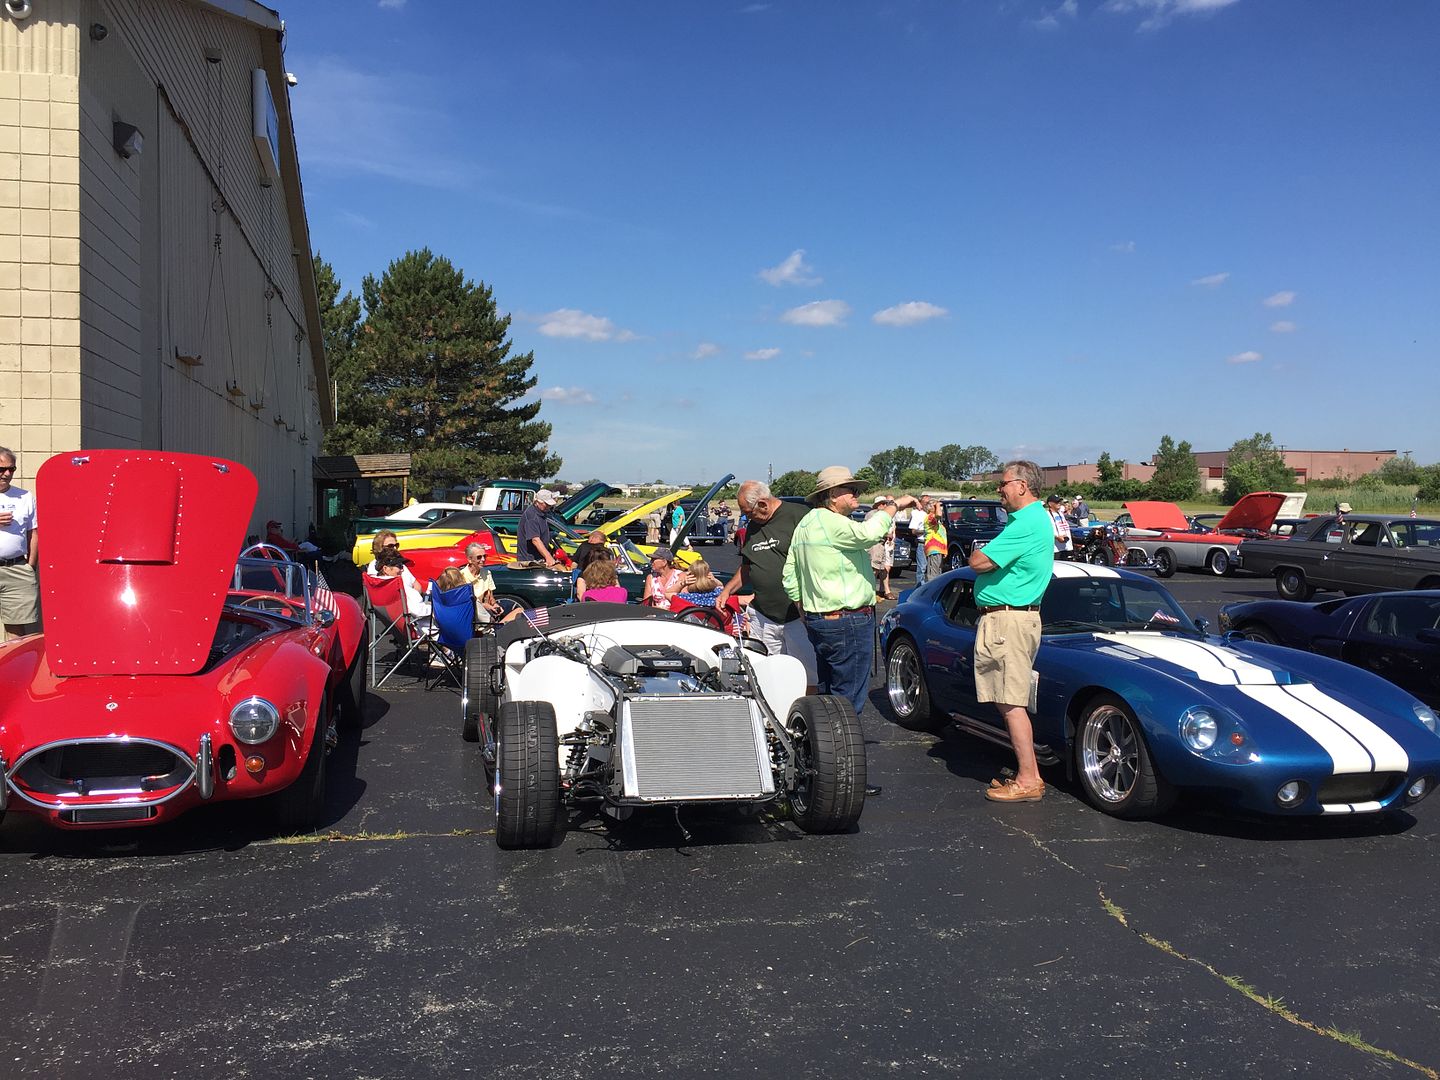
Beautiful 70+ degree and sunny day here in Michigan. Just for grins, got out the trailer and took the new build to a July 4th cruise-in today instead of driving #7750 like we normally do. I knew there would be a number of our local club members in attendance, and thought they would be interested in seeing the progress. Spent the three hours talking nearly non-stop to many attendees. Not many get to see a build at that stage, so they were very interested. Talked to several people who were seeing Factory Five for the first time. They were very impressed. Continue to be amazed at how that Coyote runs.
One of our club members told people my snake was shedding its skin. Clever. ")
Last edited by edwardb; 07-04-2016 at 03:45 PM.
Build 1: Mk3 Roadster #5125. Sold 11/08/2014.
Build 2: Mk4 Roadster #7750. Sold 04/10/2017.
Build Thread
Build 3: Mk4 Roadster 20th Anniversary #8674. Sold 09/07/2020.
Build Thread and
Video.
Build 4: Gen 3 Type 65 Coupe #59. Gen 3 Coyote. Legal 03/04/2020.
Build Thread and
Video
Build 5: 35 Hot Rod Truck #138. LS3 and 4L65E auto. Rcvd 01/05/2021. Legal 04/20/2023.
Build Thread. Sold 11/9/2023.
-
07-04-2016, 07:12 PM
#320
Fantastic; well thought out and solid work all the way through!
Do you mind telling me your source for the little nylon mounting blocks which are used on your 3/4 tubes throughout your build to cable-tie electrical loom and other things to the tubes? Looks as though the blocks might attach with a rivet in the center or similar. Pardon me if you have already mentioned this.
Thanks,
Bill


 Thanks:
  Likes:


 Reply With Quote


