-
01-06-2016, 01:06 PM
#161
I've been eyeing the MaxJax too. Never thought to look at Costco. Just checked their website and they have it on sale this week for $1800.
-
01-09-2016, 03:25 PM
#162
Thank you for the great build thread. Despite my lack of experience working on cars, I am planning on one day building a FFR roadster. I'm learning a lot following this build thread just as I did reading your previous build thread. Lots of note taking and considerations to think about.
You commented on how you are glad to have your MaxJax lift back in play again. I'm assuming this means you could not use it while the engine was temporarily in the car? Was this due to weight balance with the car only partially assembled? I'm assuming it is not due to the overall weight. Just curious why it was not in play. I'm considering a two-post lift like MaxJax for my yet-to-be-built garage - one of my dependencies to starting my own build. Thanks
-
01-09-2016, 04:33 PM
#163
Senior Member


Originally Posted by
mcduke3

Thank you for the great build thread. Despite my lack of experience working on cars, I am planning on one day building a FFR roadster. I'm learning a lot following this build thread just as I did reading your previous build thread. Lots of note taking and considerations to think about.
You commented on how you are glad to have your MaxJax lift back in play again. I'm assuming this means you could not use it while the engine was temporarily in the car? Was this due to weight balance with the car only partially assembled? I'm assuming it is not due to the overall weight. Just curious why it was not in play. I'm considering a two-post lift like MaxJax for my yet-to-be-built garage - one of my dependencies to starting my own build. Thanks
Welcome to the forum! Thanks for the nice words and glad you find the build threads helpful. For you question about the lift, my comment had nothing to do with the MaxJax itself. It has plenty of capacity (6,000 lbs) and balance isn't an issue. The situation was the way I mocked up the Coyote in the engine compartment without the transmission. I did that because the Coyote was easier to get in and out that way, plus I haven't even purchased the TKO yet. So the engine was being held only by the two front engine mounts, and did not include the normal rear transmission mount. As a result, I had blocks under the front and back of the engine to keep it stable plus also to hold it at the proper approx 2 degree down angle. Because of that I couldn't raise or lower the lift. But that's all history now. Good luck with your future plans.
Last edited by edwardb; 02-03-2016 at 08:24 AM.
Build 1: Mk3 Roadster #5125. Sold 11/08/2014.
Build 2: Mk4 Roadster #7750. Sold 04/10/2017.
Build Thread
Build 3: Mk4 Roadster 20th Anniversary #8674. Sold 09/07/2020.
Build Thread and
Video.
Build 4: Gen 3 Type 65 Coupe #59. Gen 3 Coyote. Legal 03/04/2020.
Build Thread and
Video
Build 5: 35 Hot Rod Truck #138. LS3 and 4L65E auto. Rcvd 01/05/2021. Legal 04/20/2023.
Build Thread. Sold 11/9/2023.
-
01-09-2016, 11:21 PM
#164
Originally Posted by
edwardb
I had blocks under the front and back of the engine to keep it stable plus also to hold it at the proper approx 2 degree down angle.
To get the old IRS pinion angle as close to zero as possible, my engine ended up almost level which made the side pipes angle up resulting in having to enlarge the side pipe mounting holes. Perhaps the 2015 IRS center section is mounted with a 2* tilt to help fix this problem.
-
01-10-2016, 12:21 AM
#165
Senior Member
Originally Posted by
2bking
To get the old IRS pinion angle as close to zero as possible, my engine ended up almost level which made the side pipes angle up resulting in having to enlarge the side pipe mounting holes. Perhaps the 2015 IRS center section is mounted with a 2* tilt to help fix this problem.
Interesting. I just set it at that angle because that's about where they were on my last builds, and as I understand pretty typical. But you made me curious so I did a couple quick measurements. Looks like the center section is pointing down 1.1 - 1.2 - 1.3 degrees relative to the frame rails. In that range. Nothing I've done so far would prevent me having the engine anywhere in the 2 degrees to zero range. In fact less than two would be good. The oil pan was just slightly below the frame rails where I had it set, even with the Whitby spacers. Reducing the angle would eliminate that.
Build 1: Mk3 Roadster #5125. Sold 11/08/2014.
Build 2: Mk4 Roadster #7750. Sold 04/10/2017.
Build Thread
Build 3: Mk4 Roadster 20th Anniversary #8674. Sold 09/07/2020.
Build Thread and
Video.
Build 4: Gen 3 Type 65 Coupe #59. Gen 3 Coyote. Legal 03/04/2020.
Build Thread and
Video
Build 5: 35 Hot Rod Truck #138. LS3 and 4L65E auto. Rcvd 01/05/2021. Legal 04/20/2023.
Build Thread. Sold 11/9/2023.
-
01-21-2016, 04:37 PM
#166
Senior Member
Panel Mockup Complete
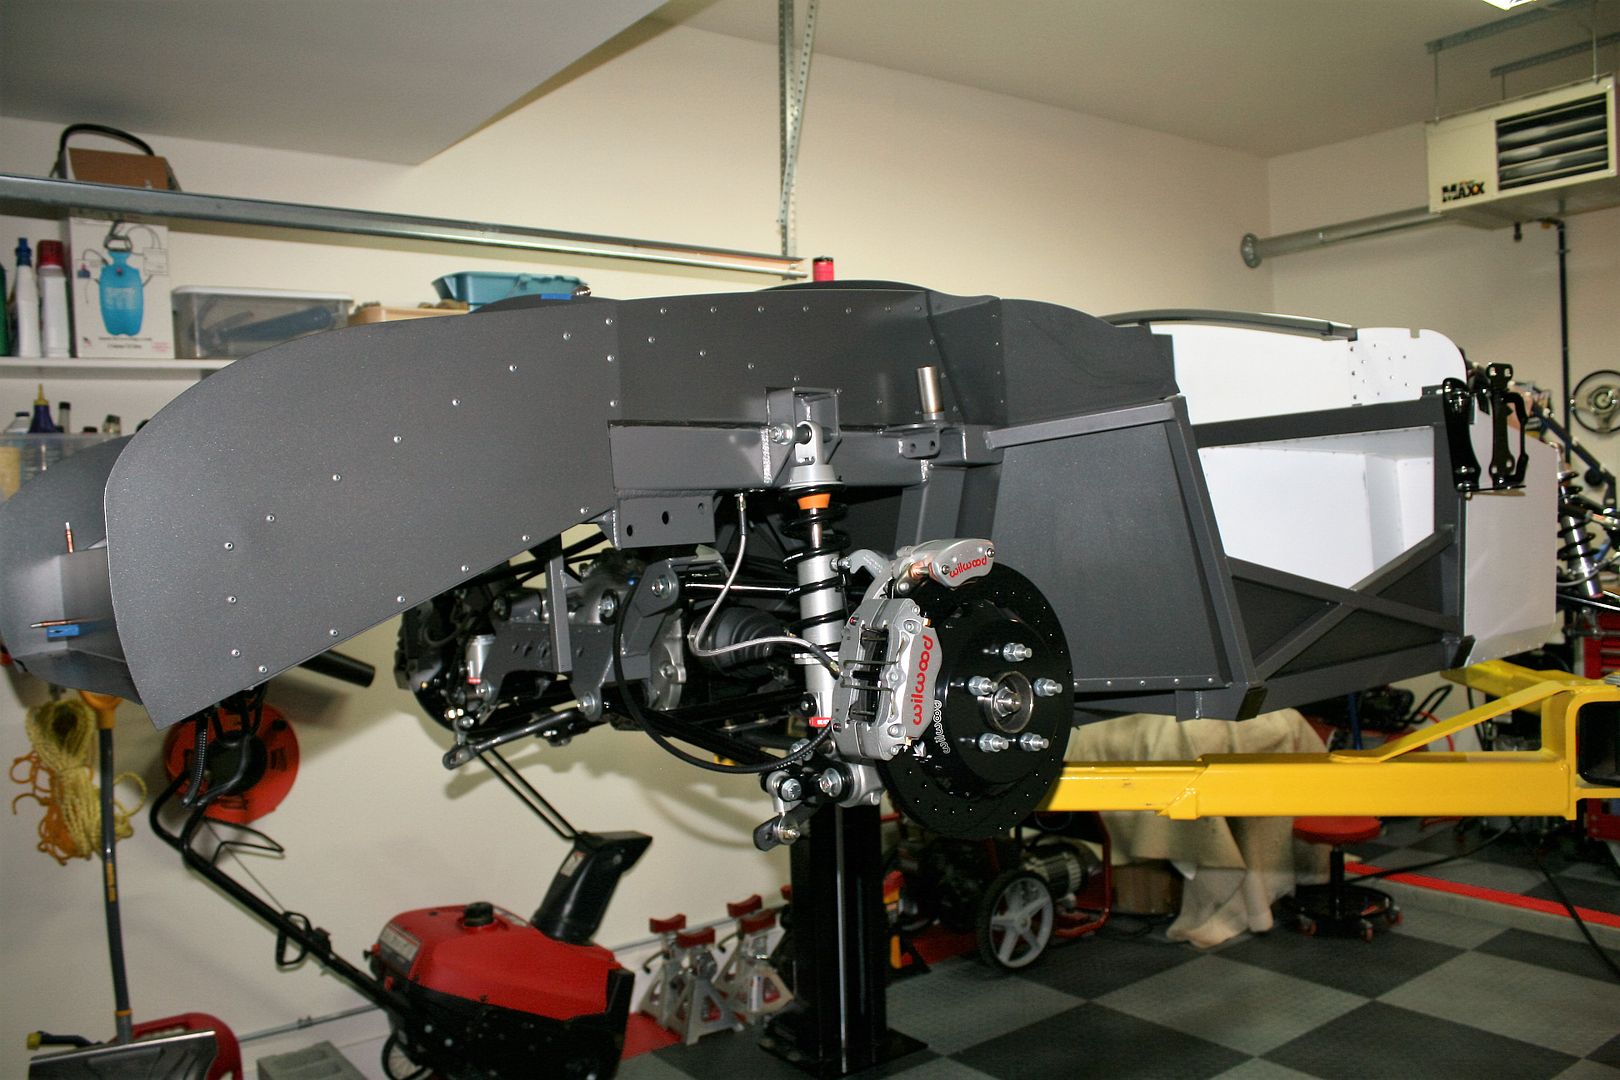
It’s been a while since I’ve posted any updates. I’ve been working but pretty routine stuff and not too photogenic. But I’ve now completed most of the panel fitting, drilling and mockup. Thought I’d go ahead and post. This is all about to come back apart and I’ll be taking most of the raw pieces out for powder coat. Most of the panels will be the same silver/grey as the Anniversary chassis and a few white to match the ones already provided by Factory Five. I’ve changed and/or modified a few, so will get them done to match. I’ve got a few panels permanently mounted, but most are just cleco’d for now.
For the most part, I followed the recommended guidelines of two inch spacing for panel to panel, and three inch spacing for panel to chassis. When over wider chassis members, I did stagger them so they look a little closer. Having some of the panels already powder coated meant taking special care with them to not scratch, mark, etc. I just used a bunch of blue masking tape when laying out holes, drilling, etc. Reinforces the practice to drill and fit before powder coat whenever possible. Few other hints for first time builders: Take the time to lay out the holes straight, evenly spaced, etc. Lots of them are hidden when you’re done. But a lot of them aren’t, and it really makes a difference IMO in the quality look of the final product. Also take the time to think ahead of where you’re going to fit the tool to pull the rivet. Most are wide open. But check before you drill. Don’t put holes where you can’t get a tool on them. Also think about which side you’re going to pull the rivet from. I strongly prefer that any exposed rivet, even underside, in the wheel wells, etc. the head is showing not the crumpled business side. For sure this is the case in the obvious areas like the engine compartment. But in my overly obsessive opinion, I try to do the same everywhere. Just plain looks better and more professional. Finally, while the panels are perfectly cut and mostly fit really well, take your time to get them just right. A bend may need to be adjusted slightly, you may need to trim slightly to clear a weld bead, etc. If it doesn’t seem like it fits though, check the manual and check your work. I didn’t have to do any significant rework to any piece.
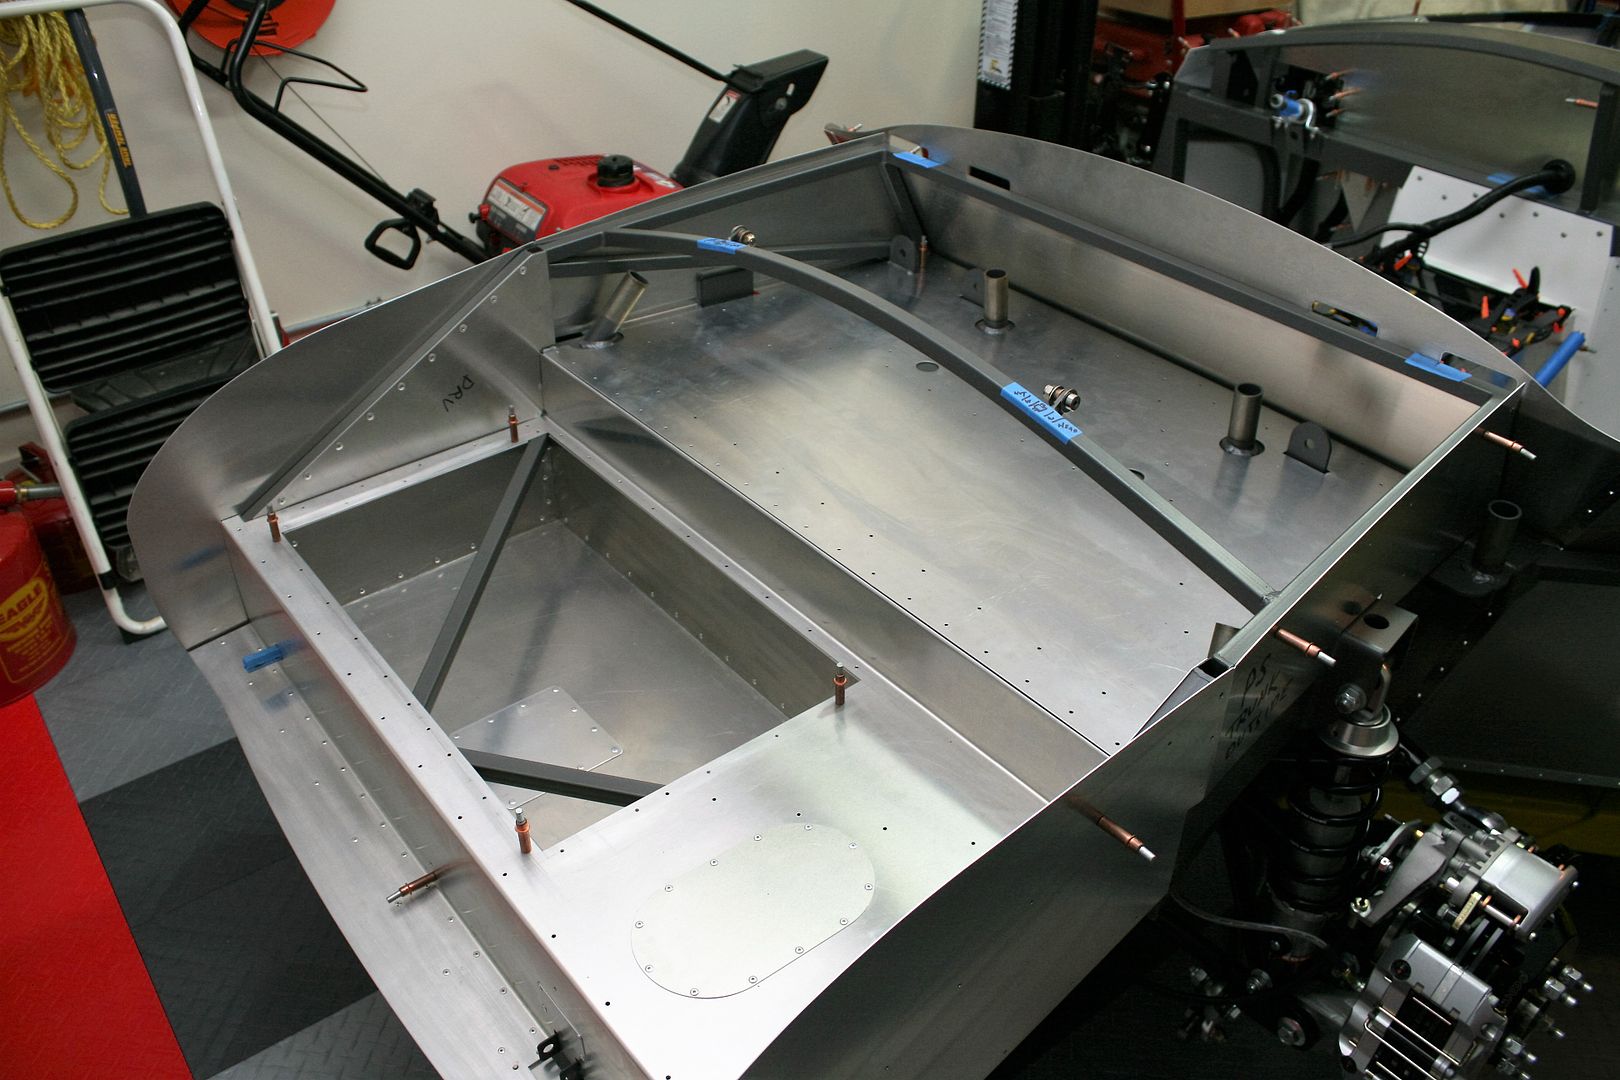
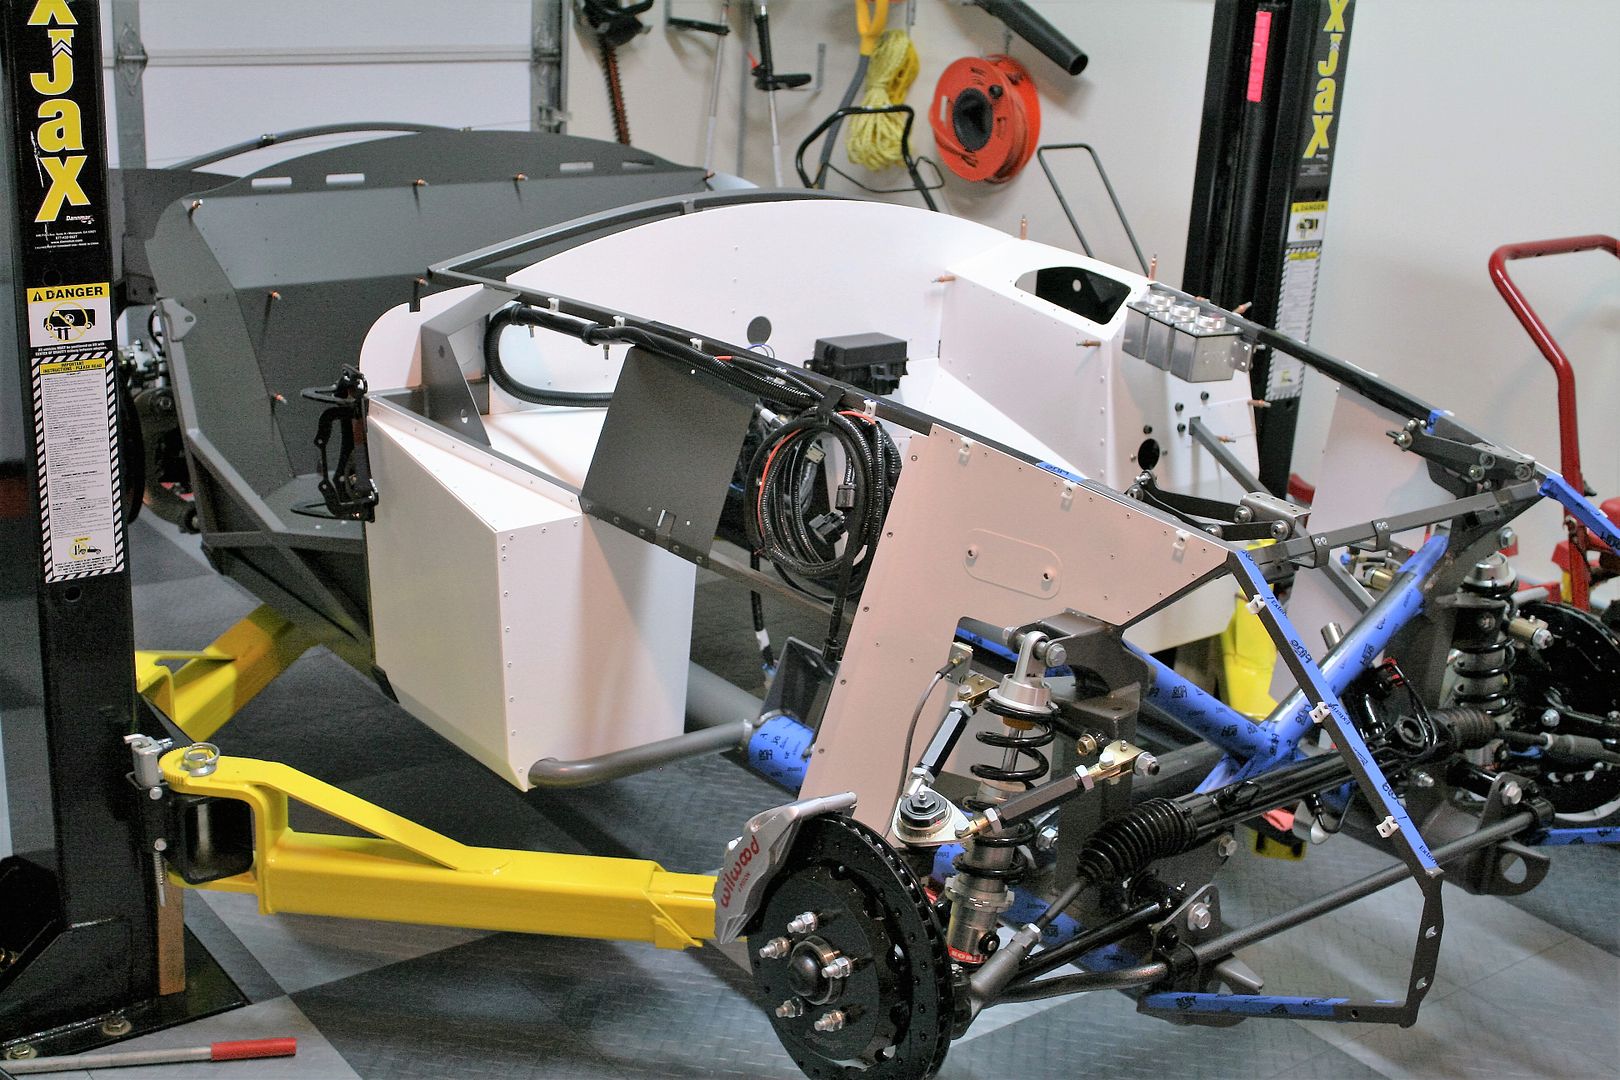
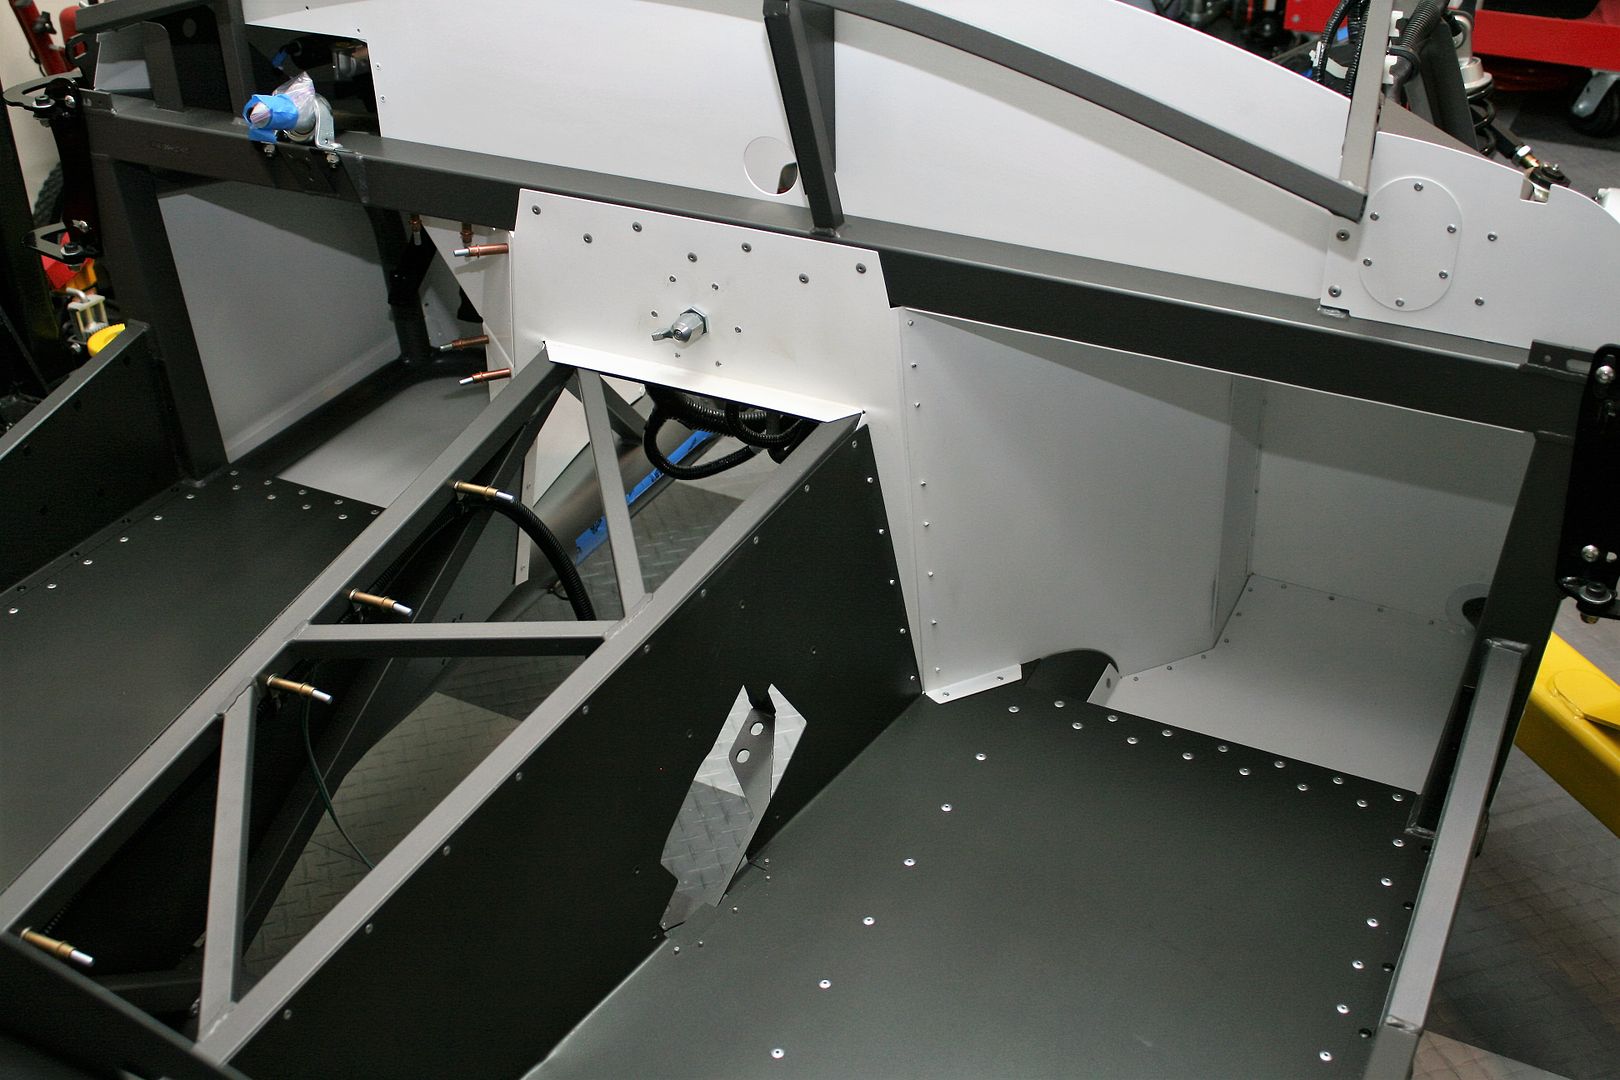
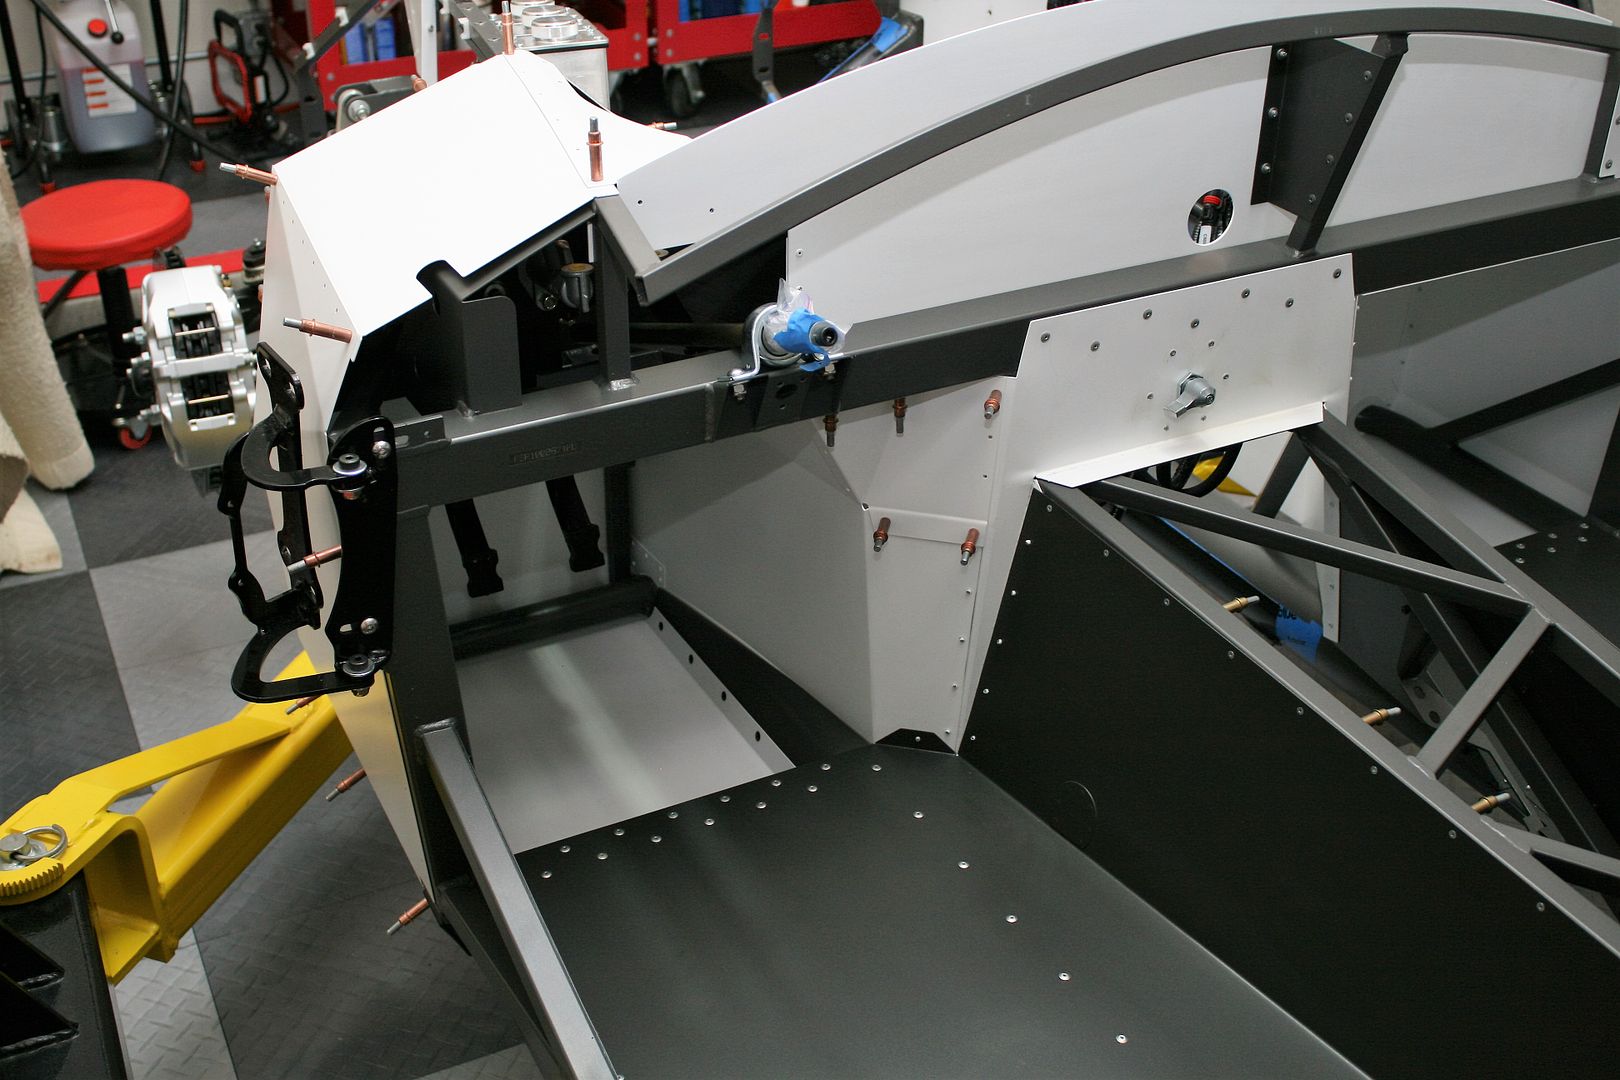
Here are some pics and details. Like I said before, mostly pretty routine stuff. This is the trunk compartment and the Russ Thompson dropped floor. I am leaving in the FF cross braces. Many guys move them below the dropped floor, which is fine. But I don’t weld plus the area will meet my needs with the braces there. Also note I permanently mounted the tank access panels. Probably many won’t agree with this. But I haven’t had to use one of those yet. Plus I played around a little getting the pump assembly out through the access hole. Not easy! It’s hard enough just getting it out of the tank itself. So I just mounted them and will carpet over. With a lift and a floor jack, I can drop the tank in minutes if necessary. For me that was the easier solution. Hopefully I don’t live to regret that decision, but it’s done. I'm also going to quickly make up some fill pieces for the upper side trunk walls. Not necessary, but makes the carpet work much easier and looks good even though not very visible.
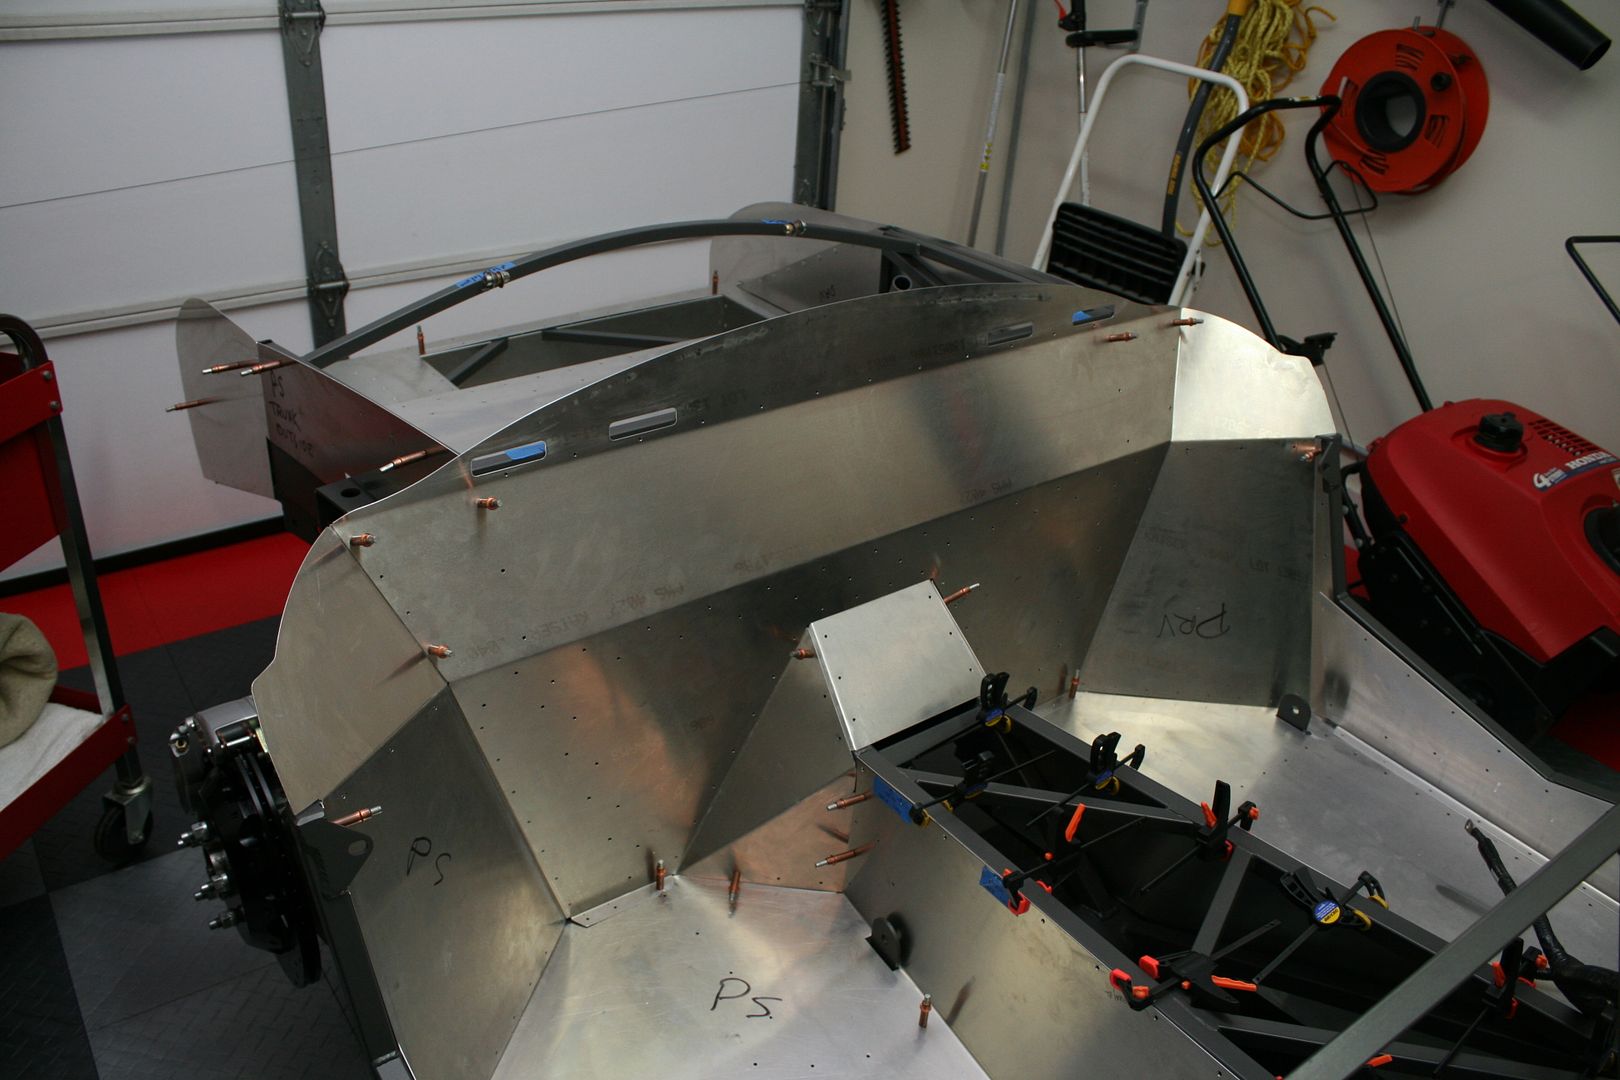
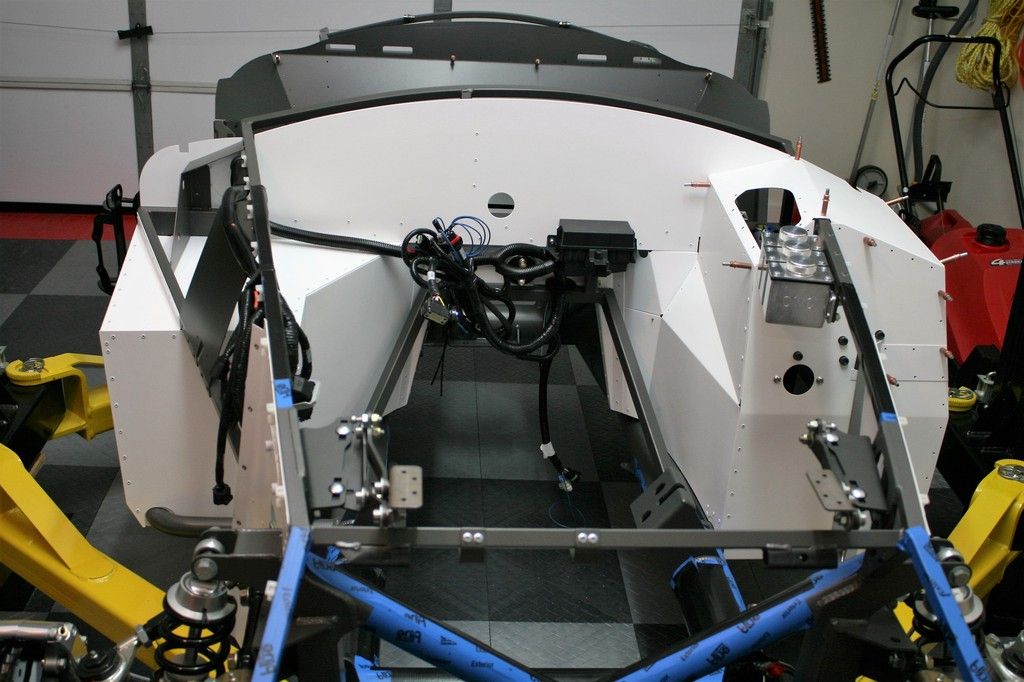
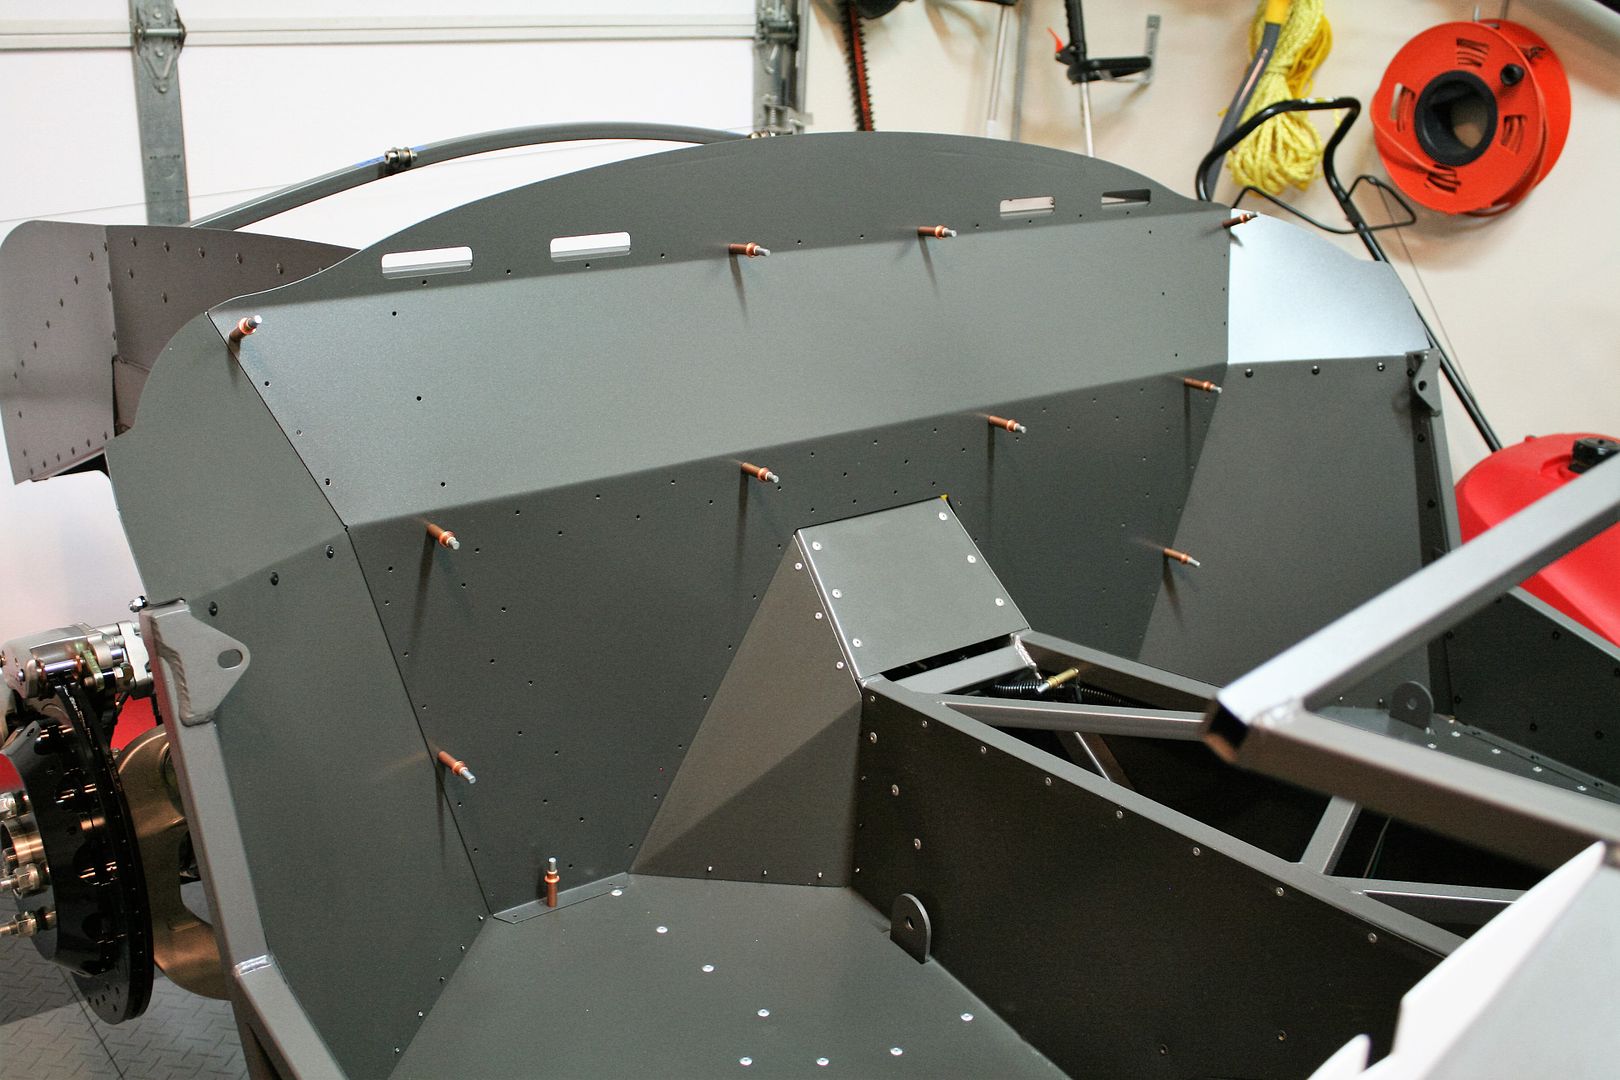
Rear cockpit wall. Nothing too exciting here. I did find the corner tunnel pieces fit better this time than my last Mk4. Maybe something changed, or maybe I just did it right this time. Installing them with the overlaps exactly as in the build manual makes a big difference. Also, just a reminder, install all the trunk panels before installing the rear cockpit wall. Otherwise you’re not going to have too much fun with the rivets along the back edge of the trunk floor and sides.
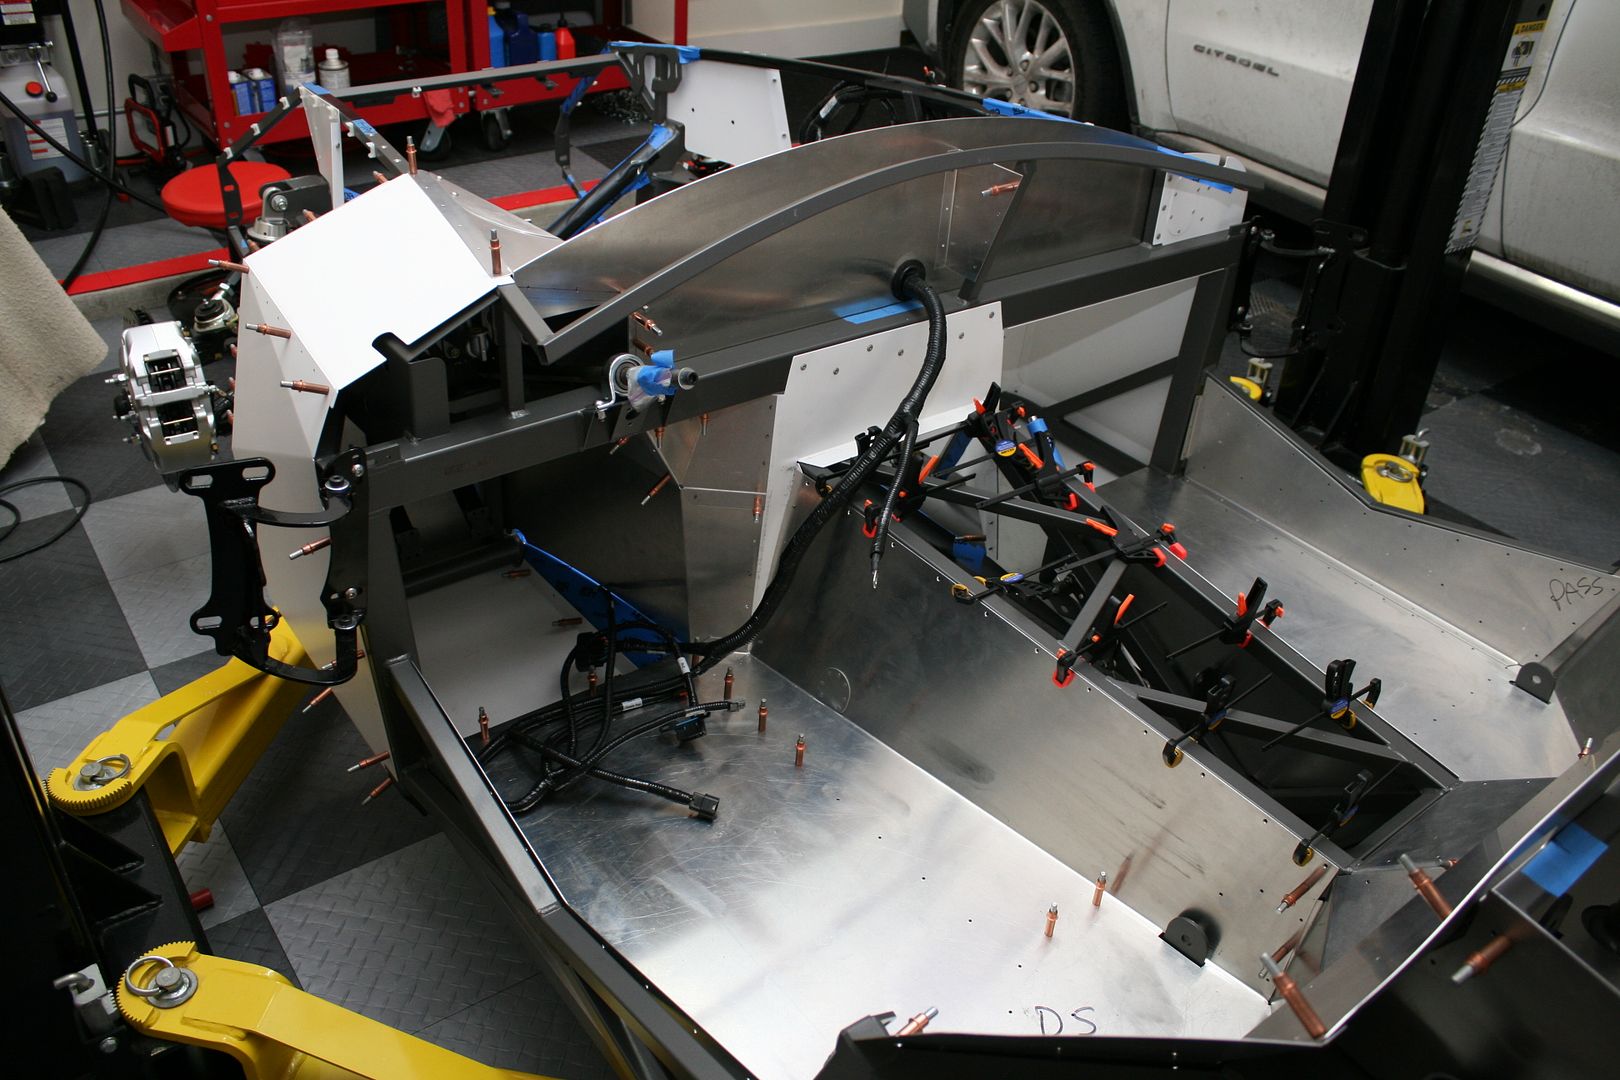
Driver’s side footbox. Again, nothing too exciting. I’m going to do a removable trans tunnel cover. Lots of discussion about whether this is really necessary, and I’ve never done one before or found it necessary. But I’m planning to cover it with something other than carpet. So it just makes sense to go ahead and make it removable. As a result, I drilled for rivets along the top edge. They’ll be flush mounts so the cover can slide past them.
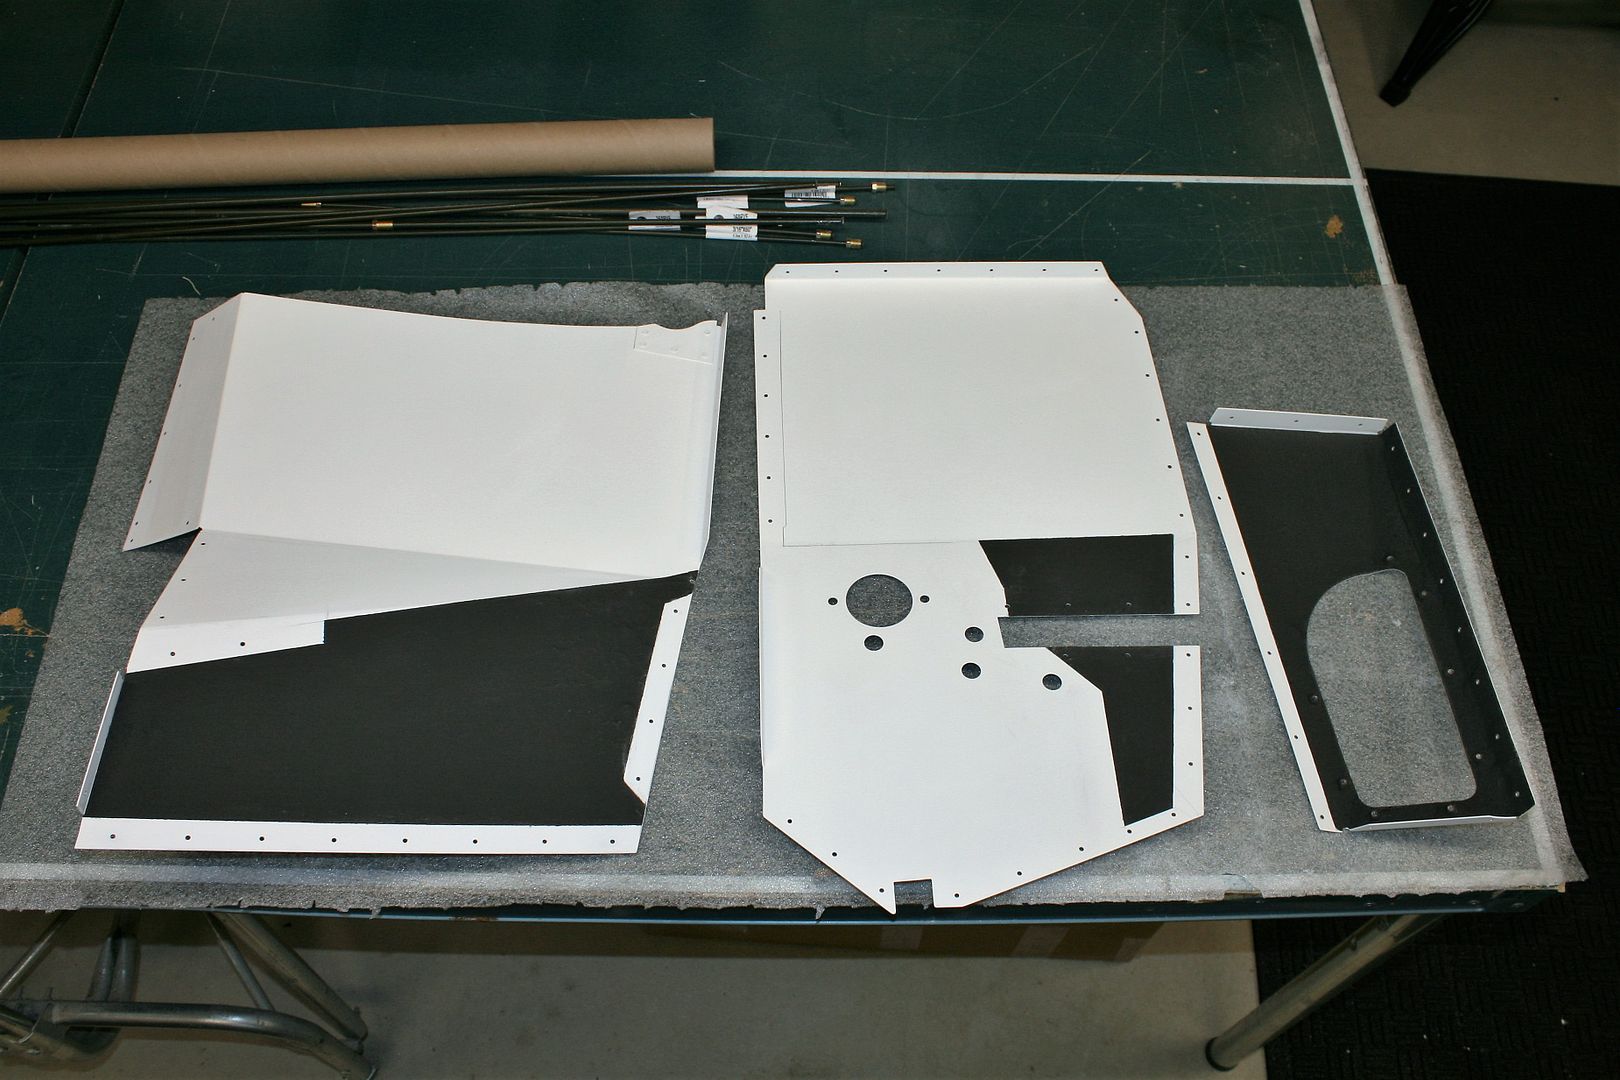
Passenger side footbox from the engine compartment. These are the Factory Five provided white panels. All fit well.
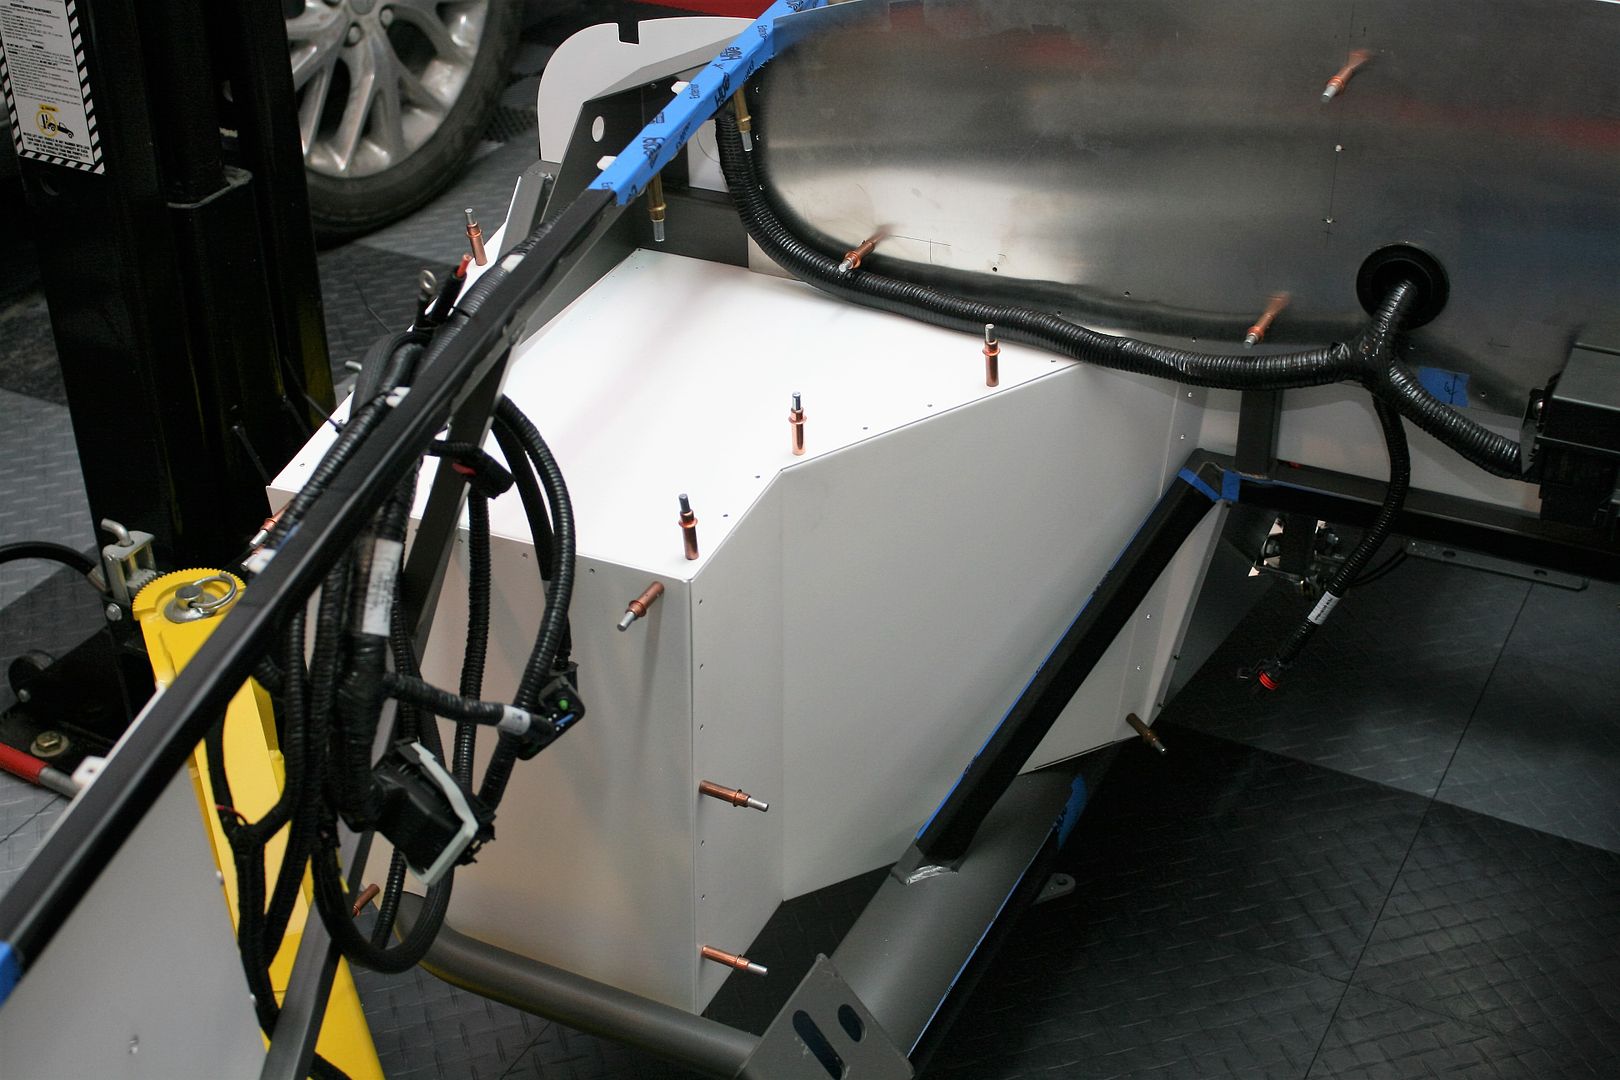
Driver’s side footbox from the engine compartment. Several things here. The inside wall, inside top and cover, and small fill piece are 2bking’s designed Coyote modded panels and supplied to me by another very generous forum member. I mentioned these before. I was able to get them to fit quite nicely. The firewall is also his layout, which I fabbed out of .090 inch aluminum. The front panel is also a piece I made. Factory Five powder coated the Mustang footbox panel instead of the Wilwood footbox panel, which a couple other Anniversary kit buyers also found. Upon further review, I found that if I made a couple minor tweaks to the front panel, the other modded panels fit a little better. That was all the excuse I needed. So I made a new one, and without the clutch or wire harness holes, and also shrunk down the steering column hole since I have the bearing mounted on the inside. Looks nice and clean. A lot of messing around for something that is basically unseen once the build is done. But I like it. I’ll need to punch a couple holes for the front harness and brake lines when the time comes and I determine the exact locations.
Driver’s side footbox from the outside. The outside side and top are set to go, but I won’t mount them permanently until everything else is done. Basically right before the body is finally installed.
One more tip. If you don’t own this tool from Harbor Freight, I would suggest getting one. Best $15 dollars you’ll spend. Works really great to adjust panels and bends as needed. Their item #98728.

Once I get all the parts to the coater, I’m going to start electrical, fuel lines, and brake lines. First up I think will be the instrument panel. So I’ll get that covered, the gauges installed, and start wiring. Then on from there.
Last edited by edwardb; 01-22-2016 at 07:21 AM.
Build 1: Mk3 Roadster #5125. Sold 11/08/2014.
Build 2: Mk4 Roadster #7750. Sold 04/10/2017.
Build Thread
Build 3: Mk4 Roadster 20th Anniversary #8674. Sold 09/07/2020.
Build Thread and
Video.
Build 4: Gen 3 Type 65 Coupe #59. Gen 3 Coyote. Legal 03/04/2020.
Build Thread and
Video
Build 5: 35 Hot Rod Truck #138. LS3 and 4L65E auto. Rcvd 01/05/2021. Legal 04/20/2023.
Build Thread. Sold 11/9/2023.
-
01-21-2016, 05:18 PM
#167
 Administrator

Man I wish I was with you guys doing a 20th anni car. You're doing a great job so far! You have me thinking about doing a Coyote build myself! Not sure about fitment though. I guess I'll have to find someone local doing one to see about footbox fit.

FFR 5369 Pin Drive, IRS, Trigos, Torsen, Wilwoods, FMS BOSS 302 "B" cam , Mass-flo. CA SB100 (SPCN) Registered
Delivered 4/23/06. "Finished" 4/2012 (still not done!)
-
01-21-2016, 10:35 PM
#168
Originally Posted by
David Hodgkins
I guess I'll have to find someone local doing one to see about footbox fit.
David, My guest room is always open to you! I'm still a ways away from having seats installed so you could really check footbox fit, but I'll get there soon enough. I'm not exactly local, but not too bad a drive either.
-
01-22-2016, 12:40 AM
#169
Senior Member
Originally Posted by
David Hodgkins
You have me thinking about doing a Coyote build myself! Not sure about fitment though. I guess I'll have to find someone local doing one to see about footbox fit.
With these modded panels, the DS footbox space and pedal spacing is exactly the same as my SBF Mk4 with standard FF panels, which for me is very comfortable. I didn't finally decide to do the Coyote until I was convinced about that. I've seen a picture of a very recent Coyote kit delivery from Factory Five, and it looks like they've gone to something very similar. Much improved over their previous mod motor panels. Also looks like they've added a small bump out on the LH side of the DS footbox. There's not much more to be gained there on a Mk4, but looks like they took advantage of the remaining available space. Something for you to confirm and see for yourself.
Last edited by edwardb; 01-22-2016 at 07:32 AM.
Build 1: Mk3 Roadster #5125. Sold 11/08/2014.
Build 2: Mk4 Roadster #7750. Sold 04/10/2017.
Build Thread
Build 3: Mk4 Roadster 20th Anniversary #8674. Sold 09/07/2020.
Build Thread and
Video.
Build 4: Gen 3 Type 65 Coupe #59. Gen 3 Coyote. Legal 03/04/2020.
Build Thread and
Video
Build 5: 35 Hot Rod Truck #138. LS3 and 4L65E auto. Rcvd 01/05/2021. Legal 04/20/2023.
Build Thread. Sold 11/9/2023.
-
01-27-2016, 09:51 PM
#170
Senior Member
E-Brake Installation / Modifications
All my sheet metal plus other parts are at the powder coater now. Should be a week or so then lots to do. In the meantime, plenty of other things to do including work on the e-brake. I’ve used the Mustang handle in the stock FF location for my previous builds. I’m OK with the location, and the Mustang handles worked OK. But this kit included the newer FF in-house design e-brake handle. After looking it over and assembling it, I’m fine with the design except a couple things: I’m not a fan of the plastic bearings on the main handle pivot. Just doesn’t strike me as terribly stable or long-lasting. Easy fix though. The same bronze bushings used for the hood, doors, trunk, etc. are the right size just a little too thick. I had some spares around, so it was easy to grind down a couple so they could seat in the handle pivot. Much better. My other concern was the little pawl piece just floats between the two main halves. A couple of small washers on each side keeps it aligned much better. I also chose to use a 10-32 bolt to hold it instead of the supplied drive pin. Just personal preference. With these changes I moved to the installation.
I mentioned in a previous update that I wasn’t real excited about routing the e-brake cables under the 4-inch chassis tube. I know hundreds (thousands?) have been built this way, but I’ve managed to avoid it on my other builds and really preferred to again. First is the matter of the cables wrapping under the tubes, which to me looks pretty cheesy plus won’t pass technical inspection in some states. Not a problem for Michigan, but still… The other perhaps more serious concern for me is the cables take a pretty sharp angle out of the rear cable mounts to make the trip around the tube. Probably they would be fine, but I was interested in alternatives.
Fellow forum member carlewms was nice enough to post his solution earlier in this build thread. I had seen that before in his build thread, and it was first on my list to try. Unfortunately, it won’t work on this setup. The separate Wilwood e-brake calipers used on the Anniversary Roadsters requires very little cable movement. Actually just going from slack to tight actuates the e-brake enough to lock the disks down hard. With the stock pull location the movement required where the cables connect is just under .75 inches, or 5 clicks on the handle. I mocked up the modified extended location, allowing the cables to be routed above the 4 inch chassis tube, and it was 2 maybe 3 clicks at the most to actuate the brakes. Just not what I wanted.
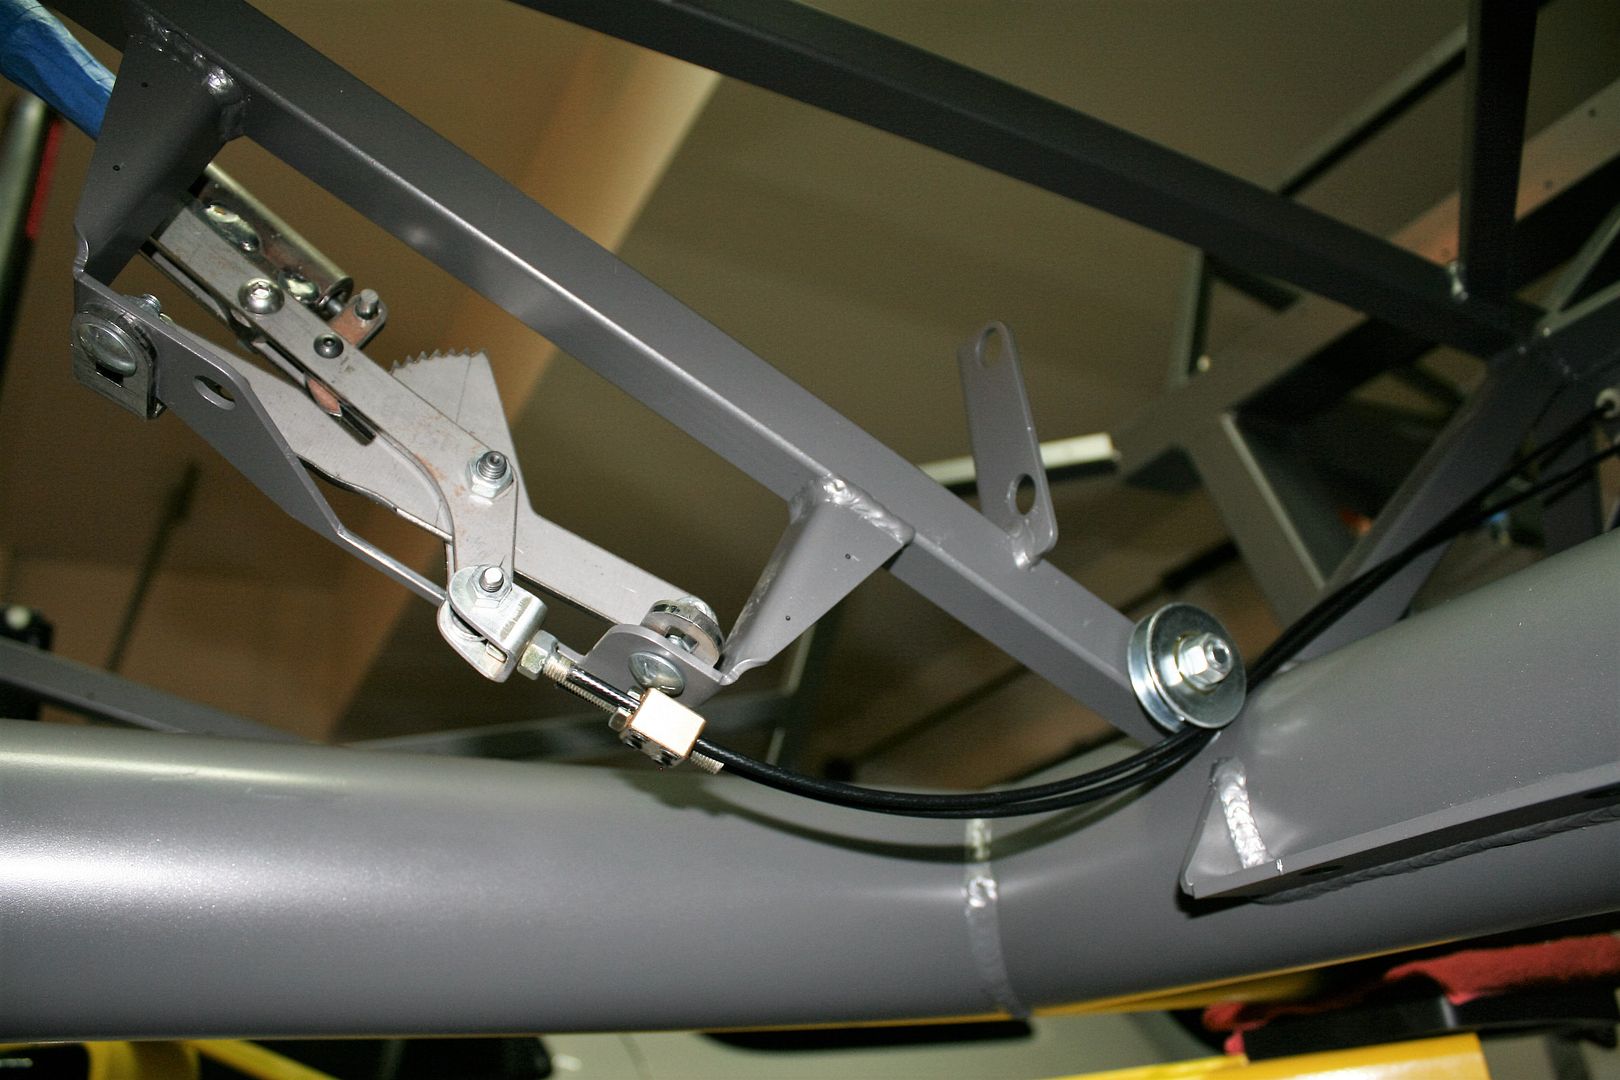
After staring at the chassis and e-brake for a while (I do that…) I realized the Lokar cable clevis carlewms used could be the beginnings of a solution for the routing plus provide the needed adjustability. If I wanted to use the same cables, the fixed ends would be too long if the routing were changed. Fortunately they’re sold separately. Lokar S-8078. My next brainstorm was to use a pulley right above the 4 inch tube to pull the cables down as far as possible, providing the best routing to the handle as well as up to the rear cable mounts. Digging through McMaster's website I found a suitable candidate, their #3434T24. Both parts arrived today, and I think it’s going to work out well.
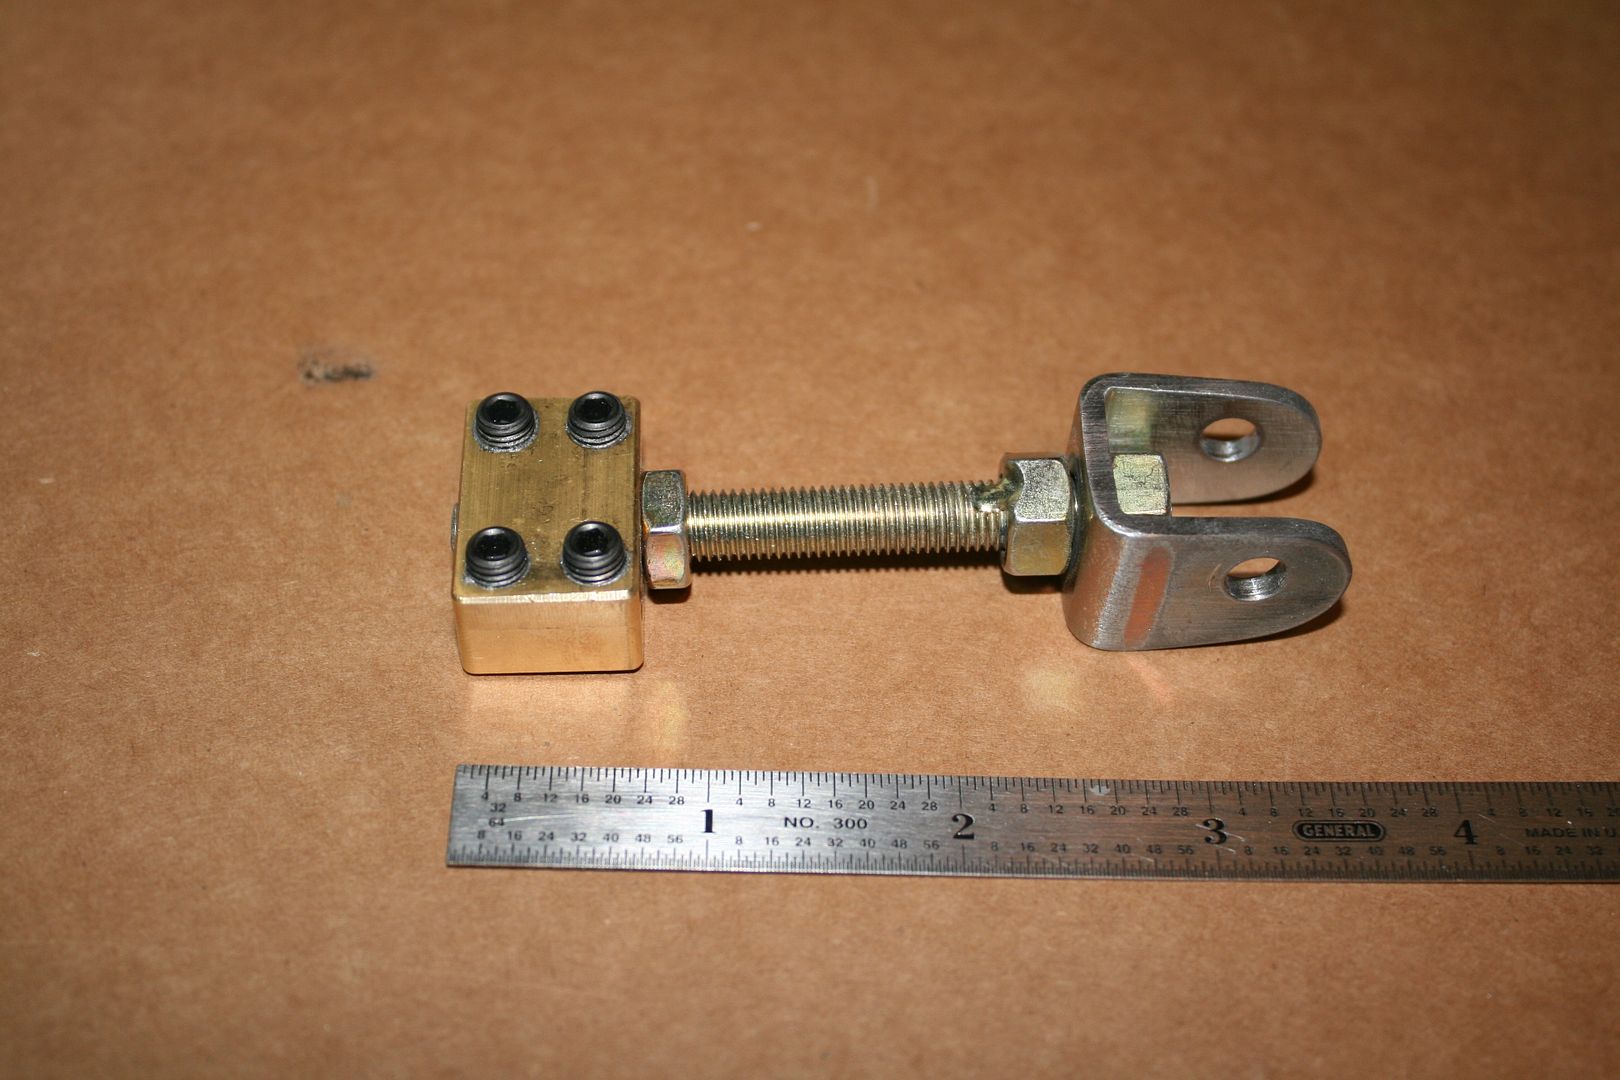
My first idea was to add the Lokar cable clevis behind the FF provided rod ends where the cables attach to the e-brake handle. But then I realized with a little modification, the Lokar cable clevis could be used by itself. Simple and neat. This is the stock Lokar part. I think it’s used with most/all of their e-brake handle assemblies;
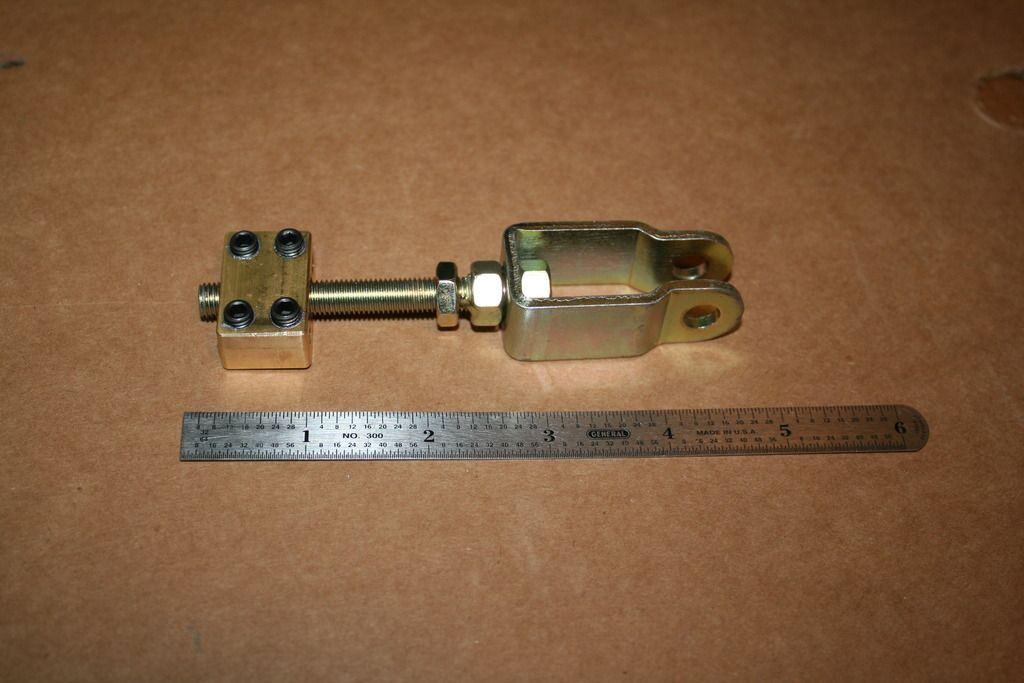
After some careful layout, trimmed it down and drilled some new holes. Now looks like this:
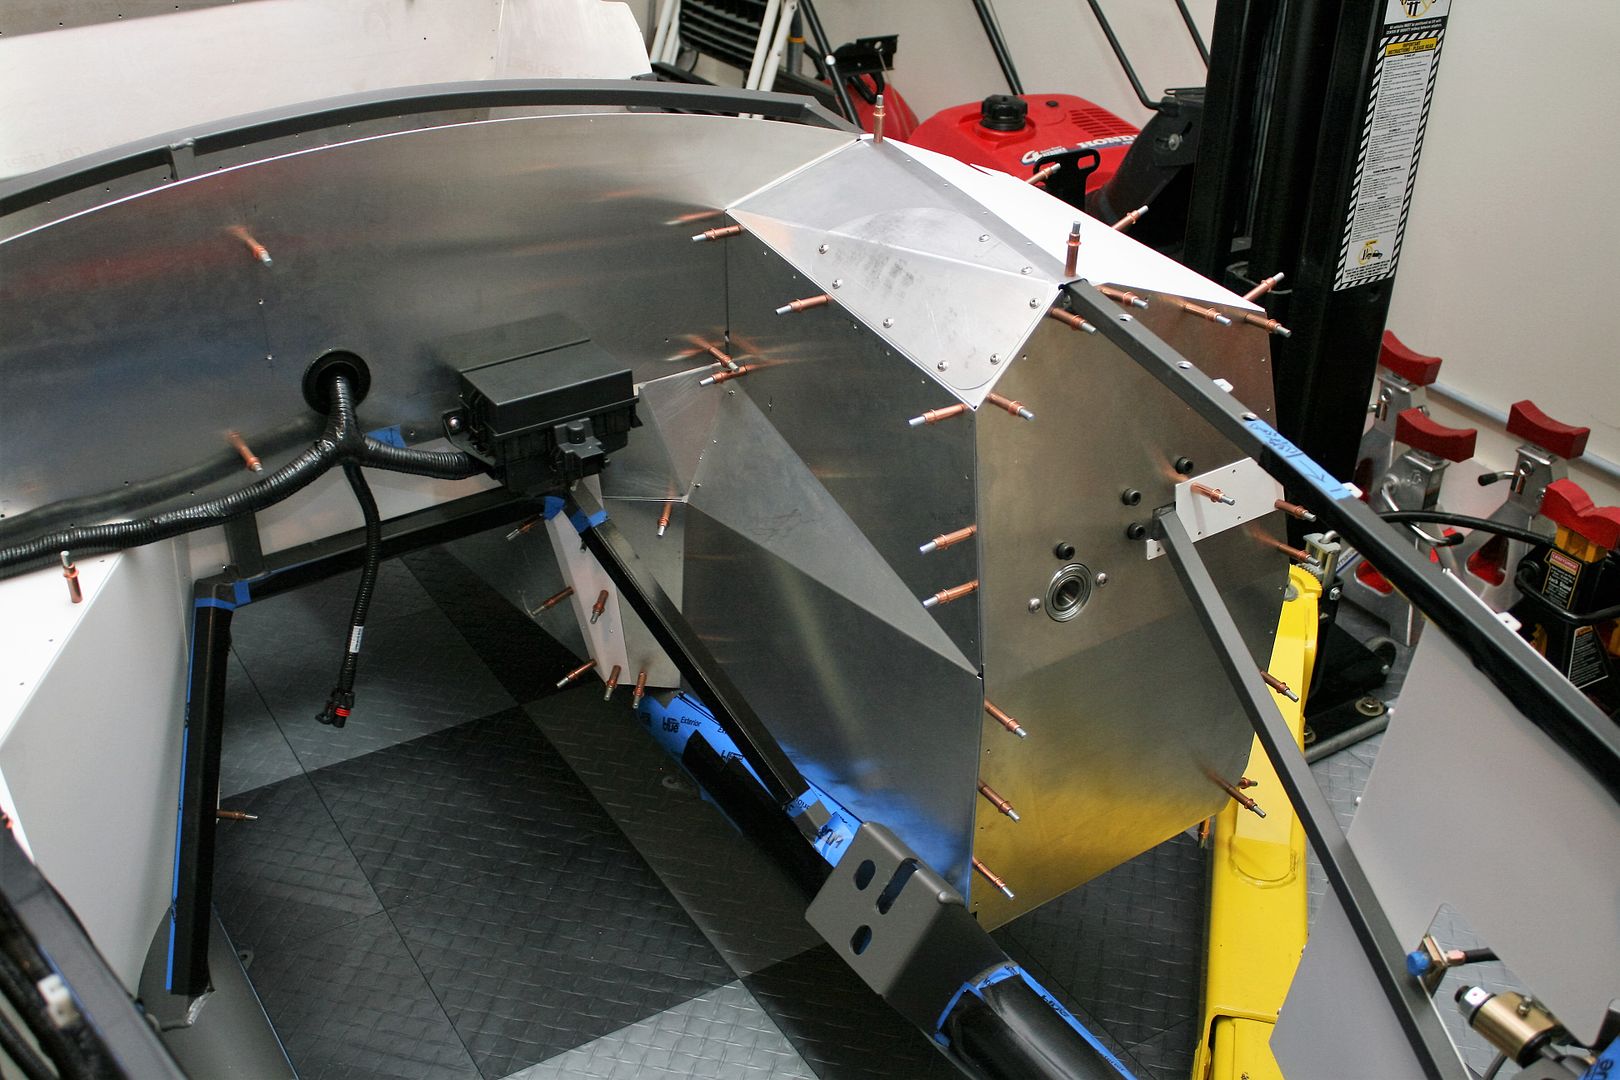
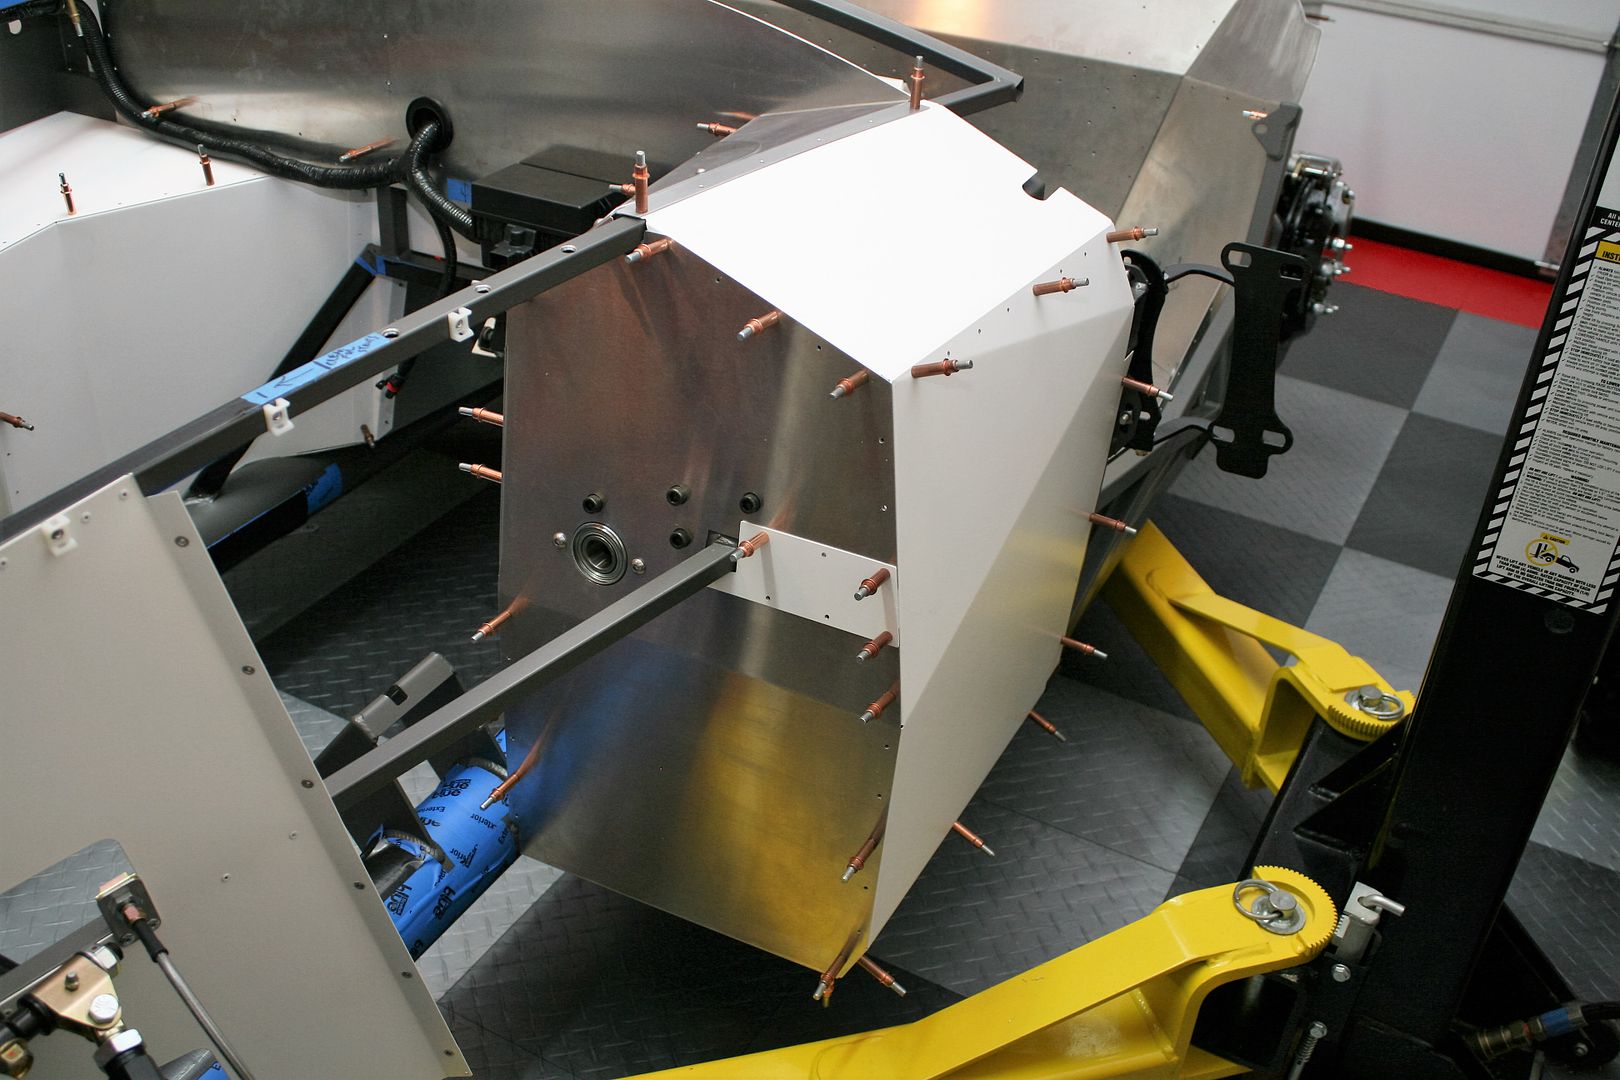
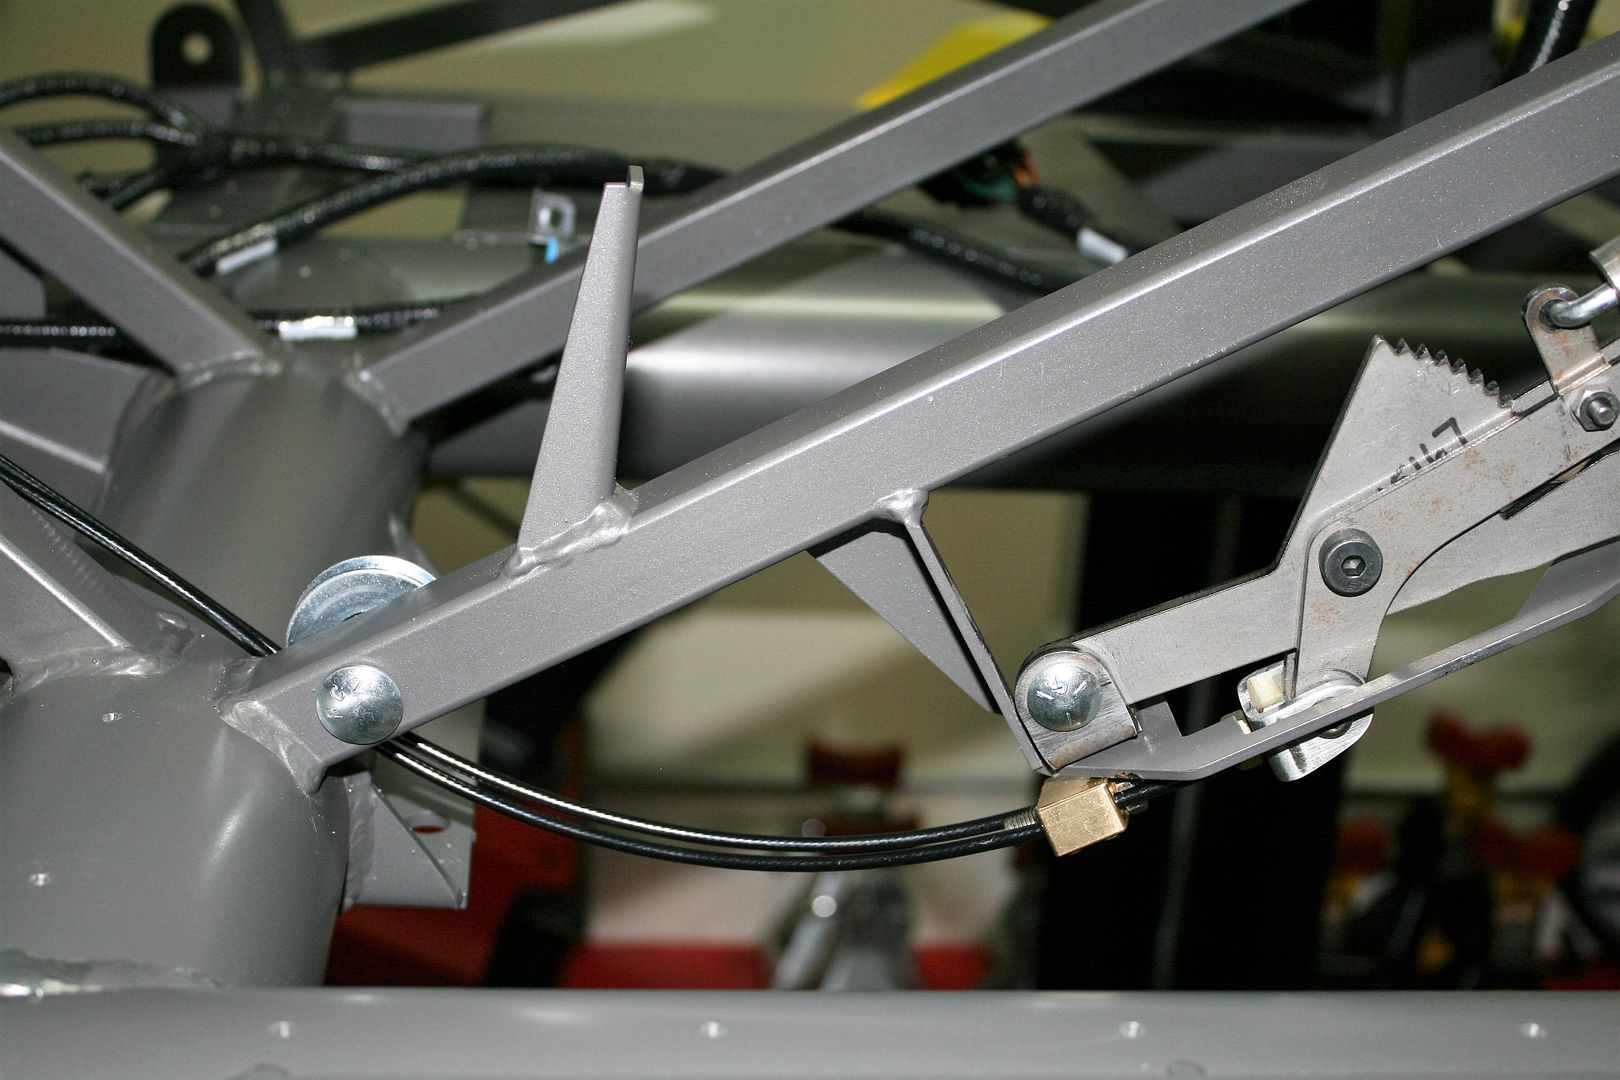
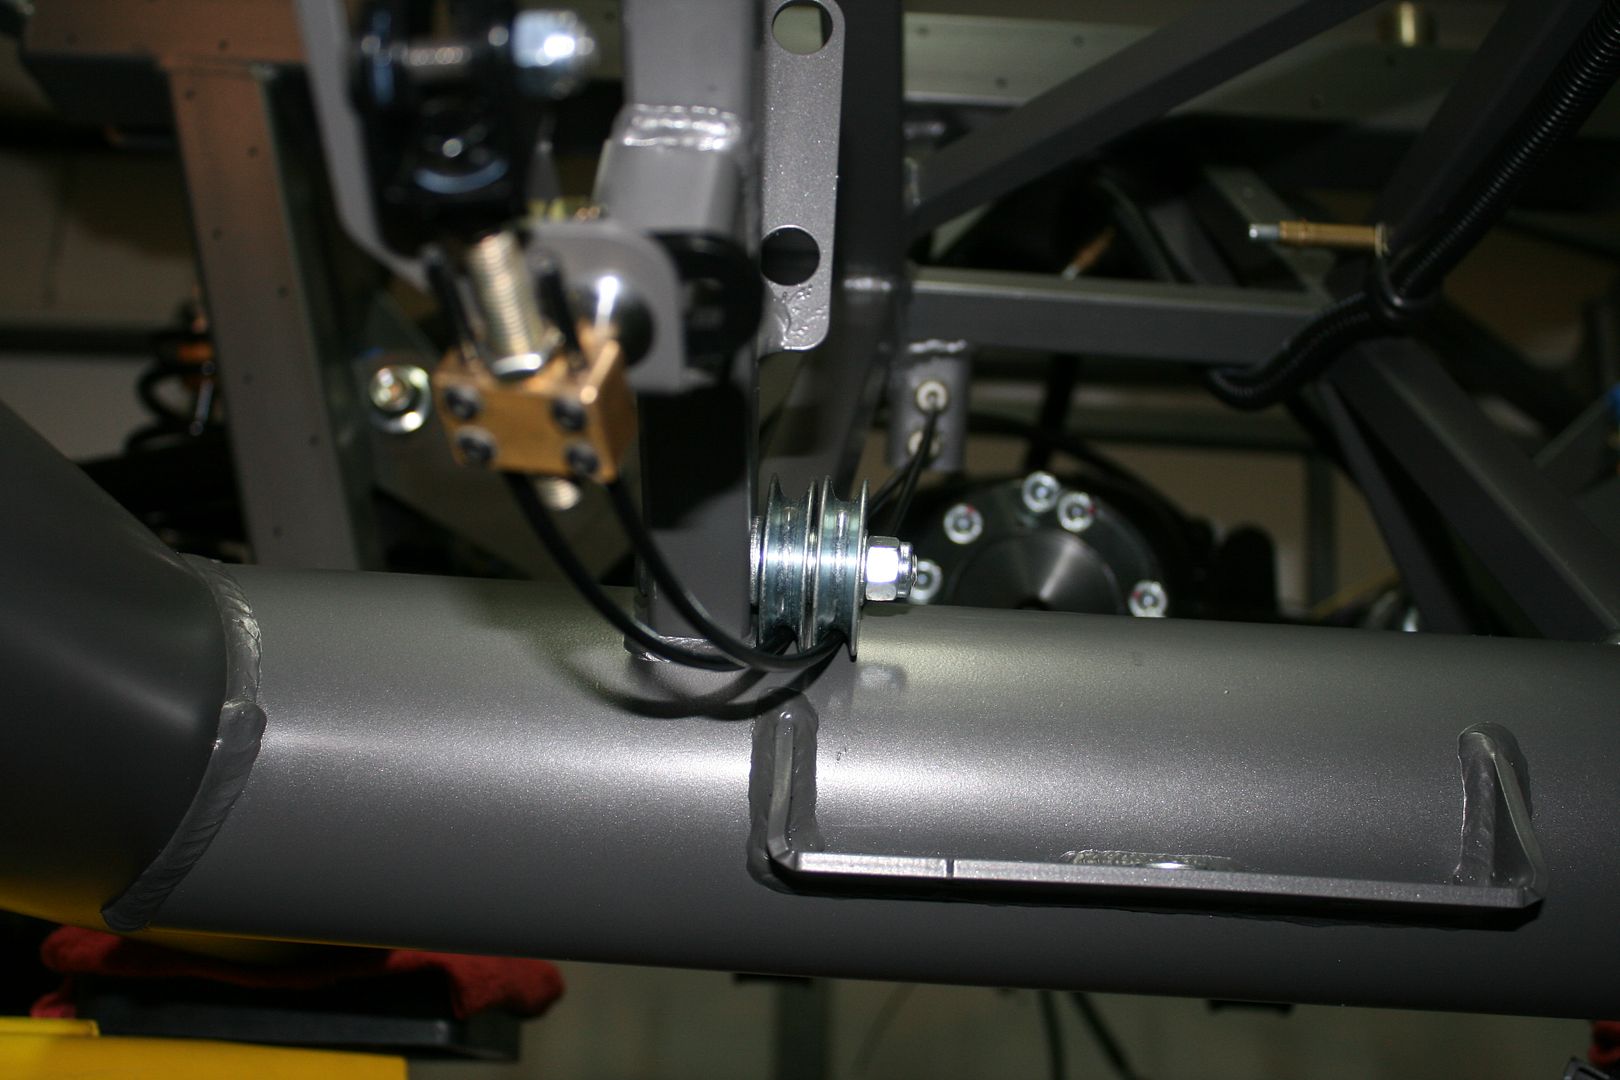
With the handle installed using the modified Lokar cable clevis, located the pulley and routed the cables. With the rear mounting bolt pointed up as shown, the cable clevis slides over it just fine. Also note I put the front bracket under the chassis mount. Gave a little more clearance at the back.
Viewed from the other side (PS cockpit) showing the new pretty direct routing. I used a carriage bolt to hold the pulley. The head of the bolt will get covered with the cockpit sheet metal. But the bolt will be captured and kept from turning with the square hole it's in.
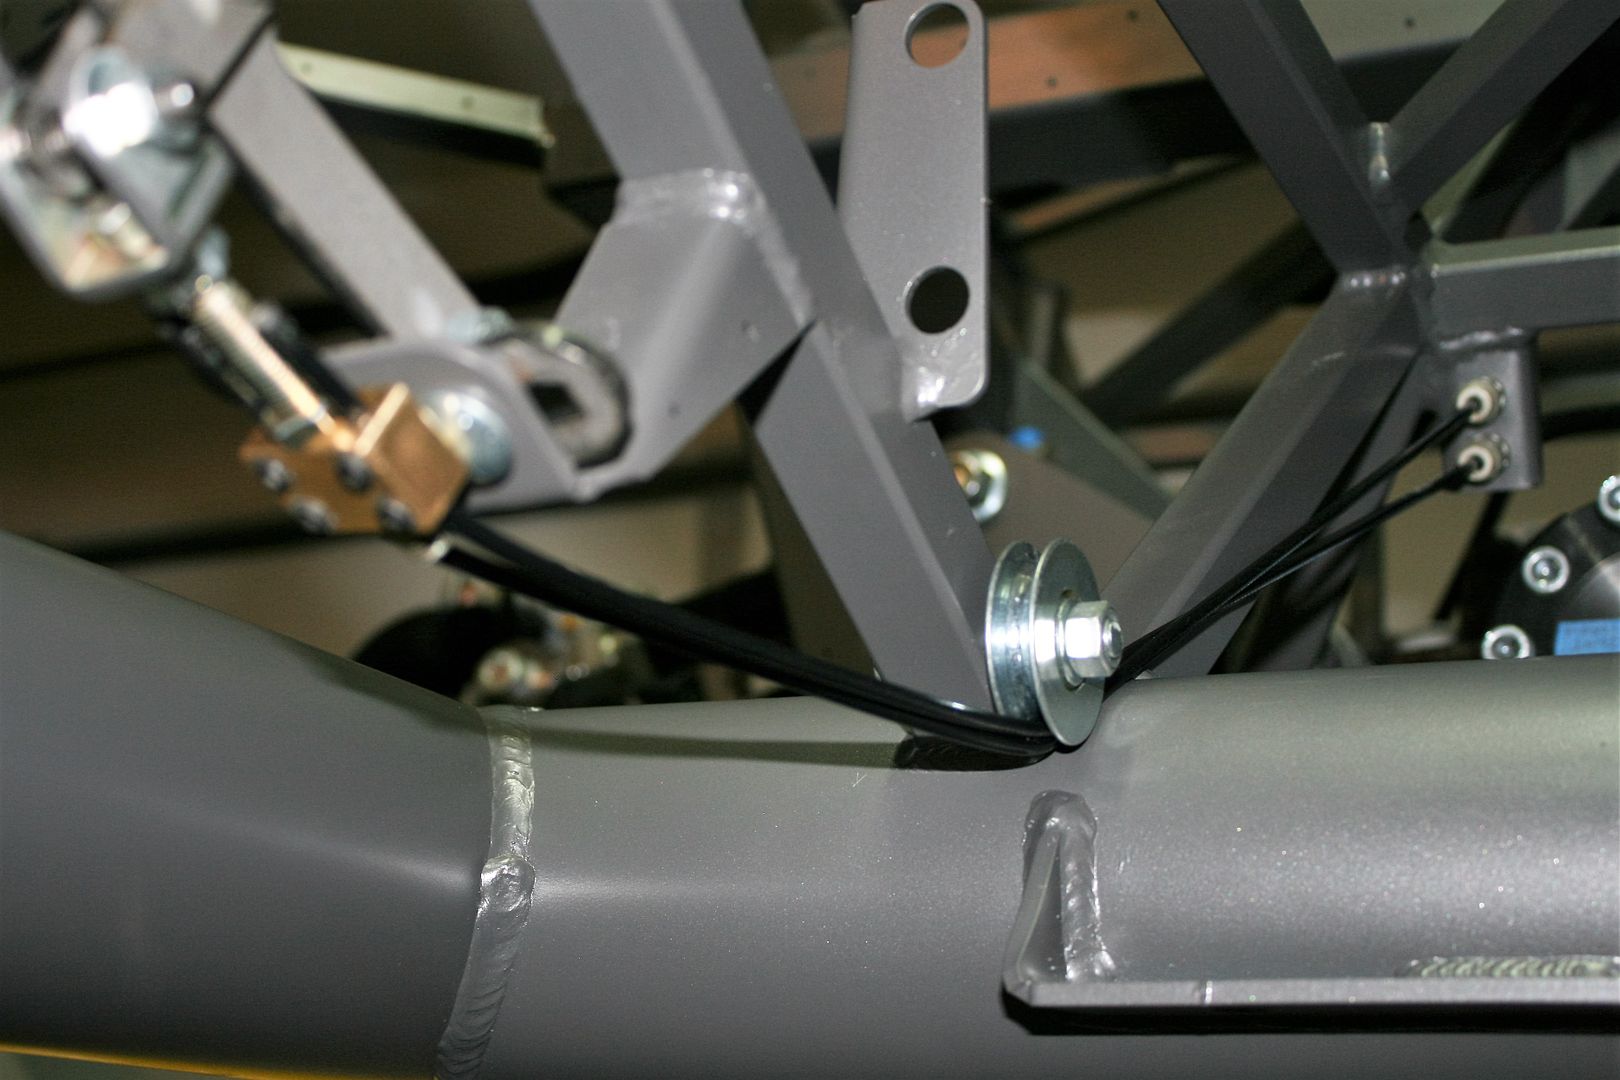
This is with the e-brake actuated, and the cables pulled tight. The disk rotors are locked solid. I think it's a go. The pulley I found is actually a rope pulley for 1/4 inch rope. The two cables don’t fit into it perfectly, but it was the best I could find and seems to work OK. I purposely mounted the pulley close enough to the chassis tube so the cables are captured. It’s a steel pulley with ball bearings, rated at 290 lbs work load. I think it’s more than up to the task, and was only $7. Gotta love McMaster.
I’m going to take everything back out now that I’m satisfied with how it’s working and paint the raw steel parts. It will go back in after the sheet metal is installed. Last week I also played around and made an aluminum dust cover to go around the e-brake opening in the transmission tunnel. It’s nothing fancy and certainly not an air or water tight seal. But generally covers the opening which just seems a lot more open than before without the much bigger Mustang piece hanging there. It’s in my batch of parts at the powder coater, so can’t show it now.
I’ve got supplies on the way to start putting covering on the dash. Should be here next week. In the meantime, I’ve starting working on the wiring. Spent some hours yesterday changing one of the Coyote harnesses. Specifically moving the starter and cooling fan wires.
Last edited by edwardb; 01-27-2016 at 10:05 PM.
Build 1: Mk3 Roadster #5125. Sold 11/08/2014.
Build 2: Mk4 Roadster #7750. Sold 04/10/2017.
Build Thread
Build 3: Mk4 Roadster 20th Anniversary #8674. Sold 09/07/2020.
Build Thread and
Video.
Build 4: Gen 3 Type 65 Coupe #59. Gen 3 Coyote. Legal 03/04/2020.
Build Thread and
Video
Build 5: 35 Hot Rod Truck #138. LS3 and 4L65E auto. Rcvd 01/05/2021. Legal 04/20/2023.
Build Thread. Sold 11/9/2023.
-
Post Thanks / Like - 1 Thanks, 0 Likes
-
01-28-2016, 10:28 AM
#171
Carl

Very nice solution ...
I like mucho ...
Carl
Mk 4 Roadster
October 25, 2012 - Kit Arrives
April 8, 2013 - Build Starts
August 23, 2015 - Rolling Chassis/Engine & Transmission Installed
March 26, 2016 - Go Cart
-
01-28-2016, 11:21 AM
#172
Senior Member
Originally Posted by
carlewms
Very nice solution ...
I like mucho ...
Carl
Gracias. Does that mean this is now a bilingual thread?  Thanks for your contribution. Got the thinking process going.
Build 1: Mk3 Roadster #5125. Sold 11/08/2014.
Build 2: Mk4 Roadster #7750. Sold 04/10/2017.
Build Thread
Build 3: Mk4 Roadster 20th Anniversary #8674. Sold 09/07/2020.
Build Thread and
Video.
Build 4: Gen 3 Type 65 Coupe #59. Gen 3 Coyote. Legal 03/04/2020.
Build Thread and
Video
Build 5: 35 Hot Rod Truck #138. LS3 and 4L65E auto. Rcvd 01/05/2021. Legal 04/20/2023.
Build Thread. Sold 11/9/2023.
-
01-28-2016, 11:22 AM
#173
Not a waxer

Nicely done Paul! Although I know you would have addressed it if you observed it being an issue---no problem with the cables wanting to bind or walk over one another sharing the grove in the pulley? Seems it would be easy enough to simply add another pulley and have them side by side if it proves to be. Thanks! I'll be filing this one away for later use
Jeff
-
01-28-2016, 12:17 PM
#174
Administrator
Originally Posted by
Jeff Kleiner
Nicely done Paul! Although I know you would have addressed it if you observed it being an issue---no problem with the cables wanting to bind or walk over one another sharing the grove in the pulley? Seems it would be easy enough to simply add another pulley and have them side by side if it proves to be. Thanks! I'll be filing this one away for later use
Jeff
Yeah, I'm filing this one away too for future use. I wish there was a way to retrofit this solution to my recently finished roadster. I'm going to have to give that some thought. The cable routing is vastly improved over the stock setup.
PS I stare at the build too, working out stuff in my mind. It's fun figuring out new ways to put these together!
FFR 5369 Pin Drive, IRS, Trigos, Torsen, Wilwoods, FMS BOSS 302 "B" cam , Mass-flo. CA SB100 (SPCN) Registered
Delivered 4/23/06. "Finished" 4/2012 (still not done!)
-
01-28-2016, 12:32 PM
#175
Senior Member

Edwardb
For future reference
http://www.mcmaster.com/#round-belt-pulleys/=10vp490
The existing pulley you have may not last with the high tension encountered when the brake is activated
-
01-28-2016, 01:02 PM
#176
Senior Member
Originally Posted by
2FAST4U
I'm not sure why you think that. The pulley I selected is all steel with a steel hub and ball bearings. It's a robust piece rated at 290 lbs working weight. I don't have a way to measure, but there's no way the tension of the cables deflecting across the pulley is approaching that weight. The plastic and brass pulleys you linked to don't show working weight, but don't appear to be any better than what I chose. Actually probably not as strong.
Last edited by edwardb; 02-03-2016 at 08:34 AM.
Build 1: Mk3 Roadster #5125. Sold 11/08/2014.
Build 2: Mk4 Roadster #7750. Sold 04/10/2017.
Build Thread
Build 3: Mk4 Roadster 20th Anniversary #8674. Sold 09/07/2020.
Build Thread and
Video.
Build 4: Gen 3 Type 65 Coupe #59. Gen 3 Coyote. Legal 03/04/2020.
Build Thread and
Video
Build 5: 35 Hot Rod Truck #138. LS3 and 4L65E auto. Rcvd 01/05/2021. Legal 04/20/2023.
Build Thread. Sold 11/9/2023.
-
01-28-2016, 01:11 PM
#177
Senior Member
Originally Posted by
Jeff Kleiner
Nicely done Paul! Although I know you would have addressed it if you observed it being an issue---no problem with the cables wanting to bind or walk over one another sharing the grove in the pulley? Seems it would be easy enough to simply add another pulley and have them side by side if it proves to be. Thanks! I'll be filing this one away for later use
Jeff
Thanks Jeff. These separate e-brake calipers actually require almost no cable movement. Basically just going from slack to tensioned locks up the disks. So taking both cables through the single pulley seems to be working fine. But I like your suggestion a lot. Stacking two pulleys next to each other would be even better. I'll do a quick sanity check, but I think there's plenty of room in that area. I just may have to throw another pulley on my next McMaster order.
Build 1: Mk3 Roadster #5125. Sold 11/08/2014.
Build 2: Mk4 Roadster #7750. Sold 04/10/2017.
Build Thread
Build 3: Mk4 Roadster 20th Anniversary #8674. Sold 09/07/2020.
Build Thread and
Video.
Build 4: Gen 3 Type 65 Coupe #59. Gen 3 Coyote. Legal 03/04/2020.
Build Thread and
Video
Build 5: 35 Hot Rod Truck #138. LS3 and 4L65E auto. Rcvd 01/05/2021. Legal 04/20/2023.
Build Thread. Sold 11/9/2023.
-
01-31-2016, 08:32 AM
#178
Senior Member

Hey Edward, I'm pleased that I'm always several steps behind you in this build, your suggestions are always very helpful, one being to pre-install and drill all the panels before sending them to get powder coated. Like you I'm powder coating all the remaining panels in the car gray to match the frame. I wanted to check if you managed to find any gray rivets that were a close match to the frame color. The gray ones I ordered from McMaster where too light. Otherwise I was just going to send some plain ones to get powder coated as well, that way I'll have a perfect match. Cheers
-
01-31-2016, 09:08 AM
#179
Senior Member
Originally Posted by
Paul_M
Hey Edward, I'm pleased that I'm always several steps behind you in this build, your suggestions are always very helpful, one being to pre-install and drill all the panels before sending them to get powder coated. Like you I'm powder coating all the remaining panels in the car gray to match the frame. I wanted to check if you managed to find any gray rivets that were a close match to the frame color. The gray ones I ordered from McMaster where too light. Otherwise I was just going to send some plain ones to get powder coated as well, that way I'll have a perfect match. Cheers
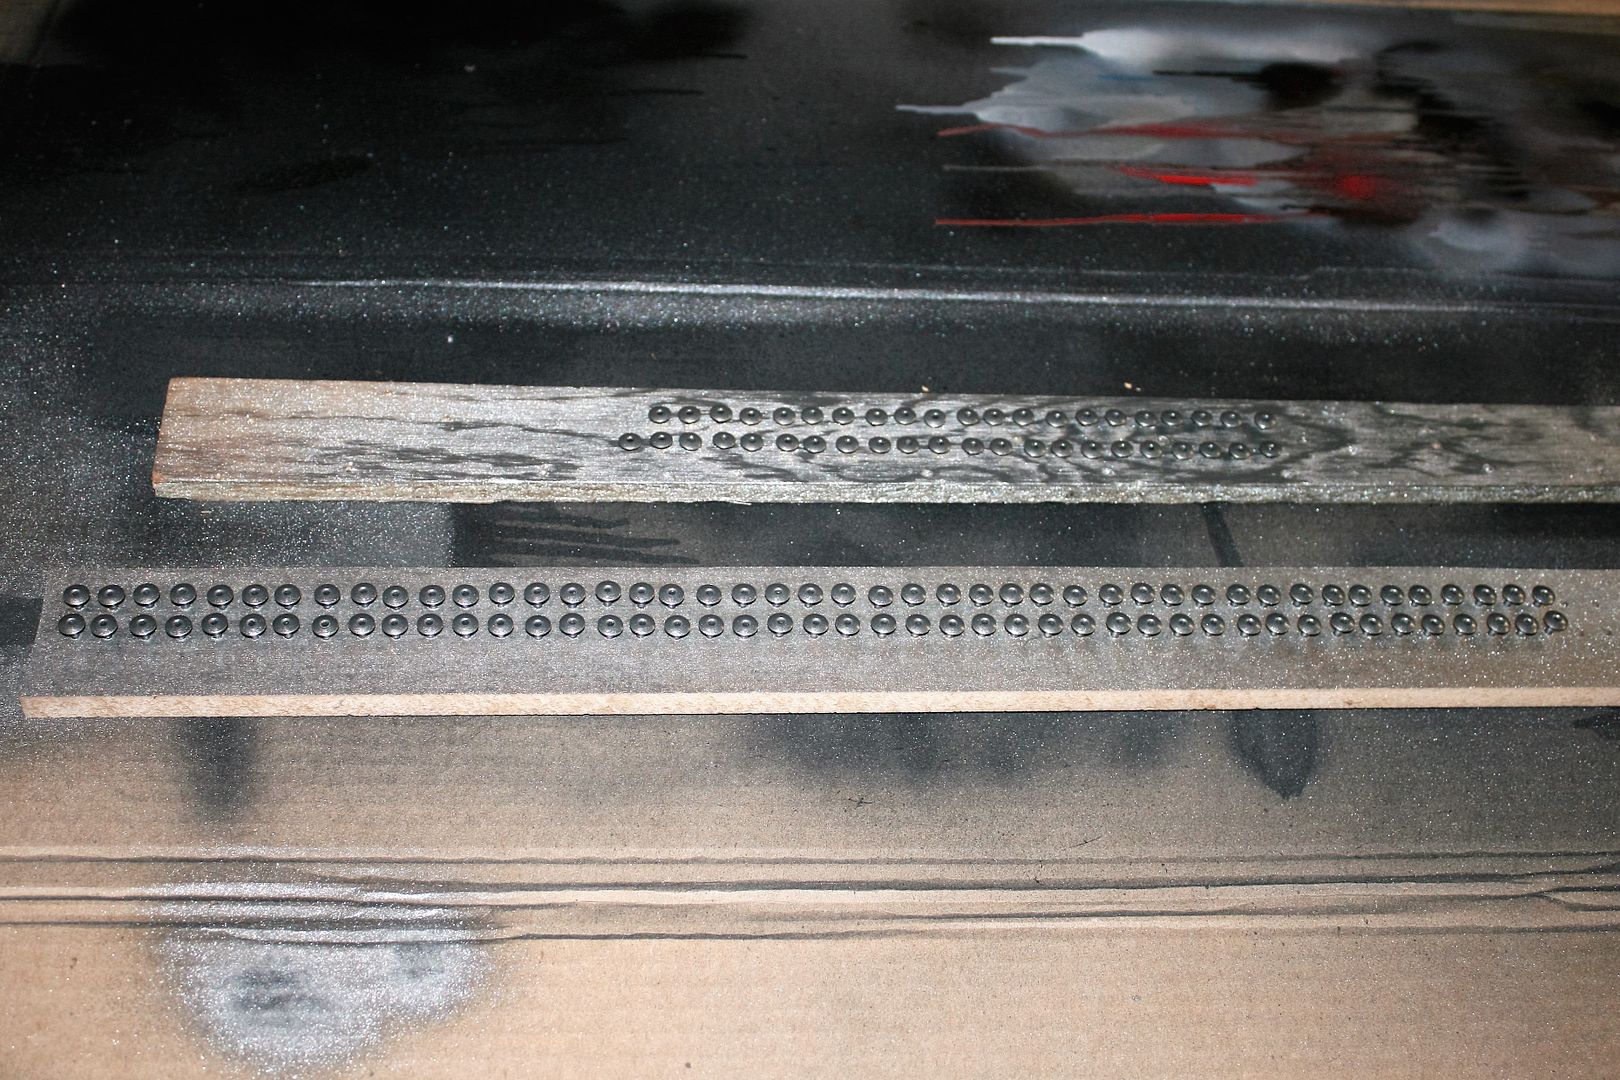
Initially I was going to just use the plain raw aluminum rivets. But upon further review agree having them the same color as the panels would be much better. I'm going to line some up in a block of wood and hit them with the same Rust-Oleum High Performance Wheel Paint, color 248930 GRAPHITE, mentioned earlier in my build thread. I'm using a pneumatic puller, and I found if I keep a real light touch like on the McMaster white ones I've used already, there is little/no damage to the painted rivets. Easy enough to touch up after the fact if necessary though.
My powder coat parts are supposed to be done sometime this week. Most are the matching grey color. But I have a few custom panels that will be white to match the FF supplied white panels. With the info provided by FF, I was able to get the same exact Prismatic Powders white.
Last edited by edwardb; 01-31-2016 at 09:11 AM.
Build 1: Mk3 Roadster #5125. Sold 11/08/2014.
Build 2: Mk4 Roadster #7750. Sold 04/10/2017.
Build Thread
Build 3: Mk4 Roadster 20th Anniversary #8674. Sold 09/07/2020.
Build Thread and
Video.
Build 4: Gen 3 Type 65 Coupe #59. Gen 3 Coyote. Legal 03/04/2020.
Build Thread and
Video
Build 5: 35 Hot Rod Truck #138. LS3 and 4L65E auto. Rcvd 01/05/2021. Legal 04/20/2023.
Build Thread. Sold 11/9/2023.
-
02-02-2016, 10:37 PM
#180
Senior Member
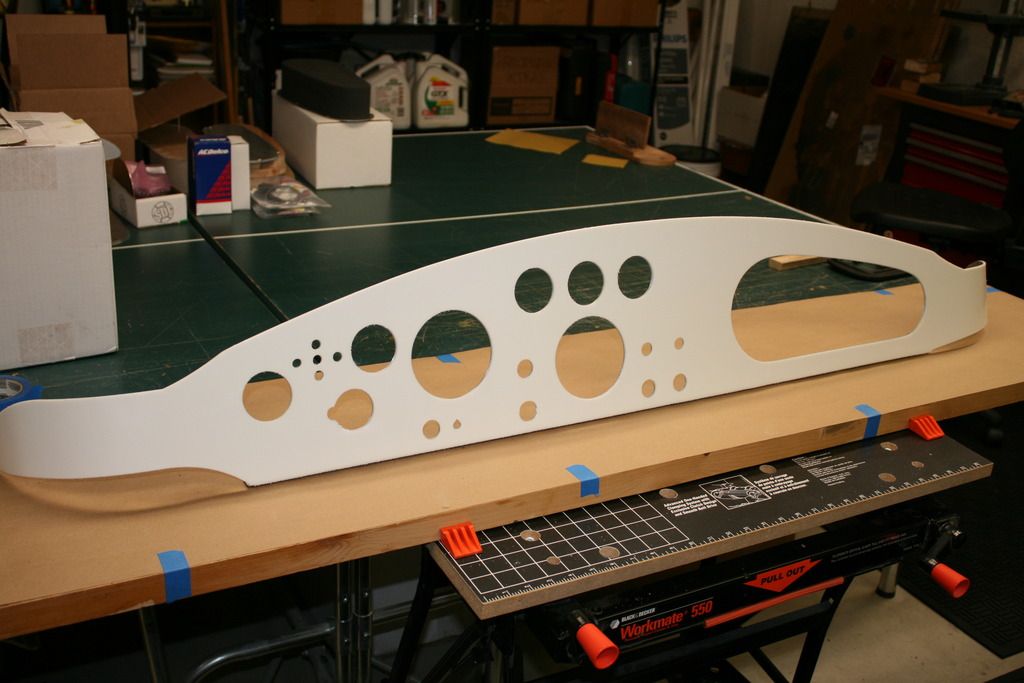
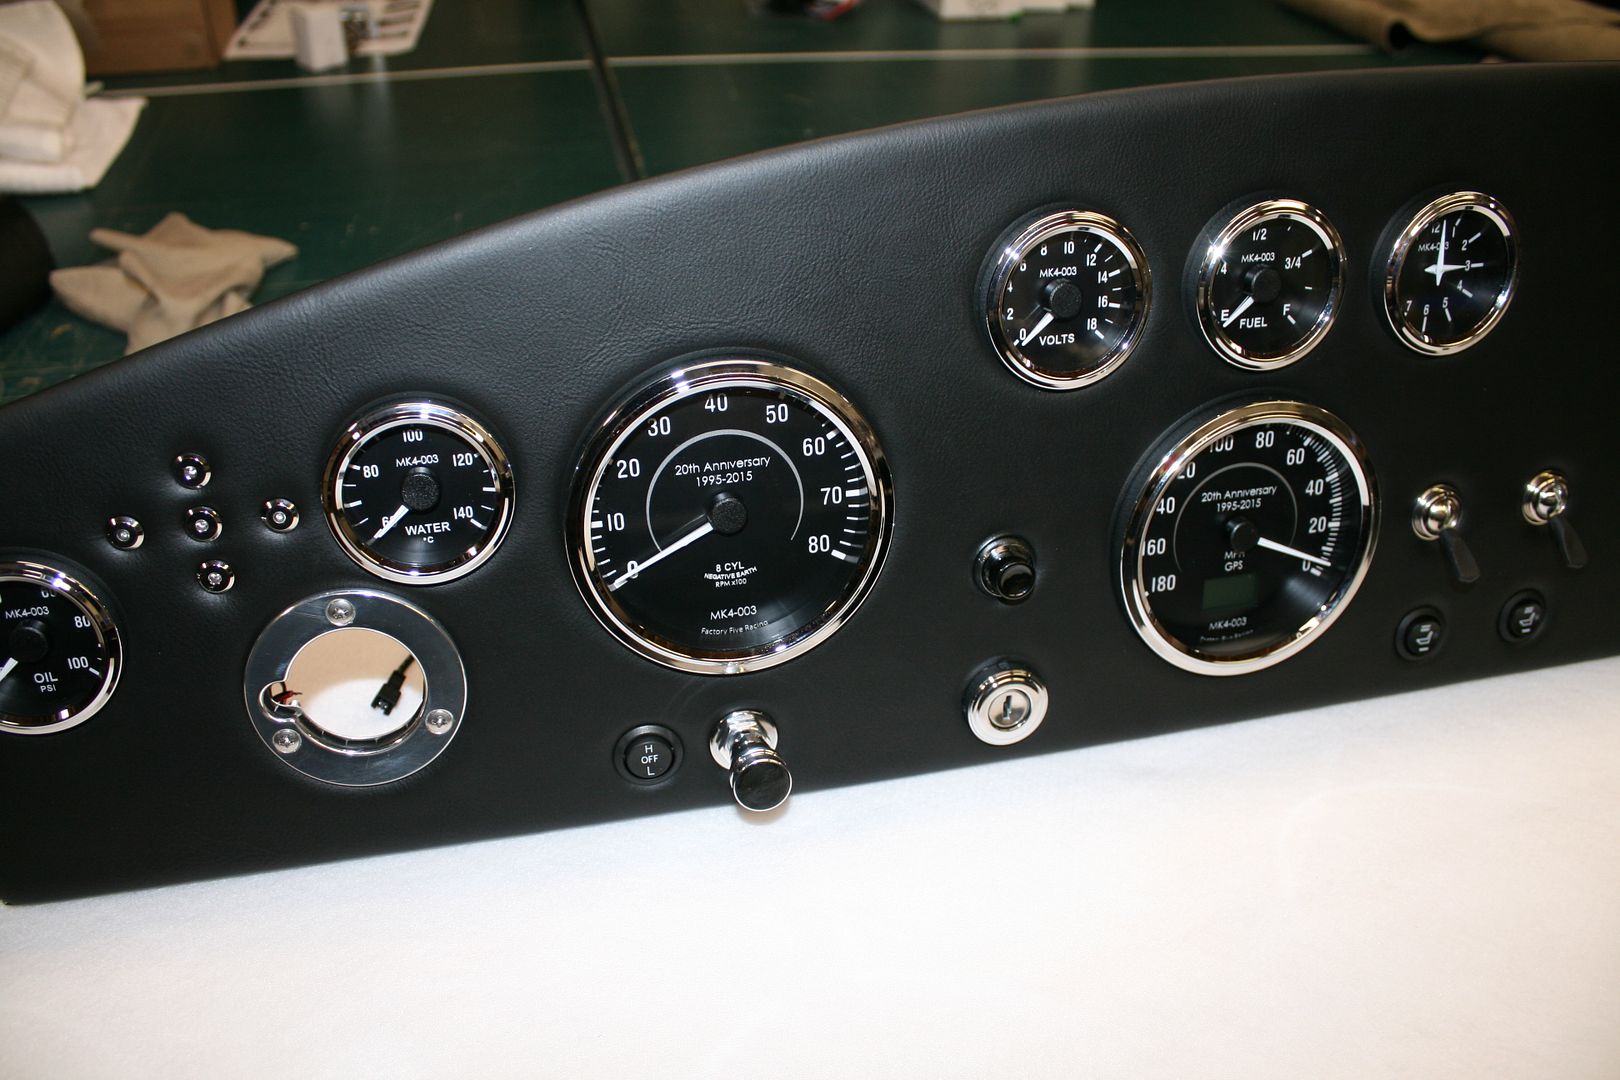
Instrument Panel Cover and Assembly
While waiting for powder coating to be finished on all my sheet metal and related, decided to tackle the instrument panel. As described in previous updates, I did a slightly modified competition layout using a blank FF panel and fabricated a glove box. I decided early on to give leather covering a try. I picked up a full hide on eBay. It’s way more than I needed, but found a source that was reasonable and figured having extra just in case wasn’t a bad thing. I’m also planning to do the transmission tunnel cover, but that will be sometime later. For my last build, I wanted to avoid the puffy look, so did two layers of vinyl and no padding. It turned out nice, but had a bit less “give” than I expected. So this time around, I decided to give thin padding a try. I bought some 1/8" thick Volara Sculpting Foam from YourAutoTrim.com. I did some testing, and was satisfied. Nice cushion but not puffy.
This is the instrument panel with the foam applied. I used DAP Weldwood Landau Top & Trim HHR (High Heat Resistant) Contact Cement also from YourAutoTrim.com. This is the stuff I’ve used before and it’s outstanding. It’s a professional product that usually is sprayed. But I’ve found it works OK if brushed or rolled. Probably not the most efficient application method, but the smallest you can buy is one gallon, so no problem with running out. If you take something to a professional upholstery or auto trim shop, guarantee this is the stuff they’ll be using.
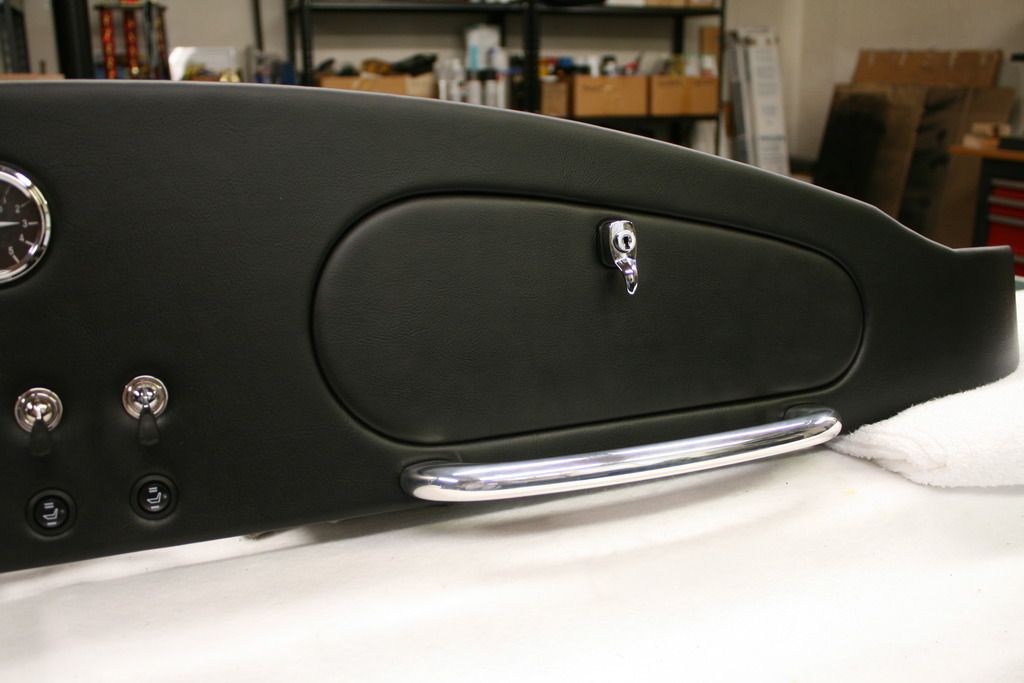
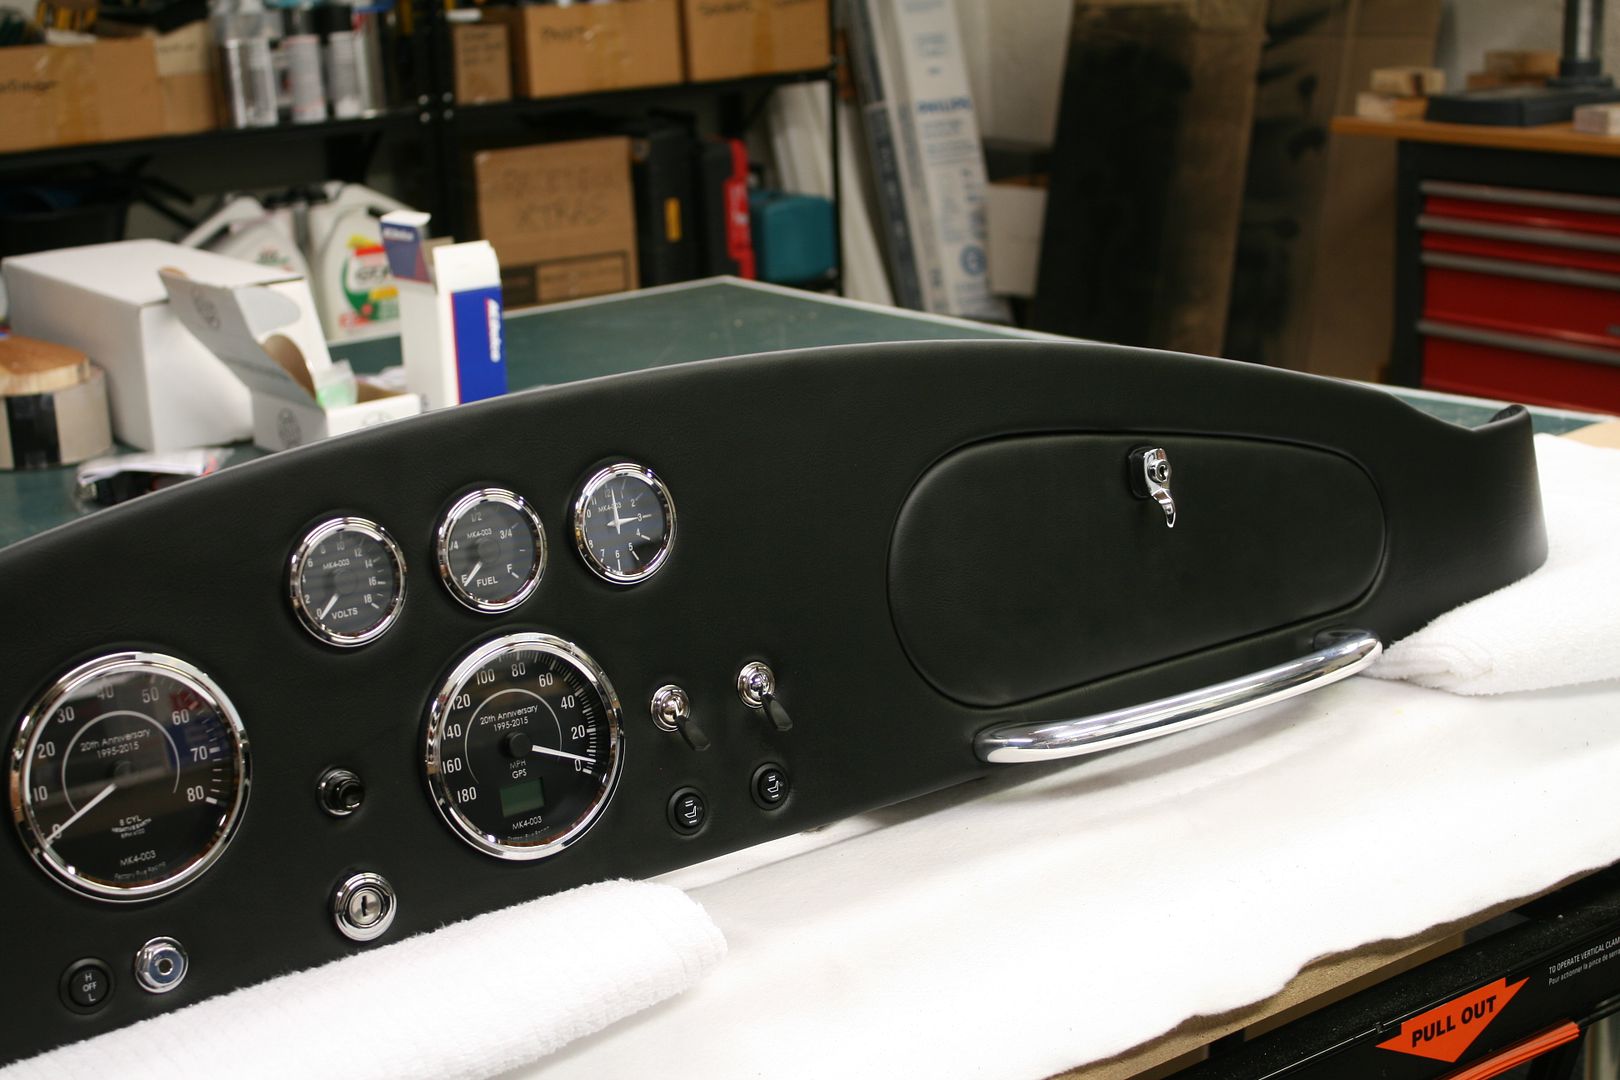
Some hours later (!), had the leather applied and everything installed. Having done a couple panels in vinyl and now leather, it’s a bit different. It goes from flat to a little wavy when the contact cement is applied. Maybe wouldn’t be as pronounced if the cement were sprayed. But with care it goes down and rolls out nice and flat. It also eats blades. I went through a stack of X-Acto blades. I pulled the leather through to the back with pie cuts on all but a couple openings where there isn't room and there's a sufficient flange or finish washer. The holes were cut taking this into account. These pictures don’t really do the leather justice. The natural grain is pretty cool. I still have work to do on the glovebox. I’m planning to line the interior with leather (have plenty) and then need to cover and hang the door. The grab handle is just bolted through the dash at this point. Once the dash is installed in the chassis, I’ll add braces down to the 2x2 dash tube as I’ve done before.

Just a little more work to do back here.
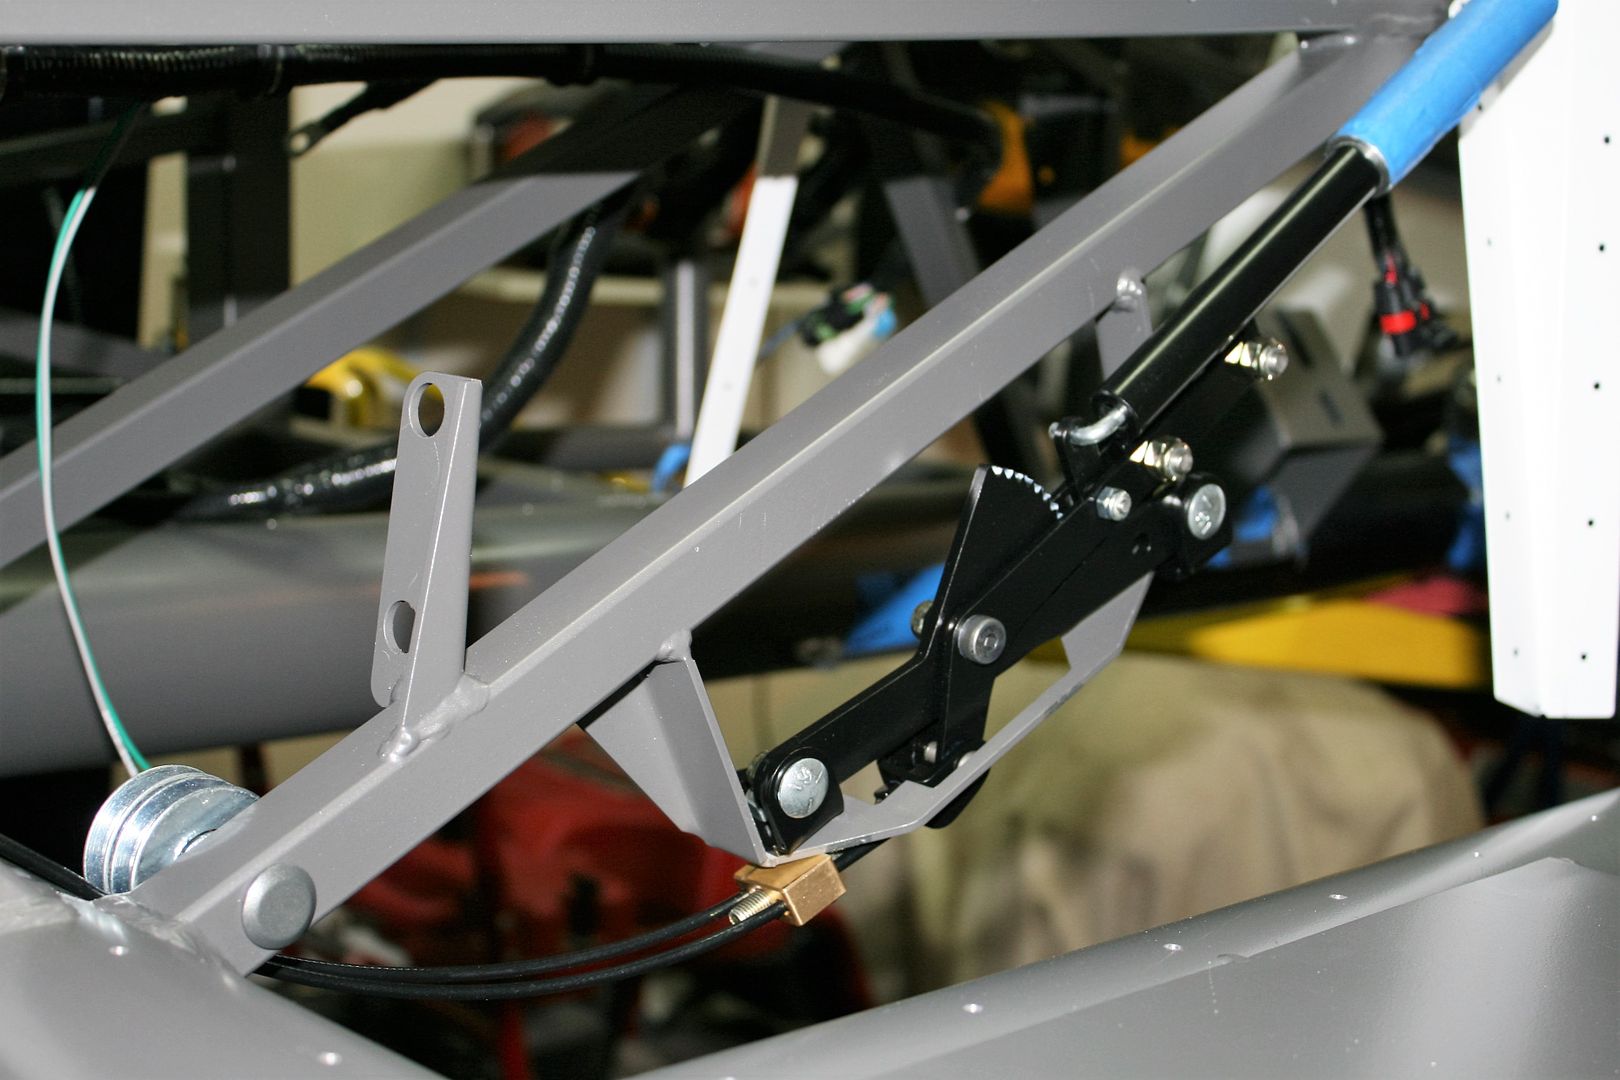
Quick follow-up to a previous update. I posted my e-brake cable routing going through pulleys instead of under the 4 inch chassis tube. Jeff Kleiner made an excellent observation that perhaps a second pulley with a cable through each might work well. After I got past the “Why didn’t I think of that…” moment, decided to give it a try. It worked OK before, but even better now. I checked as best I could with the transmission frame and mount in place, pictures I have of my other TKO installed, and all indications are I should have enough room. I’ve got the e-brake handle assembly painted and the cable routing really finalized now. It will need to come out one more time to install the aluminum panel and insulation.
Last edited by edwardb; 02-02-2016 at 10:52 PM.
Build 1: Mk3 Roadster #5125. Sold 11/08/2014.
Build 2: Mk4 Roadster #7750. Sold 04/10/2017.
Build Thread
Build 3: Mk4 Roadster 20th Anniversary #8674. Sold 09/07/2020.
Build Thread and
Video.
Build 4: Gen 3 Type 65 Coupe #59. Gen 3 Coyote. Legal 03/04/2020.
Build Thread and
Video
Build 5: 35 Hot Rod Truck #138. LS3 and 4L65E auto. Rcvd 01/05/2021. Legal 04/20/2023.
Build Thread. Sold 11/9/2023.
-
Post Thanks / Like - 1 Thanks, 0 Likes
-
02-03-2016, 03:40 AM
#181
Senior Member

Excellent work on the dash! Where did you get the glove box?
Carlos
FFR Coupe #0635; Ford 347ci, Tremec TKO500, 8.8 rear end w/ 3.27:1 gears, Cobra/SVO brakes
-
02-03-2016, 07:13 AM
#182
Not a waxer
Dash looks fantastic! It's like jewelry I think you've hit the sweet spot for "just enough but not too much" padding!
Jeff
-
02-03-2016, 08:38 AM
#183
Senior Member
Originally Posted by
Carlos C
Excellent work on the dash! Where did you get the glove box? Carlos
I fabricated it myself. Described previously in the build thread starting here: http://thefactoryfiveforum.com/showt...l=1#post219268
Build 1: Mk3 Roadster #5125. Sold 11/08/2014.
Build 2: Mk4 Roadster #7750. Sold 04/10/2017.
Build Thread
Build 3: Mk4 Roadster 20th Anniversary #8674. Sold 09/07/2020.
Build Thread and
Video.
Build 4: Gen 3 Type 65 Coupe #59. Gen 3 Coyote. Legal 03/04/2020.
Build Thread and
Video
Build 5: 35 Hot Rod Truck #138. LS3 and 4L65E auto. Rcvd 01/05/2021. Legal 04/20/2023.
Build Thread. Sold 11/9/2023.
-
02-03-2016, 10:53 AM
#184
Administrator
Gorgeous dash! Truly amazing. I remember trying to do a custom padded dash on my first build and absolutely RUINED the dash! I'd like to try your method on a future dash...
The ebrake is another killer mod! Now it's even better with thee two pullies instead of one. FFR should take a look at your solution. TOTALLY cleans up the "least optimal" piece of the whole build! Very, very nicely done!
FFR 5369 Pin Drive, IRS, Trigos, Torsen, Wilwoods, FMS BOSS 302 "B" cam , Mass-flo. CA SB100 (SPCN) Registered
Delivered 4/23/06. "Finished" 4/2012 (still not done!)
-
02-03-2016, 04:39 PM
#185
Senior Member

I have to say that your ability to execute such well planned and clean work is very impressive. You've added some very professional touches that make perfect sense.
I can't wait to see how your car finishes out.
Congrats! Great build!
Mike
The Stig
Some say, that I only know two facts about ducks, (both being wrong); and that if I could be bothered, I could solve the "da Vinci Code" in 47 seconds...
All I know is that I'm called "The Stig".
GTM #0081
-
02-03-2016, 07:46 PM
#186
Senior Member
Originally Posted by
edwardb
Oops, I can't believe I forgot that you also built that work of art. My bad.
Carlos
FFR Coupe #0635; Ford 347ci, Tremec TKO500, 8.8 rear end w/ 3.27:1 gears, Cobra/SVO brakes
-
02-08-2016, 05:56 PM
#187
Senior Member
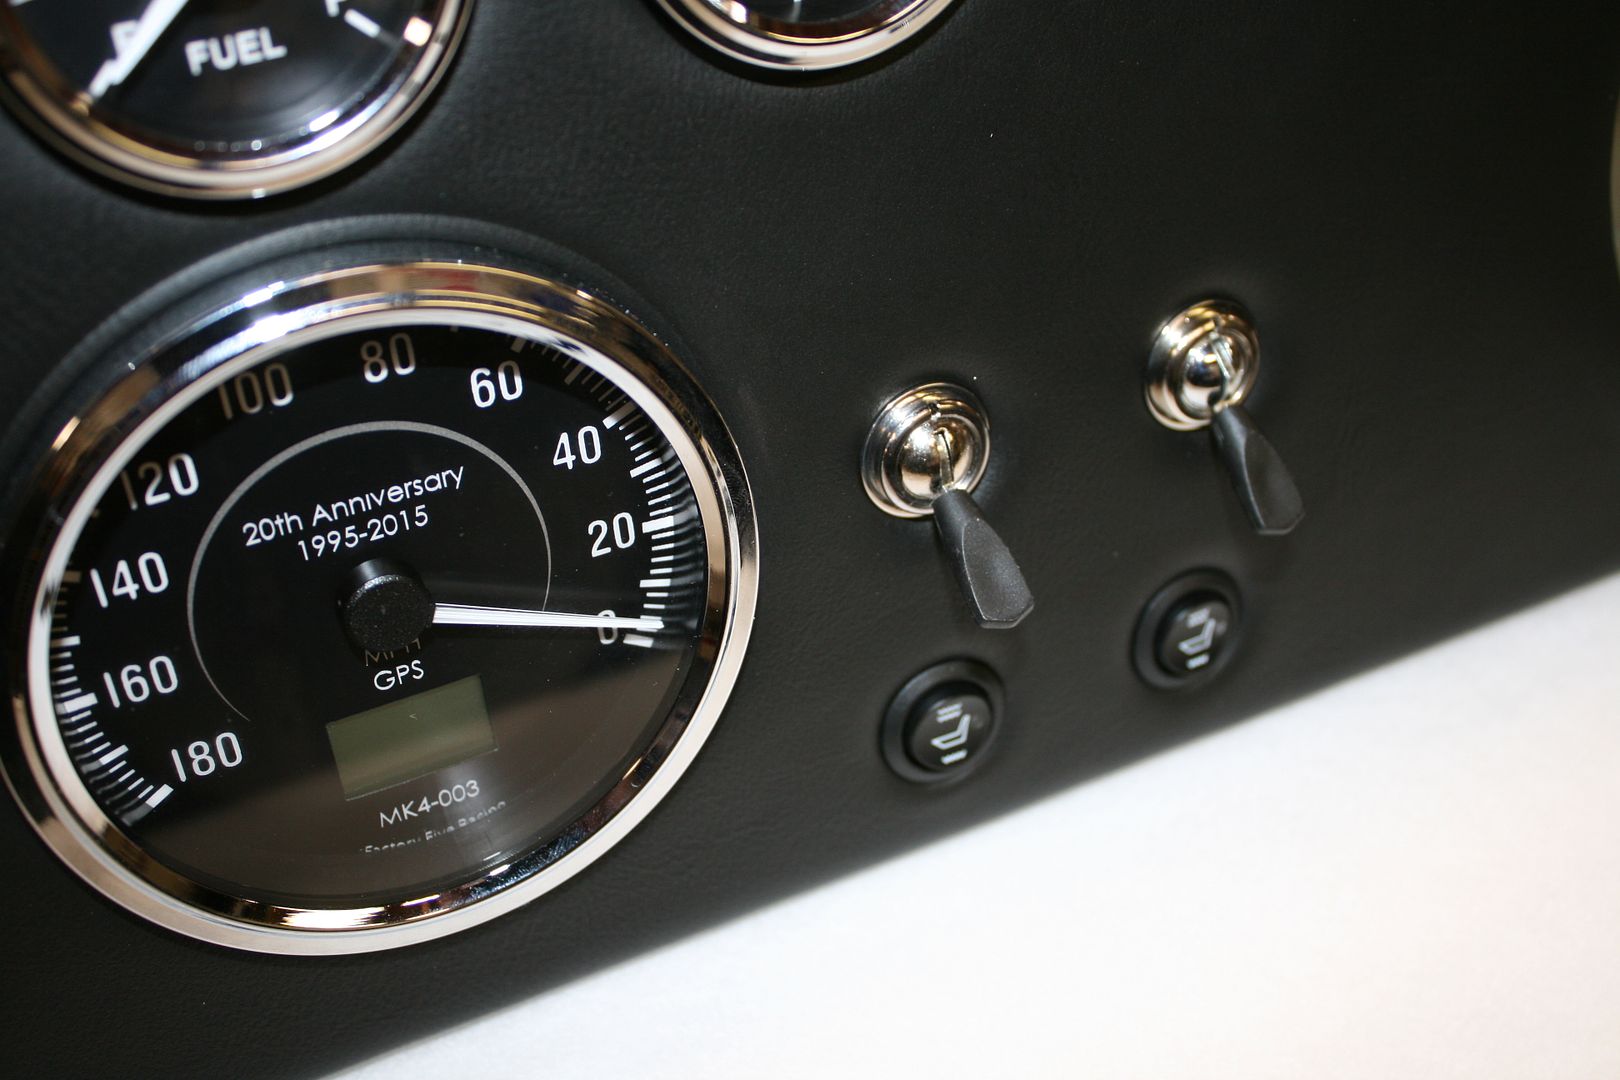
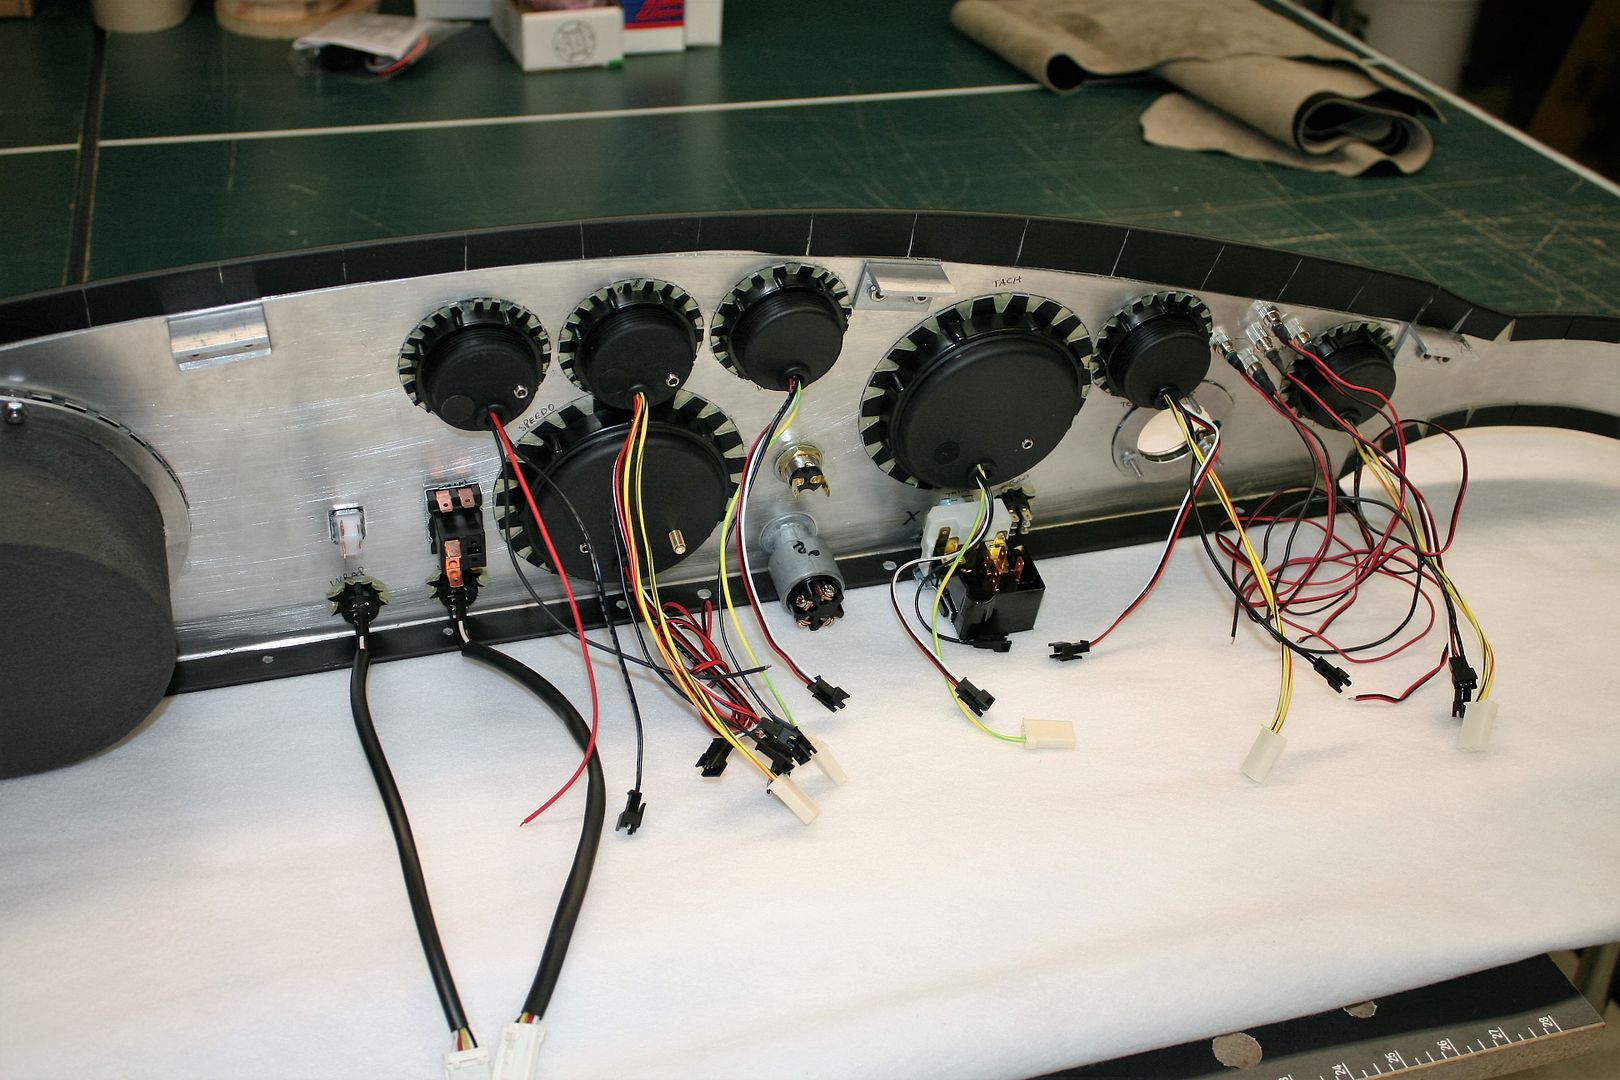
Instrument Panel and Glovebox Completed
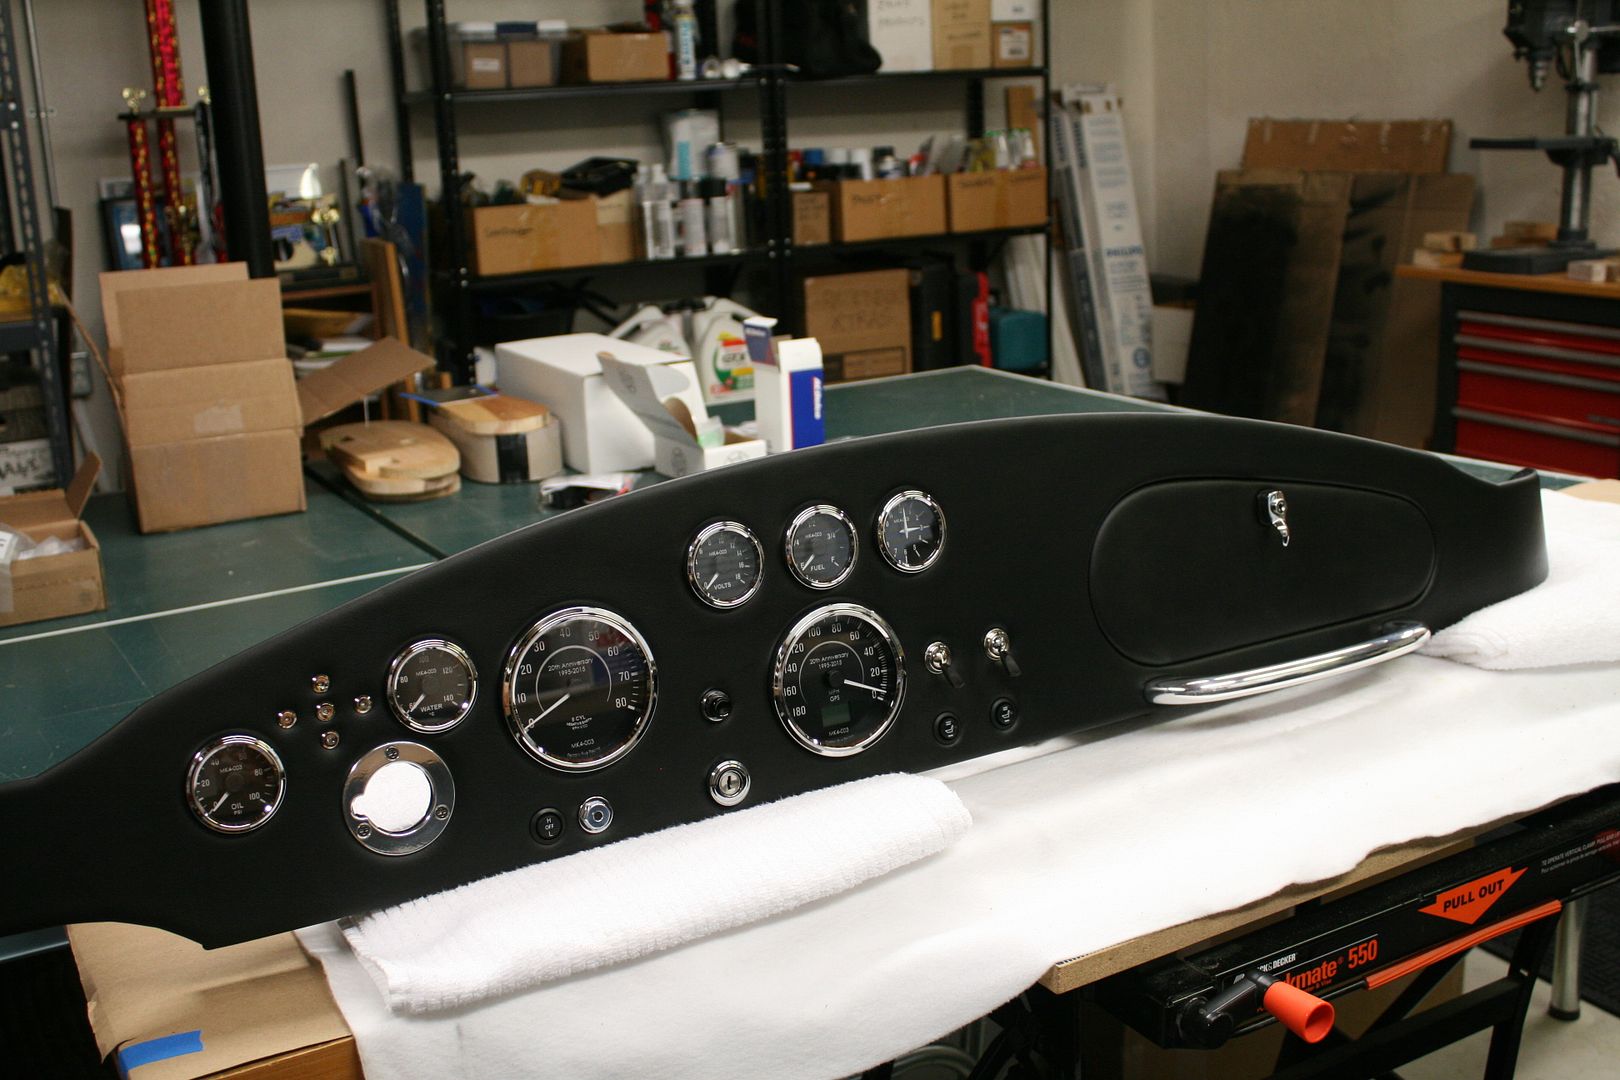
Today I finally finished the instrument panel. Since the last update the main work was finishing the inside of the glove box, fabricating and covering the door, and installing the hinges and latch. I’m planning to put leather on the trans cover, but later in the build after it’s fitted, shifter location determined, etc. So I’m out of the leather applying business for now. Good. It’s pretty stressful trying to get everything just right because it’s such a prominent part of the final product. But I'm pleased with how everything turned out. I would mostly do everything the same if I did it again.
I lined the interior of the glovebox with leather. Why not. I have plenty. I didn’t trust myself to hit the exact spots with the contact cement, so used clear silicone to glue it in. Same stuff I’m using for sheet metal. Should hold fine, but even though I rolled it like crazy, still doesn’t come out quite as flat as using contact cement. It’s OK for where it is. The doors I made from two pieces of aluminum. I used a .090 inch thick piece for the inside, and a .040 inch thick piece with the same 1/8 inch sculpting foam as the rest of the dash for the outside. I made them basically zero clearance to the opening, taking into account the thickness of the leather. Made getting the hinge alignment pretty critical, but turned out OK. Just a lot of fiddling getting the exact spots. I captured the screws for the door side of the hinges between the two door halves. The final product is a little heavy and in hindsight .040 inch thick material for both halves would have been fine. But it’s not noticeable when opening and closing.
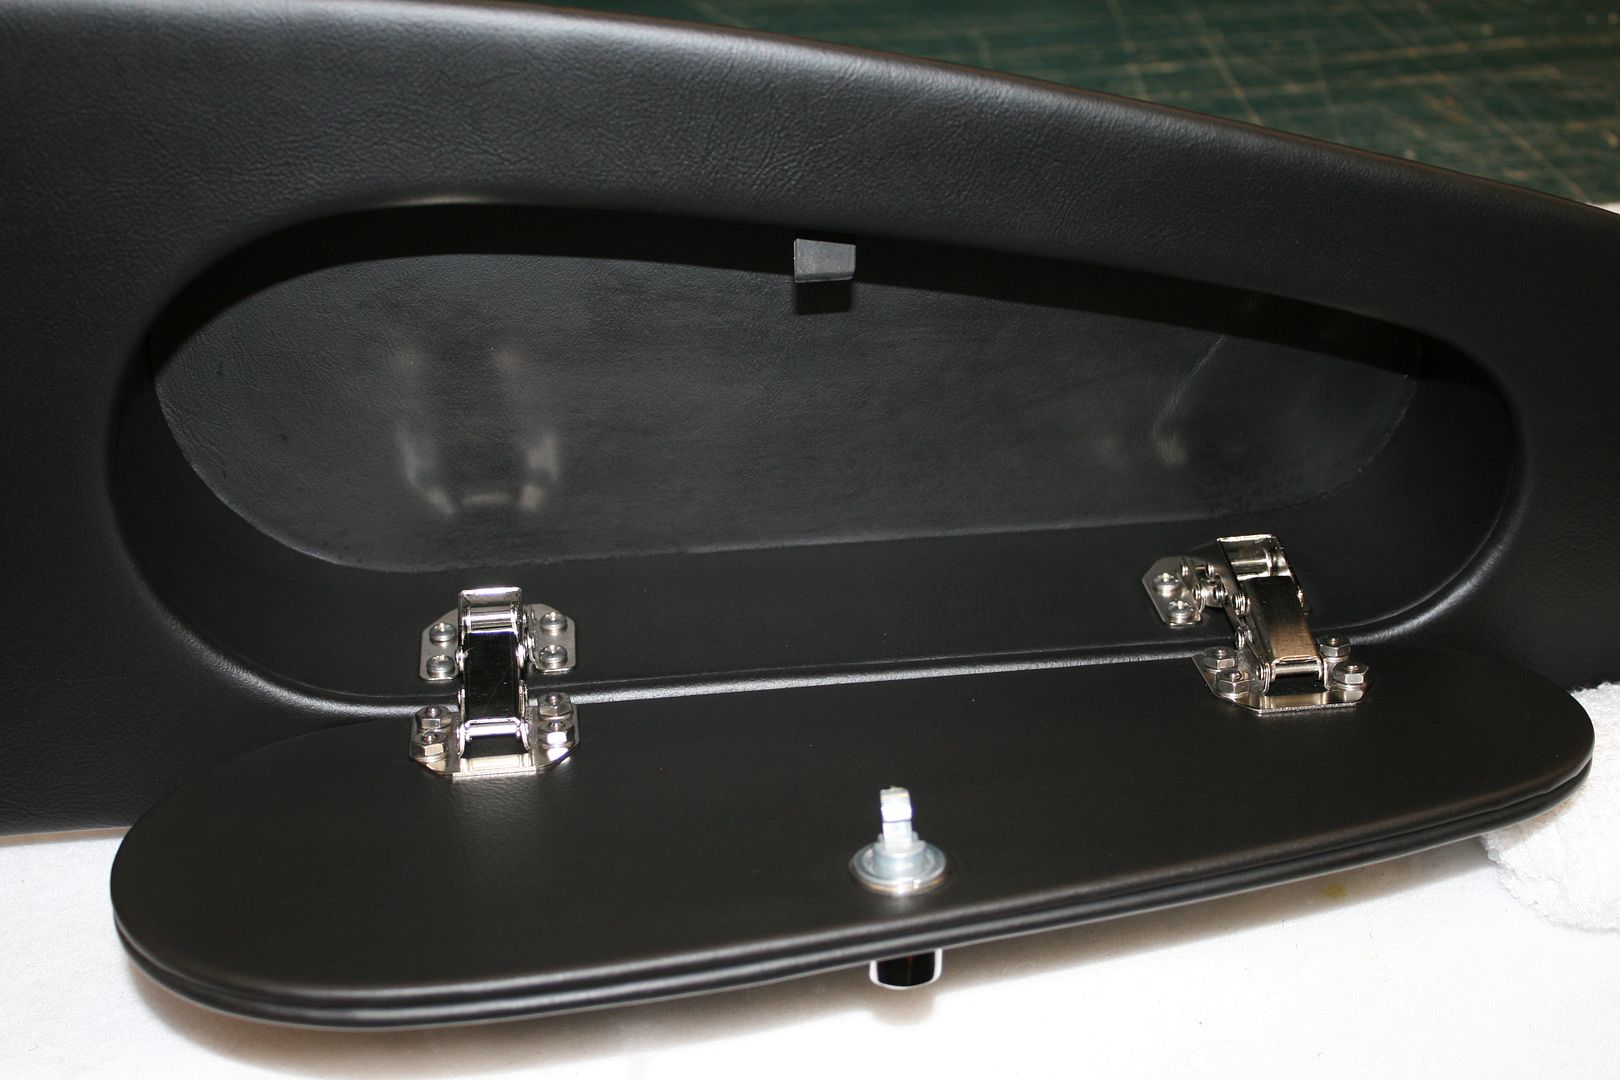
Those hinges are the same ones Alex’s Custom Roadster uses for his glovebox. They’re stock items at Lowes. Just need to pop out the spring closer that comes in them. I mentioned before that I was going to try some different hinges that take up less space on the interior. I tried some suggested ones from McMaster, but the geometry just didn’t work because I have to have the grab handle on the dash for my wife. The McMaster hinges ran the door into the grab handle at about 45 degrees open. These hinges allow it to open to nearly horizontal, and it settles nicely on the grab bar.
The latch isn’t very authentic (but then neither is the glovebox…) but it’s a piece another build thread mentioned and I found on eBay. It’s a VW latch, part number 111 857 131. It makes a really clean installation. Close the door and it latches closed. Push the button and pull the little handle to open. Also comes with keys and is lockable. Took a while to get the right location and size for the catch inside, but works great.
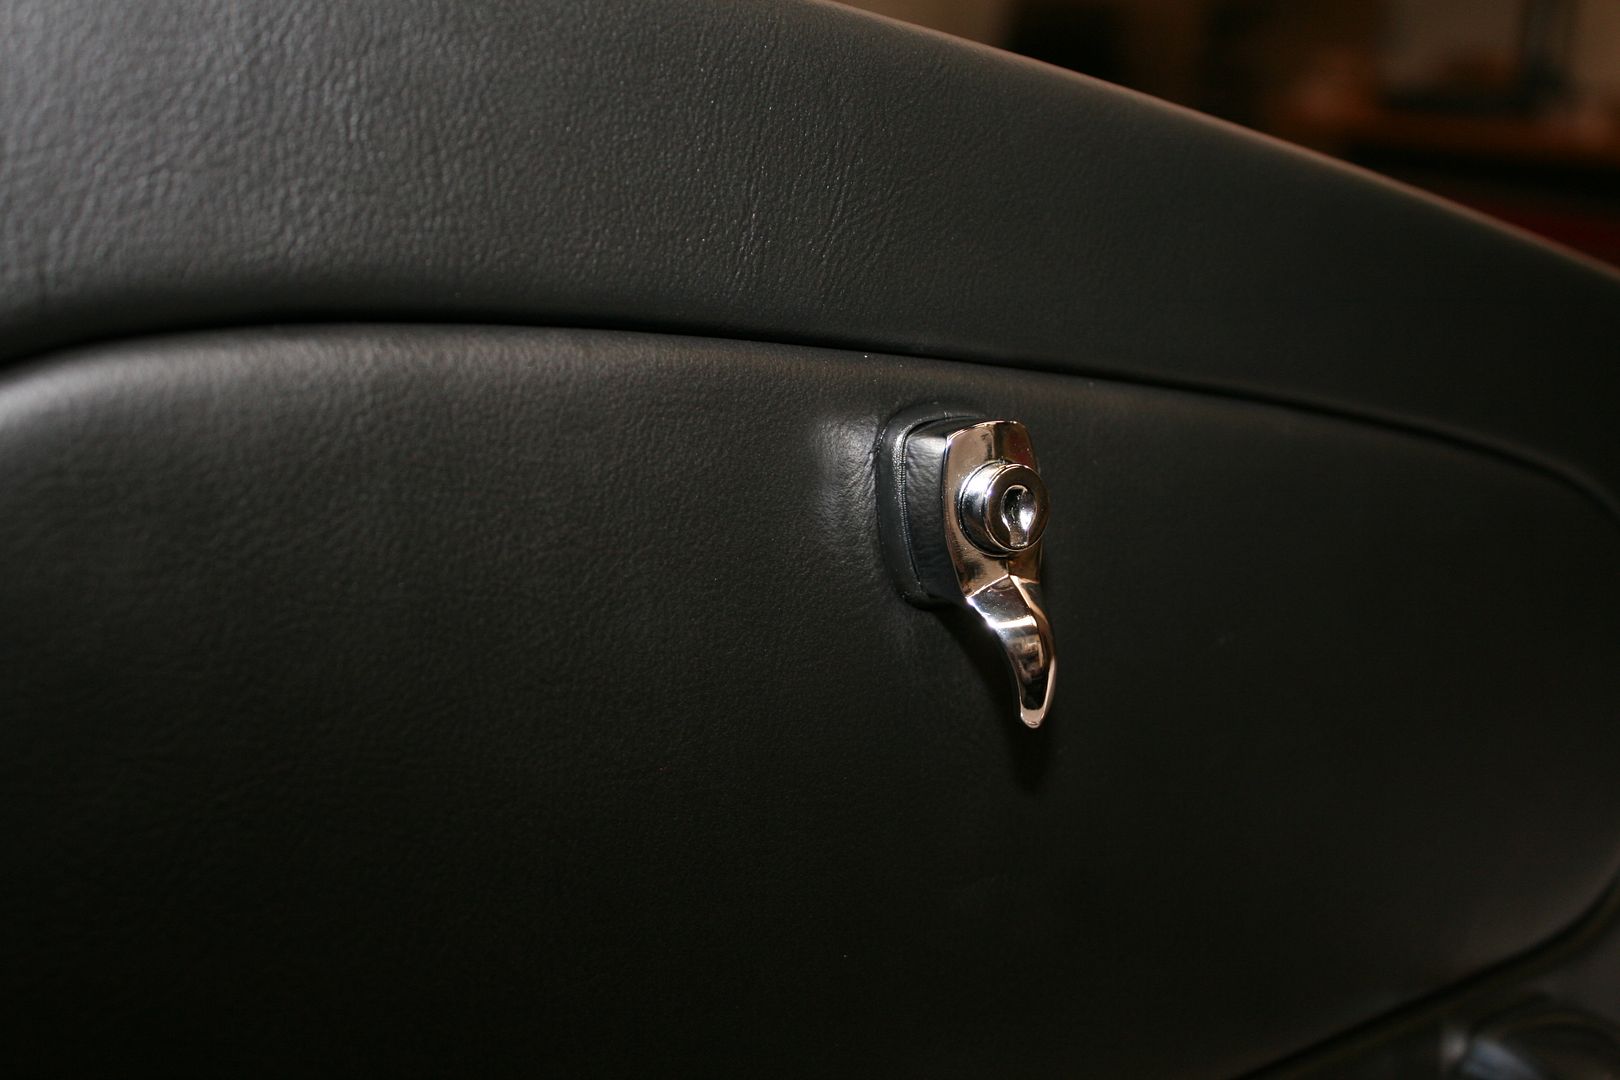
Final shot of the completed dash.
I’m done with this for now. I’ll start doing the wiring when I start that on the chassis. Still waiting for my powder coat panels. I think I’ll get the seat heaters installed into the seats, and get that off the list.
Last edited by edwardb; 02-08-2016 at 06:11 PM.
Build 1: Mk3 Roadster #5125. Sold 11/08/2014.
Build 2: Mk4 Roadster #7750. Sold 04/10/2017.
Build Thread
Build 3: Mk4 Roadster 20th Anniversary #8674. Sold 09/07/2020.
Build Thread and
Video.
Build 4: Gen 3 Type 65 Coupe #59. Gen 3 Coyote. Legal 03/04/2020.
Build Thread and
Video
Build 5: 35 Hot Rod Truck #138. LS3 and 4L65E auto. Rcvd 01/05/2021. Legal 04/20/2023.
Build Thread. Sold 11/9/2023.
-
Post Thanks / Like - 1 Thanks, 1 Likes
-
02-09-2016, 06:22 PM
#188
Carl
The dash looks fantastic ... the glove box is a part I struggled with and will be changed when I do a mod to the dash in the future. I am going to keep your thread to make sure I follow it ...
Thanks for sharing.
Mk 4 Roadster
October 25, 2012 - Kit Arrives
April 8, 2013 - Build Starts
August 23, 2015 - Rolling Chassis/Engine & Transmission Installed
March 26, 2016 - Go Cart
-
02-09-2016, 07:28 PM
#189
Senior Member
Pretty sweet Edward. Congrats. I saw you also used larger supports under the dash, did you find in your previous builds the dash would rattle or shake when hitting a bump?
-
02-09-2016, 08:33 PM
#190
Senior Member
Thanks all.
Originally Posted by
Paul_M
Pretty sweet Edward. Congrats. I saw you also used larger supports under the dash, did you find in your previous builds the dash would rattle or shake when hitting a bump?
I've done all three of my builds exactly the same, with hidden mounts on the back at the top and three braces along the bottom. They don't rattle or shake, and I doubt very much whether other methods if reasonably secure (screws through the front, Velcro, etc.) would would rattle or shake either. These are just my personal preferences.
Build 1: Mk3 Roadster #5125. Sold 11/08/2014.
Build 2: Mk4 Roadster #7750. Sold 04/10/2017.
Build Thread
Build 3: Mk4 Roadster 20th Anniversary #8674. Sold 09/07/2020.
Build Thread and
Video.
Build 4: Gen 3 Type 65 Coupe #59. Gen 3 Coyote. Legal 03/04/2020.
Build Thread and
Video
Build 5: 35 Hot Rod Truck #138. LS3 and 4L65E auto. Rcvd 01/05/2021. Legal 04/20/2023.
Build Thread. Sold 11/9/2023.
-
02-11-2016, 11:02 PM
#191
Senior Member
Heated Seats
Initially I wasn’t going to add this to my build thread because it's pretty routine. But after completing, decided there were a few things worth mentioning. I’ve put heated seats in all of my builds, and we like them very much. I’ve chosen to not install space heaters, and these provide all we need. If a top were ever in our plans, I would have a different opinion. But for us, this has worked well. I’ve used the same WarmSeats WSH heaters from CobraHeat in all cases. Some choose the waterproof version. Either seem fine. The heaters come with pads that need to be installed into the seats plus the wiring harness and switches with indicator lights. Very nice quality product.
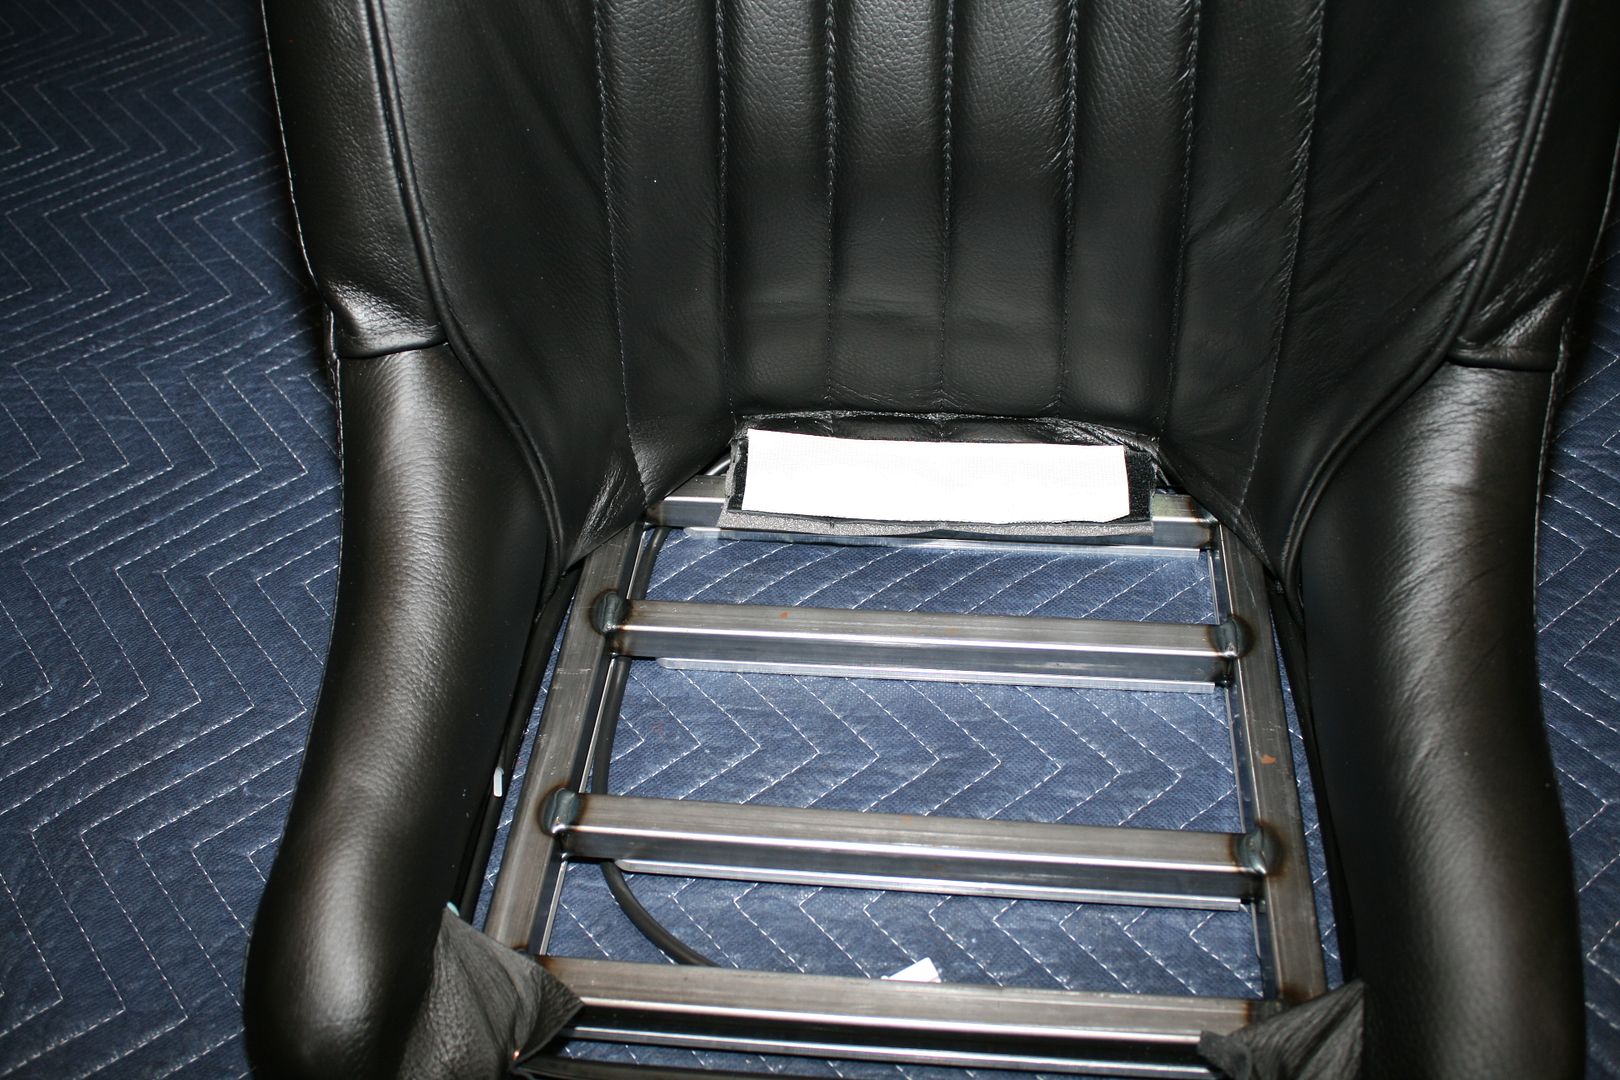
Installation of the pads requires some disassembly. Here I had a pleasant surprise. For the other seats I’ve done, this meant removing and reinstalling a bunch of hog rings. Not hard, but a little bit of a pain getting everything stretched back into place and putting the hog rings back in. What I found on these seats is the hog rings have been almost completely replaced with sewn on plastic channels that are hooked over the seat frame. There are still a few hog rings, but none of them need to be removed. Talk about easier. Literally minutes instead of a few hours. I don’t know if this is a general change by the company making these, or maybe only for this leather version. But I'll take it.
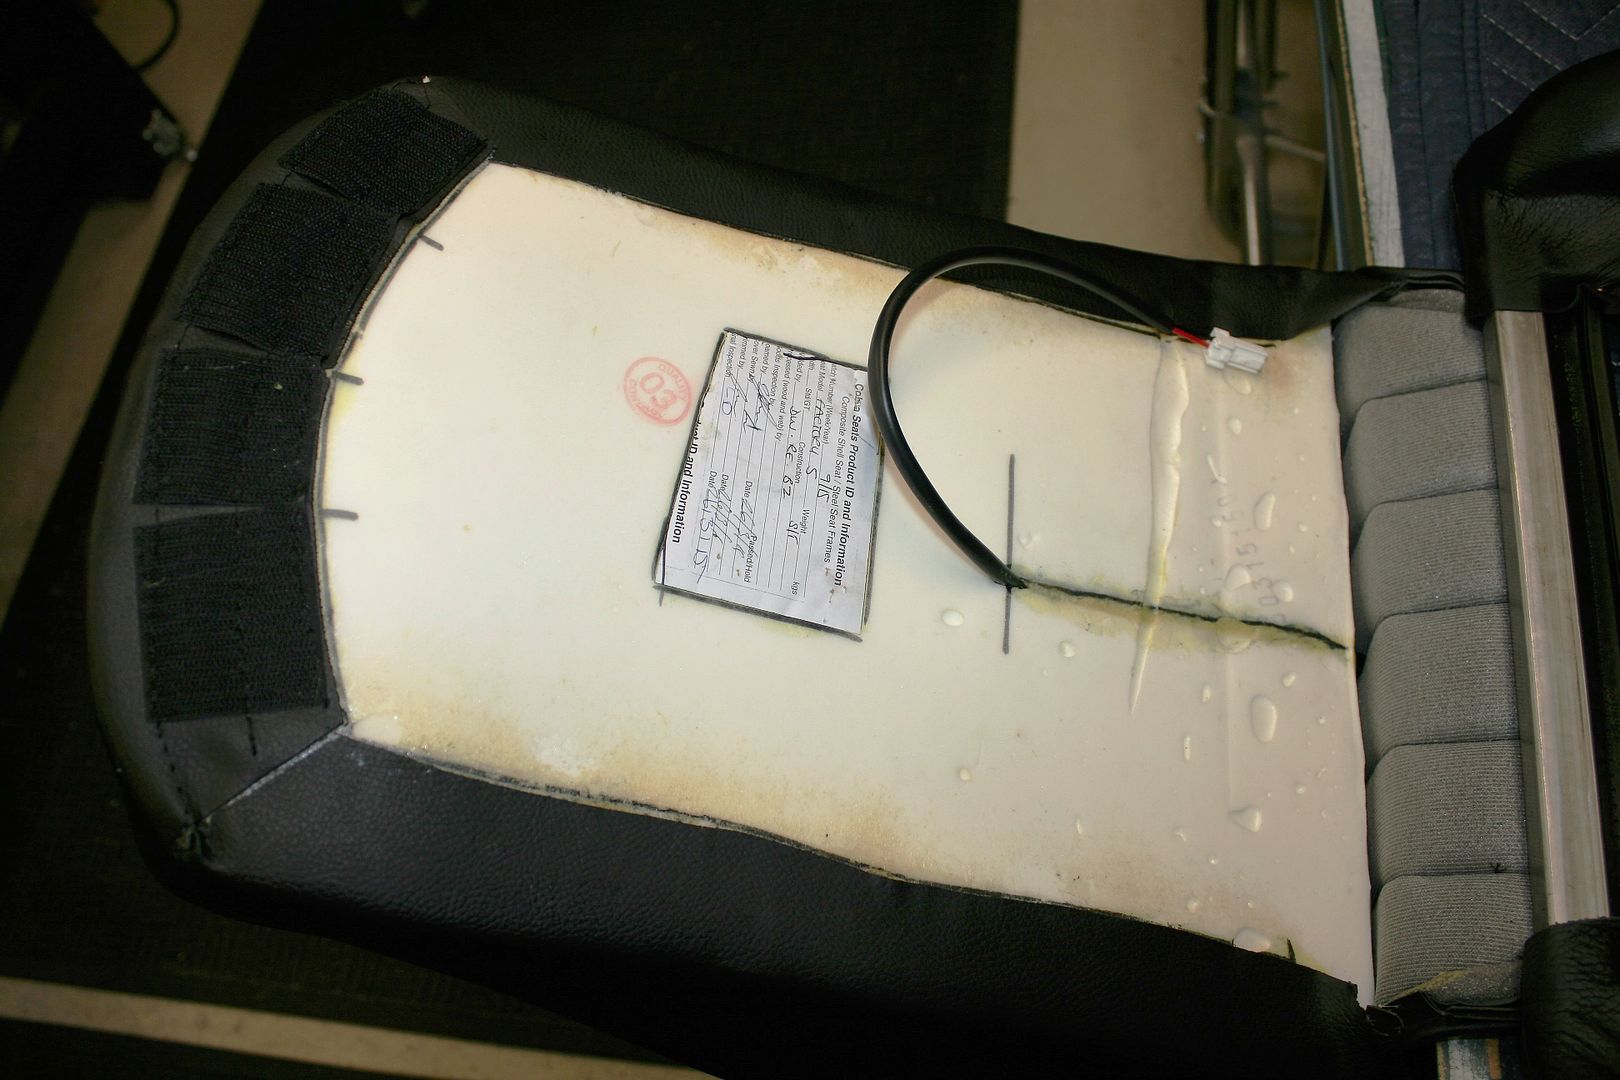
The seat cushion has the covering wrapped around to the bottom and glued. Nothing changed there. In order to install the bottom pad, it’s necessary to peel the covering off the cushion and glue back into place. Here I would recommend that guys check their seats even if not installing seat heaters. I don’t know what kind of adhesive was used, but it's not very effective. Kind of gummy and not sticking well. For my two seats, one was about 75% unattached, and the other almost completely unattached. The Velcro at the bottom back was also loose in both cases. Before taking anything apart, mark around the perimeter of the covering with a felt marker, and use this to replace the covering to the same spot. Contact cement works great. I used the same DAP Welwood Landau I used on the instrument panel.
Here's the bottom seat cushion after disassembly, heater pad installed, and glued back together. I cut a slit for the power wire and glued closed.
These are a couple close-ups of the plastic channel that’s hooked to the seat frame. Pop the front one off and the bottom cushion is loose from the seat assembly. Pop the rest loose and the seat back covering is loose enough you can reach in through the bottom and roll the heater pad into place. The hog rings showing here don't need to be removed.
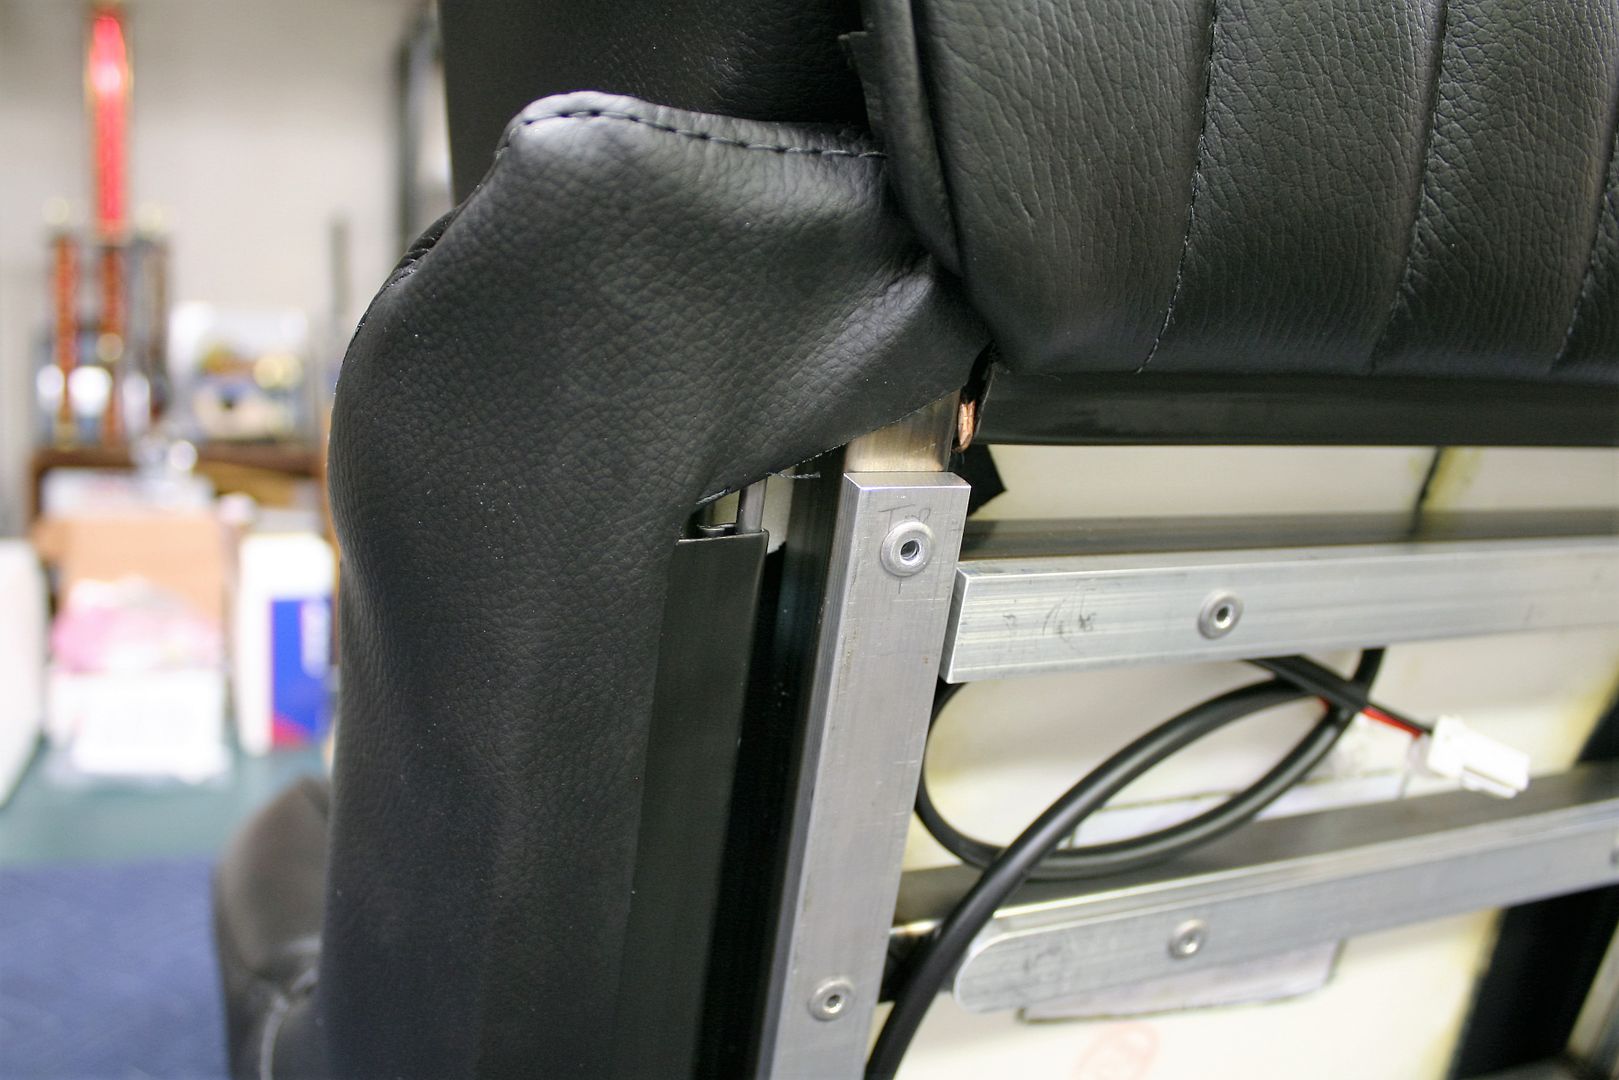
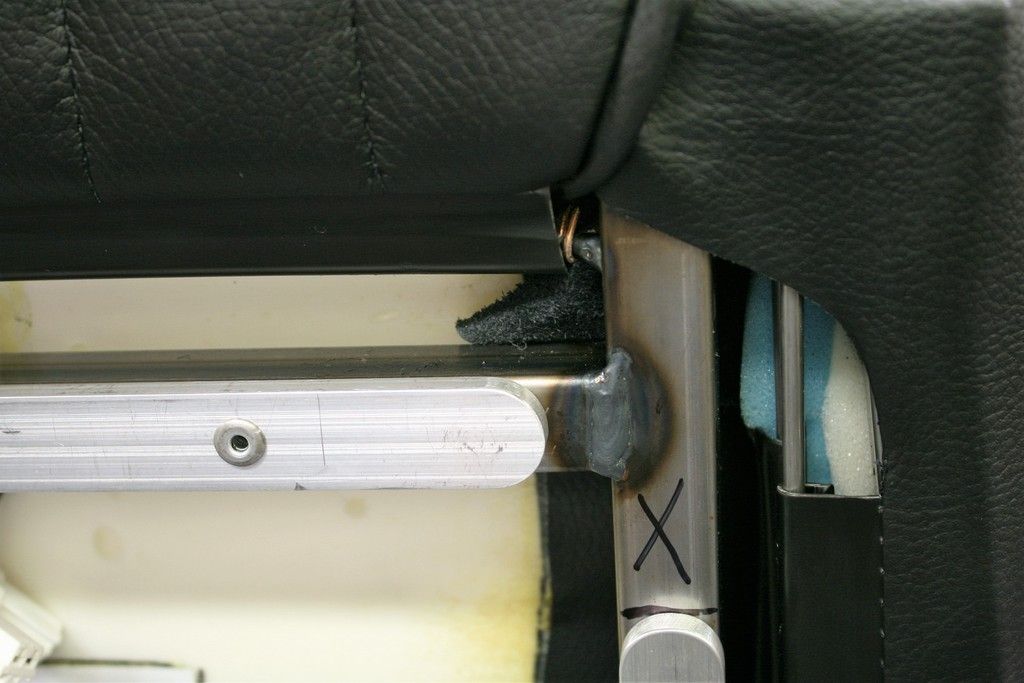
The other thing I've done on each of my builds is to put 1/4 x 3/4 inch aluminum spacers on the bottom of the seat frame, seen already in a couple of the pics. This does three things. First raises the seat just slightly, which I like. Second allows the seat to rest a little better on the frame and not on the surrounding upholstery which in some cases is lower than the frame. Especially at the front on these particular seats. Third, and maybe most importantly it provides a channel for the seat heater wires. In this case, I’m bringing the back wire along one side, and also providing an opening for the wire harness bringing the switched power to the seats. It’s possible to route all the wires without the spacers, and most do, but this works well for me. There won't be any pinched or worn wires.

Here's the wire routing from the top. Another tip. Put a piece of tape over the Velcro as shown during the build. You'll be raising and lower that bottom cushion a bunch, and it's nice not having to peal the Velcro open every time.
I hooked the seats up to my 12 volt power supply and took them for a test drive. Both seats checked good. We have burn. They're now done and ready to bolt into the chassis. Last comment. I like the switches up on the dash, as shown in my previous updates. It does take a little rework of the harness, but easy compared to all the other electrical work necessary for the build. Since I’m not using a space heater, I’ll use the heater circuit from the RF fuse box for the seats. The 20 amp circuit is just right.
Last edited by edwardb; 02-18-2016 at 11:09 PM.
Build 1: Mk3 Roadster #5125. Sold 11/08/2014.
Build 2: Mk4 Roadster #7750. Sold 04/10/2017.
Build Thread
Build 3: Mk4 Roadster 20th Anniversary #8674. Sold 09/07/2020.
Build Thread and
Video.
Build 4: Gen 3 Type 65 Coupe #59. Gen 3 Coyote. Legal 03/04/2020.
Build Thread and
Video
Build 5: 35 Hot Rod Truck #138. LS3 and 4L65E auto. Rcvd 01/05/2021. Legal 04/20/2023.
Build Thread. Sold 11/9/2023.
-
02-18-2016, 10:46 PM
#192
Thanks Paul. I just ordered them for my build and this info is great. Also ordered a kit for a quilt my wife is making for the cobra. She will have a heated blanket that way.
-
Post Thanks / Like - 0 Thanks, 1 Likes
-
02-19-2016, 08:10 AM
#193
Senior Member
Originally Posted by
RR20AC
Thanks Paul. I just ordered them for my build and this info is great. Also ordered a kit for a quilt my wife is making for the cobra. She will have a heated blanket that way.
You're welcome. Glad the info was helpful. I always install 12V accessory outlets under the dash, and will again, for phone chargers, GPS, etc. Thought they would be useful for a heated blanket, but we don't have one so haven't tried that yet. A blanket or quilt should be nice.
Build 1: Mk3 Roadster #5125. Sold 11/08/2014.
Build 2: Mk4 Roadster #7750. Sold 04/10/2017.
Build Thread
Build 3: Mk4 Roadster 20th Anniversary #8674. Sold 09/07/2020.
Build Thread and
Video.
Build 4: Gen 3 Type 65 Coupe #59. Gen 3 Coyote. Legal 03/04/2020.
Build Thread and
Video
Build 5: 35 Hot Rod Truck #138. LS3 and 4L65E auto. Rcvd 01/05/2021. Legal 04/20/2023.
Build Thread. Sold 11/9/2023.
-
02-19-2016, 09:33 PM
#194
Senior Member

Originally Posted by
edwardb
Quick question. I see a few people put the the steering pushing on the inside of the driver side pedal box instead of the outside. Any particular reason other than a cleaner look? I see in the manual it shows on the outside. Just curious if it was for power steering or some other reason.
Thanks
-
02-19-2016, 11:45 PM
#195
Senior Member
Originally Posted by
Duke
Quick question. I see a few people put the the steering pushing on the inside of the driver side pedal box instead of the outside. Any particular reason other than a cleaner look? I see in the manual it shows on the outside. Just curious if it was for power steering or some other reason.
Thanks
You are correct. The manual shows the lower steering shaft bearing on the outside of the driver's footbox. I tried to put it there but it just didn't fit due to the fixed length of the lower steering column and the location of the adapter on my PS rack. The only solution was to move it inside. That provided just enough additional space. I never measured or compared, but the steering shaft out of the Breeze Unisteer PS rack looked at bit longer than racks I've used before. I assumed that was the reason, but never took it any further than that.
As a side benefit, it does look a little cleaner on the inside. In this case since I made a new DS footbox front panel, and I already knew the bearing would be on the inside, I just cut a circle instead of the outline of the bearing holder. That makes it look even cleaner. But even for a neat freak like me, that wasn't my motivation for moving it. ")
It doesn't apply to this build, but sometimes it's necessary to move the bearing inside due to vacuum power brakes. The commonly used vacuum booster interferes with the bearing on the outside, and moving it inside is the common solution. You may have seen this on other builds.
Last edited by edwardb; 02-19-2016 at 11:52 PM.
Build 1: Mk3 Roadster #5125. Sold 11/08/2014.
Build 2: Mk4 Roadster #7750. Sold 04/10/2017.
Build Thread
Build 3: Mk4 Roadster 20th Anniversary #8674. Sold 09/07/2020.
Build Thread and
Video.
Build 4: Gen 3 Type 65 Coupe #59. Gen 3 Coyote. Legal 03/04/2020.
Build Thread and
Video
Build 5: 35 Hot Rod Truck #138. LS3 and 4L65E auto. Rcvd 01/05/2021. Legal 04/20/2023.
Build Thread. Sold 11/9/2023.
-
02-20-2016, 10:27 AM
#196
edwardb,
As you mentioned tackling the electrical next, I thought my posing this question may be helpful to others. I'm not certain you would address this as I didnt see it discussed in your previous build. It pertains to the Russ Thomson self canceling directionals mod. I saw in your last build that you used his mod and I plan on using in my current anniversary build. But, as mentioned, I didnt find where you discussed the wiring. I believe he has been selling this unit for some time now, but I'm wondering whether the use of additional diodes, relays and junction boxes, per his electrical schematic are necessary. The complete kit is equipped with a turn signal toggle, a high/low beam toggle and the Ron Francis wiring contains a flasher and relays, etc. So...and this is where I'm automotive electrically challenged...am I not merely swapping one switch for another? Therefore, can I just connect his 5 wires directly to the Ron Francis labeled wiring for those respective features?
-
02-20-2016, 11:05 AM
#197
Senior Member
Originally Posted by
ThickCobra
edwardb,
As you mentioned tackling the electrical next, I thought my posing this question may be helpful to others. I'm not certain you would address this as I didnt see it discussed in your previous build. It pertains to the Russ Thomson self canceling directionals mod. I saw in your last build that you used his mod and I plan on using in my current anniversary build. But, as mentioned, I didnt find where you discussed the wiring. I believe he has been selling this unit for some time now, but I'm wondering whether the use of additional diodes, relays and junction boxes, per his electrical schematic are necessary. The complete kit is equipped with a turn signal toggle, a high/low beam toggle and the Ron Francis wiring contains a flasher and relays, etc. So...and this is where I'm automotive electrically challenged...am I not merely swapping one switch for another? Therefore, can I just connect his 5 wires directly to the Ron Francis labeled wiring for those respective features?
Yes, I'll be starting the wiring very soon, and will post some details I guess. The short answer to your question though is "yes" you can use the Russ Francis turn signal switching as a substitute for the toggle switch shown in the RF schematic, but "no" on the way the RF schematic shows doing the high/low beam switching. The diodes come into play depending on how you want dash indicators to work. Since some of the circuitry between the hazards and turns signals is shared, depending on how you wire the indicator lights, diode(s) may be necessary to prevent backfeeding. They're very simple to add, so don't make decisions about that alone. The pushbutton on the end of the stalk can be whatever you want. Horn, high beams, whatever. It's just a two wire momentary switch. The schematics show a couple of ways to switch high/low beam using this button with a relay. There are also electronic switching options using the button, which is what I'll be doing. This can be a complex subject and there are lots of threads on the subject, mainly on the other forum. Hopefully this helps a little.
Last edited by edwardb; 02-20-2016 at 11:09 AM.
Build 1: Mk3 Roadster #5125. Sold 11/08/2014.
Build 2: Mk4 Roadster #7750. Sold 04/10/2017.
Build Thread
Build 3: Mk4 Roadster 20th Anniversary #8674. Sold 09/07/2020.
Build Thread and
Video.
Build 4: Gen 3 Type 65 Coupe #59. Gen 3 Coyote. Legal 03/04/2020.
Build Thread and
Video
Build 5: 35 Hot Rod Truck #138. LS3 and 4L65E auto. Rcvd 01/05/2021. Legal 04/20/2023.
Build Thread. Sold 11/9/2023.
-
02-20-2016, 06:12 PM
#198
Senior Member
Panels Installed
Last Friday I picked up most of my powder coated panels and some other miscellaneous parts like hood hinges, battery box, brackets, etc. Total of 53 parts. Several white panels like the already provided white parts from Factory Five, and the balance in the silver/grey Anniversary color. The white matched perfectly because we used the same Prismatic Powders color as the ones from FF. The other chassis color we used a stock color that appeared to be a near exact match based on several samples and small parts. With larger panels now completed, the new powder coat is just slightly darker than the color from FF. When done, most of that color will be on the bottom, so it will be OK. Certainly not enough different to do over, and too late now anyway because most are mounted on the chassis. BTW, the color difference is much less to the eye than what shows in these pictures. For whatever reason, the lighting or flash makes it look different than in does in person. I'll have one more very small batch of powder coating near the end of the build, and that will be it.
I have all the panels installed with several exceptions. Didn’t finalize the DS footbox two top pieces and outside side piece. I’ll do the inside top a little later. The outside top and side will be nearly the last thing before the body goes on for the final time. I also didn’t finalize the rear cockpit wall center and the upper and lower trunk floors. I left the trunk floors off so I can run fuel and brake lines next with better access. The rear cockpit wall will go on after the trunk floors are in. (You all did get the memo on that, right? Don’t install the rear cockpit wall until the upper trunk floor is in. You will find some of the rivets nearly impossible if you don’t.)
I used clear GE Silicone II from the local Home Depot. I used two caulking gun sized tubes to get as far as pictured here. I tried a tube of grey on one of the darker parts, but it was much too light so just did everything with clear. I did apply it pretty liberally so I had good squeeze-out when assembling the pieces (like any good former woodworker would do…) but it cleans up pretty easily. I find Goo Gone Gel Formula works as good as anything. Plain old isopropyl alcohol works OK too.
There was a question before about rivets to match the silver/grey chassis color since there doesn’t seem to be anything available that matches it. Plain silver rivets really stand out. Some guys powder coated a bunch of them, but I didn’t think of that in advance and probably that’s OK since powder coating isn’t exactly cheap to have done. I ended up taking some apart and using the same Rustoleum wheel color I’ve mentioned before. I’m actually quite surprised how well that turned out. I needed about 150 so drilled a bunch of holes in a couple scrap pieces of wood and sprayed them in a couple passes. I kind of felt like I had officially jumped the shark going to this length for the rivets though. One other comment about painted rivets. I used white rivets from McMaster for all the white panels. I found my pneumatic gun is pretty hard on the paint. I tried putting several different kinds of tape on the tip of the gun, but it didn’t help much and wore out very quickly. I found pulling them manually wasn’t as bad, so most of the white I did that way. Surprisingly, the ones I painted held up to the pneumatic gun quite well, although I did end up pulling some of those manually as well. I have to say I like pulling the trigger on the gun better than squeezing the hand riveter. (Feel sorry for me yet?)
One other thing I did based on past experience plus an idea from another build thread. I’m going to use Lizard Skin heat and sound insulation a couple steps from now. The DS footbox outside top and side pieces I'll spray loose and have ready for installation later. The rest of the DS footbox is a real pain to mask and spray because of the pedal box, pedals, etc. So I outlined the areas that would get insulation around the pedal box, masked them off, and brushed on 2 coats each of the Lizard Skin sound and heat insulation material before assembly. Now these areas are done, and masking and spraying will be a bit simpler. I saw someone did this same thing but cut pieces of the stick-on material. Good idea.
Here’s what it looks like now. My kind of different looking two-tone build:
Last edited by edwardb; 02-20-2016 at 11:11 PM.
Build 1: Mk3 Roadster #5125. Sold 11/08/2014.
Build 2: Mk4 Roadster #7750. Sold 04/10/2017.
Build Thread
Build 3: Mk4 Roadster 20th Anniversary #8674. Sold 09/07/2020.
Build Thread and
Video.
Build 4: Gen 3 Type 65 Coupe #59. Gen 3 Coyote. Legal 03/04/2020.
Build Thread and
Video
Build 5: 35 Hot Rod Truck #138. LS3 and 4L65E auto. Rcvd 01/05/2021. Legal 04/20/2023.
Build Thread. Sold 11/9/2023.
-
02-20-2016, 06:14 PM
#199
Senior Member
Panels Installed (continued)
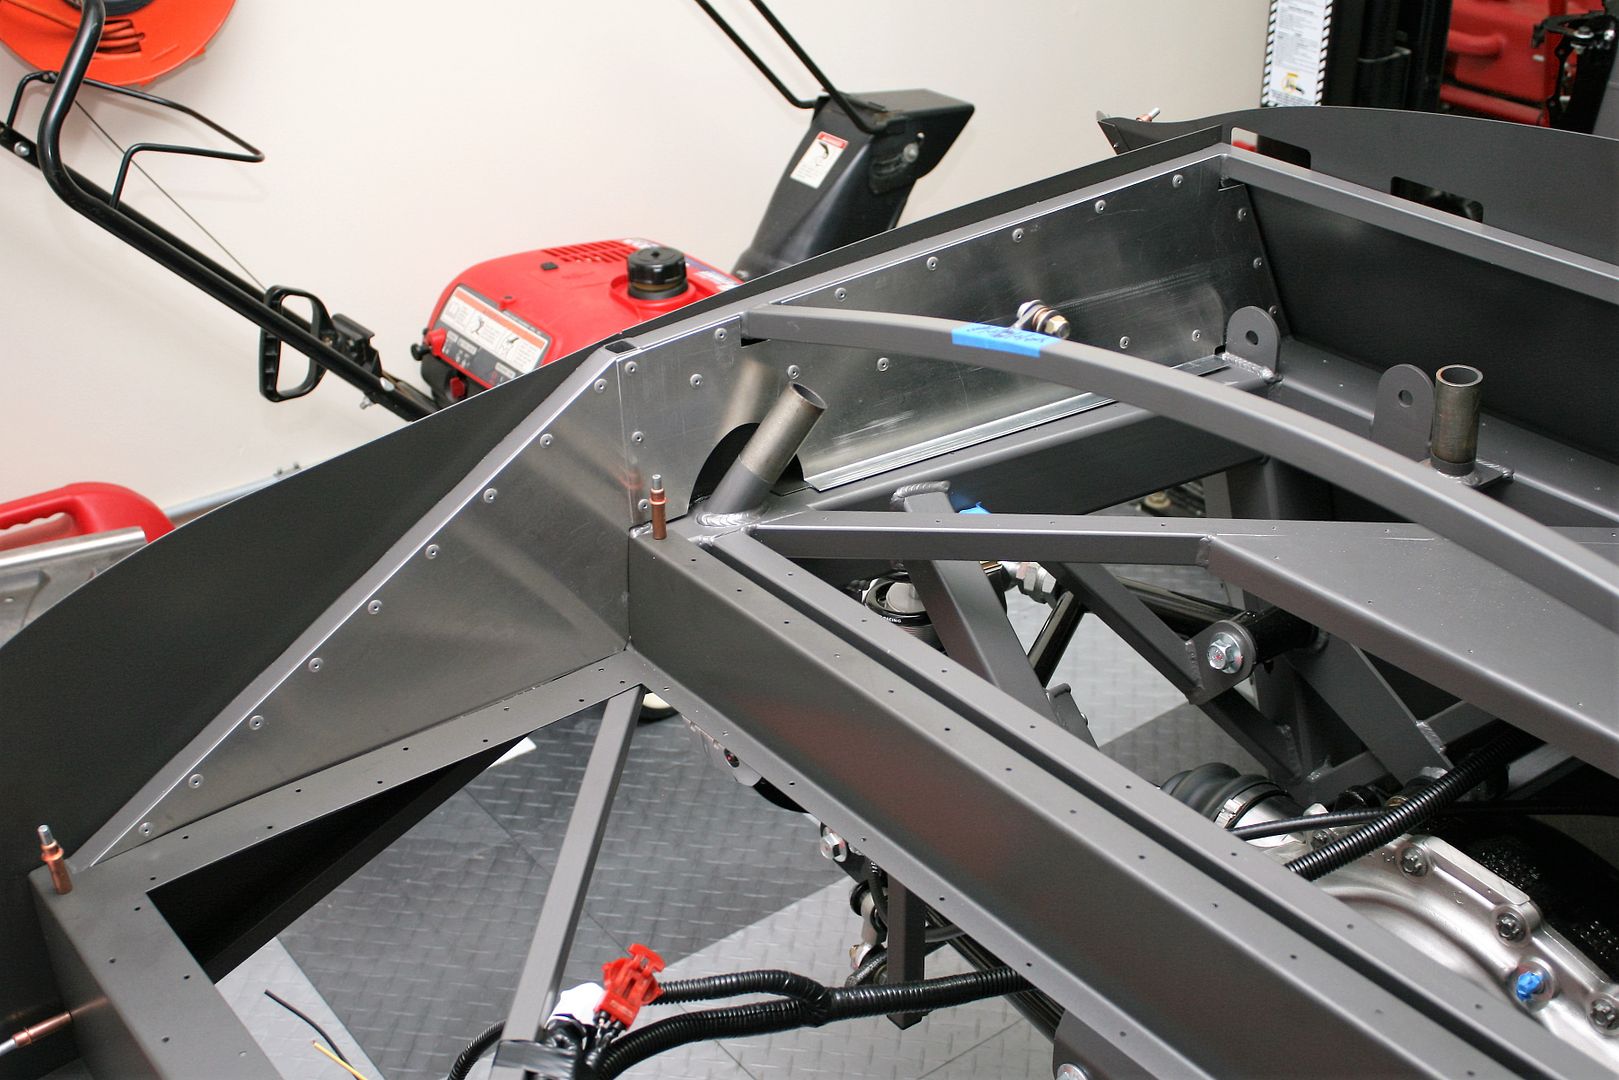
This is a closer view of the filler panel I made for the upper trunk area. Absolutely not necessary, but makes it easier to carpet and looks a little better when done. I didn't powder coat the inner trunk sides. Both sides are buried when done.
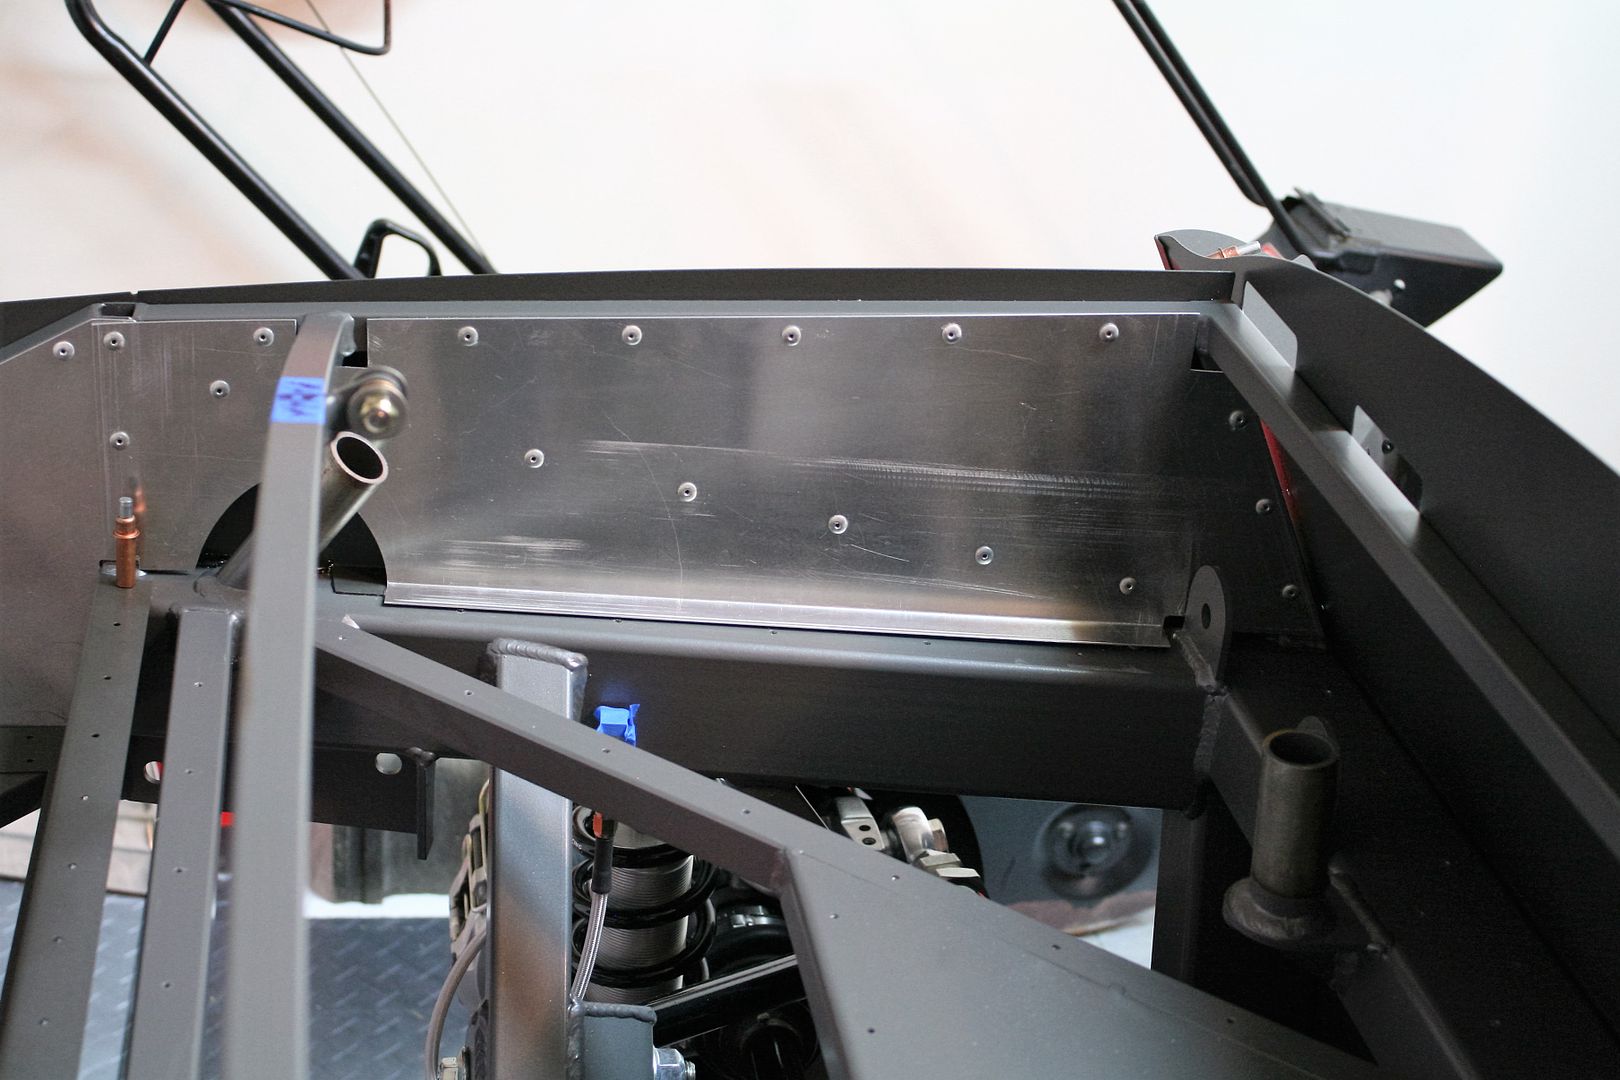
This is a closer view of the now nearly completed 2bking sheet metal modification to better fit the Coyote. Turned out well. The good news is that new kits from Factory Five have a similar configuration. I missed it by that much...
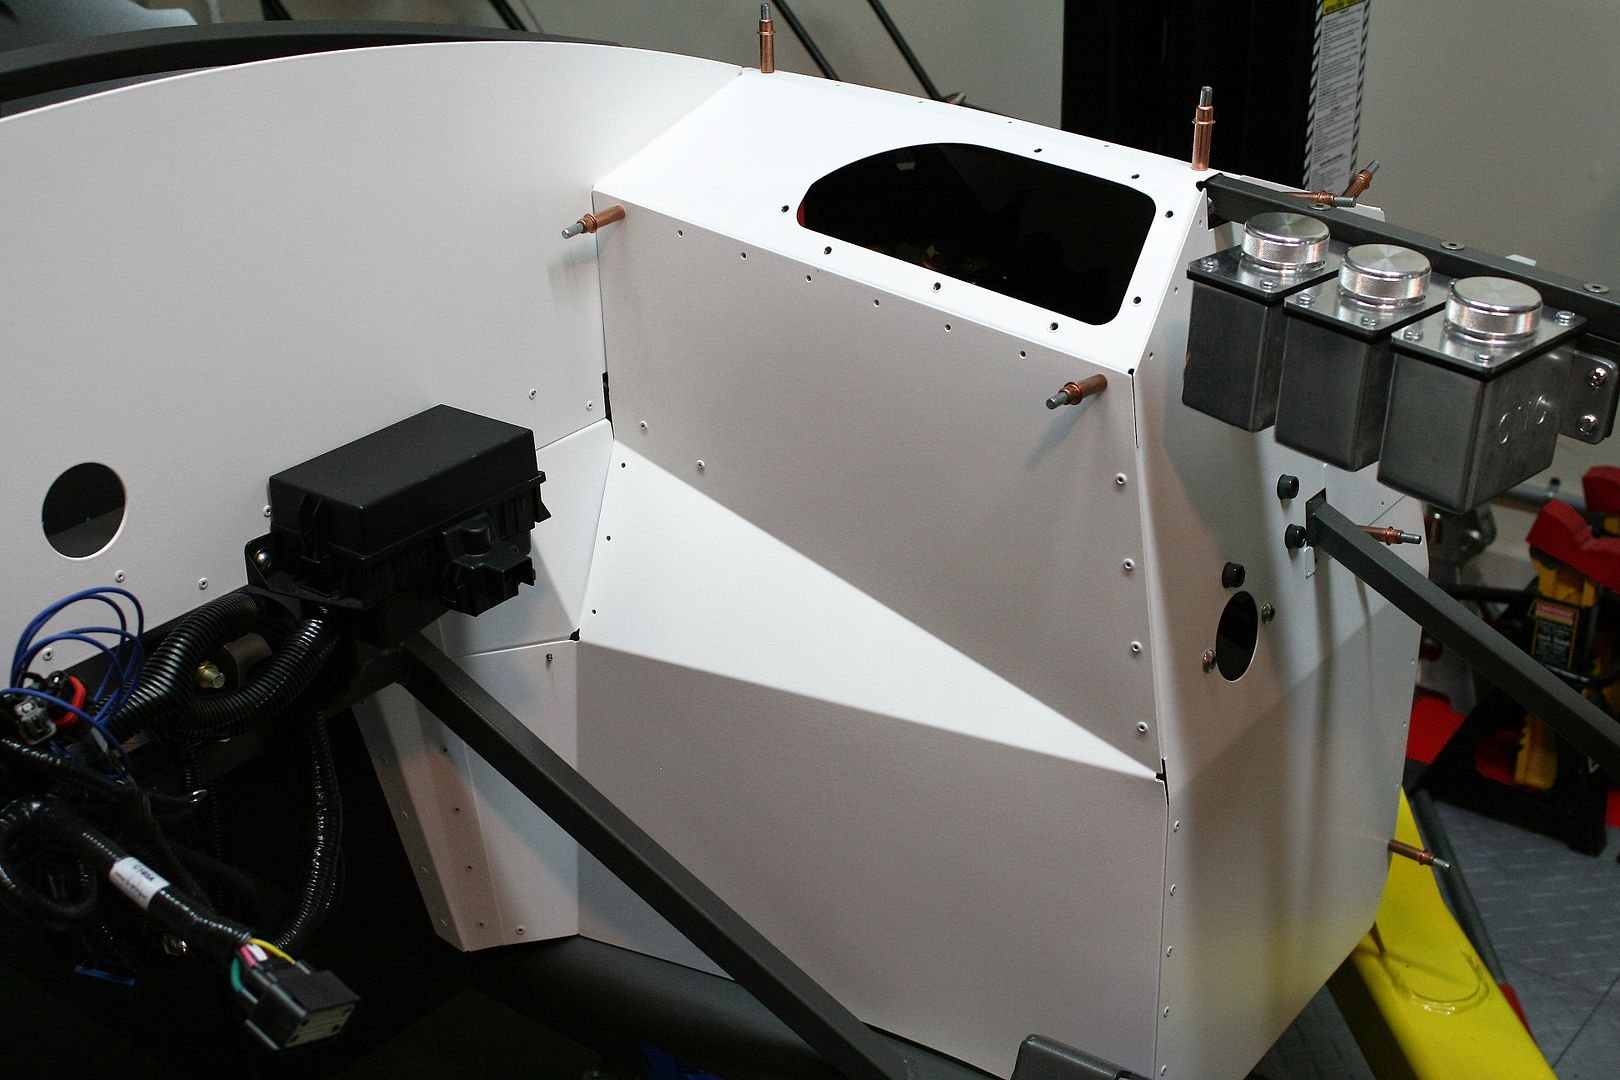
Next week I'm going to start on fuel and brake lines. I'll be using rigid SS tubing like my last build. I have the Eastwood flaring tool out and warmed up.
Last edited by edwardb; 02-20-2016 at 11:17 PM.
Build 1: Mk3 Roadster #5125. Sold 11/08/2014.
Build 2: Mk4 Roadster #7750. Sold 04/10/2017.
Build Thread
Build 3: Mk4 Roadster 20th Anniversary #8674. Sold 09/07/2020.
Build Thread and
Video.
Build 4: Gen 3 Type 65 Coupe #59. Gen 3 Coyote. Legal 03/04/2020.
Build Thread and
Video
Build 5: 35 Hot Rod Truck #138. LS3 and 4L65E auto. Rcvd 01/05/2021. Legal 04/20/2023.
Build Thread. Sold 11/9/2023.
-
02-21-2016, 07:38 AM
#200
Senior Member
Edward, really looks great, congrats. I should be receiving my panels back next week. All the panels fit really well for me except for one, Drivers top footbox inside panel. (one with hole cut out in your photo above) Front and side lined up well, but I couldn't get it flush with the firewall. Spoke to Dan at FF and he said most guys pull the firewall into the panel. I'm using the thicker FFmetal firewall, for me this was about 1/2" away from the 3/4" frame that runs long the side of engine bay. Wondering if anyone else had a similar experience? Something else I came across was it seems that FF started shipping a different radiator in summer of 2015. I'm #9 of the 20th kits, received my kit in Aug 2015 and my radiator came with angled inlet and outlet. Edward yours looks like it has straight outlet from the photos above. I ordered my breeze radiator shroud a while ago. When I received it, it didn't line up 100%, thought it was just the panel so I used some persuasion to get it to fit, wasn't 100% as I had to pull the top and bottom out a bit, but it worked. I see now that Breeze has a new radiator shroud 32204 for the radiator I was shipped, this one has the fan hole already cut. Mine is already at the PC'er but I'm going to get this new one as I assume it fits better.


 Thanks:
  Likes:


 Reply With Quote


