Forte's

Visit our community sponsor

Thanks Thanks:  0
Likes Likes:  0
Results 1 to 20 of 20

Thread: radiator offset

  1. #1
    Senior Member chopthebass's Avatar
    Join Date
    Oct 2013
    Location
    Calgary, Canada
    Posts
    941
    Post Thanks / Like

    radiator offset

    What is the reason for offsetting the radiator 5/8" from the center? FFR just said the kit is designed for the complete kit radiator, as well as multiple stock mustang radiators. Didn't really answer my question.
    Finally started my build the beginning July. 2015!

  2. #2
    Administrator David Hodgkins's Avatar
    Join Date
    Feb 2011
    Location
    Corona del Mar, CA
    Posts
    6,066
    Post Thanks / Like
    Blog Entries
    7
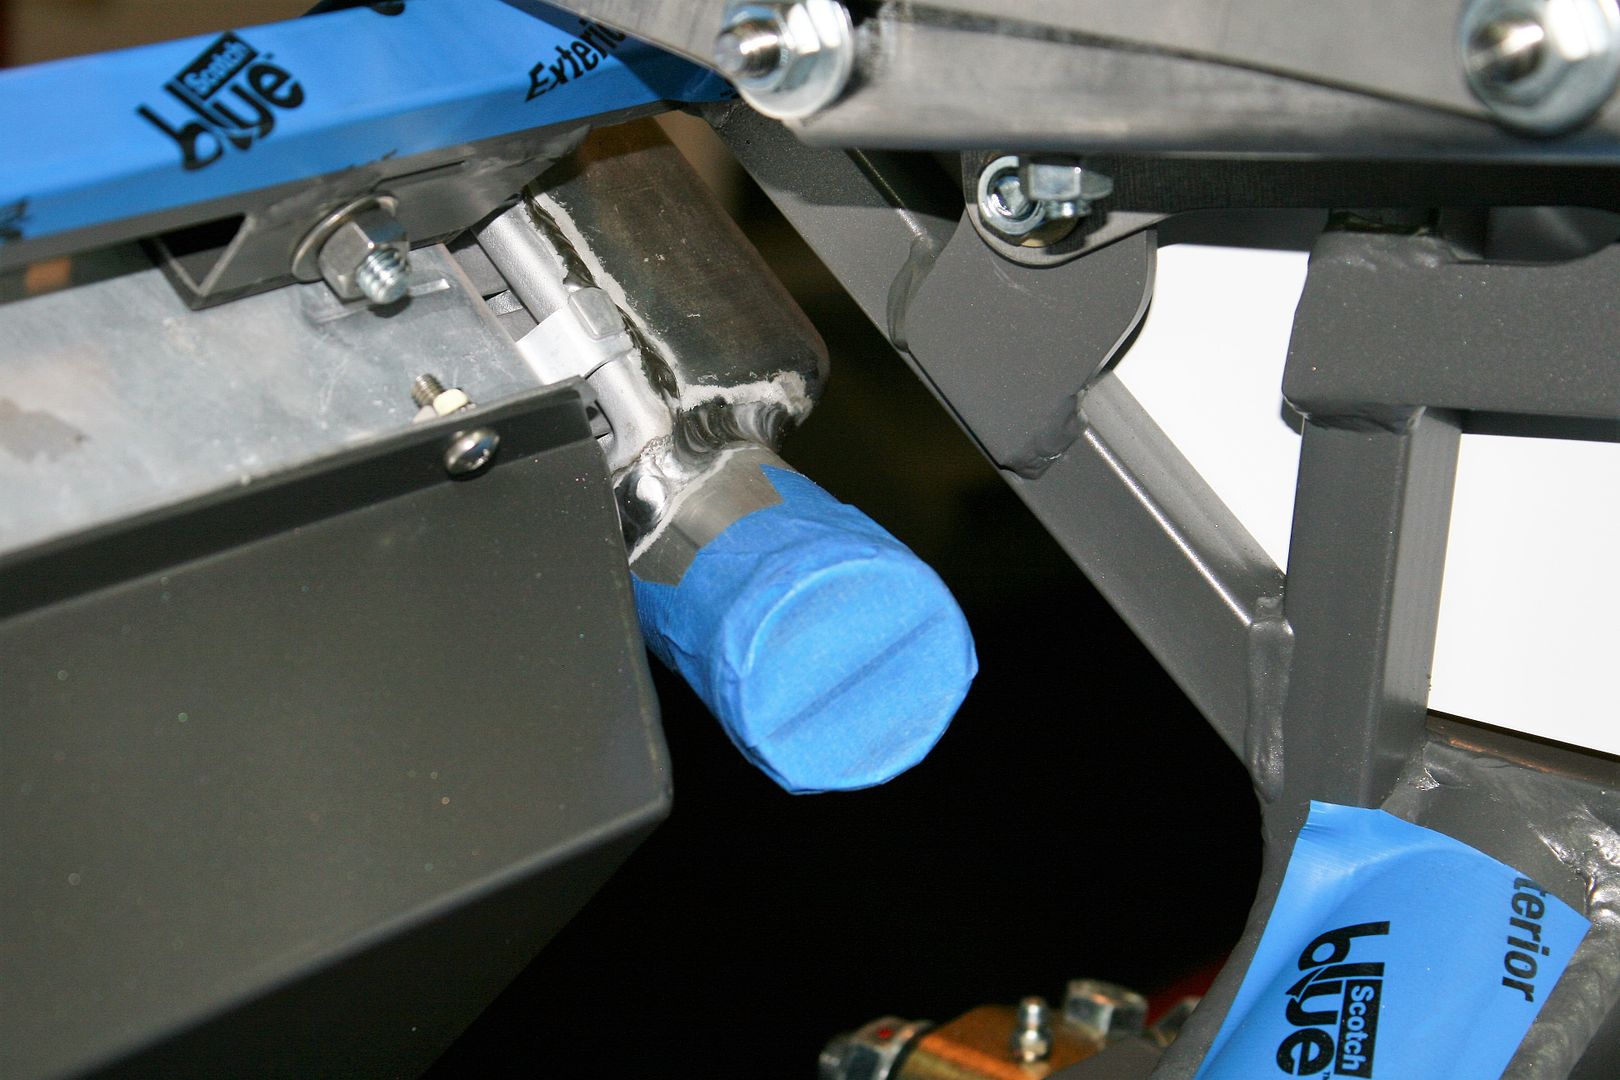
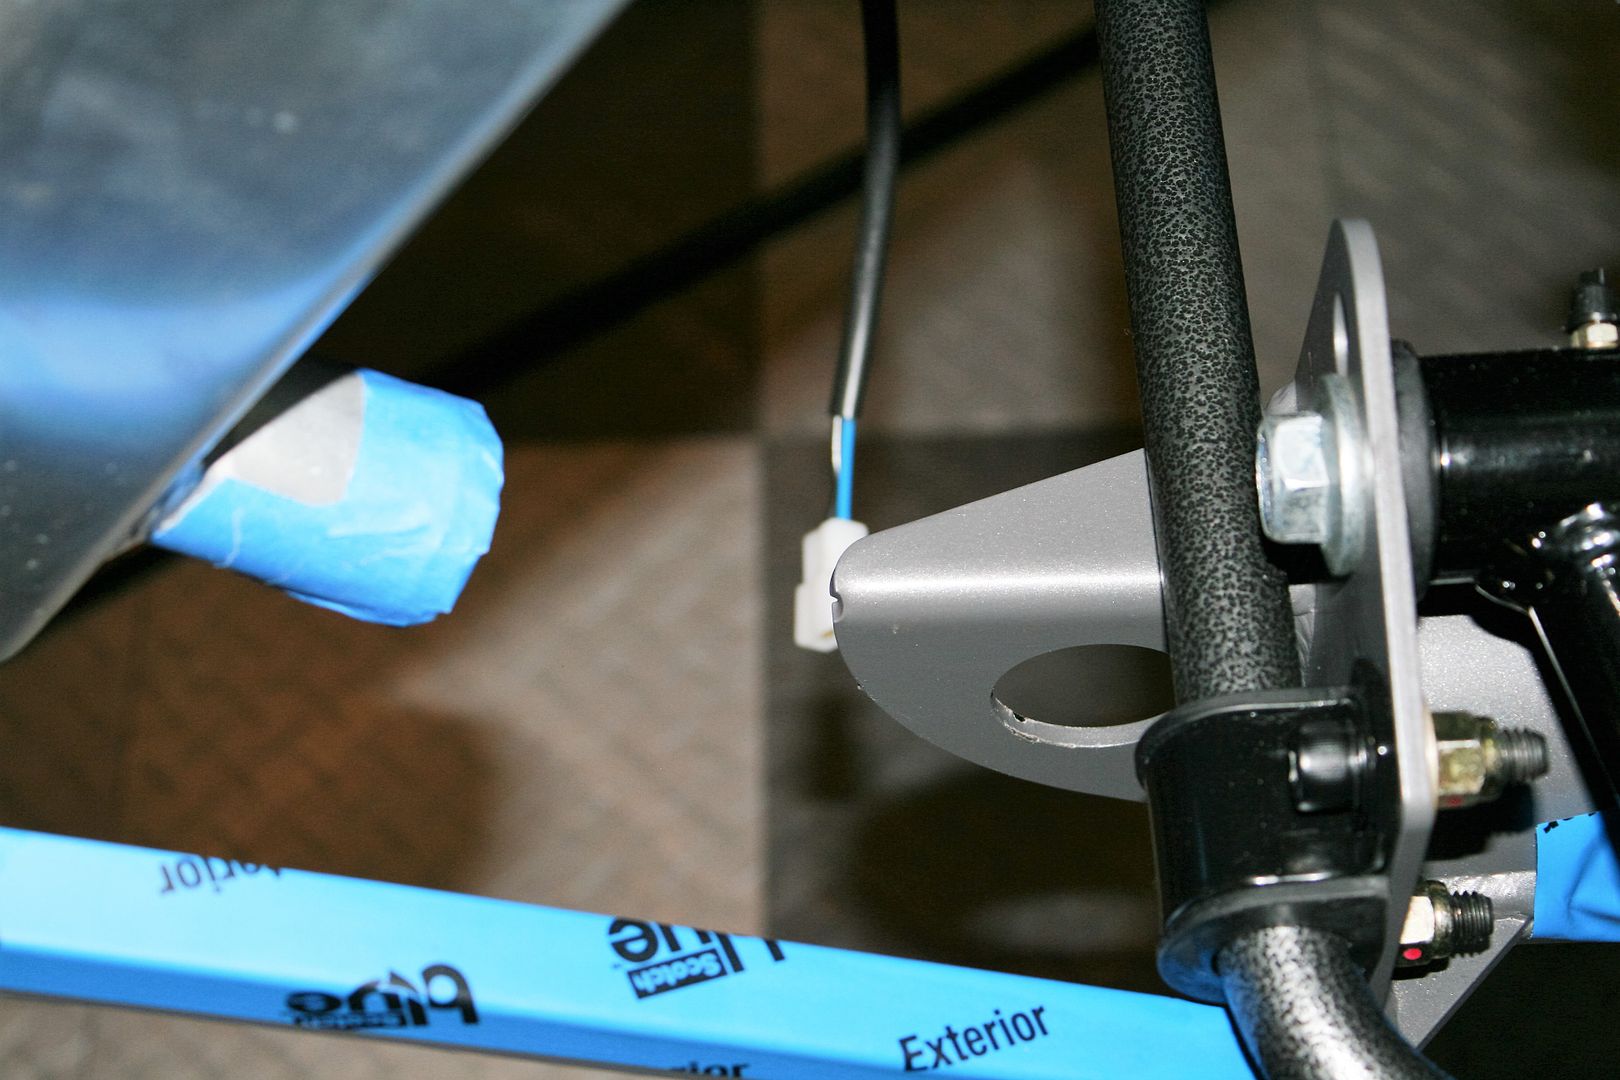
    It's because (IMO) of the lower rad outlet. The corrugated tubing can't make the turn without hitting the front driver's tow hook unless it is offset toward the passenger side.

    Here's a pic of the offset radiator and the corrugated tubing:


    FFR 5369 Pin Drive, IRS, Trigos, Torsen, Wilwoods, FMS BOSS 302 "B" cam , Mass-flo. CA SB100 (SPCN) Registered
    Delivered 4/23/06. "Finished" 4/2012 (still not done!)


  3. #3
    Senior Member chopthebass's Avatar
    Join Date
    Oct 2013
    Location
    Calgary, Canada
    Posts
    941
    Post Thanks / Like
    Oh crap, I thought the manual said offset it 5/8" the other way! So I mark radiator center line, and chassis center line and shift towards passenger side?
    Finally started my build the beginning July. 2015!

  4. #4
    Senior Member chopthebass's Avatar
    Join Date
    Oct 2013
    Location
    Calgary, Canada
    Posts
    941
    Post Thanks / Like
    I'm ok I think. Checked the manual and it is shifter towards driver side.
    Finally started my build the beginning July. 2015!

  5. #5
    Senior Member rich grsc's Avatar
    Join Date
    Feb 2011
    Location
    O'Fallon, MO
    Posts
    3,096
    Post Thanks / Like
    NO. The offset is from the original design when people would use the donor radiator. It needed to be offset because of the cap on the top of the radiator. Put the radiator where ever you like if using one that has no filler cap on it.

  6. #6
    Senior Member chopthebass's Avatar
    Join Date
    Oct 2013
    Location
    Calgary, Canada
    Posts
    941
    Post Thanks / Like
    Quote Originally Posted by rich grsc View Post
    NO. The offset is from the original design when people would use the donor radiator. It needed to be offset because of the cap on the top of the radiator. Put the radiator where ever you like if using one that has no filler cap on it.
    Good to know. The radiator in the manual looks like mine (came with complete kit), and they still offset it.
    Finally started my build the beginning July. 2015!

  7. #7
    Senior Member edwardb's Avatar
    Join Date
    Feb 2011
    Location
    Lake Orion, Michigan
    Posts
    10,575
    Post Thanks / Like
    Agree the connection to the lower radiator hose is tight by the DS tow hook is tight. But the off-center shown in the manual is toward that side, not away from it. So I don't think that's it. Also agree there were clearance issues with the donor radiator, and maybe off center helped. But the radiator shown in the manual picture is clearly the AFCO Racing piece. The one theory I heard was for clearance on the upper radiator hose connection. Moving it over provides a little more clearance there. But maybe they've made a change to the radiator, because it doesn't need to be offset to have plenty of room for the upper radiator hose connection. I just installed the radiator in my new build last night. Placed it dead center.
    Build 1: Mk3 Roadster #5125. Sold 11/08/2014. Build 2: Mk4 Roadster #7750. Sold 04/10/2017. Build Thread
    Build 3: Mk4 Roadster 20th Anniversary #8674. Sold 09/07/2020. Build Thread and Video. Build 4: Gen 3 Type 65 Coupe #59. Gen 3 Coyote. Legal 03/04/2020. Build Thread and Video
    Build 5: 35 Hot Rod Truck #138. LS3 and 4L65E auto. Rcvd 01/05/2021. Legal 04/20/2023. Build Thread. Sold 11/9/2023.

  8. #8
    Member
    Join Date
    Jan 2014
    Location
    Richmond, Texas
    Posts
    95
    Post Thanks / Like
    Quote Originally Posted by edwardb View Post
    Agree the connection to the lower radiator hose is tight by the DS tow hook is tight. But the off-center shown in the manual is toward that side, not away from it. So I don't think that's it. Also agree there were clearance issues with the donor radiator, and maybe off center helped. But the radiator shown in the manual picture is clearly the AFCO Racing piece. The one theory I heard was for clearance on the upper radiator hose connection. Moving it over provides a little more clearance there. But maybe they've made a change to the radiator, because it doesn't need to be offset to have plenty of room for the upper radiator hose connection. I just installed the radiator in my new build last night. Placed it dead center.
    I did the offset per F5 instructions. I have the complete kit. According to the photo, it looks like it provided a little more space for the hose. You can see for yourself.
    Attached Images Attached Images

  9. #9
    Not a waxer Jeff Kleiner's Avatar
    Join Date
    Feb 2011
    Location
    Bloomington, Indiana
    Posts
    8,081
    Post Thanks / Like
    Quote Originally Posted by edwardb View Post
    ...The one theory I heard was for clearance on the upper radiator hose connection. Moving it over provides a little more clearance there.
    Ding, ding, ding, we have a winner! Depending on the angle that the radiator is set to you can squeeze it on with the AFCO located on center. Either way, when viewed through the body's radiator opening the nose aluminum will not be symmetrical with the radiator's core so you'll see the tank on the driver's side and not on the passenger side.

    Jeff

  10. #10
    Senior Member edwardb's Avatar
    Join Date
    Feb 2011
    Location
    Lake Orion, Michigan
    Posts
    10,575
    Post Thanks / Like
    Quote Originally Posted by Jeff Kleiner View Post
    Ding, ding, ding, we have a winner! Depending on the angle that the radiator is set to you can squeeze it on with the AFCO located on center. Jeff
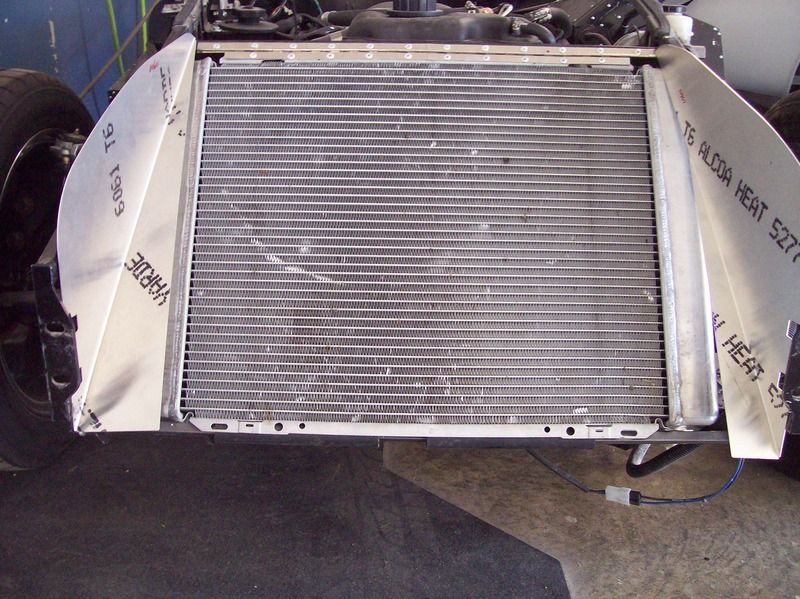
    Thanks Jeff. So I didn't dream that after all. Here's a pic of the upper radiator hose in my new Anniversary edition build, just located the other night. This is with the radiator on center. Plenty of space.


    But I am also noticing the lower radiator hose, already tight due to the already mentioned tow hook, is a little more congested with the sway bar installed. I think it will be OK, but I wouldn't want it any further over.

    Build 1: Mk3 Roadster #5125. Sold 11/08/2014. Build 2: Mk4 Roadster #7750. Sold 04/10/2017. Build Thread
    Build 3: Mk4 Roadster 20th Anniversary #8674. Sold 09/07/2020. Build Thread and Video. Build 4: Gen 3 Type 65 Coupe #59. Gen 3 Coyote. Legal 03/04/2020. Build Thread and Video
    Build 5: 35 Hot Rod Truck #138. LS3 and 4L65E auto. Rcvd 01/05/2021. Legal 04/20/2023. Build Thread. Sold 11/9/2023.

  11. #11
    Senior Member chopthebass's Avatar
    Join Date
    Oct 2013
    Location
    Calgary, Canada
    Posts
    941
    Post Thanks / Like
    Thanks guys. So provided I can get hoses on, and it doesn't clash with the body, it can go anywhere.
    Finally started my build the beginning July. 2015!

  12. #12
    Senior Member edwardb's Avatar
    Join Date
    Feb 2011
    Location
    Lake Orion, Michigan
    Posts
    10,575
    Post Thanks / Like
    Quote Originally Posted by chopthebass View Post
    Thanks guys. So provided I can get hoses on, and it doesn't clash with the body, it can go anywhere.
    Pretty much. But Jeff also mentioned the front radiator surround sheet metal, which is a good point. Use the two side pieces to set the angle and also to see where they're going to sit in relation to the radiator. Personally, I don't like how those pieces look or fit, so I've made my own for each build and will again. But if you plan to use them, take that into account as well.
    Build 1: Mk3 Roadster #5125. Sold 11/08/2014. Build 2: Mk4 Roadster #7750. Sold 04/10/2017. Build Thread
    Build 3: Mk4 Roadster 20th Anniversary #8674. Sold 09/07/2020. Build Thread and Video. Build 4: Gen 3 Type 65 Coupe #59. Gen 3 Coyote. Legal 03/04/2020. Build Thread and Video
    Build 5: 35 Hot Rod Truck #138. LS3 and 4L65E auto. Rcvd 01/05/2021. Legal 04/20/2023. Build Thread. Sold 11/9/2023.

  13. #13
    Senior Member 6t8dart's Avatar
    Join Date
    Apr 2015
    Location
    Irving, TX
    Posts
    545
    Post Thanks / Like
    Quote Originally Posted by BobsMK4 View Post
    I did the offset per F5 instructions. I have the complete kit. According to the photo, it looks like it provided a little more space for the hose. You can see for yourself.
    To: BobsMK4

    What is in this pictuure is not good, if you have your SS hose zip-tied to the tow hook, it will eventually rub through and leak due to vibration. Either isolate it with rubber, or move it away.

  14. #14
    Member
    Join Date
    Jan 2014
    Location
    Richmond, Texas
    Posts
    95
    Post Thanks / Like
    Quote Originally Posted by 6t8dart View Post
    To: BobsMK4

    What is in this pictuure is not good, if you have your SS hose zip-tied to the tow hook, it will eventually rub through and leak due to vibration. Either isolate it with rubber, or move it away.
    Thanks for the tip. I have it loosely tied, but I wil isolate with a piece of rubber hose.

  15. #15
    cobra Handler skullandbones's Avatar
    Join Date
    Jul 2011
    Location
    Superstition Mtn foothills 5 miles west of Gold Canyon AZ
    Posts
    2,686
    Post Thanks / Like
    Blog Entries
    19
    I wouldn't worry about the offset. If you mock up the radiator using a fabbed lower radiator mount which a lot of people do, you can then check all components for clearance with it held in place with a couple of screws on the upper 3/4 inch bracket. I found that helpful for the side pieces with the body on. I did something that makes the install look better and seems to me to be a little more efficient. I ran the lower radiator hose outside the 4 inch tube below the LCA and then a straight shot up to the water pump. It looks a lot cleaner when you are looking down into the engine bay. It sort of disappears unless you really are looking for it. I originally ran it the suggested way and didn't like it for a few reasons. I will eventually change the corrugated tubing to SS or aluminum sold pieces but this works good until that is done. BTW: I'm using the aluminum racing radiator, too.

    Good luck,

    WEK.
    FFR MkIII 302 (ATK), EFI 75mm TB with custom box plenum chamber, 24# injectors, 4 tube BBK ceramic, cold air sys, alum flywheel, crane roller rockers, T5, Wilwood pedals, custom five link with Watt's link, 4 rotors, coil overs, power steering with Heidt valve, alum FFR rad, driver's crash bar mod, mini dead pedal mod, quick release steering wheel hub #6046

  16. #16
    Senior Member
    Join Date
    Sep 2014
    Location
    Farmington, Maine
    Posts
    122
    Post Thanks / Like
    I am building a de-badged 20th anniversary Cobra which I picked up on October 01. I have two sets of holes in my radiator mount, one centered and on offset 5/8th of an inch to the drivers side, per the manual. I see no interference with hoses, but can't really picture what this does to the filler pieces, which are installed after the body is installed. At this point, I am just checking the install off the list and feel I can easily shift the radiator as required. Am I missing something here?

    Rick

  17. #17
    Senior Member edwardb's Avatar
    Join Date
    Feb 2011
    Location
    Lake Orion, Michigan
    Posts
    10,575
    Post Thanks / Like
    Quote Originally Posted by rickscobra View Post
    I am building a de-badged 20th anniversary Cobra which I picked up on October 01. I have two sets of holes in my radiator mount, one centered and on offset 5/8th of an inch to the drivers side, per the manual. I see no interference with hoses, but can't really picture what this does to the filler pieces, which are installed after the body is installed. At this point, I am just checking the install off the list and feel I can easily shift the radiator as required. Am I missing something here? Rick
    You want it in the center IMO. I just finished the lower radiator hose on my anniversary build last night, which is an update from what I showed above in post #10. As long as the upper hose connection has adequate clearance, you want the lower toward the center of the car as much as possible to get around the tow hook and sway bar. I was able to get the lower hose to clear around everything. It wouldn't have helped a bit had it been over 5/8 inch off center.
    Build 1: Mk3 Roadster #5125. Sold 11/08/2014. Build 2: Mk4 Roadster #7750. Sold 04/10/2017. Build Thread
    Build 3: Mk4 Roadster 20th Anniversary #8674. Sold 09/07/2020. Build Thread and Video. Build 4: Gen 3 Type 65 Coupe #59. Gen 3 Coyote. Legal 03/04/2020. Build Thread and Video
    Build 5: 35 Hot Rod Truck #138. LS3 and 4L65E auto. Rcvd 01/05/2021. Legal 04/20/2023. Build Thread. Sold 11/9/2023.

  18. #18
    Senior Member
    Join Date
    Sep 2014
    Location
    Farmington, Maine
    Posts
    122
    Post Thanks / Like
    Centered it will be. Thanks for putting this one to bed for me. Now if those brakes, hubs, axels, and driveshaft will just arrive, I will be set. Picking up the Forte 306 this coming week. Life is good.

  19. #19
    Not a waxer Jeff Kleiner's Avatar
    Join Date
    Feb 2011
    Location
    Bloomington, Indiana
    Posts
    8,081
    Post Thanks / Like
    Quote Originally Posted by rickscobra View Post
    ... can't really picture what this does to the filler pieces, which are installed after the body is installed...
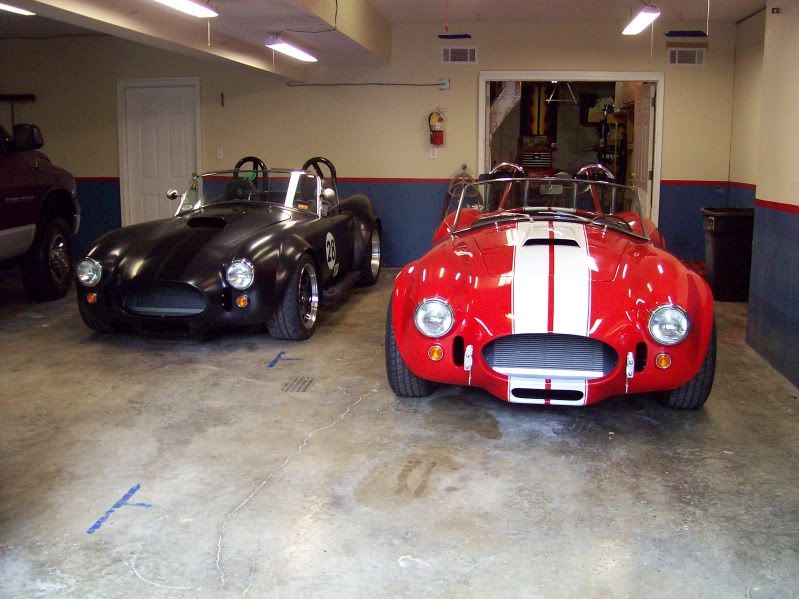
    The side nose pieces aren't symmetrical and will reveal differently side to side no matter where you put the radiator. Just went to the garage and snapped this photo of one that is in the works---radiator is centered in the chassis but as you can see the two sides are different:


    Many builders, myself included, will remake or modify the side panels such as I did on the red one shown here to end up with a more symmetrical radiator reveal:


    Jeff

  20. #20
    Senior Member
    Join Date
    Sep 2014
    Location
    Farmington, Maine
    Posts
    122
    Post Thanks / Like
    That is the visual I wanted to see. Thanks for showing me what I could not see. Looks like I will be fabricating one new side panel. Thanks Jeff.

    Rick

Posting Permissions

  • You may not post new threads
  • You may not post replies
  • You may not post attachments
  • You may not edit your posts
  •  

Breeze

Visit our community sponsor