FormaCars

Visit our community sponsor

Thanks Thanks:  0
Likes Likes:  0
Page 1 of 2 12 LastLast
Results 1 to 40 of 55

Thread: Flynntuna's EZ36 818 build

  1. #1
    Senior Member flynntuna's Avatar
    Join Date
    Apr 2011
    Location
    San Diego Ca 92106
    Posts
    1,972
    Post Thanks / Like

    Flynntuna's EZ36 818 build

    So it begins. Just purchased an incomplete project from TahoeTim, which included the 818s and all his donor parts. The heart of the beast will be an EZ36 that Tim had acquired for the build.
    This will be a father son build and each of us will bring our different skills to the project. Im sure we'll be leaning heavily on the vast experience of the members of this forum.

    Can't say enough about Tim, a great guy and went out of his way to even deliver the car to my home!
    Tim was working with Wayne on putting together the computer and harness for the car, and I will be going to go that route too.

    I'm not sure how often I'll post updates, especially in the beginning since I'm still getting my garage in shape (more than 1/2 way done though).

    So far what has been done is the fitting of the front firewall and mockup of the front suspension. I still have to go thru all the parts to see what's there and what's not.
    No pics yet, they'll be coming

  2. #2
    Sgt.Gator's Avatar
    Join Date
    Apr 2013
    Location
    Bend, Oregon
    Posts
    1,652
    Post Thanks / Like
    Subscribed! I'm very interested in the EZ30 as an NA alternative.
    "Good Judgement comes from Experience. Experience comes from Bad Judgement"
    Owner: Colonel Red Racing
    eBAy Store: http://stores.ebay.com/colonelredracing
    818R ICSCC SPM
    2005 Subaru STI Race Car ICSCC ST and SPM
    Palatov DP4 - ICSCC Sports Racer

  3. #3
    Senior Member Canadian818's Avatar
    Join Date
    Nov 2011
    Location
    Edmonton, Alberta
    Posts
    1,378
    Post Thanks / Like
    While I'm sorry to hear that Tim was unable to finish his build, it's great that it's found a home and new found excitement. I had talked to tim a few times in the past when I too was considering an EZ36. IMO your best off dealing with Wayne for the ECU and wiring. The EZ's have so little aftermarket support that you need a pro who can help you troubleshoot and also with tuning. Good luck, take lots of pictures!
    Last edited by Canadian818; 10-21-2015 at 01:21 PM. Reason: Engrish
    Adam _____ Instagram @PopesProjects____ YouTube Channel
    818 SRX - #91
    Arrived 01/02/2014
    First Start 10/31/2016
    First Drive 05/22/2017
    Registered 10/25/2019 BRAP818

  4. #4
    Senior Member Flamshackle's Avatar
    Join Date
    Jun 2011
    Location
    Aotearoa (New Zealand)
    Posts
    648
    Post Thanks / Like
    I look forward to the development of your car as I am hoping to go the same direction.
    __________________________________________________ _____________

    That man is no fool, who gives what he cannot keep to gain what he cannot lose
    __________________________________________________ _____________

  5. #5
    Senior Member Rasmus's Avatar
    Join Date
    Mar 2012
    Location
    Las Vegas, USA
    Posts
    983
    Post Thanks / Like
    Looking forward to the build.
    Fast Cars, Fast Women, Fast Haircuts!

  6. #6
    Senior Member Frank818's Avatar
    Join Date
    Jun 2013
    Location
    QC, Canada
    Posts
    5,732
    Post Thanks / Like
    Cool!!
    Frank
    818 chassis #181 powered by a '93 VW VR6 Turbo GT3582R
    Go-karted Aug 5, 2016 - Then May 19+21, 2017
    Tracked May 27/July 26, 2017
    Build time before being driveable on Sep 27, 2019: over 6000h
    Build Completed Winter 2021

  7. #7
    Junior Member
    Join Date
    Jul 2012
    Posts
    16
    Post Thanks / Like
    A friend of mine is still working on his EZ36 swap. It's going into a TR-42 (exocar). I'm really excited for him... It should be a proper hoon-mobile when he's done!

  8. #8
    Senior Member
    Join Date
    Apr 2012
    Location
    Nepa
    Posts
    685
    Post Thanks / Like
    Quote Originally Posted by AgentH View Post
    A friend of mine is still working on his EZ36 swap. It's going into a TR-42 (exocar). I'm really excited for him... It should be a proper hoon-mobile when he's done!
    any build threads on this?

  9. #9
    Senior Member wleehendrick's Avatar
    Join Date
    Jul 2012
    Location
    Encinitas, CA
    Posts
    1,653
    Post Thanks / Like
    Blog Entries
    2
    Quote Originally Posted by flynntuna View Post
    So it begins.
    Congrats, George! Great to see you going forward with the H6.

  10. #10
    Senior Member flynntuna's Avatar
    Join Date
    Apr 2011
    Location
    San Diego Ca 92106
    Posts
    1,972
    Post Thanks / Like
    My build is progressing at a snails pace, seem like "life" is conspiring against me Lol. Anyway some progress has been made. Fitted and drilled belly aluminum, fitted and installed the fire wall and wilwood pedal box.

    Today I test fit the engine, there's a couple of sensors that need to be removed before installing the engine because are in a very vulnerable location. Other than that the engine went in fairly easily. This test fit was without the engine mounts bolted to the engine . It appears that their will need to be some modification to the frame mounting location. Looks like the slot for the engine mount on the frame will need to moved back a 1/4-1/2".

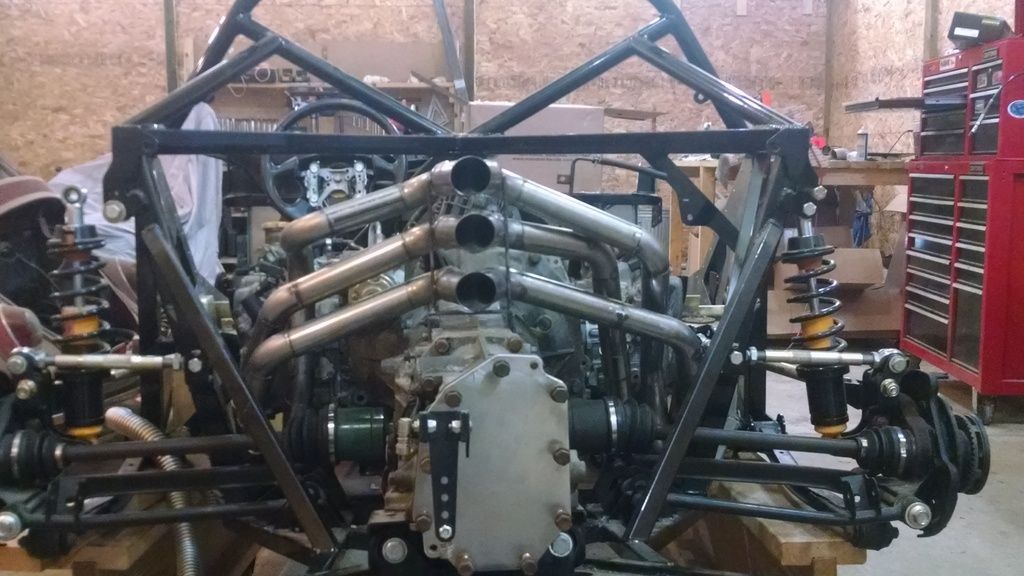
    One other thing I wanted to see was whether the headers from raptor would fit. They don't fit. http://www.raptorsc.com.au/subaru10.html
    Looks like those beautiful headers will have to be cut up. I'll have to be creative in routing the exhaust because the frame and suspension mounting location is in the way..
    Attached Images Attached Images

  11. #11
    Member
    Join Date
    May 2014
    Posts
    88
    Post Thanks / Like
    Quote Originally Posted by flynntuna View Post
    My build is progressing at a snails pace, seem like "life" is conspiring against me Lol. Anyway some progress has been made. Fitted and drilled belly aluminum, fitted and installed the fire wall and wilwood pedal box.

    Today I test fit the engine, there's a couple of sensors that need to be removed before installing the engine because are in a very vulnerable location. Other than that the engine went in fairly easily. This test fit was without the engine mounts bolted to the engine . It appears that their will need to be some modification to the frame mounting location. Looks like the slot for the engine mount on the frame will need to moved back a 1/4-1/2".

    One other thing I wanted to see was whether the headers from raptor would fit. They don't fit. http://www.raptorsc.com.au/subaru10.html
    Looks like those beautiful headers will have to be cut up. I'll have to be creative in routing the exhaust because the frame and suspension mounting location is in the way..
    I broke one of the avls or avcs sensors clean off the second time I installed the ez30r... wish I was thinking ahead like you did.

  12. #12
    Senior Member DSR-3's Avatar
    Join Date
    Oct 2015
    Location
    San Jose, CA
    Posts
    386
    Post Thanks / Like
    Thanks for posting- good to see you are still on it. Our snails should race!
    If you don't already have a better-than-stock engine mount solution, it's not too late to get a set of my adapters made (see separate thread). I just gave the machine shop some slack on making them.
    If the EZ36 is like the EZ30R re. the intake cam phaser (though it looks smaller in your pic), you may need to move the engine back closer to an inch. I have my EZ30R in (modified the frame) and it hangs "into" the frame by over 1/2" as I recall.
    My engine arrived with a busted AV?S solenoid too... I think they can be repaired.
    Taking the intake manifold off makes working the engine in easier.

  13. #13
    Member
    Join Date
    May 2014
    Posts
    88
    Post Thanks / Like
    Mine came missing one of the avls solenoids, Dallas JDM started it should have been missing both since they aren't compatible with the us ecus... sure whatever they didn't want to replace it, oh well.

    I've never tried installing it with the intake manifold on, other than where I'm hoisting it from, I don't foresee it as making it much worse.

  14. #14
    Senior Member flynntuna's Avatar
    Join Date
    Apr 2011
    Location
    San Diego Ca 92106
    Posts
    1,972
    Post Thanks / Like
    The photo below shows the motor mounts that I have. They mount to the engine in three places. What did you do to move the mounts? Did you cut a new slot in the frame? Or did you cut slots perpendicular to the one that's there?

    I'm pretty sure in Wayne's thread he mentioned moving the mount location by a 1/4" I'll have to look through his thread again.

    If your keeping yours NA how are you routing the exhaust? Moving the engine back will leave a little room between the frame and the heads. One possible route would be route the headers buy the side of the motor mounts keeping it tight to the heads and then over the axles. Under the frame is unacceptable, no ground clearance for that. Through the motor mount mounting bracket may be an option if notching and reinforcing the frame was something I was willing to do. That would run the exhaust under the axles and right up against the tranny. Or just run straight pipes out the side. Lol anyway just thinking out loud and rambling, any ideas will be appreciated.
    Attached Images Attached Images

  15. #15
    Senior Member Hobby Racer's Avatar
    Join Date
    Feb 2011
    Location
    Syracuse, NY
    Posts
    1,291
    Post Thanks / Like
    Quote Originally Posted by flynntuna View Post
    ...Or just run straight pipes out the side.
    I am planning to do just that. Exit the exhaust in front of the rear tires, poking through the side sails as low as possible.
    MK3.1 Roadster completed 2011
    818R built with EZ36R H6 completed 2018
    818R rebuild with a JDM Honda K24A

  16. #16
    Senior Member flynntuna's Avatar
    Join Date
    Apr 2011
    Location
    San Diego Ca 92106
    Posts
    1,972
    Post Thanks / Like
    That would be the easiest, but I'm afraid my neighbors would show up with pitchforks.

  17. #17
    Member
    Join Date
    May 2014
    Posts
    88
    Post Thanks / Like
    It's not easy at all. My learning is that the 6 is better off turboed so you give less about the routing.

  18. #18
    Senior Member flynntuna's Avatar
    Join Date
    Apr 2011
    Location
    San Diego Ca 92106
    Posts
    1,972
    Post Thanks / Like
    Ok, got the motor punts mounted to the engine and trans. and the mounts need to definitely be moved back at least an inch.
    The right side of the timing cover is about 1 1/2" longer than the left and hits the frame before the mount stud reaches the frame slot though axles are not centered hopefully they are ok since the transmission mounts fit but are at the end of the slot. They probably should be expanded since the right side of the engine is with in 1/4" from the frame.
    I could use some advice, particularly on how close the timing cover can be to the frame and how far the axles can be moved.
    Attached Images Attached Images

  19. #19
    Senior Member flynntuna's Avatar
    Join Date
    Apr 2011
    Location
    San Diego Ca 92106
    Posts
    1,972
    Post Thanks / Like
    Well... I've got the engine in. I cut new slots in the frame mounting location 1 1/4" back from the stock location and one of the transmission slots 1/4". The engine slipped in easily and is in its new home for now. With this mod the engine sits 3/8" from the frame and hopefully this will be far enough so as not to cause a problem. I do however have to either shim the engine up 1/8-1/4" or make a small notch in the frame because the front motor mount/anti pitch mount just barely touches the frame.

    Can anyone tell me how much if any the engine mounts can be shimmed?

    I could just notch the corner of the frame were the front motor mount touches the frame since I'll have to weld brackets for it anyway, but if I can avoid that with 1/8" shims I'd rather do that.
    Attached Images Attached Images

  20. #20
    Senior Member Hobby Racer's Avatar
    Join Date
    Feb 2011
    Location
    Syracuse, NY
    Posts
    1,291
    Post Thanks / Like
    With the engine setting on the mounts now, does any part of the oil pan hang below the frame? To be clear, you are using the two motor mounts in the normal position for the EJ motors plus the one on the front of the case correct?

    I am planning out my EZ36 install and your information is very helpful.
    MK3.1 Roadster completed 2011
    818R built with EZ36R H6 completed 2018
    818R rebuild with a JDM Honda K24A

  21. #21
    Senior Member flynntuna's Avatar
    Join Date
    Apr 2011
    Location
    San Diego Ca 92106
    Posts
    1,972
    Post Thanks / Like
    As it sits now without shimming , it looks to set about 1/2" below the frame.
    Attached Images Attached Images

  22. #22
    Senior Member flynntuna's Avatar
    Join Date
    Apr 2011
    Location
    San Diego Ca 92106
    Posts
    1,972
    Post Thanks / Like
    The motor mounts mount to the engine in three places.
    Sorry for the lousy pics
    Attached Images Attached Images

  23. #23
    Member
    Join Date
    May 2014
    Posts
    88
    Post Thanks / Like
    I spoke to Wayne, he said the engine torques vertical and aft so fire wall clearance shrinking is only thermal expansion.

  24. #24
    Senior Member UnhipPopano's Avatar
    Join Date
    Mar 2016
    Posts
    344
    Post Thanks / Like
    In looking at the forward Mount, it looks like it is stiffest when the engine moves up, and then forwards and back. If you are using stiffer supports, do you need the front mount?

  25. #25
    Senior Member flynntuna's Avatar
    Join Date
    Apr 2011
    Location
    San Diego Ca 92106
    Posts
    1,972
    Post Thanks / Like
    Thanks for that observation, with most of the shock absorbing material on the top of the mount it does make sense that it's function is to keep the engine from rocking up.

    As to weather to keep it or not, I'm more inclined to keep it because of some of the videos posted here on this forum showing how much the engines rock and I'm not that comfortable with taking that chance of the engine bouncing off the frame.

  26. #26
    Moonlight Performance
    Hindsight's Avatar
    Join Date
    May 2014
    Location
    Atlanta
    Posts
    3,402
    Post Thanks / Like
    I'm not an expert with this, and it looks like a very cool project, but I see no issue with shimming the engine up other than dealing with alignment issues of the driveshafts. I highly doubt 1/4" to 1/2" of shimming would have any impact on driveshaft angle though. So long as everything fits in the frame, it should be fine. That's my two cents anyway.

  27. #27
    Senior Member flynntuna's Avatar
    Join Date
    Apr 2011
    Location
    San Diego Ca 92106
    Posts
    1,972
    Post Thanks / Like
    One concern with shimming it up is that it'll leave very few threads on the motor mount bolts. The only way I can see around that is that the shim be bolted to the mount and the shims have bolts attached so that it can be bolted to the frame.
    I hope that makes sense.
    Notching the 4" of the corner edge of the frame and reinforcing by welding the bracket for the front motor mount to the frame may be the easiest route.

    Lots more head scratching to do.

  28. #28
    Member
    Join Date
    May 2014
    Posts
    88
    Post Thanks / Like
    What motor mounts do you have? I'm using Cusco I believed and there is enough threads for a half inch shim.
    Last edited by craigfree; 07-18-2016 at 02:02 PM. Reason: Grammar

  29. #29
    Senior Member flynntuna's Avatar
    Join Date
    Apr 2011
    Location
    San Diego Ca 92106
    Posts
    1,972
    Post Thanks / Like
    I believe they are the stock ones for the ez36. They came with the package deal when I bought the kit from TahoeTim. I'll check how much leeway there is when I get home.

  30. #30
    Senior Member flynntuna's Avatar
    Join Date
    Apr 2011
    Location
    San Diego Ca 92106
    Posts
    1,972
    Post Thanks / Like
    So I checked the amount of thread left after snugging the motor mount bolts. Not much available, there's only 3/8" past the bolt. But while under there it occurred to me that if I use longer bolts to mount the motor mount to the engine that I could use washers between the engine and motor mounts say 1/8" worth and 1/8" shim between the motor mounts and frame.
    Or even making a 1/4"-1/2" spacer to go between the motor mounts and engine and using longer bolts.

    Am I asking for trouble getting to 1/4" or so this way?
    Last edited by flynntuna; 07-18-2016 at 05:35 PM.

  31. #31
    Moonlight Performance
    Hindsight's Avatar
    Join Date
    May 2014
    Location
    Atlanta
    Posts
    3,402
    Post Thanks / Like
    Shouldn't matter which side the shims go - except for bolt or stud length. I see no reason not to put ALL shim you need between the engine and the mount, so long as it doesn't use studs on that side and you can simply use longer bolts.

  32. #32
    Senior Member flynntuna's Avatar
    Join Date
    Apr 2011
    Location
    San Diego Ca 92106
    Posts
    1,972
    Post Thanks / Like
    Thanks , they are all bolts. I'll get longer bolts and make spacers to go between the engine and mounts.
    Now to decide how thick the spacer should be.

  33. #33
    Senior Member flynntuna's Avatar
    Join Date
    Apr 2011
    Location
    San Diego Ca 92106
    Posts
    1,972
    Post Thanks / Like
    Not much to update, I've been painting parts and putting in new wheel bearings , my son has borrowed the engine crane so no progress on the engine install. I have been looking and thinking about the mods that will need to be made to the engine mount bracket. The front outside corner of the engine frame mount looks like it'll need to be cut to make room for the headers. I'm wondering a gusset will be needed to reinforce the structure of the bracket?
    Attached Images Attached Images
    Last edited by flynntuna; 08-28-2016 at 05:30 PM.

  34. #34
    Senior Member
    Join Date
    Aug 2016
    Location
    East Hartford, Ct.
    Posts
    240
    Post Thanks / Like
    I just found out the electronics to run my engines with Motec is going to cost OVER $10,000. Anybody want to buy a cool project or two EZ30 engines?

  35. #35
    Member
    Join Date
    Oct 2016
    Posts
    62
    Post Thanks / Like
    Why not go with haltech? They already have done ez motors avcs and all.

  36. #36
    Member
    Join Date
    Oct 2016
    Posts
    62
    Post Thanks / Like
    Basic kit is around $1800 I believe for drive by wire. Full dual wide band , sequential fire with racepak dash display around $3500 depending where you buy it. It Does auto tune even

  37. #37
    Member
    Join Date
    Oct 2016
    Posts
    62
    Post Thanks / Like
    Is it possible to mount the front engine mount upside down?

  38. #38
    Senior Member flynntuna's Avatar
    Join Date
    Apr 2011
    Location
    San Diego Ca 92106
    Posts
    1,972
    Post Thanks / Like
    Quote Originally Posted by Toysrus View Post
    Is it possible to mount the front engine mount upside down?
    You get the same interference with a frame crossbar right side up or upside down. When upside down it is close to the balancer and you'd still need to either mod the motor mount bracket to lower the engine 1/4" or
    cut the upper crossbar.

    My friend suggested to make a bracket to offset the mounting holes. Bolt it to the engine then the front mount to it. This way I could use the stock front mount bracket.

    I'm thinking of either using spacers 1/4"-1/2" it raise the engine at the motor mounts, or redo the motor mount frame bracket by the same 1/4"-1/2". Either way I'd have to make a new front motor mount bracket and ditch the stock one.
    Attached Images Attached Images

  39. #39
    fasterer and furiouser longislandwrx's Avatar
    Join Date
    Aug 2012
    Location
    Long Island
    Posts
    2,540
    Post Thanks / Like
    Blog Entries
    6
    can you space it off the block an inch and a half or so, mount it backwards to the block and run the other frame piece off the face of the square tube rather than the top?

    looks like it would work if you redrilled some holes in the piece with the ears, and trimmed a little off.
    Last edited by longislandwrx; 10-28-2016 at 02:10 PM.
    A well stocked beverage fridge is the key to any successful project.

  40. #40
    Senior Member flynntuna's Avatar
    Join Date
    Apr 2011
    Location
    San Diego Ca 92106
    Posts
    1,972
    Post Thanks / Like
    Thanks for your input, it got me thinking in a different way. Spacing it off an inch or so and flipping it won't work. If I used a piece of angle and bolt it to the engine then bolt the mount to the angle effectively using the mount horizontal instead of vertical it might work. I'll have to play with it to see for sure.

    I've got to make sure I have space for the two into one coolant line and alternator drive belt that will occupy the same space.
    Attached Images Attached Images

Page 1 of 2 12 LastLast

Posting Permissions

  • You may not post new threads
  • You may not post replies
  • You may not post attachments
  • You may not edit your posts
  •  

FFMetal

Visit our community sponsor