Forte's

Visit our community sponsor

Thanks Thanks:  0
Likes Likes:  0
Results 1 to 38 of 38

Thread: Mk IV UCA Failure

  1. #1
    Senior Member jakester888's Avatar
    Join Date
    Jun 2011
    Location
    Portland, OR
    Posts
    444
    Post Thanks / Like

    Mk IV UCA Failure

    Popular topic at least on FFCars. Wondering if anyone else has seen this?

    1500 miles in, my driver's side upper control arm snapped while driving (I was turning left, stopped and felt something snap... just before a SEMI missed me). I limped along about 40 yds down the road, pulled over and saw the driver's side front tire with a hell-of-a-lot of instant positive camber.

    I towed her home.

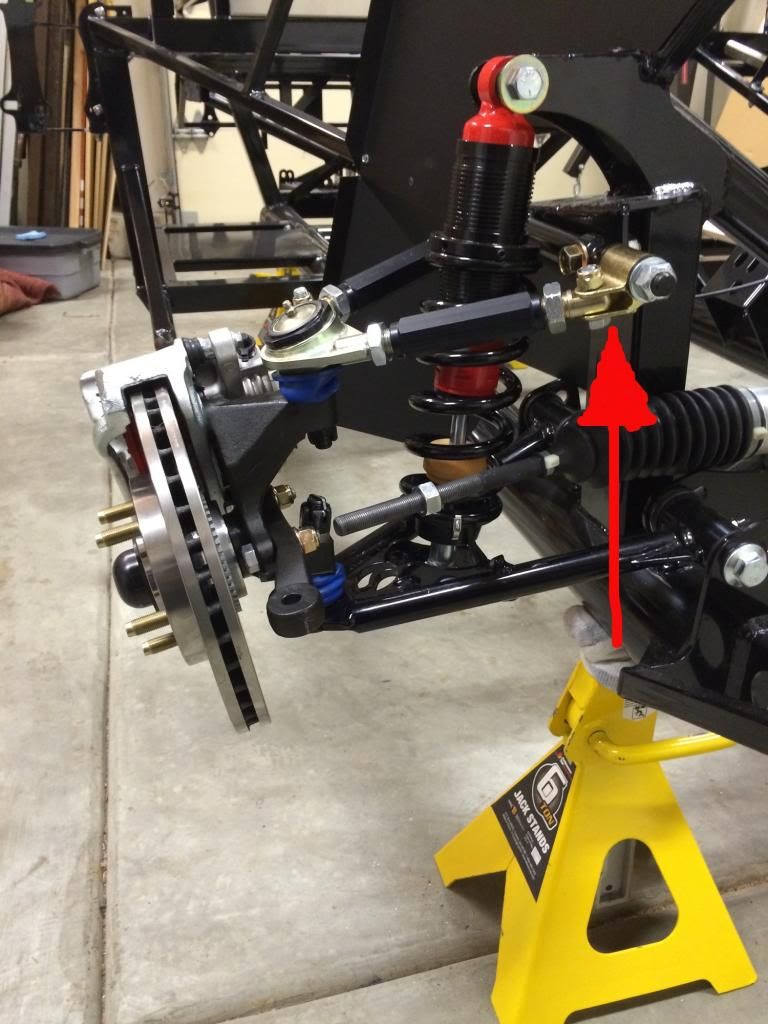
    Jacked her up, took off the tire and saw this.

    UCA Fail sm.jpg

    Seems to be a commonly broken part according to other posts. I called FFR, ordered 2 new front UCA's. The parts girl at FFR was not aware of a failure rate (and no hint of replacing this). She was in a hurry to leave as it was 5pm Friday... so I just went ahead and paid the 2x$229 and had them shipped. I plan to replace both sides while I'm at it.

    *NOTE* Incase it matters : I am using donor Mustang OEM lower control arms.

    Kind of un-nerving. Any similar experiences? Did I do something incorrect? Some suggest a lack of lube. I am suspecting the UCA itself. Please share your thoughts.
    Last edited by jakester888; 12-11-2015 at 10:04 PM.

  2. #2

    Join Date
    Feb 2011
    Location
    Norton, MA USA earth
    Posts
    3,338
    Post Thanks / Like
    Does the part that is still attached rotate or is it seized? This can also happen of the bolts are not loosened slightly during adjustments.
    Mike

  3. #3
    Not a waxer Jeff Kleiner's Avatar
    Join Date
    Feb 2011
    Location
    Bloomington, Indiana
    Posts
    8,060
    Post Thanks / Like
    99% chance that you will find that the rotating link is seized to the cross shaft due to lack of lube.

    The new style arms are more willing to accept lubricant. They are physically different than what you have now with angled ball joint plates rather than straight. The joint needs to angle outward and one side will have the fixed leg forward and it will be to the rear on the other.

    Good luck,
    Jeff

  4. #4
    Senior Member CraigS's Avatar
    Join Date
    Feb 2011
    Location
    Blacksburg, Va
    Posts
    4,728
    Post Thanks / Like
    Is that pivot the older steel on steel style or the newer one w/ a plastic insert? Will it rotate on the shaft?
    FFR MkII, 408W, Tremec TKO 500, 2015 IRS, DA QA1s, Forte front bar, APE hardtop.

  5. #5
    Senior Member
    Join Date
    Sep 2014
    Posts
    138
    Post Thanks / Like
    Isn't there supposed to be a washer between the sleeve and the retaining nut? My inserts/bushings show about 1/16" of exposed material on each side, if I remember correctly. It looks like the nut is against the sleeve in this pic.
    Mk 4 roadster #8495 delivered on 12-23-2014. Build thread: http://thefactoryfiveforum.com/showt...r-Build-Thread Carbureted 4.6 SOHC, C-4 auto with manual valve body. Fox width rear with 2.73 gear. First start video:https://www.youtube.com/watch?v=v8ie...ature=youtu.be

  6. #6
    Senior Member Mike N's Avatar
    Join Date
    Feb 2011
    Location
    Mooresville NC
    Posts
    801
    Post Thanks / Like
    In addition to the above comments the through bolt between the pivot and the arm needs to be loosened when making alignment adjustments or you will induce bind in the pivot.
    Mike............

    FFR2100 - 331 with KB supercharger - T5 - 5 link rear 3.08's and T2 Torsen.

  7. #7
    Senior Member Todd Buttrick's Avatar
    Join Date
    May 2011
    Posts
    135
    Post Thanks / Like
    Quote Originally Posted by Ray W. View Post
    Isn't there supposed to be a washer between the sleeve and the retaining nut?
    Not that I"m aware of. Tie rod end adjustment sleeve is same with no washer on either side.

  8. #8
    Senior Member
    Join Date
    Sep 2014
    Posts
    138
    Post Thanks / Like
    Quote Originally Posted by Todd Buttrick View Post
    Not that I"m aware of. Tie rod end adjustment sleeve is same with no washer on either side.
    This is what I'm talking about. (circled in the pic below) Page 94 of the MK4 manual has a pic of an upper control arm with no washers, which I'm assuming is the older type shown in jakester888's pic. I have the newer type control arms depicted on page 95, which has washers and about 1/16" of exposed bushing flange on both ends.

    UCA Fail sm.jpg
    Mk 4 roadster #8495 delivered on 12-23-2014. Build thread: http://thefactoryfiveforum.com/showt...r-Build-Thread Carbureted 4.6 SOHC, C-4 auto with manual valve body. Fox width rear with 2.73 gear. First start video:https://www.youtube.com/watch?v=v8ie...ature=youtu.be

  9. #9
    Senior Member
    Join Date
    Dec 2013
    Location
    Twin Cities, MN
    Posts
    139
    Post Thanks / Like
    I am not a metallurgist but looking at that it appears the part failed in shear (vertically). Could be a weld issue if thats the case...especially if the part has freedom of movement. If it doesn't move, or binds, that may be the problem as others have mentioned.
    Hurricane HM-2016, 9" Ford w/3.50, 427W, TKO 600.

  10. #10
    Junior Member
    Join Date
    Oct 2014
    Posts
    5
    Post Thanks / Like
    Quote Originally Posted by aarvig View Post
    I am not a metallurgist but looking at that it appears the part failed in shear (vertically). Could be a weld issue if thats the case...especially if the part has freedom of movement. If it doesn't move, or binds, that may be the problem as others have mentioned.
    More like bending around the UCA pivot axis, not shear. It's brittle fracture, probably initiated on the side not visible, further away from the weld. I am sure the weld-induced embrittlement did not help.

    The comments about lube and binding are likely correct, based on the angle of the fracture surface.

    (no, I am not a professional mettalurgist, but I have 5 years of education in the field :-) )

    Jeff

  11. #11
    Not a waxer Jeff Kleiner's Avatar
    Join Date
    Feb 2011
    Location
    Bloomington, Indiana
    Posts
    8,060
    Post Thanks / Like
    There is no weld on the part that broke. Those UCAs have a long history of not accepting lube at the cross shaft to pivot joint. Anyone running these needs to assure that lube is going in and through; i.e., coming out both sides of the pivot (this one appears dry with no grease visible). This is what happens when it does not.

    Jeff

  12. #12
    Junior Member
    Join Date
    Apr 2011
    Posts
    24
    Post Thanks / Like
    I am finishing a old kit, a Mk2. Should I upgrade the UCA's?

  13. #13
    Senior Member
    Join Date
    Dec 2013
    Location
    Twin Cities, MN
    Posts
    139
    Post Thanks / Like
    Quote Originally Posted by Jeff Kleiner View Post
    There is no weld on the part that broke. Those UCAs have a long history of not accepting lube at the cross shaft to pivot joint. Anyone running these needs to assure that lube is going in and through; i.e., comeing out both sides of the pivot (this one appears dry with no grease visible). This is what happens when it does not.

    Jeff
    You're right, I thought those were welded, looking closer they are not. Thanks for correcting.
    Hurricane HM-2016, 9" Ford w/3.50, 427W, TKO 600.

  14. #14
    Not a waxer Jeff Kleiner's Avatar
    Join Date
    Feb 2011
    Location
    Bloomington, Indiana
    Posts
    8,060
    Post Thanks / Like
    Quote Originally Posted by greydog View Post
    I am finishing a old kit, a Mk2. Should I upgrade the UCA's?
    Most Mk2s used Pole Position/SPC uppers like the latest Mk4 arms which are not prone to cross shaft galling. Post a photo and we can identify them.

    Jeff

  15. #15
    Senior Member CraigS's Avatar
    Join Date
    Feb 2011
    Location
    Blacksburg, Va
    Posts
    4,728
    Post Thanks / Like
    Quote Originally Posted by greydog View Post
    I am finishing a old kit, a Mk2. Should I upgrade the UCA's?
    I would. I recently installed new cross shafts and pivots on my MKII and re-used the rest of the UCA. These plastic bushing pivots have very well done grease channels so the grease disperses rather than just leaking out at the easiest path. I ordered from Summit
    2qty SPS-93400 cross shaft
    4qty SPS-92025 pivots
    Verify that the threads in your sleeves are 3/4 inch like mine before ordering.
    FFR MkII, 408W, Tremec TKO 500, 2015 IRS, DA QA1s, Forte front bar, APE hardtop.

  16. #16
    Senior Member Raceral's Avatar
    Join Date
    Feb 2011
    Location
    Stoneville NC
    Posts
    374
    Post Thanks / Like
    http://www.summitracing.com/search/b...%20Performance

    What is the part number of the latest F5 control arm....
    Thanks,
    Al Adkins
    Certified "Kool Aid" drinker

  17. #17
    Senior Member CraigS's Avatar
    Join Date
    Feb 2011
    Location
    Blacksburg, Va
    Posts
    4,728
    Post Thanks / Like
    Jakester where are you?
    FFR MkII, 408W, Tremec TKO 500, 2015 IRS, DA QA1s, Forte front bar, APE hardtop.

  18. #18
    Senior Member jakester888's Avatar
    Join Date
    Jun 2011
    Location
    Portland, OR
    Posts
    444
    Post Thanks / Like
    Quote Originally Posted by CraigS View Post
    Jakester where are you?
    I am in Dallas.

  19. #19
    Senior Member jakester888's Avatar
    Join Date
    Jun 2011
    Location
    Portland, OR
    Posts
    444
    Post Thanks / Like
    New vs Old. Finally back on the road as of today.

    UCA Fix.jpg UCA Fail.jpg

  20. #20
    Not a waxer Jeff Kleiner's Avatar
    Join Date
    Feb 2011
    Location
    Bloomington, Indiana
    Posts
    8,060
    Post Thanks / Like
    Bad news Jake---you have assembled your control arms wrong (well I assume you did them both the same anyway). The ball joints are supposed to angle outward as shown in the photo below, not in as you have it.


    You'll need to disassemble, remove the ball joint and flip the ball joint plate portion over then reinstall the joint and put it all back together.

    Jeff

  21. #21

    Join Date
    Mar 2013
    Location
    Medway, MA
    Posts
    298
    Post Thanks / Like
    Blog Entries
    1
    The thing that scares me about the SPC's is the tiny minimum cross sectional area where the clevis is bored through for the bolt - its about 1/4" square total for the 4 remaining connections. I will be checking the lube on Mk3 UCA's before this coming driving season and encourage everyone else to do so.
    www.breezeautomotive.com 2005 FFR Mk3 Roadster, 302/340hp, MassFlo EFI, Breeze Pulleys, T5, Aluminum Flywheel, 3-link rear with Torsen Diff and 3.27:1 gears, Power Steering, Breeze Front Sway Bar, SN-95 Spindles with outboard SAI Mod, Breeze Battery Mount, QA1 Externally Adjustable Shocks, Quick Release Steering Wheel, Vintage Race seats, GM Arctic White, Sky Blue Scoop, Hidden Hinges, Billet Aluminum Side-view Mirrors, 2,183lbs wet. 1967 Mustang Fastback, Dark Moss Green, black interior, '67 14" styled steel wheels, 2000 Explorer 302 w 5.0 Cam, Quickfuel 450 CFM, 289 Hi-Po Dual exhaust, C4, lowering springs w Shelby drop.

  22. #22
    Not a waxer Jeff Kleiner's Avatar
    Join Date
    Feb 2011
    Location
    Bloomington, Indiana
    Posts
    8,060
    Post Thanks / Like
    Quote Originally Posted by Mark Reynolds View Post
    The thing that scares me about the SPC's is the tiny minimum cross sectional area where the clevis is bored through for the bolt - its about 1/4" square total for the 4 remaining connections....
    Me too Mark.

    Jeff

  23. #23
    Senior Member jakester888's Avatar
    Join Date
    Jun 2011
    Location
    Portland, OR
    Posts
    444
    Post Thanks / Like
    Crap!

  24. #24
    Member mike w's Avatar
    Join Date
    Jan 2012
    Location
    Bridgewater, NJ
    Posts
    89
    Post Thanks / Like
    Lesson learned is grease, grease, and more grease!!!!!!
    Mk-3 FFR 5558, 351W, Comp Xtreme Energy Cam, Aluminum Heads, Roller Rockers, Mallory Comp S/S 42 Distributor, Edelbrock RPM Performer, 670 Holley Street Avenger, T-5, 3:08 Posi, 15" Team III Wheels, BF Goodrich T/A 225/60R-15, 275/50R-15, 4-wheel disc brakes, Electric Blue/White Stripes.

  25. #25
    Senior Member CraigS's Avatar
    Join Date
    Feb 2011
    Location
    Blacksburg, Va
    Posts
    4,728
    Post Thanks / Like
    Quote Originally Posted by Jeff Kleiner View Post
    Me too Mark.

    Jeff
    Here is the solution I am running.
    http://www.mcmaster.com/#rod-ends/=114h8pu
    Next to the bottom # 4749T211. Two notes: 1- The hole is 3/8 so needs to be drilled to 7/16. The slot is 3/8 so I found a 7/16 washer that is 1/8 thick to take up the space. These have much more meat around the pinch bolt. I had them on though the last half of the 2015 autocross season running 295 Hoosier A7s on 10.5 wheels.
    FFR MkII, 408W, Tremec TKO 500, 2015 IRS, DA QA1s, Forte front bar, APE hardtop.

  26. #26
    Senior Member
    Join Date
    Mar 2013
    Location
    Fort Collins, Colorado
    Posts
    405
    Post Thanks / Like
    Quote Originally Posted by Ray W. View Post
    This is what I'm talking about. (circled in the pic below) Page 94 of the MK4 manual has a pic of an upper control arm with no washers, which I'm assuming is the older type shown in jakester888's pic. I have the newer type control arms depicted on page 95, which has washers and about 1/16" of exposed bushing flange on both ends.

    UCA Fail sm.jpg
    Page 128 of the SPC catalog shows a cross shaft with washers under the nuts on the cross shaft. I was just at SPC on friday getting some parts for my arms, and I compared the old vs new shafts. I am staying with the old.

    The current part number for a roadster is 92142

    I will also add that the guys at SPC were great to deal with.

    Derald.
    Last edited by Derald Rice; 02-14-2016 at 04:17 PM. Reason: add part number

  27. #27
    Out Drivin' Gumball's Avatar
    Join Date
    Feb 2011
    Location
    Blackberry Township, IL
    Posts
    2,653
    Post Thanks / Like
    This isn't my photo, but it was from a similar thread where the owner took a picture of the old versus new style UCA when replacing his due to a very similar failure that is posted here.

    This picture is what convinced me to swap my UCAs for the new style, even though my Mk3 was just about finished. My old-style UCAs only did go-kart miles and then were retired for the upgraded units.


    Here is my then-new suspension...

    Last edited by Gumball; 02-14-2016 at 08:05 PM.
    Later,
    Chris

    "There are no more monsters to fear, and so, we have to build our own."
    Mk3.1 #7074

  28. #28
    Senior Member CraigS's Avatar
    Join Date
    Feb 2011
    Location
    Blacksburg, Va
    Posts
    4,728
    Post Thanks / Like
    These are my comments on my thread on the other forum when I upgraded to the new cross shafts and delrin pivots.
    "Two items:
    1- the shafts are shorter than my old ones by about an inch. Ok for me but could be a problem for others if your front sleeves are close to the spring already.
    2- the delrin bushings have very well done grease channels. I greased by hand prior to assembly. Once on the car I got the grease gun out. I got six small streams of grease equally spaced around the circumference on both sides of the pivot. What a nice change from the old stuff."
    FFR MkII, 408W, Tremec TKO 500, 2015 IRS, DA QA1s, Forte front bar, APE hardtop.

  29. #29
    Senior Member jakester888's Avatar
    Join Date
    Jun 2011
    Location
    Portland, OR
    Posts
    444
    Post Thanks / Like
    Quote Originally Posted by Jeff Kleiner View Post
    Bad news Jake---you have assembled your control arms wrong (well I assume you did them both the same anyway). The ball joints are supposed to angle outward as shown in the photo below, not in as you have it.

    You'll need to disassemble, remove the ball joint and flip the ball joint plate portion over then reinstall the joint and put it all back together.

    Jeff
    OK - flipped and re-installed.

    Photo evidence (before & after).

    UCA Fix.jpg UCA Fix2.jpg

  30. #30
    Not a waxer Jeff Kleiner's Avatar
    Join Date
    Feb 2011
    Location
    Bloomington, Indiana
    Posts
    8,060
    Post Thanks / Like
    Quote Originally Posted by jakester888 View Post
    OK - flipped and re-installed.

    Photo evidence (before & after).

    UCA Fix.jpg UCA Fix2.jpg
    You're getting closer Jake...notice that I said to flip the ball joint plate. You also did the shaft and attached pivots. Yours are now upside down; their grease fitting should point up like in your "before" photo.

    Jeff

  31. #31
    Senior Member ram_g's Avatar
    Join Date
    Feb 2011
    Location
    Houston, TX
    Posts
    234
    Post Thanks / Like
    Quote Originally Posted by Jeff Kleiner View Post
    You're getting closer Jake...notice that I said to flip the ball joint plate. You also did the shaft and attached pivots. Yours are now upside down; their grease fitting should point up like in your "before" photo.

    Jeff
    Just an interested bystander...you may be right, but why? Why does it matter which way the grease nipples point? Or is it something asymmetrical about the shaft and the grease nipples are just an indicator of which way it's installed?
    FFR Mk3.1 #6720. Carb'd 302. Fun.

  32. #32
    Not a waxer Jeff Kleiner's Avatar
    Join Date
    Feb 2011
    Location
    Bloomington, Indiana
    Posts
    8,060
    Post Thanks / Like
    Quote Originally Posted by ram_g View Post
    Just an interested bystander...you may be right, but why? Why does it matter which way the grease nipples point? Or is it something asymmetrical about the shaft and the grease nipples are just an indicator of which way it's installed?
    Ram,
    Your 2008 vintage UCAs are like Jake's failed originals and have non-directional pivots however the new style from SPC that he replaced his failed ones with have an upside and a down side. The direction the grease fittings are pointing is simply the quick visual giveaway. The pivots are not symmetrical as you can see in this photo which shows them oriented incorrectly (as is the angle of the ball joint):


    See how when installed this way the the links join the pivots below the cross shaft?

    Here is the same front corner after the builder corrected both the direction of the ball joint plate and pivots:


    The questions:
    With the pivots oriented upside down is the suspension geometry significantly changed? ---Probably not. Is it how they were designed to be installed?---No. Will it make it difficult to lubricate?---Yes (and lack of pivot lubrication was what caused Jake's upper control arm problems to begin with).

    Jeff

  33. #33
    Senior Member JIMOCO's Avatar
    Join Date
    Aug 2013
    Location
    Camp Hill, PA
    Posts
    297
    Post Thanks / Like
    I had installed mine upside down and found that I could not turn the steering wheel without a lot of effort. It was binding at the ball joint. After looking at the manual and playing what's wrong with this picture for a while I realized what I had done wrong. Once flipped back all was fine. The worst part was getting the ball joint out after a bit too much thread locker. Lots of heat and they came out fine.
    Mk4 Roadster, Picked up complete kit 8/22/14. Most FFR options except Wilwood brakes and IRS. First start 11/11/14. Go-kart 3/8/15. 347 Stroker, TKO 500, 3-link/3.27 rear. PA street legal 7/29/15.

  34. #34
    Director of R&D, FFR Jim Schenck's Avatar
    Join Date
    Mar 2011
    Location
    Wareham
    Posts
    444
    Post Thanks / Like
    The inner clevises being upside down won't affect the geometry since the center of the pivot remains the same, however I agree with Jeff it is much easier to grease the fittings with them pointing up.
    Jim Schenck
    Factory Five Racing

  35. #35
    Senior Member jakester888's Avatar
    Join Date
    Jun 2011
    Location
    Portland, OR
    Posts
    444
    Post Thanks / Like
    I thought about just reversing the plate... but then I reasoned not to because that was the way they were shipped from FFR.

    I hope the arrangement I have will work. Since it's a pain in the arse to take that thing apart again. But hey, I'm getting pretty good at it by now.

  36. #36
    Senior Member AC Bill's Avatar
    Join Date
    Feb 2011
    Location
    Vancouver Island BC Canada
    Posts
    1,878
    Post Thanks / Like
    I've always looked for the grease oozing out to ensure adequate lubrication, on my older MK3.1 control arms. Some of the arms from earlier models the grease wasn't getting in where it belonged, and some builders were taking them apart and adding custom made grease channels. I think FFR recognized the problem, and made the needed improvements on the next generation of arms to make sure grease was flowing into the bushings.

    What, if any, is the advantage with the newest arms? Just the addition of plastic bushings? How long are they expected to last, being plastic?
    FFR6803RD, MK 3.1, 302 EFI, fr/rr disc brakes, WC-T5, c/w Hurst Competition Plus shifter, 3 link rear, Koni adjustable coil over shocks, dual roll bars, BBK 4-4 headers, 3.55 rear gears, BBK rear lower control arms c/w poly bushings. Ivy Green Metallic Arrived-02/08, On road 09/2010

  37. #37
    Senior Member CraigS's Avatar
    Join Date
    Feb 2011
    Location
    Blacksburg, Va
    Posts
    4,728
    Post Thanks / Like
    Jakester I think you will be fine. To make greasing easier I used to separate the pivot from the sleeve so I could spin the pivot around while greasing. That really helped w/ the old steel on steel setup. The delrin doesn't need that for grease dispersion but could be done for easier access to the grease nipple. And separating it this way doesn't affect alignment. Also, w/ the delrin, I suspect greasing will be maybe a once a year deal.
    FFR MkII, 408W, Tremec TKO 500, 2015 IRS, DA QA1s, Forte front bar, APE hardtop.

  38. #38
    Senior Member
    Join Date
    May 2013
    Location
    Harrisburg, PA
    Posts
    190
    Post Thanks / Like
    Is it really that difficult to remove the cross-shaft nuts, lift up on the spindle and slide the pivot collars off the end of the cross-shaft, flip them over and then reassemble? You could either unbolt the upper coilover mount or use a jack to raise the spindle.
    Last edited by NukeMMC; 02-20-2016 at 09:55 AM.

Posting Permissions

  • You may not post new threads
  • You may not post replies
  • You may not post attachments
  • You may not edit your posts
  •  

FFMetal

Visit our community sponsor