Very Cool Parts

Visit our community sponsor

Thanks Thanks:  0
Likes Likes:  0
Results 1 to 25 of 25

Thread: Radiator failure - stress fatigue at 3,500 miles

  1. #1
    Junior Member
    Join Date
    Oct 2012
    Location
    LeClaire, IA - home of the American Pickers, Birthplace of Buffalo Bill Cody
    Posts
    17
    Post Thanks / Like

    Radiator failure - stress fatigue at 3,500 miles

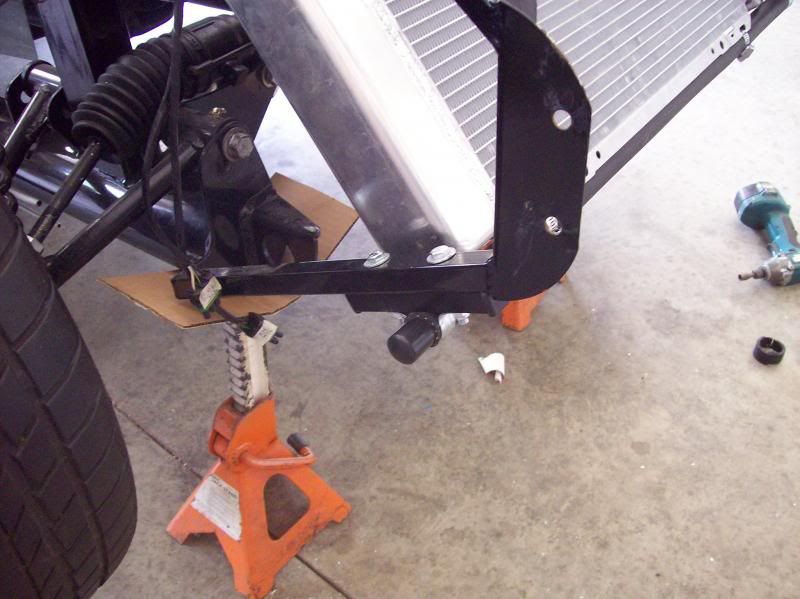
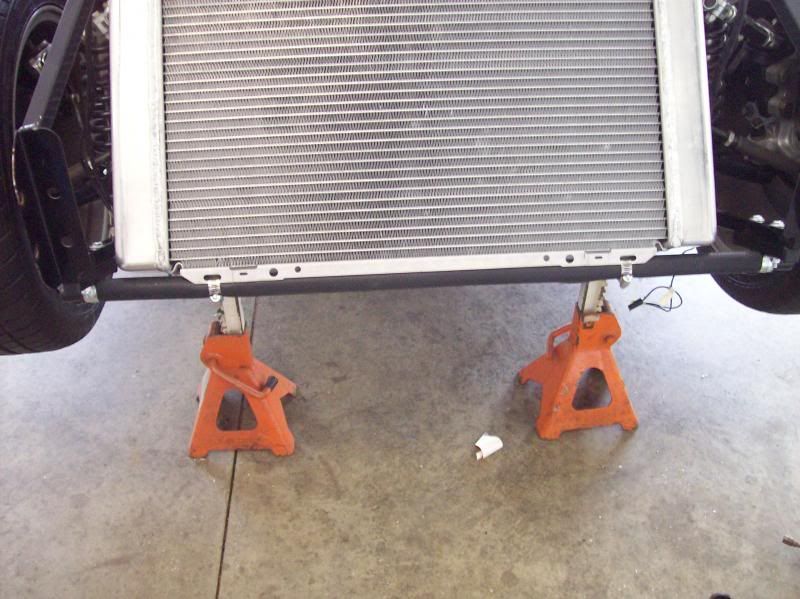
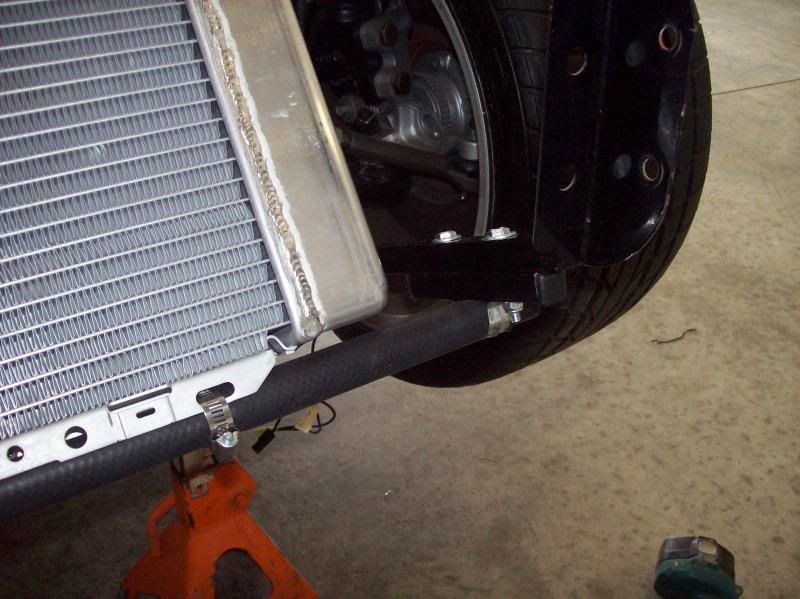
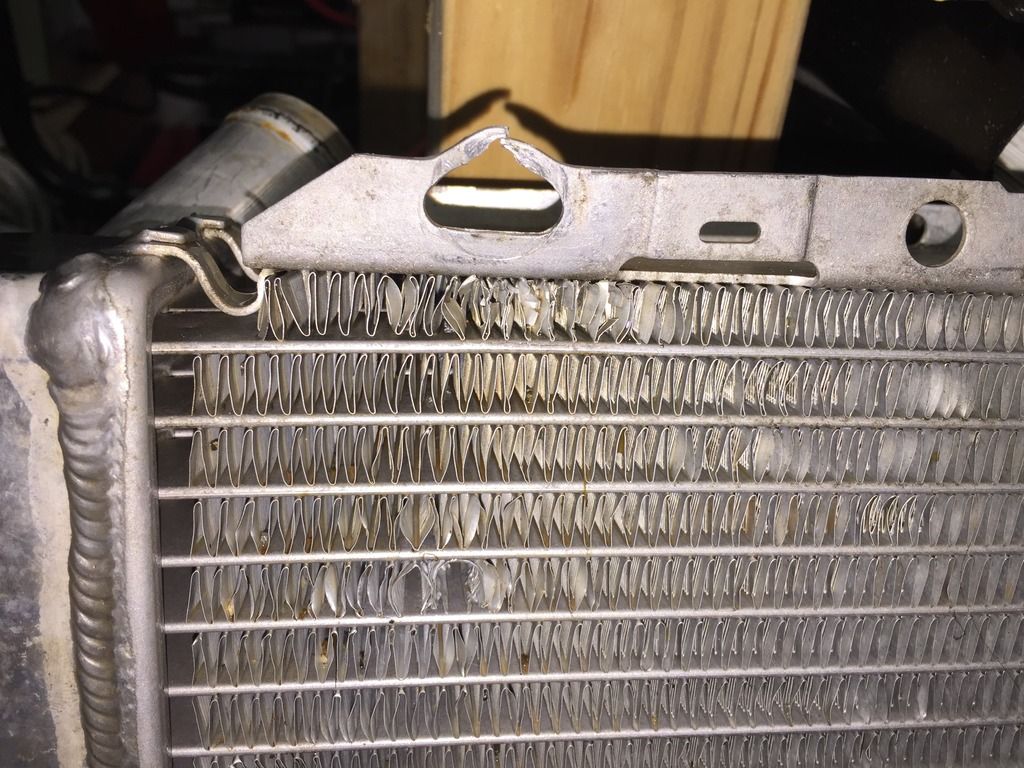
    Has anyone else had a radiator go bad prematurely on their Roadster? I've driven mine just over a year and I recently developed a leak. The failure is up high on the front near the upper inlet where the top rail bolts to the 3/4" tube. Apparently the radiator has been experiencing some stress at this point, such that one of the tubes ruptured... My local radiator expert was amazed at how little support there is for the radiator, has anyone else had the same trouble and or have you supported your radiator better than stock? I bolted and mounted mine according to the manual...

    20160208_103643_resized.jpg
    Last edited by Bluesman; 02-08-2016 at 04:21 PM.

  2. #2
    Senior Member 6t8dart's Avatar
    Join Date
    Apr 2015
    Location
    Irving, TX
    Posts
    545
    Post Thanks / Like
    I agree that the rad is not supported well. I was planning on upgrading this on my build anyway.

  3. #3
    Senior Member edwardb's Avatar
    Join Date
    Feb 2011
    Location
    Lake Orion, Michigan
    Posts
    10,576
    Post Thanks / Like
    I assume your picture is of one of the the top bolt locations, since that's what you describe. I've not seen this kind of failure reported before on either forum. Not saying it hasn't happened -- just haven't seen it reported. Did you have the radiator sheet metal surround pieces mounted, and attached along the bottom of the radiator in addition to the top bolt(s) that failed? Properly installed the surround pieces give OK support. But many of us use the Breeze lower radiator support. http://www.breezeautomotive.com/details.php?prod_id=494. Gives better support during the build rather than having it hanging from the top bolts and a couple tie wraps at the bottom, and then increased support once everything is finished.
    Last edited by edwardb; 02-08-2016 at 05:00 PM.
    Build 1: Mk3 Roadster #5125. Sold 11/08/2014. Build 2: Mk4 Roadster #7750. Sold 04/10/2017. Build Thread
    Build 3: Mk4 Roadster 20th Anniversary #8674. Sold 09/07/2020. Build Thread and Video. Build 4: Gen 3 Type 65 Coupe #59. Gen 3 Coyote. Legal 03/04/2020. Build Thread and Video
    Build 5: 35 Hot Rod Truck #138. LS3 and 4L65E auto. Rcvd 01/05/2021. Legal 04/20/2023. Build Thread. Sold 11/9/2023.

  4. #4
    Tool Baron frankeeski's Avatar
    Join Date
    Feb 2011
    Location
    "The I.E." SoCal
    Posts
    1,356
    Post Thanks / Like
    Quote Originally Posted by Bluesman View Post
    has anyone else had the same trouble and or have you supported your radiator better than stock? I bolted and mounted mine according to the manual...

    20160208_103643_resized.jpg
    I haven't looked at the manual for quite some time but I will say this. I have seen a lot of these cars during different stages of the build process. It's amazing how many of them I have seen in which the radiator is "fixed" in place with no means of movement. If you bolt the top of the radiator to the 3/4" cross tube as suggested in the manual, you're just asking for trouble. Steel and aluminum expand and contract at different rates. The radiator should be held in place such that it can expand and contract freely. The O.E.'s do this by using rubber isolators on the bottom and brackets on the top. The top brackets are not bolted directly to the radiator , they simply hold the radiator in place with a capture front and back on the brackets.

    These are the brackets I made for the current car I'm working on.


    These along with a bottom support similar to the Breeze
    radiator support and you should be able to stop this from happening again.
    http://www.breezeautomotive.com/details.php?prod_id=494
    Frank
    __________________________
    Factory Five Racing MKIII Super Snake Replica. Cannonball Cobra Drop Trunk Box, Horn Button and other machined Do Dads.
    i.e.427 Chromed Full Width Roll Bar with integrated LED Third Brake Light.
    I will never forget My Buddy Paul.

  5. #5
    Junior Member
    Join Date
    Oct 2012
    Location
    LeClaire, IA - home of the American Pickers, Birthplace of Buffalo Bill Cody
    Posts
    17
    Post Thanks / Like
    Quote Originally Posted by edwardb View Post
    I assume your picture is of one of the the top bolt locations, since that's what you describe. I've not seen this kind of failure reported before on either forum. Not saying it hasn't happened -- just haven't seen it reported. Did you have the radiator sheet metal surround pieces mounted, and attached along the bottom of the radiator in addition to the top bolt(s) that failed? Properly installed the surround pieces give OK support. But many of us use the Breeze lower radiator support. http://www.breezeautomotive.com/details.php?prod_id=494. Gives better support during the build rather than having it hanging from the top bolts and a couple tie wraps at the bottom, and then increased support once everything is finished.
    Yes, looking at the front of the car that's the oval bolt hole on the upper right hand side where it's mounted to the 3/4" tube. The aluminum top rail is stress cracked at that point and it started to work on the adjacent core tube as you can see from the photo. I have the lower aluminum sheet metal riveted along the bottom radiator rail, and that part is bolted to the body nose as specified. I'll have to check out that Breeze part... thanks!
    Last edited by Bluesman; 02-08-2016 at 05:26 PM.

  6. #6
    Junior Member
    Join Date
    Oct 2012
    Location
    LeClaire, IA - home of the American Pickers, Birthplace of Buffalo Bill Cody
    Posts
    17
    Post Thanks / Like
    Yes, I like the Breeze items very much!! #70558 and #70551 in the shopping cart!

  7. #7
    Junior Member
    Join Date
    Mar 2011
    Location
    Harrisburg, PA
    Posts
    16
    Post Thanks / Like
    Get the new radiator as well. They changed the expansion joints between the side tank and top support. When they would fail, it would rupture the top cooling tube. Photos on ffcars under my name if you want to see the two types.

  8. #8
    Junior Member
    Join Date
    Oct 2012
    Location
    LeClaire, IA - home of the American Pickers, Birthplace of Buffalo Bill Cody
    Posts
    17
    Post Thanks / Like
    Quote Originally Posted by Renegadezx View Post
    Get the new radiator as well. They changed the expansion joints between the side tank and top support. When they would fail, it would rupture the top cooling tube. Photos on ffcars under my name if you want to see the two types.
    OK, I see from your photos that I have the newer style. Thanks!
    Last edited by Bluesman; 02-08-2016 at 09:44 PM.

  9. #9
    Senior Member chopthebass's Avatar
    Join Date
    Oct 2013
    Location
    Calgary, Canada
    Posts
    941
    Post Thanks / Like
    Quote Originally Posted by Bluesman View Post
    Yes, I like the Breeze items very much!! #70558 and #70551 in the shopping cart!
    I'm trying to figure out how the hinge attaches to the radiator. Got me thinking about the top mount! I have the lower support from breeze. Maybe that'll be enough on its own?
    Finally started my build the beginning July. 2015!

  10. #10
    cobra Handler skullandbones's Avatar
    Join Date
    Jul 2011
    Location
    Superstition Mtn foothills 5 miles west of Gold Canyon AZ
    Posts
    2,686
    Post Thanks / Like
    Blog Entries
    19
    Don't know if the manual has gotten better but when I was installing my MKIII radiator, the manual was vague at best. There are a lot of variations based on the donor builds so I can see why FFR hesitated on saying install it this way (not a one size fits all sort of solution). However, the attaching the radiator via the aluminum panels is just not acceptable. Take the advice of others and me, don't do it that way. If you use the Breeze or some variation of that solution you are headed in the right direction. At the very least, figure out how to mount the top with some elasticity as well. You don't want too much movement but don't want rigid mounting either. Maybe rubber cushions with elongated holes and nyloc type nuts so the radiator can stretch like others have suggested. There is much more work in this area of the car than you can see at first. You need to concentrate a lot of good thought and design to make it last. I think it is so difficult because you are working with components that are bulky and have to fit within a confined area but the bolt holes are not there for you to guide you like say putting a suspension part on. It requires a little creativity.

    Good luck,

    WEK.
    FFR MkIII 302 (ATK), EFI 75mm TB with custom box plenum chamber, 24# injectors, 4 tube BBK ceramic, cold air sys, alum flywheel, crane roller rockers, T5, Wilwood pedals, custom five link with Watt's link, 4 rotors, coil overs, power steering with Heidt valve, alum FFR rad, driver's crash bar mod, mini dead pedal mod, quick release steering wheel hub #6046

  11. #11
    Senior Member CraigS's Avatar
    Join Date
    Feb 2011
    Location
    Blacksburg, Va
    Posts
    4,730
    Post Thanks / Like
    Quote Originally Posted by skullandbones View Post
    At the very least, figure out how to mount the top with some elasticity as well. You don't want too much movement but don't want rigid mounting either. Maybe rubber cushions with elongated holes and nyloc type nuts so the radiator can stretch like others have suggested.
    Good luck,
    WEK.
    I agree. All regular cars have the radiator mounted in rubber. It needs to be contained but not bolted solidly.
    FFR MkII, 408W, Tremec TKO 500, 2015 IRS, DA QA1s, Forte front bar, APE hardtop.

  12. #12
    Out Drivin' Gumball's Avatar
    Join Date
    Feb 2011
    Location
    Blackberry Township, IL
    Posts
    2,653
    Post Thanks / Like
    I have the AFCO rad from FFR and mounted it using the Breeze upper and lower solutions. On the top, it's mounted to a full-width hinge that has rubber isolator pads between the radiator, hinge, and frame tubes. On the bottom, it rests on a rubber isolated rod that cradles the cross-channel of the radiator. It does have a small bolt at the bottom - #10 I believe - that holds it aligned, while allowing a very slight amount of movement due to vibration and expansion.
    Later,
    Chris

    "There are no more monsters to fear, and so, we have to build our own."
    Mk3.1 #7074

  13. #13

    Super Moderator
    R. Button's Avatar
    Join Date
    Feb 2011
    Location
    Elmira, NY
    Posts
    524
    Post Thanks / Like
    Blog Entries
    13
    Another vote for Breeze's Rad mount kit! I also have the aluminum rad and no issues! ( kind of have a few miles on mine )
    Ralph Button
    FFR 1436 (PROUD Owner of an Original Mark I)
    400,013 miles as of 11/1/2009
    417,840 miles as of 8/12/2010
    435,021 miles as of 12/19/2011
    Now a well broken in 347 engine
    523,145 miles as of 7/29/2014
    601,165 miles as of 6/1/2018
    615,215 miles as of 4/23/2022

    "It's not about the destination, it's the about the journey. And where is your journey taking you?"

    "... Not all who wander are lost!... --J.R.R. Tolkien

  14. #14
    Senior Member FritoBandito's Avatar
    Join Date
    Feb 2011
    Location
    Torrance, CA
    Posts
    100
    Post Thanks / Like
    Made my own support and I'm a bit surprised that more people don't do it this way.

    1412139402_cooling51.jpg

    Mario

  15. #15
    Senior Member bwwooster's Avatar
    Join Date
    Dec 2012
    Location
    Pacifica, CA, Land of Fog and Rust
    Posts
    112
    Post Thanks / Like
    What Frito said-- I made mine out of U-channel aluminum stock and put door edge moulding on the bottom flange of the radiator to fit into the aluminum stock.
    FFR Mk II 4437
    Finally on the road, 8/12! SVO Crate 302, IRS, EEC IV

  16. #16

    Join Date
    Feb 2011
    Location
    Colorado Springs
    Posts
    1,383
    Post Thanks / Like


    Had a similar problem a few years ago.

    After that, I made a solid steel piece for the top of the radiator to support it across the entire width. And then I used some aluminum straps to connect the shroud to the top brace, across the top of the radiator.

    I fabbed a brace for the bottom of the radiator a few years before that.
    .boB "Iron Man"
    NASA Rocky Mountain, TTU #42, HPDE Instructor
    BDR 1642: Coyote, 6 Speed Auto, Edelbrock Supercharger
    Member: www.MileHiCobraClub.com
    www.RacingTheExocet.com

  17. #17
    Senior Member AC Bill's Avatar
    Join Date
    Feb 2011
    Location
    Vancouver Island BC Canada
    Posts
    1,878
    Post Thanks / Like
    I made a lower support similar to Mario's. Rubber hose over pipe the full length of the support to cushion, and dampen vibration. For top mounts I used thick rubber between the 3/4" frame pieces and the rad flange. Because of all that isolation from the rubber, I added grounds to the rad, to hopefully prevent galvanic corrosion, (electrolysis), which can apparently happen with an aluminum rad.


  18. #18
    Not a waxer Jeff Kleiner's Avatar
    Join Date
    Feb 2011
    Location
    Bloomington, Indiana
    Posts
    8,087
    Post Thanks / Like
    I do them with strips of 1/4" thick rubber at the top and home made rubber covered lower supports:


    Cheers,
    Jeff

  19. #19

    Join Date
    Feb 2011
    Location
    Norton, MA USA earth
    Posts
    3,345
    Post Thanks / Like
    I now have radiator shrouds in stock for the new FFR radiator if you need one.
    Mike

  20. #20
    Senior Member
    Join Date
    Feb 2011
    Location
    Myrtle Beach, SC
    Posts
    2,108
    Post Thanks / Like
    Quote Originally Posted by R. Button View Post
    Another vote for Breeze's Rad mount kit! I also have the aluminum rad and no issues! ( kind of have a few miles on mine )
    I would copy Ralph myself, I only wish he had a few miles on his car so I could see how durable it is. ;-o)

    I think a combination of upper and/or lower support is the right solution, as the others have posted. Any rigid attachment invites potential points of failure in my opinion.

    Regards,

    Steve

  21. #21
    Senior Member John4337's Avatar
    Join Date
    Feb 2011
    Location
    Copperhill, TN
    Posts
    425
    Post Thanks / Like

    Another victim

    13000 miles on the mk4 and I started losing coolant. Found it inside the bottom of the fan shroud

    Pulled the radiator and found this.


    Leak is just below the stretched hole somewhere, but I can't actually see it.

    What is the success rate of repairing an aluminum radiator? I've never had to do it, so I'm in the dark.

    The hole further down was where the temp probe was for the fan controller. I'll certainly look into some sort of support when I reinstall everything.

    John
    FFR #7388 - Mk 4 Complete Kit w/ IRS, Ordered 10/21/10, Delivered 12/8/10. 302 with FiTech and Under Car Exhaust, Heat & A/C, Rod Top. Hard top and shop built side curtains added 2023.

  22. #22
    Senior Member
    Join Date
    Jun 2016
    Location
    Leesburg, Va
    Posts
    204
    Post Thanks / Like
    Spend the money for the Breeze upper and lower. They spread out the stress and allow for movement due to the heating and cooling cycles.
    Doug
    Doug
    FFR 7995
    347 SBF Prestige Mototsports, Moser 8.8 (3.31) 3 Link, TKO 600, Nitto 555s, 17" Halibrands, PS, AC, Heat, Color Redfire Pearl, with Wimbledon White Stripes

  23. #23
    Curmudgeon mikeinatlanta's Avatar
    Join Date
    Feb 2011
    Posts
    698
    Post Thanks / Like
    Not trying to beat up on FFR, but these cars have many compromises that fall well short of best practices, and the radiator mounting is certainly one of them. Every kit maker and even the originals have multiple design issues. The only surprise here is just how few problems develop from the factory mounts. As always, the fix is time and money.

    A good radiator mount will evenly support and isolate the radiator from flex, vibration, current flow, and stress from thermal expansion. The weight of the fan should never be supported by the radiator core. In order to do this, I made a custom mount utilizing 1/4" rubber isolators and mild steel. The lower support also has a secondary bracket in case the primary mounts fail. This exact design won't work on a MKIV without more mods, but it shows what can be done within the space constraints. Anyone is welcome to copy for the price of ONE beer should we ever meet.

    Here are the upper mounts. The radiator rests on these and they only carry the weight in compression, so there is no risk of isolators breaking.

    DSC00036-600x450.jpg

    Here is the lower support bracket. Once again the isolators are loaded mostly in compression. The tabs near the isolators are the secondary supports.

    DSC00037-600x450.jpg

    Radiator mounts installed without radiator.

    Copy_of_DSC000012-600x450.jpg

    Radiator installed.

    DSC00039-600x450.jpg

    Close up showing secondary supports. Note that they are not touching the radiator, and should the radiator move they will contact on the welded area of the tank.

    DSC00041-600x450.jpg

    Here are the fan supports. The fan is mounted independent of the radiator. The bottom of the supports bolt to the lower radiator support bracket. This arrangement eliminates fan weight or vibration stressing the radiator. Secondary benefit is easy removal for high speed work.

    DSC000272-600x450.jpg

    This is all you see with it put together.

    DSC00248-600x450.jpg
    MKII "Little Boy". 432CI all aluminum Windsor. .699 solid roller, DA Koni shocks, aluminum IRS, Straight cut dog ring T-5, 13" four piston Brembos, Bogart wheels. BOOM!

  24. #24
    Senior Member
    Join Date
    May 2014
    Location
    Burlington, WI
    Posts
    689
    Post Thanks / Like
    Blog Entries
    1
    Quote Originally Posted by Gumball View Post
    I have the AFCO rad from FFR and mounted it using the Breeze upper and lower solutions. On the top, it's mounted to a full-width hinge that has rubber isolator pads between the radiator, hinge, and frame tubes. On the bottom, it rests on a rubber isolated rod that cradles the cross-channel of the radiator. It does have a small bolt at the bottom - #10 I believe - that holds it aligned, while allowing a very slight amount of movement due to vibration and expansion.
    I also installed the Breeze upper and lower radiator kits, but don't remember any upper rubber isolators. Thanks, I'll reach out to Mark today.

  25. #25
    Senior Member
    Join Date
    Feb 2011
    Location
    Southport, NC
    Posts
    511
    Post Thanks / Like
    Here is what I did.

    Not liking the top mounting and fit I ended cutting off the 3/4" mounts attached to the 3/4" cross bar. I attached a piano hinge solidly to that 3/4" cross member. I then used a bunch of Isolator Bolts. Five more than you can see in the picture below. So I've got a good bunch of them. Overkill, each one can handle 8 lbs. load. I added a thick aluminum bar to the top of the radiator so I could have a better connection onto the radiator and then mounted that to the Isolator bolts which are then attached to the hinge.

    I cut these off


    Extra aluminum bar to the top of radiator


    Rubber Isolator bolted to the hinge


    I've added five more isolators than shown here


    Mounted to the radiator


    Again five more Isolators have been added since this picture


    Mounted to the back of the 3/4" cross bar


    The hinge and Isolator Bolts I got from McMaster Carr. I am using the lower radiator mount from Breeze.

    These pictures were taken before I was finished. I'm now done and will download more to photobucket if anyone is interested. I am very please with how it turned out.

    George
    Last edited by GWL; 10-31-2016 at 12:37 PM.

Posting Permissions

  • You may not post new threads
  • You may not post replies
  • You may not post attachments
  • You may not edit your posts
  •  

Brown County Customs

Visit our community sponsor