Boig Motorsports

Visit our community sponsor

Thanks Thanks:  0
Likes Likes:  0
Page 1 of 2 12 LastLast
Results 1 to 40 of 71

Thread: New nose headlight buckets

  1. #1
    Senior Member metros's Avatar
    Join Date
    Jun 2013
    Location
    NoVA
    Posts
    1,064
    Post Thanks / Like

    New nose headlight buckets

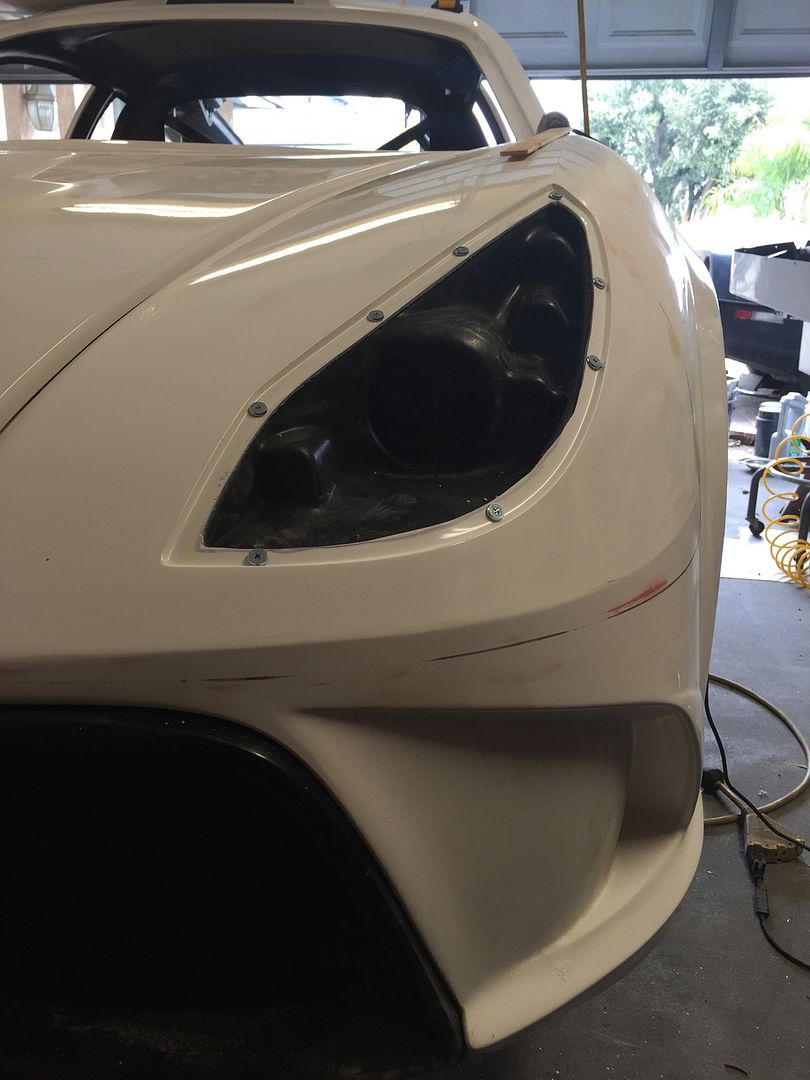
    Anybody have them installed yet? Tips and tricks?

  2. #2
    Senior Member
    Join Date
    Jan 2012
    Posts
    1,112
    Post Thanks / Like
    Waiting for lenses before I install mine.

  3. #3
    Senior Member Frank818's Avatar
    Join Date
    Jun 2013
    Location
    QC, Canada
    Posts
    5,732
    Post Thanks / Like
    Lenses are BOed.
    Frank
    818 chassis #181 powered by a '93 VW VR6 Turbo GT3582R
    Go-karted Aug 5, 2016 - Then May 19+21, 2017
    Tracked May 27/July 26, 2017
    Build time before being driveable on Sep 27, 2019: over 6000h
    Build Completed Winter 2021

  4. #4
    Senior Member metros's Avatar
    Join Date
    Jun 2013
    Location
    NoVA
    Posts
    1,064
    Post Thanks / Like
    I wouldn't bother waiting as those can be installed after everything else.

  5. #5
    Senior Member
    Join Date
    Jan 2012
    Posts
    1,112
    Post Thanks / Like
    Ya I know that they can be installed afterward but its so pointless for me to install the headlights and not drive the care because of lenses. Im not risking a rock taking out my projectors. I might just install them with screws and save the silicone seal for when the lenses go one for final install after paint.

  6. #6
    Senior Member metros's Avatar
    Join Date
    Jun 2013
    Location
    NoVA
    Posts
    1,064
    Post Thanks / Like
    Thoughts on how well paint is going to stick to the plexi lenses? Trying to decide if I get the trim painted professionally or do some vinyl.

  7. #7
    Senior Member
    Join Date
    Jul 2015
    Posts
    615
    Post Thanks / Like
    Have people actually gotten this stuff yet? I got my C kit in November and still no glass or lights...

  8. #8
    Member jcpresto's Avatar
    Join Date
    Aug 2015
    Posts
    84
    Post Thanks / Like
    I have received everything for my C kit except for rear hatch glass, handle mounts, and lens. But I just got the glass last week.

  9. #9
    Senior Member
    Join Date
    Jan 2012
    Posts
    1,112
    Post Thanks / Like
    The lenses are held in place with 3m double side paint. I think it will be fine or you could use some buytl glue. I think it will hold up fine just prep the surfaces and make sure everything is clean prior to application.

  10. #10
    Senior Member metros's Avatar
    Join Date
    Jun 2013
    Location
    NoVA
    Posts
    1,064
    Post Thanks / Like
    I'm more concerned with paint sticking to the lens, not the lens to car.

  11. #11
    Senior Member
    Join Date
    Jan 2012
    Posts
    1,112
    Post Thanks / Like
    There are the aluminum trim rings remember so even if you get paint to stick to the lense it would be covered. If the paint is fully cured prior to install I don't think paint transfer is a concern.

  12. #12
    Senior Member metros's Avatar
    Join Date
    Jun 2013
    Location
    NoVA
    Posts
    1,064
    Post Thanks / Like
    I didn't anticipate a trim ring to go around the outside of the lense. I thought that was painted on.

  13. #13
    Senior Member UnhipPopano's Avatar
    Join Date
    Mar 2016
    Posts
    344
    Post Thanks / Like
    My reading of the instructions is that there is an optional step where you can paint the inside contact area "If desired mask off the top of the lenses so that there is a boarder showing the same with or 1/8 inch more than the flange on the fender and paint the lens boarder. This will cover the adhesive, tape and bucket screws.". IMHO the best way to do this is with epoxy paint and a steady hand. If the paint does not have a strong adhesion to the plastic, it could come loos at the worst possible time and leave its mark on the body.

  14. #14
    Senior Member
    Join Date
    Jan 2012
    Posts
    1,112
    Post Thanks / Like
    I guess that's paint. My bad thought it was aluminum trim rings didn't read the manual since I don't have lenses yet to finish the install. You could get creative and use vinyl wrap to do this. Just need to be careful.

  15. #15
    Senior Member UnhipPopano's Avatar
    Join Date
    Mar 2016
    Posts
    344
    Post Thanks / Like
    Here is a good instructional video on how to install something similar, but most of what is shown applies.

    http://boatworkstoday.com/archives/1735

  16. #16
    Mechie3's Avatar
    Join Date
    May 2012
    Location
    Indianapolis
    Posts
    5,174
    Post Thanks / Like
    I'm not a fan of having to paint the new headlights. Seems very non serviceable and potential for poor cosmetic fit and finish.
    Zero Decibel Motorsports
    Check out my new website!
    www.zerodecibelmotorsports.com
    www.facebook.com/zero.decibel.motorsports

  17. #17
    Senior Member
    Join Date
    Feb 2011
    Location
    Woodstock ,Illinois
    Posts
    752
    Post Thanks / Like
    I used Krylon Fusion paint on another project and it worked out great! That stuff sticks to milk jugs!
    FFR 5136 Started as a donor...donor guages, engine, trans,etc. Now...TFS street intake,stage 1 cam, GT40p's,24# injectors and 80mm MAF,70mm TB,Z-spec t-5, and PSE Halibrand wrapped with Nitto 555 G2’s. My ever evolving dream car!!

  18. #18
    Senior Member metros's Avatar
    Join Date
    Jun 2013
    Location
    NoVA
    Posts
    1,064
    Post Thanks / Like
    *Opens amazon app and 1-click purchases vhb tape*

    Shut up and take my money.

  19. #19
    Senior Member
    Join Date
    Jan 2012
    Posts
    1,112
    Post Thanks / Like
    Now if I could get a one click factory five BOP going we would be in business.

  20. #20
    Senior Member
    Join Date
    Sep 2013
    Location
    Williamsburg VA
    Posts
    105
    Post Thanks / Like
    20160409_164234_resized.jpg20160409_171443_resized.jpg20160409_172700_resized.jpg20160409_173511_resized.jpg
    20160409_175623_resized.jpg20160409_175639_resized.jpg
    20160409_182728_resized.jpg


    Got my headlamps test fitted. Much easier setup the old lights. I am going to use 1/8" rivets to hold together instead of bolts provided to pull gaps closed.
    Attached Images Attached Images

  21. #21
    Senior Member metros's Avatar
    Join Date
    Jun 2013
    Location
    NoVA
    Posts
    1,064
    Post Thanks / Like
    Great pictures!

  22. #22
    Senior Member
    Join Date
    Jan 2012
    Posts
    1,112
    Post Thanks / Like
    You beat me to it. But I'm switching out the LEDs from ffr for some replacements that I've found also giving my buckets a nicer finish when I'm done with it. I like your rivet idea and might copy it but for now since I don't have lenses I'm going with some #10 screws to hold everything in place.


  23. #23
    Senior Member metros's Avatar
    Join Date
    Jun 2013
    Location
    NoVA
    Posts
    1,064
    Post Thanks / Like
    I bought those same leds. I'd like to see how you're wiring them for a tidy solution, especially given your employer

  24. #24
    Senior Member UnhipPopano's Avatar
    Join Date
    Mar 2016
    Posts
    344
    Post Thanks / Like
    Is the double sided tape strong enough to hold the buckets to the body? Both rivets and screws would require that the lens be removed in order to replace burned out LEDs. The tape and perhaps additional Silicon would make the task easier, assuming the fenders are made to be removable. The headlight buckets do not look to weigh very much and neither do the small LEDs. Would the "Halo Projector Headlights" weigh too much to make this possible? Is there another way to attach the buckets from the back?

  25. #25
    Senior Member Frank818's Avatar
    Join Date
    Jun 2013
    Location
    QC, Canada
    Posts
    5,732
    Post Thanks / Like
    Fireblade, how did you get rid of the seams on the fenders?

    Metros, what LEDs? Fireblade doesn't show pix of them.
    Frank
    818 chassis #181 powered by a '93 VW VR6 Turbo GT3582R
    Go-karted Aug 5, 2016 - Then May 19+21, 2017
    Tracked May 27/July 26, 2017
    Build time before being driveable on Sep 27, 2019: over 6000h
    Build Completed Winter 2021

  26. #26
    Senior Member metros's Avatar
    Join Date
    Jun 2013
    Location
    NoVA
    Posts
    1,064
    Post Thanks / Like

  27. #27
    Senior Member
    Join Date
    Jan 2012
    Posts
    1,112
    Post Thanks / Like
    A lot of work... but i started with some masking tape and put that on both sides on the seams. Next I sanded down the seam first with a dremel then blocked out the rest. After I just blocked the remainder of the seam after my initial trim down with no tape on the fenders. Metro you gave my leds out away but its alright. I would rivet or bolt the buckets to the fender that way it is secure I wouldn't trust silicone and tape only. The projector puts a significant amount of stress on the buckets and does weight a decent amount.

  28. #28
    Senior Member UnhipPopano's Avatar
    Join Date
    Mar 2016
    Posts
    344
    Post Thanks / Like
    Has any one tried to use a cabinet scraper to take the seams down?

  29. #29
    Senior Member
    Join Date
    Jan 2012
    Posts
    1,112
    Post Thanks / Like
    Took me about a good weekend to get the fenders to where they are at. It's just very time consuming and boring work. Nothing to difficult to do.

  30. #30
    Senior Member UnhipPopano's Avatar
    Join Date
    Mar 2016
    Posts
    344
    Post Thanks / Like
    If you know how to use a cabinet scraper you can save yourself a lot of time and effort over sanding. In addition, you make a lot less of a mess. The cabinet scraper produces thin shavings rather than dust. Also, I hope that if you are sanding fiberglass, that you use a respirator.

  31. #31
    Senior Member Frank818's Avatar
    Join Date
    Jun 2013
    Location
    QC, Canada
    Posts
    5,732
    Post Thanks / Like
    If you rivet the buckets and you need to remove the buckets later you have to drill all the time, more serviceable with bolts but bolts make a bigger hole and it looks like the inner border is not very large, seems to fit anyway.
    Frank
    818 chassis #181 powered by a '93 VW VR6 Turbo GT3582R
    Go-karted Aug 5, 2016 - Then May 19+21, 2017
    Tracked May 27/July 26, 2017
    Build time before being driveable on Sep 27, 2019: over 6000h
    Build Completed Winter 2021

  32. #32
    Senior Member UnhipPopano's Avatar
    Join Date
    Mar 2016
    Posts
    344
    Post Thanks / Like
    If you drill out the rivets, how do you keep from not drilling into the lens? If you remove the lens and then drill out the rivets, how do you clean the silicone and tape off the lens?

  33. #33
    Senior Member gwarden's Avatar
    Join Date
    Jan 2012
    Location
    Surry Va
    Posts
    199
    Post Thanks / Like
    Quote Originally Posted by UnhipPopano View Post
    If you drill out the rivets, how do you keep from not drilling into the lens? If you remove the lens and then drill out the rivets, how do you clean the silicone and tape off the lens?
    If you use bolts you ill still have to remove the lens

  34. #34
    Senior Member
    Join Date
    Jan 2012
    Posts
    1,112
    Post Thanks / Like
    No matter what you do you have to remove the lenses unless you want exposed screws. Personally not my taste I'm going to paint and bolt the buckets in place. To remove the silicone and tape residue you could simply rub it off with your hands and use goo gone or some other adhesive remover.

  35. #35
    Senior Member UnhipPopano's Avatar
    Join Date
    Mar 2016
    Posts
    344
    Post Thanks / Like
    If you use bolts, what kind of access do you have once the front end is together and should you rivnut the aluminum panels?

  36. #36
    Senior Member Frank818's Avatar
    Join Date
    Jun 2013
    Location
    QC, Canada
    Posts
    5,732
    Post Thanks / Like
    Quote Originally Posted by UnhipPopano View Post
    If you use bolts, what kind of access do you have once the front end is together and should you rivnut the aluminum panels?
    Welcome to the design factory.
    You gotta do it the right way and gotta think before you start doing it. I'll be going again through these steps in the next months, for the buckets and lenses.
    Frank
    818 chassis #181 powered by a '93 VW VR6 Turbo GT3582R
    Go-karted Aug 5, 2016 - Then May 19+21, 2017
    Tracked May 27/July 26, 2017
    Build time before being driveable on Sep 27, 2019: over 6000h
    Build Completed Winter 2021

  37. #37
    Senior Member
    Join Date
    Aug 2014
    Posts
    127
    Post Thanks / Like
    Is it possible to use studs in the fender pointing down and slip the bucket on from underneath and attach with some nuts? The glass-in studs may be too big but you may be able to trim them down enough to fit and glue in. Or may the weld in studs are low profile enough to glue in from the top. There's also the PEM studs (press in) but I doubt the fiberglass is thick enough for those to work. I can't remember the name of the glue that I'm thinking of. The stuff that a number of people on here have used to glue hood hinges to roadster hoods as such. The trick of coarse is lining up all the studs so that the bucket can go on easy. If it works, you wouldn't have to remove the cover to get to your fastener. The cover could be put on over top of the stud bases and no one would ever know they're there. Just a thought.

  38. #38
    Mechie3's Avatar
    Join Date
    May 2012
    Location
    Indianapolis
    Posts
    5,174
    Post Thanks / Like
    I don' think you can press pems into fiberglass, but you could probably get a wide base version and glue it in. I think you're thinking of 3M panel bond.
    Zero Decibel Motorsports
    Check out my new website!
    www.zerodecibelmotorsports.com
    www.facebook.com/zero.decibel.motorsports

  39. #39
    Mechie3's Avatar
    Join Date
    May 2012
    Location
    Indianapolis
    Posts
    5,174
    Post Thanks / Like
    Almost forgot, my new front end is showing up Monday and the Harley/Vman style rear bumper showed up Wednesday.

    Zero Decibel Motorsports
    Check out my new website!
    www.zerodecibelmotorsports.com
    www.facebook.com/zero.decibel.motorsports

  40. #40
    Mechie3's Avatar
    Join Date
    May 2012
    Location
    Indianapolis
    Posts
    5,174
    Post Thanks / Like
    I had a thought this morning.

    I have a daytona prototype front end (splitter and bumper/hood) in my garage. They have female threaded receptacles bonded into the fiberglass and then screws going through lense into these receptacles. For all intents and purposes they're like 8-32 rivnuts in fiberglass. The lenses then have a painted stripe around them and they use black scerws. From a distance they're not visible but up close they are. If you're going for a "because racecar" look these would work well. Rivet the bucket to the body and then insert small pems into the fender and bolt on the lense.

    For those wanting a more oem look you could make some strips with pem studs pressed into them. These would fit on top of the lip in the fender and be bonded (or riveted) to the fender. The studs stick down into the car so the buckets can be bolted on with nuts and alternatively removed. The headlight lenses would get bonded in place permanently and the outside painted to hide the strips underneath.
    Zero Decibel Motorsports
    Check out my new website!
    www.zerodecibelmotorsports.com
    www.facebook.com/zero.decibel.motorsports

Page 1 of 2 12 LastLast

Posting Permissions

  • You may not post new threads
  • You may not post replies
  • You may not post attachments
  • You may not edit your posts
  •  

Replica Parts

Visit our community sponsor