BluePrint Engines

Visit our community sponsor

Thanks Thanks:  0
Likes Likes:  0
Page 2 of 2 FirstFirst 12
Results 41 to 71 of 71

Thread: New nose headlight buckets

  1. #41
    Senior Member
    Join Date
    Sep 2013
    Location
    Williamsburg VA
    Posts
    105
    Post Thanks / Like
    20160416_163858_resized_1.jpg20160416_163934_resized_1.jpg20160416_164009_resized_1.jpg
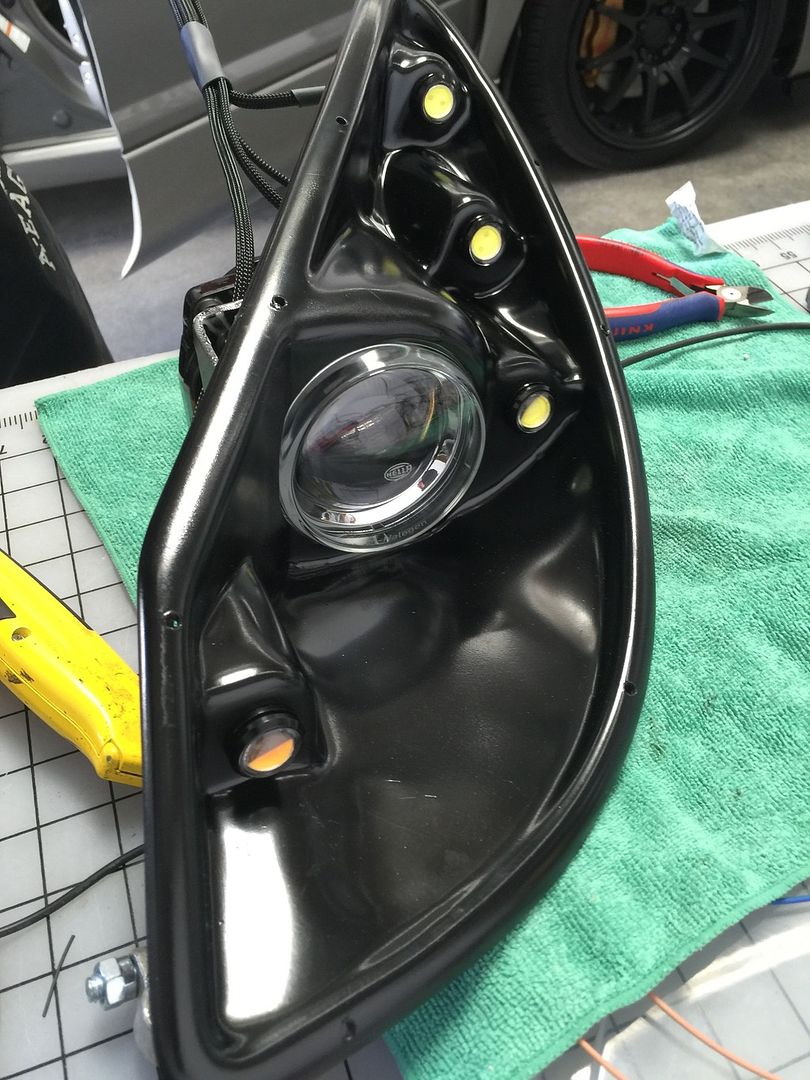
    Got my lights working this weekend. LEDs are nice and bright. Don't like yellow headlamp light so will be upgrading to better bulb.
    High beam is same bulb just something changing inside lamp assembly.

  2. #42
    Senior Member Frank818's Avatar
    Join Date
    Jun 2013
    Location
    QC, Canada
    Posts
    5,732
    Post Thanks / Like
    Looks cool! Those 4 LED bulbs aren't FFR's, right?

    Yeah get rid of that yellow headlamp. Let us know what you find, I'm looking for blueish tint (zenon color imitation).
    Frank
    818 chassis #181 powered by a '93 VW VR6 Turbo GT3582R
    Go-karted Aug 5, 2016 - Then May 19+21, 2017
    Tracked May 27/July 26, 2017
    Build time before being driveable on Sep 27, 2019: over 6000h
    Build Completed Winter 2021

  3. #43
    Senior Member
    Join Date
    Sep 2013
    Location
    Williamsburg VA
    Posts
    105
    Post Thanks / Like
    Quote Originally Posted by Frank818 View Post
    Looks cool! Those 4 LED bulbs aren't FFR's, right?

    Yeah get rid of that yellow headlamp. Let us know what you find, I'm looking for blueish tint (zenon color imitation).
    Yes all the bulbs are from FFR. 20160416_164150_resized.jpg
    That is the headlamp bulb that is being used. I am sure a LED or Zenon light can be found to work.

  4. #44
    Senior Member metros's Avatar
    Join Date
    Jun 2013
    Location
    NoVA
    Posts
    1,064
    Post Thanks / Like
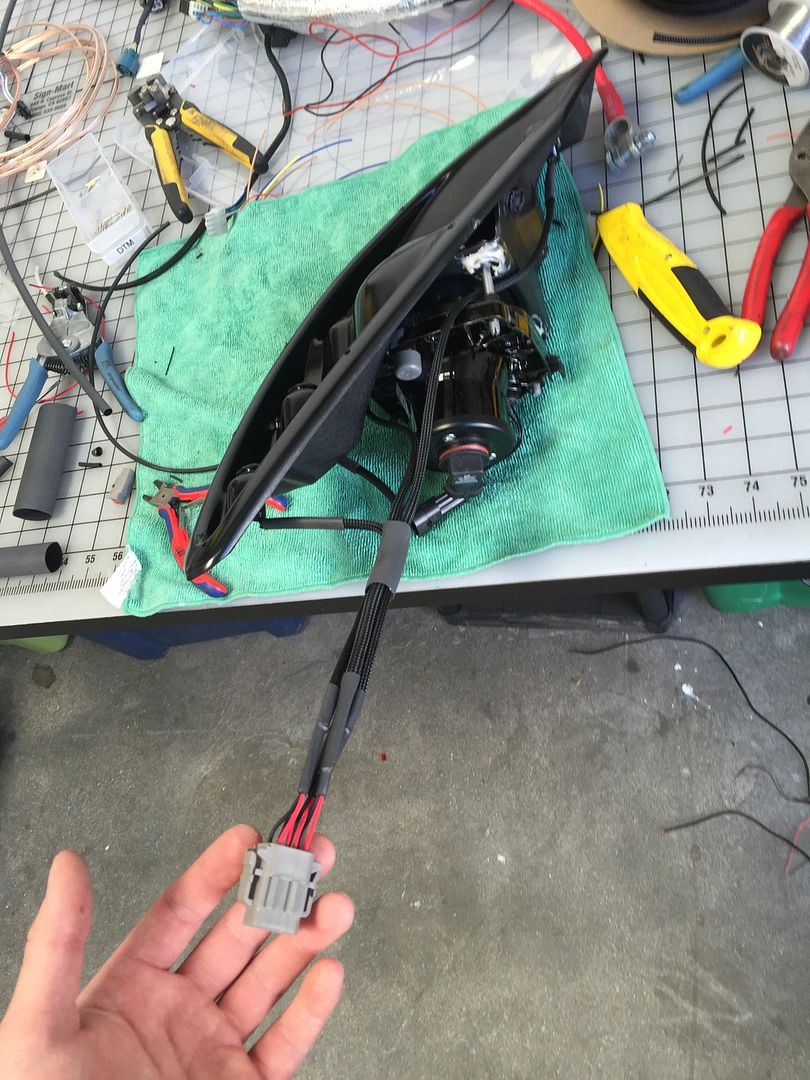
    Pics of wiring?

  5. #45
    Senior Member
    Join Date
    Jan 2012
    Posts
    1,112
    Post Thanks / Like


    Testing my setup this weekend. Finishing up my harness this weekend and installing them. I already have a H9 hid kit ready to go so no nasty yellow light from the main projector.

  6. #46
    Senior Member Frank818's Avatar
    Join Date
    Jun 2013
    Location
    QC, Canada
    Posts
    5,732
    Post Thanks / Like
    Awesome! Can't wait to see the result. Plz let us know once you can.
    Frank
    818 chassis #181 powered by a '93 VW VR6 Turbo GT3582R
    Go-karted Aug 5, 2016 - Then May 19+21, 2017
    Tracked May 27/July 26, 2017
    Build time before being driveable on Sep 27, 2019: over 6000h
    Build Completed Winter 2021

  7. #47
    Senior Member metros's Avatar
    Join Date
    Jun 2013
    Location
    NoVA
    Posts
    1,064
    Post Thanks / Like
    That harness is perfect.

  8. #48
    Senior Member
    Join Date
    Jan 2012
    Posts
    1,112
    Post Thanks / Like
    Thought about running the headlight connectors through the same plug but decided against it. I also made two different harness setups to test out what I liked. I prefer this one compared to my other headlight essentially the same just routing was different. I wanted to figure out how best to make the connectors if a customer wanted to send in their headlight buckets during the build process. I have a h9 hid kit already waiting to go in this bad boy. Wells its the same kit that was in my old setup just with the correct bulbs. Should be way brighter and match the rest of my lighting

  9. #49
    Senior Member UnhipPopano's Avatar
    Join Date
    Mar 2016
    Posts
    344
    Post Thanks / Like
    If one of the LEDs burn out, how do you replace it?

  10. #50
    Senior Member
    Join Date
    Jan 2012
    Posts
    1,112
    Post Thanks / Like
    Same way unfortunately you would for the ffr setup. Take the headlight lense apart and pull the led. De-pin the connector and re-pin the new led. I've already benched tested my LEDs though any they've all survive a few hours of continual usage to this point. Also they are not the multi faceted ffr ones where individual LEDs could burn out in the assembly.

  11. #51
    Senior Member UnhipPopano's Avatar
    Join Date
    Mar 2016
    Posts
    344
    Post Thanks / Like
    Could a base such as a "T1-3/4 Wedge Base Socket - Wired" be used? It would make changing the bulb much easier.

  12. #52
    Senior Member
    Join Date
    Jan 2012
    Posts
    1,112
    Post Thanks / Like
    If you could get it to fit of course it could be wired. I thought about doing that but a price for a replacement buckets turned me off from the idea. That's why I went this route. A better light to begin with IMO

  13. #53
    Senior Member Frank818's Avatar
    Join Date
    Jun 2013
    Location
    QC, Canada
    Posts
    5,732
    Post Thanks / Like
    For LED replacement I thought I could do it from underneath, remove the bucket and pull the LED out, not touching the lense.


    As for H9 projector bulb LED replacement, it's hard to find a proper match, not all sellers tell the lumens, I think for a headlight you need around 3000lumens. Hard to see of a 30W LED would do the job or a 10W, or whatever.
    Frank
    818 chassis #181 powered by a '93 VW VR6 Turbo GT3582R
    Go-karted Aug 5, 2016 - Then May 19+21, 2017
    Tracked May 27/July 26, 2017
    Build time before being driveable on Sep 27, 2019: over 6000h
    Build Completed Winter 2021

  14. #54
    Senior Member UnhipPopano's Avatar
    Join Date
    Mar 2016
    Posts
    344
    Post Thanks / Like
    It looks like there are a number of Bayonet based sockets out there, that are reasonably priced, along with reasonably priced bulbs that would allow the bulbs to be replaced without removing the bucket. I was able to find parts for both Twist lock and push in style on line from a number of sources that would make the conversion around $160 for both headlights. [Example, 1156 Ba 15s base $3.49, Luved 5X 1156 White bulb $11.99, JDM ASTAR AX-2835 1156 Amber $14.99]

  15. #55
    Mechie3's Avatar
    Join Date
    May 2012
    Location
    Indianapolis
    Posts
    5,174
    Post Thanks / Like
    The PEM studs I ordered came in yesterday and my parents left this morning so I should have some time to actually look at my parts now. Going to see what can be done to make the lens permanent but allow the bucket to drop out from behind.
    Zero Decibel Motorsports
    Check out my new website!
    www.zerodecibelmotorsports.com
    www.facebook.com/zero.decibel.motorsports

  16. #56
    Senior Member 6t8dart's Avatar
    Join Date
    Apr 2015
    Location
    Irving, TX
    Posts
    545
    Post Thanks / Like
    Quote Originally Posted by Mechie3 View Post
    The PEM studs I ordered came in yesterday and my parents left this morning so I should have some time to actually look at my parts now. Going to see what can be done to make the lens permanent but allow the bucket to drop out from behind.
    Are you still hiding car parts from your parents?

  17. #57
    Mechie3's Avatar
    Join Date
    May 2012
    Location
    Indianapolis
    Posts
    5,174
    Post Thanks / Like
    Quote Originally Posted by 6t8dart View Post
    Are you still hiding car parts from your parents?
    Yes....


    (they actually were home when the new front end was delivered so that worked out well since they needed a signature).
    Zero Decibel Motorsports
    Check out my new website!
    www.zerodecibelmotorsports.com
    www.facebook.com/zero.decibel.motorsports

  18. #58
    Senior Member Frank818's Avatar
    Join Date
    Jun 2013
    Location
    QC, Canada
    Posts
    5,732
    Post Thanks / Like
    Fireblade, how did you push the headlamp that far into the bucket? When I test fitted it the top corner of the headlamp assembly hits on the bucket and I can't fit it that far.
    Frank
    818 chassis #181 powered by a '93 VW VR6 Turbo GT3582R
    Go-karted Aug 5, 2016 - Then May 19+21, 2017
    Tracked May 27/July 26, 2017
    Build time before being driveable on Sep 27, 2019: over 6000h
    Build Completed Winter 2021

  19. #59
    Senior Member
    Join Date
    Jan 2012
    Posts
    1,112
    Post Thanks / Like
    You have to cutoff one of the ears off the projector. A little nerve raking but manageable if you take your time. It's plastic and metal. I used a deemed with a cutoff wheel and then worked everything by hand once I got the fitment I wanted.

  20. #60
    Senior Member Frank818's Avatar
    Join Date
    Jun 2013
    Location
    QC, Canada
    Posts
    5,732
    Post Thanks / Like
    In other words, the usual plug&play the manual doesn't say about.
    Frank
    818 chassis #181 powered by a '93 VW VR6 Turbo GT3582R
    Go-karted Aug 5, 2016 - Then May 19+21, 2017
    Tracked May 27/July 26, 2017
    Build time before being driveable on Sep 27, 2019: over 6000h
    Build Completed Winter 2021

  21. #61
    Senior Member
    Join Date
    Jan 2012
    Posts
    1,112
    Post Thanks / Like
    Definitely. It's a coaster for me

  22. #62
    Member
    Join Date
    Oct 2015
    Location
    Quebec, Canada
    Posts
    41
    Post Thanks / Like
    Quote Originally Posted by Frank818 View Post
    In other words, the usual plug&play the manual doesn't say about.
    In fact it does, Page 39 on the revision 1P of the manual:
    Manual 1-P-page39.jpg

  23. #63
    Senior Member Frank818's Avatar
    Join Date
    Jun 2013
    Location
    QC, Canada
    Posts
    5,732
    Post Thanks / Like
    I feel bad, looks like I skipped that page when I printed the P version. I printed only the new nose pages but missed this one. So many errors I committed with this build.
    Frank
    818 chassis #181 powered by a '93 VW VR6 Turbo GT3582R
    Go-karted Aug 5, 2016 - Then May 19+21, 2017
    Tracked May 27/July 26, 2017
    Build time before being driveable on Sep 27, 2019: over 6000h
    Build Completed Winter 2021

  24. #64
    Senior Member
    Join Date
    Sep 2013
    Location
    Williamsburg VA
    Posts
    105
    Post Thanks / Like
    20160430_151245_resized.jpg20160501_125525_resized.jpg20160501_125536_resized.jpg20160501_195347_resized.jpg20160501_195410_resized.jpg20160501_195424_resized.jpg

    I got the lights installed and mounted. I went with double sided tape and long rivets to hold everything together. Had to sand down lenses to fit the fenders.
    I recessed the rivets into the lenses for a smooth finish. I cracked both lenses either with tightening the rivets or drilling the lenses. Hoping to cover most of the cracks with the vinyl strip I plan to add to the outside.
    The lenses don't fit flat so if you want to use double sided tape I would get real thick foam to make up for not being flat. I used thin body shop 3m tape and and it didn't hit the lenses all the way around.
    I also used the double sided tape on the buckets to seal it against the fender instead of silicone.

  25. #65
    Mechie3's Avatar
    Join Date
    May 2012
    Location
    Indianapolis
    Posts
    5,174
    Post Thanks / Like
    Man...I'm liking this front end more and more (look wise).
    Zero Decibel Motorsports
    Check out my new website!
    www.zerodecibelmotorsports.com
    www.facebook.com/zero.decibel.motorsports

  26. #66
    Moonlight Performance
    Hindsight's Avatar
    Join Date
    May 2014
    Location
    Atlanta
    Posts
    3,402
    Post Thanks / Like
    Quote Originally Posted by Mechie3 View Post
    Man...I'm liking this front end more and more (look wise).
    Get that thing on the road first

  27. #67
    Mechie3's Avatar
    Join Date
    May 2012
    Location
    Indianapolis
    Posts
    5,174
    Post Thanks / Like
    I have the new front end. It's upstairs in a spare bedroom still wrapped up. I was going to work on the car yesterday. Ended up couch surfing all day after throwing up in the early morning. :/
    Zero Decibel Motorsports
    Check out my new website!
    www.zerodecibelmotorsports.com
    www.facebook.com/zero.decibel.motorsports

  28. #68
    Senior Member metros's Avatar
    Join Date
    Jun 2013
    Location
    NoVA
    Posts
    1,064
    Post Thanks / Like
    Taco, I like the idea of using tape to seal the bucket instead of silicone. Riveting the lens in place looks good, too bad about the cracking.

  29. #69
    Senior Member
    Join Date
    Sep 2013
    Location
    Williamsburg VA
    Posts
    105
    Post Thanks / Like
    Quote Originally Posted by metros View Post
    Taco, I like the idea of using tape to seal the bucket instead of silicone. Riveting the lens in place looks good, too bad about the cracking.
    If the lens fit flat cracking wouldn't be an issue. Using a hand riveter helped. Making the hole in the lens wasn't bad but recessing the rivet was fun since lens melted while drilling.
    I had to find real long rivets to reach through all three parts. The vinyl should cover most of the cracks.

  30. #70
    Senior Member
    Join Date
    Jan 2012
    Posts
    1,112
    Post Thanks / Like
    Using a heat gun on low setting and being careful you can tweak the fitment of the lense. Tape is also recommended to hold the lenses down to the fender. Talked to tony at the show about them.

  31. #71
    Senior Member Frank818's Avatar
    Join Date
    Jun 2013
    Location
    QC, Canada
    Posts
    5,732
    Post Thanks / Like
    Those are HIDs?
    Frank
    818 chassis #181 powered by a '93 VW VR6 Turbo GT3582R
    Go-karted Aug 5, 2016 - Then May 19+21, 2017
    Tracked May 27/July 26, 2017
    Build time before being driveable on Sep 27, 2019: over 6000h
    Build Completed Winter 2021

Page 2 of 2 FirstFirst 12

Posting Permissions

  • You may not post new threads
  • You may not post replies
  • You may not post attachments
  • You may not edit your posts
  •  

Breeze

Visit our community sponsor