Very Cool Parts

Visit our community sponsor

Thanks Thanks:  0
Likes Likes:  0
Results 1 to 25 of 25

Thread: MK1 front A arm issues

  1. #1
    Senior Member
    Join Date
    Oct 2016
    Location
    Palm Bay FL
    Posts
    109
    Post Thanks / Like

    MK1 front A arm issues

    So with no real reference in the manual, my kit came with both upper and lower FFR arms. How Can I be sure there in correct? The original owner had assembled the a arms to the spindles. When I mounted assembly to the chassis, I can't get the coil overs in right side up or down. Adjusting the upper arms WAY out, still have interference issues. Any suggestions.....thanks in advance!

  2. #2
    Member
    Join Date
    Feb 2011
    Posts
    39
    Post Thanks / Like
    Do you have the lower arms in the outer holes on the frame? I believe the uppers are slotted on your model. You have the spindle adapters for the uppers with 4 holes in them? One pair for Fox spindles and the other for 1994 and later spindles. Put it all together without shocks. Move assembly till lower arms are parallel with the ground. Is the spindle face vertical or tilted in or out? You should be able to adjust them vertical or a bit tilted inward to the car. Also the upper to lower ball joint should be that the upper is more rearward than the bottom.

  3. #3

    Join Date
    Nov 2016
    Location
    "The i.e." SoCal
    Posts
    763
    Post Thanks / Like
    Pictures always help when asking questions like this. You have any?

  4. #4
    Senior Member
    Join Date
    Oct 2016
    Location
    Palm Bay FL
    Posts
    109
    Post Thanks / Like
    20170201_051218.jpg20170201_051227.jpg20170201_051241.jpg
    Quote Originally Posted by i.e.427 View Post
    Pictures always help when asking questions like this. You have any?

  5. #5
    Senior Member CraigS's Avatar
    Join Date
    Feb 2011
    Location
    Blacksburg, Va
    Posts
    4,730
    Post Thanks / Like
    Those pics look correct to me. Where is the interference when trying to install the coil over? What brand coil overs do you have? Generally they will only go in one way because one of the ends needs to be extra long to go down into the lower arm. Usually the spring is down w/ the shock body up. As an aside, you have the MkI frame w/ the slots for the UCAs but have the more modern adjustable UCAs. I recommend that you figure a way to lock the bolts in the slots and use the sleeves on the arms for adjustment.
    Last edited by CraigS; 02-01-2017 at 07:05 AM.
    FFR MkII, 408W, Tremec TKO 500, 2015 IRS, DA QA1s, Forte front bar, APE hardtop.

  6. #6
    Senior Member stack's Avatar
    Join Date
    Feb 2011
    Location
    Macedon, NY
    Posts
    320
    Post Thanks / Like
    Those may be the older style lower control arms. If you are trying to fit konis on there they will not fit without modification. I had the older front lower control arms on my MK1. When i switched to koni shocks i used the hat off my old pro shock and was able to make it work. Attach more pics of what you have going on. I may still have a pair of pro shocks i can take parts from if you need them

    stack
    FFR MKI Roadster FFR2202K Built in 2000 sold
    FFR Hot Rod #39 under construction

  7. #7
    Senior Member
    Join Date
    Oct 2016
    Location
    Palm Bay FL
    Posts
    109
    Post Thanks / Like
    Quote Originally Posted by stack View Post
    Those may be the older style lower control arms. If you are trying to fit konis on there they will not fit without modification. I had the older front lower control arms on my MK1. When I switched to koni shocks i used the hat off my old pro shock and was able to make it work. Attach more pics of what you have going on. I may still have a pair of pro shocks i can take parts from if you need them

    stack
    I guess my issue is clearance with springs on. Shock only fits upside down, when I try with springs they hit the upper arms. I tried adjusting all the way out. What is proper way to in stall? I first tried with the springs cranked down but the shocks seemed to long. My manual shows the shocks with "hat up", only adding to confusion, especially not fitting at all that way. I'll try to add pic tonight

  8. #8
    Senior Member stack's Avatar
    Join Date
    Feb 2011
    Location
    Macedon, NY
    Posts
    320
    Post Thanks / Like
    FFR MKI Roadster FFR2202K Built in 2000 sold
    FFR Hot Rod #39 under construction

  9. #9
    Senior Member stack's Avatar
    Join Date
    Feb 2011
    Location
    Macedon, NY
    Posts
    320
    Post Thanks / Like
    FFR MKI Roadster FFR2202K Built in 2000 sold
    FFR Hot Rod #39 under construction

  10. #10
    Director of R&D, FFR Jim Schenck's Avatar
    Join Date
    Mar 2011
    Location
    Wareham
    Posts
    444
    Post Thanks / Like
    Older MKIs have the shock hole further out on the top than the newer frames, if you re-drill the shock hole leaving about 1/8 inch between the new hole and old one it will pull the shock in away from the upper arm. It will also change the rates slightly, however the current Koni rates were based on the shock being mounted more inboard so no issues there.
    Jim Schenck
    Factory Five Racing

  11. #11
    Senior Member
    Join Date
    Oct 2016
    Location
    Palm Bay FL
    Posts
    109
    Post Thanks / Like
    Quote Originally Posted by Jim Schenck View Post
    Older MKIs have the shock hole further out on the top than the newer frames, if you re-drill the shock hole leaving about 1/8 inch between the new hole and old one it will pull the shock in away from the upper arm. It will also change the rates slightly, however the current Koni rates were based on the shock being mounted more inboard so no issues there.
    any chance of illustration, even a sketch....thanks

  12. #12
    Senior Member
    Join Date
    Oct 2016
    Location
    Palm Bay FL
    Posts
    109
    Post Thanks / Like
    Quote Originally Posted by stack View Post
    thank you stack, all your research appreciated
    Last edited by fhp1154!; 02-01-2017 at 03:58 PM.

  13. #13
    Director of R&D, FFR Jim Schenck's Avatar
    Join Date
    Mar 2011
    Location
    Wareham
    Posts
    444
    Post Thanks / Like
    I don't have an old one around to draw on but but basically you need to just drill a second set of holes in the shock mount on the chassis. The holes should be located at the same height as the current ones, so if you draw a horizontal line from the center of the original hole inward and then make a mark on the line 3/8 inch inside the edge of the hole then that would be your new center. The shock mounts use a 1/2 inch bolt but it is easiest to start with a small bit and work your way up in sizes (I usually use the sizes that don't get used much as they are sharper from less use). If you can get a good view of the drill and make sure its straight you can do both front and rear tabs at the same time, but if you can't see in there to get the drill straight just mark and drill the front and rear separately and then finish the last two together with the 1/2 inch bit.
    Jim Schenck
    Factory Five Racing

  14. #14
    Senior Member CraigS's Avatar
    Join Date
    Feb 2011
    Location
    Blacksburg, Va
    Posts
    4,730
    Post Thanks / Like
    Good catch Stack. Those are the older LCAs.
    FFR MkII, 408W, Tremec TKO 500, 2015 IRS, DA QA1s, Forte front bar, APE hardtop.

  15. #15
    Senior Member Mesa Mike's Avatar
    Join Date
    Mar 2011
    Location
    Mesa, AZ
    Posts
    332
    Post Thanks / Like
    OK, I have an early MK1. I read a post above recommending you put something in the slots to make sure the upper a arm doesn't slip back. I just place a second set of nuts/bolts behind the ones in the a arm for insurance. 16-17 years ago an owner's came loose and it caused him to crash. FFR since released frames with holes instead of slots for this reason. Some owners mfg a spacer to fit in behind the a arms. Hope you have it worked out. I am currently rebuilding my front end with new ball joints and brakes. Hope I don't have your problem. Also, my shocks are "upside down" front and back.

  16. #16
    Not a waxer Jeff Kleiner's Avatar
    Join Date
    Feb 2011
    Location
    Bloomington, Indiana
    Posts
    8,081
    Post Thanks / Like
    Weld a flat washer to the chassis over the slots and it becomes a hole.

    Jeff

  17. #17
    Senior Member
    Join Date
    Oct 2016
    Location
    Palm Bay FL
    Posts
    109
    Post Thanks / Like
    Quote Originally Posted by Jim Schenck View Post
    I don't have an old one around to draw on but but basically you need to just drill a second set of holes in the shock mount on the chassis. The holes should be located at the same height as the current ones, so if you draw a horizontal line from the center of the original hole inward and then make a mark on the line 3/8 inch inside the edge of the hole then that would be your new center. The shock mounts use a 1/2 inch bolt but it is easiest to start with a small bit and work your way up in sizes (I usually use the sizes that don't get used much as they are sharper from less use). If you can get a good view of the drill and make sure its straight you can do both front and rear tabs at the same time, but if you can't see in there to get the drill straight just mark and drill the front and rear separately and then finish the last two together with the 1/2 inch bit.
    Well, with complete frustration and feeling like I have screwed up my chassis now, holes drilled and I'm no closer to front suspension. The biggest thing I see is the LCA mounts just aren't correct for using coil overs.....HELP!20170203_060640.jpg20170203_060630.jpg20170203_060624.jpg
    The image with top of shock pic with newly drilled hole, is about as close as I can get the top of shock to the mount, the LCA won't let it lay over enough20170203_060904(1).jpg
    Last edited by fhp1154!; 02-03-2017 at 06:49 AM.

  18. #18
    Senior Member
    Join Date
    Mar 2016
    Posts
    149
    Post Thanks / Like
    Try to use a full height nut to lock the rod eyelet. Instead of the thin nut currently used. It will give your some space between the spring hat and the LCA.
    See pic 20170203_06040.jpg http://thefactoryfiveforum.com/attac...3&d=1486121892

  19. #19
    Senior Member CraigS's Avatar
    Join Date
    Feb 2011
    Location
    Blacksburg, Va
    Posts
    4,730
    Post Thanks / Like
    Check here on pg 13 for an extra long rodend # B212-1.
    https://issuu.com/afcoperformancegro...52565/40494261
    Also on pg 38 it says it is a 9/16 which I am pretty sure is the size of the threaded hole that the shock shaft threads into while the hole in the ball is still 1/2.
    FFR MkII, 408W, Tremec TKO 500, 2015 IRS, DA QA1s, Forte front bar, APE hardtop.

  20. #20
    Not a waxer Jeff Kleiner's Avatar
    Join Date
    Feb 2011
    Location
    Bloomington, Indiana
    Posts
    8,081
    Post Thanks / Like
    Quote Originally Posted by fhp1154! View Post
    ...The image with top of shock pic with newly drilled hole, is about as close as I can get the top of shock to the mount, the LCA won't let it lay over enough20170203_060904(1).jpg
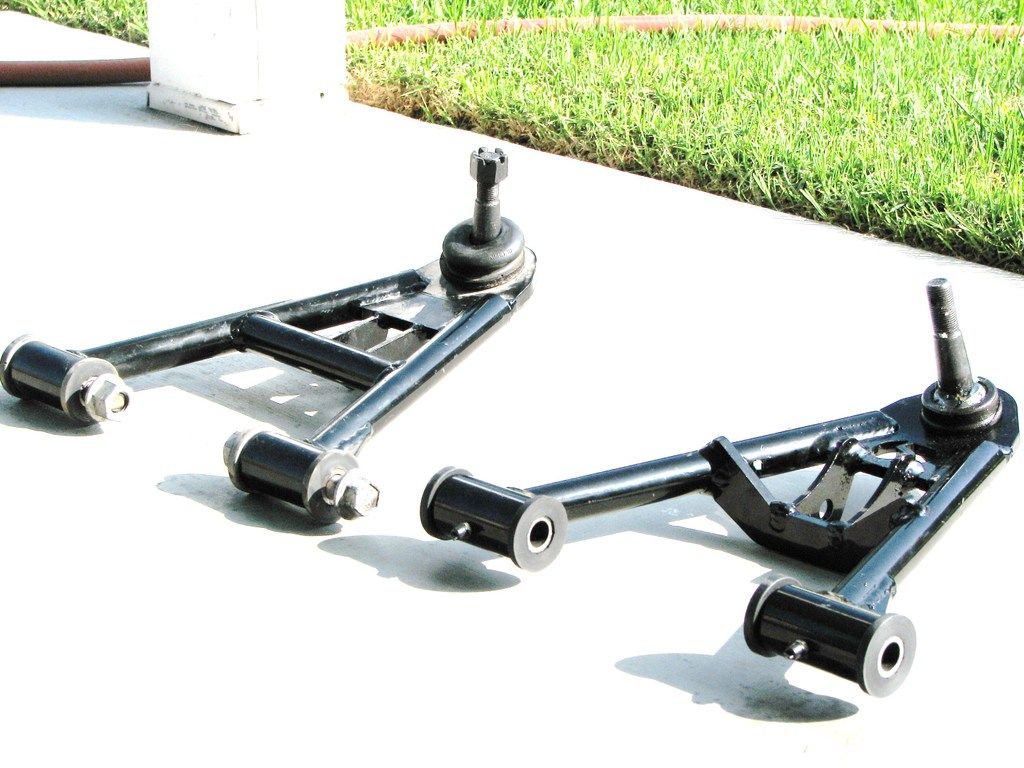
    You have the early control arms like the one on the left in the photo below. They were redesigned to address this clearance issue as can be seen on the arm on the right:


    Further compounding things is the additional mix of different generation parts. The earliest cars like yours had nonadjustable tubular arms which curved out and around the coilover for clearance (the nonadjustable aspect was the reason for the chassis slots) as can be seen here:


    I think your adjustable SPC type uppers preclude you being able to mount the coilovers with the spring up because of interference which then causes the problem at the lower arm. Nobody knows these things better than Jim so hopefully he'll chime in with additional suggestions about what will mix & match but it looks to me like one of your 3 components needs to change (coilover, upper arm or lower arm) 'cause your combination doesn't want to play together.

    Good luck,
    Jeff

  21. #21
    Director of R&D, FFR Jim Schenck's Avatar
    Join Date
    Mar 2011
    Location
    Wareham
    Posts
    444
    Post Thanks / Like
    What is hitting that is preventing you from mounting the shocks body down now that the upper hole is further in? Is there a number stamped in the end of the shock body, next to where the shaft seal is?
    Jim Schenck
    Factory Five Racing

  22. #22
    Senior Member
    Join Date
    Oct 2016
    Location
    Palm Bay FL
    Posts
    109
    Post Thanks / Like
    Quote Originally Posted by Jim Schenck View Post
    What is hitting that is preventing you from mounting the shocks body down now that the upper hole is further in? Is there a number stamped in the end of the shock body, next to where the shaft seal is?
    I'll have to get back to you about the number on shock, but no matter mounting up or down , the "hat" hits cross support nearest chassis and the body hits if right side up. The picture above from Jeff Kleiner , the right side one would fix because mine is exactly the left pic. Gonna try the extension from pro shock unless you don't feel it will work. thanks for all your help!

  23. #23
    Senior Member stack's Avatar
    Join Date
    Feb 2011
    Location
    Macedon, NY
    Posts
    320
    Post Thanks / Like
    Are you sure you have the right shocks? Front and rear use different sizes. I'll dig up one of my old pro shocks when i get home

    stack
    FFR MKI Roadster FFR2202K Built in 2000 sold
    FFR Hot Rod #39 under construction

  24. #24
    Senior Member
    Join Date
    Oct 2016
    Location
    Palm Bay FL
    Posts
    109
    Post Thanks / Like
    yea, I'm pretty sure, the rears are much longer!

  25. #25
    Senior Member
    Join Date
    Oct 2016
    Location
    Palm Bay FL
    Posts
    109
    Post Thanks / Like
    Quote Originally Posted by CraigS View Post
    Check here on pg 13 for an extra long rodend # B212-1.
    https://issuu.com/afcoperformancegro...52565/40494261
    Also on pg 38 it says it is a 9/16 which I am pretty sure is the size of the threaded hole that the shock shaft threads into while the hole in the ball is still 1/2.
    CraigS, thank you sir, you are the man. After looking at the Proshock.com web site, I saw the extension and ordered the 1" version and since they won't be here til Monday, I fab'd a mock up with a cut bolt and couple nuts and I believe we have a solution! Won't know for sure until wheels and engine are in place, but front suspension is installed!20170205_130607.jpg 20170205_130616.jpg20170205_130620.jpg20170205_130627(1).jpg
    I think I just have a couple hole to plug weld
    Last edited by fhp1154!; 02-05-2017 at 01:28 PM.

Posting Permissions

  • You may not post new threads
  • You may not post replies
  • You may not post attachments
  • You may not edit your posts
  •  

FFMetal

Visit our community sponsor