Very Cool Parts

Visit our community sponsor

Thanks Thanks:  0
Likes Likes:  0
Page 2 of 2 FirstFirst 12
Results 41 to 58 of 58

Thread: Body Work Advise

  1. #41
    Not a waxer Jeff Kleiner's Avatar
    Join Date
    Feb 2011
    Location
    Bloomington, Indiana
    Posts
    8,073
    Post Thanks / Like
    Quote Originally Posted by RickP View Post
    Thank you Jeff, I found your post. Not sure what 1/4" thick runner sheet is but sounds like a bumper of sort to "lift" the body to meet the hood rather than try to get the hood to meet the body.
    I think there must have been a typo in that post---should be "rubber", not "runner" (it's actually conveyor belt material) but yeah, the idea is to bring the body to the hood. Like Mark advised just get things functioning for now and let the body guy fine tune it.

    Cheers,
    Jeff

  2. #42
    Senior Member
    Join Date
    Aug 2016
    Location
    Northern VA
    Posts
    653
    Post Thanks / Like
    looking great!

  3. #43
    mcwho's Avatar
    Join Date
    Feb 2011
    Location
    DeBary - Florida
    Posts
    541
    Post Thanks / Like
    Gumball,

    Your car looks awesome.

    My son and I started the bodywork about a year ago. We really like the writeup that J. Keiner had posted out here. My son lives in Chicago and I live in Florida, he has taken a few weeks here and there and now we are almost ready for paint. The body is filled, primered an smooth, at this point the body is on, and we are fitting everything, an we have found lots of good info here. As for the side holes where the exausts go thru, I used a dremel and a 1 1/2 round sanding disk to make the corners even. The dremel cuts thru the body like Butter.

    my .02 cents
    Baghdad Bob

    Complete Kit Delivered July 2010, serial @ 7287, Whitby Power Brakes, Whitby Tonneau, Power Steering w HEIDTS PS Valve, Hydralic clutch, 15" Wheels, BFG Tires, 331 stroker w Quick Fuel 650, RPM Heads, Air Gap Intake. IRS w 3.27, TKO-600. FFMETAL Firewall Forward, FFMETAL Dropped Battery Box in Trunk, Enlarged Passenger footbox, Breeze Cubby storage, Breeze Seat Brackets, Herbs Door Panels. Ford ruby red 12 coats.

  4. #44
    Senior Member RickP's Avatar
    Join Date
    Feb 2016
    Location
    Boyertown, PA
    Posts
    683
    Post Thanks / Like
    I've got a couple of questions that I hope those in the know can steer me in the right direction

    1. Does the rear firewall edge get a bulb seal. I've come across conflicting information


    2. Lastly; My trunk lock thru bolt hole does not quite line up with the aluminum. Originally, I had no idea why this odd hole was even in the aluminum and frame so I ran a rivet thru it. Now I am well aware of what it's for.

    a.) should I tap the hole and size the hole in the aluminum to match up?

    OR

    b.) Should I drill out the hole and nut the bolt from behind? Not sure if the bolt is long enough with the body off.

    OR

    c.) Do something else.


  5. #45
    Carl carlewms's Avatar
    Join Date
    May 2012
    Location
    Nokesville, VA
    Posts
    1,125
    Post Thanks / Like
    Rick,

    Ditto on your question ... I have the exact same issue on my Mk 4. The hole in the aluminum is slightly to the right of the hole in the fiberglass lip of the trunk.

    The other thing I have noticed in fitting the trunk lid is that their is considerable lateral movement of the latch end of the trunk when you close the latch.

    Carl
    Mk 4 Roadster
    October 25, 2012 - Kit Arrives
    April 8, 2013 - Build Starts
    August 23, 2015 - Rolling Chassis/Engine & Transmission Installed
    March 26, 2016 - Go Cart

  6. #46
    Senior Member edwardb's Avatar
    Join Date
    Feb 2011
    Location
    Lake Orion, Michigan
    Posts
    10,575
    Post Thanks / Like
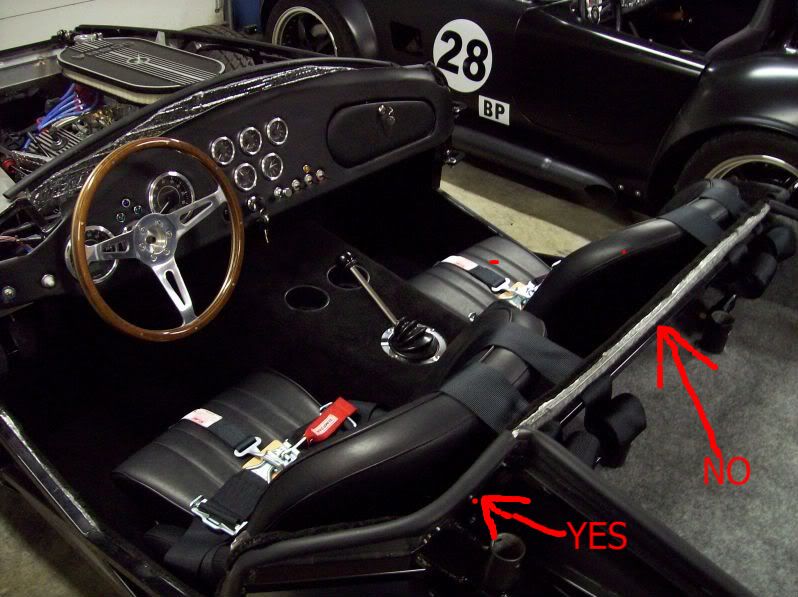
    1. The corner your pointing to on the rear cockpit wall does get bulb seal. From right about the door latch to the trunk sides. Nothing across the top of the back wall between the trunk sides.

    2. For the trunk latch, I would open the hole as necessary to get the provided bolt through. There's a nut and washer for the back side. Hopefully you have small and flexible fingers to install them. It's pretty tight.

    When properly aligned and the right bulb seal around the trunk opening, the latch pulls down on the catch pretty firmly. There shouldn't be any movement.
    Build 1: Mk3 Roadster #5125. Sold 11/08/2014. Build 2: Mk4 Roadster #7750. Sold 04/10/2017. Build Thread
    Build 3: Mk4 Roadster 20th Anniversary #8674. Sold 09/07/2020. Build Thread and Video. Build 4: Gen 3 Type 65 Coupe #59. Gen 3 Coyote. Legal 03/04/2020. Build Thread and Video
    Build 5: 35 Hot Rod Truck #138. LS3 and 4L65E auto. Rcvd 01/05/2021. Legal 04/20/2023. Build Thread. Sold 11/9/2023.

  7. #47
    Senior Member RickP's Avatar
    Join Date
    Feb 2016
    Location
    Boyertown, PA
    Posts
    683
    Post Thanks / Like
    Quote Originally Posted by edwardb View Post
    1. The corner your pointing to on the rear cockpit wall does get bulb seal. From right about the door latch to the trunk sides. Nothing across the top of the back wall between the trunk sides.

    2. For the trunk latch, I would open the hole as necessary to get the provided bolt through. There's a nut and washer for the back side. Hopefully you have small and flexible fingers to install them. It's pretty tight.

    When properly aligned and the right bulb seal around the trunk opening, the latch pulls down on the catch pretty firmly. There shouldn't be any movement.
    Thank you Paul. Exactly the info I was looking for.

  8. #48
    Senior Member RickP's Avatar
    Join Date
    Feb 2016
    Location
    Boyertown, PA
    Posts
    683
    Post Thanks / Like
    Quote Originally Posted by carlewms View Post
    Rick,

    Ditto on your question ... I have the exact same issue on my Mk 4. The hole in the aluminum is slightly to the right of the hole in the fiberglass lip of the trunk.

    The other thing I have noticed in fitting the trunk lid is that their is considerable lateral movement of the latch end of the trunk when you close the latch.

    Carl
    I'm hoping to get the body back on this weekend. The hole in the fiberglass lip "appears" to line up but that's from an eyeball it perspective. I'll really know what I'm facing once I run the catch bolt through. At least I have the trunk lid trimmed to fit and swinging.

  9. #49
    Not a waxer Jeff Kleiner's Avatar
    Join Date
    Feb 2011
    Location
    Bloomington, Indiana
    Posts
    8,073
    Post Thanks / Like
    As Paul already noted belb seal goes on the "wings" behind the seats but not across the rear bulkhead:


    It's not unusual to need to make some adjustment to the latch pin location. You can slot or oversize the holes in the body &/or chassis a bit then use a washer on both sides so that you can pinch it tight once you've found the sweet spot horizontally and vertically. Carl, yes, as the latch hook rotates around the pin it can shift the lower edge of lid side to side. You'll want to set the pin so that it brings the lid to center when fully latched which may require adjusting it's position as mentioned.

    Good luck,
    Jeff

  10. #50
    Senior Member RickP's Avatar
    Join Date
    Feb 2016
    Location
    Boyertown, PA
    Posts
    683
    Post Thanks / Like
    Quote Originally Posted by Jeff Kleiner View Post
    As Paul already noted belb seal goes on the "wings" behind the seats but not across the rear bulkhead:


    It's not unusual to need to make some adjustment to the latch pin location. You can slot or oversize the holes in the body &/or chassis a bit then use a washer on both sides so that you can pinch it tight once you've found the sweet spot horizontally and vertically. Carl, yes, as the latch hook rotates around the pin it can shift the lower edge of lid side to side. You'll want to set the pin so that it brings the lid to center when fully latched which may require adjusting it's position as mentioned.

    Good luck,
    Jeff
    Thank you JK for the "how to" on the catch pin. Makes perfect sense. If it landed dead perfect I would be surprised.

  11. #51
    Senior Member RickP's Avatar
    Join Date
    Feb 2016
    Location
    Boyertown, PA
    Posts
    683
    Post Thanks / Like

    Hood Scoop

    I have the hood fitted and swinging to a point where I think it's acceptable for "gel coat" riding. Certainly not paint ready seams etc. The body and hood are pretty level so I went ahead and mounted the hood closers and fitted my Breeze prop rods. I was going to move onto the windshield but I need to line up my buddy and in the meantime, should I cut and mount the hood scoop OR should I leave that for the body/paint pro when the times comes? I am painting it with stripes and am concerned about stripe to hood scoop alignment.

    rick

  12. #52
    Not a waxer Jeff Kleiner's Avatar
    Join Date
    Feb 2011
    Location
    Bloomington, Indiana
    Posts
    8,073
    Post Thanks / Like
    Quote Originally Posted by RickP View Post
    ...should I cut and mount the hood scoop OR should I leave that for the body/paint pro when the times comes? I am painting it with stripes and am concerned about stripe to hood scoop alignment.

    rick
    I prefer to get them untouched but maybe your painter isn't the same kind of control freak perfectionist that I am

    Jeff

  13. #53
    Senior Member RickP's Avatar
    Join Date
    Feb 2016
    Location
    Boyertown, PA
    Posts
    683
    Post Thanks / Like
    Quote Originally Posted by Jeff Kleiner View Post
    I prefer to get them untouched but maybe your painter isn't the same kind of control freak perfectionist that I am

    Jeff
    Thank you Jeff. I'm going to take your advise and not fuss with it. Pretty much stay the course and continue getting everything fitted.

  14. #54
    Senior Member RickP's Avatar
    Join Date
    Feb 2016
    Location
    Boyertown, PA
    Posts
    683
    Post Thanks / Like

    Update/question

    I've made some steady strides with much "a do". Thought I would get some pics up so the question doesn't arise "where are you at in the build". Upfront, there is a question at the end of this post!

    I got the hood mounted, swinging, and propped.


    The trunk lid is mounted as well.


    Kleiner mod (thank you Jeff)


    Roll Bar:


  15. #55
    Senior Member RickP's Avatar
    Join Date
    Feb 2016
    Location
    Boyertown, PA
    Posts
    683
    Post Thanks / Like

    Update/Question Post 2


    And finally the windshield (don't get me started.....)


    And finally my question:

    I need to go back and button up a few things but I believe I am in good shape to take a stab at mounting the doors. Should I mount the front elephant ears prior to door installation? If so, do I need to ensure they are removable? I do plan to coat them with bed liner so initially they will be cleco'd in place for mock up but my concern is if the painter wants to pull the body I would hate to have him/her drilling out rivets.

  16. #56
    Senior Member edwardb's Avatar
    Join Date
    Feb 2011
    Location
    Lake Orion, Michigan
    Posts
    10,575
    Post Thanks / Like
    Quote Originally Posted by RickP View Post
    Should I mount the front elephant ears prior to door installation? If so, do I need to ensure they are removable? I do plan to coat them with bed liner so initially they will be cleco'd in place for mock up but my concern is if the painter wants to pull the body I would hate to have him/her drilling out rivets.
    I haven't noticed they make a big difference for the door fitting. But definitely for the side pipe fitting. You do plan on doing that too before sending off to the painter, right? And yes, they need to be removable to get the body on and off.
    Build 1: Mk3 Roadster #5125. Sold 11/08/2014. Build 2: Mk4 Roadster #7750. Sold 04/10/2017. Build Thread
    Build 3: Mk4 Roadster 20th Anniversary #8674. Sold 09/07/2020. Build Thread and Video. Build 4: Gen 3 Type 65 Coupe #59. Gen 3 Coyote. Legal 03/04/2020. Build Thread and Video
    Build 5: 35 Hot Rod Truck #138. LS3 and 4L65E auto. Rcvd 01/05/2021. Legal 04/20/2023. Build Thread. Sold 11/9/2023.

  17. #57
    Senior Member RickP's Avatar
    Join Date
    Feb 2016
    Location
    Boyertown, PA
    Posts
    683
    Post Thanks / Like
    Quote Originally Posted by edwardb View Post
    I haven't noticed they make a big difference for the door fitting. But definitely for the side pipe fitting. You do plan on doing that too before sending off to the painter, right? And yes, they need to be removable to get the body on and off.
    Thanks Paul. Yes, I plan on driving this car for a tad before committing to a painter so the side pipes will get fitted.

  18. #58
    Senior Member RickP's Avatar
    Join Date
    Feb 2016
    Location
    Boyertown, PA
    Posts
    683
    Post Thanks / Like

    Side Pipe Fitment

    I need some advice on the side pipe fitment. The drivers side and subsequently passenger side are cocked slightly with the passenger side being more noticeable. My fist instinct is to jerk the motor to align the pipes but I have a issue with my 02 sensor placement. Also I fear the way the pipes need to move, I would have to open the side cutout more on the passenger side. My thought goes to the Breeze wedges/spacers.

    Any advice is much appreciated.


    Driver's side alignment (not bad)


    Passenger side alignment (oooof)


    Drivers's cutout (eh)


    Passenger cut out (a little better)


    The issue (rear edge of passenger)

    It's not touching but I fear I would really have to open the hole up to get the pipe to clear with some breathing room.


    And the sensor; again not touching but darn close. My thinking was a spacer that bumps the pipe out and angles it back towards the rear inboard side


Page 2 of 2 FirstFirst 12

Posting Permissions

  • You may not post new threads
  • You may not post replies
  • You may not post attachments
  • You may not edit your posts
  •  

Replica Parts

Visit our community sponsor