
Visit our community sponsor

Thanks:
0

Likes:
0
-
Senior Member

Problems removing CVs from Trans. Help?!?!
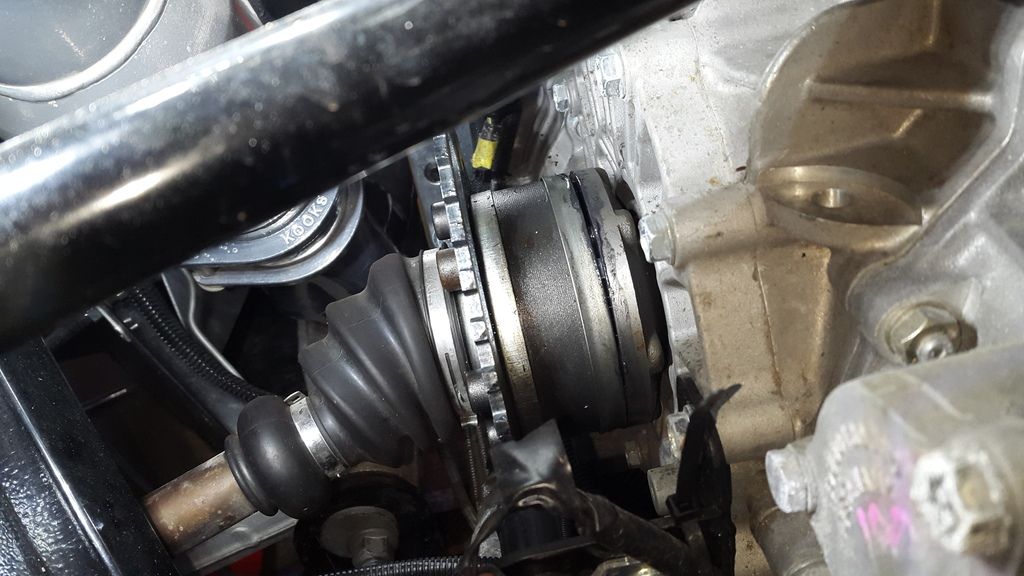
I have a GT2 trans (G96/88 if I remember correctly) with axles from Crash. The bolts backed out as seen in the pics so I am trying to remove then from the trans to clean and install new bolts. Normal FWD cars you just snatch on them to get them out at most a pry bar or 2 or between the CVs and trans and they pop right out.
I cant get mine out to save my life. Do i have to take the side cover off the trans or anything? These things locked in there somehow that I dont know about? I'm just trying not to break anything.
-
They are bolted to the diff. Remove the backed out bolts to get the axle/cv out of the way. There's a bolt down the center of the half shaft.
They will slide right out once bolt is removed.
44Nm (33 ftlb) is torque spec on center bolt according to the shop manual.
I have the GT3 Trans G96.96 from 2004, which is the same as yours more or less AFAIK.
Last edited by Tmzand; 04-06-2017 at 10:42 PM.
-
There shouldn't be any need to remove the stub shaft from the transaxle. You just need to unbolt the CV from the output flange to get the axles out.
Shane Vacek
VRaptor SpeedWorks, LLC
www.vraptorspeedworks.com
Turn-key GTM, SL-C & Ultima GTR Built to Your Specs!
Offering a full line of GTM Upgrades and Custom Parts
-
Senior Member
Thanks guys, Im just trying to get it out so I can really clean them so when I reinstall the new bolts the grease will not be all over them as well.
-
Posted from my reply in the other forum so that members here can also maybe benefit...
It sounds like, tmz, you are discussing the fact that the drive flanges are bolted into the diff? I don't think that is what flowtown is asking about.
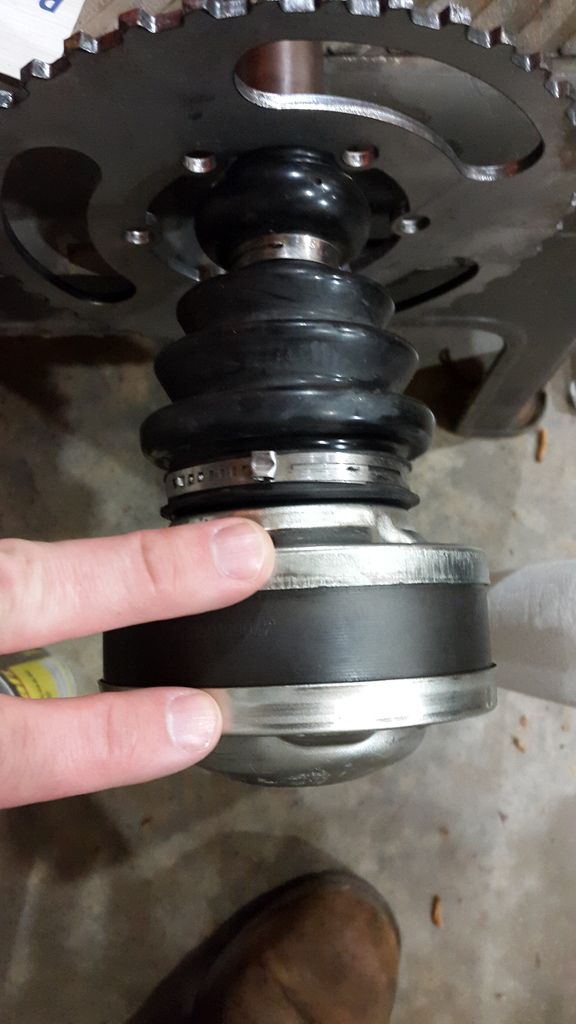
You need to remove all the bolts from the CV before trying to separate it from the drive flange. Also, you have what appear to be dust covers on the insides of the inner CVs. While these do keep grease contained, they do not allow for the CVs to be tightened properly against the drive flanges, and, if you were to be using a Mendeola transaxle, which it appears you are not, it would make the CVs darn near impossible to remove, and when you did get them off, you would see that your dust covers would be thoroughly destroyed. I do not recommend dust covers.
Also, you are running boot clamps on the small diameters of the boots. You can do this, but there is really no reason to, and there is also a passageway that can be blocked if you tighten the clamps too much. This passageway is needed to relieve air pressure that builds up inside the boots when they get hot. If that passage is blocked, the boots can blow up like balloons when they get hot. When this happens, if some of the air is relieved, but the passage is still blocked, you will get a boot that gets sucked into the CV when it cools off. Then the boot can be damaged by the rotating CV. Again, I do not recommend the boot clamps on the small diameter end of the boots.
You also need to make sure that the small hole in the secondary part of the boot(the small little bubble of boot to the left of your small diameter boot clamp in the picture) is open and not closed from cast flash. I try and do this on all boot we send out, but I may have missed a few. Good to double check. if this hole is not open, use an 1/8th rivet drill and drill it out.
-
Yup, exactly. My impression is he wanted to remove the drive flanges/half shafts as referred to by Porsche, to thoroughly clean the threads.
My guess is to get thread lock to "bite".
Good info on the boot "venting"
Edit:It was the pry bar approach that got my attention. Sorry if I got it wrong. Just trying to help.
Last edited by Tmzand; 04-07-2017 at 05:24 PM.
-
Senior Member
I see now. I removed the bolts and pulled the shafts from under the car. The clamps were on the small end of the boots. I will remove them and ensure the hole is open.
Are these the dust caps you refer too Mike?
-
You may want to consider safety wiring the bolts.
I had a hell of a time with them always backing out even with Loctite until I safety wired them.
Since then its just a visual check before and after a drive out of habit.
-
Yes, the dustcover/grease cover is in the bottom of that picture. Judging by the grease in the first picture between the cover and the drive flange it appears that the cover may be damaged and leaking, or...?
-
Senior Member
I didnt have time to take them off and inspect. I just figured they were just leaking from the bolts being loose. I will have to take them back apart more than likely. I could not find any safety wire in stock anywhere without ordering it so for now I just cleaned them really good and reinstalled for now.
Cars and coffee is this weekend and I wanted to take it so next week I may pull it back apart. I get faster at it every time LOL.
-
Again, axles take a LONG time to do properly. Both assembly and install. One of the things we do is to install the CV and then remove one bolt at a time and squirt brake/carb clean down the hole and then blow it out with compressed air. We do this a couple of times and then use high temp red Loctite on the bolts, which we also clean thoroughly, and then reinstall and torque. After all that is done, we then safety wire the bolts. Matter of fact, axle CV bolts take SO MUCH time that when we are doing a swap at the track of a transaxle, for whatever reason, one person does nothing but the CV bolts, and usually once it gets to safety wiring, two people usually do that because of the time it takes. Take your time, make sure everything is clean, and use a quality thread locker. Even without safety wire, you should not be having so many problems...if you pay attention to the cleanliness of the install.
Oh, and BTW, we use red silicone between the CV and the drive flanges. Again, as long as you take your time and pay attention to cleanliness, this will seal better than using those dust covers.
Last edited by crash; 04-12-2017 at 10:09 AM.
 Posting Permissions
- You may not post new threads
- You may not post replies
- You may not post attachments
- You may not edit your posts
-
Forum Rules

Visit our community sponsor


 Reply With Quote

