FormaCars

Visit our community sponsor

Thanks Thanks:  0
Likes Likes:  0
Results 1 to 10 of 10

Thread: Lower Center Dash

  1. #1
    Member
    Join Date
    Feb 2017
    Location
    Peoria, Arizona
    Posts
    40
    Post Thanks / Like

    Lower Center Dash

    I've seen a couple pictures of creative ideas to the addition of a lower center dash full of different switches and gauges. I have yet to find a thread (I'm struggling with the search feature for some reason) that is specific to this in order to share some of your accomplishments as well as to spark some new ideas.

    Thanks

  2. #2
    Senior Member
    Join Date
    Jun 2016
    Location
    Leesburg, Va
    Posts
    204
    Post Thanks / Like

    Lowe Dash

    Just a single piece of .050 with two bends. I mocked it up with poster board and laid out the seat heater switches, power outlets, and HVAC controls. Behind it is power block to provide the fuses for the accessories. It is wired to the battery with the on/off controlled by a relay. The signal for relay was an extra switched lead from the complete kit wiring harness. I covered it with some marine grade vinyl upholstery from JoAnns Fabrics. I used the same material for the transmission tunnel cover.
    Doug
    FFR 7995
    347 SBF Prestige Mototsports, Moser 8.8 (3.31) 3 Link, TKO 600, Nitto 555s, 17" Halibrands, PS, AC, Heat, Color Redfire Pearl, with Wimbledon White Stripes

  3. #3
    Senior Member
    Join Date
    Feb 2011
    Location
    Manchester, MD
    Posts
    147
    Post Thanks / Like
    Forget where I found a PDF file of a console. Used it as a starting point and much like Doug, used cardboard to mock it up. Don't think I really needed the PDF.

    IMG_0541.jpgIMG_0538.jpg

  4. #4

    Steve >> aka: GoDadGo
    GoDadGo's Avatar
    Join Date
    Feb 2015
    Location
    Slidell, Louisiana
    Posts
    6,572
    Post Thanks / Like
    Blog Entries
    1
    I don't have any good pictures of it, but you can see what I did in the middle of this video.
    It's just a piece of aluminum door sill kick plate that I cut and bent to the desired shape.

    From left to right the switches are:

    1. High/Low bean
    2. Emergency Flasher
    3. Blinker L/C/R
    4. Drivers Foot Box Vent
    5. Passenger Foot Box Vent

    https://youtu.be/_wnHDNgnNqs

    The stereo is an Infinity 200 Watt (4 X 50) Marine unit that has auxiliary inputs and blue tooth compatible.
    Last edited by GoDadGo; 04-13-2017 at 07:27 PM.

  5. #5
    Senior Member BEAR-AvHistory's Avatar
    Join Date
    May 2015
    Location
    Raleigh NC, OIB NC
    Posts
    1,599
    Post Thanks / Like


    $30 3 piece kit from Whitby Motors. I now have a metal brake so I would just buy aluminum stock & fold it if I were to make another one.

    Naugahyde over thin foam covering matches the dash & tunnel top,

    Two knobs at the top are blast gate pulls for the foot well vents.

    Red lights are power on indicators for the vent fans

    Switches are vent fan on/off left/right sides.

    Screen is a Pioneer NEX 4200

    Sides 6" Polk Audio speakers

    Degree of difficulty on a 1-10 scale = 2
    Kevin
    MKIV #8234
    Coyote '14/TKO-600/3-Link 3:55 Rear
    I love the smell of 100 octane in the morning.
    NITTO NT01 275X40X17ZR - 315X35ZRX17
    Delivered 2/7/14 - Plate "COYOTE NC1965" 3/25/15

  6. #6
    Member
    Join Date
    Jun 2015
    Posts
    61
    Post Thanks / Like
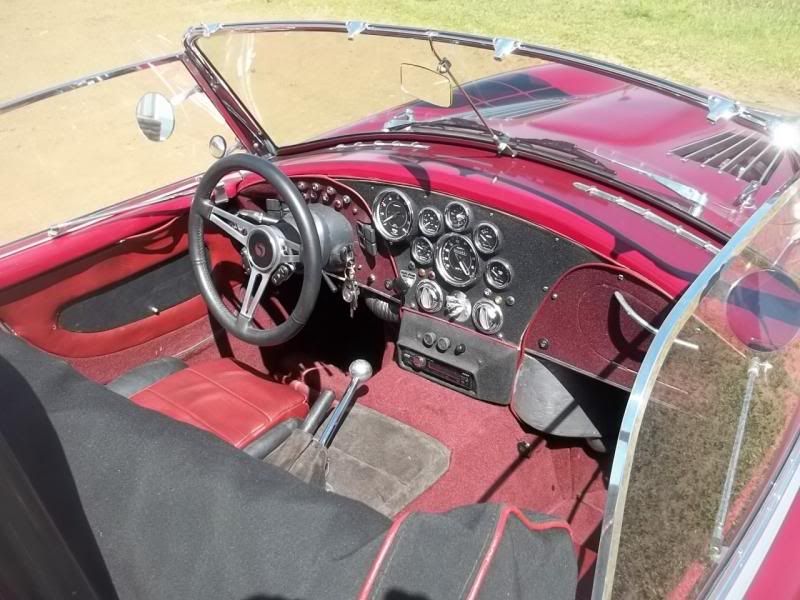
    Here is what I did: Welded 1/8" aluminum into a U shape. Installed (left to right) Nitrous power button, nitrous activation button, cruise control (in the open spot), drivers seat heater, heater controls, passenger seat heater and USB charger with plug from phone or iPod into the hidden stereo. Pulled all buttons off and covered with black vinyl from JoAnn Fabric.
    31517 015.jpg

  7. #7
    bobl's Avatar
    Join Date
    Aug 2014
    Location
    Spicewood, Texas
    Posts
    503
    Post Thanks / Like
    Here's what I did. I have air conditioning so I needed a place for vents. I just cut it from aluminum and covered in vinyl. Then I made under dash panels that curved down to cover the sides. About 8 screws and it all comes out.
    Attached Images Attached Images

  8. #8
    RR20AC's Avatar
    Join Date
    Jul 2015
    Location
    Puyallup/WA
    Posts
    394
    Post Thanks / Like
    Blog Entries
    1
    Built something simple to hold a few controls and power supplies
    Attached Images Attached Images
    20th Anniversary MK4 Roadster, #8752, 18 of 20, Delivered 12/03/15, 1st Start 01/28/2017, off to paint 4/13/2017, Forte 351w/ Holley EFI, Forte throttle linkage, TKO 600/Forte Hyd. Clutch, UniSteer Electra Steering, RT's turn Signals, many Breeze parts, Paint by the Jeff Miller. Finished on 10/08/2017. 500 mile inspection on 10/21/2017, 3000 mile inspection on 1/14/19.

  9. #9
    Member
    Join Date
    Feb 2017
    Location
    Peoria, Arizona
    Posts
    40
    Post Thanks / Like
    These are great, thanks everyone.

  10. #10
    Junior Member CRZN 427's Avatar
    Join Date
    Feb 2011
    Location
    Morro Bay, CA
    Posts
    22
    Post Thanks / Like
    I made a lower part from resin coated cardboard, with one layer of matt on the outer surface for additional strength. It was fairly easy to make the shape that I needed to facilitate both my radio and A/C controls. The covering is Flocking.

    Regards, Rick.


Posting Permissions

  • You may not post new threads
  • You may not post replies
  • You may not post attachments
  • You may not edit your posts
  •  

Stewart Transport

Visit our community sponsor