
Visit our community sponsor

Thanks:
0

Likes:
1
-
07-30-2017, 08:12 AM
#241

Originally Posted by
Jeff Kleiner

Once again, what Professor Mr. The Bat said. Cut & buff is wet and sloppy (I'll stop there and not make any comments like "same way Miller likes his wimmin")---drag it outside to the driveway if you can.
Jeff
HEY ! WHAT HAPPENS IN LONDON STAYS IN LONDON ! You wanna take it out in the driveway? Oh! it's on. Gravel Angels ,,, face down,,,naked ,High Noon !!!! (this is gonna hurt).
Once you sand the defect a little Dukes idea works....I like using a tooth pick.
-
07-30-2017, 11:22 AM
#242
Not a waxer

Originally Posted by
srobinsonx2
...As you can see, It did not turn out perfect...
Dude, they never are. There's ALWAYS something. You fix it or work it out as best you can---thing is when you get as up close and personal as we do with the bodywork, paint, cut & buff you know where all the bodies are buried but 99% of the time nobody else will ever find 'em.
Once Miller stepped in I kind of stood back and paid attention as he guided you through. No way to ignore his advice and experience; on line and off I've learned a bunch from him over the years---even a thing or two during the course of this thread! As much he and I like to blow smoke up each others skirts (oops, was that another secret I wasn't supposed to tell?) I have nothing but respect for him and gratitude for the pearls of wisdom he's shared.
Again Shannon, GOOD JOB 
Batty my friend, kudos to ya' 
Jeff
-
07-30-2017, 07:38 PM
#243
Senior Member

Alright. Thanks for the reality check guys. I guess I was hoping for a little better results from my first paint job than what should reasonably be expected. So, I need to move on and resolve the issues. One problem at a time. It sounds like this is salvageable and I got some good feedback on the sweat spots, runs, and sags.
A couple of observations about painting before I move on. At least this is what I have learned:
1. Just about anything can be fixed. So don't get worked up. Just work the problem with the advice from the experts.
2. I found the base coat to be the easiest thing to apply.
3. Clear was the trickiest to apply. The ideal application is the slight difference between dry spray/orange peel and a run. The experts can get this right routinely.....an amateur can not. At least my clear was very sensitive to temperature. 85-90 did not work very well. 75 F worked much better.
4. If you sweat, find some way to keep that off the car while you paint. I don't have a solution but figure out something.
5. Bugs suck!!! And I mean ALL BUGS!! I hate 'em.
6. Without a paint suit, it takes some work to get clear coat out of your leg hair. I'm just saying.
7. Make a plan and stick with it. Your plan should include how to deal with issues (bugs, hose touching painted parts, sweat, etc). Don't try to make up your own solutions on the fly. Both times it didn't work out for me. Take advantage of what other have already learned the hard way.
8. Painting is a lot of work and I see why a good paint job cost so much. Good tools, experience, quality shop, and reliable help is not cheap or easy to get. If you aren't 100% committed to doing it, hire someone.
9. Whenever you think you are done sanding........YOUR NOT!!
10. Seeing a shiny new paint job is very rewarding. Very few people will know all the work it takes to get such a thing. But you will know and that is all that matters.
Enough of my thoughts. I have some issues to fix. They won't fix themselves. So, with renewed hope and energy, let's get this thing done. I have some clear coat that is curing and it is just begging for me to make it come alive. So I did some research. My plan is as follows:
1. Test this method on a panel that can be easily fixed. The passenger side door will be my first attempt
2. Wet Sand down any runs or sags with 600 grit on a paint stick. Take my time and just knock down the area of concern.
3. Wet sand the panel with 1000 grit on my rubber pad to remove the orange peel. Stop when the panel is dull and smooth. Use the same cross hatch pattern I used for blocking.
4. Wet sand with 1500 grit to remove the sanding scratches from before.
5. Wet sand again with 2000 grit to remove the 1500 scratches (this step is recommended by some and not by others. Some do this with a DA). I was going to do this by hand if I did it at all. I might skip this and see how buffing will take care of this.
6. Use a rotary buffer, wool pad and 3M Perfect-it #1 (rubbing compound) and remove the scratches. Don't stay in one spot too long, keep moving.
7. Use rotary buffer, foam pad and Perfect it #2 machine polish to remove swirl marks.
8. Use the rotary buffer, ultra fine polishing foam pad, and Perfect it #3 ultra fine polish to finish.
9. If the inside of the door turns out ok, then I will do the outside and move on to the next panel.
I know there will be some tricks/tips, so let them fly. Comment on my plan. I want to pick up some supplies early this week so I can start the process towards the end of the week. I plan to go full bore this next weekend. Game on!!!! The orange peel and runs are gone.
FFR MK4 Complete Kit #8952
Build Thread
Bodywork Thread
3 Link Rear Suspension, Gordon Levy 347 SBF with T5
First start Feb 20, 2017, First Go Kart March 5, 2017, Registered & Title April 25, 2017
-
07-31-2017, 09:35 AM
#244

Sooo, With all the 500-600 paper in my shop,,,when it comes to sanding out a run or sag I'll order a 5pack of 800. Rip a sheet in half, then half again and wrap it around a paint stick. When I buff, I try to buff no more then two square feet at a time. OK! so here it goes.....BUFFING ! so who's doing the work while buffing ? Is it you? the machine? the wool pad ? NO, NO, AND NO! Those three things are the delivery system for the "worker which is the "compound" . Max rpm for #1 cut is 1400 rpm. #2-#3 is 1000rpm. Your pressure should be little more then the weight of your buffer. You want it to travel over the surface at about 3-4in per second (pretty slow). You want to hold your pad at 8-10 degrees (almost flat) where possible. WATCH OUT FOR THE EDGES !!! Your spinning pad has leading edge and a trailing edge...whenever you are working near an edge on the body, hood,,,,etc , you want the trailing edge of the pad coming off the panel . If the leading edge comes "ON" to the panel your clear and paint will be cut to nothing (#1 killer in buffing). Don't try to buff without making a mess....leave that to a detailer....I MAKE A MESS! The compound needs to be wet to a degree. Dry buffing does two things...scratches the surface and takes forever. Buffing "wet" runs the risk of "pad clogging" it just cakes up and does next to nothing. Buy a "pad spur" for cleaning your pad....DO NOT USE A DAMN FORK ! it kills the pad and I have seen the fork get caught and thrown across the shop. For a new guy I would say (to be on the safe side) Buff wet and spur your pad after each 6sq feet or panel "which ever comes first".....get a buffing apron (you are going to be wearing this stuff) Rule of thumb.....IF THERE IS NO DROPS OF COMPOUND ON THE CEILING YOU'RE BUFFING TOO DRY ! Just like sanding...to and fro....side to side. It will take at least 4 passes (if not more) to get the scratches out. When you look and the polished surface...if you see linear scratches you need to keep going...if you see arched or round scratches those are from the buffer....little tip "you can't buff out buffer scratches by continuing to buff"....by the time you get done with the compound , the foam will be a breeze. Do me a favor....if you have watched a You Tube of buffing...let me know so I can take a look. When it comes to "how too's" on Y-tube I have seen some really wrong info being past on. cheers ,,,da Bat
-
07-31-2017, 10:56 AM
#245
Senior Member

One of these days we'll have to teach da Bat how to use paragraphs 
- He's spot on. First time out, stay away from wool. You'll burn through.
- Heat will cause you to melt and roll the paint off. Watch your speed, don't buff without material on the pad, period. It will cause too much heat.
- Easy on the 1000. Those scratches are pretty deep. I like to start with 1500.
- 2000 helps make the polishing to quicker. It's just a quick pass that's needed.
- Watch your edges in relationship to the pad rotation. Never come 'into' an edge, only 'off' the edge.
-
07-31-2017, 11:16 AM
#246
Senior Member
Thanks guys. I found this on the other forum. Was helpful for me regarding the process.
http://www.ffcars.com/forums/17-fact.../291115?page=1
Jeff, Here is a link to the video I found on line. I don't plan on using a DA.
https://youtu.be/_i_rmKAUa1Y
It sounds like this is less physical effort than blocking and wet sanding primer? Does it go faster? I don't want to mess up the paint and clear. Repainting would suck. I will just take it slow.
FFR MK4 Complete Kit #8952
Build Thread
Bodywork Thread
3 Link Rear Suspension, Gordon Levy 347 SBF with T5
First start Feb 20, 2017, First Go Kart March 5, 2017, Registered & Title April 25, 2017
-
07-31-2017, 03:36 PM
#247
Originally Posted by
Duke
One of these days we'll have to teach da Bat how to use paragraphs
- He's spot on. First time out, stay away from wool. You'll burn through.
- Heat will cause you to melt and roll the paint off. Watch your speed, don't buff without material on the pad, period. It will cause too much heat.
- Easy on the 1000. Those scratches are pretty deep. I like to start with 1500.
- 2000 helps make the polishing to quicker. It's just a quick pass that's needed.
- Watch your edges in relationship to the pad rotation. Never come 'into' an edge, only 'off' the edge.
Well, Duke ; IT'S A "PAIR OF GIRAFFES" ....paragraphs....you crack me up !!! I can just see Noah trying to put a paragraphs on the ark of the covenant. (can't mess with me...I saw Indiana Jones....5 times !) Next you'll want to correct my gramma and punchafication. But I digress . At this time I am disinclined to aquiesse to your request....so there ! (that means "NO"!) Would have thought you would burn me on my run-on sentences and disembodied thought strands....ok, now I'm lost OPH ! and I never said don't start with wool....IT GIVES THE BEST CUT ! I just said "watch the edges". Swear to god Duke you are on my last nerve
 You're as bad as my sisters kid !
I use the 3000 but not the 5k. I do not like the compound that brakes down into a polish (it clogs the pad) It's great if you are doing one panel...or a little spot like the dude in the video...but we are doing a whole car. I WANT GRIT the whole time I'm compounding. So what we saw in the video was how to polish. Or did we ? the steps he takes are correct but it was a disguised infomercial for several products. He does a little spot,,,,takes a little time,,,,get down tonight,,,get down tonight....oops! song cross-over. I see this all the time at trade shows....it takes a lot of time to cut and polish. A lot of concentration. A lot of patience. It is the most physically demanding part of the whole project (for me). I need to do it over a period of 2 days to make the chedda, you can take your own sweet time (see if I care). It' going to take some trial and error to get a feel for it...well, that's all I can say because my f-ing paragraphitis has kicked in !!!! ...da Bat
Last edited by j.miller; 07-31-2017 at 03:38 PM.
-
07-31-2017, 06:57 PM
#248
Senior Member
Originally Posted by
j.miller
Well, Duke ; IT'S A "PAIR OF GIRAFFES" ....paragraphs....you crack me up !!! I can just see Noah trying to put a paragraphs on the ark of the covenant. (can't mess with me...I saw Indiana Jones....5 times !) Next you'll want to correct my gramma and punchafication. But I digress . At this time I am disinclined to aquiesse to your request....so there ! (that means "NO"!) Would have thought you would burn me on my run-on sentences and disembodied thought strands....ok, now I'm lost
OPH ! and I never said don't start with wool....IT GIVES THE BEST CUT ! I just said "watch the edges". Swear to god Duke you are on my last nerve
You're as bad as my sisters kid !
9sis8.jpg?a416640.jpeg
You know we love yea, low hanging fruit on a Monday.
-
07-31-2017, 08:32 PM
#249
Senior Member
Cut test - 1st attempt
This thread has become very entertaining. You guys are hilarious. I am not sure where Jeff M. comes up with this stuff but it is gold....pure gold. Keep it coming. Our goal here is to both inform and entertain.
Alright, I am going to be honest with you guys. I was a little overwhelmed and concerned with the clear once I saw all the issues. I got some good advice here and did some research. Last night I felt a little better that I could tackle some of the issues. I wouldn't be truly confident until I started some of this work. So........no need to delay.....LET'S DO THIS!!
Went to the supply store and spent some more money......ssshhhh. Don't tell my wife. Budget? What is a budget? Got some sanding paper and little applicators to fill in the infamous sweat spots. It is the left handed paper Jeff warned me not to buy anymore but that is all they have.

Got my buffing stuff as well. I got the 3M Perfect-It EX. The EX is for extreme. Supposedly it is what some of the locals use as it stays wetter longer in the hot Texas weather.

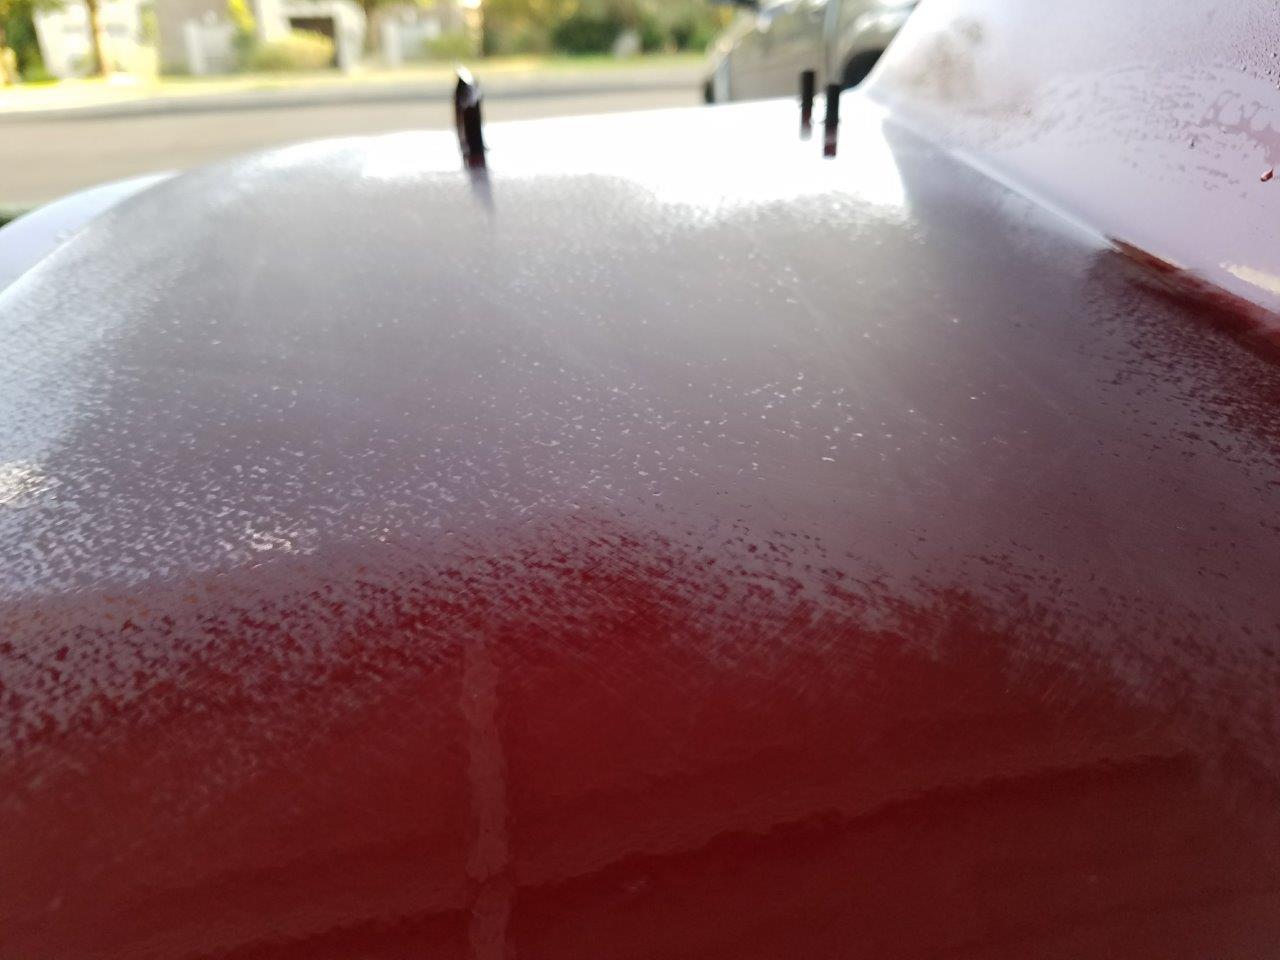
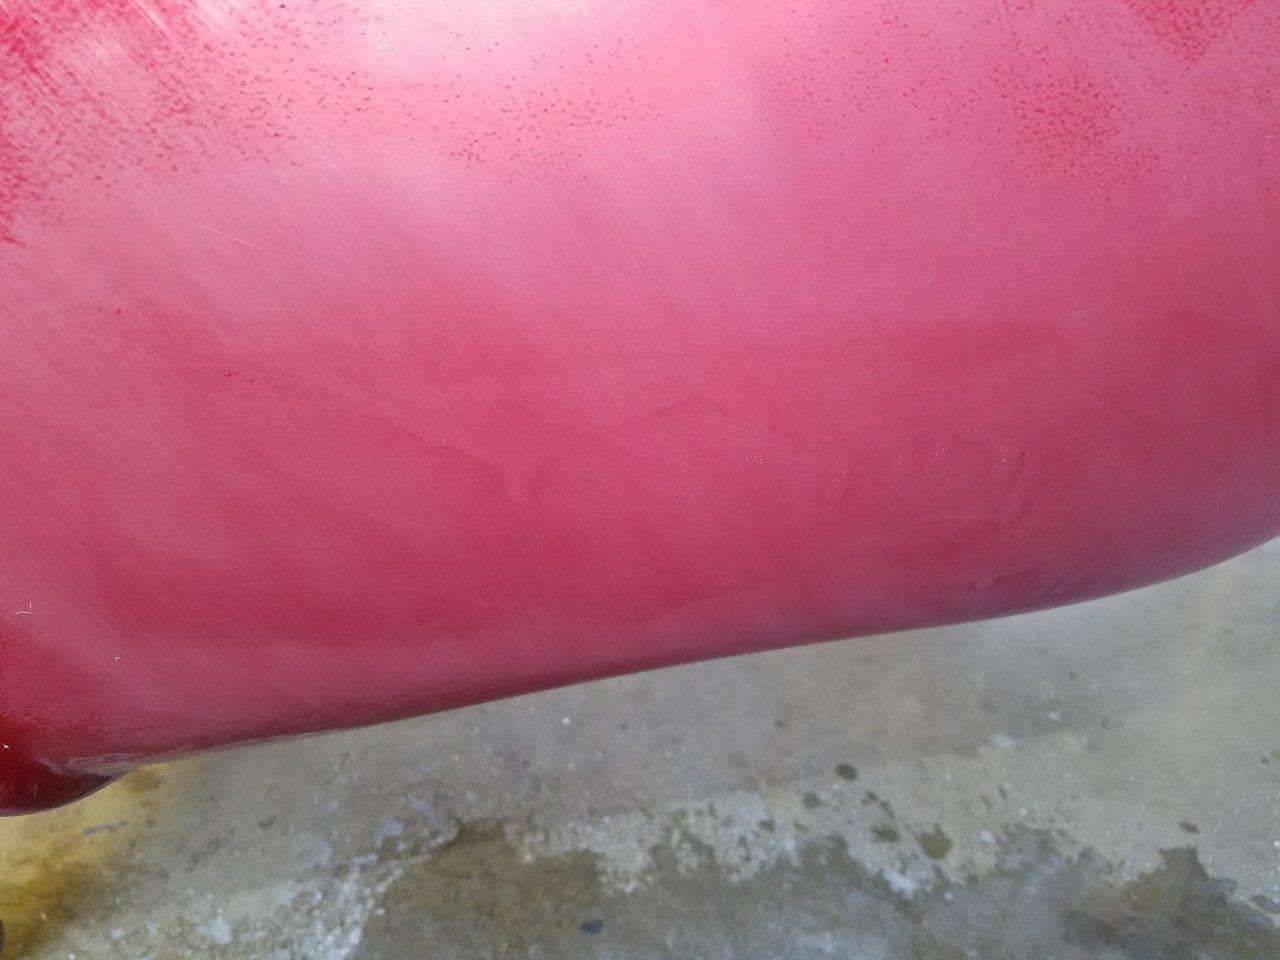
Got my passenger door out in the garage and all set up. The door was cleared last Wednesday so it should be good and cured. Here is a picture of a run and then a pic to show the level of orange peel I am dealing with.


Orange peel isn't bad and about typical for what I have elsewhere. I first attacked the run. I didn't have any 800 (forgot to pick that up from the store). So I took some 600 grit and a paint stick. Wrapped the 600 around the stick, made small strokes just on the run, until it was just about smooth. Here is a shot just before I got it all the way down.

I started getting into the clear around it so I stopped.
Continued on the next post
FFR MK4 Complete Kit #8952
Build Thread
Bodywork Thread
3 Link Rear Suspension, Gordon Levy 347 SBF with T5
First start Feb 20, 2017, First Go Kart March 5, 2017, Registered & Title April 25, 2017
-
07-31-2017, 08:45 PM
#250
Senior Member
1st cut continued
I then jumped right into to sanding the bulk of this panel and would sand this run area down during that process to see how it came out. I had already put some 1000 and 1200 grit in some water to soak. I did a little test to see which would work better. In the picture below the left half of the sanding was done with 1000 and the right was 1200. I couldn't tell much difference in either scratches or speed of peel removal.
For reference, this was about 20 full strokes (back and forth) of each. I decided the 1200 would work so finished up with that. This next picture is about 40 strokes and wasn't quite complete. I still had a few low spots. It seemed to take about 45-50 to remove all the orange peel and this door panel would consume 1/3 of a half sheet of paper.

I then used 1500 in the same manner. Here is a shot of the 1500 on top of the 1200. The area on the left was done with 1500 and you can see a fine difference. It is much easier to see in person.

Carried on with 2000 after that. You can see in the next picture the difference between 2000 and 1500. 2000 is on the left.

Again each subsequent pass took about 45-50 strokes to remove the scratches from the higher grit. I took this final picture after 2000. This is also a good place to see that the runs has been completely removed.

How am I doing so far? Am I on the right track? Let me know what you think.
I and not sure how I am going to get those small areas with that big 7" buffer I have. I might have to find something smaller for the tight little areas. I also am waiting for my pad spur to get here. Amazon says Wednesday. So have tomorrow to fix any issues you guys point out.
FFR MK4 Complete Kit #8952
Build Thread
Bodywork Thread
3 Link Rear Suspension, Gordon Levy 347 SBF with T5
First start Feb 20, 2017, First Go Kart March 5, 2017, Registered & Title April 25, 2017
-
07-31-2017, 09:25 PM
#251
Senior Member
Looking good. Two suggestions:
1. Stay out of the hard to reach areas. Don't bother sanding them unless you have the tools to reach it. It won't be noticeable.
2. Before you sand anymore polish the inside of the door out and see how you like it. Learn on it before you get into the main body areas.
Your call on how many times you want to swap paper grids. Just be careful to not burn through sanding. I'm assuming you have 3 or 4 coats of clear on (e.g. a little extra for the first time). Personally, I usually do 1500, 2000, 3000, but everyone's different in what they like.
-
07-31-2017, 09:38 PM
#252
Senior Member

DA Bat has a problem? Who'da thunk that was even poscible. he'sa gonna be a star...wait he already is. I wanna know if he's advertising the use of a DA in his name? No worries mate, we come from the same mother and different fathers, or, was it the other way around. I forget a lot these days. Gonna start a new paragraph.
Mr. Robinsonxtacy, you are doing just fine. Not too many would take the time and guidance, even if it's confusing, to take on the task at hand. A lot is trial and error but you have surpassed more than some would admit. Once you start the polishing aspect and get the hang of it, you will be rewarded of all the work you've do e. Just don't rush that part just like you've done so far.
I use a small 3" orbital for the areas that are tight. You may have to use some strong elbow grease as well I you can still find it. Maybe eBay has some.
-
07-31-2017, 10:32 PM
#253
-
08-01-2017, 02:31 PM
#254
I'm gonna be on the road for about 12 days. I'll try to check in. Call if you need to (I'll be a little north of you in Benton). Do me a favor....DON'T LET THESE GUYS BESMIRCH MY GOOD NAME WHILE I'M GONE....I can do that on my own when I get back...Cheers...da Bat
-
08-01-2017, 03:35 PM
#255
Senior Member
I'll do my best Jeff but I have seen how these guys are. They don't cut anyone much slack. It seems to me that you must have used up what ever slack you had, a long time ago.
Have fun in Benton. I assume you mean Arkansas just south of Little rock. I lived in south Arkansas for a few years. You are a long way from the left coast.....be careful in razorback country.
I will post some buffing pics tonight. I have some smaller pads (3") coming so I can get the tight areas. Just won't sand those areas in the future. That just means less I have to sand and buff so no complaints from me. I will try not to bother you on your trip (but if I get completely wrapped around the axle I might give you a ring). I bet these guys can keep me between the ditches while your gone. As long as they focus on the problem at hand and not on less than PG rated back alley stories that make us question the personal judgment of all involved.
Thanks everyone. This group does feel more like friends than strangers on the internet. Maybe someday I can meet some of you and thank you personally for the help.
Shannon
Last edited by srobinsonx2; 08-01-2017 at 03:44 PM.
FFR MK4 Complete Kit #8952
Build Thread
Bodywork Thread
3 Link Rear Suspension, Gordon Levy 347 SBF with T5
First start Feb 20, 2017, First Go Kart March 5, 2017, Registered & Title April 25, 2017
-
08-01-2017, 06:48 PM
#256
Senior Member
Buff test
Did my first buff test. I am impressed with how shiny the clear can get after making it so dull with the sand paper. Here is a shot of my tools

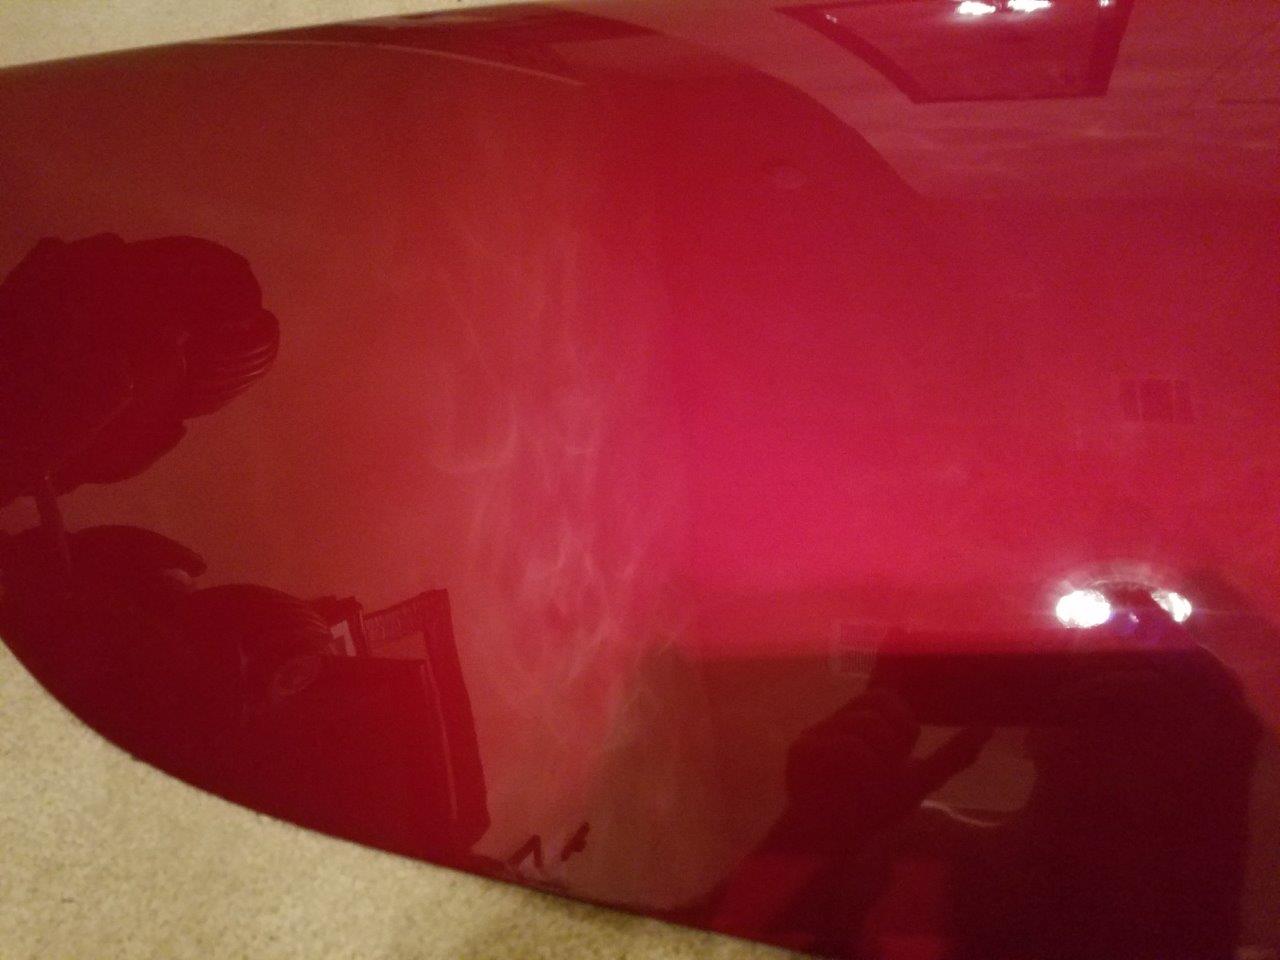
I currently have a wool pad and a black pad to match the first two steps in the 3M Perfect-It EX system. I started with the wool pad and #1 of the 3M system. I put a little compound on the panel (quarter sized maybe), sprayed a little water on the pad (just so it wouldn't start off dry in some spots), used the pad to spread the compound around, and then started the buffing. I began at 1000 rpms to start and buffed for about 15-20 seconds. I cleaned the panel with water and a microfiber towel to check. Jeff told me not to do this but since this was my first test I didn't want to go too far. I won't do this check once I dial in my buffing technique and time. That first 15 seconds took out about 95% of the sanding scratches. I put down some more compound and used the same process but only went about 10 seconds. All sanding scratches were gone and only circular swirl marks were visible. They were really small but noticeable. With the panel clean, I then switched to the black foam pad, applied some #2 polishing compound, wet the pad with my spray bottle of water, spread the compound around with the pad, and buffed for another 15-20 seconds. Stopped, cleaned, inspected and about 95% good. Repeated for about 10 seconds and all the swirl marks were gone. Here is my initial first look

Not bad so I took a picture where there was a reflection. Sorry but that included my ugly mug.

I also got a flash light and took a picture about 3-4 inches from the panel. If you look close you can see some very slight swirl marks.

Nothing bad and I could probably live with it but I want to do this right. I will pick up a blue pad and the #3 ultra fine polish tomorrow and give that area one final pass. That should get it all. I also sanded a small area by hand. I used a small piece of an old T shirt. It worked ok but I can tell you this, I don't want to hand buff very much. I can handle a few small areas but nothing more.
I didn't take a picture of it but the wool pad put out a lot of lint. It made a mess when combined with the compound. I am going to try a foam pad made to mimic the wool. I hear it will heat up faster so I will have to be careful.
Thoughts and critique is welcome
FFR MK4 Complete Kit #8952
Build Thread
Bodywork Thread
3 Link Rear Suspension, Gordon Levy 347 SBF with T5
First start Feb 20, 2017, First Go Kart March 5, 2017, Registered & Title April 25, 2017
-
08-02-2017, 08:38 AM
#257
I've really enjoyed reading and following this thread. Back in 2004 i did all the bodywork on my MK3 roadster up to color and clear. I chickened out and had a pro finish it for me. Your work looks outstanding, you should be very proud!
FFR8551 289 FIA build in progress.
-
08-02-2017, 12:56 PM
#258
Senior Member
Originally Posted by
Bguetter
I've really enjoyed reading and following this thread. Back in 2004 i did all the bodywork on my MK3 roadster up to color and clear. I chickened out and had a pro finish it for me. Your work looks outstanding, you should be very proud!
Bguetter,
Thanks for the kind words. It is a lot of nerve racking work but not unboable. Thanks for forging the way and giving guys like me a good foundation of knowledge to build on. Our success is based on yours.
Shannon
Last edited by srobinsonx2; 08-02-2017 at 02:44 PM.
FFR MK4 Complete Kit #8952
Build Thread
Bodywork Thread
3 Link Rear Suspension, Gordon Levy 347 SBF with T5
First start Feb 20, 2017, First Go Kart March 5, 2017, Registered & Title April 25, 2017
-
08-02-2017, 02:16 PM
#259
Senior Member
Looking good. Not sure if you are using the buffer screw in handle or not, but it helps with arm fatigue. It doesn't look like it's screwed in sitting on the bench, but it could just be on the left side.
Overall, polishing looks great. Keep up the good work.
-
08-02-2017, 02:23 PM
#260
Senior Member
I tend to use the foam pads because I feel I have better control when buffing. I tried wool and didn't like the "grip". Just a personal preference, plus you won't have any lint flying around. Remember, it can always be fixed.
-
08-02-2017, 09:23 PM
#261
Senior Member
Thanks weekdoggy and Duke.
Duke, I am using a handle. It does help a lot.
weendoggy,
I don't have a foam pad to handle the first stage of the buffing compound and have only used the wool pad. I guess I don't know any better and the wool works ok.
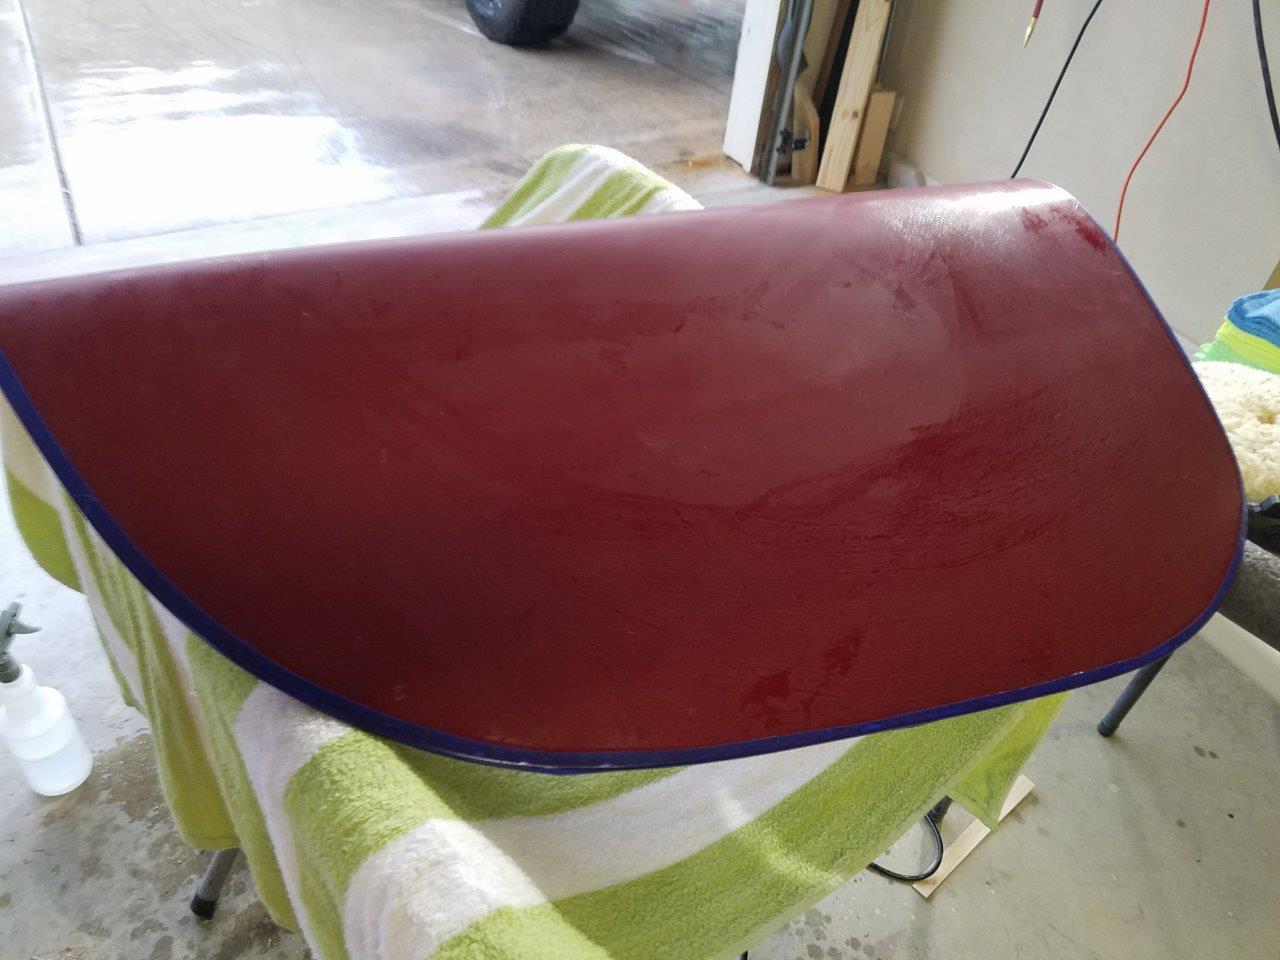
I got the passenger door completed this evening. It has taken me a long time because I am stopping, cleaning, inspecting, and just generally going real slow. This is my test to see how buffing is going to work. Here is the final product. Sorry, it is an indoor picture and doesn't show much. Not even sure why I am posting this. I guess just so I can officially say it is buffed.
I tried something on the front of the panel to help me protect against burning an edge. I ran fine line tape along the edge prior to sanding. I then wet sanded with 1000 grit followed by 1500 grit. I then removed the tape and buffed. My thought was without sanding scratches right at the edge I wouldn't have to spend alot of buffing time and effort right at the edge. It worked ok but I am not sure I really need to do this. Here is the sanding set up.
I think I understand now what people mean by the leading vs trailing edge of the buffer. At least here is what I think it means and how I am buffing the edges. Here is a pic of my buffer.

If you can imagine the buffer as a face on a clock, the removable handle on the left is at 9 oclock, the body of the buffer is at 6 oclock and so on. Now, the buffer rotates clockwise. So, I always orient the buffer so that the edge I am working is on the right hand side or at the 3 oclock position. I then slightly angle the buffer so that the 10-12 o clock position is firmly on the panel and the 4-6 oclock position is just lightly touching the panel. I then move the buffer to the edge of the panel and don't allow the pad to get off the panel past the 2-5 oclock locations. This ensures that the portion of the pad most in contact with the edge is always moving "off" the panel. And the pad is coming back on the panel as close to parallel as possible. I also move the buffer quicker when I get to the edge and ensure it doesn't stay on the edge very long. This has seemed to work and I had no issues on the door. Hopefully that makes sense. Chime in and let me know if I got this wrong and am in danger of messing something up.
I also picked up a ultra fine pad (light blue) and the #3 compound of the 3M Perfect-IT EX kit. I was able to get all the swirl marks out completely on the passenger door. It looks really good and I am happy.
I am estimating an hour or two to complete the driver side door. This means I might be able to knock out the deck lid and scoop Friday after work. I will then start working on the hood, and main body over the weekend. I don't think I will finish this weekend and will probably have to finish up next week. I have some runs to fix on the body and might try some new techniques. Some of the runs/sags are large. I found a different technique to address runs that uses glazing putty to surround the run,provides a good visual when the run is gone, and also protects the surrounding clear. I will document that process well and share my results.
I will keep plugging along. I am building confidence and skills with this groups help.
Send good buffing vibes my way.
Shannon
FFR MK4 Complete Kit #8952
Build Thread
Bodywork Thread
3 Link Rear Suspension, Gordon Levy 347 SBF with T5
First start Feb 20, 2017, First Go Kart March 5, 2017, Registered & Title April 25, 2017
-
08-03-2017, 05:51 AM
#262
Not a waxer
Sounds like you have it RE: "moving off the edges"... It's OK for the pad edge to be in contact as it is rotating away from/off the panel edge but it is not OK for it to be in contact as it is rotating back to the edge (remember what Miller said about tipping the buffer a few degrees---you will have it held such that the incoming edge of the pad is not in contact with the panel). Let me know if you're unsure and I'll try to play substitute teacher in da bat's absence.
Door looks good!
Jeff
-
08-03-2017, 08:19 AM
#263
Senior Member
Thanks for the confirmation JeffK. By all means please jump in and provide input. I recommend doing so even when Miller is on line. I respect your opinion and will always take advice. Plus your posts have a good chance of getting Miller stirred up and that adds to the entertainment value of this thread. I enjoy the good natured ribbing about as much as the "leranin".
I am going to attempt a run/sag removal this afternoon and am going to try the glazing putty technique. Have you ever tried that? If so, any advice?
FFR MK4 Complete Kit #8952
Build Thread
Bodywork Thread
3 Link Rear Suspension, Gordon Levy 347 SBF with T5
First start Feb 20, 2017, First Go Kart March 5, 2017, Registered & Title April 25, 2017
-
08-03-2017, 09:00 PM
#264
Senior Member
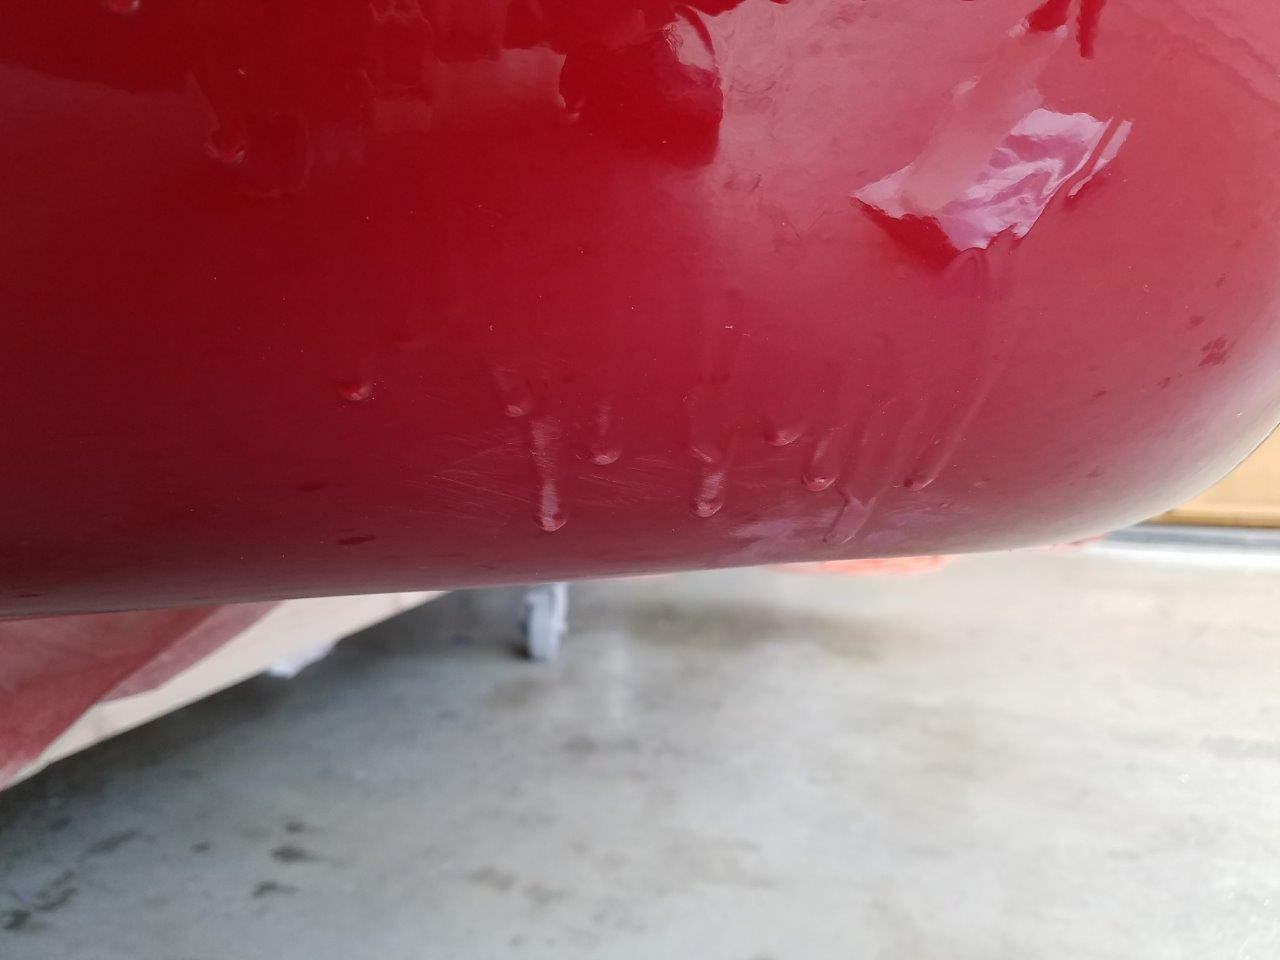
Trouble
Well I screwed up this evening. I was wet sanding the driver's side door today with 1000 grit. Everything was going great. My mind wondered, muscle memory took over, I guess I started going back to blocking, I sanding right on the edge of the door, and burn through. CRAP!!! I just about came unglued. My mind wondered for one minute and I now have a problem

Look right at the edge where the door rolls over. I know the right thing to do. Tape off the back, hit everything untaped with at least 1000 grit, spot in some color, and reclear. I am just hoping someone has an easier fix. Any ideas?
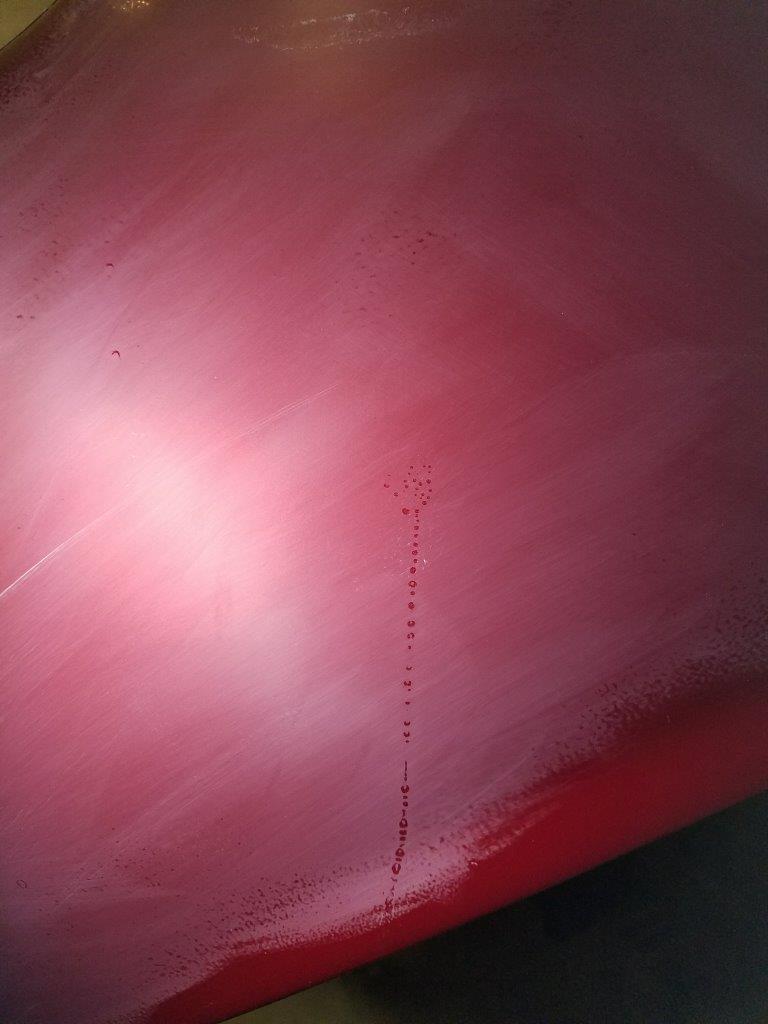
So, I stopped working on the door after that fiasco, and thought I would try my hand at removing a major run/sag. I have two of these. This is the worst. So, I am going to show everyone how bad a painter I am. My theory when spraying clear was, I could fix a run easier than a real thin layer of clear with alot of oragne peel. So, in true amateur fashion, I err'd on the side of more is better. The result is the following:
I know. It is pretty bad. So, I saw a method for removing runs which involves glazing putty. I thought I would give it a try. The idea is to cover the area with glazing putty and use it kind of as a protectant to sort of block out the area. Here is the glazing putty applied.

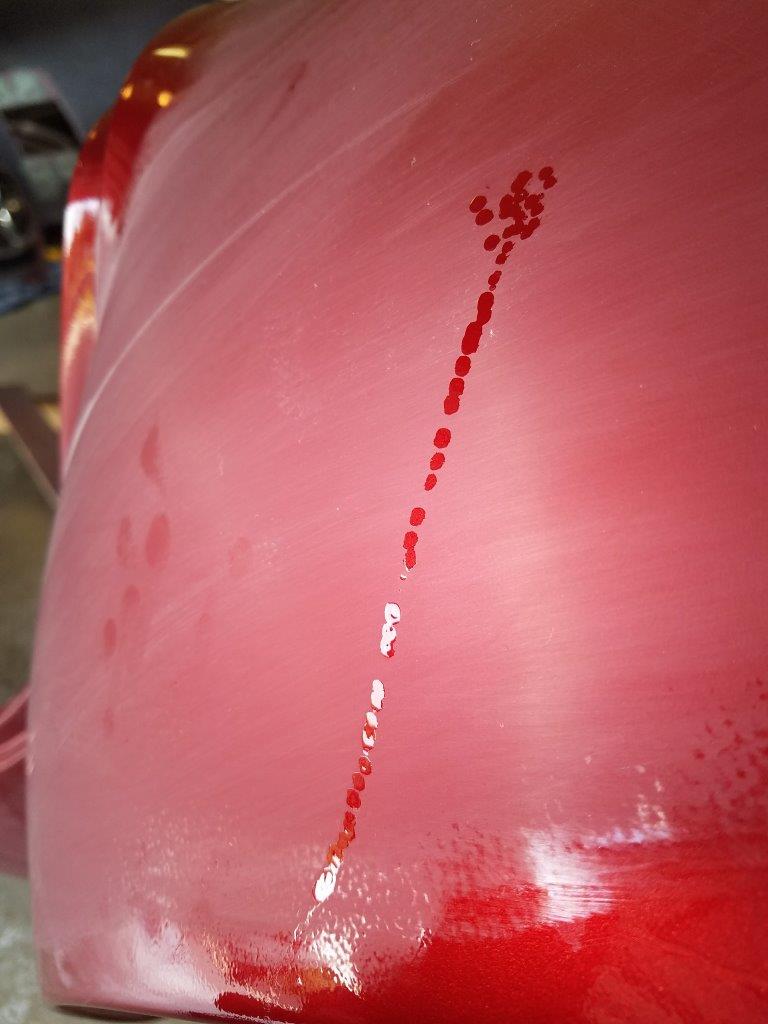
I started with 600 grit and wet sanded the area. I stopped after knocking down the high areas and switched to 1000 grit. I probably should have stayed with the 600 grit a little longer but was afraid I might get too aggressive and took the conservative route. It took a while. About an hour and 2 full sheets of 1000 grit to get this completed. Here is shot mid way through and you can see how the high spots of the run are showing through and are getting sanded down with the surrounding putty.

It worked pretty good, just took a long time. Here is final result. You can kind of see where the sag/run was but I think one more pass at 100 grit and then 1500 should get is smooth and good enough to buff.
This technique was ok and is probably best used for long runs or sags. The 600 on a paint stick is better for localized runs.
Give me some feedback on the burn through. Like I said, I am hoping for a short cut, but I know the right answer. Short cuts are just that, short cuts around doing things right.
Thanks
Shannon.
FFR MK4 Complete Kit #8952
Build Thread
Bodywork Thread
3 Link Rear Suspension, Gordon Levy 347 SBF with T5
First start Feb 20, 2017, First Go Kart March 5, 2017, Registered & Title April 25, 2017
-
08-03-2017, 09:19 PM
#265
That is a good idea w the glazing putty, almost like a guide coat.
I don't have feed back, I've been following and picking up tips from the Jeff's. I do have a question. I am about to primer so I am thinking ahead some. Da bat talked about soft and hard clear coat. Can we get some pros and cons on both those types of clear coats? Looking for climate condition, road wear, stuff like that. Sorry to thread jack, but thought it might help some people picking out paint and coatings.
-
08-03-2017, 09:22 PM
#266
Ps... I see the shine on the head, in the picture... Gnarly
-
08-03-2017, 09:32 PM
#267
Senior Member
Originally Posted by
awd-turbo
That is a good idea w the glazing putty, almost like a guide coat.
I don't have feed back, I've been following and picking up tips from the Jeff's. I do have a question. I am about to primer so I am thinking ahead some. Da bat talked about soft and hard clear coat. Can we get some pros and cons on both those types of clear coats? Looking for climate condition, road wear, stuff like that. Sorry to thread jack, but thought it might help some people picking out paint and coatings.
awd-turbo,
I am no expert but from what I have gathered from Miller is that the clear I used (PPG Shopline JC6700) is similar is hardness to House of Color Clear. I think he is indicating that it is a little softer. I think this because he said I should be able to cut with 1000 then 1500 and go on to buffing. He said harder clears will need 2000 grit before buffing. I tried buffing right after 1500 and it worked fine. I did a test with 1000, 1500, 2000, then buff and it appears the buffing took the same amount of time to buff out both.
Miller is out for a couple of weeks so we might not hear from him right away. I bet Jeff K, weendoggy, or Duke can provide more info than I can. I really only know what my clear is like and what I have learned here.
Thanks for following along and I hope you can learn from my mistakes. I have made plenty so you should have plenty of opportunities.
Later
Shannon
FFR MK4 Complete Kit #8952
Build Thread
Bodywork Thread
3 Link Rear Suspension, Gordon Levy 347 SBF with T5
First start Feb 20, 2017, First Go Kart March 5, 2017, Registered & Title April 25, 2017
-
08-04-2017, 05:39 PM
#268
Just a passin through....Never tried the glaze trick..guess it's ok. Now, for your edge sand through. Get a pinstripe brush and dip it in your base coat, run it over a slick magazine cover a couple of time to load the brush then take the brush to the edge of the door and transfer the paint on the brush to the bald spot....on the door ! If it covers the gray, mix up a little clear with no reducer, mix 50/50 base and clear....yes, color and clear with hardner (in a little container) (bottom of a dixei cup turned upside down works good) and do the same with the brush one more time. That should take care of the edge.....If you screw up putting the base on....wipe it off and try again...in fact, go pinstripe your trash can till you get the hang of it....it's called a "brush touch " good luck. talk to ya in a few days from Dallas...da Bat
-
08-04-2017, 06:21 PM
#269
Senior Member
Dang Miller. You just made my day. I had psyched myself up for a spot paint and full clear. I would say I love you, but that might be a bit much in front of this crowd. Thanks man. YOU ROCK!!!!
MAN!!! I am just so relieved. Burning through that edge had me worked up.
I am headed to Dallas this weekend to see the grandkid. If you get I trouble holler at me. I will come bail you out.
Last edited by srobinsonx2; 08-04-2017 at 06:24 PM.
FFR MK4 Complete Kit #8952
Build Thread
Bodywork Thread
3 Link Rear Suspension, Gordon Levy 347 SBF with T5
First start Feb 20, 2017, First Go Kart March 5, 2017, Registered & Title April 25, 2017
-
08-04-2017, 07:50 PM
#270

Moderator

so close!
It's not going to be long until it's all done and twinkling in the sunshine
(How's my GoDadGo impression? *wink*)
James
FFR33 #997 (Gen1 chassis, Gen2 body), license plate DRIVE IT says it all!
build thread
My build: 350SBC, TKO600, hardtop, no fenders/hood, 32 grill, 3 link, sway bars, 355/30r19
Previous cars: GTD40, Cobra, tubeframe 55 Chevy, 66 Nova, 56 F100
-
08-04-2017, 09:21 PM
#271
Originally Posted by
srobinsonx2
Dang Miller. You just made my day. I had psyched myself up for a spot paint and full clear. I would say I love you, but that might be a bit much in front of this crowd. Thanks man. YOU ROCK!!!!
MAN!!! I am just so relieved. Burning through that edge had me worked up.
I am headed to Dallas this weekend to see the grandkid. If you get I trouble holler at me. I will come bail you out.
See ! The way it works is....I give you a call and we end up needing to be bailed out together. I never go to jail alone.....I HATE BANJO MUSIC !
-
08-04-2017, 09:30 PM
#272
Senior Member
Week #15
RoadRacer,
Pretty good GoDadGo impression. I will have to swing by when I get done. I want to check out that 33 you are building. The only problem will be I don't think another project is in the budget right now. Once I see your hot rod, I know I will want one.
Update for all,
I am 15 weeks in and have logged 201 hours on bodywork. Won't get anything done this weekend. I am going out of town so will have to get back after it next week.
I have a plan to fix the burn through on the driver's side door. Thanks to Miller for the "short cut". I will post that process once my pin striping brushes come in. I found some on Amazon and they should be here Monday.
I got all the runs fixed on the main body. I tried three different approaches. The glazing putty technique (posted earlier), the Miller technique (800 on a paint stick), and a razor blade. I found a mix of the paint stick and razor blade worked the best. I would use 800 grit on a paint stick and focus sanding on just the run without getting into the surrounding clear. Once I knocked the run down a little, I would use a razor blade I bent a little to knock down the bulk of the run. I found that using the razor blade after the sand paper would allow the razor to bite. If I didn't the razor blade seemed to just slide over the clear without taking anything off. I would take the run down with the razor until is was almost smooth with the surrounding clear. I did this slowly and took my time.

If you want to see this technique in action, just check out youtube. There are few examples. It is curved to the edges don't dig into the surrounding area and it also helps focus on just the area you are working. I would then smooth everything down with the 800. Would finish the area around it with 1000 grit to smooth it down and remove any surrounding orange peel. It took a little time but was faster than the glazing putty. The putty technique would be good for long sags. The only problem was it ate up paper quickly.
So here is where I am. I have the passenger door completed (buffed and ready to go). The driver side door is sanded to 1000 grit but needs some touch up paint. The body is a little over half way done with 1000 grit. Here is a pic.

If you look you can see I stayed clear of the areas that would be hard to buff, wheel well lips, roll on cockpit, trunk and hood lips. I also have some sweat spots to fix. I sanded them as much as I dare. Afraid to sand too much and have some burn through. I am going to mix up a little clear and use toothpick to touch some clear in and fill the low spots. I will let that dry and then sand it smooth.
All this cut and buff so far has taken 12 hours. Each step seems to get easier. I hope to knock out the rest of the body, hood, and trunk during next week. Try to finish buff next weekend with a little luck. I am plugging along slowly but surely. I can see the light at the end of the tunnel. It is clouded with wet sanding muck but I can see the light.
FFR MK4 Complete Kit #8952
Build Thread
Bodywork Thread
3 Link Rear Suspension, Gordon Levy 347 SBF with T5
First start Feb 20, 2017, First Go Kart March 5, 2017, Registered & Title April 25, 2017
-
08-04-2017, 10:39 PM
#273
I love this thread. So much inspiration and knowledge.
Gonna be a bit bittersweet when the end credits roll.
Hope it has a good Marvel-esque trailer...like maybe you tease a 33 build for the next installment.
Kudos to you. Makes me less nervous for when I get to this point some time in the hopefully near future.
-
08-05-2017, 01:56 PM
#274
Steve-
I think it looks great, although I have to confess, I am not sure I like the white accents you have in the red in the picture above! HA
Just in case anyone misses my poor attempt at humor, the white stuff is the result of all the sanding that I am talking about. Yeah, weak sauce I know...
I have really enjoyed following along, seeing how you made it all work, as well as the feedback from the Jeffs! Those guys have helped a whole lot of people, and have really made this thread a great read on the body and paint process.
I look forward to seeing her all wrapped up!
Regards,
Steve
-
08-05-2017, 02:15 PM
#275
Senior Member
Looking good. Jeff is spot on about the burn through. Touch it up by hand and you are all set. Don't stress about it as you probably aren't yet done burning through (Sorry). It happens to everyone. When you apply the clear by hand, you can also put on an extra coat and sand down flush if need be. Just wait the typical flash times between recoat and dry times for sanding. Pin strip brushes work great, as do these things: http://www.eastwood.com/touch-up-app...SABEgIwgvD_BwE
Regarding clear and 'hardness'. I've sprayed various Dupont and PPG products. The PPG clears I have always found to be harder than the Duponts. The detailer who put on my clear bra pieces had a lot of car painting and touch up experience and told me about some new clear coat that's ceramic based. Haven't heard of it before or googled it yet, but apparently it's much harder than traditional clears. On my next car paint job I may research it a bit more and do a small spray out to see how it holds up to various abuse.
-
08-07-2017, 09:47 PM
#276
Senior Member
You are probably right Duke. I am sure I will have another burn through. I am going to wait and fix the current burn through at the end of this process.
Ceramic based clear huh? That sounds pretty high tech. If it is easier to spray then I am in.
Quick update. Nothing real exciting today. I was out of town all weekend and didn't make any progress until this evening. I spent about 2 1/2 hours sanding and buffing after work. I finished cutting the body with 1000 grit. I stayed out of the hard to buff areas. That means the valleys between the hood and fenders, hood lip, and wheel well edges. Here are a couple of pictures of the body. I don't think the unsanded areas will be a real problem. They aren't areas that show defects easily and there isn't much orange peel in these areas. Let me know what you guys think. I am just trying to minimize issues during buffing.


I also knocked out the deck lid. I sanded with 1000 grit, 1500 grit, and buffed with all three stages of the 3M process. I think it looks really good. Sorry for the indoor pic but you get an idea by the quality of the reflection.
I am getting better and more confident. The deck lid took about an hour just for reference. Tomorrow will be more exciting. I am going to try and touch up the sweat spots in the clear. That way they can dry and we can see how they look after being smoothed down.

FFR MK4 Complete Kit #8952
Build Thread
Bodywork Thread
3 Link Rear Suspension, Gordon Levy 347 SBF with T5
First start Feb 20, 2017, First Go Kart March 5, 2017, Registered & Title April 25, 2017
-
08-08-2017, 07:55 PM
#277
If I missed it I am sorry, but how much paint and clear coat did you end up using??? I picked up sealer yesterday, I am getting ready to start the big show.. I didn't want to come up short.
-
08-08-2017, 08:33 PM
#278
Senior Member
Originally Posted by
awd-turbo
If I missed it I am sorry, but how much paint and clear coat did you end up using??? I picked up sealer yesterday, I am getting ready to start the big show.. I didn't want to come up short.
No problem awd-turbo. I bought a gallon of sealer (JP335) and that was way too much. I tried to get a smaller amount based on the advice of Jeff Miller but they didn't have any in stock and I would have had to wait about a week. Didn't want to do that so bought the gallon. Could have gotten by with quart but would buy two just in case something goes wrong.
The base coat I bought was JBP and I bought a gallon of the main color and quart of the stripe color. Both were a 1:1 mix ratio and that was plenty. I probably have 1/3 of a gallon of the main color and a little less than half the stripe color.
I bought a gallon of clear (5 L to be exact) and the required catalyst. I have a little less than 1/2 left of both. The clear I bought (JC6700) didn't come in smaller amounts.
Hope this helps. Post some pics when you get done. Painting was nerve racking for me but fun to learn something new. Plus you can say you did it. Exciting times.
FFR MK4 Complete Kit #8952
Build Thread
Bodywork Thread
3 Link Rear Suspension, Gordon Levy 347 SBF with T5
First start Feb 20, 2017, First Go Kart March 5, 2017, Registered & Title April 25, 2017
-
08-08-2017, 08:55 PM
#279
Senior Member
Small fixes
No big items completed tonight. I did get the sweat spots filled and the burned edge fixed. I mixed up a small batch of clear and used special applicators to apply the clear. Here is a shot of the sweat spots filled in. I just dabbed a little in each spot. I will have to smooth these out once they dry. I will give them 24 hours.
Here is a pic of the applicators.

The applicators worked great. Super easy to apply a little and it easily filled the low spot.
I also used the pin striping brush touch up technique Miller suggested to fix the edge I burned through. Here is the brush with the small batch of color and clear.

I used a magazine like Miller suggested to get the right amount of paint on the brush. I applied a coat of color and made sure I had coverage. I had good coverage and then applied a mix of clear and color. Miller suggested this so I followed his sage advice. He didn't really say how to mix them so I just did 50/50. Applied one coat of the clear/color and it came out pretty good. Here is pic of the finished product. I will let it dry and then buff the door. I will get a pic of that when I am finished to show everyone.

Tomorrow I am going to cut and buff the hood and try my hand at smoothing out the sweat spot repairs. More updates to follow. I am taking off work Friday and will try to knock this thing out.
FFR MK4 Complete Kit #8952
Build Thread
Bodywork Thread
3 Link Rear Suspension, Gordon Levy 347 SBF with T5
First start Feb 20, 2017, First Go Kart March 5, 2017, Registered & Title April 25, 2017
-
08-08-2017, 09:21 PM
#280
srobinsonx2 I would first like to thank you for this excellent build thread and second, commend you on doing a GREAT JOB! Most folks get in a hurry and skimp on sanding between all the build coats of filler and primer and then regret it once they get to this stage of a paint job. I don't think you'll have too many regrets when it's all said and done. I've only painted 10 or 11 cars/trucks but I painted commercial jets for 13 years and for a year or so we were turning out a Boeing 757 every 7 days. That included stripping the old finish, prep and paint. When you pay someone to paint a car you're basically paying for all the time spent sanding/prepping. Painting is the easiest part! One trick I learned was if you accidentally double spray an area, and catch it just as it starts to form a run, you can take a piece if 2" masking tape about 8-10 inches long, and form it in a "u" shape and lightly blot the run before it starts to flowing. It will leave a rough orange peel and if you give it time to tack up you can lightly spray over it and flow out some of the orange peel. It is much better to sand out rough orange peel than cutting runs and sags with a blade. Keep up the excellent work!
 Posting Permissions
- You may not post new threads
- You may not post replies
- You may not post attachments
- You may not edit your posts
-
Forum Rules

Visit our community sponsor


 Reply With Quote
")