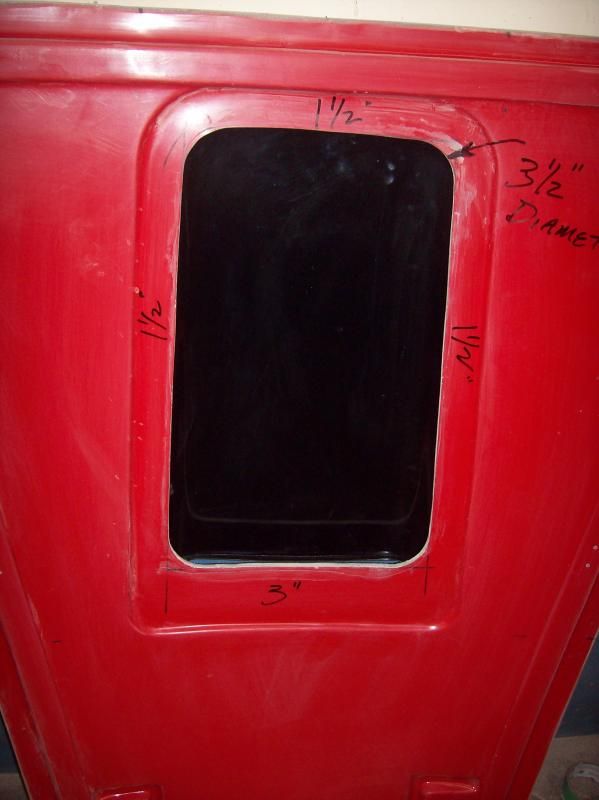
FormaCars

Visit our community sponsor

Thanks Thanks:  0
Likes Likes:  0
Results 1 to 10 of 10

Thread: Hood Scoop Hole

  1. #1
    Member
    Join Date
    Jun 2015
    Posts
    61
    Post Thanks / Like

    Cool Hood Scoop Hole

    hood hole2.jpg
    Hello all!

    I'm hoping I didn't screw up too bad as a new hood is kind of expensive!

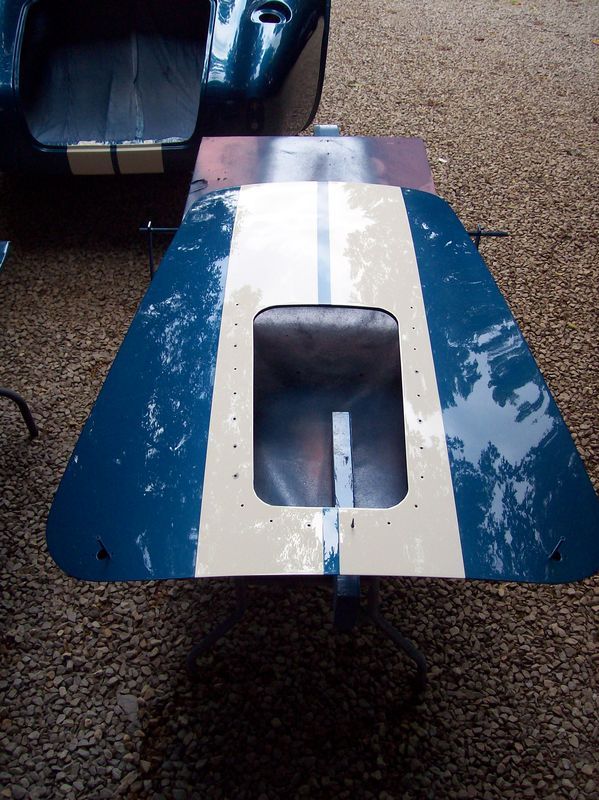
    I measured the 1.5" back and sides, 4" front, measured about 5 times, prayed, sacrificed some old VW parts, etc. then made my cuts. I filled in the side gaps with Bondo hair and am ready to mount the scoop. Like most people, 19" back from the front puts the scoop too far forward. I'll move it back and it will work just fine - it seems. My question?

    Did I mess up by squaring off the cuts? I know I didn't use a hole saw at the corners but will I have any problem without rounding the corners?

    Thanks for any insight.

    Bruce

  2. #2
    Not a waxer Jeff Kleiner's Avatar
    Join Date
    Feb 2011
    Location
    Bloomington, Indiana
    Posts
    8,087
    Post Thanks / Like
    Others have found that the square corners sometimes restrict the scoop &/or fastener placement. I do them a little differently; here's a reply I made to another builder just a few days ago who posted the same question after cutting his:

    Quote Originally Posted by Jeff Kleiner View Post
    You should be able to fudge the scoop and stripes a bit to compensate and kind of split the difference; like Jeff Miller said to me a long time ago regarding stripe placement---"trust your eyes more than the tape measure". So true with these cars since nothing is straight or symmetrical.

    This info is coming kinda' late for you now but maybe the following will help someone else who is following along. I do not use the manual's dimensions. Square cuts or too small of a corner radius can result in the issue you are dealing with. The hoods have a top and bottom layer which are bonded together then cut and I've found that center of the underside doesn't always match up with the center of the topside. For this reason I make the hole a little smaller and position it based on the indentation on the underside rather than a centerline on the top. This leaves enough room to allow for the minor adjustments on the top to center the scoop without the risk of the hole and scoop conflicting. . The photo below shows the dimensions I use when cutting them (Note that I use a 3 1/2" hole saw for the corners).


    This photo shows the fastener holes which should give you a pretty good indication of where the scoop's flange sits:


    And another with it in place:


    Because of the smaller hole you don't see it but the scoop is actually slightly offset in relation to the underside of the hood.
    Good luck,
    Jeff

  3. #3
    Senior Member
    Join Date
    Feb 2016
    Posts
    110
    Post Thanks / Like
    My only fear with square corners is it makes a good starting point for a crack. I am not that checked out in the fiberglass world but in my line of work (Stone, solid surface and laminate countertops) a square corner is almost a sure point for a crack to start. I hope i'm wrong in this case though.
    #8869 Delivered 5/11/2016 Traditional donor build using 1994 Mustang

  4. #4
    Well Used Member boat737's Avatar
    Join Date
    Feb 2016
    Location
    So. Bay (So. Calif.)
    Posts
    874
    Post Thanks / Like
    Quote Originally Posted by Jstanding View Post
    My only fear with square corners is it makes a good starting point for a crack. I am not that checked out in the fiberglass world but in my line of work (Stone, solid surface and laminate countertops) a square corner is almost a sure point for a crack to start. I hope i'm wrong in this case though.
    Same with aluminum. A good place for a stress point. Not sure about fiberglass.
    If Brute Force doesn't work, you're not using enough of it.
    Basic Stuff: MK4 Complete Kit #8439, Wilwood's, 17" Halibrands. Extra Stuff: Stainless brake and fuel lines, Breeze cooling, Battery mount, SS Roll Bar. Old Fart Stuff: Heater, Seat Heaters, Footbox Fresh Air, Stereo, Keyless ignition, Power Steering, Hyd Clutch.
    Young & Dumb Stuff: 427w Dart, TKO600, 3 link Moser M9/Ford 9", 3.5:1, Eaton TruTrac Posi. Graduation Thread

  5. #5
    Senior Member edwardb's Avatar
    Join Date
    Feb 2011
    Location
    Lake Orion, Michigan
    Posts
    10,576
    Post Thanks / Like
    A little late for the OP, but for others who may be reading this, I recommend mounting the scoop first. Then cut the hole in the hood using the mounting holes as a pattern. No downside to this approach (that I know of or anyone has told me!) and it will turn out perfect with less stress. Details in my build thread: http://thefactoryfiveforum.com/showt...l=1#post259468
    Last edited by edwardb; 05-08-2017 at 08:52 PM.
    Build 1: Mk3 Roadster #5125. Sold 11/08/2014. Build 2: Mk4 Roadster #7750. Sold 04/10/2017. Build Thread
    Build 3: Mk4 Roadster 20th Anniversary #8674. Sold 09/07/2020. Build Thread and Video. Build 4: Gen 3 Type 65 Coupe #59. Gen 3 Coyote. Legal 03/04/2020. Build Thread and Video
    Build 5: 35 Hot Rod Truck #138. LS3 and 4L65E auto. Rcvd 01/05/2021. Legal 04/20/2023. Build Thread. Sold 11/9/2023.

  6. #6
    Senior Member phileas_fogg's Avatar
    Join Date
    Jun 2015
    Location
    Fairfax Station VA
    Posts
    1,235
    Post Thanks / Like
    Quote Originally Posted by boat737 View Post
    Same with aluminum. A good place for a stress point. Not sure about fiberglass.
    Same with just about any material. That's the reason port holes are round, and airplane windows too.

    You're definitely going to want to round the corners.


    John
    Last edited by phileas_fogg; 05-09-2017 at 07:50 AM.
    MK IV Roadster #8631
    Ford 302, Holley Terminator EFI, T5z, 3.55 Rear End, IRS, 17” Halibrand Replicas (9” front, 10.5” rear), Nitto 555 G2’s (275/40ZR17 front, 315/35ZR17 rear), Fast Freddie’s Power Steering, F5 Wilwood Brakes, FFMetal’s Firewall Forward, Forte’s Hydraulic Clutch & Throttle Linkage
    https://www.ffcars.com/threads/phile.../#post-4776313

  7. #7
    Seasoned Citizen NAZ's Avatar
    Join Date
    Feb 2016
    Location
    "The High Country", beautiful Flagstaff, AZ
    Posts
    2,443
    Post Thanks / Like
    Just to echo what others have said, the square corners are setting this part up for failure. It may be too late for making large radius corners as shown in the photos above but even a smaller radius will help to mitigate the propensity to crack in this area.

  8. #8
    Out Drivin' Gumball's Avatar
    Join Date
    Feb 2011
    Location
    Blackberry Township, IL
    Posts
    2,653
    Post Thanks / Like
    Another tip for future builders - my late Mk3.1 still had the scoop molded into the outer fiberglass skin, so I cut it off and added a rivet-on one (actually acorn nuts and button head screws) for that S/C look. But, I didn't like the fact that the original hole in the inner skin was just as large as the scoop, allowing you to look in right at the distributor and thermostat housing. So, I filled in the front eight inches of the hole and so that the hole was more sized to and aligned with the turkey-pan I was running at the time. Even though I've since swapped out the turkey-pan for a larger old-school air cleaner, the smaller hole in the hood still suits my taste more.

    Pic of the underside of the hood with the patch panel that I grafted into place before any fiberglassing was done....


    Work in progress....


    Nearing completion.....


    Hole to carb alignment - look close and you can see the holes for the scoop screws showing the distance from the front of the scoop to the hole in the hood ....


    And the finished hood opened....

    Last edited by Gumball; 05-09-2017 at 09:10 AM.
    Later,
    Chris

    "There are no more monsters to fear, and so, we have to build our own."
    Mk3.1 #7074

  9. #9
    Well Used Member boat737's Avatar
    Join Date
    Feb 2016
    Location
    So. Bay (So. Calif.)
    Posts
    874
    Post Thanks / Like
    This looks like an excellent fix for the OP'er. I know nobody wants to do things more than once, but it seems everything I do on my build I do 2 or 3 times. Part of the process.

    Nice work Chris.
    If Brute Force doesn't work, you're not using enough of it.
    Basic Stuff: MK4 Complete Kit #8439, Wilwood's, 17" Halibrands. Extra Stuff: Stainless brake and fuel lines, Breeze cooling, Battery mount, SS Roll Bar. Old Fart Stuff: Heater, Seat Heaters, Footbox Fresh Air, Stereo, Keyless ignition, Power Steering, Hyd Clutch.
    Young & Dumb Stuff: 427w Dart, TKO600, 3 link Moser M9/Ford 9", 3.5:1, Eaton TruTrac Posi. Graduation Thread

  10. #10
    Member
    Join Date
    Jun 2015
    Posts
    61
    Post Thanks / Like
    Thank you everyone for your help. I'll round off the corners of the cuts to (hopefully) prevent any cracking.

    Bruce

Posting Permissions

  • You may not post new threads
  • You may not post replies
  • You may not post attachments
  • You may not edit your posts
  •  

Stewart Transport

Visit our community sponsor