BluePrint Engines

Visit our community sponsor

Thanks Thanks:  0
Likes Likes:  0
Results 1 to 18 of 18

Thread: Question for those that went the bare aluminum panel route.

  1. #1
    Senior Member Yama-Bro's Avatar
    Join Date
    Jul 2012
    Location
    Kearney Nebraska
    Posts
    847
    Post Thanks / Like

    Question for those that went the bare aluminum panel route.

    Hi Guys.

    I'm patiently waiting for my kit and thinking through some of the first steps. I want to do bare aluminum panels. I like the look and I want the car to have a vintage feel to it. My question for those that have done bare panels is; what did you do to the panels before mounting them: leave them as shipped, sand them, use a cleaner to wipe the markings off? If you could post a picture and mention what you did that would be great. I'm just trying to figure out what my plan of attack will be for the aluminum.

    Thanks!
    Started dreaming of a Cobra around 1987
    Purchased Complete Kit 6/9/2017, Delivered 9/4/2017, Rolling Chassis 3/30/2018, Engine Dyno'ed 3/4/2022, Engine installed 8/27/2022
    Click here for my build thread
    Serial #9158
    Design Engineer at BluePrint Engines

  2. #2
    Senior Member BEAR-AvHistory's Avatar
    Join Date
    May 2015
    Location
    Raleigh NC, OIB NC
    Posts
    1,599
    Post Thanks / Like
    A lot of my panels are sprayed with truck bed liner or covered with insulation the rest are bare. All the panels were cleaned to remove any markings, oils, metal chips etc after I drilled the required holes. Used Toluene, MEK or similar.
    Kevin
    MKIV #8234
    Coyote '14/TKO-600/3-Link 3:55 Rear
    I love the smell of 100 octane in the morning.
    NITTO NT01 275X40X17ZR - 315X35ZRX17
    Delivered 2/7/14 - Plate "COYOTE NC1965" 3/25/15

  3. #3
    Senior Member
    Join Date
    Jun 2015
    Location
    Ancaster, Ontario
    Posts
    244
    Post Thanks / Like
    I like the look of bare aluminum as well. For all panels I used acetone to remove the markings, mounted and drilled them, removed them and sanded them in one direction with 1000 grit, and finally applied Shark's Hide. The panels look very nice with this technique. Can't comment on durability just yet but have read that it is good.

    Sorry the photo upload failed.

    Cheers,

    Joe

  4. #4
    Straversi's Avatar
    Join Date
    Nov 2014
    Location
    Palos Verdes, CA
    Posts
    1,278
    Post Thanks / Like
    I hand sanded my panels with 220 grit and a sanding block. I used a guid board to get the scratches straight. Then clear coated. I used AlumaClear. Others use Sharkhyde with good results.

    I had planed leave them natural but found they had too many scratches ( mostly from my own mishandling).
    I tested several different methods on the bottom of trunk panels until I got what I liked. There are only a few panels that show. I drilled all of my panels before I sanded them.

    I just cleaned and sprayed the exposed panels that are not visible.

    Sorry, can't attach a photo to is reply for some reason. I have a few photos in my build thread. Steve's MKIV Coyote Build.
    -Steve
    Mk IV #8901 - Complete kit, Coyote, TKO-600, IRS. Ordered 5/23/16, Delivered 7/14/16, First Start 8/13/17, First Go-Kart 10/22/17, Registered and Completed 10/18/18. Build Thread: http://thefactoryfiveforum.com/showt...V-Coyote-Build Graduation Thread: https://thefactoryfiveforum.com/show...-Roadster-8901

  5. #5
    Senior Member
    Join Date
    Aug 2016
    Location
    Northern VA
    Posts
    653
    Post Thanks / Like
    Mine are bare (still assembling) and I just use brake cleaner to clean them before I mount them. I will probably go over them with acetone to get off anything I missed or that was stubborn.

  6. #6
    Senior Member
    Join Date
    Feb 2011
    Location
    Woodstock ,Illinois
    Posts
    751
    Post Thanks / Like
    I started with bare panels, but after 10 years of wiping down and cleaning with a bit of Mothers polish I now have polished panels! I hit them once or twice lightly a season, and they look great! All by hand.
    FFR 5136 Started as a donor...donor guages, engine, trans,etc. Now...TFS street intake,stage 1 cam, GT40p's,24# injectors and 80mm MAF,70mm TB,Z-spec t-5, and PSE Halibrand wrapped with Nitto 555 G2’s. My ever evolving dream car!!

  7. #7
    Banned
    Join Date
    Apr 2017
    Location
    Loveland, CO
    Posts
    318
    Post Thanks / Like
    If you want a brushed finish look, it takes several steps of sanding to remove a thin, darker layer at the surface. This is usually done with 120 grit. Watch the slightly darker color disappear after enough sanding. Switch to 220 grit before all of darker layer is removed. After the 220 grit, sand with 400 for awhile, then switch to maroon colored scotch brite for the final finish.

    If you do nothing to the factory finish you'll probably have some scratches from working with the metal and there is no way to remove them that won't look different than the rest of the panel. With the brushed finish, it can be touched up with scotch brite, or some 400 grit, then scotch brite.

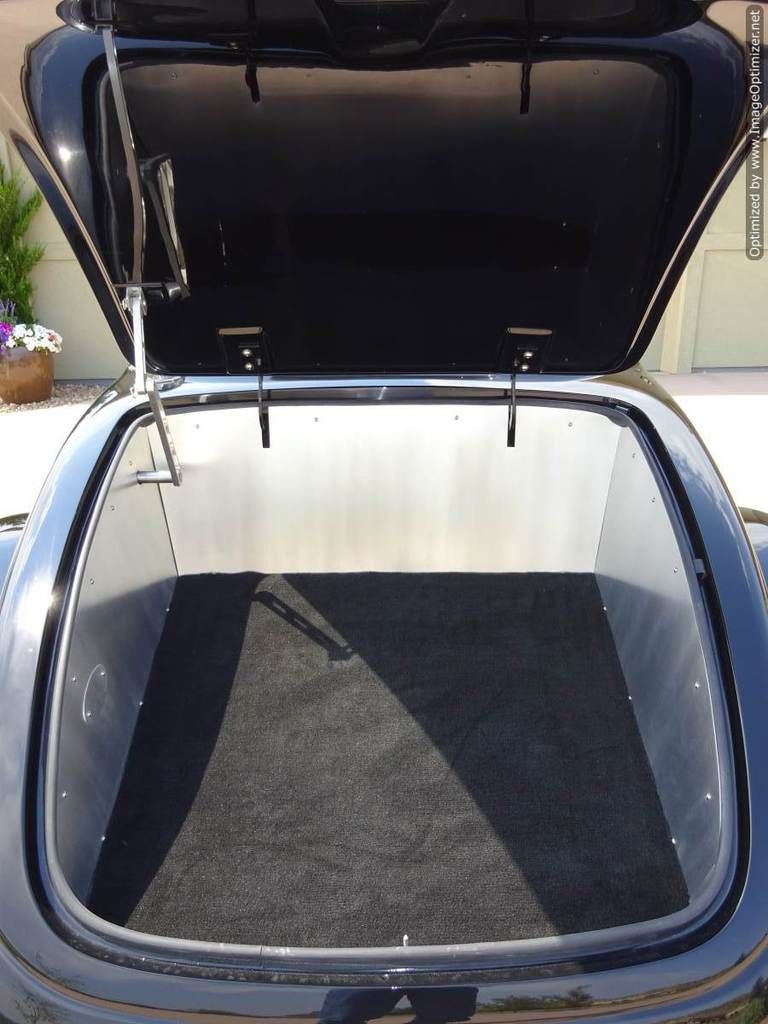
    All of the interior panels on the inside of my car and the trunk have this type of finish on the 3003 alloy aluminum.

    Last edited by DaveS53; 07-06-2017 at 02:53 PM.

  8. #8
    Senior Member MPTech's Avatar
    Join Date
    Feb 2011
    Location
    St. Louis, MO
    Posts
    1,182
    Post Thanks / Like
    Blog Entries
    8
    I only did the exposed panels in the engine bay. I used truck-bed liner on the inner fenders.
    I temporarily installed all of my panels with sheet-metal screws and drove in gel-coat 1 summer (highly recommend this).
    While the body was off being painted, I removed all of the panels and prepped them for finishing.
    I used lacquer thinner to remove all of the markings.
    Then i use a series off sanding discs on a random orbital sander to prepare the surface for final finish and coating.
    Starting with 200 and going to 800 grit. (you can buy boxes of 50 of the velcro-style on Amazon, relatively cheap and very easy to use!)
    After the surface imperfections were removed, I cleaned them again with lacquer thinner to remove all of the sanding dust.
    Then I carefully used green Scotch-brite pads in straight strokes, in one direction, for a machined finish. Do not go back&forth, it will give bad stroke marks.
    Then I applied 1 coat of Shark-hide. (I tried to apply a second coat, but couldn't get this to work without it attacking the first coat).
    On the panels that I coated the opposite side with truck bed liner, I carefully taped and masked the Shark-hide side after allowing 2 days to dry. Make sure to tape all drill holes and curt-outs, the spray-on truck-bed liner will over-spray them easily.
    I'm very happy with the results and have received compliments on the finish.
    Cleanup is VERY easy with a Quick-Detail spray and they look new again. (raw aluminum will kind of turn white/gray and dull over time, also scratch more easily).
    F5R #7446: MK4, 302, T5 midshift, 3.55 Posi IRS, 17" Halibrands
    Delivered 4/4/11, First start 9/29/12, Licensed 4/24/13, off to PAINT 2/15/14!! Wahoo!

  9. #9

    Moderator
    RoadRacer's Avatar
    Join Date
    Oct 2011
    Location
    Manor, TX
    Posts
    2,245
    Post Thanks / Like
    I'll just be wiping off the sharpie markings off and riveting to the car. No finish or sanding.
    James

    FFR33 #997 (Gen1 chassis, Gen2 body), license plate DRIVE IT says it all! build thread
    My build: 350SBC, TKO600, hardtop, no fenders/hood, 32 grill, 3 link, sway bars, 355/30r19
    Previous cars: GTD40, Cobra, tubeframe 55 Chevy, 66 Nova, 56 F100

  10. #10
    Senior Member Mike N's Avatar
    Join Date
    Feb 2011
    Location
    Mooresville NC
    Posts
    801
    Post Thanks / Like
    My build was on the road in 2002 and I still have the panels bare. You will never keep the panels perfect but they will look pretty good if you use something like Luster Seal at the start of each driving season. For the underside of the car I use Shark Hide to keep the oxidation in check.
    Mike............

    FFR2100 - 331 with KB supercharger - T5 - 5 link rear 3.08's and T2 Torsen.

  11. #11
    Out Drivin' Gumball's Avatar
    Join Date
    Feb 2011
    Location
    Blackberry Township, IL
    Posts
    2,653
    Post Thanks / Like
    All of my aluminum panels are raw. I cleaned them with acetone to get the ink markings off, that's it. Every so often, I wipe down the visible panels - really just a few in the engine compartment - with an old rag that has WD-40 on it and they all still look as nice as the day I installed them. The wheel wells and other areas have been left to gather patina.
    Later,
    Chris

    "There are no more monsters to fear, and so, we have to build our own."
    Mk3.1 #7074

  12. #12
    Senior Member Hotyacht's Avatar
    Join Date
    Jul 2014
    Location
    Auckland, New Zealand
    Posts
    159
    Post Thanks / Like
    I have used Eastwood ExoArmour - it is expensive but goes a long way. 1x125ml bottle did all of my alloy panels - i chose to mix and then wipe on with the supplied cloth rather than spray, and it was easy, quick, and the finish is invisible once dry. Stands up to 2000F deg and resists salt corrosion - similar to aircraft protection products. I am glad that I paid a bit extra and used this rather than Sharkhide.

    http://www.eastwood.com/exoarmour.html
    FFR MkIV 8419 - Right Hand Drive
    427W with Inglese 8 Stack injection - 560hp
    TKO600 5 Speed, 8.8 Detroit Trutrak LSD IRS
    VPM Adjustable Sway Bars
    Vintage Wheels 17" Pin Drive

  13. #13
    Senior Member 2FAST4U's Avatar
    Join Date
    Feb 2011
    Posts
    1,006
    Post Thanks / Like
    I wet sanded mine with 120 grit, then 220 grit, and finished with 320 grit

  14. #14
    Senior Member
    Join Date
    Apr 2016
    Location
    Ohio
    Posts
    249
    Post Thanks / Like
    Acetone will take all the ink markings off. I sanded mine with an orbital sander and then coated them with Sharkhide. I'm envious of all the builders that have them powder coated. I don't know how they don't scratch them with all the work needed to build these cars. Mine all have a brushed look which I'm glad I did as it is nearly impossible to notice any slight scratches.
    JRL16
    Mk4 delivered 4/28/16. First start 10/15/16. First gocart 11/10/16. Engine Factory 427W. 750 carb. Tremec TKO600. 2015 IRS. Power steering. Whitby power brakes. Wilwood brakes. 18" wheels. Falken tires. Sway bars front and rear. Forte hydraulic clutch and mechanical throttle linkage. Scott's Hot Rods triple reservoir. Ceramic coated headers. Gas’n sidepipes. Heated seats. Herb Fraser walnut door panels. Wipers. Console.

  15. #15
    Senior Member Dave Howard's Avatar
    Join Date
    Feb 2012
    Location
    North Bay, Ontario
    Posts
    534
    Post Thanks / Like
    Like others, my bare panels were cleaned with acetone to remove the inkjet markings only. I also like the raw aluminum look, but after 20,000 miles of driving over the last 3 seasons, I have found it is impossible to keep the aluminum looking good. The next build will budget for additional powder coating of all visible aluminum pieces. Hoping the 25th anniversary model will included powered coated pieces similar to past anniversary offerings.

  16. #16
    Senior Member canuck1's Avatar
    Join Date
    Feb 2011
    Location
    Victoria, BC CANADA
    Posts
    162
    Post Thanks / Like
    Quote Originally Posted by Gumball View Post
    All of my aluminum panels are raw. I cleaned them with acetone to get the ink markings off, that's it. Every so often, I wipe down the visible panels - really just a few in the engine compartment - with an old rag that has WD-40 on it and they all still look as nice as the day I installed them. The wheel wells and other areas have been left to gather patina.
    Me too. Cleaned when I remember with rag & WD40. I have heat-reflective coating around the footbox areas. Only firewall and upper footbox portions with a little of the inside F-panels are really visible.

    P.S. my frame powder coat probably has a few nicks and scratches underneath as well... If you're the kind of guy lying on your back trying to examine the underside of my frame tubes, I'm probably not the kind of guy you'd like to hang out with anyways!

    Sean
    MK 3.5 roadster (MK IV body retrofit to MK III chassis) 396W stroker, 4 bbl mass air EFI, QH (self-tuned), AFR 195CC Renegade, XE274HR, GP 4-1-4 SS headers, 3link, 3.73, 15" Halibrand replicas, SAI mod, bumpers, 2 X roll bars, I² electronics, PS, hydroboosted brakes: 95 GT front, custom MK VIII calipers/Cobra discs rear, FFR front, Levy rear LCA's, Forte front, VPM rear bars, CF dash, mod comp layout w/Auto Meter Ultra-Lites, Lucas tri-bar headlights, coupe taillights, painted by SRP (again!)

  17. #17
    Senior Member
    Join Date
    Feb 2011
    Location
    Myrtle Beach, SC
    Posts
    2,108
    Post Thanks / Like
    Y-B-

    I powder coated all my visible panels with the exception of the aluminum in the cockpit as well as the trunk. I wanted to protect the aluminum panels in general, and I liked the powder coating in the engine bay. However, I wanted to leave the bare metal spartan look in the cockpit, and I just left the trunk to match. I have used acetone to clean up all the various the markings -- the ones from the factory, as well as my sharpie notes. I am not going to treat these panels, and I anticipate that they will receive a fair amount of scratches and such over time. I may just polish them up every now and again, although I haven't finalized my thoughts on that yet.

    It is a bit unusual to do the panels this way, but my hope is that it will match the overall theme of my car. I hope this helped...

    Regards,

    Steve

  18. #18
    Not a waxer Jeff Kleiner's Avatar
    Join Date
    Feb 2011
    Location
    Bloomington, Indiana
    Posts
    8,069
    Post Thanks / Like
    Another option that's cheap and easy---mine aren't raw but kind of look like it.

    The recipe:
    ---Clean with acetone or lacquer thinner to remove ink markings
    ---Run over them with gray Scotchbrite in one direction using uninterrupted strokes
    ---Clean again to remove residue
    ---2 or 3 coats of rattlecan "Crystal Clear" Rustoleum
    ---Bake panels that fit in the oven at 250 for 10-15 minutes (did I mention that my wife was out of town?) Larger panels get two 500 watt halogen lamps focused on them to help bake it in

    After 10 years and 20 some thousand miles when I clean the road grime off once or twice a year they still look like day one.


    Cheers,
    Jeff


    100_0415.jpg100_0423.jpg

Posting Permissions

  • You may not post new threads
  • You may not post replies
  • You may not post attachments
  • You may not edit your posts
  •  

Stewart Transport

Visit our community sponsor